Block HONDA INTEGRA 1994 4.G Owner's Manual
[x] Cancel search | Manufacturer: HONDA, Model Year: 1994, Model line: INTEGRA, Model: HONDA INTEGRA 1994 4.GPages: 1413, PDF Size: 37.94 MB
Page 166 of 1413
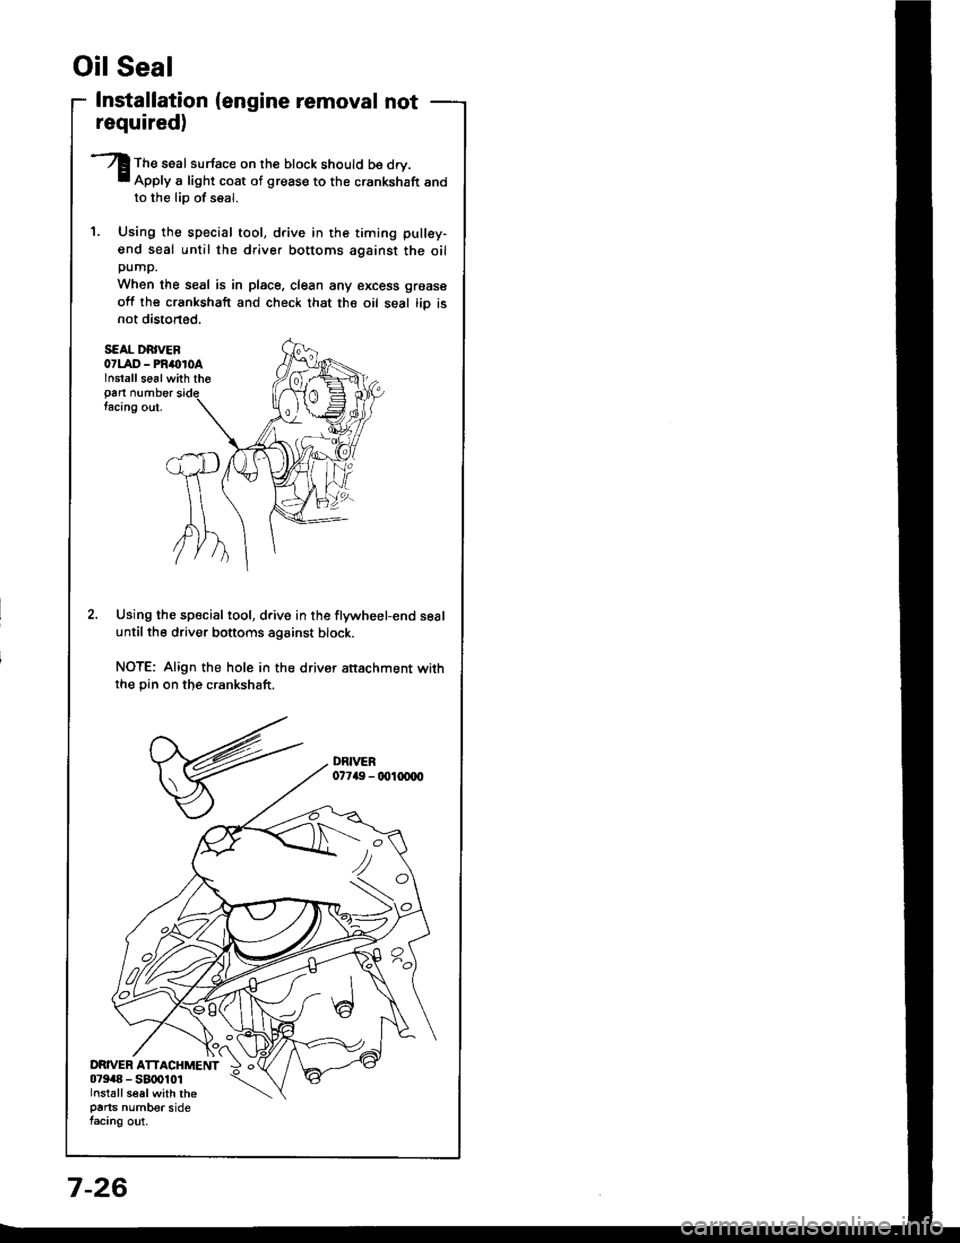
Installation (engine removal not
S€AL DRIVEB07LAD - PRimroAlnstallse6lwith tho
Pan numbertacing out.
Using the special tool, drive in the flywheel-end seal
until the driver bottoms against block.
NOTE: Align the hole in the drivsr attachment withthe Din on the crankshaft.
Oil Seal
required)
The seal surface on the block should b€ dry.Apply a light coat of grease to the crankshaft andto the lio of seal.
Using the special tool, drive in the timing pullsy-
end seal until the driver bottoms against the oilpump.
When the seal is in place, clean any excess grease
off lhe crankshaft and check that the oil seal tiD isnot distoned.
7-26
Page 169 of 1413
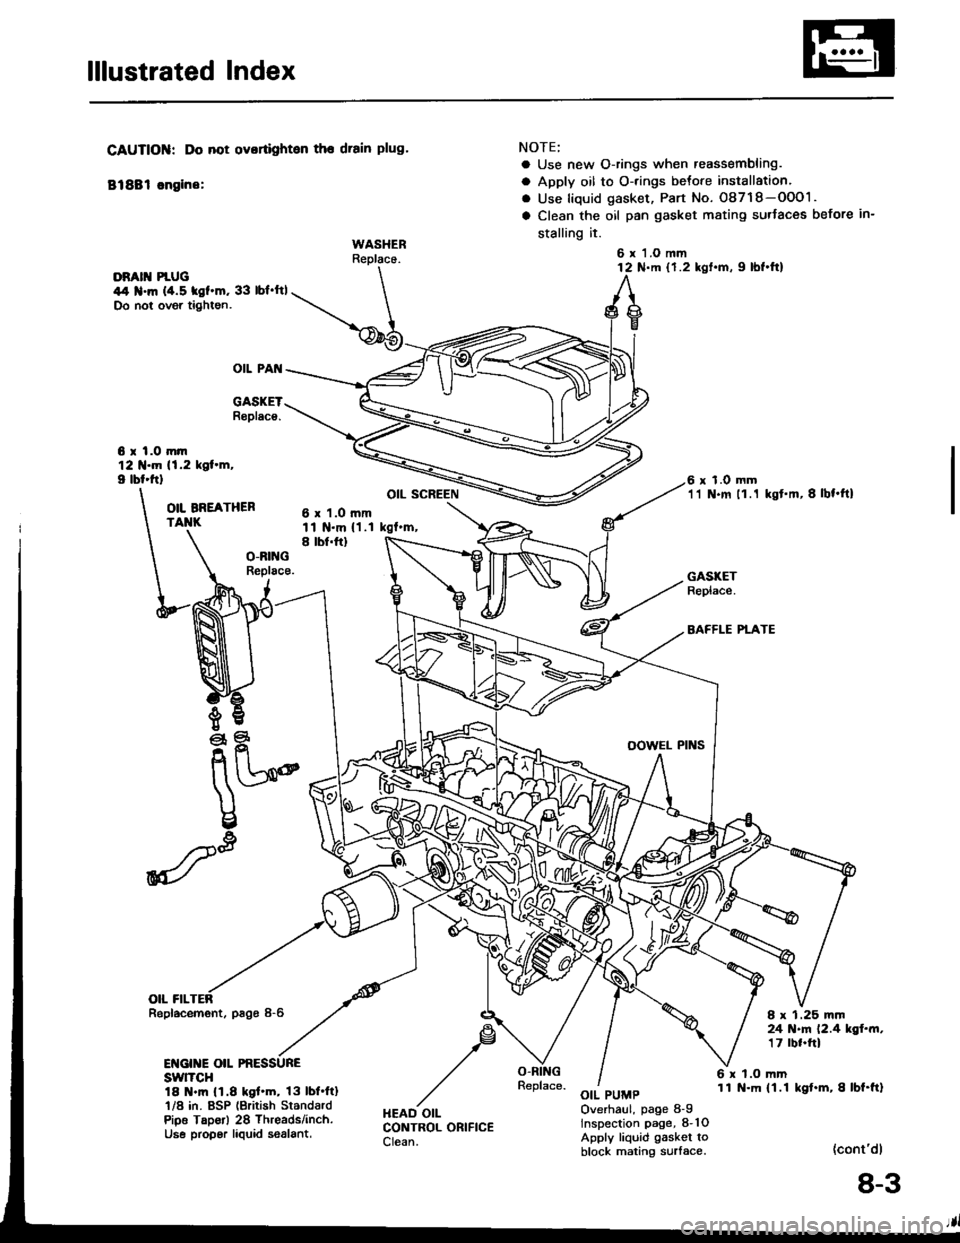
lllustrated Index
DRATT PIUG \44 .m (4.5 tgf.m, 33 lbf'ftl \Do not ovgr tightgn. \-@5
OIL PAI{
6 r l.O mtn121{.m 11.2 kol.m,I lbl.ttl
CAUTIOIiI: Do not ovortighten the drain plug.
81881 sngine:
WASHERReplace.
O|L BNEATHERTAIIK
eq
nU2o@
\
u
I
#-'
GASKETR6placs,
NOTE;
o Use new O-rings when reassembling.
a Apply oil to O-rings betore installation,
. Use liquid gasket, Part No. O8718-OOO1.
a Clean the oil pan gasket mating surtaces before in-
stalling it.
6 x'l.o mm12 N.m {1.2 kgt.m, 9 lbt.tt)
6 x 1.0 mm'11 N.m 11 .1 kgt'm,8lbt.ftl
6 x 1.O mmll N.m {1.1 kgf'm,
OIL SCREEN
A
,F
HEAD OILCONTROL ORIFICECIean.
I tbt.ftl
OIL FILRepl.cemont, p6gs 8-6
ENGINE OIL PRESSUREswlTcH18 .m 11.8 kgl.m, 13lbl.ftl'l/8 in. BSP lgritish StandardPioo Taporl 28 Threads/inch.Use propgr laquid 56alant.
GASKETReplace.
BAFFLE PTATE
I x 1.25 mm24 N.m 12.4 kgf..n,17 rbr.ftl
6 x 1.O mm11 N-m (1.1 kgt.m,8lbf.ft)OIL PUMPOverhaul, page 8-9lnspection page, 8-1OApply liquid gasket toblock mating surlace.(cont'dl
8-3
Page 170 of 1413
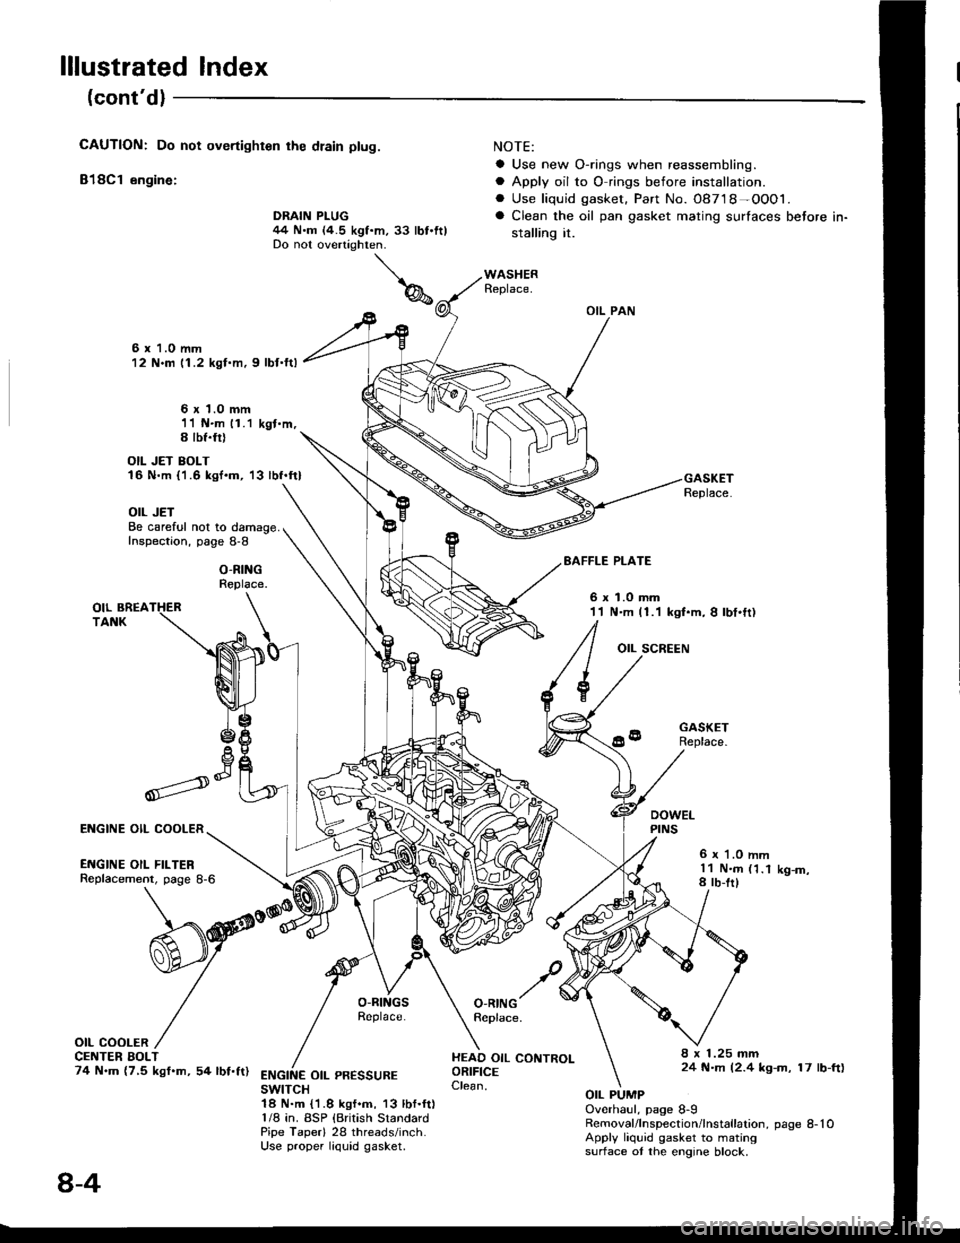
lllustrated Index
(cont'dl
CAUTION: Do not overtighten rhe dlain ptug.
818C1 engine:
NOTE:
a Use new O-rings when reassembling.
a Apply oil to O rings before installation.. Use liquid gasket. Part No. 08718-OOO1.
a Clean the oil pan gasket mating surfaces before in-
stalling it.
OIL PAN
Replace.
6 x 1.0 mm12 N.m 11.2 kgl.m, 9 lbf.ftl
6 x 1.0 mm11 N.m 11.1 kgt.m,S lbf.fil
OIL JET BOLT16 N.m {'1.6 kgf.m, '13 lbf.ft}
OIL JETBe careful not to damage.Inspection, page 8-8
O-RINGReplace.
EAFFLE PLATE
6xl.0mm11 N.m (1.1 kgt.m, I lbt.ft)
OIL SCREEN
GASKETReplace.
6 r '1.0 mml1 N.m (1.18 rb-trlK9-m,
O-RINGReplace.
HEAD OIL CONTROLORIFICEClean.
8 x 1.25 mm24 N.m (2.4 kg-m, 17 lb-ft)ENGINE OIL PR€SSUREswtTcH1A N.m {1.8 kgf.m, 13 lbf.ft)1/8 in. BSP {British StandardPipe Taperl 28 threads/inch.Use proper liquid gasket.
OIL PUMPOverhaul, page 8-9Removal/lnspection/lnstallation, page 8-10Apply liquid gasket to matingsurface ot the engine block.
Il
,--)e6V
ENGINE OIL COOLER
ENGINE OIL FILTERReplacement, page 8-6
OIL COOLERCE TER BOLT74 N.m (7,5 kgf.m, 54 lbf.ft)
DRAIN PLUG44 N.m (4.5 kgf.m, 33 lbt.ftlDo not overtighten.
8-4
Page 172 of 1413
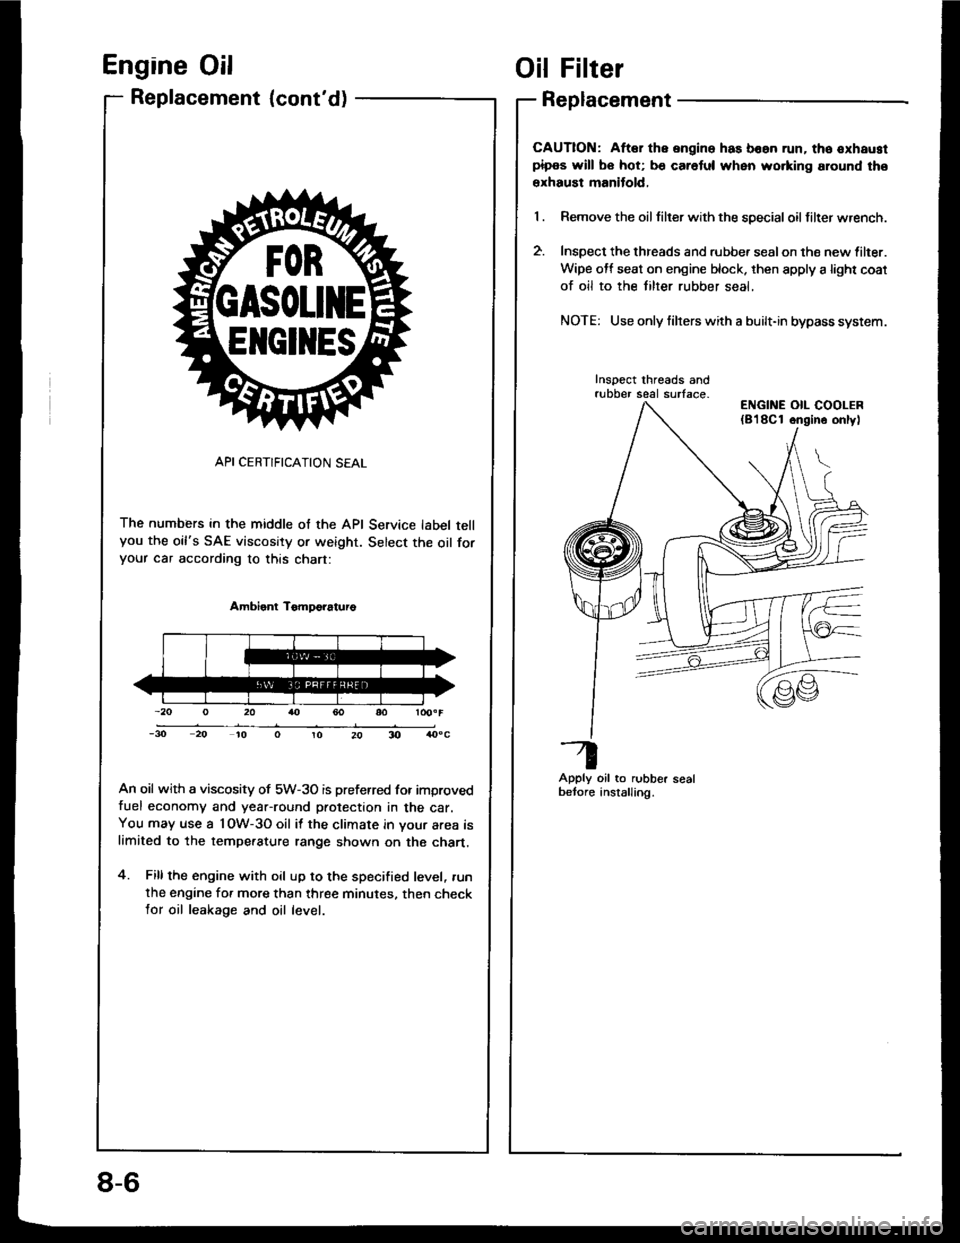
Englne Oil
Replacement {cont'd)
API CERTIFICATION SEAL
The numbers in the middle of the API Service label tellyou the oil's SAE viscosity or weight. Select the oil foryour car according to this chart:
Ambient TomDo?aturo
An oil with a viscosity of 5W-3O is preferred for improvedfuel economy and year-round protection in the car.You may use a l OW-3O oil it the climate in your area islimited to the tempe.ature range shown on the chart.
4. Fillthe engine with oil up to the specified level, .un
the engine for more than three minutes. then checklor oil leakage and oil level.
ElrclltEs
Oil Filter
Replacement
CAUTION: Aftar the ongine has boan run. tho oxhaustpipos will bo hot; b€ caretul when wo.king around tho
erhaust manitold,
Remove the oil tilter with the special oil filter wrench.
Inspect the threads and rubbe. sealon the new lilter.
Wipe off seat on engine block. then apply a light coat
of oil to the tilter rubber seal,
NOTE: Use only filrers with a built-in bypass system.
Inspect threads andrubber seal surface-
Apply oil to rubber sealbetore anstalling.
ENGINE OIL COOLER(8'l8Cl ongino onlyl
8-6
Page 173 of 1413
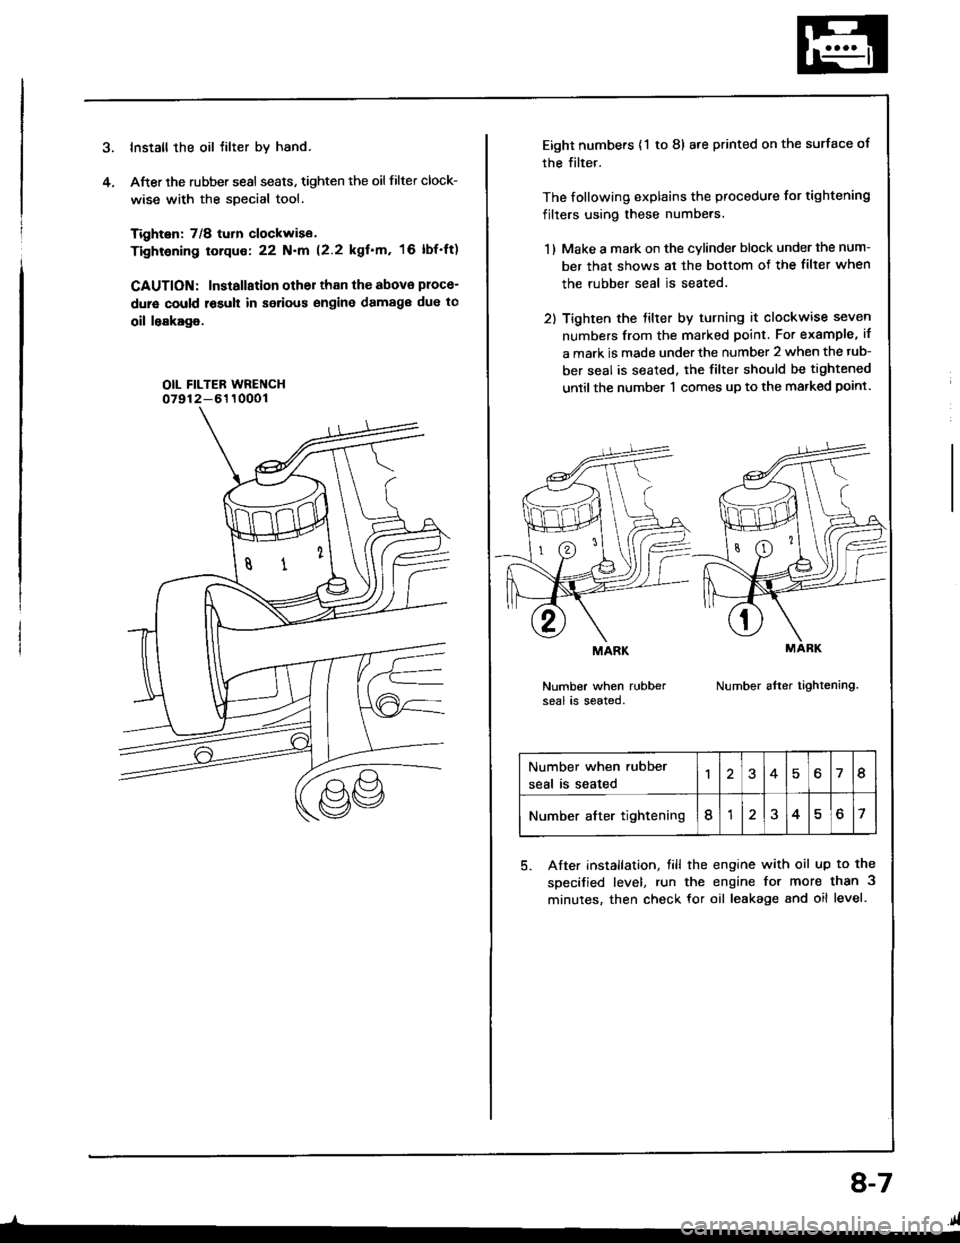
Install the oil tilter by hand.
After the rubber sesl seats, tighten the oil filter clock-
wise with the special tool.
Tighten: 7/8 turn clockwise.
Tightening torque: 22 N.m (2.2 kgf'm, 16 lbf'ft)
CAUTION: Installation other than the abova ploce-
dure could r6suh in serious engine damag€ due to
oil leakage.
OIL FILTEB WRENCH07912-6110001
4.
_l-
8-7
Eight numbers {'l to 8) are printed on the surface of
rhe filter.
The following explains the procedure for tightening
filters using these numbers.
1 ) Make a mark on the cvlinder block under the num-
ber that shows al the bottom of the filter when
the rubber seal is seated.
2) Tighten the tilter by turning it clockwise seven
numbers from the marked point. For example, if
a mark is made under the number 2 when the tub-
ber seal is seated. the filter should be tightened
until the number 'l comes up to the marked point.
Number when rubberseal is seated.Number after tightening.
MARK
Number when rubber
seal is seated46I
Number after tightening8?o7
5. After installation, till the engine with oil up to the
specified level, run the engine for more than 3
minutes, then check for oil leakage and oil level.
.41
Page 175 of 1413
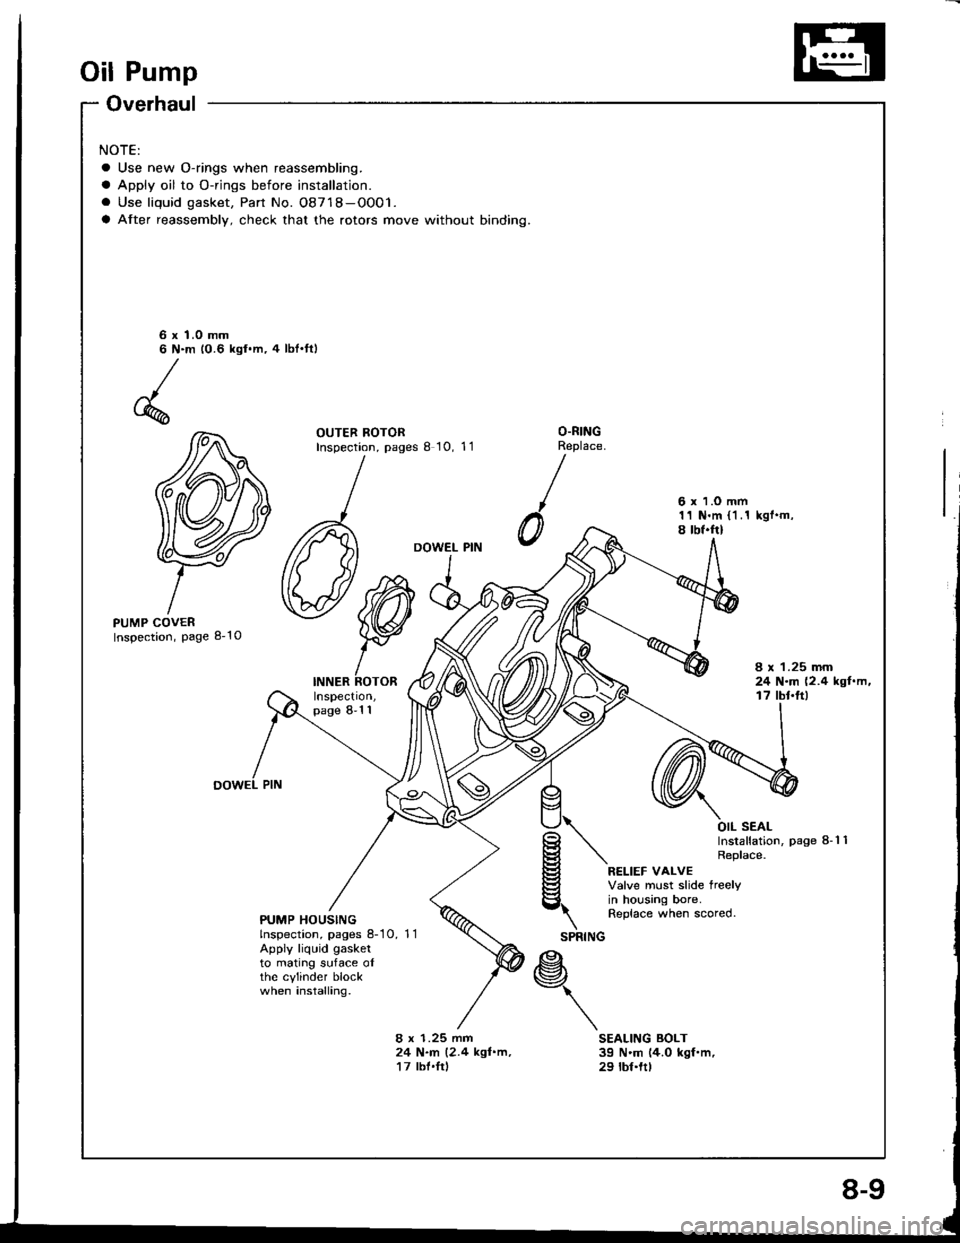
Oil Pump
Overhaul
NOTE:
a Use new O-rings when reassembling.
a Apply oil to O-rings before installation.
. Use liquid gasket, Part No. 08718-OO01.
a After reassembly, check that the rotors move without binding.
6 x 1.0 mm6 N.m 10.6 kgl.m, 4 lbt'ttl
OUTER ROTORInspection, pages I 10, 11O.RINGReplace.
0
6 x 1.O mm11 N.m (1.1 kgf.m,8 tbf.frl
DOWEL PIN
PUMP COVERInspection, page 8-10
INNER ROTORInspect|on,page 8-1 1
8 x 1.25 mm24 N.m (2.4 kgf.m,t7 tbt'ft)
\SPRING
OIL SEALInstallation, Page 8-1 1Replace.
RELIEF VALVEValve must slide treelyin housing bore.Replace when scored.PUMP HOUSINGlnspection, pages 8-10, 11Apply liquid gasketto mating suface oIthe cylinder blockwhen installing.*\
8 x 1.25 mm24 N.m (2.4 kgl.m,17 lbl.Irl
SEALING BOLT39 N'm 14.0 kgf.m,29 tbt.ttt
Page 177 of 1413
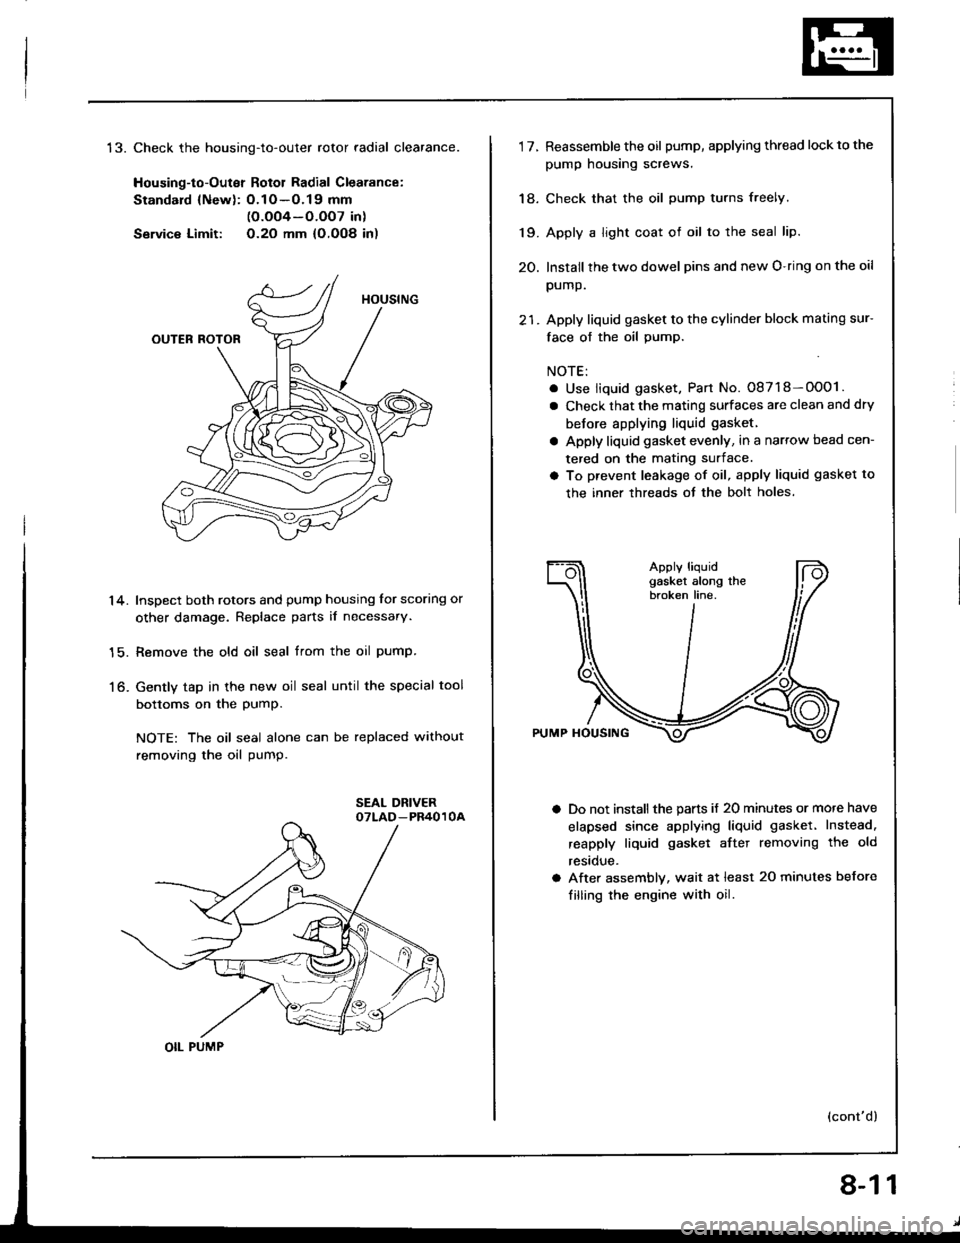
t5.Check the housing-to-outer rotor radial clearance.
Housing-to-Outer Rotol Radial Clearance:
Standard {Newl: O.1O -O.19 mm(O.oO4-O.OO7 in)
Servic€ Limit: O.2O mm {O,OO8 in)
Inspect both rotors and pump housing for scoring or
other damage. Replace parts il necessary.
Remove the old oil seal trom the oil pump.
Gently tap in the new oil seal until the special tool
bottoms on the PumP.
NOTE: The oil seal alone can be replaced without
removing the oil pump.
14.
15.
to-
OIL PUMP
8-11
1'lReassemble the oil pump, applying thread lockto the
pump housing screws.
Check that the oil pump turns freely.
Apply a light coat of oil to the seal lip.
Install the two dowel pins and new O-ring on the oil
pump.
Apply liquid gasket to the cylinder block mating sur-
face of the oil pump.
NOTE:
. Use liquid gasket, Part No. 08718-OOO1.
a Check that the mating surfaces are clean and dry
betore applying liquid gasket.
a Apply liquid gasket evenly, in a narrow bead cen-
tered on the mating surface.
a To prevent leakage of oil, apply liquid gasket to
the inner threads ot the bolt holes.
Do not install the parts if 20 minutes or more have
elapsed since applying liquid gasket. Instead.
reapply liquid gasket aftet removing the old
restclue.
After assembly, wait at least 20 minutes before
filling the engine with oil.
(cont'd)
18.
19.
20.
Page 178 of 1413
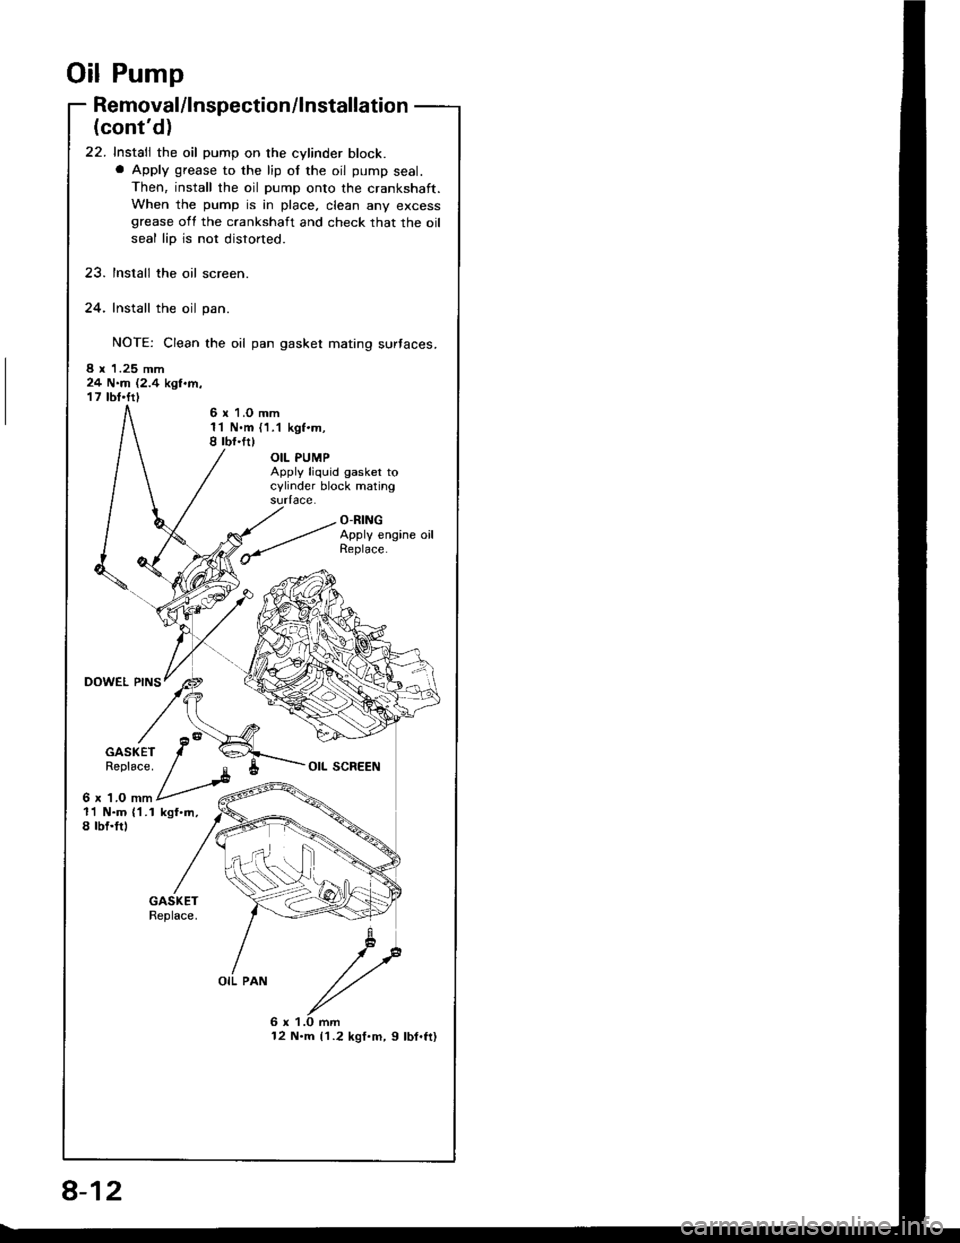
Oil Pump
DOWEL PINS
Removal/lnspection/lnstallation
(cont'd)
22. Install the oil pump on the cylinder block.a Apply grease to the lip of the oil pump seal.
Then, install the oil pump onto the crankshaft.
When the pump is in place, clean any excessgrease oll the crankshaft and check that the oil
seal lip is not distorted.
23. Install the oil screen.
24. Install the oil pan.
NOTE: Clean the oil pan gasket mating surtaces.
8 x 1.25 mm24 N.m (2.4 kgl.m,17 tbt.ftl
6 r 1.O mm1'l N.m {1.1 kgf.m,8 rbf.fr)
OIL PUMPApply liquid gasket tocylinder block matingsudace.
O-RINGApply engine oil
GASKETReplace.
6 x 1.O mm
OIL SCREEN
11 N.m ('l .1 kgf.m,8 tbf.trl
OIL PAN
6 x 1.O mm12 N.m {1.2 kgf.m, 9 lbf.ft}
8-12
Page 189 of 1413
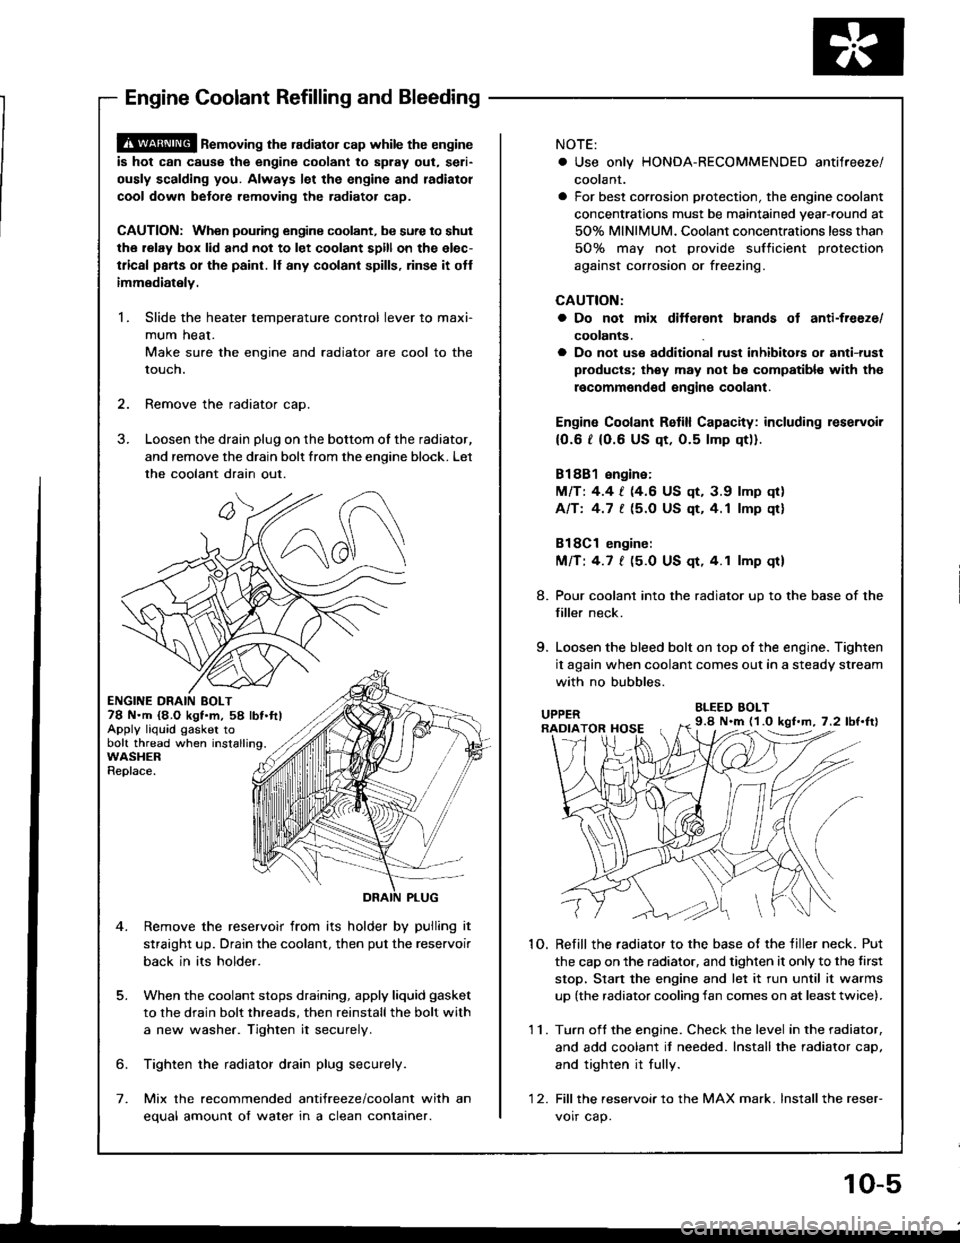
@ ne-oving the radiator cap while the engine
is hot can cause the engine coolant to splay out, seri-
ously scalding you. Always let the engine and radiatol
cool down betore removing the radiator cap.
CAUTION: When poudng engine coolant, be sure to shut
the relay box lid and not to let coolant spill on the elec-
tlical pans or the paint. ll any coolant spills, rinse it otf
immediately.
1. Slide the heater temperature control lever to maxi-
mum heat.
Make sure the engine and radiator are cool to the
touch.
2. Remove the radiator cao.
3. Loosen the drain plug on the bottom of the radiator,
and remove the drain bolt from the enoine block. Let
the coolant drain out.
ENGINE DRAIN BOLT78 N.m {8,O kgt.m, 58 lbt.ftlApply liquid gasker tobolt thread when installing.WASHERReplace.
5.
Remove the reservoir from its holder by pulling it
straight up. Drain the coolant, then put the reservoir
back in its holder.
When the coolant stops draining, apply liquid gasket
to the drain bolt threads, then reinstallthe bolt with
a new washer. Tighten it securely
6. Tighten the radiator drain plug securely.
7. Mix the recommended antifreeze/coolant with an
equal amount of water in a clean container.
NOTE:
. Use only HONDA-RECOMMENOED antifreeze/
coolant.
a For best corrosion protection, the engine coolant
concentrations must be maintained year-round at
50% MINIMUM. Coolant concentrations less than
50% may not provide sufficient protection
against corrosion or freezing.
CAUTION:
a Do not mix ditterent blands ot anti-freeze/
coolants.
a Do not use additional rust inhibitois or anti-rust
products; they may not bs compatibl€ with the
recommgndsd engins coolant.
Engin€ Coolant Retill Capacity: including reservoir
{0.6 t (0.6 US qt, 0.5 lmp qt)).
81881 engine:
MlTt 4.4 | (4.6 US qt, 3.9 lmp qr)
Afft 4.7 [ (5.O US qt,4.1 lmp qt]
Bl8Cl engine:
Mnt 4.7 | (5.0 US qt.4.1 lmp qt)
8. Pour coolant into the radiator up to the base of the
filler neck.
9. Loosen the bleed bolt on top of the engine. Tighten
it again when coolant comes out in a steady stream
with no bubbles.
BLEED BOLT
1O. Refill the radiator to the base of the tiller neck. Put
the cap on the radiator. and tighten it only to the tirst
stop, Stan the engine and let it run until it warms
up (the radiator cooling fan comes on at leasttwice).
11. Turn oft the engine. Check the level in the radiator,
and add coolant it needed. Install the radiator caD,
and tighten it fully.
'1 2. Fill thereservoirto the MAX mark. lnstallthe reser-
voir cap.
9.8 N.m (1.O kgl.m, 7.2 lbf.ftl
Engine Coolant Refilling and Bleeding
10-5
Page 193 of 1413
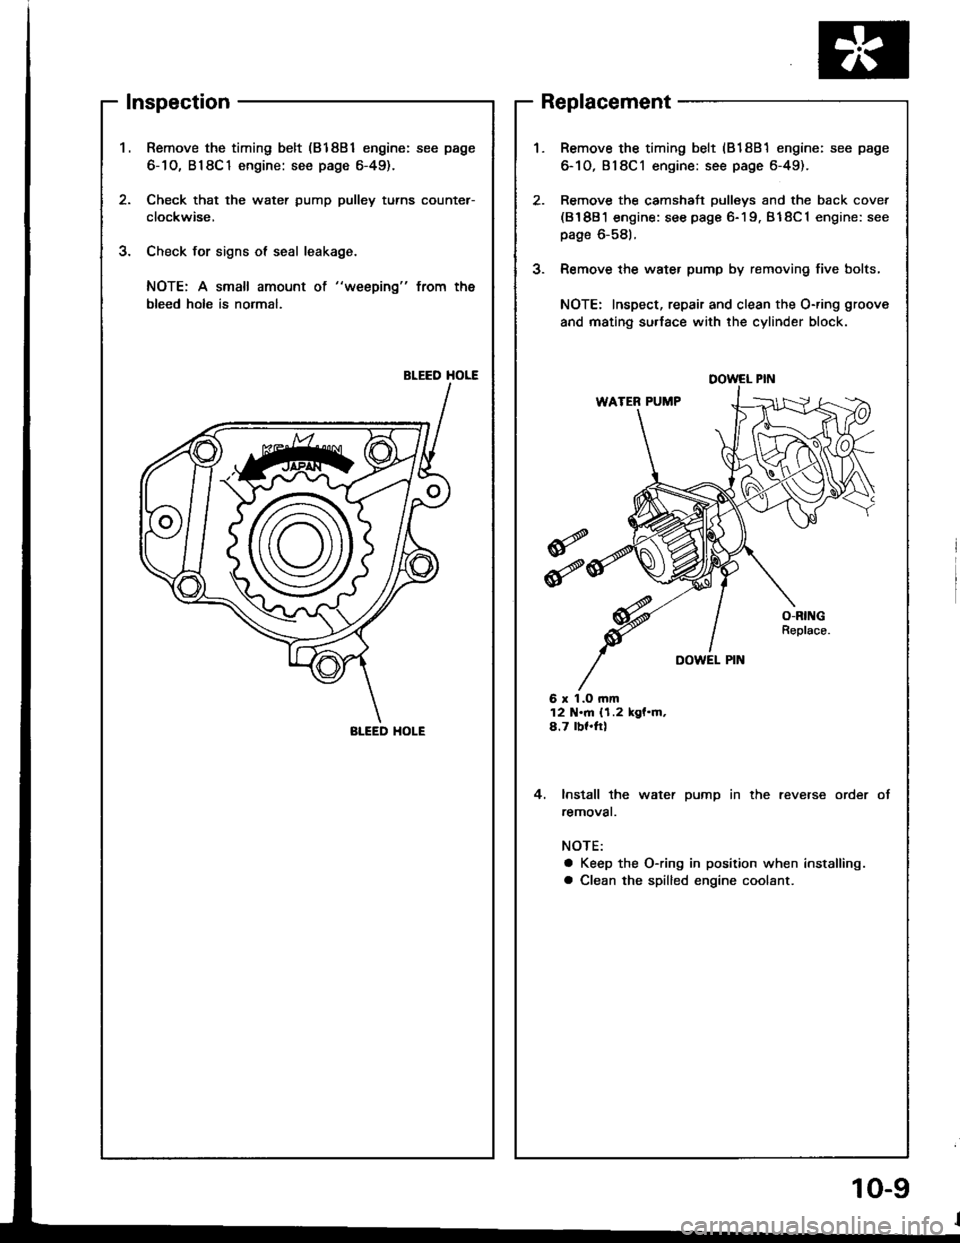
Inspection
Remove the timing belt (81881 engine: see page
6-1O, B18C1 engine: see page 6-49).
Check that the water pump pulley turns counter-
clockwise,
Check for signs ol seal leakage.
NOTE: A small amount ot "weeping" from the
bleed holo is normal,
BLEED HOLE
2.
J.
J.
Replacement
6 r 1.O rnm12 N.m {1.2 kgf.m,4.7 bf.ftl
4. lnstall the water pump in the reverse order
removat.
NOTE:
a Keep the O-ring in position when installing.
a Clean the spilled engine coolant.
Remove the timing belt (818B1 engine: see page
6-10,818C1 engine: see page 6-49).
Remove the camshaft pulleys and the back cover(81881 engine: see page 6-19. B18C1 engine: see
page 6-581.
Remove the water pump by removing five bolts,
NOTE: Inspect, repair and clean the O-ring groove
and mating su.lace with the cylinder block.
DOWEL PIN
BI-EED HOI-E
10-9