service HONDA INTEGRA 1998 4.G User Guide
[x] Cancel search | Manufacturer: HONDA, Model Year: 1998, Model line: INTEGRA, Model: HONDA INTEGRA 1998 4.GPages: 1681, PDF Size: 54.22 MB
Page 159 of 1681
11
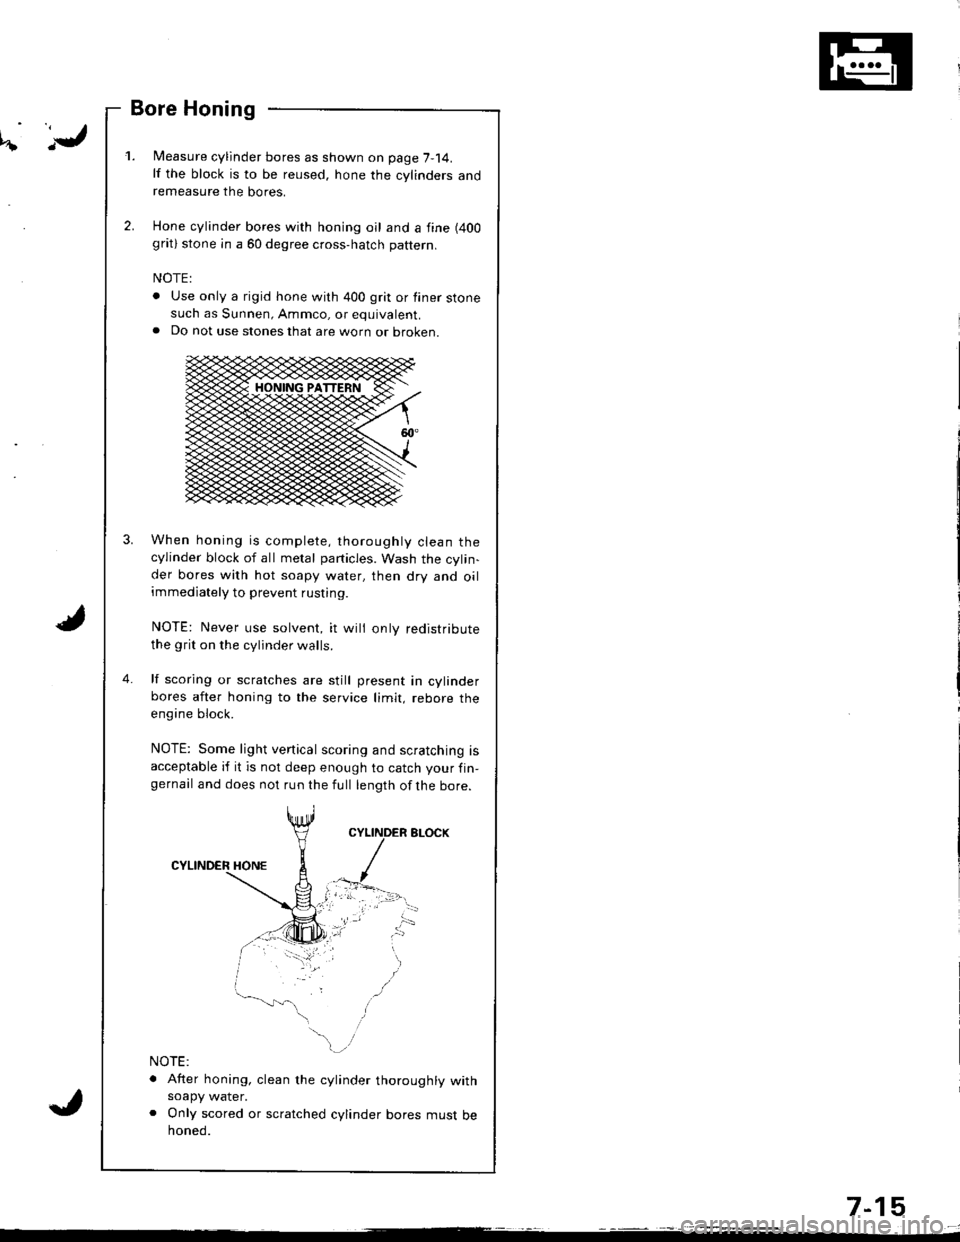
Bore Honing
l/easure cylinder bores as shown on page 7-14.lf the block is to be reused, hone the cylinders andremeasure the bores.
Hone cylinder bores with honing oil and a fine (400
grat) stone in a 60 degree cross-hatch pattern.
NOTE:
. Use only a rigid hone with 400 grit or finer stonesuch as Sunnen, Ammco, or equivalent.a Do not use stones that are worn or oroKen.
When honing is complete, thoroughly clean thecylinder block of all melal particles. Wash the cylin-der bores with hot soapy water, then dry and oilimmediately to prevent rusting.
NOTE: Never use solvent, it wili only redistribute
the grit on the cylinder walls.
lf scoring or scratches are still present in cylinderbores after honing to the service limit, rebore theengine block.
NOTE: Some light vertical scoring and scratching isacceptable if it is not deep enough to catch your fin-gernail and does not run the full length ofthe bore.
NOTE:
. After honing, clean the cylinder thoroughly withsoapy water.o Only scored or scratched cylinder bores must behoned.
4.
7-15
Page 160 of 1681
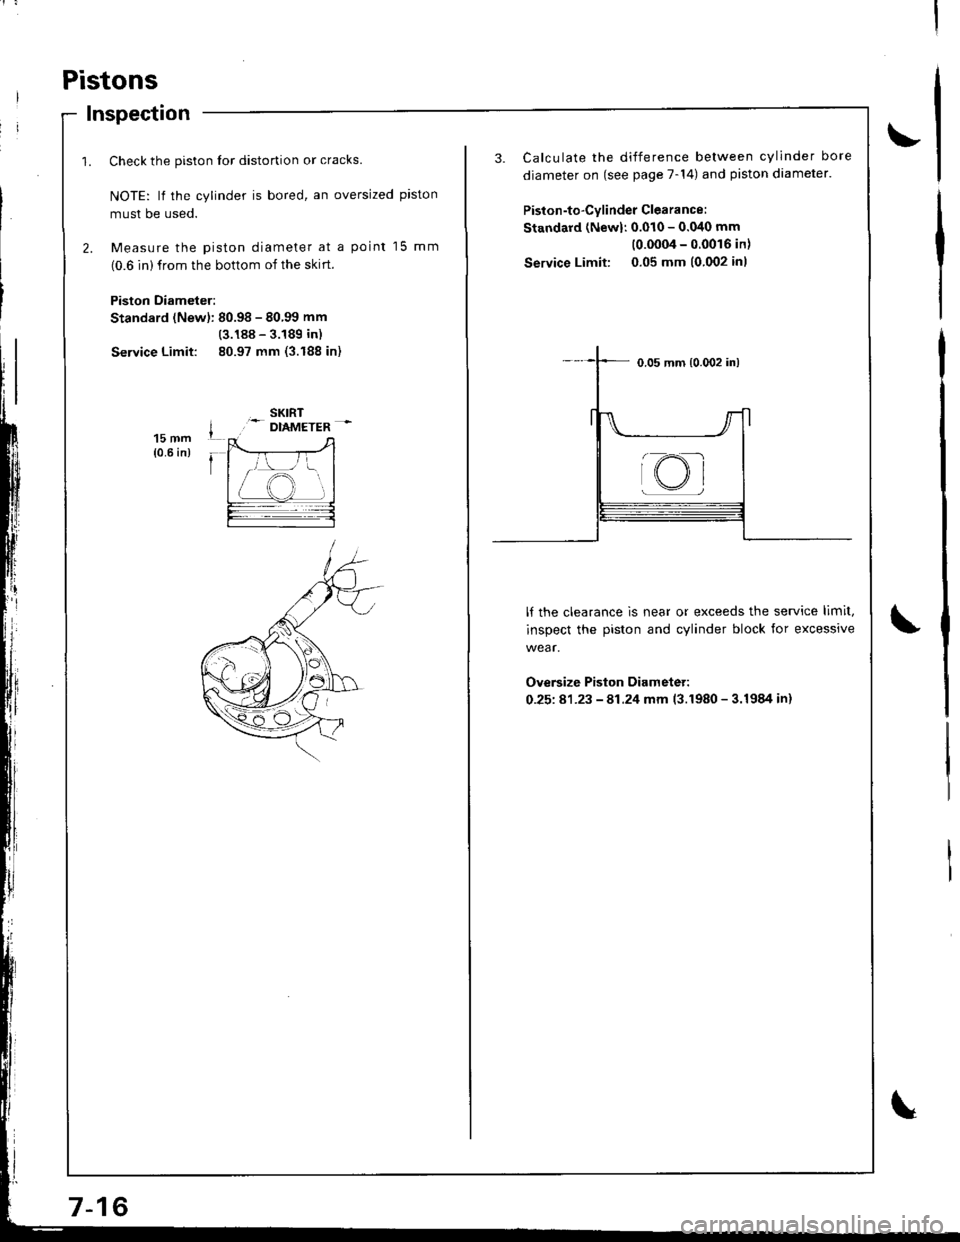
Pistons
Inspection
1. Check the piston lor distortion or cracks.
NOTE: lf the cylinder is bored, an oversized piston
musl be used.
2. Measure the piston diameter at a point 15 mm
(0.6 in) from the bottom of the skrrt.
Piston Diameter:
Standard (Newl: 80.98 - 80.99 mm
(3.188 - 3.189 in)
Service Limit: 80.97 mm (3.188 in)
15 mm{0.6 in)
3. Calculate the difference between cylinder bore
diameter on (see page 7-14) and piston diameter.
Piston-to-Cylinder Clearance:
Standard (Newl: 0.010 - 0.040 mm
(0.0004-00016in)
Service Limit: 0.05 mm (0.002 inl
lf the clearance is near or exceeds the service limit,
inspect the piston and cylinder block for excessive
wear.
Ove6ize Piston Diameter:
0-25181-23 - 81.24 mm 13.1980 - 3.1984 in)
@
Page 164 of 1681
Piston Rings
Replacement
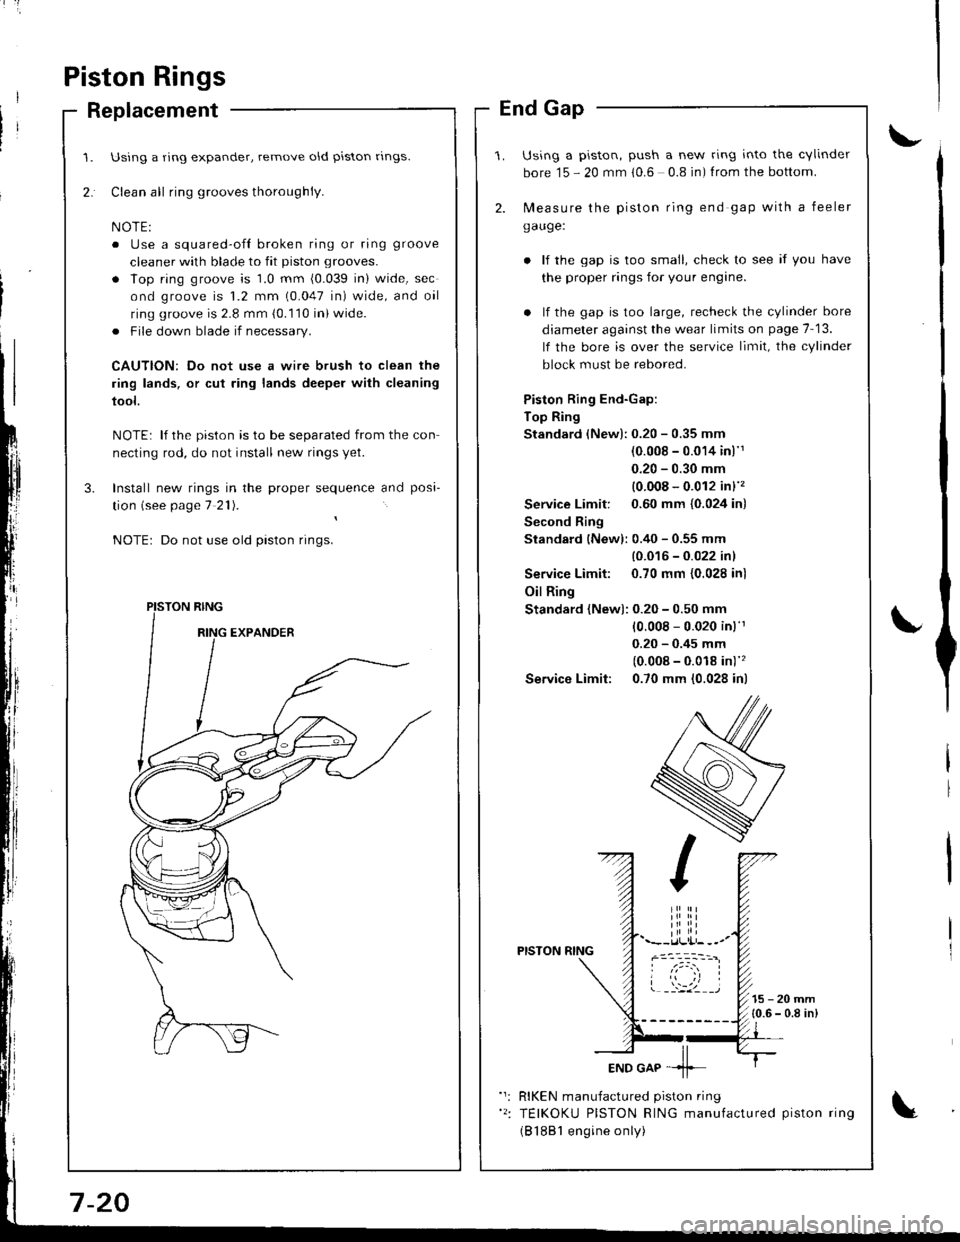
Using a ring expander, remove old piston rlngs.
Clean all ring grooves thoroughly.
o Use a squared-ofl broken ring or ring groove
cleaner with blade to fit piston grooves.
. lop ring groove is 1.0 mm (0.039 in) wide, sec
ond groove is 1.2 mm (0.047 in) wide, and oil
ring groove is 2.8 mm (0.110 in) wide.
. File down blade if necessary.
CAUTION: Do not use a wire brush to clean the
ring lands, or cut ring lands deeper with cleaning
tool.
NOTE: lf the piston is to be separated from the con
necting rod, do not install new rings yet.
Install new rings in the proper sequence and posa-
tion (see page 7 21).
Do not use old piston rings.
PISTON RING
End Gap
Using a piston, push a new ring into the cvlinder
bore 15 - 20 mm 10.6 0.8 in) f rom the bottom.
2. N,4easure the piston ring end gap with a feeler
gauge:
lf the gap is too small, check to see if you have
the proper rings for your engine.
. lf the gap is too large, recheck the cylinder bore
diameter against the wear limits on page 7-13.
lf the bore is over the service limit, the cylinder
block must be rebored.
Piston Ring End-Gap:
Top Ring
Standard (New):0.20 - 0.35 mm
(0.008 - 0.014 inl'1
0.20 - 0.30 mm
{0.008 - 0.012 in}''�
Service Limit: 0.60 mm {0.024 in)
Second Ring
Standard {New): 0.40 - 0.55 mm
{0.016 - 0.022 inl
Service Limit: 0.70 mm {0.028 inl
Oil Ring
Standard (New): 0.20 - 0.50 mm
10.008 - 0.020 in)'r
0.20 - 0.45 mm
(0.008 - 0.018 in)''�
Service Limit: 0.70 mm (0.028 in)
PISTON RING
15-20mm{0.6 - 0.8 in)
RIKEN manufactured piston ring
TEIKOKU PISTON RING manufactured piston ring
(B 1881 engine only)
Page 168 of 1681
Inspection (cont'dl
3.
4.
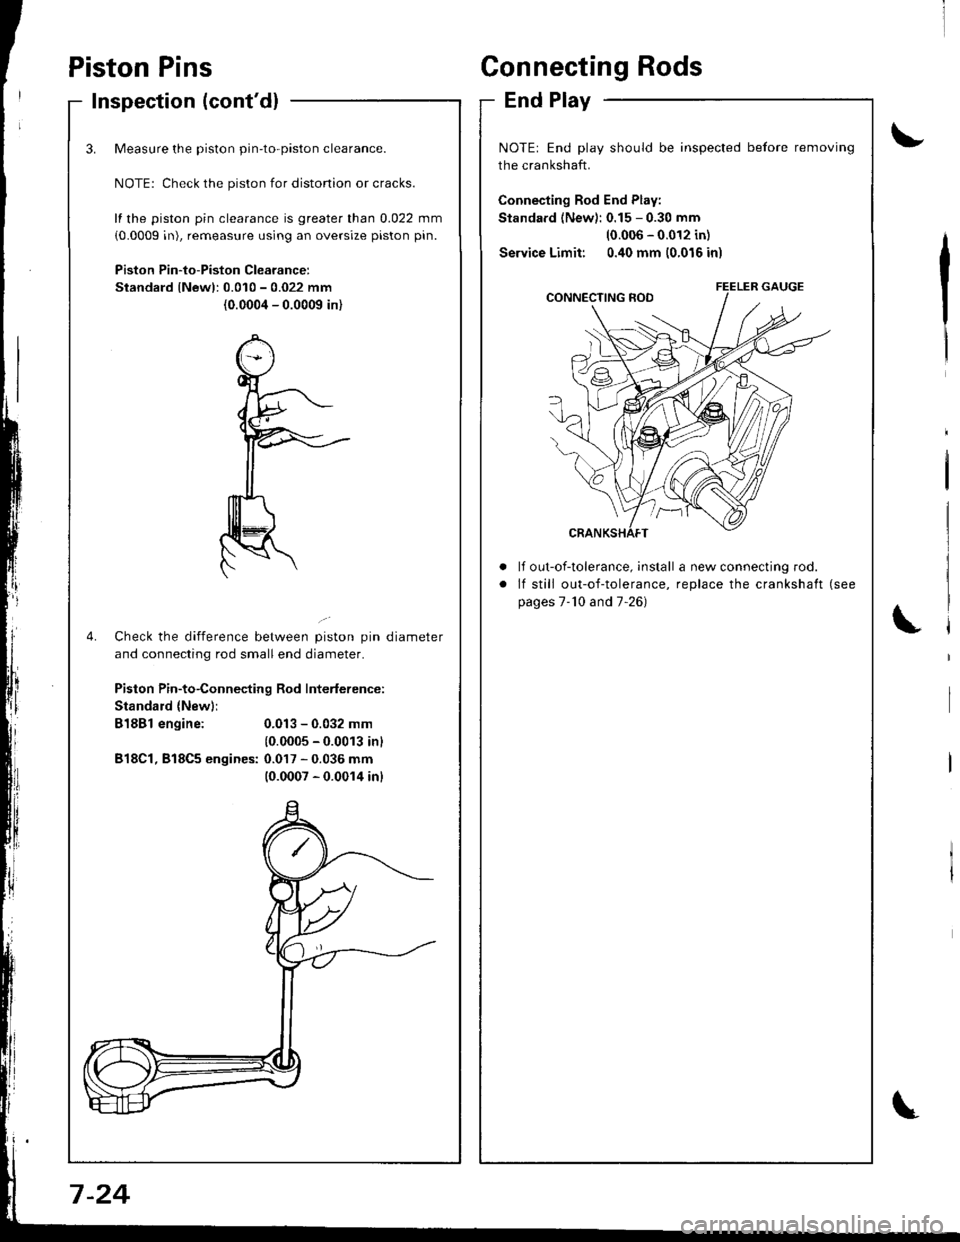
Measure the piston pin-to-piston clearance.
NOTE: Check the piston for distonion or cracks.
fl the piston pin clearance is greater than 0.022 mm
(0.0009 in), remeasure using an oversize piston pin.
Piston Pin-to-Piston Clearancer
Standard lNewl:0.010 - 0.022 mm
(0.0004 - 0.0009 in)
Check the difference between piston pin diameter
and connecting rod small end diameter.
Piston Pin-to-Connecting Rod Interlerence:
Standard {New)i
B18Bl engine:
B18Cl, 818C5 engines:
0.013 - 0.032 mm
10.0005 - 0.0013 inl
0.017 - 0.036 mm(0.0007 - 0.0014 inl
Piston PinsConnecting Rods
End Play
\,
\
t'
NOTE: End play should be inspected before removing
the crankshaft.
Connecting Rod End Play:
Standard (New): 0.15 - 0.30 mm
10.006 - 0.012 in)
Service Limit: 0.40 mm (0.016 in)
a
a
It out-of-tolerance, install a new connecting rod.
lf still out-of-tolerance, replace the crankshaft (see
pages 7-'10 and 7-26)
7 -24
Page 179 of 1681
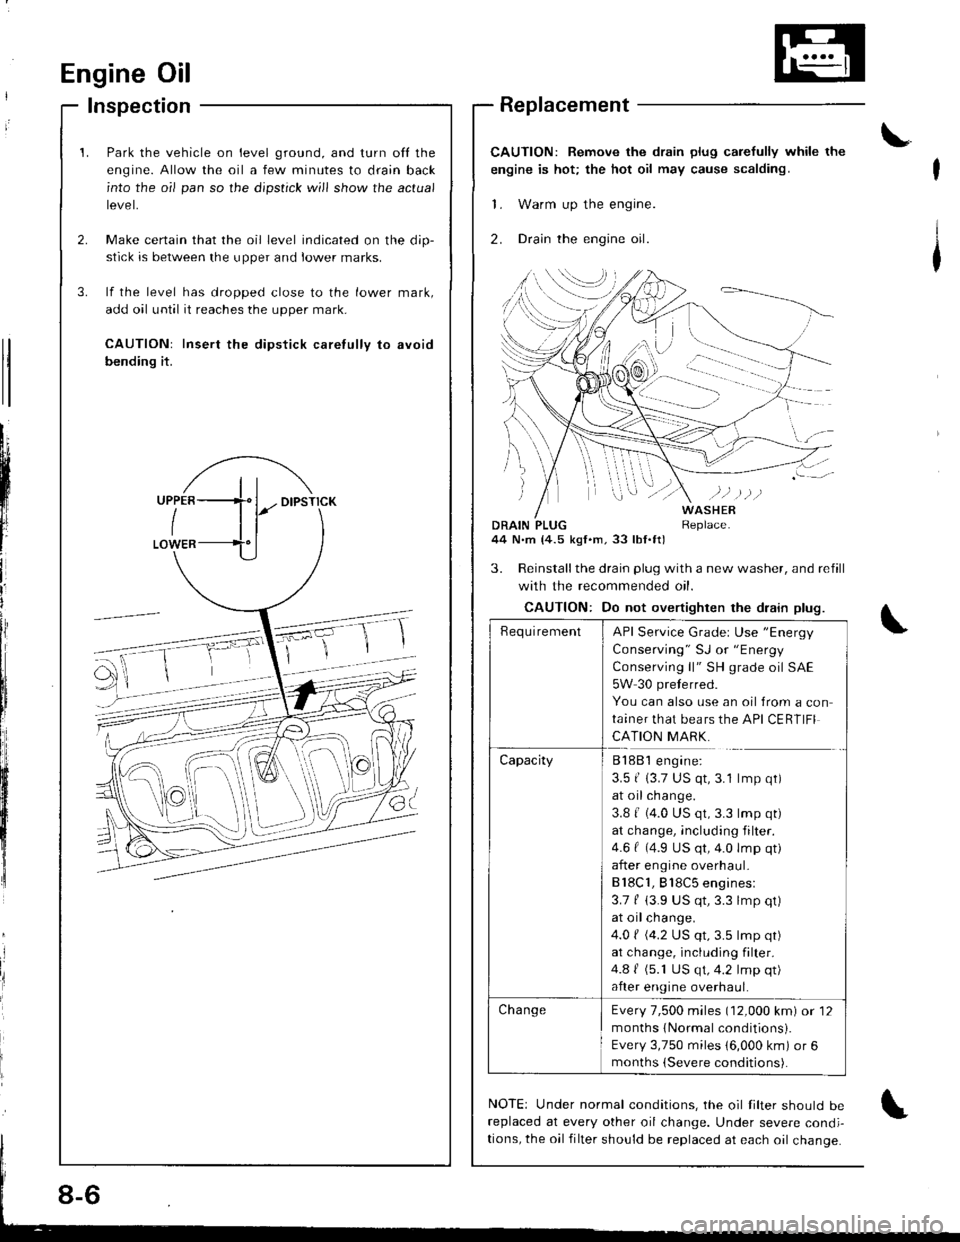
Inspection
Park the vehicle on level ground, and turn ofl the
engine. Allow the oil a few minutes to drain back
into the oil pan so the dipstick will show the actual
tevet,
Make certain that the oil level indicated on the dip-
stick is between the upper and lower marks.
lf the level has dropped close to the lower mark,
add oil until it reaches the upper mark.
CAUTION: Insert the dipstick caretully to avoid
bending it.
Engine Oil
t'
Replacement
CAUTION: Remove the drain plug carefully while the
engine is hot; the hot oil may cause scalding.
'1. Warm up the engine.
2. Drcin the engine oil.
\
tl
tl
tl
Lii
t'l
lr
ii
I
iliIItl
J
DRAIN PLUG44 N.m (4.5 kgl.m,33 lbl.tt)
WASHERReplace.
3. Reinstallthe drain plug with a new washer, and refill
with the recommended oil.
CAUTION: Do not overtighten the drain plug.
NOTE: Under normal conditions, the oil filter should bereplaced at every other oil change. Under severe condi-
tions, the oil filter should be replaced at each oil change.
\
-Ff
_ ,€- @
'@
oE
RequirementAPI Service Grader Use "Energy
Consetuing " SJ or "Energy
Conserving ll" SH grade oil SAE
5W 30 preterred.
You can also use an oil {rom a con
ta,ner that bears the API CERTIFI
CATION MARK.
CapacityB188 l engine:
3.5 | 13.7 US qt,3.1 lmp qt)
at oil change.
3.8 | (4.0 US qt,3.3 lmp qt)
at change, including filter.
4.6 | (4.9 US qt,4.0 lmp qt)
after engine overhaul-
Bl8C1, Bl8C5 engines:
3.7 f (3.9 US qt,3.3 lmp qt)
at oil change.
4.0 ( (4.2 US qt,3.5 lmp qt)
at change, including filter.
4.8 | (5.1 US qt,4.2 lmp qt)
after engine overhaul.
Cha ngeEvery 7,500 miles (12,000 km) or 12
months {Normal conditionsi.
Every 3,750 miles 16,000 km) or 6
months (Severe conditions).
8-6
Page 180 of 1681
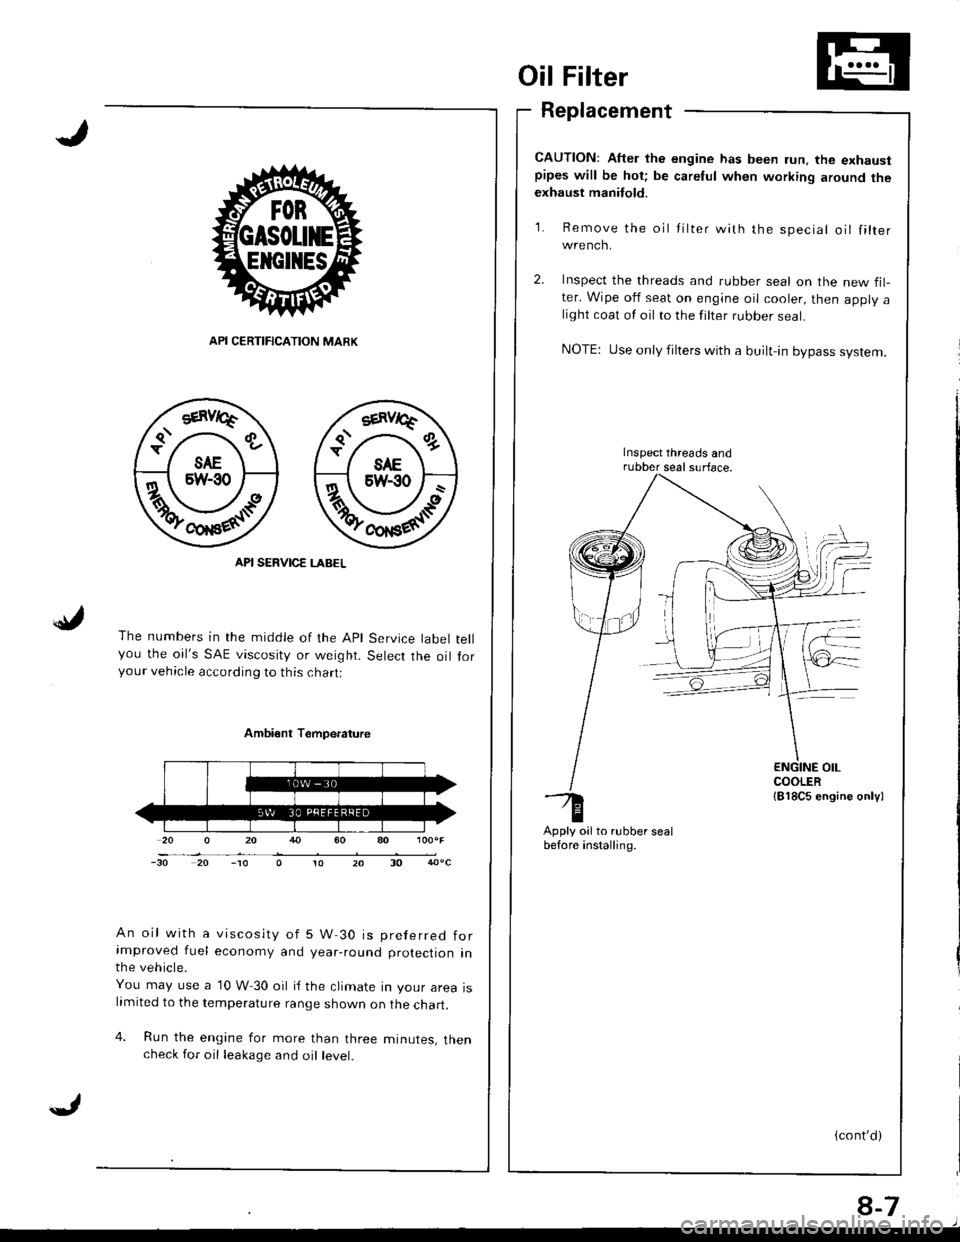
Oil Filter
Replacement
CAUTION: After the engine has been run, the exhaustpipes will be hot; be careful when working around theexhaust manitold.
Re m ove the
wrench.
Iilter with the speciallilter
API CERTIFICATION MARK
API SERVICE LABEL
The numbers in the middle of the Apl Service tabelyou the oil's SAE viscosity or weight. Selecr rhe oilyour vehicle according to this chart:
Inspect the threads and rubber seal on the new fil-ter. Wipe oif seat on engine oil cooler, then apply alight coat ol oil to the filter rubber seal.
NOTE: Use only filters with a built-in bypass system.
Inspect threads andrubber seal surface.
tell
for
Ambi€nt Temperature
An oil with a viscosity of 5 W 30 is preferred forimproved fuel economy and year-round protection inthe vehicle.
You may use a 10 W 30 oil if the climate in your area islimited to the temperature range shown on the chart.
4. Run the engine for more than three minutes, thencheck for oil leakage and oil level.
Apply oilto.ubber sealbefore installing.-to20-30
{cont'd)
8-7
Page 184 of 1681
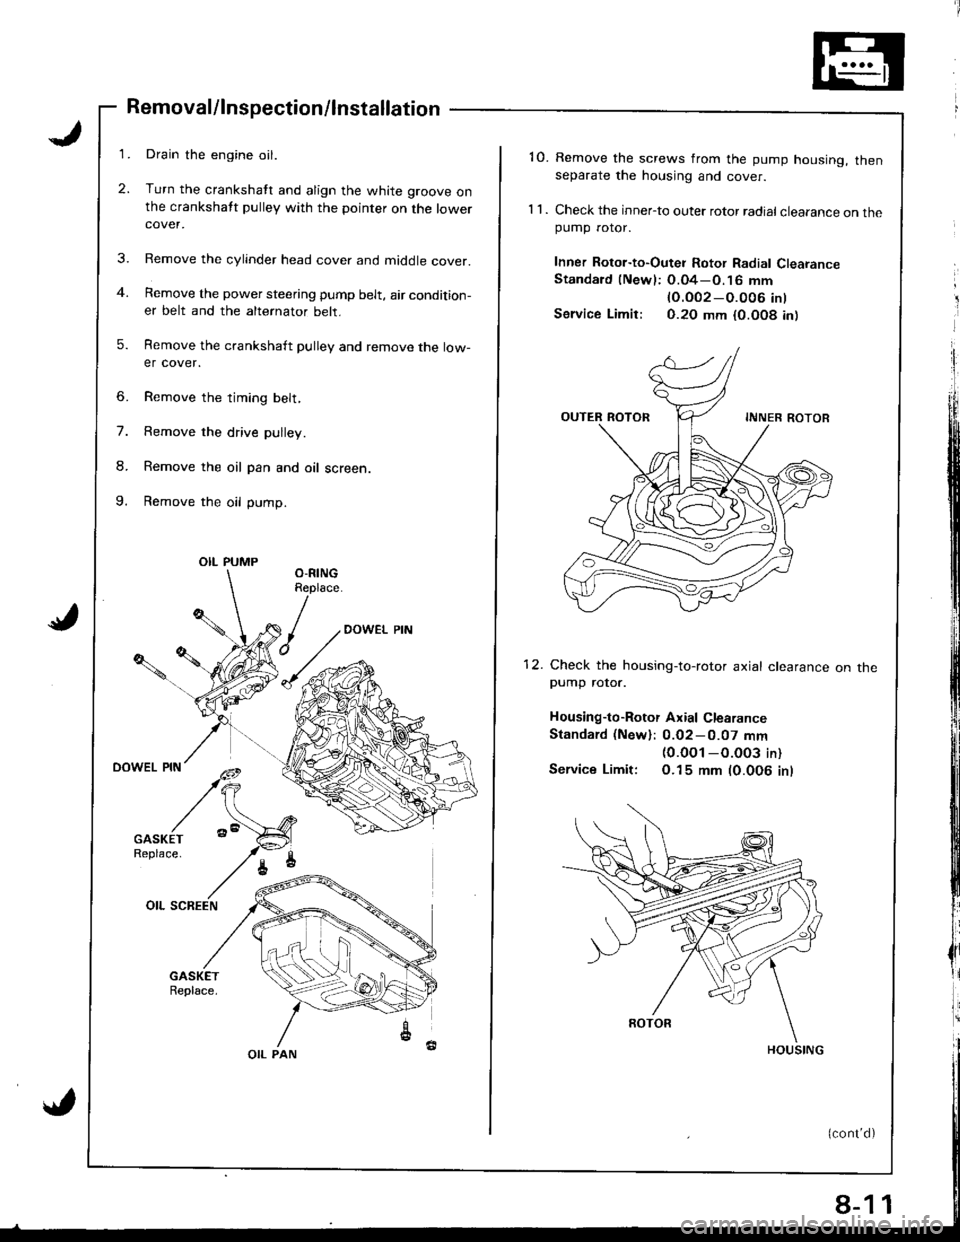
3.
Removal/lnspection/lnstallation
Drain the engine oil.
Turn the crankshatt and align the white groove onthe crankshatt pulley with the pointer on the lowercover.
Remove the cylinder head cover and middle cover.
Remove the power steering pump belt, air condition-er belt and the alternator belt.
Remove the crankshaft pulley and remove the low-er cover.
6. Remove the timing belt,
7. Remove the drive pulley.
8. Remove the oil pan and oil screen.
9. Remove the oil pump.
OIL PUMP
OIL PAN
8-1
'10. Remove the screws from the pump housing, thenseparate the housing and cover.
1 1 . Check the inner-to outer rotor radial clearance on thepumD rotor.
Inner Rotor-to-Outei Rotor Radial ClearanceStandard (Newl: O.04-O.16 mm
lO.OO2-O.O06 int
Service Limir: 0.20 mm {0.O08 in)
12. Check the housing-to-rotor axial clearancepump rotor.
Housing-to-Rotor Axial Clearance
Standard (New): 0.02-0.07 mm(0.0O1 -O.003 in)
Service Limit: O.15 mm (0.006 inl
on tne
1
Page 185 of 1681
Oil Pump
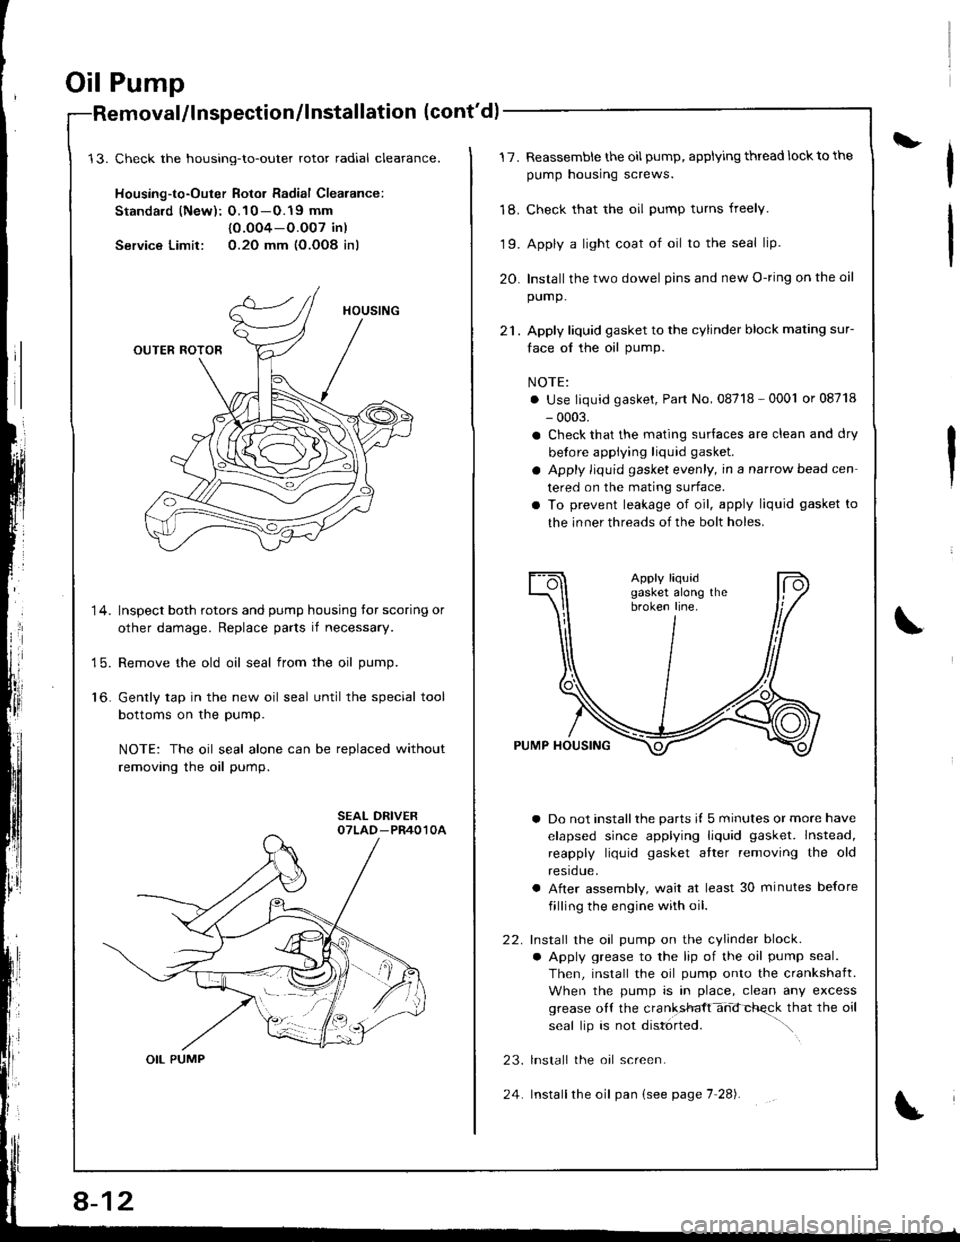
Check the housing-to-outer rotor radial cleatance.
Housing-to-Outer Rotor Radial Clearance:
Standald (New): O.10 -O.19 mm
{0.O04-O.O07 in)
Service Limit: 0.2O mm (O.OO8 inl
Inspect both rotors and pump housing tor scoring or
other damage. Replace parts if necessary.
Remove the old oil seal from the oil pump.
Gently tap in the new oil seal until the special tool
bottoms on the pump.
NOTE: The oil seal alone can be replaced without
removing the oil pump.
alllnspection/lnstallation (cont'd)
14.
15.
to.
OIL PUMP
8-12
24
L17.
'18.
19.
20.
Reassemble the oil pump, applying thread lock to the
pump housing screws.
Check that the oil pump turns freely.
Apply a light coat of oil to the seal lip.
Install the two dowel pins and new O-ring on the oil
pump.
Apply liquid gasket to the cylinder block mating sur-
face ol the oil pump.
NOTE:
. Use liquid gasket, Part No, 08718 - 0001 or 08718
- 0003.
a Check that the mating surlaces are clean and dry
betore applying liquid gasket.
a Apply liquid gasket evenly, in a narrow bead cen
tered on the mating surface.
a To prevent leakage of oil, apply liquid gasket to
the inner threads of the bolt holes.
a Do not installthe parts il 5 minutes or more have
elapsed since applying liquid gasket. Instead,
reapply liquid gasket atter removing the old
resrdue.
a After assembly, wait at least 30 minutes before
filling the engine with oil.
Install the oil pump on the cylinder block.
a Apply grease to the lip of the oil pump seal.
Then, install the oil pump onto the crankshaft.
When the pump is in place, clean any excess
grease oll the cranksfft-hd-chqck that the oil
seal lip is not disl6rted. ".\
lnstall the oal screen.
Installthe oil pan (see page 7 28).
22.
23.
Page 207 of 1681
I
l
t
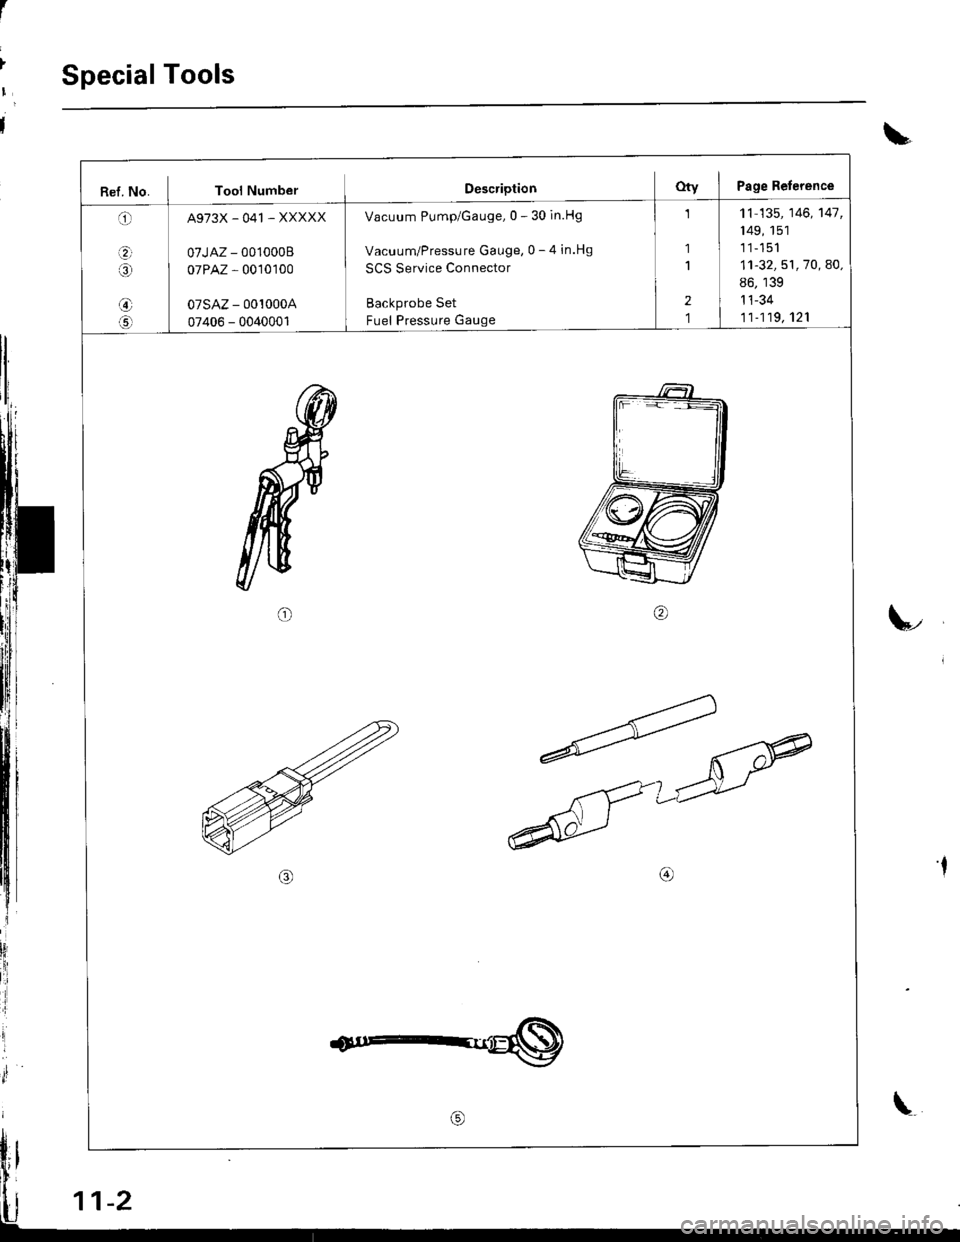
Special Tools
L
Ref. No. Tool NumberDescriptionOty J Page Reference
O A973x - 041 - xxxxx
a 07JAZ - 0010008
i0
I
oTPAZ-oo1o1oo
@ oTsAz - ooloooA
O 07406 - oo4oool
Vacuum Pump/Gauge,0 - 30 in.Hg
Vacuum/Pressure Gauge, 0 - 4 in.Hg
SCS Service Connector
Backprobe Set
Fuel Pressure Gauge
1 't1-135, 146, 141,
149, 151
1 ] 1 1-'�151
1 11-32,51,70, AO,
86, 139
2 | 11-34
r I ir-1jg,121
11-2
Page 211 of 1681
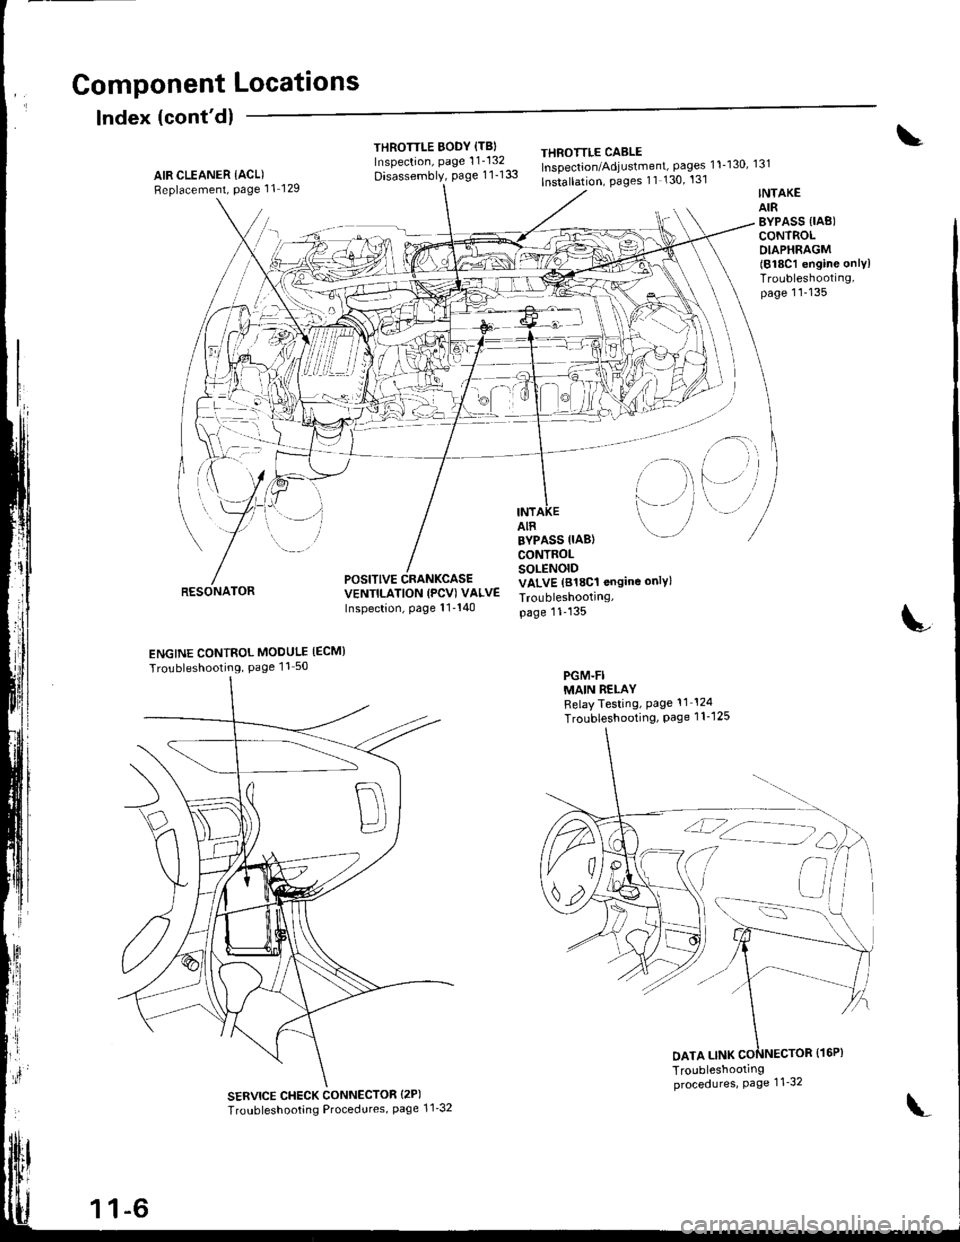
Gomponent Locations
Index (cont'dl
THROTTLE BODY {TBIInspection, page 1 1'132
Disassembly, page 1 1-133
THEOTTLE CABLEInspection/Adjustment, pages 11-130, 131
lnstallation, Pages 11 130' 131AIR CLEANER IACL)Replacement, Page 11 129
RESONATOR
INTAKEAIRBYPASS {IAB)CONTROLDIAPHRAGM(818C1 engine onlylTroubleshooting,page 11-135
i-)
i--- / /
i rl
l'-' i
INTAIR
POSITIVE CRANKCASEVENTILATION (PCV) VALVEInspection, page 11'140
BYPASS IIAB}CONTROLSOLENOIDVALVE (818C1 ongine only)
Troubleshootrng,page 11-135
PGM-FIMAIN RELAYRelayTesting, Page 11 124
Troubleshooting, Page 1 1-1 25
L
ENGINE CONTROL MODULE IECM}
Tro!bleshooting, Page 11 50
SERVICE CHECK CONNECTOR {2P)
Troubleshooting Procedures, page 1 1'32
DATA LINK
1 1-6
\'