service HONDA INTEGRA 1998 4.G Owner's Guide
[x] Cancel search | Manufacturer: HONDA, Model Year: 1998, Model line: INTEGRA, Model: HONDA INTEGRA 1998 4.GPages: 1681, PDF Size: 54.22 MB
Page 326 of 1681
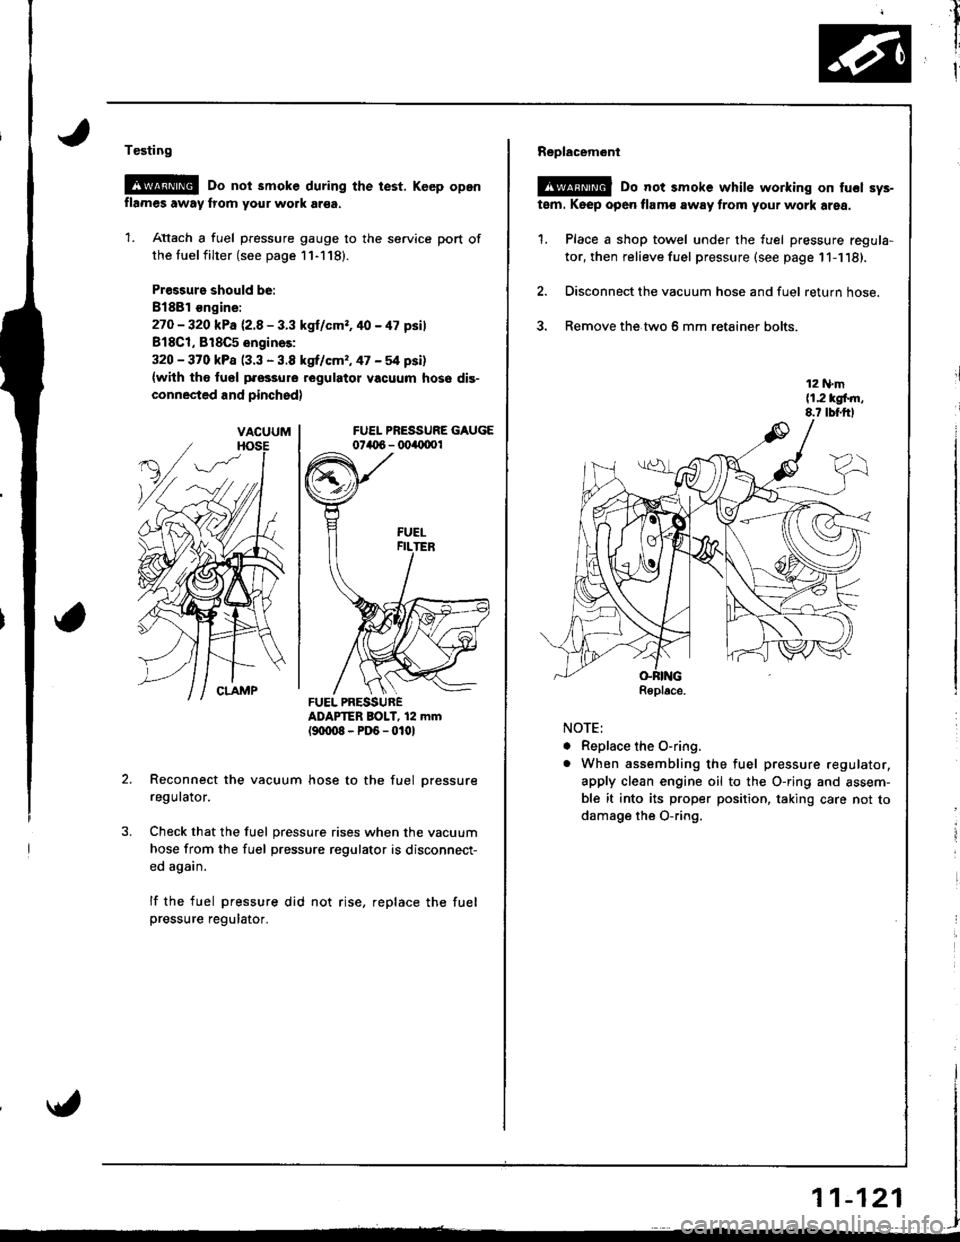
Testing
@G Do not smoke during the test. Keep opon
flames away lrom your work ar€a.
1. Attach a fuel pressure gauge to the service port of
the tuel filter (see page 11-118).
Pr€ssurs should be:
8188l €ngine:
27O - 320 kPa 12.8 - 3.3 kgl/cmr. 40 - 47 psil
818C1, 818C5 engines:
320 - 370 kPa (3.3 - 3.8 kgrf/cm,, 47 - 54 psi)
{with tho fuol pfossure regulatot vacuum hose dis-
connected and pinchsd)
FUEL PRESSURE GAUGE074t 6 - 004{1001
ADAPTER BOIT, 12 mm(9txt08-PD6-0101
Reconnect the vacuum hose to the fuel pressure
regulator.
Check that the fuel pressure rises when the vacuum
hose from the fuel pressure regulator is disconnect-
ed again.
lf the fuel pressure did not rise, replace the fuelpressure regulator.
VACUUM
FUEL PRESSURER€place.
AA
,il
I
I
Replacem6nl
@ Do not smoke while working on tucl sys-
tem. Keep open flamc away from your work area.
1. Place a shop towel under the fuel pressure regula-
tor, then relieve fuel pressure (see page 11-1'18).
2. Disconnect the vacuum hose and fuel return hose.
3. Remove the.two 6 mm retainer bolts.
NOTE:
. Replace the O-ring.
o When assembling the fuel pressure regulator,
apply clean engine oil to the O-ring and assem-
ble it into its proper position, taking care not to
damage the O-ring.
r1
i
i
11-121
Page 344 of 1681
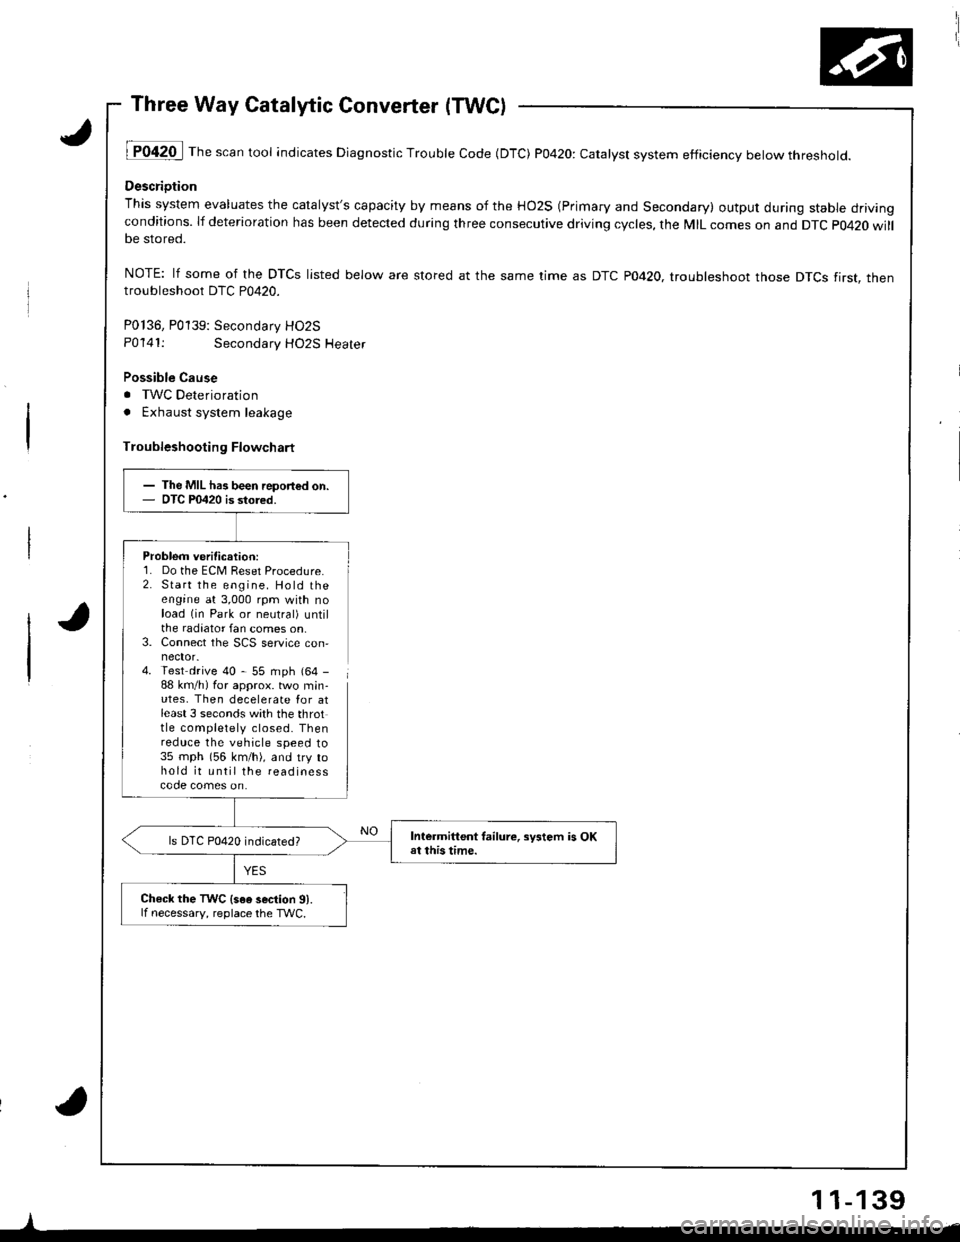
Three Way Catalytic Converter (TWC)
lT042O I Th" """n tool indicates Diagnostic Trouble Code (DTC) P0420: catatyst system efficiency below threshold.
Descriotion
This system evaluates the catalyst's capacity by means of the HO2S (Primary and Secondary) output during stable drivingconditions. lf deterioration has been detected during three consecutive driving cycles, the MIL comes on and DTC p0420 willbe stored.
NOTE: lf some of the DTCS listed below are stored at the same time as DTC PO42O. troubleshoot those DTCS tirst. thentroubleshoot DTC P0420.
P0136, P0139: Secondarv HO2S
P0141:Secondary HO2S Heater
Possible Cause
. TWC Deterioration
. Exhaust system leakage
Troubleshooting Flowchart
Problem verification:1. Do the ECM Reset Procedure.2. Start the engine. Hold theengine at 3,000 rpm with noload (in Park or neutral) untilthe radiator fan comes on,3. Connect the SCS service con,
4. Test drive 40 - 55 mph (64 -
88 km/h) for approx. two min-utes, Then decelerate Ior atleast 3 seconds with the throttle completely closed. Thenreduce the vehicle speed to35 mph (56 km/h), and try tohold it until the readinesscode comes on.
I
- The MIL has been report€d on.- OTC P0420 is stored.
Intermittent tailure, sFtem is OKat this time.ls DTC P0420 indicated?
Check the TWC {s6e 3ection 91.lf necessary, reolace the TWC.
11-139
Page 364 of 1681
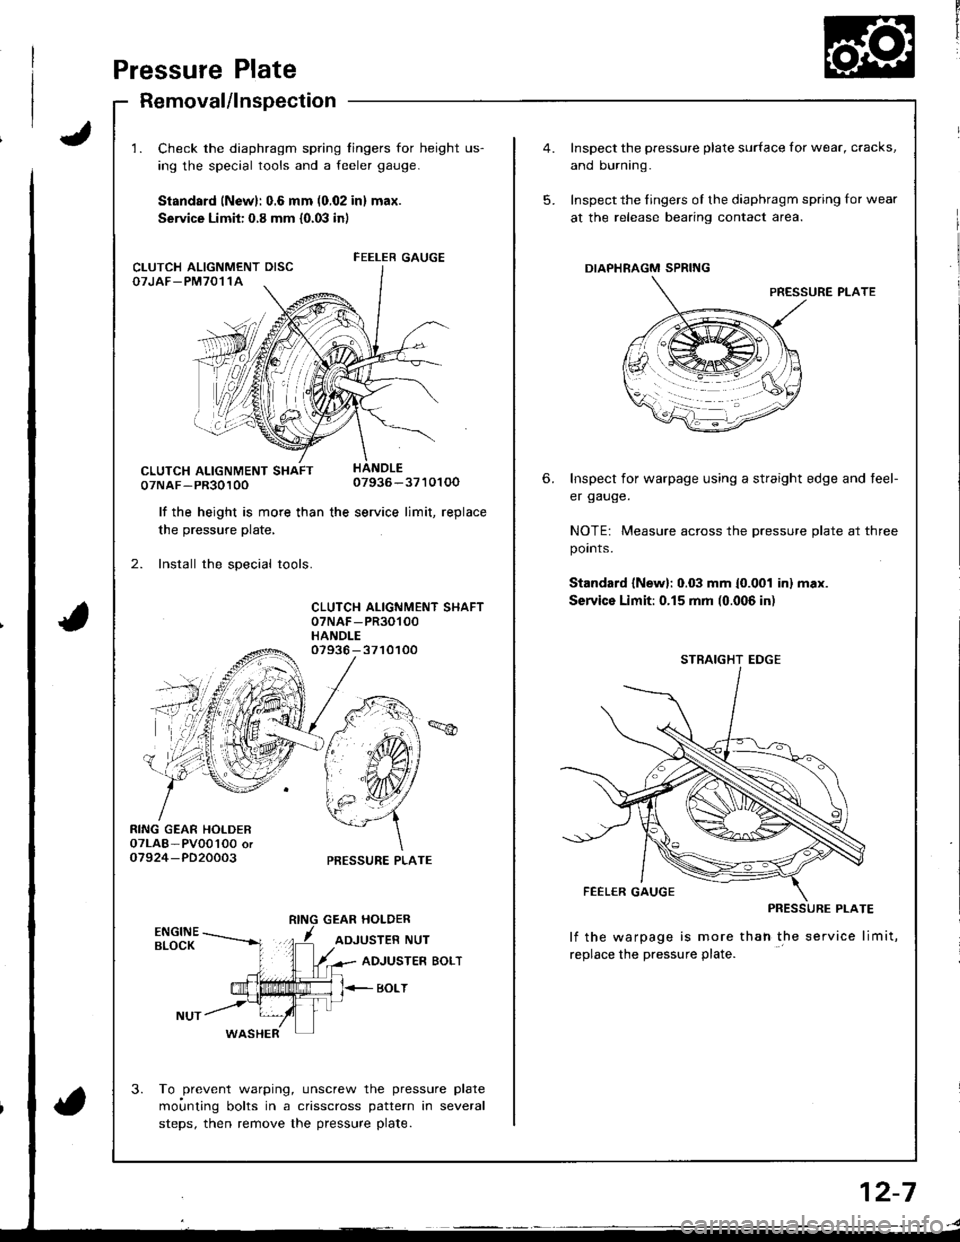
Pressure Plate
Removal/lnspectaon
1. Check the diaphragm spring fingers for height us-
ing the special tools and a feeler gauge.
Standsrd (New): 0.6 mm (0.02 in) max.
Service Limit: 0.8 mm {0.03 in)
07NAF-PR3010007936-3710100
lf the height is more than the service limit, replacethe hro..rr.a nlefe
2. Install the special tools.
CLUTCH ALIGNMENT SHAFT07NAF -PR30100
HANDLE
RING GEAR HOLDER07LAB- PVOo'l0O oro7924-PD20003
07936 - 3710100
PRESSURE PLATE
GEAR HOLDER
ADJUSTER NUT
3.
ADJUSTER BOLT
BOLT
WASHER
To prevent warping, unscrew the pressure plate
moi.rnting bolts in a crisscross pattern in several
steps, then remove the pressure plate.
FEELER GAUGECLUTCH ALIGNMENT DISCOTJAF_PM7011A
5.
6.
Inspect the pressure plate surface for wear, cracks,
and burning.
Inspect the fingers of the diaphragm spring for wear
at the release bearing contact area.
DIAPHRAGM SPRING
PRESSURE PLATE
Inspect for warpage using a straight edge and teel-
er gauge.
NOTE: Measure across the pressure plate at three
points.
Standard {New}: 0.03 mm {0.001 inl max.
Service Limit:0.15 mm (0.006 in)
lf the warpage is more thah the service limit,
replace the pressure plate.
STRAIGHT EDGE
2-7
Page 365 of 1681
rtr
1
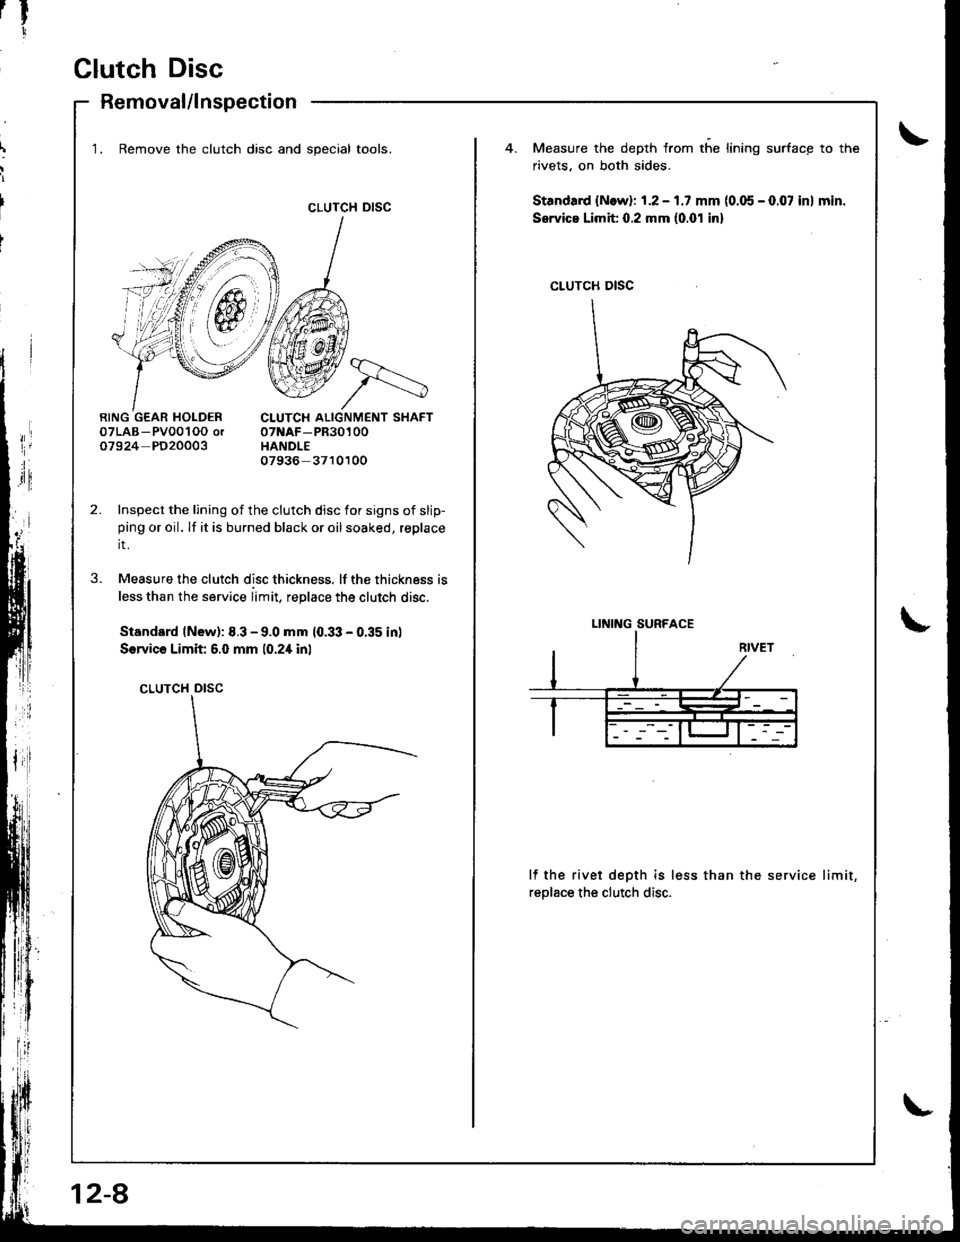
Clutch Disc
Removal/lnspection
CLUTCH DISC
1. Remove the clutch disc and special tools.Measure the depth from the lining surface to the
rivets. on both sides.
Standa.d {N.w}: 1.2 - 1.7 mm (0.05 - 0.07 in} min.
Service Limit 0.2 mm (0.01 inl
07LAB- Pv001OO or07924 PD20003
CLUTCH ALIGNMENT SHAFT07NAF-PR30100HANDLE07936- 3710100
Inspect the lining of the clutch disc for signs of slip-ping or oil. lf it is burned black or oil soaked, replace
it.
Measure the clutch disc thickness. lf the thickness is
less than the service limit, replace the clutch disc.
Standard lNew): 8.3 - 9.0 mm 10.33 - 0.35 in)
Sorvica Limit 6.0 mm 10.2i[ inl
CLUTCH DISC
3.
lf the rivet depth is less than the service limit,
reolace the clutch disc.
CLUTCH DISC
LINING SURFACE
12-8
Page 366 of 1681
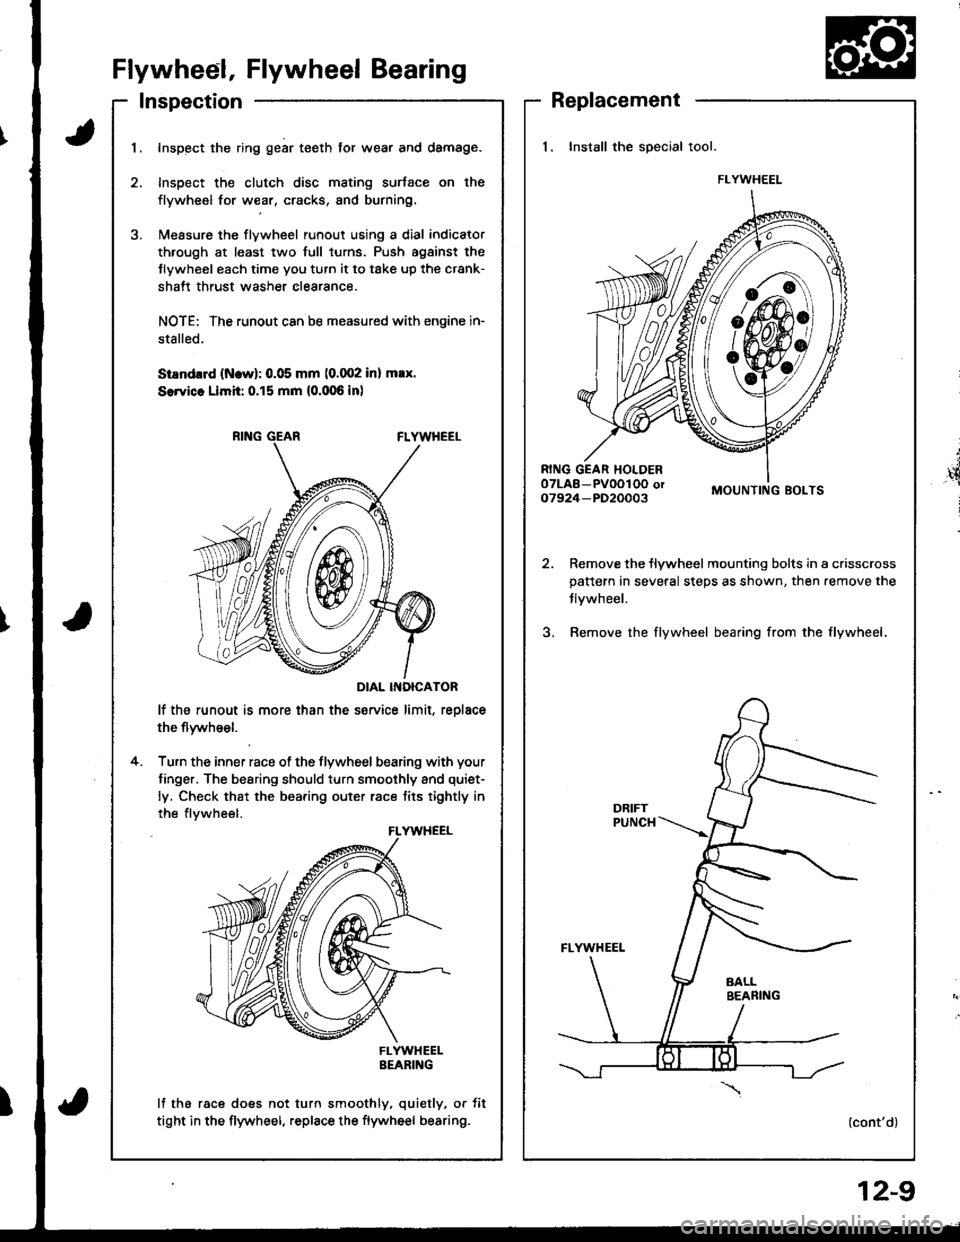
Flywheel, Flywheel Bearing
Inspection
t
',4
i
Replacement
1. Install the special tool.
MOUNTING BOLTS
Remove the flywheel mounting bolts in a crisscrosspattern in several steps as shown, then.emove the
Jlvwheel.
Bemove the flywheel bearing from the flywheel.
(cont'd)
FLYWHEEL
I
1.Inspect the ring gear teeth tor wear and damage.
Inspect the clutch disc mating surtace on the
flywheel for wear, cracks, and burning.
l\,reasure the flywheel runout using a dial indicator
through at least two full turns. Push agsinst the
Jlywheel each time you turn it to take up the crank-
shatt thrust washer clearance.
NOTE: The runout can ba measured with engine in-
stalled.
SiEndrrd (Ncw): 0.05 mm (0.002 inl max.
SerYicc Llmh: 0.15 mm (0.006 inl
DIAL INOICATOR
lf the runout is more than the service limit, reolace
the flywheel.
Turn the inner race of the flywheel bearing with your
tinger. The bearing should turn smoothly and quiet-
ly. Check that the bearing outer race tits tightly in
the flvwheel.
FLYWHEELBEARING
lf the race does not turn smoothly, quietly, or tit
tight in the flywheel, replace the flywheel bearing.
4.
FLYWHEEL
12-9
Page 378 of 1681
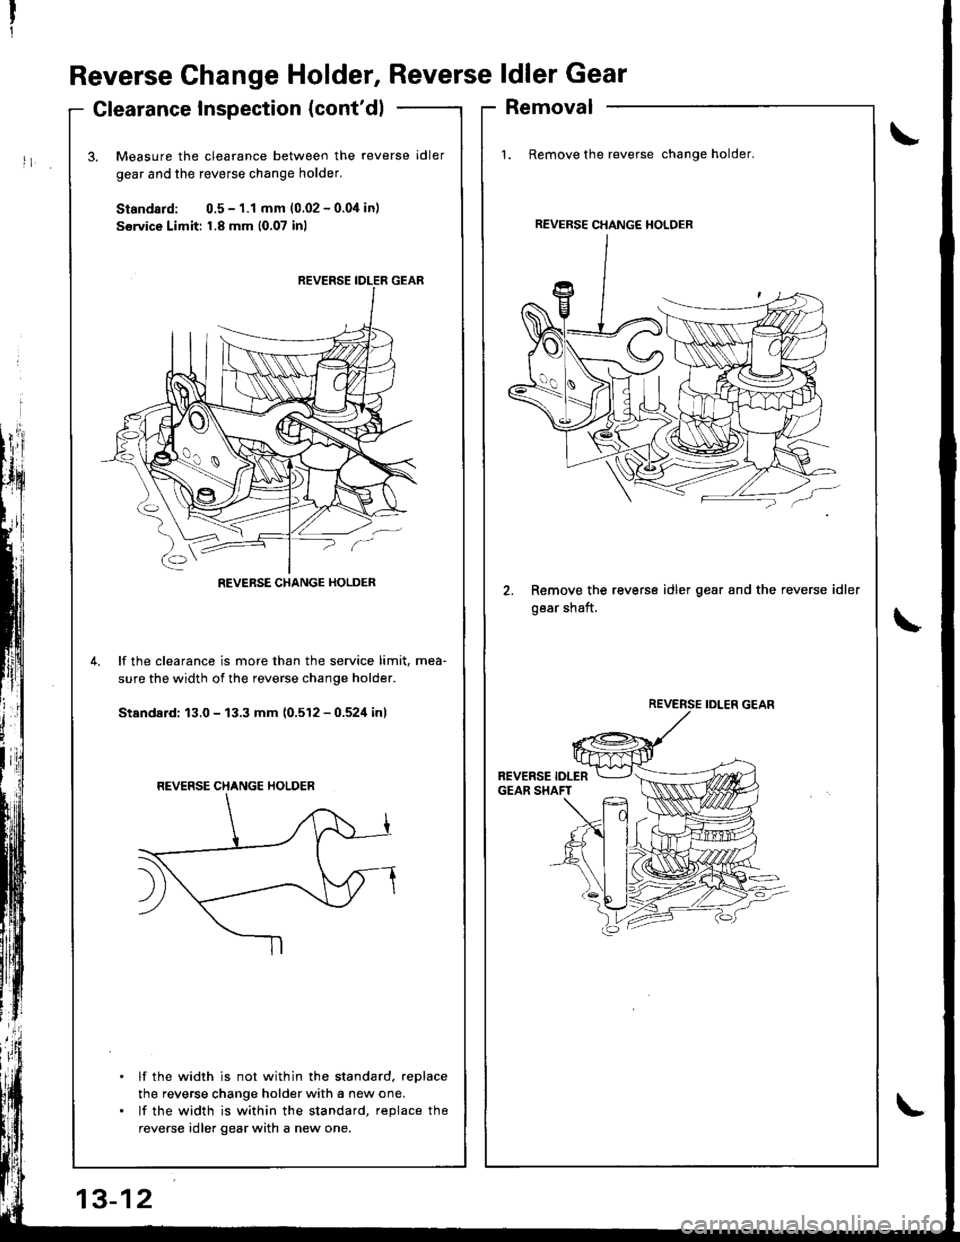
Reverse Change Holder,
Clearance Inspection {cont'dl
Reverseldler Gear
Removal
1. Remove the reverse change holder.
2. Remove the reverse idler gear and the reverse idler
oear shaft.
\
i1
\
Measure the clearance between the reverse idler
gear and the reverse change holder,
Standard: 0.5 - 1.1 mm (0.02 - 0.04 in)
Sorvice Limit: 1.8 mm (0,07 inl
4.lf the clearance is more than the service limit, mea-
sure the width of the reverse change holder.
Standa;d: 13.0 - 13.3 mm (0.512 - 0.524 inl
lf the width is not within the standard, reDlace
the reverse change holder with a new one.
lf the width is within the standard, reDlace the
reverse idler gear with a new one.
REVERSE IDLER GEAR
REVERSE CHANGE HOLDER
REVERSE CHANGE HOLDER
REVERSE CHANGE HOLDER
\
Page 379 of 1681
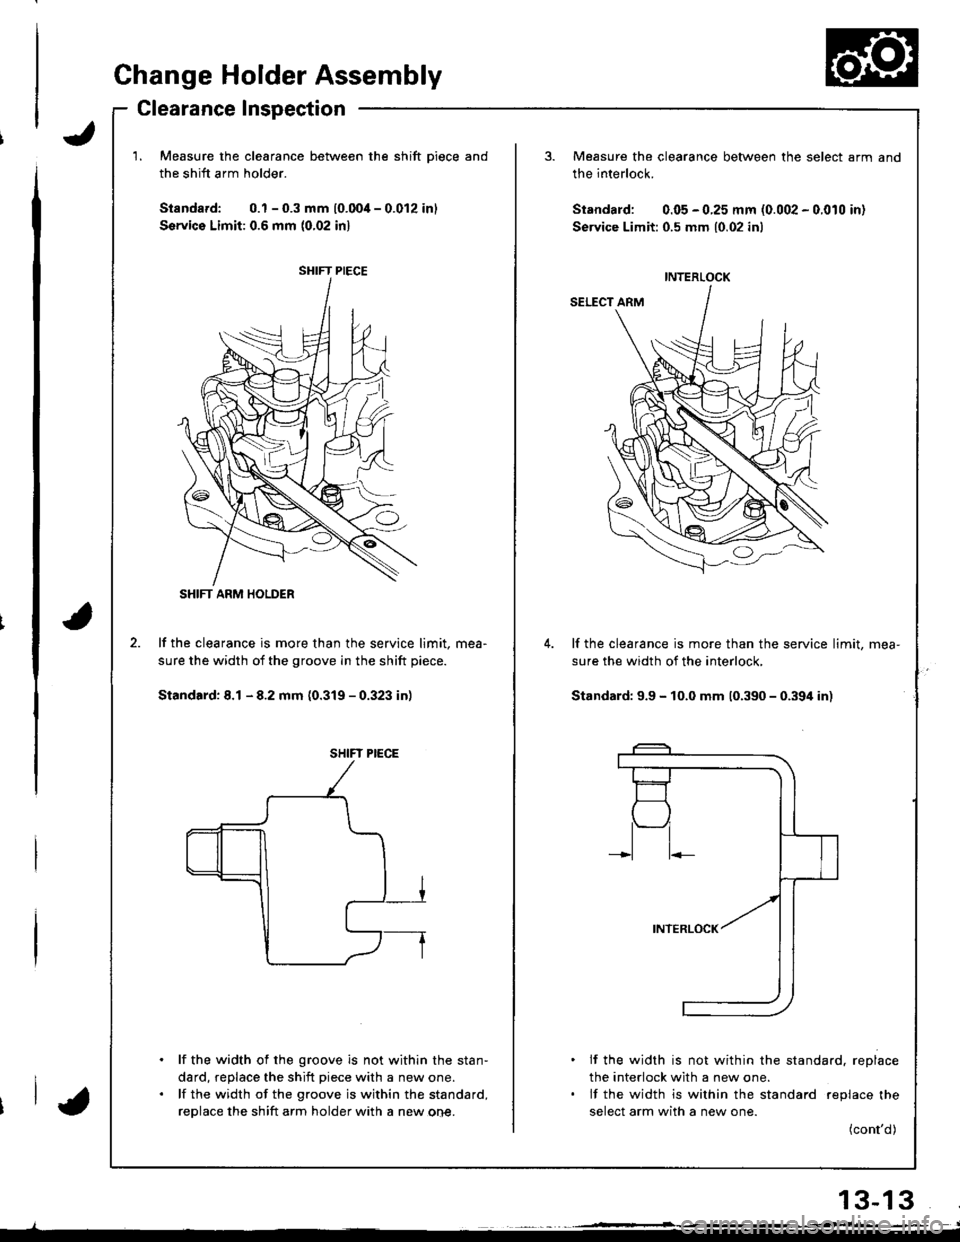
Change Holder Assembly
Clearance Inspection
Measure the clearance betwe€n the shift Diece and
the shift arm holder.
Standard: 0.1 - 0.3 mm (0.004 - 0.012 inl
Servico Limit: 0.6 mm (0,02 inl
lf the clearance is more than the service limit, mea-
sure the width of the groove in the shift piece.
Standard: 8.1 - 8.2 mm (0.319 - 0.323 in)
. lf the width of the groove is not within the stan-
dard, replace the shift piece with a new one.. lf the width of the groove is within the standard,
replace the shift arm holder with a new one.
SHIFT PIECE
t.-_
O
SHIFT ARM HOLDER
SHIFT PIECE
Measure the clearance between the select arm
the interlock.
Standard: 0.05 - 0.25 mm (0.002 - 0.010 in)
Service Limit:0.5 mm {0.02 inl
and
INTERLOCK
lf the clearance is more than the service limit, mea-
sure the width of the interlock,
Standard: 9.9 - 10.0 mm 10.390 - 0.394 in)
. lf the width is not within the standard. replace
the interlock with a new one.. lf the width is wilhin the standard replace the
select arm with a new one.
(cont'd)
13-13
Page 380 of 1681
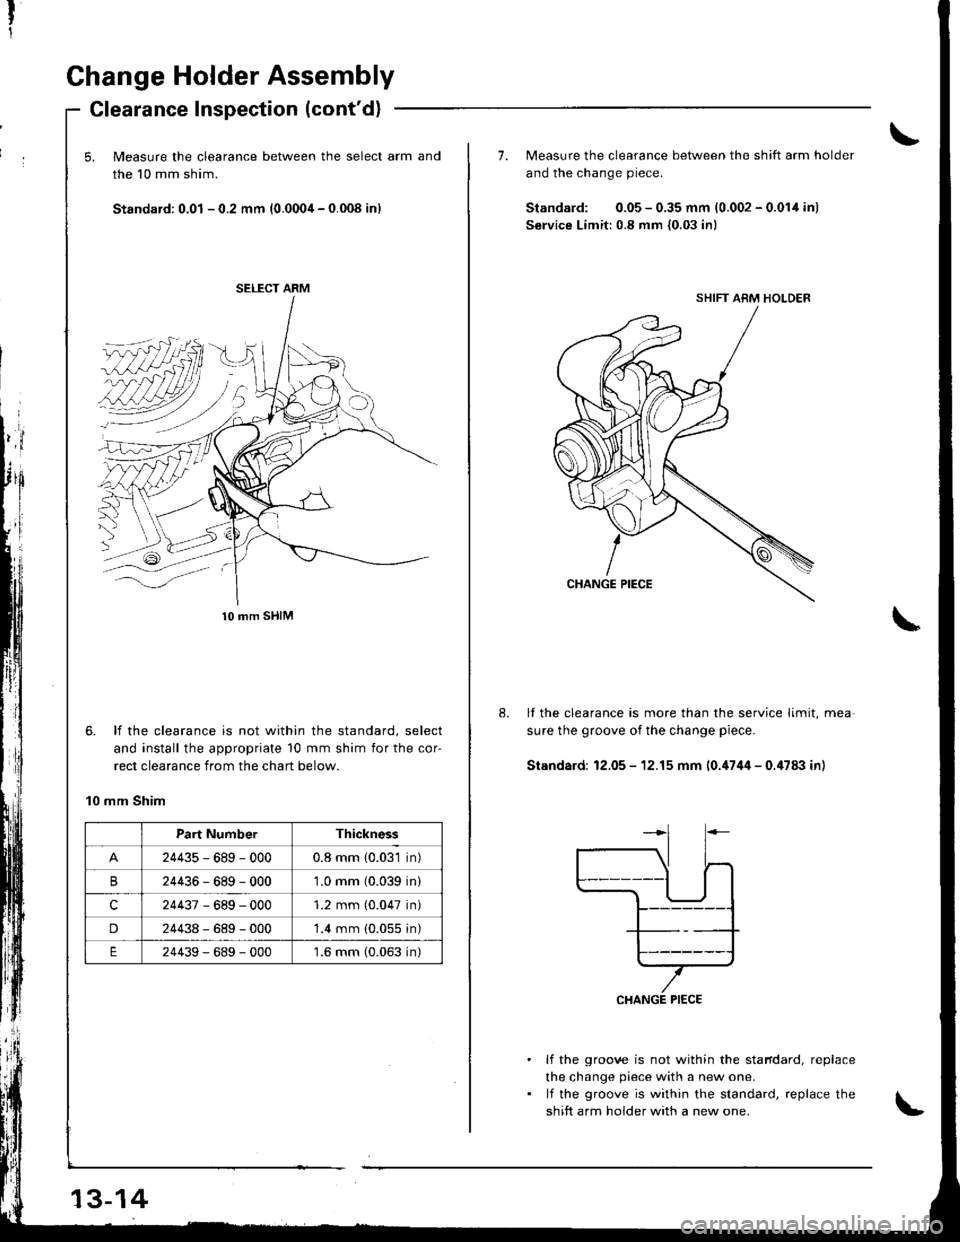
Change Holder Assembly
Glearance Inspection (cont'd)
5. Measure the clearance between the select arm and
the 10 mm shim.
Standard: 0.01 - 0.2 mm (0.0004 - 0.008 inl
,id''l
I'l
6. lf the clearance is not within the standard, select
and install the appropriate 10 mm shim for the cor'
rect clearance from the chart below.
10 mm Shim
SELECT ARM
10 mm SHIM
Part Numb€rThickness
24435-689-0000.8 mm (0.031 in)
B24436-689-0001.0 mm (0.039 in)
24437-689-0001.2 mm (0.047 in)
D24438-689-000'1.4 mm (0.055 in)
24439-689-0001.6 mm (0.063 in)
73-14
7. Measure the clearance betlveen the shift arm holder
and the change piece.
Standard: 0.05 - 0.35 mm (0.002 - 0.014 in)
Service Limit:0.8 mm {0.03 in)
lf the clearance is more than the service limit, mea
sure the groove of the change piece.
Stsndard: 12.05 - 12.15 mm 10.'1744 - 0.'t78:l in)
. lf the groove is not within the stafdard, replace
the change piece with a new one.. lf the groove is within the standard, replace the
shift arm holder with a new one.
SHIFT ARM HOLDER
Page 381 of 1681
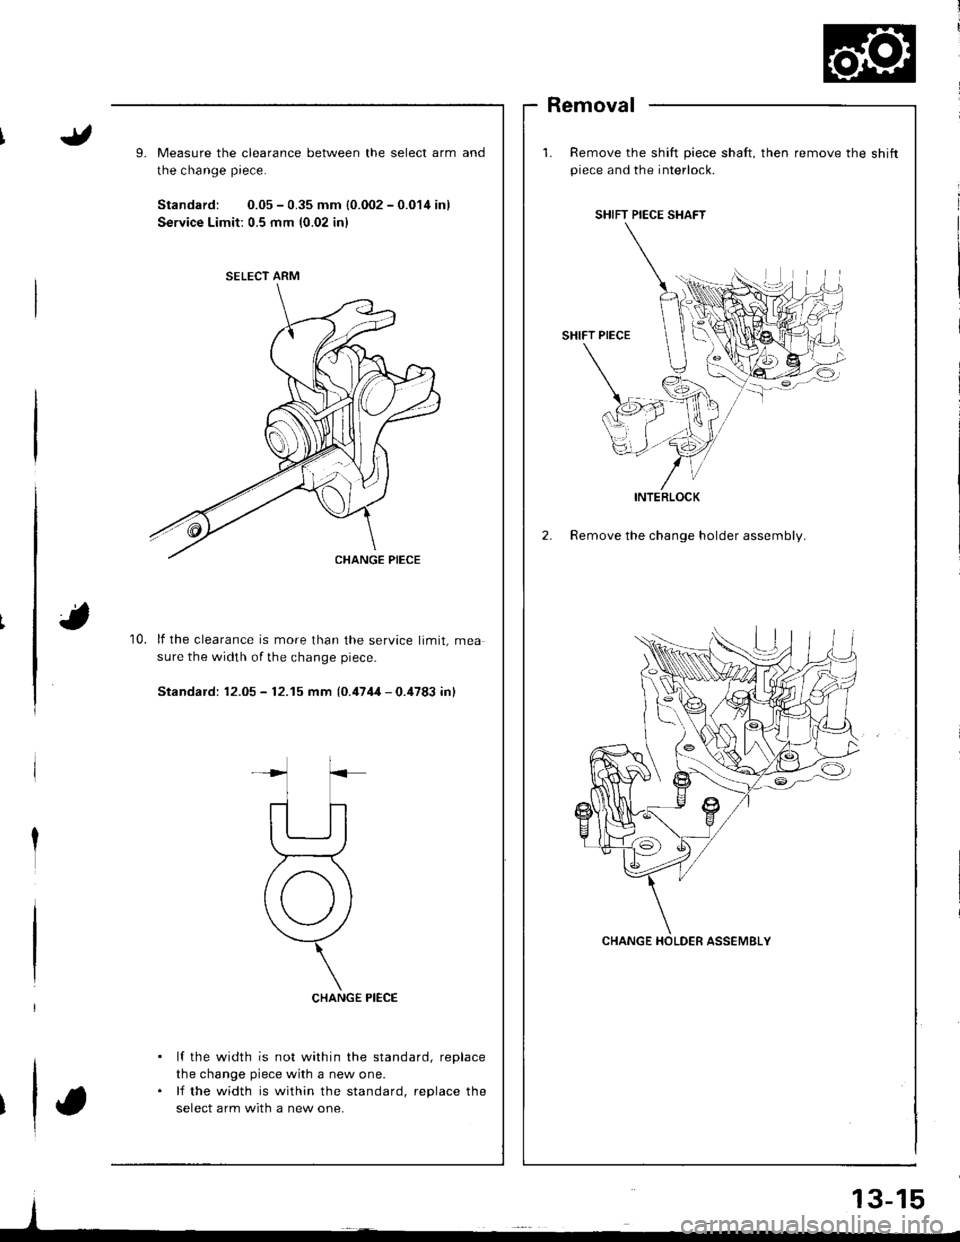
9.Measure the clearance between the select arm
the change piece.
Standard: 0.05 - 0.35 mm {0.002 - 0.014 in)
Service Limit: 0.5 mm {0.02 inl
Removal
Remove the shift piece shaft, then remove the shiftpiece and the interlock.
2. Remove the change holder assembly.
and
10.lf the clearance is more than the service limit, mea
sure the width of the change piece-
Standard: 12.05 - 12.15 mm {0.4744 - 0.4783 inl
CHANGE PIECE
lf the width is not within the standard, replace
the change piece with a new one.
lf the width is within the standard, replace the
select arm with a new one.
SELECT ARM
SHIFT PIECE SHAFT
INTERLOCK
Page 386 of 1681
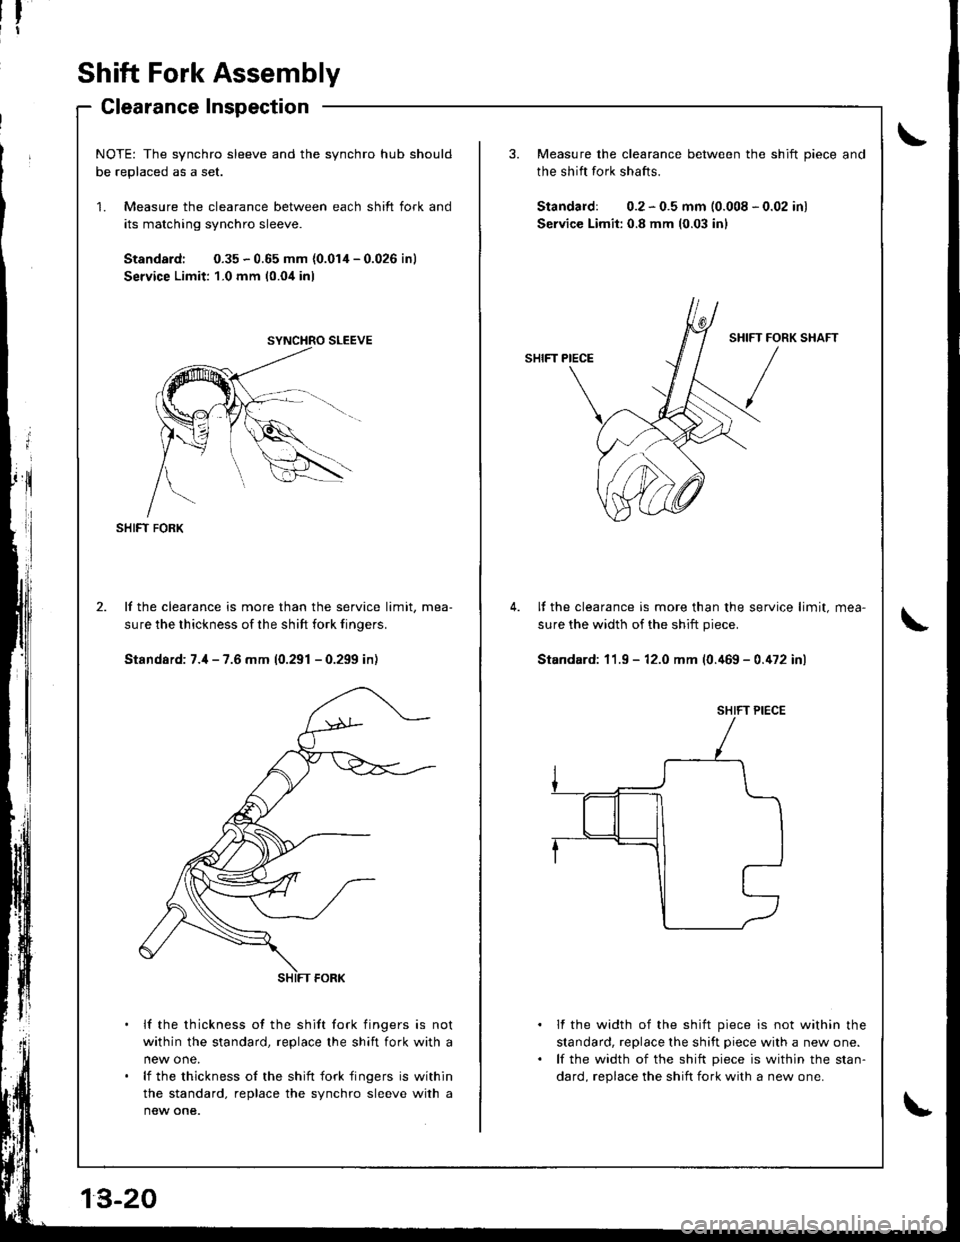
Shift Fork Assembly
Clearance Inspection
NOTE: The synchro sleeve and the synchro hub shouldh6 ronlr.o.l ,.. car
Measure the clearance between each shift fork and
its matching synchro sleeve.
Standard: 0.35 - 0.65 mm {0.014 - 0.026 inl
Service Limit: 1-0 mm 10.04 inl
SHIFT FORK
lf the clearance is more than the service limit, mea-
sure the thickness of the sh ift fork finoers.
Standard: 7.il - 7.6 mm (0.291 - 0.299 in)
lf the thickness of the shift fork fingers is not
within the standard, replace the shift fork with a
lf the thickness of the shift fork fingers is within
the standard, replace the synchro sleeve with a
new one.
3. Measure the clearance between the shift piece and
the shift fork shafts.
Standard: 0.2 - 0.5 mm (0.008 - 0.02 inl
Service Limit: 0.8 mm (0.03 inl
SHIFT PIECE
It the clearance is more than the service limit,
sure the width of the shift piece.
Standard: 11.9 - 12.0 mm (0.a69 - 0.a72 inl
lf the width of the shift piece is not within the
standard, replace lhe shift piece with a new one.
lf the width of the shift piece is within the stan-
dard. reolace the shift fork with a new one.
IFT FORK
/
SHIFT PIECE