light HONDA INTEGRA 1998 4.G Owner's Manual
[x] Cancel search | Manufacturer: HONDA, Model Year: 1998, Model line: INTEGRA, Model: HONDA INTEGRA 1998 4.GPages: 1681, PDF Size: 54.22 MB
Page 309 of 1681
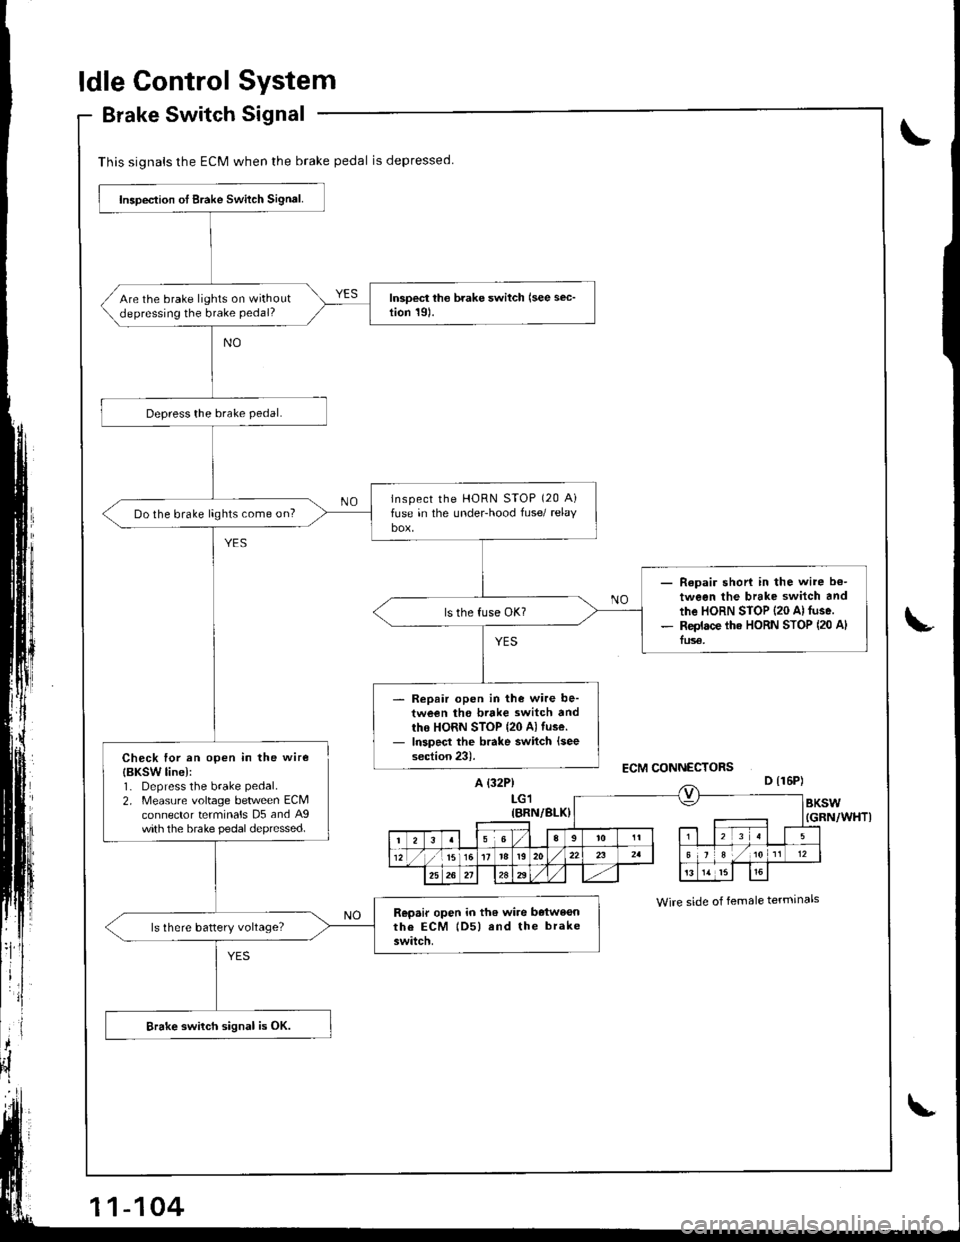
This signals the ECM when the brake pedal is depressed
Inspeclion ot Brake Switch Signal.
Are the brake lights on withoutdepressing the brake pedal?
lnspect the HoRN STOP (20 Aifuse in the under-hood fuse/ relaybox,Do the brake lights come on?
Repair shori in the wire b€-
tween the brake switch and
the HoRN STOP {20 Al fuse.Replace tha HORN STOP (20 AlIus€.
Repair open in the wire be-tween the brtke switch andtho HORN STOP {20 Al tuse.
Inspect the brake switch {seesection 23).Check tor an open in the wire
{BKSW line):1- Depress the brake pedal.
2. Measure voltage between ECMconnector terminals D5 and Agwith the brake pedal depressed.
Repair open io th6 wiae batweonthe EcM lDs) rnd the brakeswitch.
Brake switch signal is OK.
ldle ControlSystem
Brake SwitchSignal
L
L
A {32P}LGl{BRN/BLX}
D {16P)
Wrre side of female terminals
I
Page 316 of 1681
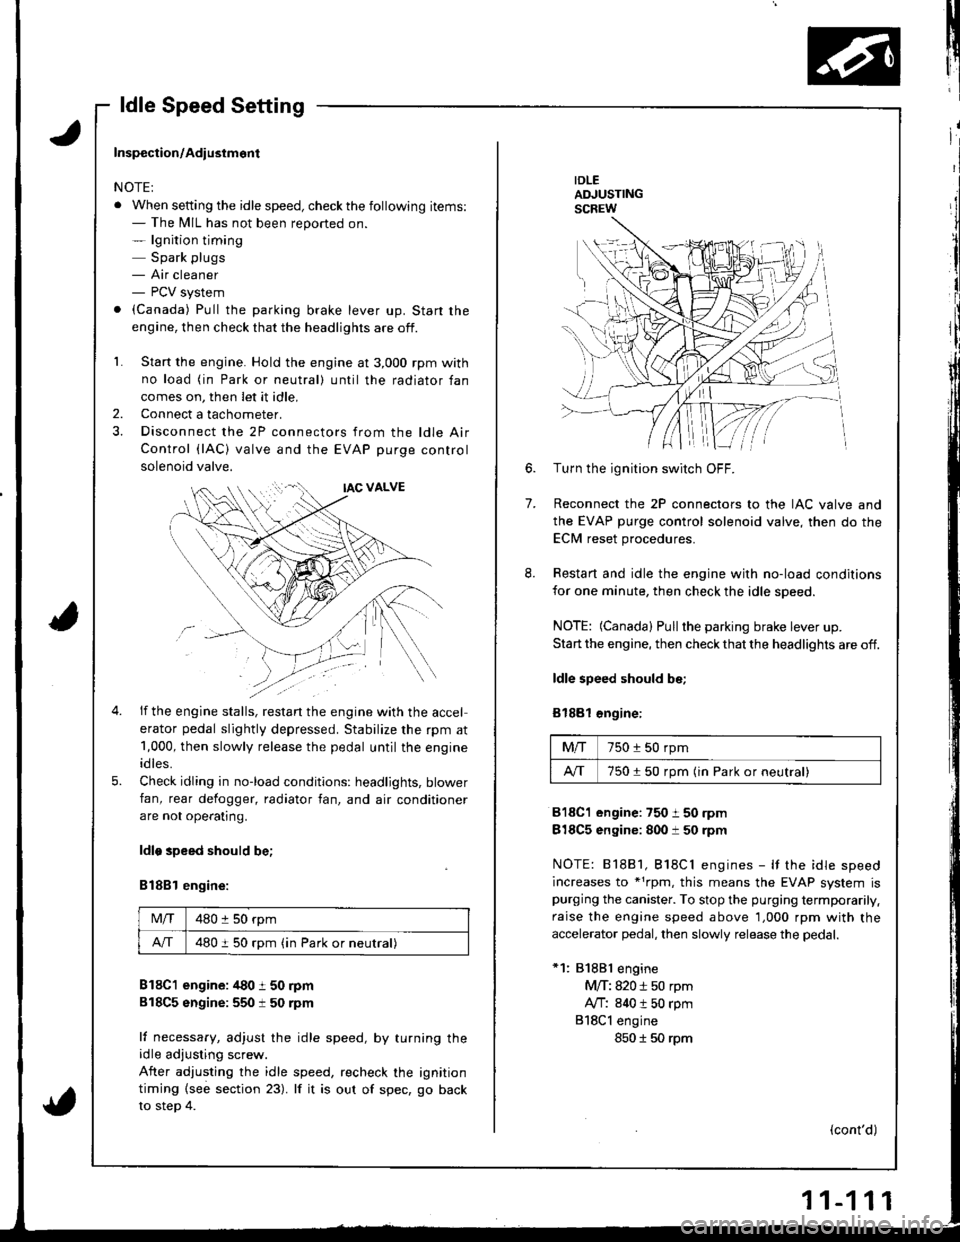
ldle Speed Setting
IDLEADJUSTINGSCREW
7.
6.Turn the ignition switch OFF.
Reconnect the 2P connectors to the IAC valve and
the EVAP purge control solenoid valve, then do the
ECM reset procedures.
Restart and idle the engine with no-load conditions
for one minute, then check the idle speed.
NOTE: (Canada) Pullthe parking brake lever up.
Start the engine, then check that the headlights are off.
ldle speed should be;
Bl88l €ngine:
Mfi750 i 50 rpm
A/T750150 rpm (in Park or neutral)
818C1 engine:750 i 50 rpm
818C5 engine: 800 i 50 rpm
NOTE: 81881, Bl8Cl engines - It the idle speed
increases to *1rpm, this means the EVAP system ispurging the canister. To stop the purging termporarily.
raise the engine speed above 1,000 rpm with the
accelerator pedal, then slowly release the pedal.
*1: 81881 engine
M/T: 820 i 50 rpm
Ay'T: 840 t 50 rpm
818Cl engine
850 I 50 rpm
(cont'd)
Inspection/Adiustmont
NOTE:
. When setting the idle speed, checkthe following items:- The MIL has not been reported on.- lgnition timing
Spark plugs- Air cleaner- PCV system
. (Canada) Pull the parking brake lever up. Start the
engine, then check that the headlights are off.
1. Start the engine. Hold the engine at 3,000 rpm with
no load (in Park or neutral) until the radiator fan
comes on, then let it idle,
Connect a tachometer.
Disconnect the 2P connectors from the ldle Air
Control (lAC) valve and the EVAP purge control
solenoid valve.
2.
5.
if the engine stalls, restan the engine with the accel
erator pedal slightly depressed. Stabilize the rpm at
1,000, then slowly release the pedal until the engine
idles.
Check idling in no-load conditions: headlights, blower
fan, rear defogger, radiator fan, and air conditioner
are not ope€tlng.
ldlo speed should be;
B188l engine:
Mlf480 :l 50 rpm
A/T480 i 50 rpm (in Park or neutral)
B18C1 engine: /t80 t 50 rpm
818C5 sngine:550 t 50 rpm
lf necessary, adjust the idle speed, by turning theidle adjusting screw.
After adjusting the idle speed, recheck the ignition
timing {see section 23). lf it is out of spec, go back
to steo 4.
Page 317 of 1681
ldle Control System
ldle Speed Setting (cont'dl
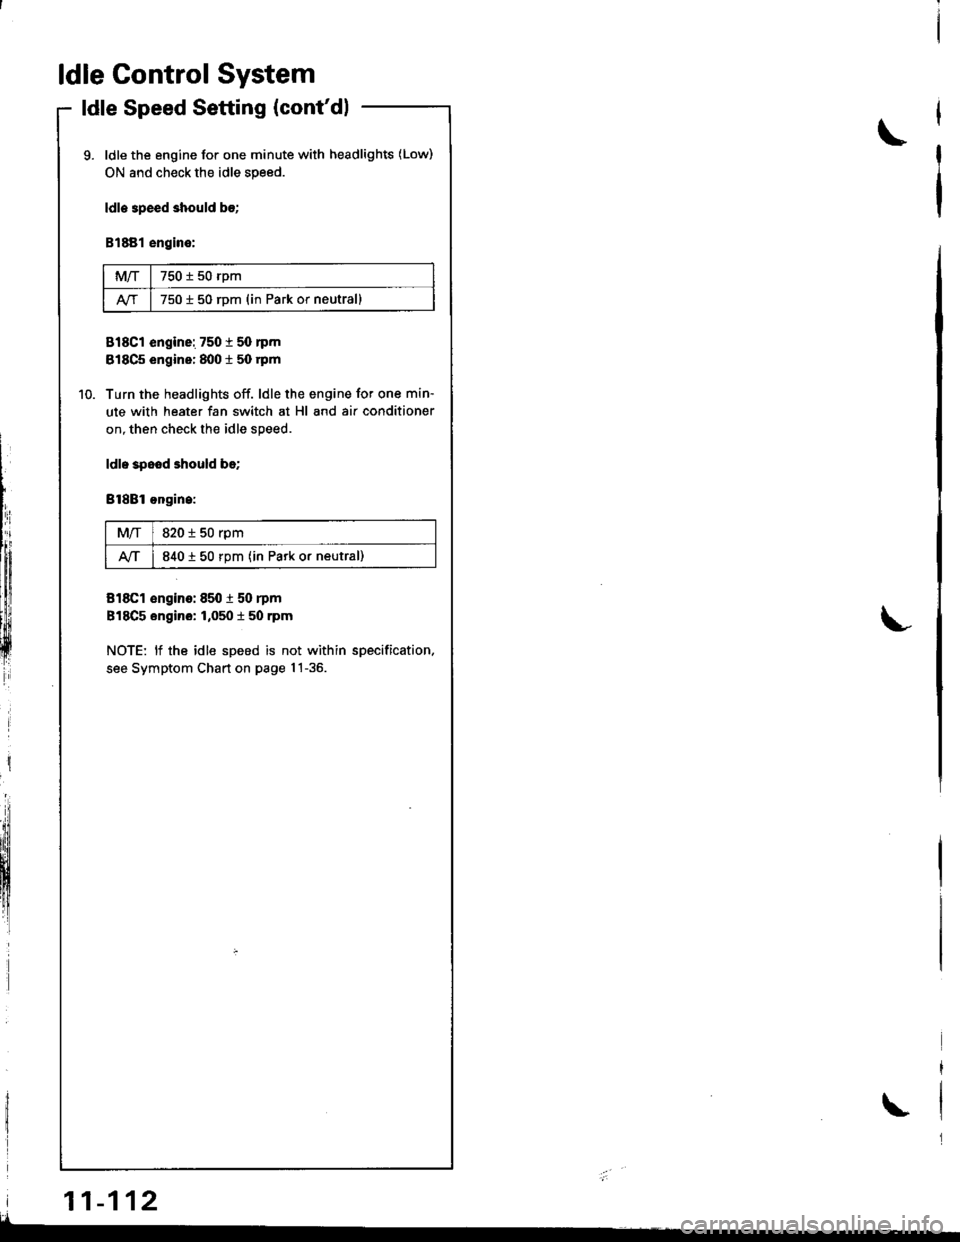
ldle the engine for one minute with headlights (Low)
ON and check the idle speed.
ldle 3peed should b€;
B1881 engine:
MIT750 t 50 rpm
750 i 50 rDm (in Park or neutrall
818C1 engine: 7501 50 nm
818C5 engine: 8001 50 rpm
Turn the headlights off. ldle the engine for one min-
ute with heater fan switch at Hl and air conditioner
on, then check the idle speed.
ldl. spood should be;
Bl8Bl ongin.:
M/T820 i 50 rpm
lvT840 t 50 rpm (in Park or neutral)
818C1 €ngino: 850 i 50 rpm
818C5 engino: 1,050 t 50 rpm
NOTE: lf the idle speed is not within specification.
see Symptom Chart on page 1!-36.
\
L
i
lIh:
lffiiltfl!
ffi
| 11-112
\
I
Page 343 of 1681
t"iI
Emission Gontrol System
System Description
Three Way Catalytic Converter (TWCI
\
t
The emission control system includes a Three Way
Catalytic Converter (TWC), Positive Crankcase Ventilation
(PCV) system and Evaporative Emission (EVAP) Control
system. The emission control system is designed to meet
tederal and state emission standards.
InsDeciion
!@@ Do not smoke during this procedure. Keep
any open llame away from your work area.
1. Start the engine. Hold the engine at 3,000 rpm with
no load {in Park or neutral) until the radiator fan
comes on, then let it idle.
2. Connect a tachometer.
Check and adjust the idle speed, if necessary (see
page '11-11 ! ).
Warm up and calibrate the CO meter according to the
meter manufacturer's instructions.
Check idle CO with rhe headlights, heater blower,
rear window defogger, cooling fan, and air condition-
er off.
NOTE: {Canada) Pull the parking brake lever up.
Start the engine, then check that the headlights are
olf.
CO meter should indicste 0.17o maximum.
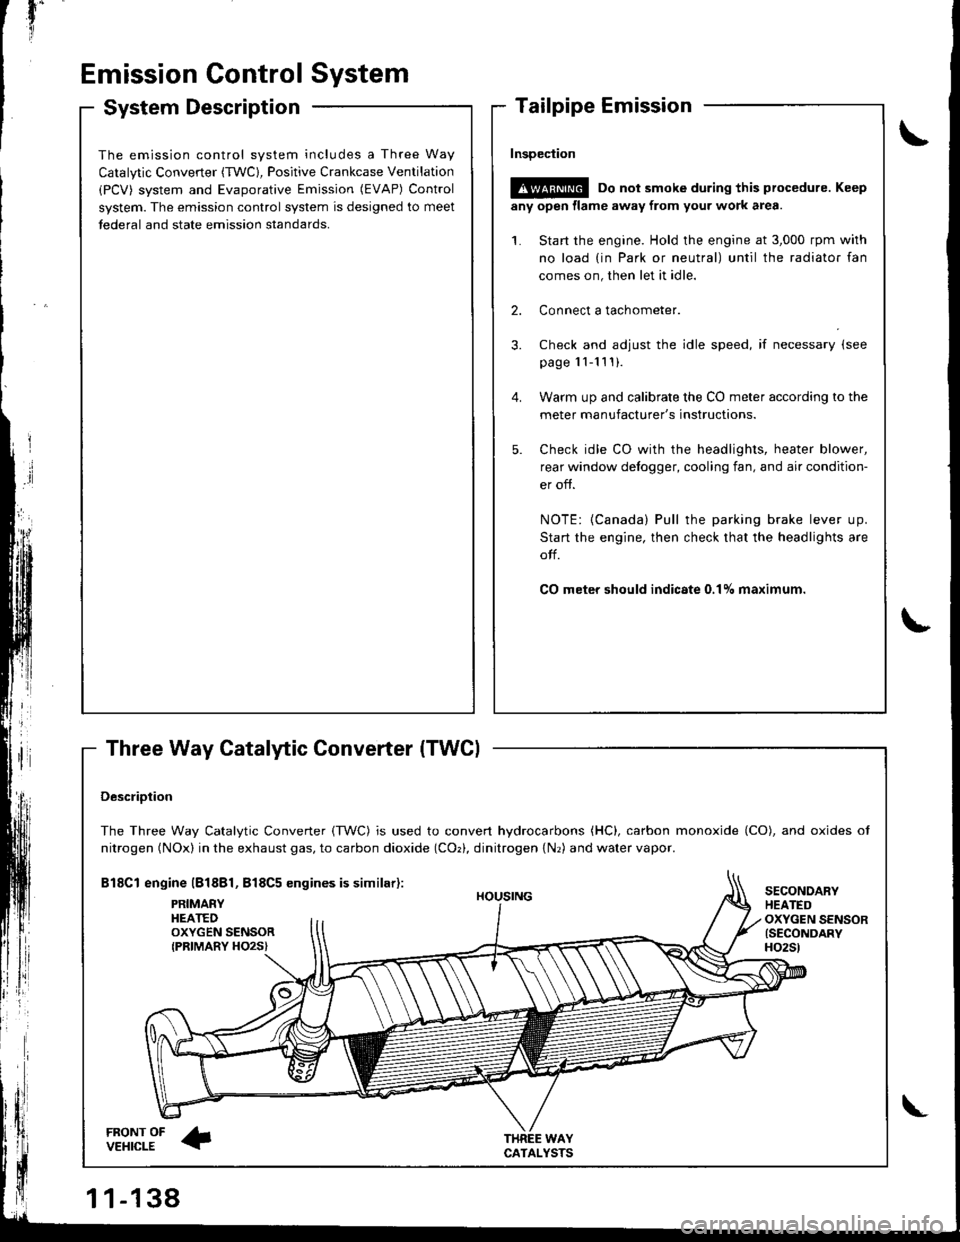
DescriDtion
The Three Way Catalytic Converter {TWC) is used to convert hydrocarbons (HC), carbon monoxide (CO), and oxides of
nitrogen (NOx) in the exhaust gas, to carbon dioxide (COr), dinitrogen {Nr) and water vapor.
Bl8Cl engine l818Bl, 818C5 engines is similar):
FRONT OFVEHICLE
PRIMAEYHEATEDOXYGEN SENSORIPRIMARY HO2S}
HOUSING
WAYCATALYSTS
SECONOARYHEATEDOXYGEN SENSOR{SECONDARYH02St
\
Page 345 of 1681
'il
Emission Gontrol System
Positive Crankcase Ventilation (PCV) System
Description
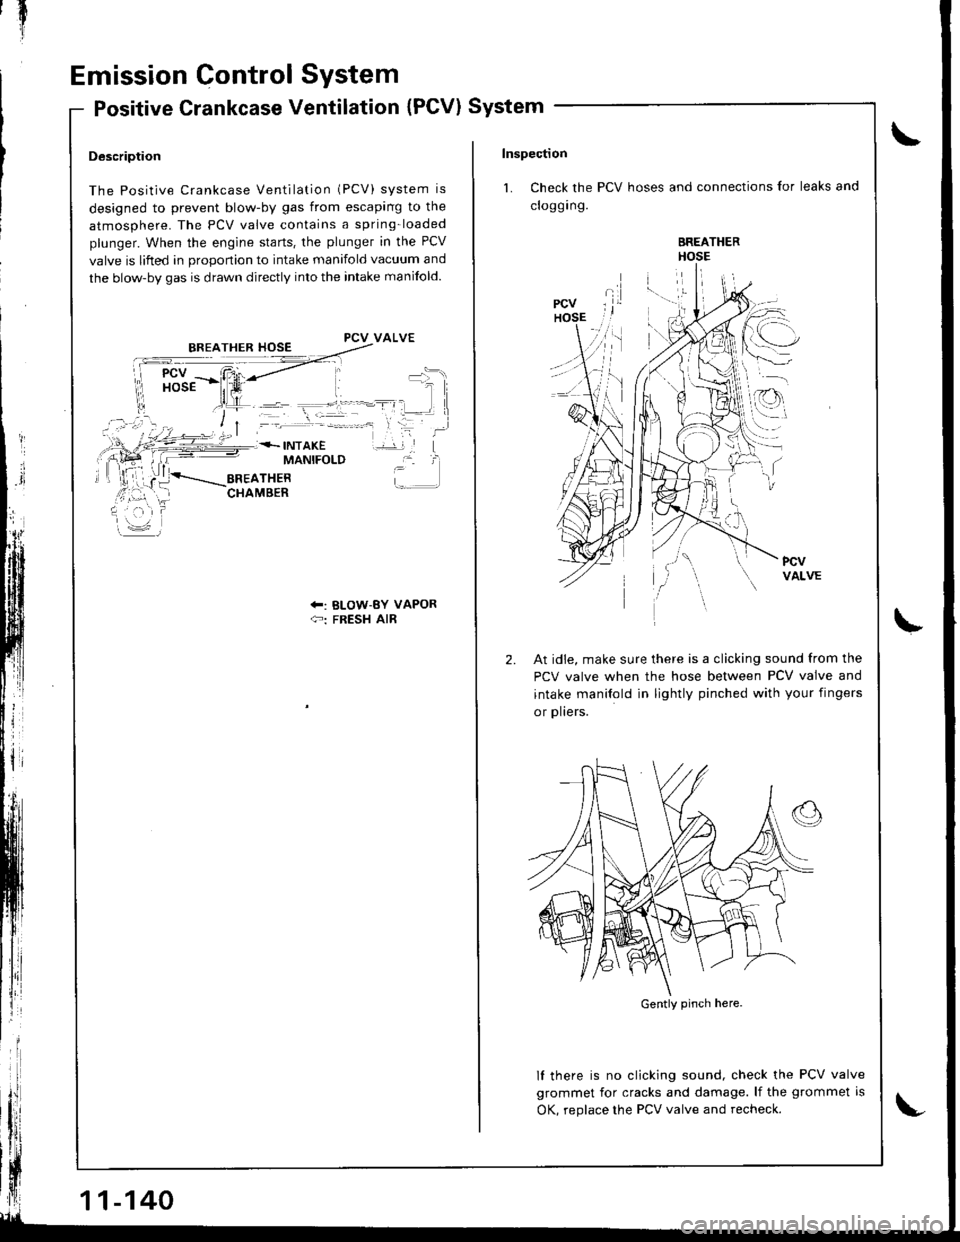
The Positive Crankcase Ventilation (PCV) system is
designed to prevent blow-by gas from escaping to the
atmosphere. The PCV valve contains a spring-loaded
plunger. When the engine starts. the plunger in the PCV
valve is lifted in orooonion to intake manifold vacuum and
the blow-by gas is drawn directly into the intake manifold.
PCV VALVE
MANIFOLD
+: BLOW-BY VAPOR{-: FRESH AIR
11-140
Inspection
1. Check the PCV hoses and connections for leaks and
croggrng.
BREATHERHOSE
l.--:\
,.r
I
2.At idie, make sure there is a clicking sound from the
PCV valve when the hose between PCV valve and
intake manilold in lightly pinched with your fingers
or plters.
lf there is no clicking sound, check the PCV valve
grommet for cracks and damage. lf the grommet is
OK, reolace the PCV valve and recheck.
Gently pinch here.
Page 370 of 1681
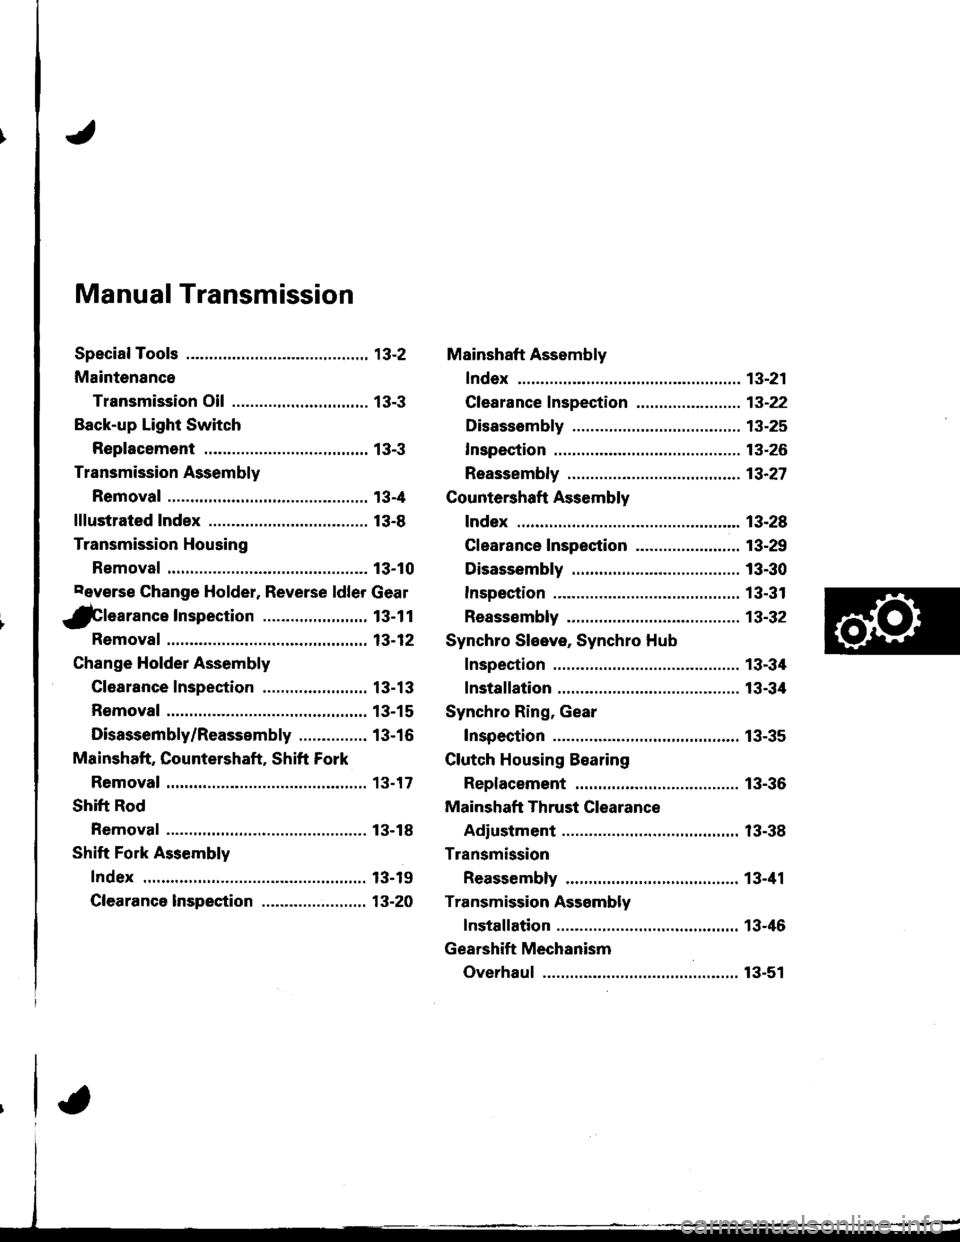
Manual Transmission
Special Tools ............. 13-2
Maintenance
Transmission Oil .............................. 13-3
Back-up Light Switch
Replacement ......... 13-3
Transmission Assembly
Removal ................. 13-4
lllustrated Index ................................... 13-8
Transmission Housing
Removal ................. 13-10
Peverse Change Holder, Reverse ldler Gear
jGlearance Inspection ....................... 13-1 1
Removal ................. 13-12
Change Holder Assembly
Clearance Inspection .....,.,....,,.....,,.. 13-13
Removal ................. 13-15
Disassembly/Reassembly ............... 13-16
Mainshaft, Countershaft, Shift Fork
Removal ................. 13-17
Shift Rod
Removal ................. 13-18
Shift Fork Assembly
Index ................ ...... 13-19
Clearance lnspection ...................,.,. 13-20
Mainshaft Assembly
fndex ................ ......13-21
Clearance f nspection ..,,,.................. 13-22
Disassembly .......... 13-25
Inspection .............. 13-26
Reassembly ........... 13-21
Countershaft Assembly
Index ................ ...... 13-28
Clearance Inspection ....................... 13-29
Disassembly .......... 13-30
Inspestion .............. 13-31
Reassembly ........... 13-32
Synchro Sleeve, Synchro Hub
Inspection .............. 13-34
Installation ............. 13-34
Synchro Ring, Gear
Inspection .............. 13-35
Clutch Housing Bearing
Replacement ......... 13-36
Mainshaft Thrust Clearance
Adiustment ............ 13-38
Transmission
Reassembly ........... 13-41
Transmission Assembly
Installation ............. 13-46
Gearshift Mechanism
Overhaul ................ 13-51
Page 372 of 1681
aintenance
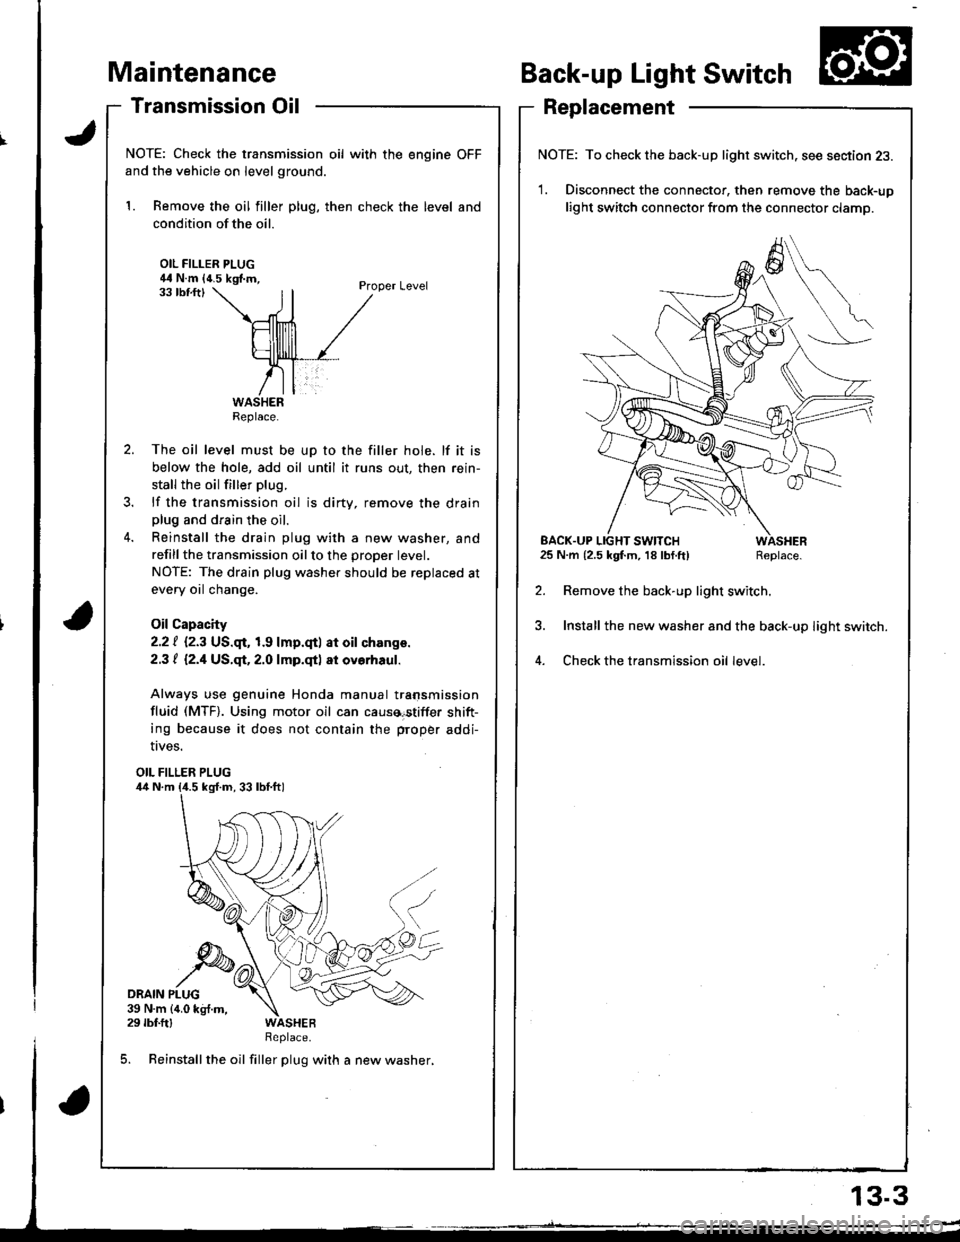
Transmission Oil
NOTE: Check the transmission oil with the engine OFF
and the vehicle on level ground.
1. Remove the oil filler plug, then check the level and
condition of the oil.
OIL FILLER PLUG44 N.m {4.5 kgf.m,Proper Level33 tbf.ftl
The oil level must be up to the filler hole. lf it is
below the hole, add oil until it runs out, then rein-
stall the oil filler plug.
lf the transmission oil is dirty, remove the drainplug and drain the oil.
Reinstall the drain plug with a new washer, and
refillthe transmission oilto the proper tevet.
NOTE: The drain plug washer should be replaced at
every oil change.
Oil Capacity
2.2 | i.2.3 US.qr,1.9 lmp.qtl at oil ch.nge.
2.3 t l2.1US.qt,2.O lmp.qtl at ovorhaul.
Always use genuine Honda manual transmission
fluid (MTF). Using motor oil can causa€tiffer shift-
ing because it does not contain the proper addi-
Back-up Light Switch
Replacement
NOTE: To check the back-up light switch. see section 23.
1. Disconnect the connector, then remove the back-up
light switch connector from the connector clamp.
l.m {2.5 kgf.m, 18lbf.ft) Replace.
Remove the back-up light switch.
Install the new washer and the back-up light switch.
Check the transmission oil level.
!ves.
OIL FILLER PLUG
DRAIN PLUG39 N.m {4.0 kg{.m,29 rbf.ftlReplace.
5. Reinstall the oil filler plug with a new washer,
Replace.
EACK.UP LIGHT SWITCH25 N.m {2.5 kgf.m, 18 lbf.ft)
13.3
Page 373 of 1681
Transmission Assembly
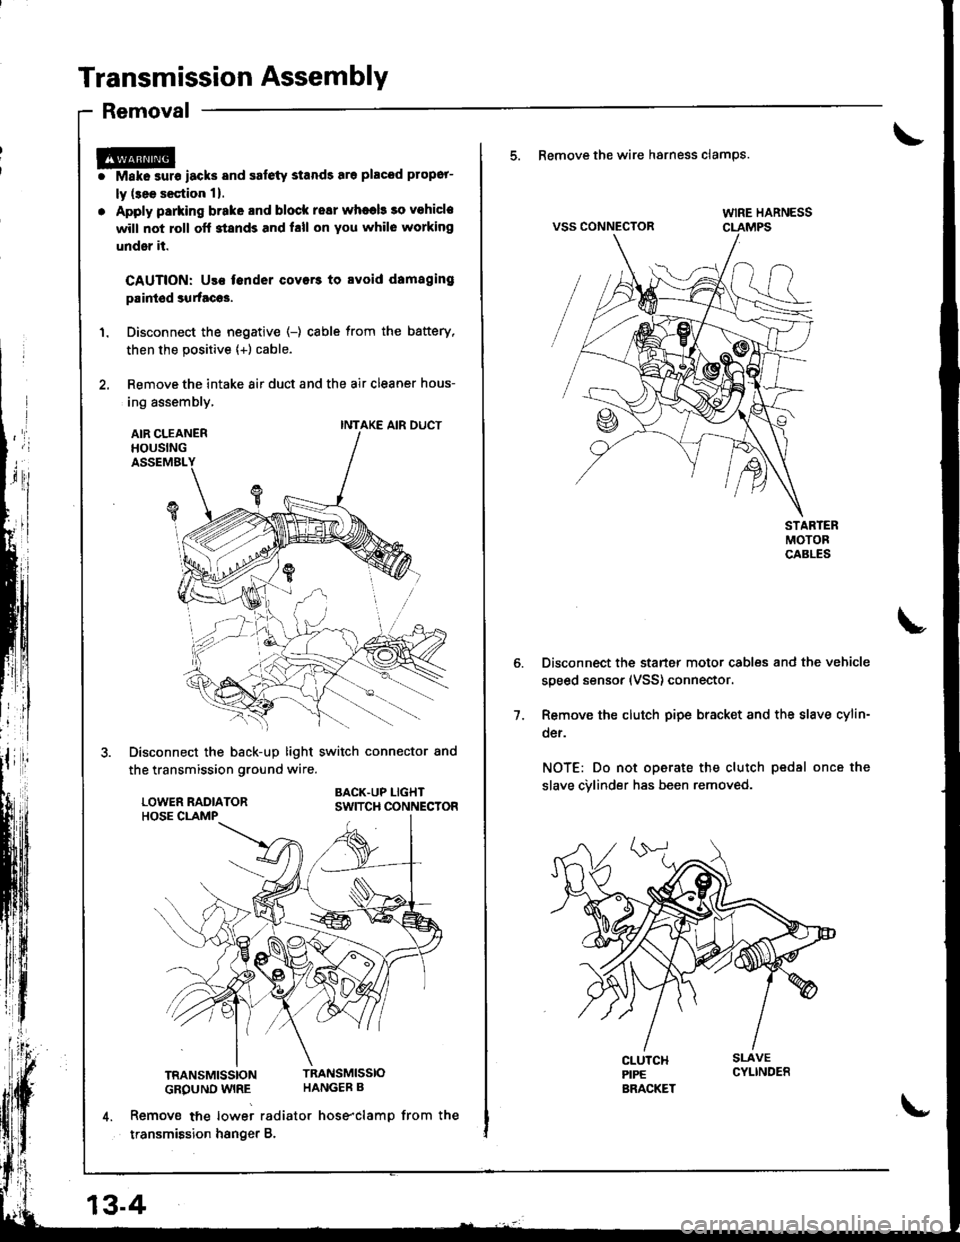
Removal
r@i Make surs iacks and safety stands sro placod propor-
ly (3ee s€ction 1).
. Apply parking brake and block resr whaeb 30 vohicle
will not roll off stands and hll on You whil6 working
under it.
CAUTION: Use fender covers to svoid damaging
paintod surtacos.
1. Disconnect the negative (-) cable from the battery,
then the positive {+) cable.
2. Remove the intake 8ir duct and the air cleaner hous-
ing assembly,
AIR CLEANERHOUSINGASSEMBL
Disconnect the back-up light switch connector and
the transmission ground wire.
BACK.UP LIGHTSWITCH CONNECTOR
TRANSMISSIONTRANSMISSIO
GROUND WIRE HANGEB B
4. Remove tne lowei radiator hose"clamp from the
transmission hsnger B.
INTAKE AIR DUCT
13-4
\-
5. Remove the wire hsrness clamps.
VSS CONNECTOR
Disconnect the starter motor cables and the vehicle
speed sensor (VSS) connector.
Remove the clutch pipe bracket and the slave cylin-
der.
NOT€: Do not operate the clutch pedsl once the
slave cvlinder has been removed.
7.
Page 376 of 1681
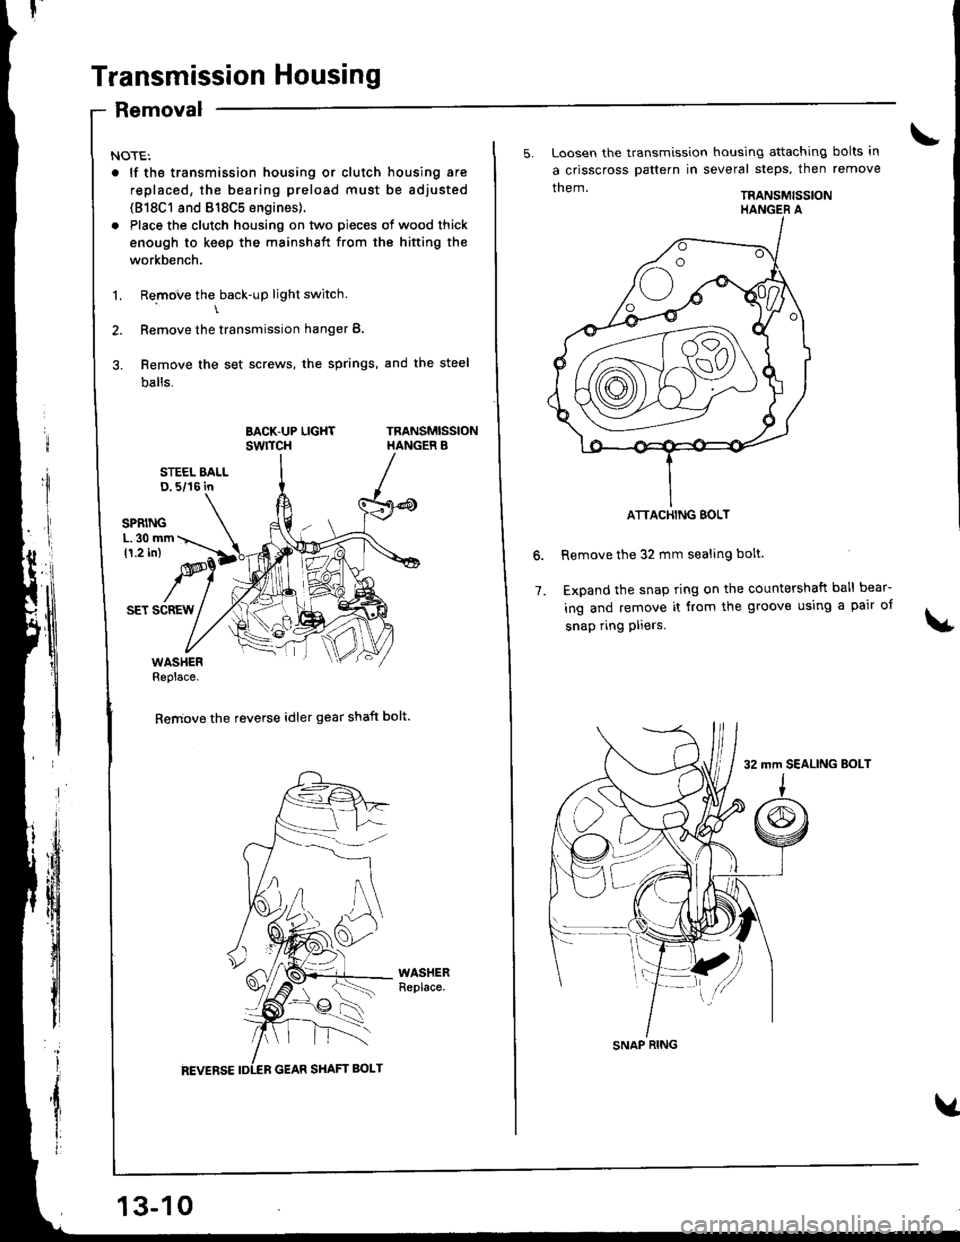
Transmission Housing
Removal
NOTE:
. lf tho transmission housing or clutch housing are
replaced, the bearing preload must be adjusted
(818C1 8nd 818C5 engines).
. Place the clutch housing on two pieces of wood thick
enough to keep the mainshaft from the hifting the
workbench.
1. Remove the back-up light switch.\
2. Remove the transmission hanger B.
3. Remove the set screws, the springs, and the steel
balls.
BACK-UP LIGHTswrTcHTRANSMISSIONHANGER B
STEEL BALLD. 5/16 in
SET SCREW
WASHERReplace.
Remove the reverse idler gear shaft bolt.
13-10
5. Loosen the transmission housing attaching bolts in
a crisscross pattern in several steps, then remove
them.TRANSMISSION
Remove the 32 mm sealing bolt.
Expand the snap ring on the countershaft ball bear-
ing and remove it from the groove using a pair of
snap ring pliers.
6.
7.
ATTACHING BOLT
SNAP RING
32 mm SEALING BoLT
Page 410 of 1681
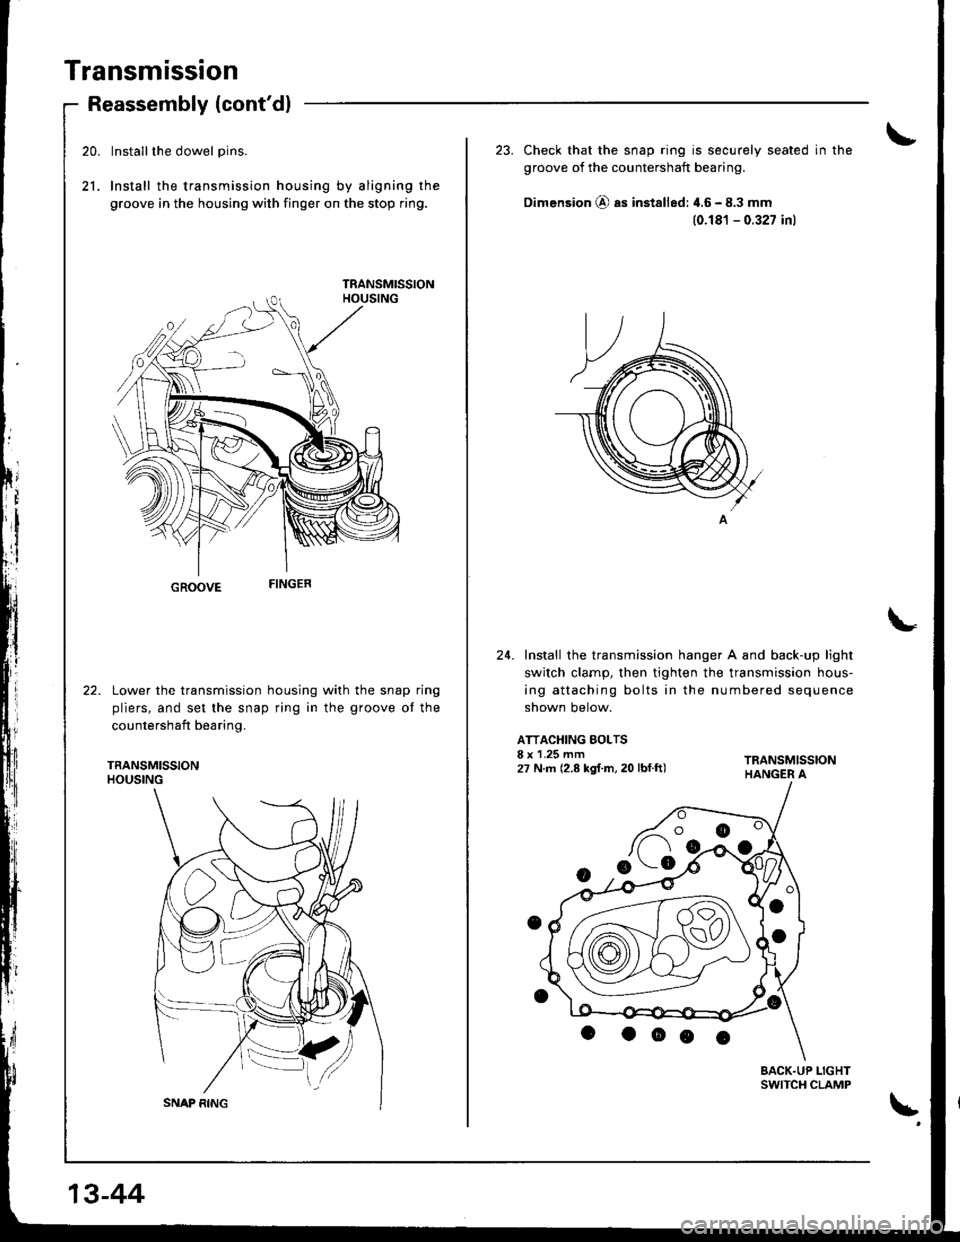
Transmission
20.
21.
Reassembly (cont'dl
Installthe dowel pins.
Install the transmission housing by aligning the
groove in the housing with finger on the stop ring.
GROOVE
Lower the transmission housing with the snap ring
pliers, and set the snap ring in the groove of the
countershaft bearing.
TRANSMISSIONHOUSING
13-44
23. Check that the snap ring is securely seated in the
groove of the countershaft bearing.
Dimension @ as installed: 4.6 - 8.3 mm
(0.181 - 0.327 inl
24. Install the transmission hanger A and back-up light
switch clarnp, then tighten the transmission hous-
ing attaching bolts in the numbered sequence
shown below.
ATTACHING BOLTSI x 1.25 mm27 N.m (2.8 kgf.m, 20 lbf.ft)
BACK.UP LIGHTSWITCH CLAMP
\'