display HONDA ODYSSEY 2013 RC1-RC2 / 5.G Navigation Manual
[x] Cancel search | Manufacturer: HONDA, Model Year: 2013, Model line: ODYSSEY, Model: HONDA ODYSSEY 2013 RC1-RC2 / 5.GPages: 267, PDF Size: 8.64 MB
Page 180 of 267
178
Bluetooth® HandsFreeLink®
Setting Up Speed Dialing
Bluetooth ® HandsFreeLink®
Setting Up Speed DialingHPHONE button
PHONE SETUP
Edit Speed Dial
Store Speed Dial
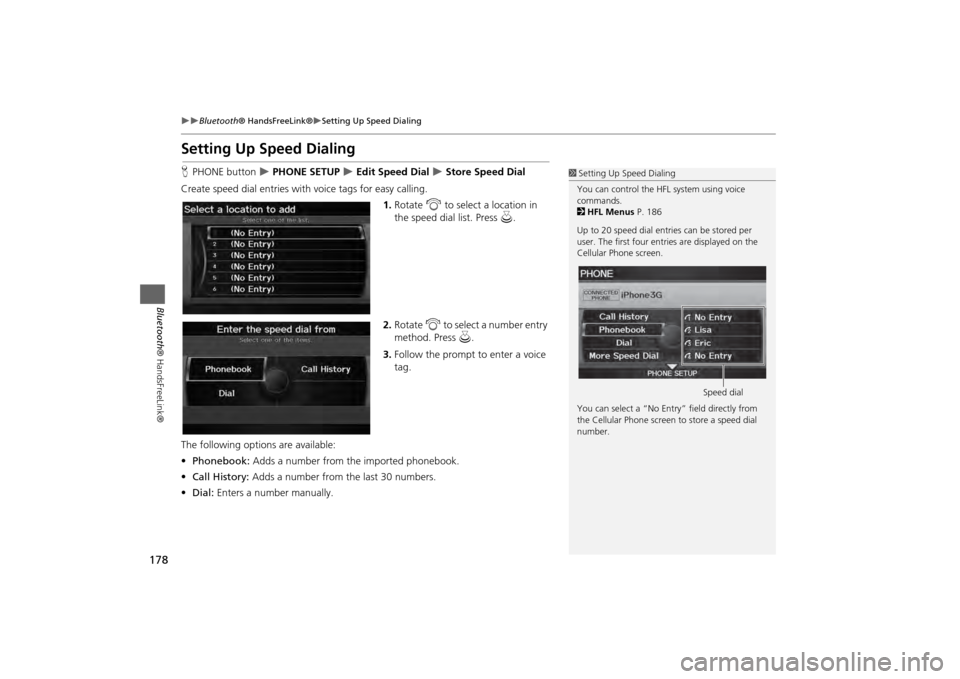
Create speed dial entries with voice tags for easy calling.
1.Rotate i to select a location in
the speed dial list. Press u.
2. Rotate i to select a number entry
method. Press u.
3. Follow the prompt to enter a voice
tag.
The following options are available:
• Phonebook: Adds a number from the imported phonebook.
• Call History: Adds a number from the last 30 numbers.
• Dial: Enters a number manually.
1Setting Up Speed Dialing
You can control the HFL system using voice
commands.
2 HFL Menus P. 186
Up to 20 speed dial entries can be stored per
user. The first four entri es are displayed on the
Cellular Phone screen.
You can select a “No Entr y” field directly from
the Cellular Phone screen to store a speed dial
number.
Speed dial
Page 185 of 267
183
Bluetooth® HandsFreeLink®
Making a Call
Bluetooth® HandsFreeLink®
HPHONE button
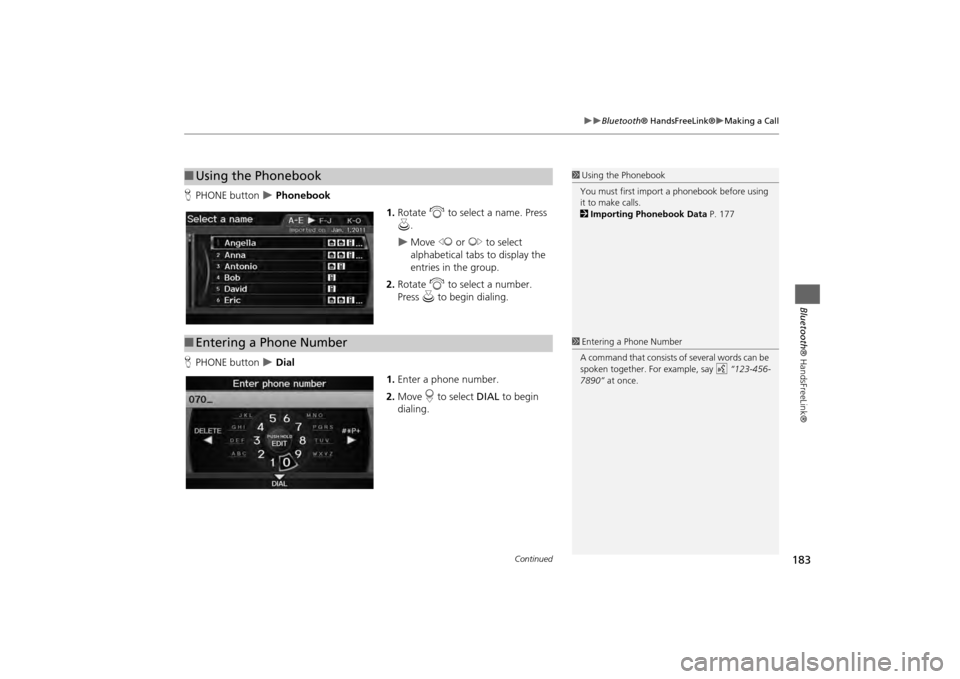
Phonebook
1.Rotate i to select a name. Press
u .
Move w or y to select
alphabetical tabs to display the
entries in the group.
2. Rotate i to select a number.
Press u to begin dialing.
H PHONE button
Dial
1.Enter a phone number.
2. Move r to select DIAL to begin
dialing.
■ Using the Phonebook
1 Using the Phonebook
You must first import a phonebook before using
it to make calls.
2 Importing Phonebook Data P. 177
■Entering a Phone Number
1 Entering a Phone Number
A command that consists of several words can be
spoken together. For example, say d “123-456-
7890” at once.
Continued
Page 187 of 267
185
Bluetooth® HandsFreeLink®
Receiving a Call
Bluetooth® HandsFreeLink®
Receiving a Call
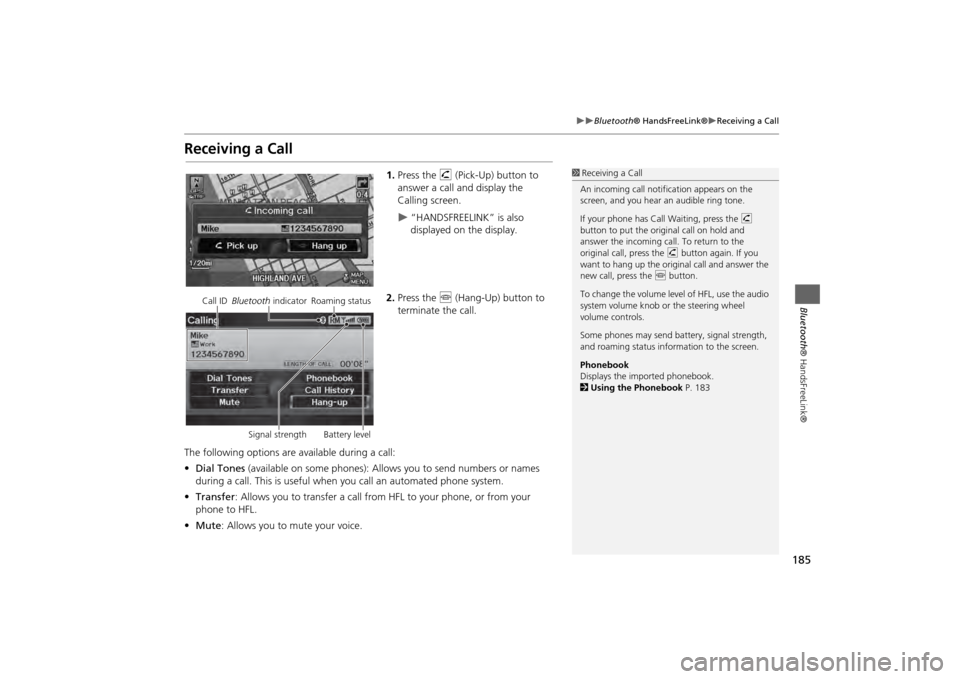
1.Press the h (Pick-Up) button to
answer a call and display the
Calling screen.
“HANDSFREELINK” is also
displayed on the display.
2. Press the j (Hang-Up) button to
terminate the call.
The following options are available during a call:
• Dial Tones (available on some phones): Allo ws you to send numbers or names
during a call. This is useful when you call an automated phone system.
• Transfer: Allows you to transfer a call from HF L to your phone, or from your
phone to HFL.
• Mute : Allows you to mute your voice.
1Receiving a Call
An incoming call notif ication appears on the
screen, and you hear an audible ring tone.
If your phone has Call Waiting, press the h
button to put the origin al call on hold and
answer the incoming call. To return to the
original call, press the h button again. If you
want to hang up the origin al call and answer the
new call, press the j button.
To change the volume leve l of HFL, use the audio
system volume knob or the steering wheel
volume controls.
Some phones may send battery, signal strength,
and roaming status information to the screen.
Phonebook
Displays the imported phonebook.
2 Using the Phonebook P. 183
Call ID Bluetooth indicator Roaming status
Signal strength Battery level
Page 188 of 267
186
Bluetooth® HandsFreeLink®
HFL Menus
Bluetooth ® HandsFreeLink®
HFL MenusUse HFL when the vehicle’s ig nition is in the ACCESSORY (I) or ON (II) position.
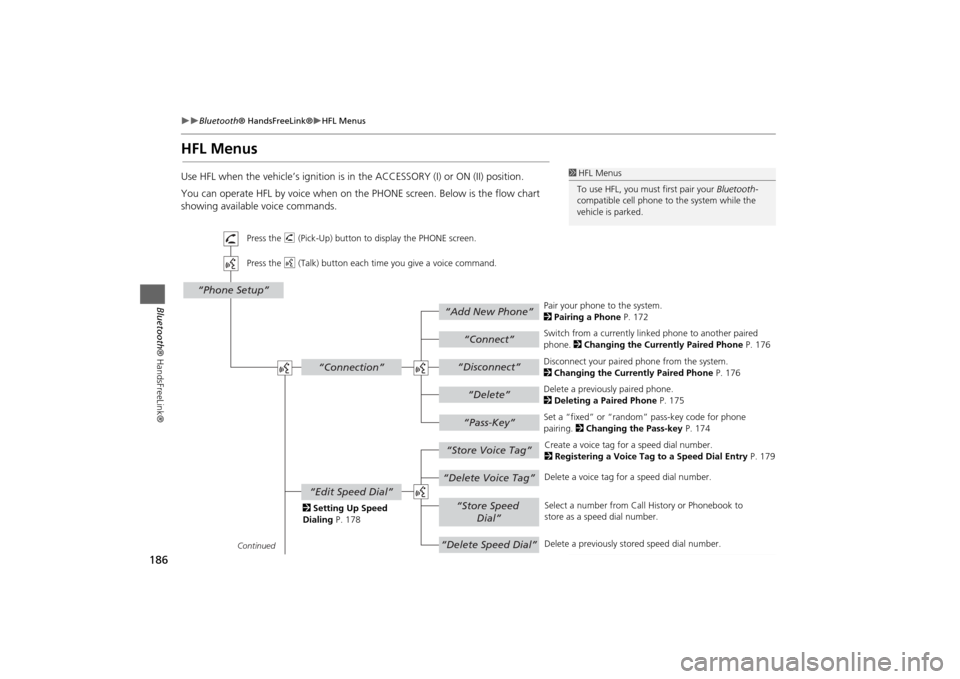
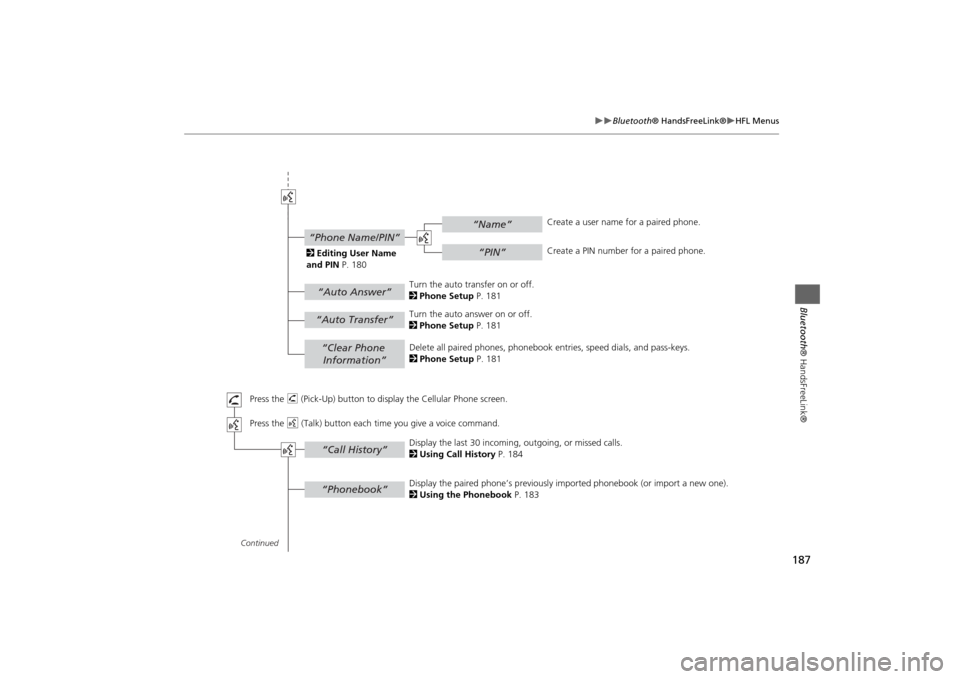
You can operate HFL by voice when on the PHONE screen. Below is the flow chart
showing available voice commands.
1 HFL Menus
To use HFL, you must first pair your Bluetooth-
compatible cell phone to the system while the
vehicle is parked.
“Add New Phone”
“Connect”“Pass-Key”
“Connection”
“Phone Setup”
“Disconnect”“Delete”
“Store Voice Tag”“Delete Voice Tag”
“Store Speed
Dial”
“Delete Speed Dial”
“Edit Speed Dial”
Continued Press the h (Pick-Up) button to display the PHONE screen.
Press the d (Talk) button each time you give a voice command.
Pair your phone to the system.
2Pairing a Phone P. 172
Set a “fixed” or “random” pass-key code for phone
pairing. 2Changing the Pass-key P. 174
Delete a previously paired phone.
2
Deleting a Paired Phone P. 175
Switch from a currently lin
ked phone to another paired
phone. 2 Changing the Currently Paired Phone P. 176
Disconnect your paired phone from the system.
2 Changing the Currently Paired Phone P. 176
Create a voice tag for a speed dial number.
2 Registering a Voice Tag to a Speed Dial Entry P. 179
Delete a voice tag fo r a speed dial number.
Select a number from Call History or Phonebook to
store as a speed dial number.
Delete a previously st ored speed dial number.
2
Setting Up Speed
Dialing P. 178
Page 189 of 267
187
Bluetooth® HandsFreeLink®
HFL Menus
Bluetooth ® HandsFreeLink®
“Clear Phone
Information”“Phonebook”“Call History”
“Name”“PIN”
“Phone Name/PIN”“Auto Answer”
“Auto Transfer”
Continued Press the h (Pick-Up) button to display the Cellular Phone screen.
Press the d (Talk) button each time you give a voice command.Delete all paired phones, phonebook entries, speed dials, and pass-keys.
2 Phone Setup P. 181
Display the paired phone’s previously imported phonebook (or import a new one).
2 Using the Phonebook P. 183
Display the last 30 incoming,
outgoing, or missed calls.
2 Using Call History P. 184
Turn the auto transfer on or off.
2
Phone Setup P. 181
Turn the auto answer on or off.
2 Phone Setup P. 181
2
Editing User Name
and PIN P. 180 Create a user name for a paired phone.
Create a PIN number for a paired phone.
Page 190 of 267
188
Bluetooth® HandsFreeLink®
HFL Menus
Bluetooth ® HandsFreeLink®
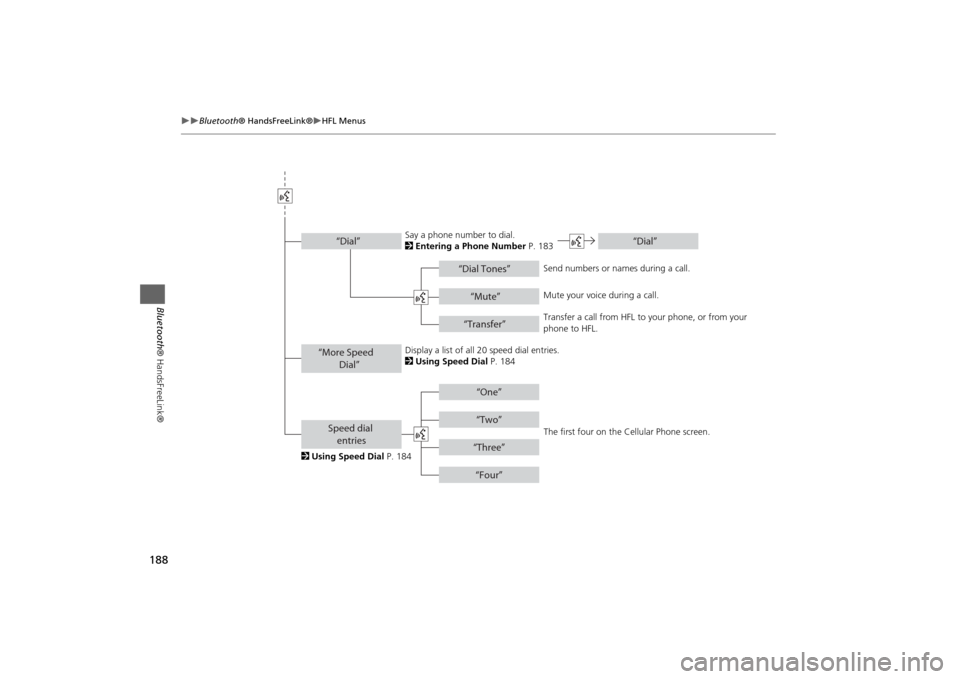
“Dial Tones”
“Dial”
“Mute”“Transfer”
“One”“Two”“Three”“Four”
“More Speed
Dial”Speed dial entries“Dial”
The first four on the Cellular Phone screen.
Display a list of all 20 speed dial entries.
2
Using Speed Dial P. 184
2 Using Speed Dial P. 184 Send numbers or na
mes during a call.
Say a phone number to dial.
2
Entering a Phone Number P. 183
Mute your voice during a call.
Transfer a call from HFL to your phone, or from your
phone to HFL.
Page 192 of 267
190Rear Entertainment System
Rear Entertainment SystemThe Rear Entertainment System (RES) is operable from both the front control panel
and the rear control panel.2Front Control Panel Operation
P. 203
2Rear Control Panel Operation
P. 192
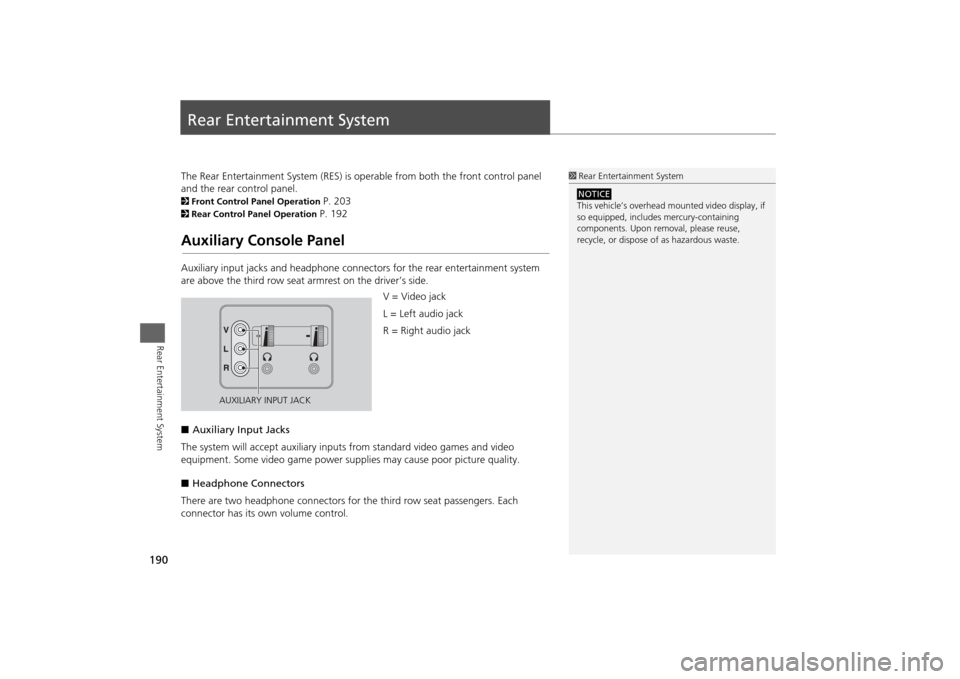
Auxiliary Console PanelAuxiliary input jacks and headphone connectors for the rear entertainment system
are above the third row seat a rmrest on the driver’s side.
V = Video jack
L = Left audio jack
R = Right audio jack
■ Auxiliary Input Jacks
The system will accept auxiliary input s from standard video games and video
equipment. Some video game power su pplies may cause poor picture quality.
■ Headphone Connectors
There are two headphone connectors for the third row seat passengers. Each
connector has its own volume control.
1 Rear Entertainment System
This vehicle’s overhead m ounted video display, if
so equipped, include s mercury-containing
components. Upon removal, please reuse,
recycle, or dispose of as hazardous waste.NOTICE
AUXILIARY INPUT JACK
Page 194 of 267
192Rear Entertainment System
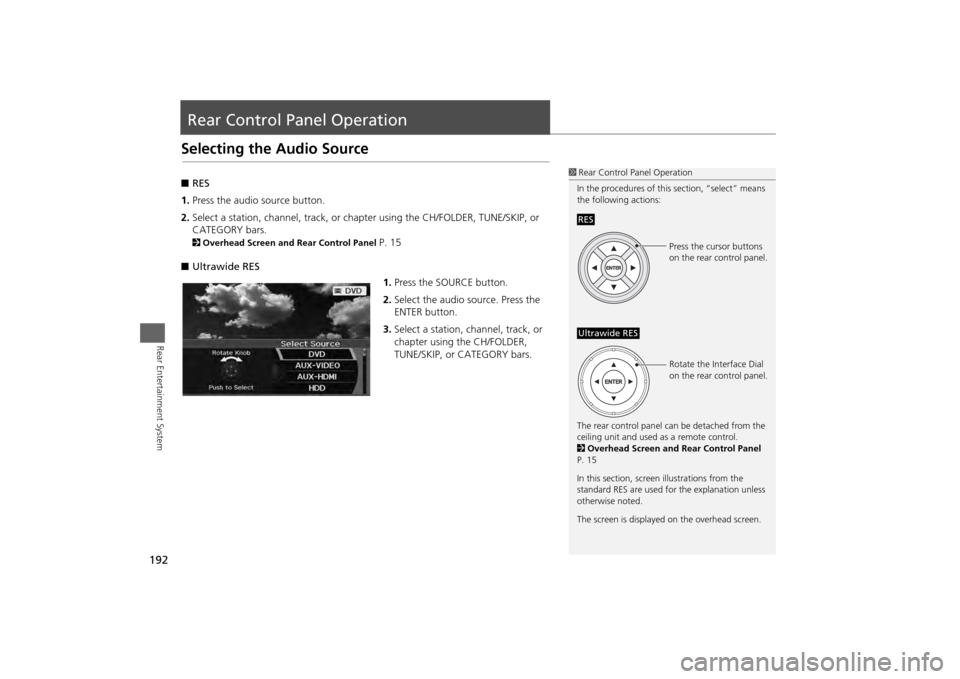
Rear Control Panel OperationSelecting the Audio Source■RES
1. Press the audio source button.
2. Select a station, channel, track, or ch apter using the CH/FOLDER, TUNE/SKIP, or
CATEGORY bars.2 Overhead Screen and Rear Control Panel
P. 15
■ Ultrawide RES
1.Press the SOURCE button.
2. Select the audio source. Press the
ENTER button.
3. Select a station, channel, track, or
chapter using the CH/FOLDER,
TUNE/SKIP, or CATEGORY bars.
1Rear Control Panel Operation
In the procedures of this section, “select” means
the following actions:
The rear control panel ca n be detached from the
ceiling unit and used as a remote control.
2 Overhead Screen and Rear Control Panel
P. 15
In this section, screen illustrations from the
standard RES are used for the explanation unless
otherwise noted.
The screen is displayed on the overhead screen.RES
Press the cursor buttons
on the rear control panel.
Ultrawide RES
Rotate the Interface Dial
on the rear control panel.
Page 195 of 267
193
Rear Control Panel Operation
Rear DVD Menu
Rear Entertainment System
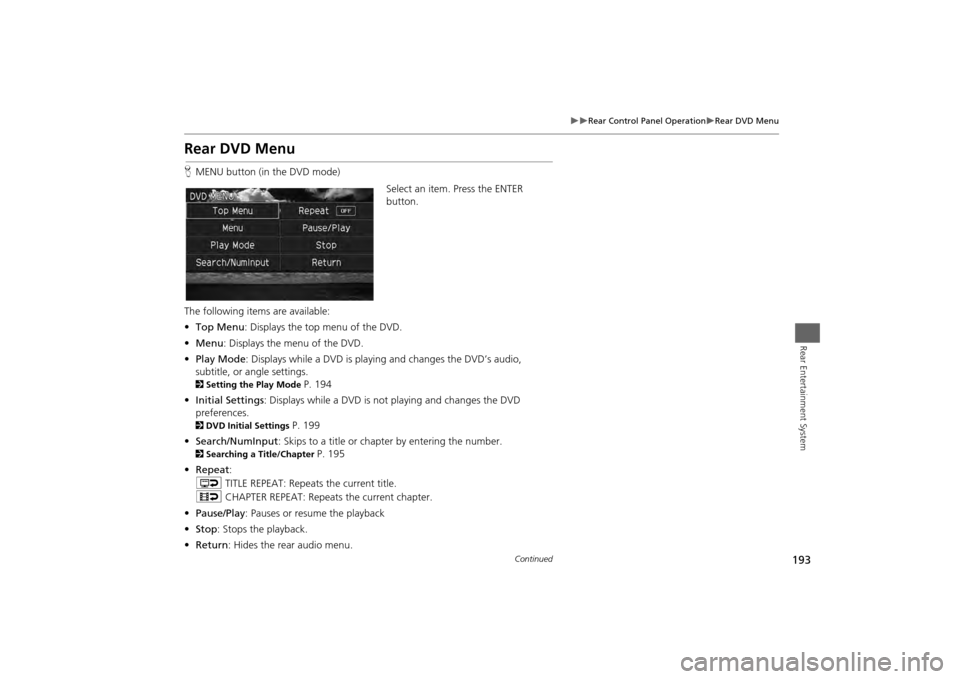
Rear DVD MenuHMENU button (in the DVD mode)
Select an item. Press the ENTER
button.
The following items are available:
• Top Menu : Displays the top menu of the DVD.
• Menu : Displays the menu of the DVD.
• Play Mode : Displays while a DVD is playing and changes the DVD’s audio,
subtitle, or angle settings.2 Setting the Play Mode
P. 194
• Initial Settings : Displays while a DVD is not playing and changes the DVD
preferences.
2 DVD Initial Settings
P. 199
• Search/NumInput : Skips to a title or chapter by entering the number.
2Searching a Title/Chapter
P. 195
• Repeat :
o TITLE REPEAT: Repeats the current title.
p CHAPTER REPEAT: Repeats the current chapter.
• Pause/Play : Pauses or resume the playback
• Stop : Stops the playback.
• Return: Hides the rear audio menu.
Continued
Page 198 of 267
196
Rear Control Panel Operation
Screen and Surround Settings
Rear Entertainment System
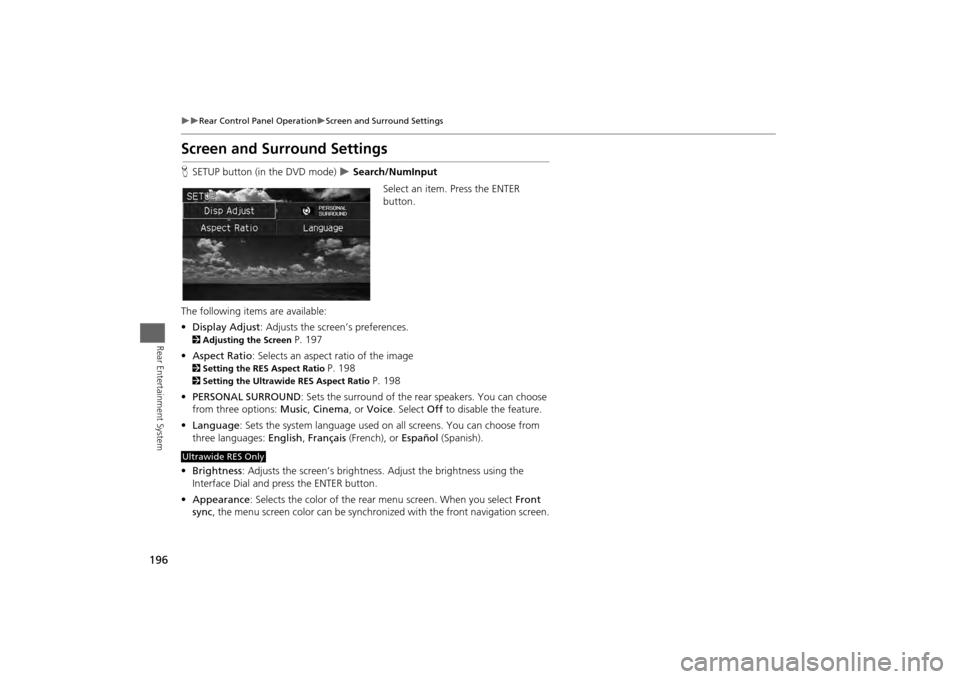
Screen and Surround SettingsHSETUP button (in the DVD mode)
Search/NumInput
Select an item. Press the ENTER
button.
The following item s are available:
• Display Adjust : Adjusts the screen’s preferences.
2Adjusting the Screen
P. 197
• Aspect Ratio : Selects an aspect ratio of the image
2Setting the RES Aspect Ratio
P. 198
2Setting the Ultrawide RES Aspect Ratio
P. 198
• PERSONAL SURROUND : Sets the surround of the rear speakers. You can choose
from three options: Music, Cinema , or Voice . Select Off to disable the feature.
• Language : Sets the system language used on all screens. You can choose from
three languages: English, Français (French), or Español (Spanish).
• Brightness : Adjusts the screen’s brightness. Adjust the brightness using the
Interface Dial and press the ENTER button.
• Appearance : Selects the color of the rear menu screen. When you select Front
sync , the menu screen color can be synchronized with the front navigation screen.
Ultrawide RES Only