Hyundai Atos 2002 Manual Online
Manufacturer: HYUNDAI, Model Year: 2002, Model line: Atos, Model: Hyundai Atos 2002Pages: 249, PDF Size: 3.11 MB
Page 81 of 249
WHAT TO DO IN AN EMERGENCY
WHAT TO DO IN AN EMERGENCY WHAT TO DO IN AN EMERGENCY
WHAT TO DO IN AN EMERGENCY
WHAT TO DO IN AN EMERGENCY
3-4 D060A01A-AAT
CHANGING A FLAT TIRE
CHANGING A FLAT TIRE CHANGING A FLAT TIRE
CHANGING A FLAT TIRE
CHANGING A FLAT TIRE
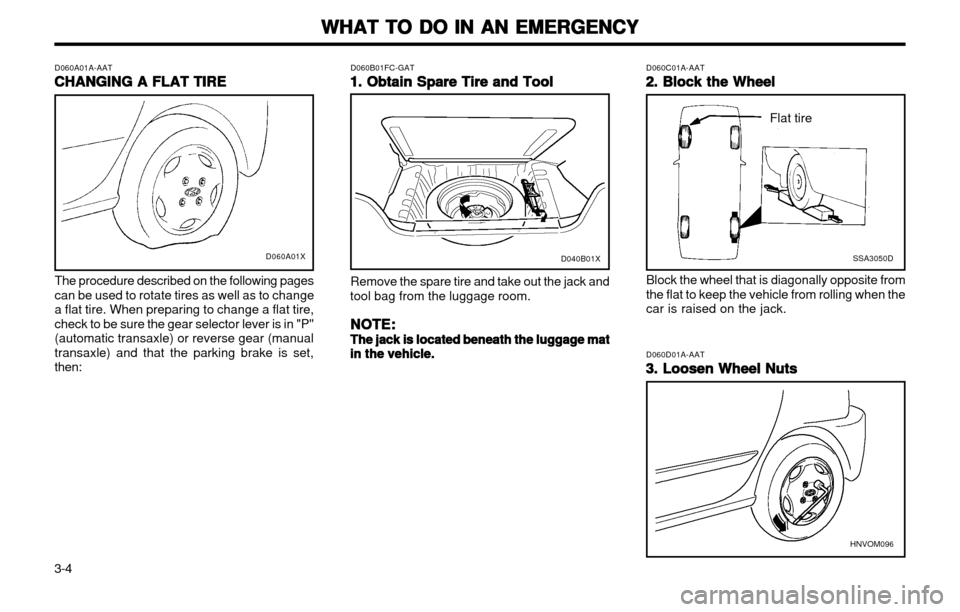
The procedure described on the following pages can be used to rotate tires as well as to change
a flat tire. When preparing to change a flat tire,check to be sure the gear selector lever is in "P"(automatic transaxle) or reverse gear (manualtransaxle) and that the parking brake is set,then: D060B01FC-GAT
1. Obtain Spare Tire and Tool
1. Obtain Spare Tire and Tool 1. Obtain Spare Tire and Tool
1. Obtain Spare Tire and Tool
1. Obtain Spare Tire and Tool
Remove the spare tire and take out the jack and
tool bag from the luggage room.
NOTE:
NOTE: NOTE:
NOTE:
NOTE:
The jack is located beneath the luggage mat
The jack is located beneath the luggage mat The jack is located beneath the luggage mat
The jack is located beneath the luggage mat
The jack is located beneath the luggage mat in the vehicle.
in the vehicle. in the vehicle.
in the vehicle.
in the vehicle. Block the wheel that is diagonally opposite from the flat to keep the vehicle from rolling when thecar is raised on the jack.
D060C01A-AAT
2. Block the Wheel
2. Block the Wheel 2. Block the Wheel
2. Block the Wheel
2. Block the Wheel
SSA3050D
Flat tire
D060D01A-AAT 3. Loosen Wheel Nuts
3. Loosen Wheel Nuts 3. Loosen Wheel Nuts
3. Loosen Wheel Nuts
3. Loosen Wheel Nuts
D060A01X
HNVOM096
D040B01X
Page 82 of 249
WHAT TO DO IN AN EMERGENCY
WHAT TO DO IN AN EMERGENCY WHAT TO DO IN AN EMERGENCY
WHAT TO DO IN AN EMERGENCY
WHAT TO DO IN AN EMERGENCY
3-5
Wheel nut Wrench
The wheel nuts should be loosened slightly
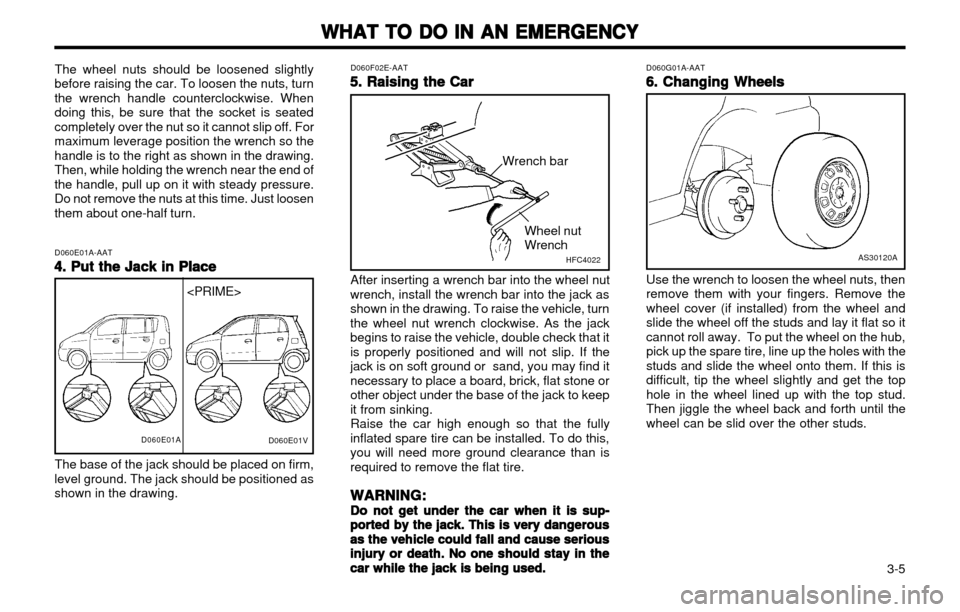
before raising the car. To loosen the nuts, turnthe wrench handle counterclockwise. Whendoing this, be sure that the socket is seatedcompletely over the nut so it cannot slip off. Formaximum leverage position the wrench so thehandle is to the right as shown in the drawing.Then, while holding the wrench near the end ofthe handle, pull up on it with steady pressure.Do not remove the nuts at this time. Just loosenthem about one-half turn.
D060E01A-AAT4. Put the Jack in Place
4. Put the Jack in Place 4. Put the Jack in Place
4. Put the Jack in Place
4. Put the Jack in Place
The base of the jack should be placed on firm,
level ground. The jack should be positioned asshown in the drawing. D060F02E-AAT
5. Raising the Car
5. Raising the Car 5. Raising the Car
5. Raising the Car
5. Raising the Car D060G01A-AAT
6. Changing Wheels
6. Changing Wheels 6. Changing Wheels
6. Changing Wheels
6. Changing Wheels
AS30120A
After inserting a wrench bar into the wheel nut
wrench, install the wrench bar into the jack as shown in the drawing. To raise the vehicle, turnthe wheel nut wrench clockwise. As the jackbegins to raise the vehicle, double check that itis properly positioned and will not slip. If thejack is on soft ground or sand, you may find itnecessary to place a board, brick, flat stone orother object under the base of the jack to keepit from sinking. Raise the car high enough so that the fully
inflated spare tire can be installed. To do this,you will need more ground clearance than isrequired to remove the flat tire.
WARNING:
WARNING: WARNING:
WARNING:
WARNING:
Do not get under the car when it is sup-
Do not get under the car when it is sup- Do not get under the car when it is sup-
Do not get under the car when it is sup-
Do not get under the car when it is sup- ported by the jack. This is very dangerous
ported by the jack. This is very dangerous ported by the jack. This is very dangerous
ported by the jack. This is very dangerous
ported by the jack. This is very dangerous
as the vehicle could fall and cause serious
as the vehicle could fall and cause serious as the vehicle could fall and cause serious
as the vehicle could fall and cause serious
as the vehicle could fall and cause serious
injury or death. No one should stay in the
injury or death. No one should stay in the injury or death. No one should stay in the
injury or death. No one should stay in the
injury or death. No one should stay in the
car while the jack is being used.
car while the jack is being used. car while the jack is being used.
car while the jack is being used.
car while the jack is being used. Use the wrench to loosen the wheel nuts, then remove them with your fingers. Remove thewheel cover (if installed) from the wheel andslide the wheel off the studs and lay it flat so itcannot roll away. To put the wheel on the hub,pick up the spare tire, line up the holes with thestuds and slide the wheel onto them. If this isdifficult, tip the wheel slightly and get the tophole in the wheel lined up with the top stud.Then jiggle the wheel back and forth until thewheel can be slid over the other studs.
D060E01A
D060E01V
HFC4022
Wrench bar
Page 83 of 249
WHAT TO DO IN AN EMERGENCY
WHAT TO DO IN AN EMERGENCY WHAT TO DO IN AN EMERGENCY
WHAT TO DO IN AN EMERGENCY
WHAT TO DO IN AN EMERGENCY
3-6
AS30130A
WARNING:
WARNING: WARNING:
WARNING:
WARNING:
Wheel covers may have sharp edges. Han-
Wheel covers may have sharp edges. Han- Wheel covers may have sharp edges. Han-
Wheel covers may have sharp edges. Han-
Wheel covers may have sharp edges. Han- dle them carefully to avoid possible severe
dle them carefully to avoid possible severe dle them carefully to avoid possible severe
dle them carefully to avoid possible severe
dle them carefully to avoid possible severe
injury.
injury. injury.
injury.
injury.
Before putting the wheel into place, be sure
Before putting the wheel into place, be sure Before putting the wheel into place, be sure
Before putting the wheel into place, be sure
Before putting the wheel into place, be surethat there is nothing on the hub or wheel
that there is nothing on the hub or wheel that there is nothing on the hub or wheel
that there is nothing on the hub or wheel
that there is nothing on the hub or wheel
(such as mud, tar, gravel, etc.) that inter-
(such as mud, tar, gravel, etc.) that inter- (such as mud, tar, gravel, etc.) that inter-
(such as mud, tar, gravel, etc.) that inter-
(such as mud, tar, gravel, etc.) that inter-
feres with the wheel fitting solidly against
feres with the wheel fitting solidly against feres with the wheel fitting solidly against
feres with the wheel fitting solidly against
feres with the wheel fitting solidly against
the hub. If there is, remove it. If there is not
the hub. If there is, remove it. If there is not the hub. If there is, remove it. If there is not
the hub. If there is, remove it. If there is not
the hub. If there is, remove it. If there is not
good contact on the mounting surface be-
good contact on the mounting surface be- good contact on the mounting surface be-
good contact on the mounting surface be-
good contact on the mounting surface be-
tween the wheel and hub, the wheel nuts
tween the wheel and hub, the wheel nuts tween the wheel and hub, the wheel nuts
tween the wheel and hub, the wheel nuts
tween the wheel and hub, the wheel nuts
could come loose and cause the loss of a
could come loose and cause the loss of a could come loose and cause the loss of a
could come loose and cause the loss of a
could come loose and cause the loss of a
wheel. Loss of a wheel may result in loss of
wheel. Loss of a wheel may result in loss of wheel. Loss of a wheel may result in loss of
wheel. Loss of a wheel may result in loss of
wheel. Loss of a wheel may result in loss of
control of the vehicle. This may cause seri-
control of the vehicle. This may cause seri- control of the vehicle. This may cause seri-
control of the vehicle. This may cause seri-
control of the vehicle. This may cause seri-
ous injury or death.
ous injury or death. ous injury or death.
ous injury or death.
ous injury or death. D060I01E-GAT
8. Lower Vehicle and Tighten Nuts
8. Lower Vehicle and Tighten Nuts 8. Lower Vehicle and Tighten Nuts
8. Lower Vehicle and Tighten Nuts
8. Lower Vehicle and Tighten Nuts
D060H01A-AAT
7. Re-install Wheel Nuts
7. Re-install Wheel Nuts 7. Re-install Wheel Nuts
7. Re-install Wheel Nuts
7. Re-install Wheel Nuts
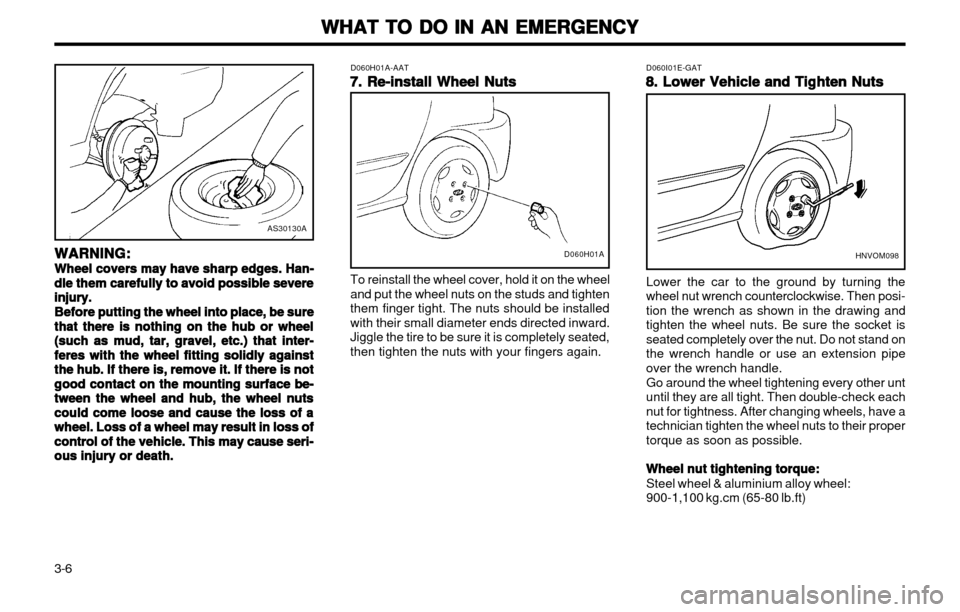
To reinstall the wheel cover, hold it on the wheel and put the wheel nuts on the studs and tightenthem finger tight. The nuts should be installedwith their small diameter ends directed inward.Jiggle the tire to be sure it is completely seated,then tighten the nuts with your fingers again. Lower the car to the ground by turning thewheel nut wrench counterclockwise. Then posi-tion the wrench as shown in the drawing andtighten the wheel nuts. Be sure the socket isseated completely over the nut. Do not stand onthe wrench handle or use an extension pipeover the wrench handle. Go around the wheel tightening every other unt until they are all tight. Then double-check eachnut for tightness. After changing wheels, have atechnician tighten the wheel nuts to their propertorque as soon as possible.
Wheel nut tightening torque:
Wheel nut tightening torque: Wheel nut tightening torque:
Wheel nut tightening torque:
Wheel nut tightening torque: Steel wheel & aluminium alloy wheel: 900-1,100 kg.cm (65-80 lb.ft)
D060H01AHNVOM098
Page 84 of 249
WHAT TO DO IN AN EMERGENCY
WHAT TO DO IN AN EMERGENCY WHAT TO DO IN AN EMERGENCY
WHAT TO DO IN AN EMERGENCY
WHAT TO DO IN AN EMERGENCY
3-7
D060J01FC-GAT
After Changing Wheels
After Changing Wheels After Changing Wheels
After Changing Wheels
After Changing Wheels
If you have a tire gauge, remove the valve cap
and check the air pressure. If the pressure is lower than recommended, drive slowly to thenearest service station and inflate to the correctpressure. If it is too high, adjust it until it iscorrect. Always reinstall the valve cap afterchecking or adjusting tire pressure. If the cap isnot replaced, air may leak from the tire. If youlose a valve cap, buy another and install it assoon as possible.
After you have changed wheels, always secure
the flat tire in its place in the luggage room andreturn the jack and tools to their proper storagelocations. D080A01A-GAT
IF YOUR CAR MUST BE TOWED
IF YOUR CAR MUST BE TOWED IF YOUR CAR MUST BE TOWED
IF YOUR CAR MUST BE TOWED
IF YOUR CAR MUST BE TOWED D080B01A-AAT
Towing a Car With a Manual Transaxle
Towing a Car With a Manual Transaxle Towing a Car With a Manual Transaxle
Towing a Car With a Manual Transaxle
Towing a Car With a Manual Transaxle
o OK FOR AUTOMATIC OR MANUAL TRANSAXLE EQUIPPED VEHICLE WITH NO DAMAGE
o OK FOR AUTOMATIC OR MANUAL
TRANSAXLE EQUIPPED VEHICLE
CAUTION:
CAUTION: CAUTION:
CAUTION:
CAUTION:
Your car can be damaged if towed incor-
Your car can be damaged if towed incor- Your car can be damaged if towed incor-
Your car can be damaged if towed incor-
Your car can be damaged if towed incor-
rectly!
rectly! rectly!
rectly!
rectly!
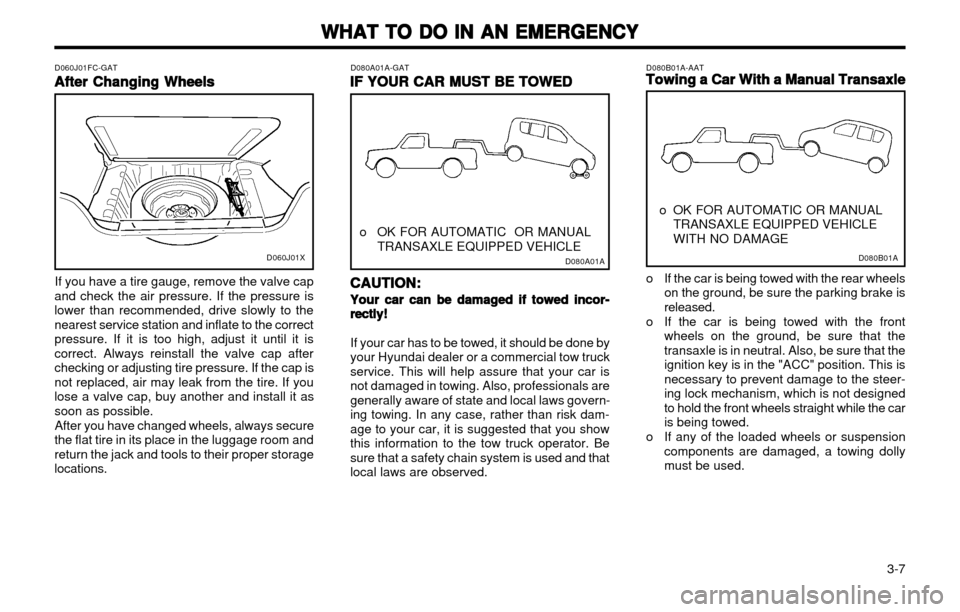
If your car has to be towed, it should be done by
your Hyundai dealer or a commercial tow truck service. This will help assure that your car isnot damaged in towing. Also, professionals aregenerally aware of state and local laws govern-ing towing. In any case, rather than risk dam-age to your car, it is suggested that you showthis information to the tow truck operator. Besure that a safety chain system is used and thatlocal laws are observed. o If the car is being towed with the rear wheels
on the ground, be sure the parking brake isreleased.
o If the car is being towed with the front wheels on the ground, be sure that thetransaxle is in neutral. Also, be sure that theignition key is in the "ACC" position. This isnecessary to prevent damage to the steer-ing lock mechanism, which is not designedto hold the front wheels straight while the caris being towed.
o If any of the loaded wheels or suspension components are damaged, a towing dollymust be used.
D080A01AD080B01AD060J01X
Page 85 of 249
WHAT TO DO IN AN EMERGENCY
WHAT TO DO IN AN EMERGENCY WHAT TO DO IN AN EMERGENCY
WHAT TO DO IN AN EMERGENCY
WHAT TO DO IN AN EMERGENCY
3-8 D080C02A-GAT
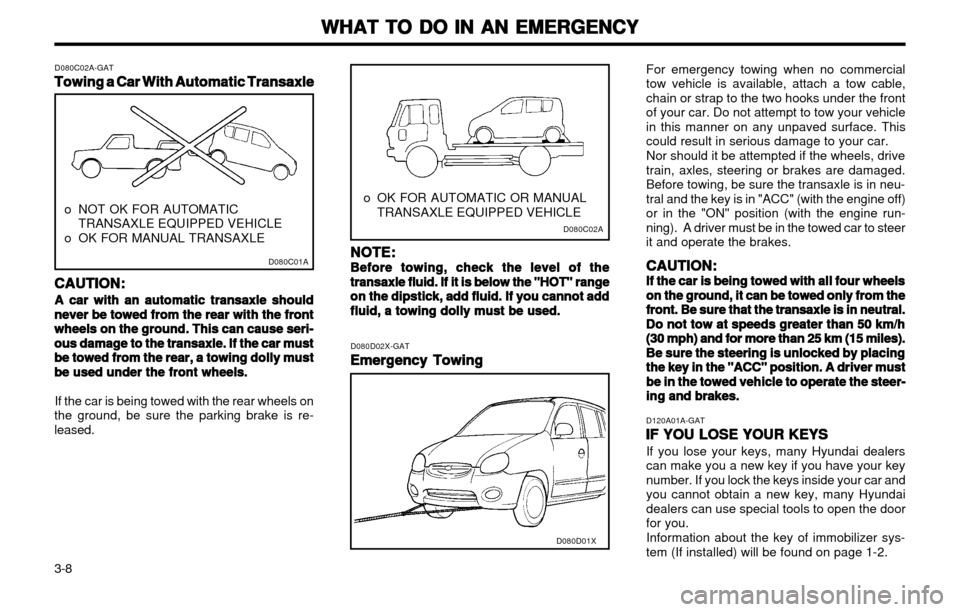
Towing a Car With Automatic Transaxle
Towing a Car With Automatic Transaxle Towing a Car With Automatic Transaxle
Towing a Car With Automatic Transaxle
Towing a Car With Automatic Transaxle
o NOT OK FOR AUTOMATIC TRANSAXLE EQUIPPED VEHICLE
o OK FOR MANUAL TRANSAXLE
CAUTION:
CAUTION: CAUTION:
CAUTION:
CAUTION:
A car with an automatic transaxle should
A car with an automatic transaxle should A car with an automatic transaxle should
A car with an automatic transaxle should
A car with an automatic transaxle should never be towed from the rear with the front
never be towed from the rear with the front never be towed from the rear with the front
never be towed from the rear with the front
never be towed from the rear with the front
wheels on the ground. This can cause seri-
wheels on the ground. This can cause seri- wheels on the ground. This can cause seri-
wheels on the ground. This can cause seri-
wheels on the ground. This can cause seri-
ous damage to the transaxle. If the car must
ous damage to the transaxle. If the car must ous damage to the transaxle. If the car must
ous damage to the transaxle. If the car must
ous damage to the transaxle. If the car must
be towed from the rear, a towing dolly must
be towed from the rear, a towing dolly must be towed from the rear, a towing dolly must
be towed from the rear, a towing dolly must
be towed from the rear, a towing dolly must
be used under the front wheels.
be used under the front wheels. be used under the front wheels.
be used under the front wheels.
be used under the front wheels.
If the car is being towed with the rear wheels on
the ground, be sure the parking brake is re- leased. D080D02X-GAT
Emergency Towing
Emergency Towing Emergency Towing
Emergency Towing
Emergency Towing For emergency towing when no commercialtow vehicle is available, attach a tow cable,chain or strap to the two hooks under the frontof your car. Do not attempt to tow your vehiclein this manner on any unpaved surface. Thiscould result in serious damage to your car. Nor should it be attempted if the wheels, drive train, axles, steering or brakes are damaged.Before towing, be sure the transaxle is in neu-tral and the key is in "ACC" (with the engine off)or in the "ON" position (with the engine run-ning). A driver must be in the towed car to steerit and operate the brakes.
CAUTION:
CAUTION: CAUTION:
CAUTION:
CAUTION:
If the car is being towed with all four wheels
If the car is being towed with all four wheels If the car is being towed with all four wheels
If the car is being towed with all four wheels
If the car is being towed with all four wheels
on the ground, it can be towed only from the
on the ground, it can be towed only from the on the ground, it can be towed only from the
on the ground, it can be towed only from the
on the ground, it can be towed only from the
front. Be sure that the transaxle is in neutral.
front. Be sure that the transaxle is in neutral. front. Be sure that the transaxle is in neutral.
front. Be sure that the transaxle is in neutral.
front. Be sure that the transaxle is in neutral.
Do not tow at speeds greater than 50 km/h
Do not tow at speeds greater than 50 km/h Do not tow at speeds greater than 50 km/h
Do not tow at speeds greater than 50 km/h
Do not tow at speeds greater than 50 km/h
(30 mph) and for more than 25 km (15 miles).
(30 mph) and for more than 25 km (15 miles). (30 mph) and for more than 25 km (15 miles).
(30 mph) and for more than 25 km (15 miles).
(30 mph) and for more than 25 km (15 miles).
Be sure the steering is unlocked by placing
Be sure the steering is unlocked by placing Be sure the steering is unlocked by placing
Be sure the steering is unlocked by placing
Be sure the steering is unlocked by placing
the key in the "ACC" position. A driver must
the key in the "ACC" position. A driver must the key in the "ACC" position. A driver must
the key in the "ACC" position. A driver must
the key in the "ACC" position. A driver must
be in the towed vehicle to operate the steer-
be in the towed vehicle to operate the steer- be in the towed vehicle to operate the steer-
be in the towed vehicle to operate the steer-
be in the towed vehicle to operate the steer-
ing and brakes.
ing and brakes. ing and brakes.
ing and brakes.
ing and brakes.
o OK FOR AUTOMATIC OR MANUAL
TRANSAXLE EQUIPPED VEHICLE
D080C01A
D080C02A
D080D01X
D120A01A-GAT
IF YOU LOSE YOUR KEYS
IF YOU LOSE YOUR KEYS IF YOU LOSE YOUR KEYS
IF YOU LOSE YOUR KEYS
IF YOU LOSE YOUR KEYS
If you lose your keys, many Hyundai dealers can make you a new key if you have your keynumber. If you lock the keys inside your car andyou cannot obtain a new key, many Hyundaidealers can use special tools to open the doorfor you. Information about the key of immobilizer sys- tem (If installed) will be found on page 1-2.
NOTE:
NOTE: NOTE:
NOTE:
NOTE:
Before towing, check the level of the
Before towing, check the level of the Before towing, check the level of the
Before towing, check the level of the
Before towing, check the level of the
transaxle fluid. If it is below the "HOT" range
transaxle fluid. If it is below the "HOT" range transaxle fluid. If it is below the "HOT" range
transaxle fluid. If it is below the "HOT" range
transaxle fluid. If it is below the "HOT" range
on the dipstick, add fluid. If you cannot add
on the dipstick, add fluid. If you cannot add on the dipstick, add fluid. If you cannot add
on the dipstick, add fluid. If you cannot add
on the dipstick, add fluid. If you cannot add
fluid, a towing dolly must be used.
fluid, a towing dolly must be used. fluid, a towing dolly must be used.
fluid, a towing dolly must be used.
fluid, a towing dolly must be used.
Page 86 of 249
CORROSION PREVENTION AND APPEARANCE CARE
CORROSION PREVENTION AND APPEARANCE CARE CORROSION PREVENTION AND APPEARANCE CARE
CORROSION PREVENTION AND APPEARANCE CARE
CORROSION PREVENTION AND APPEARANCE CARE
4-1
4.4.
4.4.
4.
CORR
CORR CORR
CORR
CORR
OSION PRE-
OSION PRE- OSION PRE-
OSION PRE-
OSION PRE-
VENTION & AP-
VENTION & AP- VENTION & AP-
VENTION & AP-
VENTION & AP-
PEARANCE CARE
PEARANCE CARE PEARANCE CARE
PEARANCE CARE
PEARANCE CARE E020A01A-AAT
TO HELP PREVENT CORROSION
TO HELP PREVENT CORROSION TO HELP PREVENT CORROSION
TO HELP PREVENT CORROSION
TO HELP PREVENT CORROSION
You can help prevent corrosion from getting
started by observing the following:
E020B01A-AATKeep Your Car Clean
Keep Your Car Clean Keep Your Car Clean
Keep Your Car Clean
Keep Your Car Clean
The best way to prevent corrosion is to keep
your car clean and free of corrosive materials. Attention to the underside of the car is particu-larly important.
o If you live in a high-corrosion area — where road salts are used, near the ocean, areas with industrial pollution, acid rain, etc.— youshould take extra care to prevent corrosion.In winter, hose off the underside of your carat least once a month and be sure to cleanthe underside thoroughly when winter isover.
o When cleaning underneath the car, give particular attention to the components underthe fenders and other areas that are hiddenfrom view. Do a thorough job; just dampen-ing the accumulated mud rather than wash-ing it away will accelerate corrosion ratherthan prevent it. Water under high pressureand steam are particularly effective in re-moving accumulated mud and corrosivematerials.
o When cleaning lower door panels, rocker panels and frame members, be sure thatdrain holes are kept open so that moisturecan escape and not be trapped inside to ac-celerate corrosion.
E010B01A-AAT
Common Causes of Corrosion
Common Causes of Corrosion Common Causes of Corrosion
Common Causes of Corrosion
Common Causes of Corrosion
The most common causes of corrosion on your
car are:
o Road salt, dirt and moisture that is allowed to accumulate underneath the car.
o Removal of paint or protective coatings by stones, gravel, abrasion or minor scrapes and dents which leave unprotected metalexposed to corrosion.
E010A01A-AAT
CORROSION PROTECTION
CORROSION PROTECTION CORROSION PROTECTION
CORROSION PROTECTION
CORROSION PROTECTION
Protecting Your Hyundai from Corro-
Protecting Your Hyundai from Corro- Protecting Your Hyundai from Corro-
Protecting Your Hyundai from Corro-
Protecting Your Hyundai from Corro-
sion
sion sion
sion
sion
By using the most advanced design and con-
struction practices to combat corrosion, Hyundaiproduces cars of the highest quality. However, this is only part of the job. To achieve the long term corrosion resistance your Hyundai candeliver, the owner's cooperation and assistanceis also required. E010C01A-AAT
High-Corrosion Areas
High-Corrosion Areas High-Corrosion Areas
High-Corrosion Areas
High-Corrosion Areas If you live in an area where your car is regularly exposed to corrosive materials, corrosion pro-tection is particularly important. Some of thecommon causes of accelerated corrosion areroad salts, dust control chemicals, ocean airand industrial pollution.
E010D01A-AATMoisture Breeds Corrosion
Moisture Breeds Corrosion Moisture Breeds Corrosion
Moisture Breeds Corrosion
Moisture Breeds Corrosion
Moisture creates the conditions in which corro-
sion is most likely to occur. For example, cor-rosion is accelerated by high humidity, particu-larly when temperatures are just above freez-ing. In such conditions, the corrosive material iskept in contact with the car surfaces by mois-ture that is slow to evaporate.
Mud is particularly corrosive because it is slow
to dry and holds moisture in contact with thevehicle. Although the mud appears to be dry, itcan still retain the moisture and promote corro-sion.
High temperatures can also accelerate corro-
sion of parts that are not properly ventilated sothe moisture can be dispersed. For all thesereasons, it is particularly important to keep yourcar clean and free of mud or accumulations ofother materials. This applies not only to thevisible surfaces but particularly to the undersideof the car.
44
44
4
Page 87 of 249
CORROSION PREVENTION AND APPEARANCE CARE
CORROSION PREVENTION AND APPEARANCE CARE CORROSION PREVENTION AND APPEARANCE CARE
CORROSION PREVENTION AND APPEARANCE CARE
CORROSION PREVENTION AND APPEARANCE CARE
4-2 E020C01A-AAT
Keep Your Garage Dry
Keep Your Garage Dry Keep Your Garage Dry
Keep Your Garage Dry
Keep Your Garage Dry
Don't park your car in a damp, poorly ventilated
garage. This creates a favorable environment for corrosion. This is particularly true if youwash your car in the garage or drive it into thegarage when it is still wet or covered with snow,ice or mud. Even a heated garage can contrib-ute to corrosion unless it is well ventilated somoisture is dispersed.
E020D01A-AATKeep Paint and Trim in Good Condition
Keep Paint and Trim in Good Condition Keep Paint and Trim in Good Condition
Keep Paint and Trim in Good Condition
Keep Paint and Trim in Good Condition
Scratches or chips in the finish should be cov-
ered with "touch-up" paint as soon as possibleto reduce the possibility of corrosion. If baremetal is showing through, the attention of aqualified body and paint shop is recommended.
E020E01A-AATDon't Neglect the Interior
Don't Neglect the Interior Don't Neglect the Interior
Don't Neglect the Interior
Don't Neglect the Interior
Moisture can collect under the floor mats and
carpeting to cause corrosion. Check under themats periodically to be sure the carpeting is dry.Use particular care if you carry fertilizers, clean-ing materials or chemicals in the car.
These should be carried only in proper contain-
ers and any spills or leaks should be cleanedup, flushed with clear water and thoroughlydried. E030A01A-AAT
WASHING AND WAXING
WASHING AND WAXING WASHING AND WAXING
WASHING AND WAXING
WASHING AND WAXING
Washing Your Hyundai
Washing Your Hyundai Washing Your Hyundai
Washing Your Hyundai
Washing Your Hyundai
Never wash your car when the surface is hotfrom being in the sun. Always wash your car inthe shade. Wash your car frequently. Dirt is abrasive and can scratch the paint if it is not removed. Airpollution or acid rain may damage the paint and trim through chemical action if pollutants are allowed to remain in contact with the surface. Ifyou live near the ocean or in an area where
road salts or dust control chemicals are used,you should pay particular attention to the under-side of the car. Start by rinsing the car toremove dust and loose dirt. In winter, or if youhave driven through mud or muddy water, besure to thoroughly clean the underside as well.Use a hard direct stream of water to removeaccumulations of mud or corrosive materials.Use a good quality car-washing solution andfollow the manufacturer's directions on the pack-
age. These are available at your Hyundai deal-
er or auto parts outlet. Don't use strong house-hold detergents, gasoline, strong solvents or
abrasive cleaning powders as these may dam-age the finish. Use a clean sponge or cloth, rinse it frequently
and don't damage the finish by rubbing toohard. For stubborn spots, dampen them fre-
quently and remove them a little at a time. To clean whitewall tires, use a stiff brush or
soapy steel-wool scouring pad. To clean plastic wheel covers, use a clean sponge or soft cloth and water. To clean cast aluminum alloy wheels, use a
mild soap or neutral detergent. Do not useabrasive cleaners. Protect the bare-metal sur-faces by cleaning, polishing and waxing. Be-
cause aluminum is subject to corrosion, be sureto give aluminum alloy wheels special attention
in winter. If you drive on salted roads, clean thewheels thoroughly afterwards. After washing, be sure to rinse thoroughly. If soapy water dries on the finish, streaking willresult. When the weather is warm and the humidity low, you may find it necessary to rinse eachsection immediately after washing to avoidstreaking. After rinsing, dry the car using a damp chamois
or soft, absorbent cloth. The reason for dryingthe car is to remove water from the car so it willdry without water spots. Don't rub, this candamage the finish. If you find any nicks or scratches in the paint, use touch-up paint to cover them to preventcorrosion. To protect the paintwork of the caragainst corrosion, you must clean your Hyundai
Page 88 of 249
CORROSION PREVENTION AND APPEARANCE CARE
CORROSION PREVENTION AND APPEARANCE CARE CORROSION PREVENTION AND APPEARANCE CARE
CORROSION PREVENTION AND APPEARANCE CARE
CORROSION PREVENTION AND APPEARANCE CARE
4-3
(at least once a month). Give special attention
to the removal of salt, mud and other substanc-
es on the underside of the splashboards of the car. Make sure that the outlets and the under-side of the doors are open. Paint damage canbe caused by small accumulation of tar, indus-trial precipitation, tree resin, insects and birddroppings, when not removed immediately.
If water alone is not strong enough to remove
the accumulated dirt, use a mild car washingsolution. Be sure to rinse the surface afterwashing to remove the solution. Never allowthe solution to dry on the painted surfaces. E030C01A-AAT
Polishing and Waxing
Polishing and Waxing Polishing and Waxing
Polishing and Waxing
Polishing and Waxing Always wash and dry the car before polishing or waxing or using a combination cleaner andwax. Use a good quality commercial productand follow the manufacturer's directions on thecontainer. Polish and wax the bright trim piecesas well as the paint.
E030B01A-AAT Spot Cleaning
Spot Cleaning Spot Cleaning
Spot Cleaning
Spot Cleaning
Don't use gasoline, strong solvents or corrosive
cleaning agents. These can damage the finishof the car. To remove road tar, use turpentineon a clean, soft cloth or commercially availablebug and tar remover. Be gentle.
To remove dead insects or tree sap, use warm
water and mild soap or car-washing solution.Soak the spot and rub gently. If the paint haslost its luster, use a commercial car-cleaningpolish. E030D01A-AAT
When to Wax Again
When to Wax Again When to Wax Again
When to Wax Again
When to Wax Again
You should polish and wax the car again when
water no longer beads on a clean surface butspreads out over a larger area.
E030E01A-AATMaintaining Bumpers
Maintaining Bumpers Maintaining Bumpers
Maintaining Bumpers
Maintaining Bumpers
Special precautions must be observed to pre-
serve the appearance of the bumpers on yourHyundai. They are:
o Be careful not to spill battery electrolyte or hydraulic brake fluid on the bumpers. If you do, wash it off immediately with clean water.
o Be gentle when cleaning the bumper sur- faces. They are made of soft plastic and thesurface can be damaged if mistreated. Donot use abrasive cleaners. Use warm waterand mild soap or car-washing solution. o Do not expose the bumpers to high tem-
peratures. For example, if you have yourcar repainted, do not leave the bumpers onthe car if the car is going to be placed in ahigh temperature paint booth.
E040A01A-AAT CLEANING THE INTERIOR
CLEANING THE INTERIOR CLEANING THE INTERIOR
CLEANING THE INTERIOR
CLEANING THE INTERIOR
To Clean the Vinyl Upholstery
To Clean the Vinyl Upholstery To Clean the Vinyl Upholstery
To Clean the Vinyl Upholstery
To Clean the Vinyl Upholstery
To clean the vinyl upholstery, first remove loose
dirt and dust with a vacuum cleaner. Then applya solution of mild soap or detergent and waterusing a clean sponge or soft cloth. Allow this tostay on the surface to loosen the dirt, then wipewith a clean damp sponge or cloth. If all the dirtstains are not removed, repeat this procedureuntil the upholstery is clean. Do not use gaso-line, solvent, paint thinner or other strong clean-ers.
E040B01A-AATTo Clean the Leather Upholstery
To Clean the Leather Upholstery To Clean the Leather Upholstery
To Clean the Leather Upholstery
To Clean the Leather Upholstery
(If Installed)
(If Installed) (If Installed)
(If Installed)
(If Installed)
In the normal course of use, leather upholstered
surfaces will, like any material, pick-up dust anddirt. This dust and dirt must be cleaned off or itmay work into the surface of the leather, caus-ing damage.
Fine leather needs care, and should be cleaned
when necessary. Washing leather thoroughlywith soap and water will keep your leather
lustrous, beautiful and ensure you have manyyears of wear.
Page 89 of 249
CORROSION PREVENTION AND APPEARANCE CARE
CORROSION PREVENTION AND APPEARANCE CARE CORROSION PREVENTION AND APPEARANCE CARE
CORROSION PREVENTION AND APPEARANCE CARE
CORROSION PREVENTION AND APPEARANCE CARE
4-4 Take a piece of cheese cloth and using any mild soap and lukewarm water, work up a goodlather. Thoroughly wash the leather. Wipe cleanwith a slightly damp cloth and dry with softcloth. Do this as often as the leather becomessoiled. During tanning operations, sufficient oils are incorporated through processing that none needbe applied during the life of the leather. Oil
applied to the finished surface will in no wayhelp the leather and may do more harm thangood. Varnishes and furniture polishes shouldnever be used under any conditions. E040C01A-AAT
Cleaning the Carpets
Cleaning the Carpets Cleaning the Carpets
Cleaning the Carpets
Cleaning the Carpets
Use a foam-type carpet cleaner. Cleaners of this type are available in aerosol cans in liquidform or powder. Read the instructions and fol-low them exactly. Using a vacuum cleaner withthe appropriate attachment, remove as muchdirt from the carpets as possible. Apply thefoam following the manufacturer's directions,then rub in overlapping circles. Do not addwater. These cleaners work best when thecarpet is kept as dry as possible. E050A01A-AAT
ANY QUESTIONS?
ANY QUESTIONS? ANY QUESTIONS?
ANY QUESTIONS?
ANY QUESTIONS?
If you have any questions about the care of
your car, consult your Hyundai dealer. E040D01A-AAT
Cleaning the Seat Belts
Cleaning the Seat Belts Cleaning the Seat Belts
Cleaning the Seat Belts
Cleaning the Seat Belts
To clean the seat belts, use a cloth or sponge
with mild soap or detergent and warm water. Donot use strong detergents, dye, bleach or abra-sive materials on the seat belts as this mayweaken the fabric.
While cleaning the belts, inspect them for ex-
cessive wear, cuts, fraying or other signs ofdamage and replace them if necessary.
E040E01A-AATCleaning the Windows
Cleaning the Windows Cleaning the Windows
Cleaning the Windows
Cleaning the Windows
You may use any household window cleaner onthe windows. However, when cleaning the in-side of the rear window be careful not to dam-age the rear window defroster wiring.
Page 90 of 249
VEHICLE MAINTENANCE REQUIREMENTS
VEHICLE MAINTENANCE REQUIREMENTS VEHICLE MAINTENANCE REQUIREMENTS
VEHICLE MAINTENANCE REQUIREMENTS
VEHICLE MAINTENANCE REQUIREMENTS
5-1
5.5.
5.5.
5.
VEHICLE MAINTE-
VEHICLE MAINTE- VEHICLE MAINTE-
VEHICLE MAINTE-
VEHICLE MAINTE-
NANCE REQ
NANCE REQ NANCE REQ
NANCE REQ
NANCE REQ
UIRE-
UIRE- UIRE-
UIRE-
UIRE-
MENTS
MENTS MENTS
MENTS
MENTS
F010A01A-GAT MAINTENANCE INTERVALS
MAINTENANCE INTERVALS MAINTENANCE INTERVALS
MAINTENANCE INTERVALS
MAINTENANCE INTERVALS
Service requirements
Service requirements Service requirements
Service requirements
Service requirements
To assure that you receive the greatest number
of kilometers of satisfying operation from your Hyundai, certain maintenance procedures must
be performed. Although careful design and en-
gineering have reduced these to a minimum,those that are required are of the utmost impor-tance. It is your responsibility to have these mainte-
nance procedures performed to comply with theterms of the warranties covering your newHyundai. The Service Passport supplied withyour new vehicle provides further information
about these warranties. F010B01A-AAT
Maintenance Requirements
Maintenance Requirements Maintenance Requirements
Maintenance Requirements
Maintenance Requirements
The maintenance required for your Hyundai
can be divided into three main areas:
o Specified scheduled procedures
o General everyday checks
o Do-it-yourself maintenance F010C01A-GAT
Specified Scheduled Procedures
Specified Scheduled Procedures Specified Scheduled Procedures
Specified Scheduled Procedures
Specified Scheduled Procedures
These are the procedures such as inspections,
adjustments and replacements that are listed in the maintenance charts starting on page 5-2.These procedures must be performed at theintervals shown in the maintenance schedule to
assure that your warranty remains in effect.Although it is strongly recommended that they
be performed by the factory-trained or distribu-tor-trained technicians at your Hyundai dealer,
these procedures may be performed at any
qualified service facility.
It is suggested that genuine Hyundai service
parts be used for any required repairs or re-placements. Other parts of equivalent quality
such as engine oil, engine coolant, manual orauto transaxle oil, brake fluid and so on which
are not supplied by Hyundai Motor Company or
its distributor may be used without affectingyour warranty coverage but you should always
be sure these are equivalent to the quality of theoriginal Hyundai parts. Your Service Passport
provides further information about your warran-ty coverage. F010E01A-AAT
Do-It-Yourself Maintenance
Do-It-Yourself Maintenance Do-It-Yourself Maintenance
Do-It-Yourself Maintenance
Do-It-Yourself Maintenance
If you are mechanically inclined, own a few
tools that are required and want to take the timeto do so, you can inspect and service a number
of items. For more information about doing ityourself, see Section 6.
F010F01A-AATA Few Tips
A Few Tips A Few Tips
A Few Tips
A Few Tips
o Whenever you have your Hyundai serviced,
keep copies of the service records in your
glovebox. This will help ensure that you candocument that the required procedures have
been performed to keep your warranties ineffect. This is especially important when
service is not performed by an authorizedHyundai dealer.
o If you choose to do your own maintenance and repairs, you may find it helpful to havean official Hyundai Shop Manual. A copy of
this publication may be purchased at yourHyundai dealer's parts department.
F020A02X-GAT SCHEDULED MAINTENANCE RE-
SCHEDULED MAINTENANCE RE- SCHEDULED MAINTENANCE RE-
SCHEDULED MAINTENANCE RE-
SCHEDULED MAINTENANCE RE-
QUIREMENTS
QUIREMENTS QUIREMENTS
QUIREMENTS
QUIREMENTS
Inspection should be performed any time a
malfunction is experienced or suspected. Re-ceipts for all emission control system services
should be retained to demonstrate compliancewith conditions of the emissions system war-ranty. For severe usage maintenance require-ments, see page 5-4 of this section.
F010D01A-AAT
General Checks
General Checks General Checks
General Checks
General Checks
These are the regular checks you should per-
form when you drive your Hyundai or you fill thefuel tank. A list of these items will be found onpage 6-2.
55
55
5