clock Hyundai Matrix 2003 Owner's Manual
[x] Cancel search | Manufacturer: HYUNDAI, Model Year: 2003, Model line: Matrix, Model: Hyundai Matrix 2003Pages: 312, PDF Size: 4.1 MB
Page 16 of 312
FEATURES OF YOUR HYUNDAI
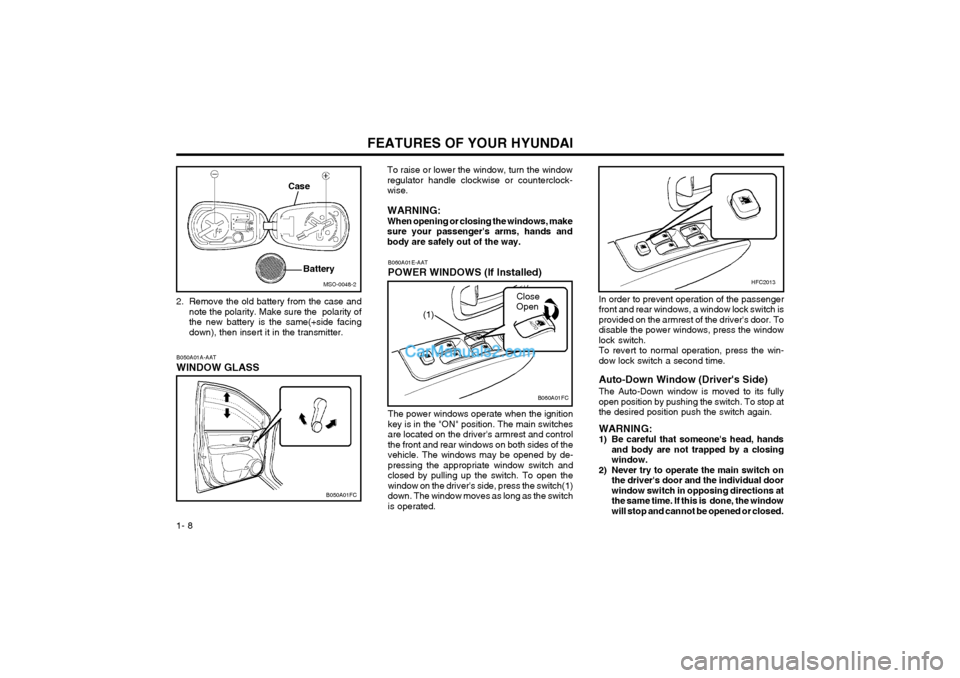
1- 8 To raise or lower the window, turn the window regulator handle clockwise or counterclock-wise. WARNING: When opening or closing the windows, makesure your passenger's arms, hands andbody are safely out of the way.
B060A01E-AAT POWER WINDOWS (If Installed)
Close Open
B060A01FC
The power windows operate when the ignition key is in the "ON" position. The main switchesare located on the driver's armrest and controlthe front and rear windows on both sides of thevehicle. The windows may be opened by de-pressing the appropriate window switch andclosed by pulling up the switch. To open thewindow on the driver's side, press the switch(1)down. The window moves as long as the switchis operated.
(1)
HFC2013
In order to prevent operation of the passenger front and rear windows, a window lock switch isprovided on the armrest of the driver's door. Todisable the power windows, press the window
lock switch.To revert to normal operation, press the win-dow lock switch a second time. Auto-Down Window (Driver's Side) The Auto-Down window is moved to its fully open position by pushing the switch. To stop atthe desired position push the switch again. WARNING:
1) Be careful that someone's head, hands and body are not trapped by a closingwindow.
2) Never try to operate the main switch on the driver's door and the individual doorwindow switch in opposing directions atthe same time. If this is done, the windowwill stop and cannot be opened or closed.
B050A01A-AAT WINDOW GLASS
B050A01FC
2. Remove the old battery from the case and
note the polarity. Make sure the polarity of the new battery is the same(+side facingdown), then insert it in the transmitter.
MSO-0048-2
Case
Battery
Page 35 of 312
FEATURES OF YOUR HYUNDAI 1- 27
o Do not place any objects over the airbagor between the airbag and yourself.
o Do not place any objects (an umbrella, bag, etc.) between the front door and the front seat. Such objects may becomedangerous projectiles and cause injury ifthe supplemental side impact air baginflates.
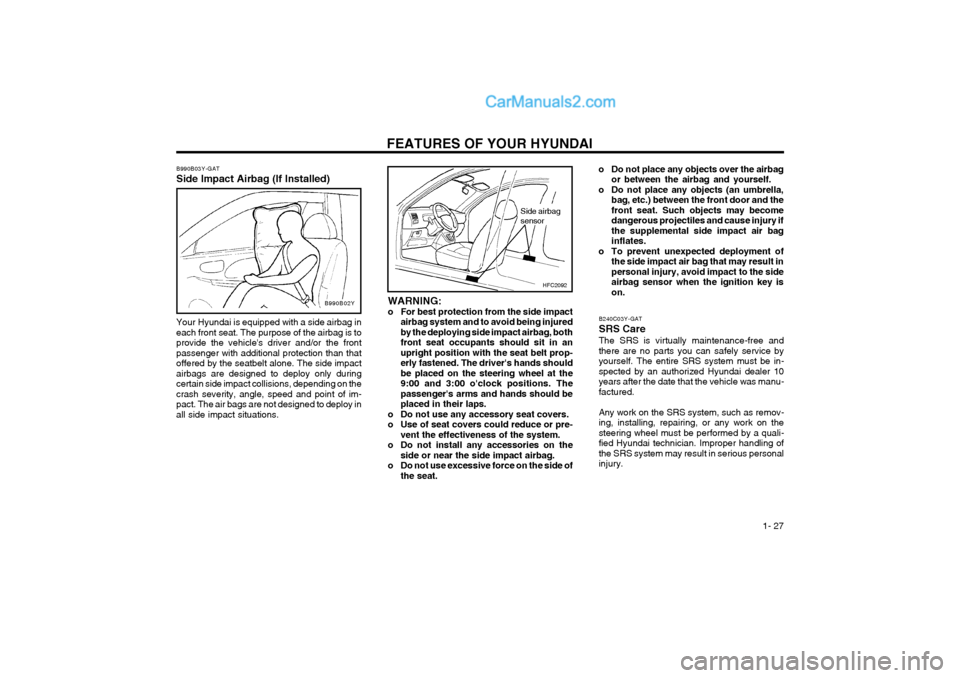
o To prevent unexpected deployment of the side impact air bag that may result inpersonal injury, avoid impact to the sideairbag sensor when the ignition key ison.
B240C03Y-GAT SRS CareThe SRS is virtually maintenance-free and there are no parts you can safely service byyourself. The entire SRS system must be in-spected by an authorized Hyundai dealer 10years after the date that the vehicle was manu-factured. Any work on the SRS system, such as remov- ing, installing, repairing, or any work on thesteering wheel must be performed by a quali-fied Hyundai technician. Improper handling ofthe SRS system may result in serious personalinjury.
HFC2092
Side airbag sensor
WARNING:
o For best protection from the side impact airbag system and to avoid being injuredby the deploying side impact airbag, bothfront seat occupants should sit in anupright position with the seat belt prop-erly fastened. The driver's hands shouldbe placed on the steering wheel at the9:00 and 3:00 o'clock positions. Thepassenger's arms and hands should beplaced in their laps.
o Do not use any accessory seat covers.
o Use of seat covers could reduce or pre- vent the effectiveness of the system.
o Do not install any accessories on the side or near the side impact airbag.
o Do not use excessive force on the side of the seat.
B990B03Y-GAT Side Impact Airbag (If Installed)B990B02Y
Your Hyundai is equipped with a side airbag in each front seat. The purpose of the airbag is toprovide the vehicle's driver and/or the frontpassenger with additional protection than thatoffered by the seatbelt alone. The side impactairbags are designed to deploy only duringcertain side impact collisions, depending on thecrash severity, angle, speed and point of im-pact. The air bags are not designed to deploy inall side impact situations.
Page 38 of 312
FEATURES OF YOUR HYUNDAI
1- 30
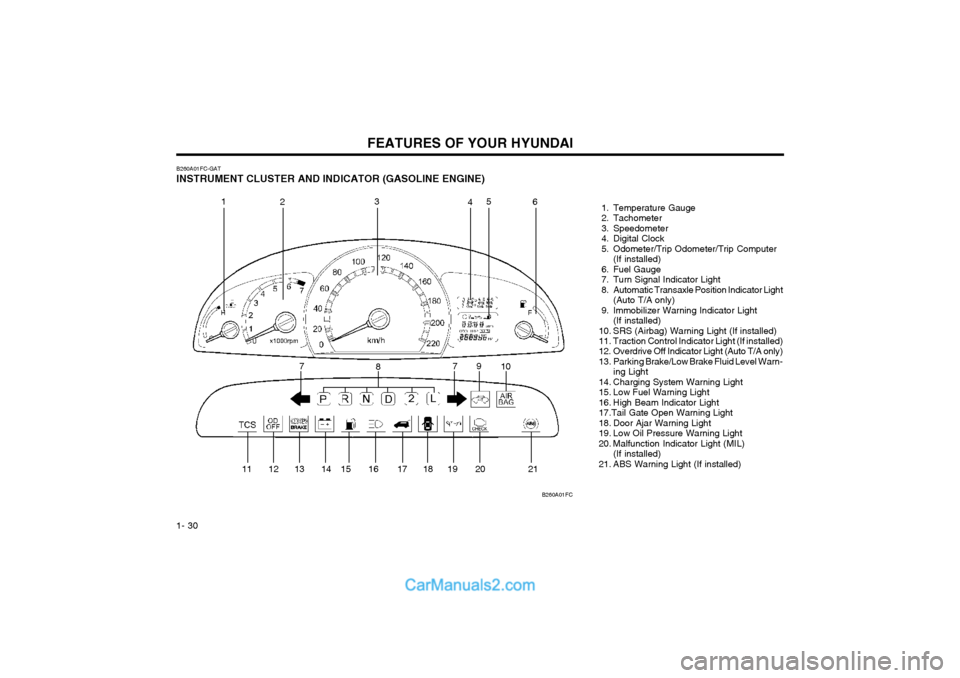
B260A01FC-GAT
INSTRUMENT CLUSTER AND INDICATOR (GASOLINE ENGINE) 1. Temperature Gauge
2. Tachometer
3. Speedometer
4. Digital Clock
5. Odometer/Trip Odometer/Trip Computer(If installed)
6. Fuel Gauge
7. Turn Signal Indicator Light
8. Automatic Transaxle Position Indicator Light (Auto T/A only)
9. Immobilizer Warning Indicator Light (If installed)
10. SRS (Airbag) Warning Light (If installed)
11. Traction Control Indicator Light (If installed)
12. Overdrive Off Indicator Light (Auto T/A only)
13. Parking Brake/Low Brake Fluid Level Warn- ing Light
14. Charging System Warning Light
15. Low Fuel Warning Light
16. High Beam Indicator Light17.Tail Gate Open Warning Light
18. Door Ajar Warning Light
19. Low Oil Pressure Warning Light
20. Malfunction Indicator Light (MIL) (If installed)
21. ABS Warning Light (If installed)
B260A01FC
1
2 3
45
6
7 8 9
10
11 12 13 14 15 16 17 18 19 20 21 7
Page 39 of 312
FEATURES OF YOUR HYUNDAI 1- 31
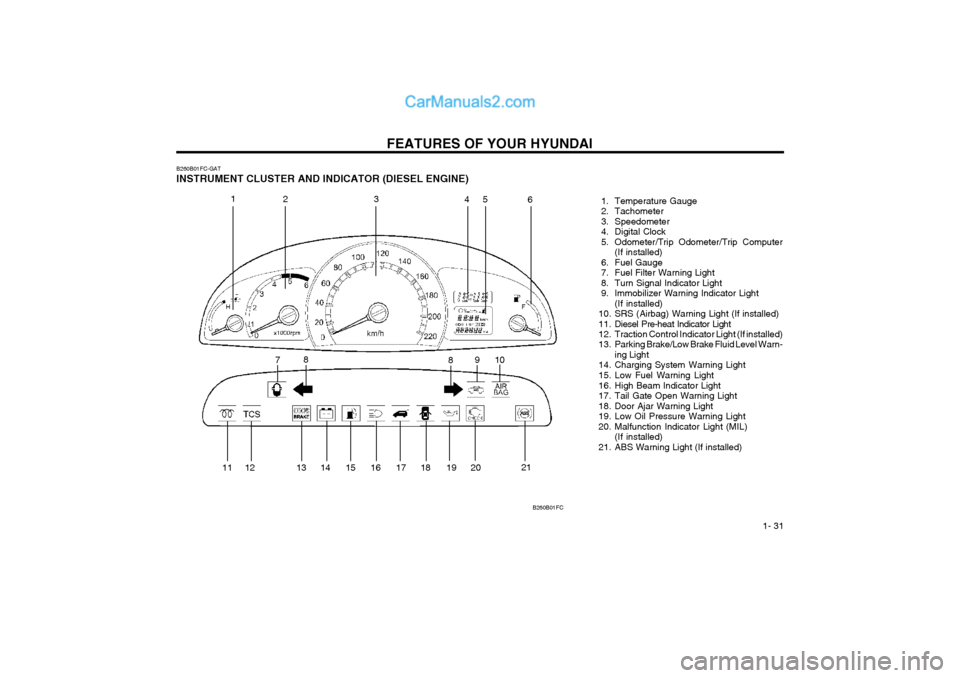
B260B01FC-GAT INSTRUMENT CLUSTER AND INDICATOR (DIESEL ENGINE)
1. Temperature Gauge
2. Tachometer
3. Speedometer
4. Digital Clock
5. Odometer/Trip Odometer/Trip Computer(If installed)
6. Fuel Gauge
7. Fuel Filter Warning Light
8. Turn Signal Indicator Light
9. Immobilizer Warning Indicator Light (If installed)
10. SRS (Airbag) Warning Light (If installed)
11. Diesel Pre-heat Indicator Light
12. Traction Control Indicator Light (If installed)
13. Parking Brake/Low Brake Fluid Level Warn- ing Light
14. Charging System Warning Light
15. Low Fuel Warning Light
16. High Beam Indicator Light
17. Tail Gate Open Warning Light
18. Door Ajar Warning Light
19. Low Oil Pressure Warning Light
20. Malfunction Indicator Light (MIL) (If installed)
21. ABS Warning Light (If installed)
B260B01FC
1 23 45
6
7 8
910
8
11 12 13 14 15 16 17 18 19 20 21
Page 49 of 312
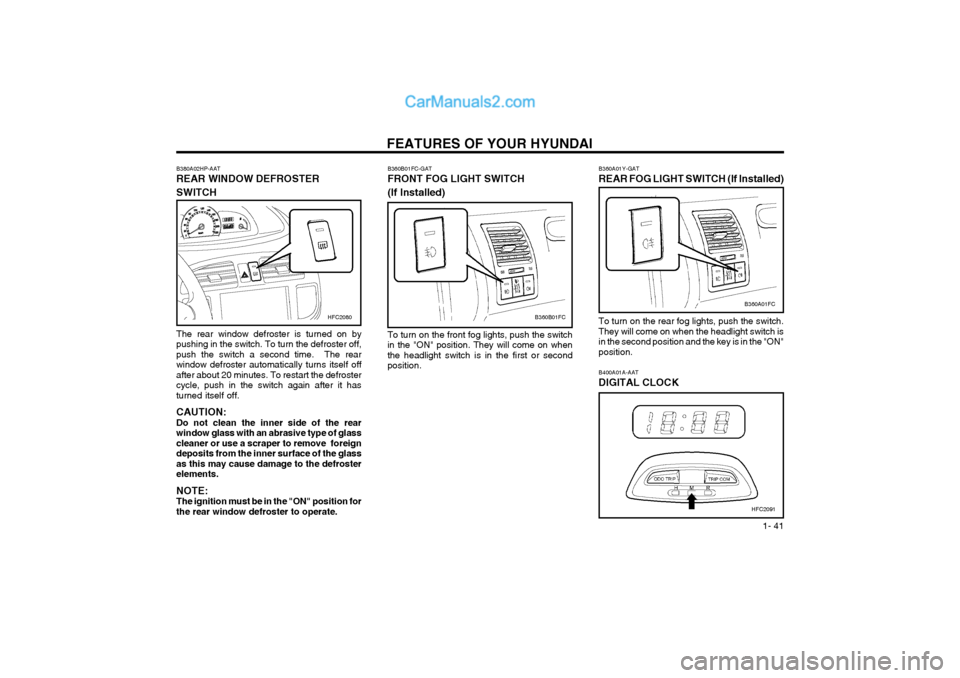
FEATURES OF YOUR HYUNDAI 1- 41
B400A01A-AAT DIGITAL CLOCK
HFC2091
B360A01Y-GAT REAR FOG LIGHT SWITCH (If Installed)
To turn on the rear fog lights, push the switch. They will come on when the headlight switch isin the second position and the key is in the "ON"position.
B360A01FC
B380A02HP-AAT REAR WINDOW DEFROSTER SWITCHHFC2080
The rear window defroster is turned on by pushing in the switch. To turn the defroster off,push the switch a second time. The rearwindow defroster automatically turns itself offafter about 20 minutes. To restart the defrostercycle, push in the switch again after it hasturned itself off. CAUTION: Do not clean the inner side of the rearwindow glass with an abrasive type of glasscleaner or use a scraper to remove foreigndeposits from the inner surface of the glassas this may cause damage to the defrosterelements. NOTE: The ignition must be in the "ON" position forthe rear window defroster to operate.B360B01FC
B360B01FC-GAT FRONT FOG LIGHT SWITCH (If Installed) To turn on the front fog lights, push the switch in the "ON" position. They will come on whenthe headlight switch is in the first or secondposition.
Page 50 of 312
FEATURES OF YOUR HYUNDAI
1- 42
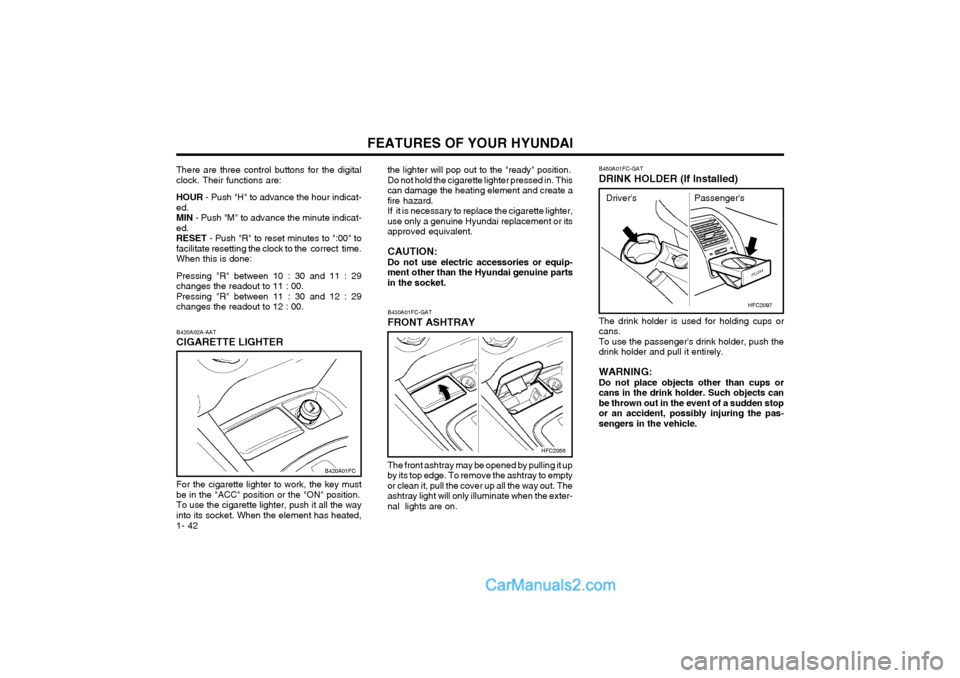
There are three control buttons for the digital clock. Their functions are: HOUR - Push "H" to advance the hour indicat-
ed. MIN - Push "M" to advance the minute indicat-
ed.RESET - Push "R" to reset minutes to ":00" to
facilitate resetting the clock to the correct time.When this is done: Pressing "R" between 10 : 30 and 11 : 29 changes the readout to 11 : 00.Pressing "R" between 11 : 30 and 12 : 29changes the readout to 12 : 00. B430A01FC-GAT FRONT ASHTRAY
HFC2056
The front ashtray may be opened by pulling it up by its top edge. To remove the ashtray to emptyor clean it, pull the cover up all the way out. Theashtray light will only illuminate when the exter-nal lights are on.
B420A02A-AAT CIGARETTE LIGHTER For the cigarette lighter to work, the key must be in the "ACC" position or the "ON" position.To use the cigarette lighter, push it all the wayinto its socket. When the element has heated,
B420A01FC the lighter will pop out to the "ready" position. Do not hold the cigarette lighter pressed in. Thiscan damage the heating element and create afire hazard.If it is necessary to replace the cigarette lighter,use only a genuine Hyundai replacement or itsapproved equivalent. CAUTION: Do not use electric accessories or equip-ment other than the Hyundai genuine partsin the socket.
B450A01FC-GAT DRINK HOLDER (If Installed)
HFC2097
The drink holder is used for holding cups or cans.To use the passenger's drink holder, push thedrink holder and pull it entirely. WARNING: Do not place objects other than cups orcans in the drink holder. Such objects canbe thrown out in the event of a sudden stopor an accident, possibly injuring the pas-sengers in the vehicle.
Driver's Passenger's
Page 53 of 312

FEATURES OF YOUR HYUNDAI 1- 45
B480A01E-AAT FRONT INTERIOR LIGHT Map Light
B480A01E
The two map light switches are located on both sides of the front overhead console. Push in themap light switch to turn the light on or off. Thislight produces a spot beam for convenient useas a map light at night or as a personal light forthe driver and the passenger.B480B01E
With Sunroof Without Sunroof
2. Turn the hexagonal bolts with a socket wrench counterclockwise to remove the front overhead console .
3. Insert the hexagonal head wrench provided with the vehicle into the socket. This wrenchcan be found in the vehicle's luggage roomor glove box.
4. Turn the wrench clockwise to open or coun- terclockwise to close.
B460D01FC-GAT Manual Operation of Sunroof
HFC1036
If the sunroof does not electrically operate:
1. Remove the rectangular plastic interior light lens in the front overhead console.
NOTE: After washing the car or after there is rain,be sure to wipe off any water that is on thesunroof before operating it.
HFC1037
HFC1038
Page 73 of 312

FEATURES OF YOUR HYUNDAI 1- 65
will be emphasized (Front speaker sound will be attenuated). 3. BASS Control Knob Press to pop the knob out and turn to the left or right for the desired bass tone. TREBLE Control Knob. Further pull-lock position of popped-up knob. Turn to the left or right for the desired trebletone. 4. BAND Selector Pressing the button changes the AM, FM1 and FM2 bands. The mode selected is dis-played on LCD.
5. TUNE (Manual) Select Button Press the ( ) side or ( ) side to increase or to decrease the frequency. With the button helddown for 1 sec. or more, the stop signal (broad-casting radio wave) is ignored and channelselection continues. SEEK Operation (Automatic Channel Selection) Press the TUNE select button for 1 sec. or more. When the ( ) side is pressed, the unit willautomatically tune to the next higher frequencyand when the ( ) side is pressed, it will automa-tically tune to the next lower frequency.
6. PRESET STATION SELECT Button Six (6) stations for AM, FM1 and FM2 respec- tively can be preset in the electronic memorycircuit on this unit. HOW TO PRESET STATIONS Six AM and twelve FM stations may be pro- grammed into the memory of the radio. Then,by simply pressing the band select button and/or one of the six station select buttons, you mayrecall any of these stations instantly. To pro-gram the stations, follow these steps:
o Press band selector to set the band for AM,
FM1, and FM2.
o Select the desired station to be stored by seek, scan or manual tuning.
o Determine the preset station select button you wish to use to access that station.
o Press the station select button for more than two seconds. A select button indicator will show in the display indicating which selectbutton you have depressed. You shouldthen release the button, and proceed toprogram the next desired station. A total of18 stations can be programmed by select-ing one AM and two FM stations per button.
o When completed, any preset station may be recalled by selecting AM, FM1 or FM2 bandand the appropriate station button.
FM
AM
H210B02O-AAT 1. POWER ON-OFF/VOLUME Control
Knob
The radio unit may be operated when the ignition key is in the "ACC" or "ON" position.Rotate the knob clockwise to switch the radiounit on and to increase the volume.The LCD shows the radio frequency in the radiomode. Turn the knob counterclockwise to re-duce the volume and to switch the radio unit off. BAL (Balance Control) Knob Pull and turn the control knob clockwise to emphasize right speaker sound. (Left speakersound will be attenuated) When the controlknob is turned counterclockwise, left speakersound will be emphasized. (Right speakersoundwill be attenuated)After adjusting the balance, push the knobagain to use the other function. SCAN Knob When the scan knob is pressed, the frequency will increase and the receivable stations will betuned in one after another, receiving eachstation for 5 seconds. To stop scanning, pressthe scan knob again.
2. FAD (Fader Control) Knob Turn the control knob counterclockwise to em- phasize front speaker sound (Rear speakersound will be attenuated). When the controlknob is turned clockwise, rear speaker sound
Page 75 of 312

FEATURES OF YOUR HYUNDAI 1- 67
will be emphasized (Front speaker sound will be attenuated). 3. BASS Control Knob Press to pop the knob out and turn to the left or right for the desired bass tone. TREBLE Control Knob. Further pull-lock position of popped-up knob. Turn to the left or right for the desired trebletone. 4. BAND Selector Pressing the button changes the AM, FM1 and FM2 bands. The mode selected is dis-played on LCD.
5. TUNE (Manual) Select Button Press the ( ) side or ( ) side to increase or to decrease the frequency. With the button helddown for 1 sec. or more, the stop signal (broad-casting radio wave) is ignored and channelselection continues. SEEK Operation (Automatic Channel Selection) Press the TUNE select button for 1 sec. or more. When the ( ) side is pressed, the unit willautomatically tune to the next higher frequencyand when the ( ) side is pressed, it willautomatically tune to the next lower frequency.
6. PRESET STATION SELECT Button Six (6) stations for AM, FM1 and FM2 respec- tively can be preset in the electronic memorycircuit on this unit. HOW TO PRESET STATIONS Six AM and twelve FM stations may be pro- grammed into the memory of the radio. Then,by simply pressing the band select button and/or one of the six station select buttons, you mayrecall any of these stations instantly. To pro-gram the stations, follow these steps:
o Press band selector to set the band for AM,
FM1, and FM2.
o Select the desired station to be stored by seek, scan or manual tuning.
o Determine the preset station select button you wish to use to access that station.
o Press the station select button for more than two seconds. A select button indicator will show in the display indicating which selectbutton you have depressed. You shouldthen release the button, and proceed toprogram the next desired station. A total of18 stations can be programmed by select-ing one AM and two FM stations per button.
o When completed, any preset station may be recalled by selecting AM, FM1 or FM2 bandand the appropriate station button.
FM
AM
H210B02O-AAT 1. POWER ON-OFF/VOLUME Control
Knob
The radio unit may be operated when the ignition key is in the "ACC" or "ON" position.Rotate the knob clockwise to switch the radiounit on and to increase the volume.The LCD shows the radio frequency in the radiomode. Turn the knob counterclockwise to re-duce the volume and to switch the radio unit off. BAL (Balance Control) Knob Pull and turn the control knob clockwise to emphasize right speaker sound. (Left speakersound will be attenuated) When the controlknob is turned counterclockwise, left speakersound will be emphasized. (Right speakersoundwill be attenuated)After adjusting the balance, push the knobagain to use the other function. SCAN Knob When the scan knob is pressed, the frequency will increase and the receivable stations will betuned in one after another, receiving eachstation for 5 seconds. To stop scanning, pressthe scan knob again.
2. FAD (Fader Control) Knob Turn the control knob counterclockwise to em- phasize front speaker sound (Rear speakersound will be attenuated). When the controlknob is turned clockwise, rear speaker sound
Page 79 of 312

FEATURES OF YOUR HYUNDAI 1- 71
3. BASS Control Knob
Press to pop the knob out and turn to the left or right for the desired bass tone.
TREB (Treble Control) Knob Pull the bass control knob further out. Turn tothe left or right for the desired treble tone.
4. SCAN Button When the scan button is pressed, the fre-quency will increase and the receivable sta-tions will be tuned in one after another, receiv-ing each station for 5 seconds. To stop scan-ning, press the scan button again.
5. TUNE (Manual) Select Button Press the ( ) side or ( ) side to increase orto decrease the frequency. Press either but-ton and hold down to continuously scroll,Release button once the desired station isreached.
SEEK Operation (Automatic Channel Selection) Press the TUNE select button for 0.5 sec or more. Releasing will automatically tune to thenext available station with a beep sound. When the ( ) side is pressed longer than 0.5 second, releasing will automatically tune tothe next higher frequency and when the ( )side is pressed longer than 0.5 second andreleasing will automatically tune to the nextlower frequency. 6. BAND Selector
Pressing the button changes the AM,
FM1 and FM2 bands. The mode selected isdisplayed on LCD. 7. PRESET STATION SELECT Button
Six (6) stations for AM, FM or FM2 respective-
ly can be preset in the electronic memory circuit on this unit. HOW TO PRESET STATIONS
Six AM and twelve FM stations may be pro-
grammed into the memory of the radio. Then, by simply pressing the band select buttonand/or one of the six station select buttons,you may recall any of these stations instantly.To program the stations, follow these steps:
o Press band selector to set the band for AM, FM or FM2.
o Select the desired station to be stored by seek, scan or manual tuning.
o Determine the preset station select button you wish to use to access that station.
o Press the station select button for more than two seconds. A select button indicator will show in the display indicating whichselect button you have depressed. Thefrequency display will flash after it hasbeen stored into the memory.
H260B03E-AAT
1. POWER ON-OFF Control Knob
The radio unit may be operated when theignition key is in the "ACC" or "ON" position.Press the knob to switch the power on. TheLCD shows the radio frequency in the radiomode or the CD track indicator in either theCD mode or CD AUTO CHANGER mode. Toswitch the power off, press the knob again.
VOLUME Control Rotate the knob clockwise to increase thevolume and turn the knob counterclockwise toreduce the volume.
BALANCE Control Pull and turn the control knob clockwise toemphasize right speaker sound (Left speakersound will be attenuated). When the controlknob is turned counterclockwise, left speakersound will be emphasized. (Right speakersound will be attenuated)
2. FAD (Fader Control) Knob Turn the control knob counterclockwise toemphasize front speaker sound. (Rear speakersound will be attenuated) When the controlknob is turned clockwise, rear speaker soundwill be emphasized. (Front speaker sound willbe attenuated)
FM/AM