Hyundai Terracan 2003 Owner's Manual
Manufacturer: HYUNDAI, Model Year: 2003, Model line: Terracan, Model: Hyundai Terracan 2003Pages: 349, PDF Size: 4.56 MB
Page 121 of 349
DRIVING YOUR HYUNDAI 2- 15
C160H01A-AAT Use Approved Anti-Freeze in Window Washer System To keep the water in the window washer system from freezing, add an approved anti-freeze solu- tion in accordance with instructions on the con- tainer. Window washer anti-freeze is available from Hyundai dealers and most auto parts out- lets. Do not use engine coolant or other types of anti-freeze as these may damage the finish.
C160F01A-AAT Check Spark Plugs and Ignition System Inspect your spark plugs as described in Section 6 and replace them if necessary. Also check all ignition wiring and components to be sure they are not cracked, worn or damaged in any way.
C160G02A-GAT To Keep Locks from Freezing To keep the locks from freezing, squirt an ap- proved de-icer fluid or glycerine into the key opening. If a lock is covered with ice, squirt it with an approved de-icing fluid to remove the ice. If the lock is frozen internally, you may be able to thaw it out by using a heated key. Handle the heated key with care to avoid
injury.
NOTE: The proper temperature for using the immo- bilizer key is from -40°C (-40°F) to 80°C (176°F). If you heat the immobilizer key over 80°C (176°F) to open the frozen lock, it may cause damage to the transponder in its head. C160I01HP-GAT Don’t Let Your Parking Brake Freeze Under some conditions your parking brake can freeze in the engaged position. This is most likely to happen when there is an accumulation of snow or ice around or near the rear brakes or if the brakes are wet. If there is a risk the parking brake may freeze, apply it only temporarily while you put the gear selector lever in "P" (automatic) or in first or reverse gear (manual transmission) and block the rear wheels so the car cannot roll. Then release the parking brake. C160K01A-AAT Carry Emergency Equipment Depending on the severity of the weather where you drive your car, you should carry appropriate emergency equipment. Some of the items you may want to carry include tire chains, tow straps or chains, flashlight, emergency flares, sand, a shovel, jumper cables, a window scraper, gloves, ground cloth, coveralls, a blanket, etc.
C160J01A-AAT Don’t Let Ice and Snow Accumulate Underneath Under some conditions, snow and ice can build up under the fenders and interfere with the steer- ing. When driving in severe winter conditions where this may happen, you should periodically check underneath the car to be sure the move- ment of the front wheels and the steering compo- nents is not obstructed.
C180A01A-AAT USE OF LIGHTS Check your lights regularly for correct operation and always keep them clean. When driving dur- ing the day in conditions of poor visibility, it is helpful to drive with headlights on low beam. This enables you to be seen as well as to see.
C170A01A-AAT HIGHER SPEED MOTORING Pre-Trip Inspections 1. Tires: Adjust the tire inflation pressures to specifica- tion. Low tire inflation pressures will result in overheating and possible failure of the tires. Avoid using worn or damaged tires which may result in reduced traction or tire failure. NOTE: Never exceed the maximum tire inflation pres- sure shown on the tires. 2. Fuel, engine coolant and engine oil: High speed travel consumes more fuel than urban motoring. Do not forget to check both engine coolant and engine oil. 3. Drive belt: A loose or damaged drive belt may result in overheating of the engine.
Page 122 of 349
DRIVING YOUR HYUNDAI
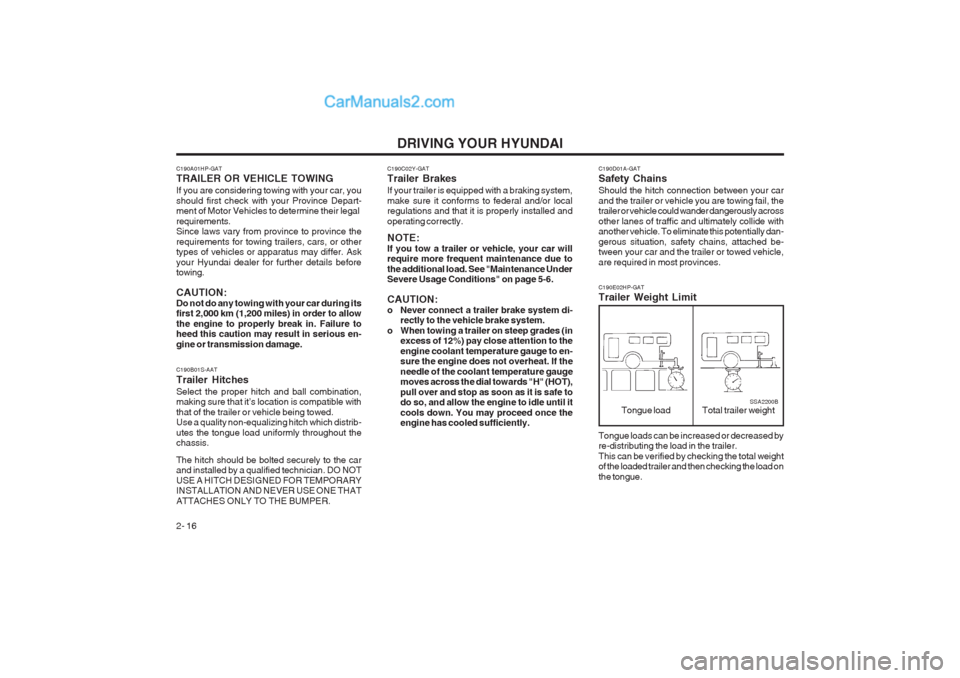
2- 16 C190D01A-GAT Safety Chains Should the hitch connection between your car and the trailer or vehicle you are towing fail, the trailer or vehicle could wander dangerously across other lanes of traffic and ultimately collide with another vehicle. To eliminate this potentially dan- gerous situation, safety chains, attached be- tween your car and the trailer or towed vehicle, are required in most provinces. C190E02HP-GAT Trailer Weight Limit
Tongue load Total trailer weightSSA2200B
Tongue loads can be increased or decreased by re-distributing the load in the trailer. This can be verified by checking the total weight of the loaded trailer and then checking the load on the tongue.
C190A01HP-GAT TRAILER OR VEHICLE TOWING If you are considering towing with your car, you should first check with your Province Depart- ment of Motor Vehicles to determine their legal requirements. Since laws vary from province to province the requirements for towing trailers, cars, or other types of vehicles or apparatus may differ. Ask your Hyundai dealer for further details before towing. CAUTION: Do not do any towing with your car during its first 2,000 km (1,200 miles) in order to allow the engine to properly break in. Failure to heed this caution may result in serious en- gine or transmission damage. C190B01S-AAT Trailer HitchesSelect the proper hitch and ball combination, making sure that it’s location is compatible with that of the trailer or vehicle being towed. Use a quality non-equalizing hitch which distrib- utes the tongue load uniformly throughout the chassis. The hitch should be bolted securely to the car and installed by a qualified technician. DO NOT USE A HITCH DESIGNED FOR TEMPORARY INSTALLATION AND NEVER USE ONE THAT ATTACHES ONLY TO THE BUMPER. C190C02Y-GAT Trailer Brakes If your trailer is equipped with a braking system, make sure it conforms to federal and/or local regulations and that it is properly installed and operating correctly. NOTE: If you tow a trailer or vehicle, your car will require more frequent maintenance due to the additional load. See "Maintenance Under Severe Usage Conditions" on page 5-6. CAUTION:
o Never connect a trailer brake system di-
rectly to the vehicle brake system.
o When towing a trailer on steep grades (in excess of 12%) pay close attention to theengine coolant temperature gauge to en- sure the engine does not overheat. If the needle of the coolant temperature gauge moves across the dial towards "H" (HOT), pull over and stop as soon as it is safe to do so, and allow the engine to idle until it cools down. You may proceed once the engine has cooled sufficiently.
Page 123 of 349
DRIVING YOUR HYUNDAI 2- 17
NOTE:
1. Never load the trailer with more weight in
the back than in the front. About 60% ofthe trailer load should be in the front half on the trailer and the remaining 40% in the rear.
2. The total gross vehicle weight with trailer
must not exceed the Gross Vehicle Weight Rating (GVWR) shown on the vehicle iden- tification plate (see page 8-1). The total gross vehicle weight is the combined weight of the vehicle, driver, all passen- gers and their luggage, cargo, hitch, trailer tongue load and other optional equip- ment.
3. The front or rear mission weight must not exceed the Gross Axle Weight Rating (GAWR) shown on the vehicle identifica- tion plate (see page 8-1). It is possible that your towing package does not exceed the GVWR but exceeds the GAWR. Improper trailer loading and/or too much luggage in the cargo area can overload the rear mis- sion. Redistribute the load and check the mission weight again.
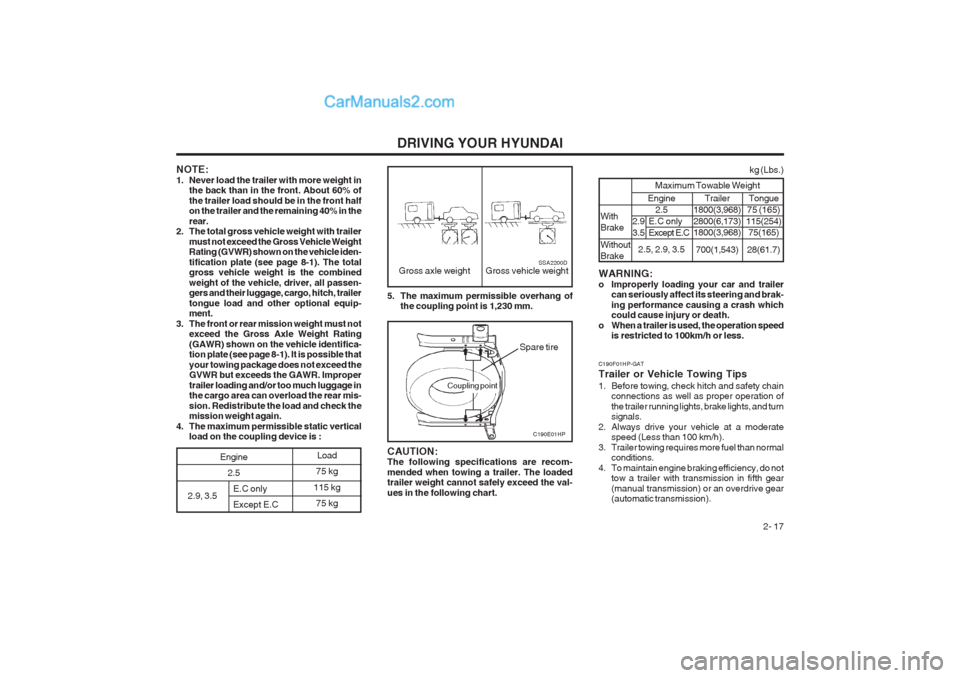
4. The maximum permissible static vertical load on the coupling device is : 5. The maximum permissible overhang of
the coupling point is 1,230 mm.
Gross axle weight Gross vehicle weightSSA2200D
C190E01HP
CAUTION: The following specifications are recom- mended when towing a trailer. The loaded trailer weight cannot safely exceed the val- ues in the following chart.
Spare tire
2.9, 3.5 E.C only Except E.C Load
75 kg
115 kg 75 kg
Engine 2.5
Coupling point
C190F01HP-GAT Trailer or Vehicle Towing Tips
1. Before towing, check hitch and safety chain connections as well as proper operation of the trailer running lights, brake lights, and turn
signals.
2. Always drive your vehicle at a moderate speed (Less than 100 km/h).
3. Trailer towing requires more fuel than normal conditions.
4. To maintain engine braking efficiency, do not tow a trailer with transmission in fifth gear(manual transmission) or an overdrive gear (automatic transmission).
WARNING:
o Improperly loading your car and trailer
can seriously affect its steering and brak-ing performance causing a crash which could cause injury or death.
o When a trailer is used, the operation speed is restricted to 100km/h or less. Engine
2.5
2.5, 2.9, 3.5
2.9 E.C only
3.5 Except E.C
kg (Lbs.)
Maximum Towable Weight
With Brake Without Brake Trailer
1800(3,968) 2800(6,173) 1800(3,968)
700(1,543) Tongue
75 (165)
115(254) 75(165)
28(61.7)
Page 124 of 349
DRIVING YOUR HYUNDAI
2- 18
5. Always secure items in the trailer to prevent
load shift while driving.
6. Check the condition and air pressure of all
tires on the trailer and your car. Low tire pressure can seriously affect the handling.
Also check the spare tire.
7. The vehicle/trailer combination is more af-
fected by crosswind and buffeting. When being passed by a large vehicle, keep a constant speed and steer straight ahead. If there is too much wind buffeting slow down to get out of the other vehicle's air turbulence.
8. When parking your car and trailer, especially
on a hill, be sure to follow all the normal precautions. Turn your front wheel into the curb, set the parking brake firmly, and put the transmission in 1st or Reverse (manual) or Park (automatic). In addition, place wheel
chocks at each of the trailer's tires.
9. If the trailer has electric brakes, start your vehicle and trailer moving, and then apply the trailer brake controller by hand to be sure the brakes are working. This lets you check your
electrical connection at the same time.
10. During your trip, check occasionally to be
sure that the load is secure, and that the lights and any trailer brakes are still working.
11. Avoid jerky starts, sudden acceleration or sudden stops.
12. Avoid sharp turns and rapid lane changes.
13. Avoid holding the brake pedal down too long or too frequently. This could cause the brakes to overheat, resulting in reduced braking effi- ciency.
14. When going down a hill, shift into a lower gear
and use the engine braking effect. When ascending a long grade, downshift the trans- mission to a lower gear and reduce speed to reduce chances of engine overloading and/or overheating.
15. If you have to stop while going uphill, do not
hold the vehicle in place by pressing on the accelerator. This can cause the automatic transmission to overheat. Use the parking brake or footbrake.
NOTE: When towing, check transmission fluid more frequently. CAUTION: If overheating should occur when towing, (temperature gauge reads near red zone), taking the following action may reduce or
eliminate the problem.
1. Turn off the air conditioner.
2. Reduce highway speed.
3. Select a lower gear when going uphill.
4. While in stop and go traffic, place the gear selector in park or neutral and idle theengine at a higher speed.
Page 125 of 349
WHAT TO DO IN AN EMERGENCY 3-1
3. WHAT TO DO IN ANEMERGENCY
D010A01A-AAT IF THE ENGINE WILL NOT START WARNING: If the engine will not start, do not push or pull the car to start it. This could result in a collision or cause other damage. In addition, push or pull starting may cause the catalytic converter to be overloaded and create a fire hazard. D010B01HP-GAT If Engine Doesn’t Turn Over or Turns Over Slowly
1. If your car has an automatic transmission, be sure the gear selector lever is in "N" or "P" and the emergency brake is set. 2. Check the battery connections to be sure
they are clean and tight.
3. Turn on the interior light. If the light dims or
goes out when you operate the starter, the battery is discharged.
4. Check the starter connections to be sure they are securely tightened.
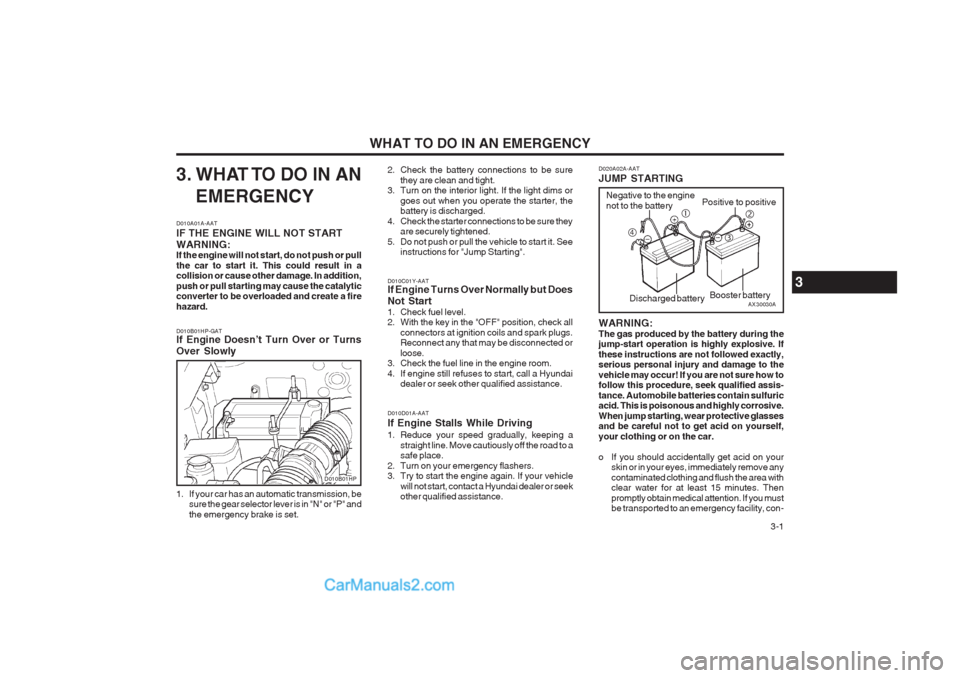
5. Do not push or pull the vehicle to start it. See instructions for "Jump Starting". D020A02A-AAT JUMP STARTING WARNING: The gas produced by the battery during the jump-start operation is highly explosive. If these instructions are not followed exactly, serious personal injury and damage to the vehicle may occur! If you are not sure how to follow this procedure, seek qualified assis- tance. Automobile batteries contain sulfuric acid. This is poisonous and highly corrosive. When jump starting, wear protective glasses and be careful not to get acid on yourself, your clothing or on the car.
o If you should accidentally get acid on your
skin or in your eyes, immediately remove any contaminated clothing and flush the area with clear water for at least 15 minutes. Then promptly obtain medical attention. If you must be transported to an emergency facility, con-
D010C01Y-AAT If Engine Turns Over Normally but Does Not Start
1. Check fuel level.
2. With the key in the "OFF" position, check all
connectors at ignition coils and spark plugs.Reconnect any that may be disconnected or loose.
3. Check the fuel line in the engine room.
4. If engine still refuses to start, call a Hyundai dealer or seek other qualified assistance.
D010D01A-AAT If Engine Stalls While Driving
1. Reduce your speed gradually, keeping a straight line. Move cautiously off the road to a safe place.
2. Turn on your emergency flashers.
3. Try to start the engine again. If your vehicle will not start, contact a Hyundai dealer or seekother qualified assistance.
AX30030A
Negative to the engine not to the battery
Positive to positive
Booster battery
�c
�e
�f �d
Discharged battery
D010B01HP
3
Page 126 of 349
WHAT TO DO IN AN EMERGENCY
3-2 tinue to apply water to the affected area with a sponge or cloth.
o The gas produced by the battery during the
jump-start operation is highly explosive. Do not smoke or allow a spark or an open flame in the vicinity.
o The battery being used to provide the jump
start must be 12-volt. If you cannot determine that it is a 12-volt battery, do not attempt to use it for the jump start.
o To jump start a car with a discharged battery,
follow this procedure exactly:
1. If the booster battery is installed in another vehicle, be sure the two vehicles are nottouching.
2. Turn off all unnecessary lights and acces-
sories in both vehicles.
3. Attach the clamps of the jumper cable in the
exact location shown in the illustration. First, attach one clamp of the jumper cable to the positive (+) post or cable of the discharged battery. Then attach the other end of the same cable to the positive (+) post or cable of the booster battery. Next, using the other cable, attach one clamp to the negative (-) post or cable of the booster battery. Then attach the other end of that cable to a solid metal part of the engine away from the battery. Do not connect the cable to any moving part.
4. Start the engine in the car with the booster battery and let it run for a few minutes. This will help to assure that the booster battery is fully charged. During the jumping operation,run the engine in this vehicle at about 2000 rpm.
5. Start the engine in the car with the discharged battery using the normal starting procedure. After the engine starts, leave the jumper cables connected and let the engine run at fast idle or about 2000 rpm for several min- utes.
6. Carefully remove the jumper cables in the reverse order of attachment.
If you do not know why your battery became discharged (because the lights were left on, etc.), have the charging system checked by your Hyundai dealer. visible loss of coolant and no steam, leave theengine running and check to be sure the engine cooling fan is operating. If the fan is not running, turn the engine off.
4. Check to see if the water pump drive belt is
missing. If it is not missing, check to see that it is tight. If the drive belt seems to be satis- factory, check for engine coolant leaking from the radiator, hoses or under the car. (If the air conditioning had been in use, it is normal for cold water to be draining from it when you stop).
WARNING: While the engine is running, keep hands and clothing away from moving parts such as the fan and drive belts to prevent injury.
5. If the water pump drive belt is broken or coolant is leaking out, stop the engine im- mediately and call the nearest Hyundai deal- er for assistance.
WARNING: Do not remove the radiator cap when the engine is hot. This can allow coolant to be blown out of the opening and cause serious burns.
6. If you cannot find the cause of the overheat- ing, wait until the engine temperature has returned to normal. Then, if coolant has been lost, carefully add coolant to the reservoir (Page 6-8) to bring the fluid level in the reser- voir up to the halfway mark.
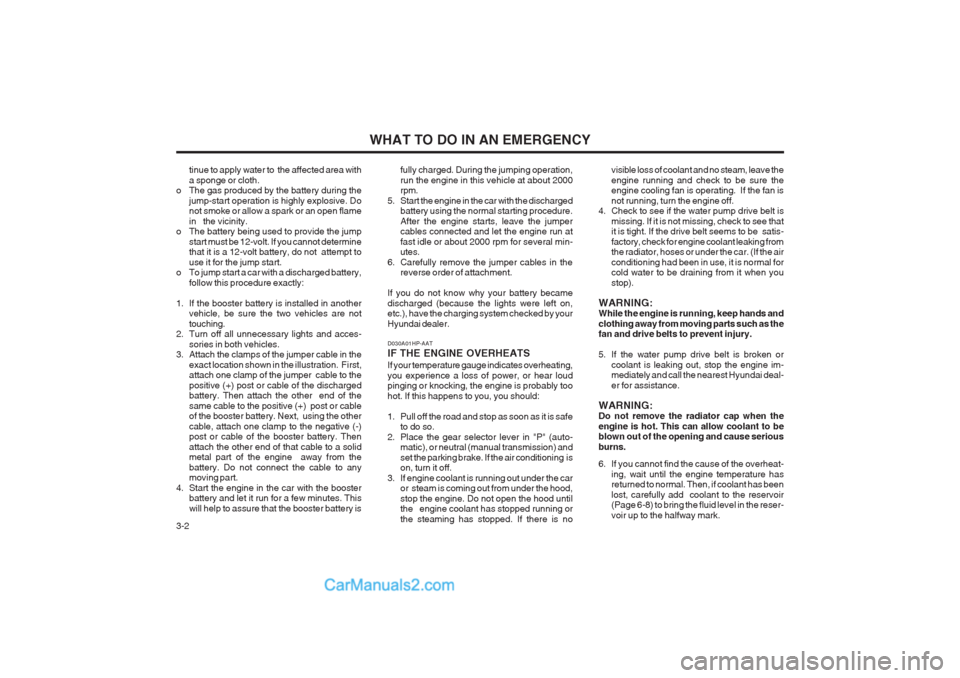
D030A01HP-AAT IF THE ENGINE OVERHEATS If your temperature gauge indicates overheating, you experience a loss of power, or hear loud pinging or knocking, the engine is probably too hot. If this happens to you, you should:
1. Pull off the road and stop as soon as it is safe
to do so.
2. Place the gear selector lever in "P" (auto- matic), or neutral (manual transmission) and set the parking brake. If the air conditioning is on, turn it off.
3. If engine coolant is running out under the car or steam is coming out from under the hood, stop the engine. Do not open the hood until the engine coolant has stopped running or the steaming has stopped. If there is no
Page 127 of 349
WHAT TO DO IN AN EMERGENCY 3-3
7. Proceed with caution, keeping alert for fur-
ther signs of overheating. If overheating hap- pens again, call a Hyundai dealer for assis- tance.
CAUTION: Serious loss of coolant indicates there is a leak in the cooling system and this should be checked as soon as possible by a Hyundai dealer. D040A01HP-GAT SPARE TIREThe following instructions for the FULL SIZE spare tire should be observed: Check inflation pressure as soon as possible after installing the spare tire, and adjust to the specified pressure. The tire pressure should be periodically checked and maintained at the spec- ified pressure while the tire is stored.
Inflation Pressure
Tire Size
Full Size 200 kPa (29 psi)
Spare Tire Pressure
D040B01HP
D040B03HP-GAT Handling the Spare Tire
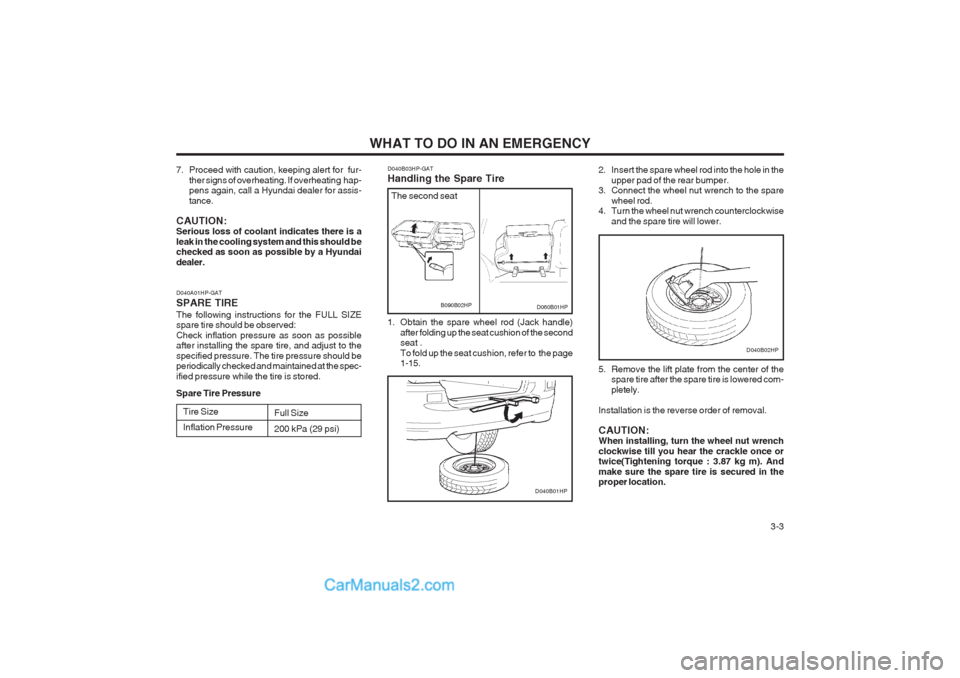
1. Obtain the spare wheel rod (Jack handle)
after folding up the seat cushion of the second seat . To fold up the seat cushion, refer to the page 1-15. 5. Remove the lift plate from the center of the
spare tire after the spare tire is lowered com- pletely.
Installation is the reverse order of removal. CAUTION: When installing, turn the wheel nut wrench clockwise till you hear the crackle once or
twice(Tightening torque : 3.87 kg m). And make sure the spare tire is secured in the proper location.
D060B01HPB090B02HP
The second seat
D040B02HP
2. Insert the spare wheel rod into the hole in the upper pad of the rear bumper.
3. Connect the wheel nut wrench to the spare
wheel rod.
4. Turn the wheel nut wrench counterclockwise
and the spare tire will lower.
Page 128 of 349
WHAT TO DO IN AN EMERGENCY
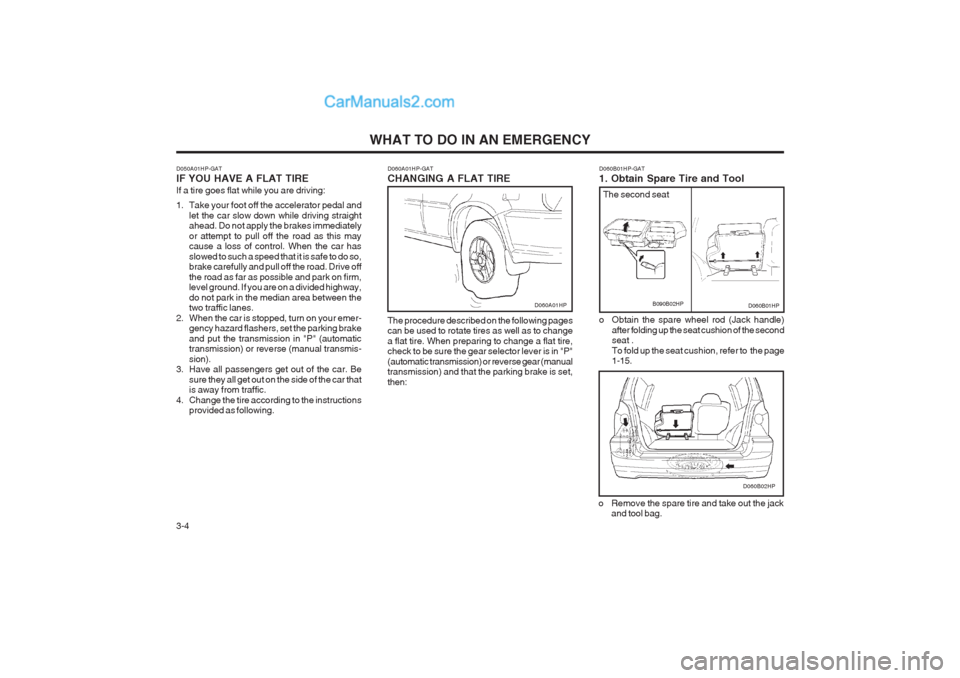
3-4 D060A01HP-GAT CHANGING A FLAT TIRE The procedure described on the following pages can be used to rotate tires as well as to change a flat tire. When preparing to change a flat tire, check to be sure the gear selector lever is in "P" (automatic transmission) or reverse gear (manual transmission) and that the parking brake is set, then:
D060B01HP
o Obtain the spare wheel rod (Jack handle) after folding up the seat cushion of the second seat . To fold up the seat cushion, refer to the page 1-15.
D060B01HP-GAT 1. Obtain Spare Tire and ToolD060A01HP
o Remove the spare tire and take out the jackand tool bag.
D060B02HP
B090B02HP
D050A01HP-GAT IF YOU HAVE A FLAT TIRE If a tire goes flat while you are driving:
1. Take your foot off the accelerator pedal and
let the car slow down while driving straight ahead. Do not apply the brakes immediately or attempt to pull off the road as this may cause a loss of control. When the car has slowed to such a speed that it is safe to do so, brake carefully and pull off the road. Drive off the road as far as possible and park on firm, level ground. If you are on a divided highway, do not park in the median area between the two traffic lanes.
2. When the car is stopped, turn on your emer- gency hazard flashers, set the parking brake and put the transmission in "P" (automatic transmission) or reverse (manual transmis- sion).
3. Have all passengers get out of the car. Be
sure they all get out on the side of the car that is away from traffic.
4. Change the tire according to the instructions provided as following. The second seat
Page 129 of 349
WHAT TO DO IN AN EMERGENCY 3-5
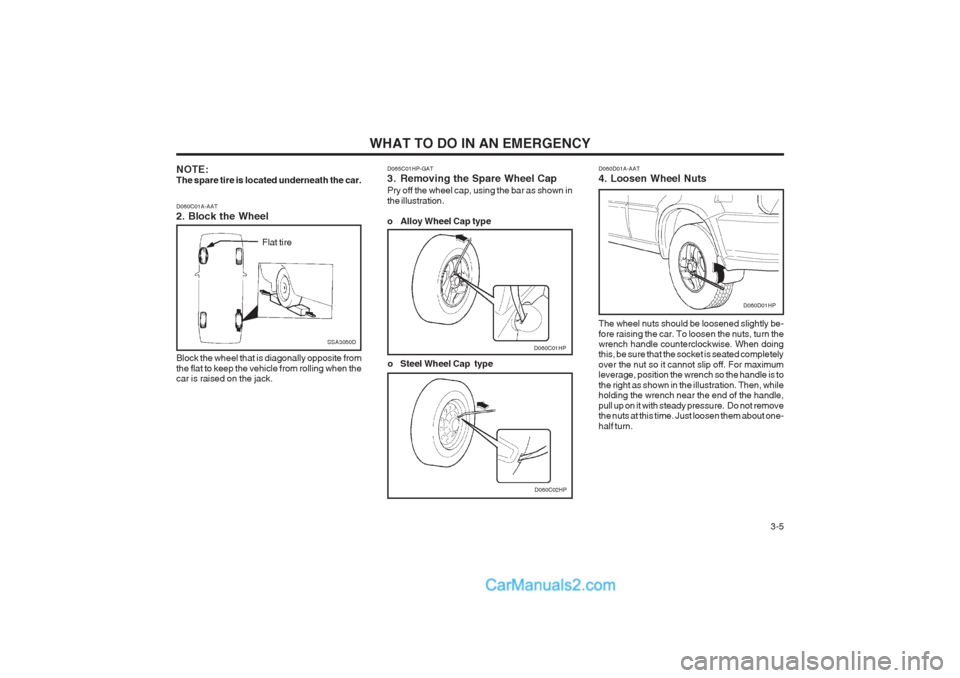
D060C01A-AAT 2. Block the Wheel Block the wheel that is diagonally opposite from the flat to keep the vehicle from rolling when the car is raised on the jack.
Flat tire
SSA3050D D060D01A-AAT 4. Loosen Wheel Nuts The wheel nuts should be loosened slightly be- fore raising the car. To loosen the nuts, turn the wrench handle counterclockwise. When doingthis, be sure that the socket is seated completely over the nut so it cannot slip off. For maximum leverage, position the wrench so the handle is to the right as shown in the illustration. Then, while holding the wrench near the end of the handle, pull up on it with steady pressure. Do not remove the nuts at this time. Just loosen them about one- half turn.
D060D01HP
D065C01HP-GAT
3. Removing the Spare Wheel Cap Pry off the wheel cap, using the bar as shown in the illustration.
o Alloy Wheel Cap type
D060C01HP
D060C02HP
o Steel Wheel Cap type
NOTE: The spare tire is located underneath the car.
Page 130 of 349
WHAT TO DO IN AN EMERGENCY
3-6
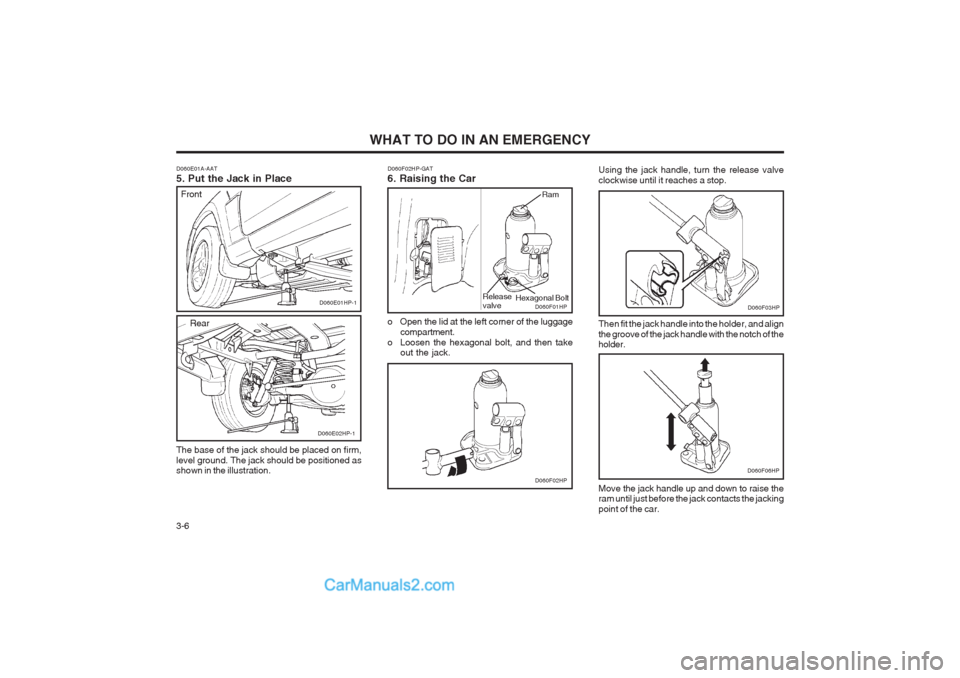
Using the jack handle, turn the release valve clockwise until it reaches a stop. Then fit the jack handle into the holder, and align the groove of the jack handle with the notch of the holder.
D060F02HP
D060F03HP
D060F02HP-GAT 6. Raising the CarD060F01HP
o Open the lid at the left corner of the luggage compartment.
o Loosen the hexagonal bolt, and then take out the jack.
Move the jack handle up and down to raise the ram until just before the jack contacts the jacking point of the car.
D060F06HP
Ram
Hexagonal BoltRelease valve
D060E01A-AAT 5. Put the Jack in Place The base of the jack should be placed on firm, level ground. The jack should be positioned as shown in the illustration.D060E01HP-1
D060E02HP-1
Rear
Front