Hyundai Terracan 2003 Manual Online
Manufacturer: HYUNDAI, Model Year: 2003, Model line: Terracan, Model: Hyundai Terracan 2003Pages: 349, PDF Size: 4.56 MB
Page 81 of 349
FEATURES OF YOUR HYUNDAI 1- 73
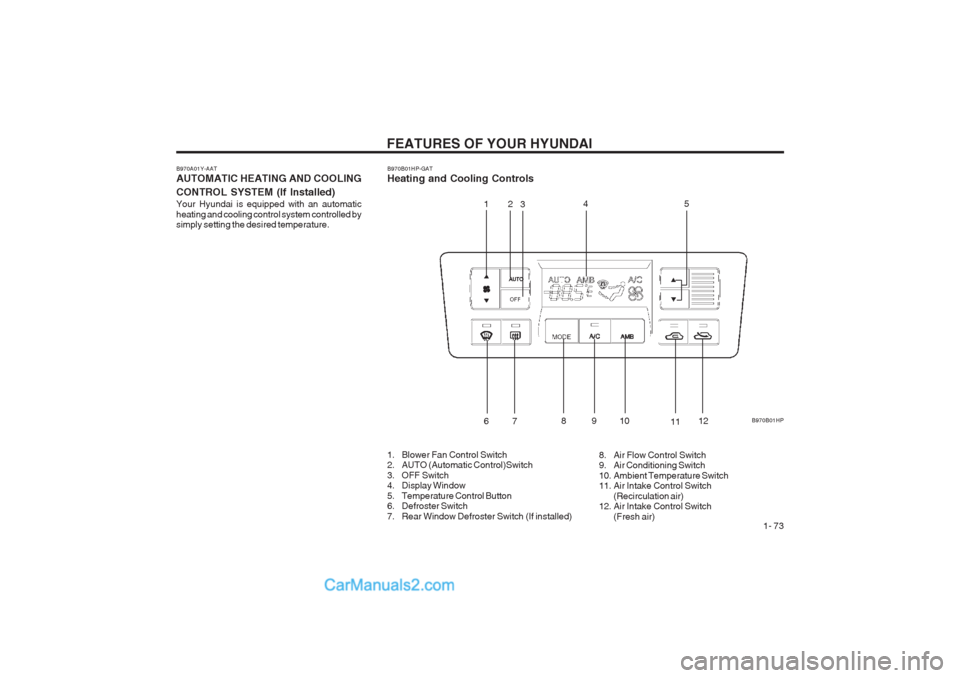
B970A01Y-AAT AUTOMATIC HEATING AND COOLING CONTROL SYSTEM (If lnstalled) Your Hyundai is equipped with an automatic heating and cooling control system controlled by simply setting the desired temperature.B970B01HP-GAT Heating and Cooling Controls
1. Blower Fan Control Switch
2. AUTO (Automatic Control)Switch
3. OFF Switch
4. Display Window
5. Temperature Control Button
6. Defroster Switch
7. Rear Window Defroster Switch (If installed) 8. Air Flow Control Switch
9. Air Conditioning Switch
10. Ambient Temperature Switch
11. Air Intake Control Switch
(Recirculation air)
12. Air Intake Control Switch
(Fresh air) B970B01HP
12
3 45
67 891
0
1112
Page 82 of 349
FEATURES OF YOUR HYUNDAI
1- 74
B970C02L-AAT Automatic Operation
B970C01HP
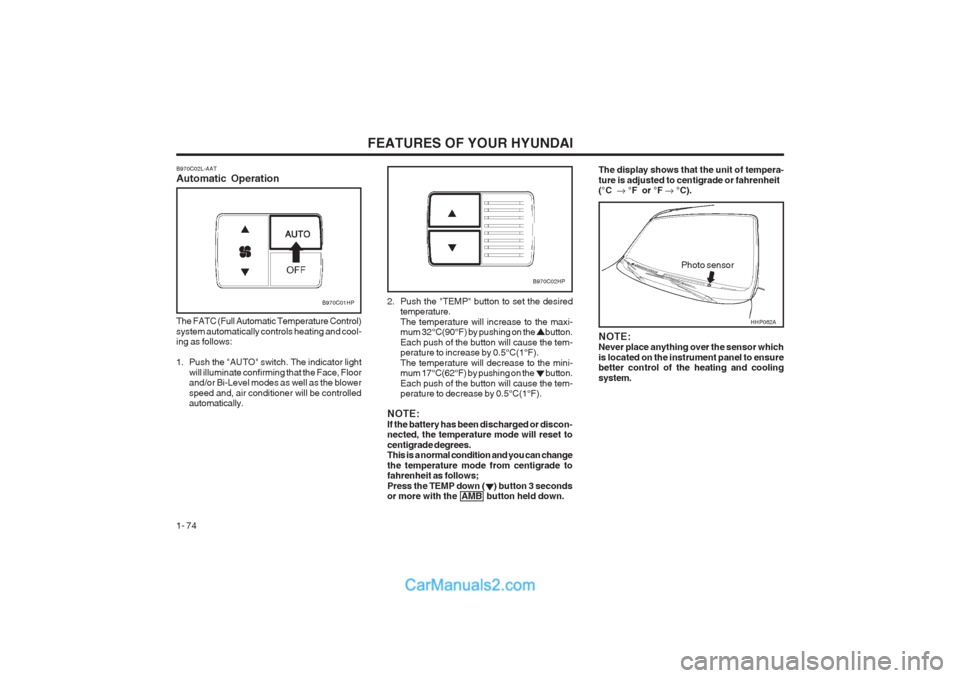
The FATC (Full Automatic Temperature Control) system automatically controls heating and cool- ing as follows:
1. Push the "AUTO" switch. The indicator light will illuminate confirming that the Face, Floor and/or Bi-Level modes as well as the blower speed and, air conditioner will be controlled automatically. 2. Push the "TEMP" button to set the desired
temperature. The temperature will increase to the maxi- mum 32°C(90°F) by pushing on the button. Each push of the button will cause the tem- perature to increase by 0.5°C(1°F). The temperature will decrease to the mini- mum 17°C(62°F) by pushing on the button. Each push of the button will cause the tem- perature to decrease by 0.5°C(1°F).
NOTE: If the battery has been discharged or discon- nected, the temperature mode will reset to centigrade degrees. This is a normal condition and you can change the temperature mode from centigrade to fahrenheit as follows; Press the TEMP down ( ) button 3 seconds or more with the AMB button held down.
Photo sensor
B970C02HP
NOTE: Never place anything over the sensor which is located on the instrument panel to ensure better control of the heating and cooling system.
The display shows that the unit of tempera- ture is adjusted to centigrade or fahrenheit (°C � °F or °F � °C).
HHP062A
Page 83 of 349
FEATURES OF YOUR HYUNDAI 1- 75
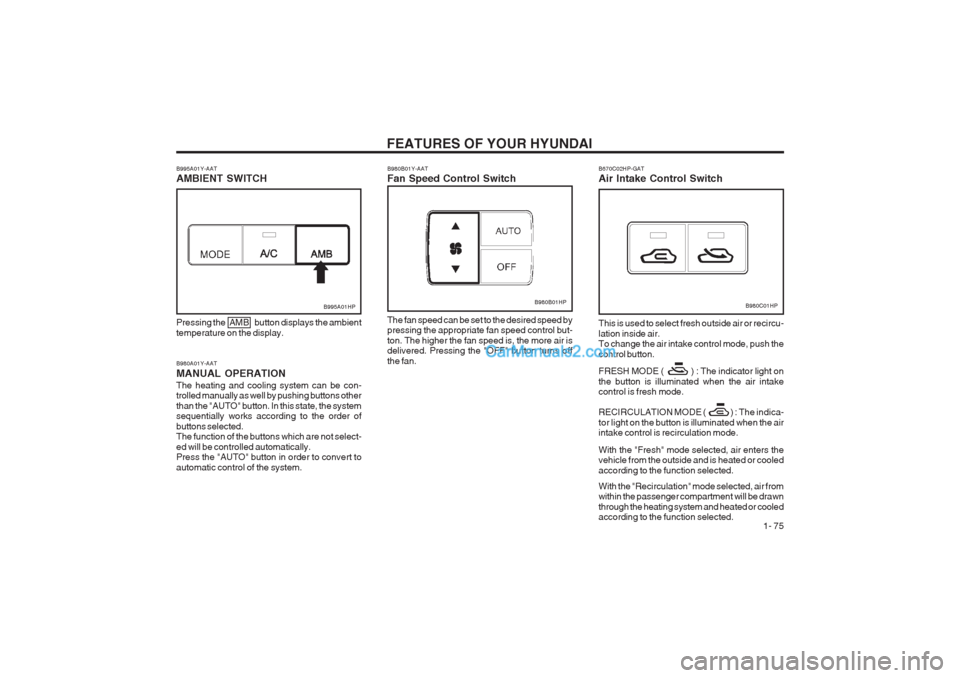
B980A01Y-AAT MANUAL OPERATIONThe heating and cooling system can be con- trolled manually as well by pushing buttons other than the "AUTO" button. In this state, the system sequentially works according to the order of buttons selected. The function of the buttons which are not select- ed will be controlled automatically. Press the "AUTO" button in order to convert to automatic control of the system.
B995A01HP
Pressing the AMB button displays the ambient temperature on the display.
B980B01Y-AAT Fan Speed Control Switch
B980B01HP
The fan speed can be set to the desired speed by pressing the appropriate fan speed control but- ton. The higher the fan speed is, the more air is delivered. Pressing the "OFF" button turns off the fan.
B995A01Y-AAT AMBIENT SWITCHB980C01HP
B670C02HP-GAT Air Intake Control Switch This is used to select fresh outside air or recircu- lation inside air. To change the air intake control mode, push the control button. FRESH MODE ( ) : The indicator light on the button is illuminated when the air intake control is fresh mode.
RECIRCULATION MODE ( ) :
The indica-
tor light on the button is illuminated when the air
intake control is recirculation mode. With the "Fresh" mode selected, air enters the vehicle from the outside and is heated or cooled according to the function selected. With the "Recirculation" mode selected, air from within the passenger compartment will be drawn through the heating system and heated or cooled according to the function selected.
Page 84 of 349
FEATURES OF YOUR HYUNDAI
1- 76 B980D01Y-AAT Heating and Cooling System Off Press the "OFF" button to stop the operation of the heating and cooling system.
NOTE:
o It should be noted that prolonged opera-
tion of the heating system in "Recircula-tion" mode will give rise to fogging of the windshield and side windows and the air within the passenger compartment will become stale. In addition, prolonged use of the air conditioning with the "Recircu- lation" mode selected may result in the air within the passenger compartment be- coming excessively dry.
o When the ignition switch is turned "ON",
the air intake control will change to ( )
mode (regardless of switch position). This
is normal operation. The air intake control
operates in "AUTO" mode when turning the ignition to the ON position if the "AUTO" mode was used before shutting off the engine.
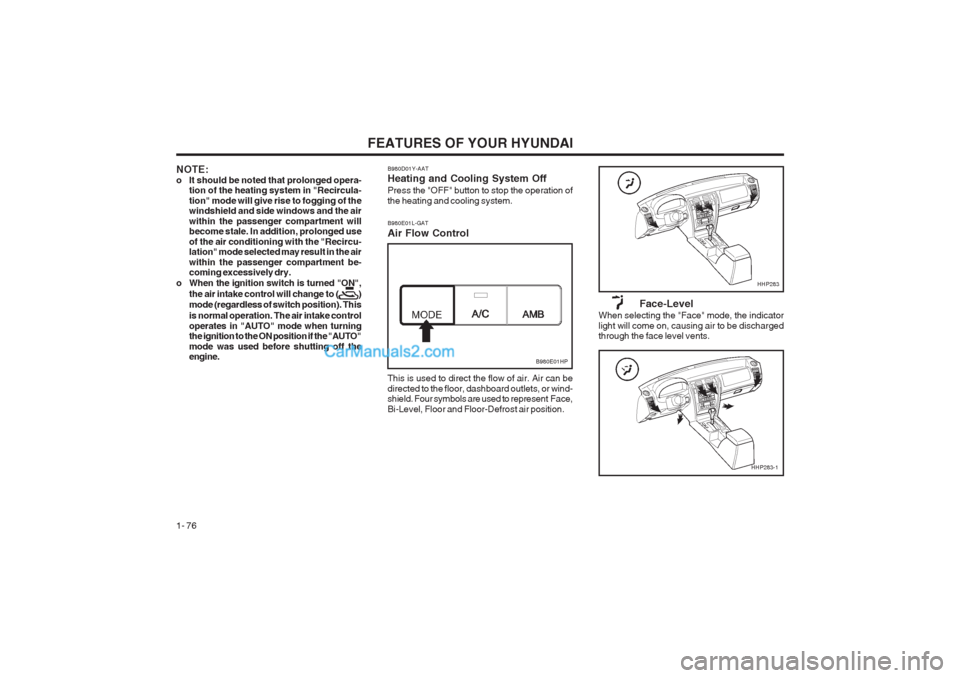
This is used to direct the flow of air. Air can be directed to the floor, dashboard outlets, or wind- shield. Four symbols are used to represent Face, Bi-Level, Floor and Floor-Defrost air position.
B980E01L-GAT Air Flow Control
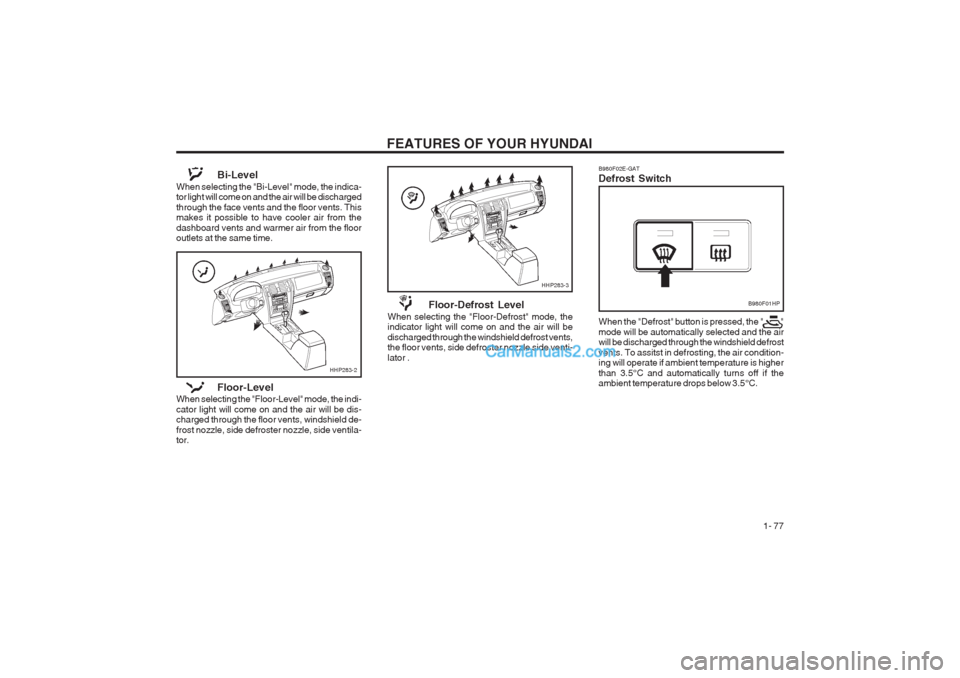
Face-Level
When selecting the "Face" mode, the indicator light will come on, causing air to be discharged through the face level vents.
B980E01HP
HHP283
HHP283-1
Page 85 of 349
FEATURES OF YOUR HYUNDAI 1- 77
B980F02E-GAT Defrost Switch When the "Defrost" button is pressed, the " " mode will be automatically selected and the air will be discharged through the windshield defrost vents. To assitst in defrosting, the air condition- ing will operate if ambient temperature is higher than 3.5°C and automatically turns off if the ambient temperature drops below 3.5°C.
B980F01HP
Bi-Level
When selecting the "Bi-Level" mode, the indica- tor light will come on and the air will be discharged through the face vents and the floor vents. This makes it possible to have cooler air from the dashboard vents and warmer air from the floor outlets at the same time.
Floor-Level
When selecting the "Floor-Level" mode, the indi- cator light will come on and the air will be dis- charged through the floor vents, windshield de- frost nozzle, side defroster nozzle, side ventila- tor. Floor-Defrost Level
When selecting the "Floor-Defrost" mode, theindicator light will come on and the air will be discharged through the windshield defrost vents, the floor vents, side defroster nozzle side venti- lator .
HHP283-2
HHP283-3
Page 86 of 349
FEATURES OF YOUR HYUNDAI
1- 78 B740D01Y-AAT Operation Tips
o If the interior of the car is hot when you first get
in, open the windows for a few minutes to expel the hot air.
o When you are using the air conditioning sys- tem, keep all windows closed to keep hot air out.
o When moving slowly, as in heavy traffic, shift
to a lower gear. This increases engine speed, which in turn increases the speed of the air conditioning compressor.
o On steep grades, turn the air conditioning off
to avoid the possibility of the engine overheat- ing.
o During winter months or in periods when the air conditioning is not used regularly, run the air conditioning once every month for a few minutes. This will help circulate the lubricants and keep your system in peak operating condition.
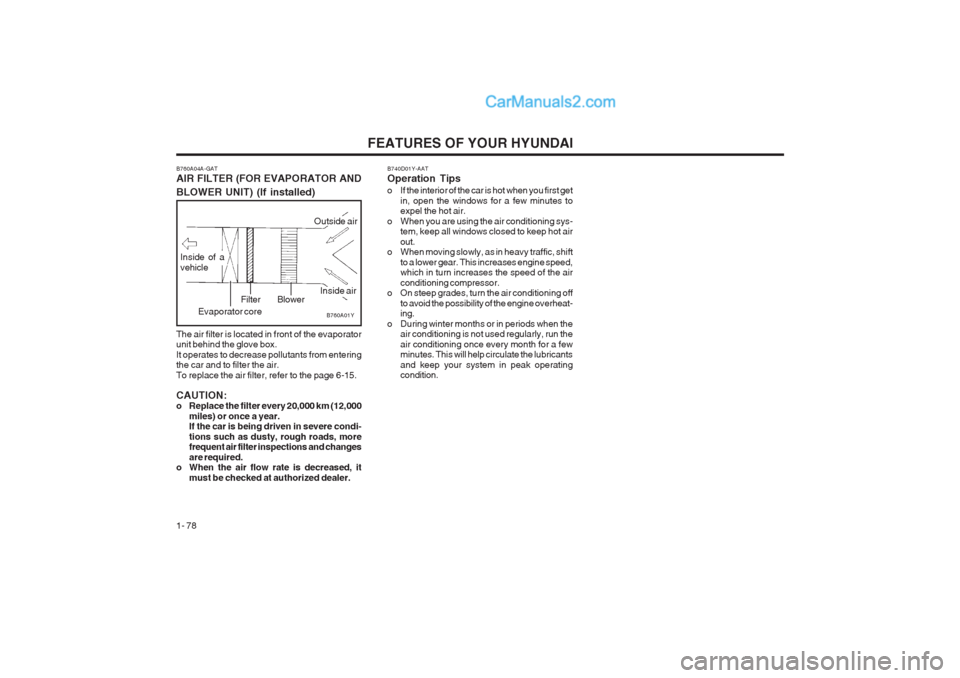
B760A04A-GAT AIR FILTER (FOR EVAPORATOR AND BLOWER UNIT) (If installed) The air filter is located in front of the evaporator unit behind the glove box. It operates to decrease pollutants from entering the car and to filter the air. To replace the air filter, refer to the page 6-15. CAUTION:
o Replace the filter every 20,000 km (12,000
miles) or once a year.If the car is being driven in severe condi- tions such as dusty, rough roads, more frequent air filter inspections and changes are required.
o When the air flow rate is decreased, it
must be checked at authorized dealer.
B760A01Y
Inside of a vehicle
Evaporator core Filter Blower
Outside air
Inside air
Page 87 of 349
FEATURES OF YOUR HYUNDAI 1- 79
MountainsBuildings
Obstructed area Iron bridges
Unobstructed area
FM radio station
SSAR012A
Ionosphere
SSAR011A
AM reception
IonosphereFM reception
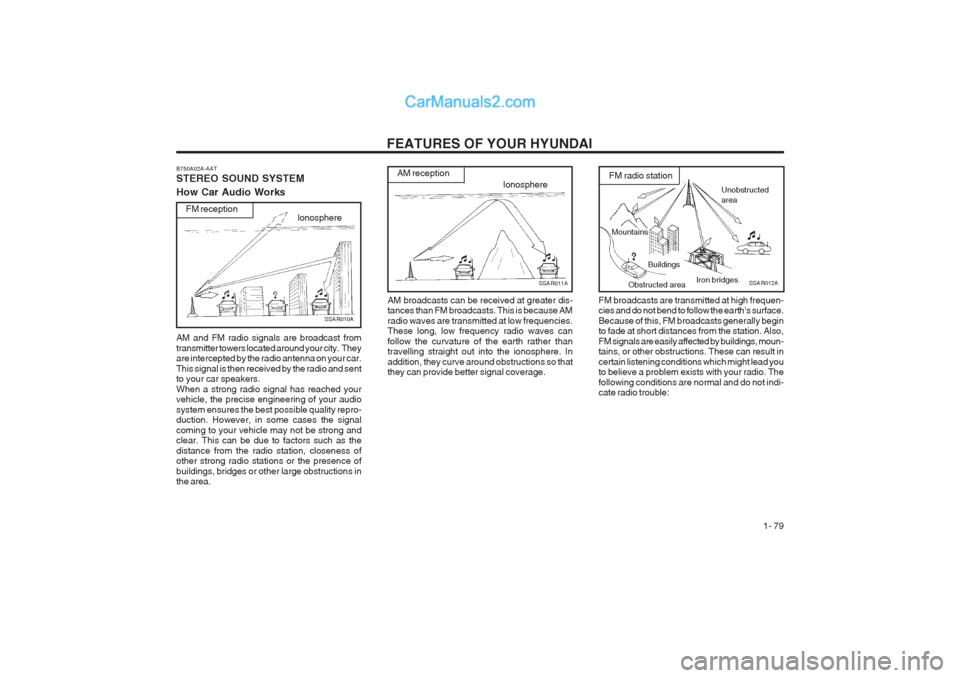
SSAR010A FM broadcasts are transmitted at high frequen- cies and do not bend to follow the earth's surface. Because of this, FM broadcasts generally begin to fade at short distances from the station. Also, FM signals are easily affected by buildings, moun- tains, or other obstructions. These can result in certain listening conditions which might lead you to believe a problem exists with your radio. The following conditions are normal and do not indi- cate radio trouble:
AM broadcasts can be received at greater dis-tances than FM broadcasts. This is because AM radio waves are transmitted at low frequencies. These long, low frequency radio waves can follow the curvature of the earth rather than travelling straight out into the ionosphere. In addition, they curve around obstructions so that they can provide better signal coverage.
B750A02A-AAT STEREO SOUND SYSTEM How Car Audio Works AM and FM radio signals are broadcast from transmitter towers located around your city. They are intercepted by the radio antenna on your car. This signal is then received by the radio and sent to your car speakers. When a strong radio signal has reached your vehicle, the precise engineering of your audio system ensures the best possible quality repro- duction. However, in some cases the signal coming to your vehicle may not be strong and clear. This can be due to factors such as the distance from the radio station, closeness of other strong radio stations or the presence of buildings, bridges or other large obstructions in the area.
Page 88 of 349
FEATURES OF YOUR HYUNDAI
1- 80 B750B02Y-AAT Using a cellular phone or a two-way radio When a cellular phone is used inside the vehicle, noise may be produced from the audio equip- ment. This does not mean that something is wrong with the audio equipment. In such a case, use the cellular phone at a place as far as possible from the audio equipment. CAUTION: When using a communication system such a cellular phone or a radio set inside the vehi- cle, a separate external antenna must be fitted. When a cellular phone or a radio set is used with an internal antenna alone, it may interfere with the vehicle's electrical system and adversely affect safe operation of the vehicle. WARNING: Don't use a cellular phone when you are driving. Stop at a safe place to use a cellular phone.
SSAR013ASSAR014A
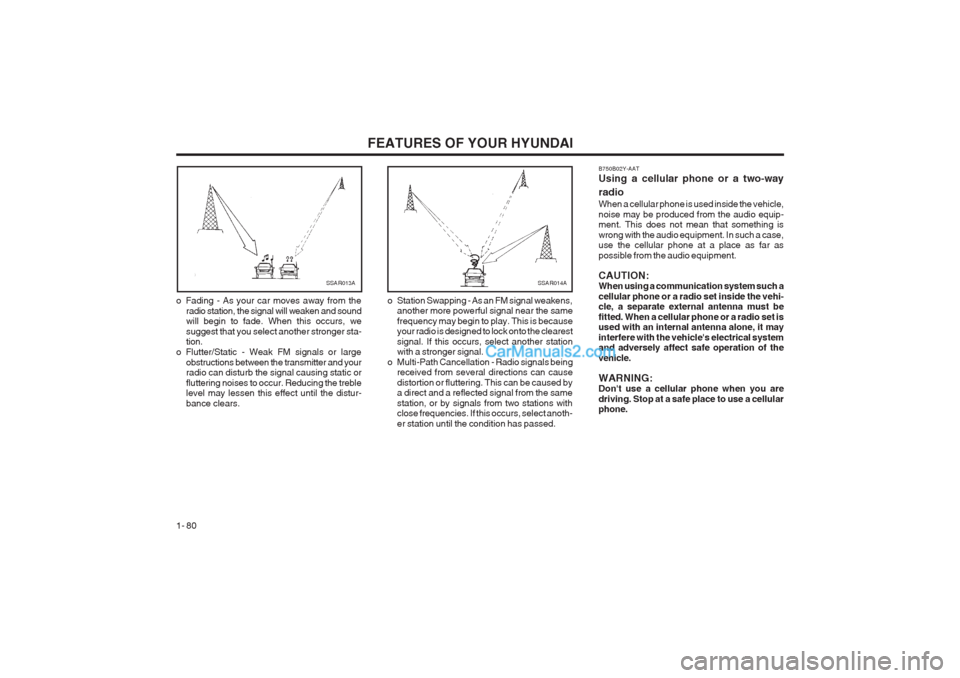
o Fading - As your car moves away from the radio station, the signal will weaken and sound will begin to fade. When this occurs, we suggest that you select another stronger sta- tion.
o Flutter/Static - Weak FM signals or large obstructions between the transmitter and yourradio can disturb the signal causing static or fluttering noises to occur. Reducing the treble level may lessen this effect until the distur- bance clears. o Station Swapping - As an FM signal weakens,
another more powerful signal near the samefrequency may begin to play. This is because your radio is designed to lock onto the clearest signal. If this occurs, select another station with a stronger signal.
o Multi-Path Cancellation - Radio signals being received from several directions can cause distortion or fluttering. This can be caused by a direct and a reflected signal from the same station, or by signals from two stations with close frequencies. If this occurs, select anoth- er station until the condition has passed.
Page 89 of 349
FEATURES OF YOUR HYUNDAI 1- 81
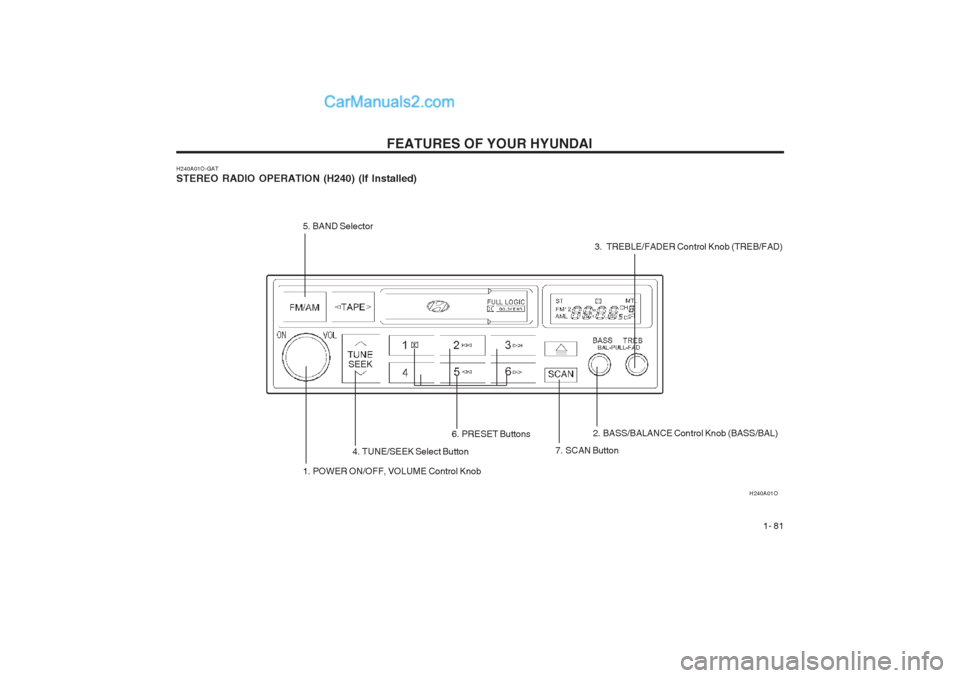
H240A01O-GAT STEREO RADIO OPERATION (H240) (If Installed) H240A01O
1. POWER ON/OFF, VOLUME Control Knob
5. BAND Selector4. TUNE/SEEK Select Button
7. SCAN Button
6. PRESET Buttons
2. BASS/BALANCE Control Knob (BASS/BAL)
3. TREBLE/FADER Control Knob (TREB/FAD)
SEEK
Page 90 of 349
FEATURES OF YOUR HYUNDAI
1- 82 FAD (Fader Control) Knob Pull the treble control knob further out. Turn the control knob counterclockwise to em- phasize front speaker sound (rear speaker sound will be attenuated). When the control knob is turned clockwise, rear speaker sound will be emphasized (front speaker sound will be attenuated). 4. TUNE (Manual) Select Button Press the side or side to increase or to decrease the frequency. Press either button and hold down to continuously scroll. Release button once the desired station is reached. SEEK Operation (Automatic Channel Selection) Press the TUNE select button 0.5 sec or more. Releasing it will automatically tune to the next available station with a beep sound. When the side is pressed longer than 0.5 second, releasing will automatically tune to the next higher frequency and when the side is pressed longer than 0.5 second, releasing will automatically tune to the next lower frequency. 5. BAND Selector Pressing the button changes the AM, FM1 and FM2 bands. The mode selected is displayed on LCD.
6. PRESET STATION SELECT Button Six (6) stations for AM, FM and FM2 respectively can be preset in the electronic memory circuit on this unit. HOW TO PRESET STATIONS Six AM and twelve FM stations may be pro- grammed into the memory of the radio. Then, by simply pressing the band select button and/or one of the six station select buttons, you may recall any of these stations instantly. To program the stations, follow these steps:
o Press band selector to set the band for AM,
FM, or FM2.
o Select the desired station to be stored by
seek or manual tuning.
o Determine the preset station select button
you wish to use to access that station.
o Press the station select button for more than
two seconds. A select button indicator will show in the display indicating which select button you have depressed. The frequency display will flash after it has been stored into the memory with a beep sound. You should then release the button, and proceed to pro- gram the next desired station. A total of 18 stations can be programmed by selecting one AM and two FM stations per button.
o When completed, any preset station may be
recalled by selecting AM, FM or FM2 band and the appropriate station button.
H240B02O-AAT
1. POWER ON-OFF Control Knob The radio unit may be operated when the ignition key is in the "ACC" or "ON" position. Press the knob to switch the power on. The LCD shows the radio frequency in the radio mode or the tape direction indicator in the tape mode. To switch the power off, press the knob again. VOLUME Control Rotate the knob clockwise to increase the vol- ume and turn the knob counterclockwise to re- duce the volume. 2. BASS Control Knob Press to pop the knob out and turn to the left or right for the desired bass tone. BAL (Balance Control) Knob Pull the bass control knob further out. Turn the control knob clockwise to emphasize right speaker sound (left speaker sound will be at- tenuated). When the control knob is turned counterclock- wise, left speaker sound will be emphasized (right speaker sound will be attenuated). 3. TREB (Treble Control) Knob Press to pop the knob out and turn to the left or right for the desired treble tone.
FM/AM