INFINITI M 2010 Owners Manual
Manufacturer: INFINITI, Model Year: 2010, Model line: M, Model: INFINITI M 2010Pages: 445, PDF Size: 6.15 MB
Page 181 of 445
Guidance Voice :
When this item is turned to ON, you will hear
voice guidance in the navigation (if so
equipped) operation or in other operations.
Ringer Vol./Incoming Call/Outgoing Call :
For the details of these items, see
ªBLUETOOTHTHANDS-FREE PHONE SYSTEM
WITH NAVIGATION SYSTEMº later in this sec-
tion.
Button Beeps :
When this item is turned to ON, you will hear a
beep sound when you use a button.
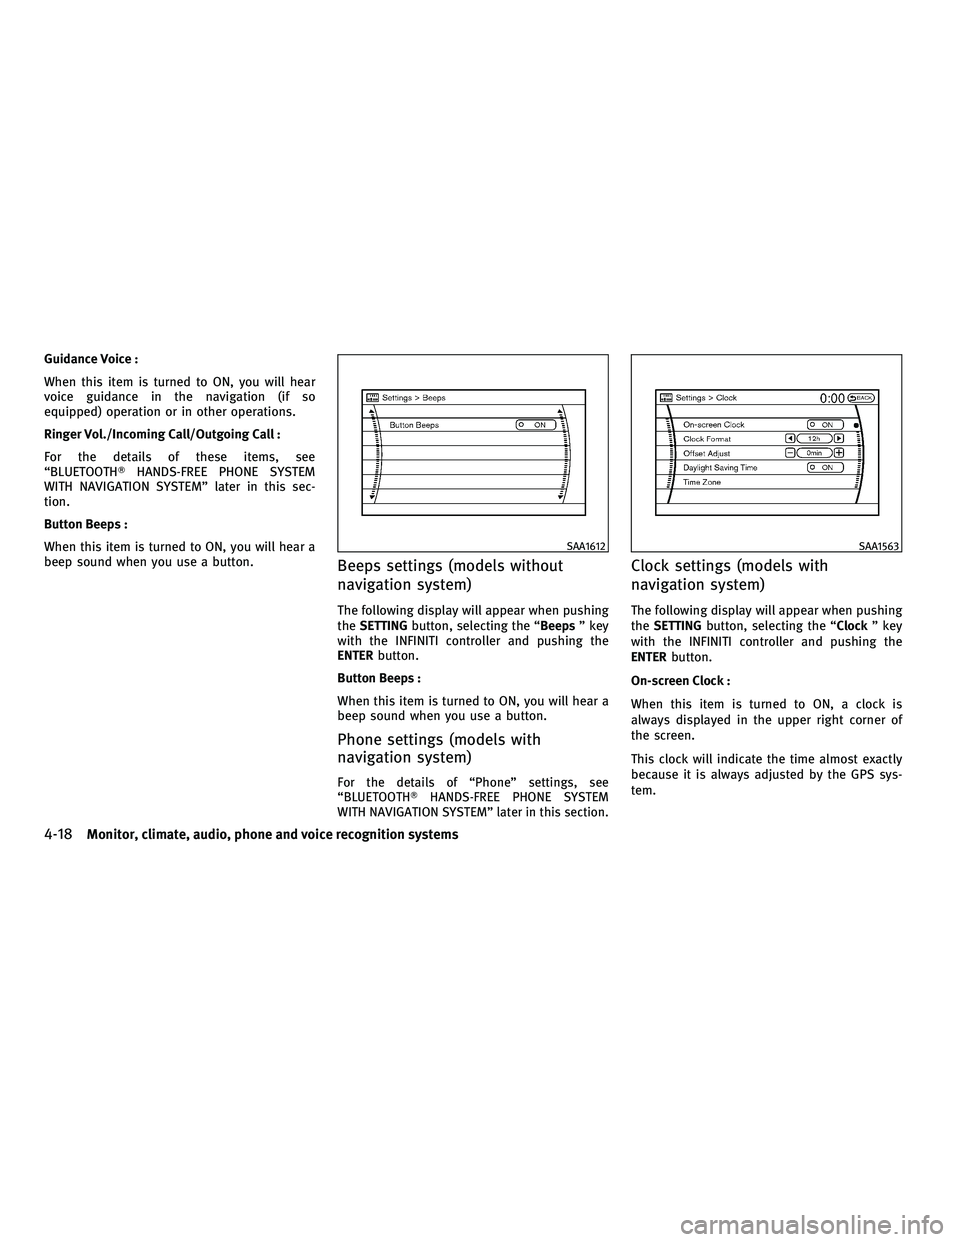
Beeps settings (models without
navigation system)
The following display will appear when pushing
the SETTING button, selecting the ª Beepsº key
with the INFINITI controller and pushing the
ENTER button.
Button Beeps :
When this item is turned to ON, you will hear a
beep sound when you use a button.
Phone settings (models with
navigation system)
For the details of ªPhoneº settings, see
ªBLUETOOTHT HANDS-FREE PHONE SYSTEM
WITH NAVIGATION SYSTEMº later in this section.
Clock settings (models with
navigation system)
The following display will appear when pushing
the SETTING button, selecting the ªClock º key
with the INFINITI controller and pushing the
ENTER button.
On-screen Clock :
When this item is turned to ON, a clock is
always displayed in the upper right corner of
the screen.
This clock will indicate the time almost exactly
because it is always adjusted by the GPS sys-
tem.
SAA1612SAA1563
4-18Monitor, climate, audio, phone and voice recognition systems
wÐ
Ð
05/14/09Ðpattie
X
Page 182 of 445
Clock Format :
Choose either the 12-hour clock display or the
24-hour clock display.
Offset Adjust :
Adjust the time by increasing or decreasing per
minute.
Daylight Saving Time :
Turn this item to ON for daylight saving time
application.
Time Zone :
Choose the time zone from the following
cPacific
c Mountain
c Central
c Eastern
c Atlantic
c Newfoundland
c Hawaii
c Aleutian
c Alaska
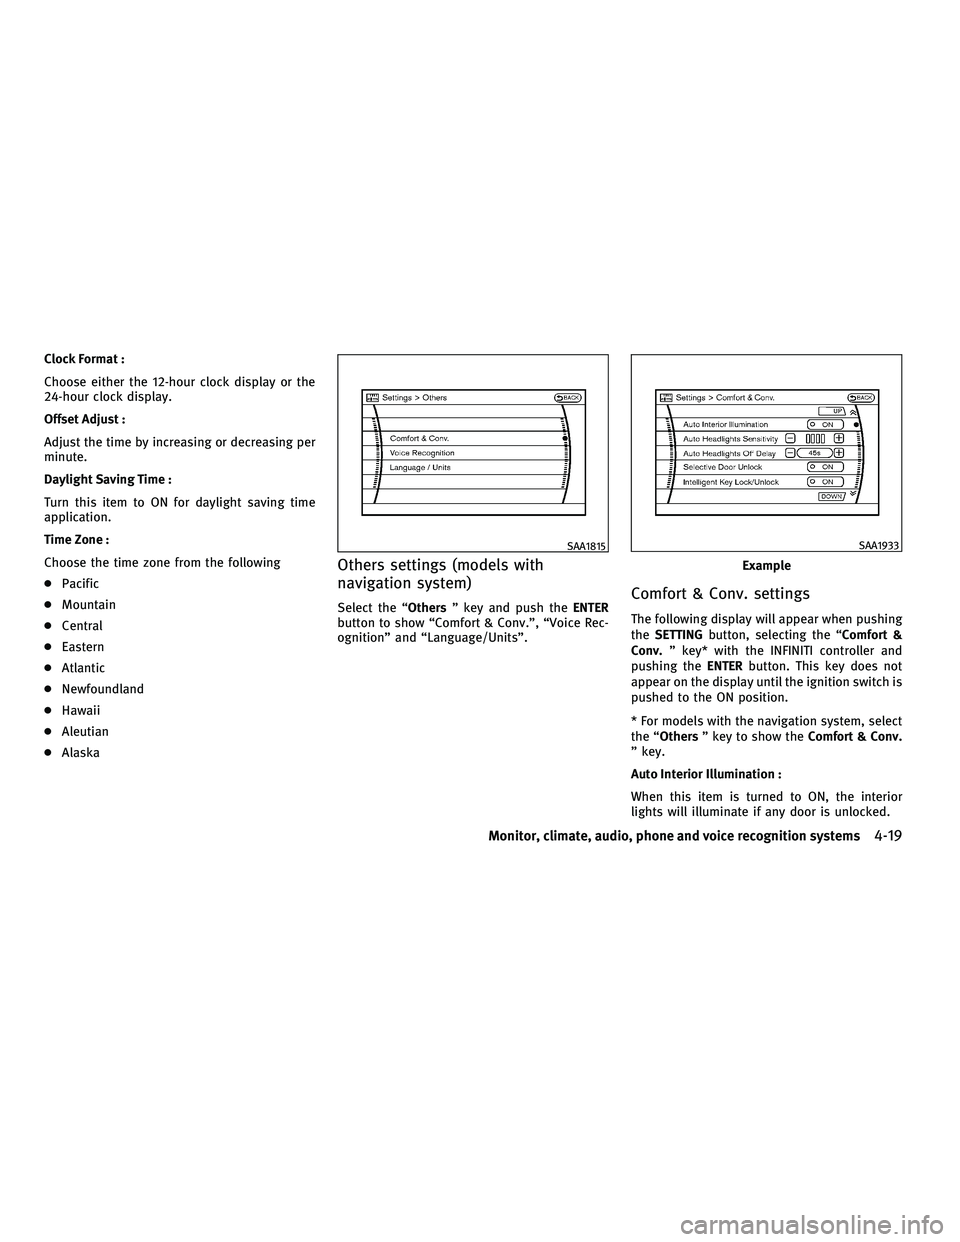
Others settings (models with
navigation system)
Select the ªOthers º key and push the ENTER
button to show ªComfort & Conv.º, ªVoice Rec-
ognitionº and ªLanguage/Unitsº.Comfort & Conv. settings
The following display will appear when pushing
the SETTING button, selecting the ªComfort &
Conv. º key* with the INFINITI controller and
pushing the ENTERbutton. This key does not
appear on the display until the ignition switch is
pushed to the ON position.
* For models with the navigation system, select
the ªOthers º key to show the Comfort & Conv.
º key.
Auto Interior Illumination :
When this item is turned to ON, the interior
lights will illuminate if any door is unlocked.
SAA1815
Example
SAA1933
Monitor, climate, audio, phone and voice recognition systems4-19
wÐ
Ð
05/14/09Ðpattie
X
Page 183 of 445
Auto Headlights Sensitivity (if so equipped) :
Adjust the sensitivity of the automatic head-
lights higher (right) or lower (left).
Auto Headlights Off Delay (if so equipped) :
Choose the duration of the automatic headlight
off timer from 0, 30, 45, 60, 90, 120, 150 and
180 second periods.
Selective Door Unlock :
When this item is turned to ON, only the driver's
door is unlocked first after the door unlock
operation. When the door handle request
switch on the driver's or front passenger's side
door is pushed to be unlocked, only the corre-
sponding door is unlocked first. All the doors
can be unlocked if the door unlock operation is
performed again within 5 seconds.
When this item is turned to OFF, all the doors
will be unlocked after the door unlock operation
is performed once.
Intelligent Key Lock/Unlock :
When this item is turned to ON, door
lock/unlock function by pushing the door
handle request switch will be activated.
Lift Steering Wheel on Exit (if so equipped) :
When this item is turned to ON, the steering
wheel moves upward for easy exit if the ignitionswitch is in the LOCK position and the driver's
door is opened. After getting into the vehicle
and pushing the ignition switch to the ACC
position, the steering wheel moves to the pre-
vious position.
Slide Driver Seat Back on Exit (if so equipped) :
When this item is turned to ON, the driver's seat
moves backward for easy exit if the ignition
switch is in the LOCK position and the driver's
door is opened. After getting into the vehicle
and pushing the ignition switch to the ACC
position, the driver's seat moves to the previous
position.
Return All Settings to Default :
Select this item, push the
ENTERbutton and
choose ªYESº if you want to return all settings
to the default.
Voice Recognition settings (models
with navigation system)
For details about the ªVoice Recognitionº set-
tings, see ªINFINITI VOICE RECOGNITION SYS-
TEM (models with navigation system)º later in
this section.
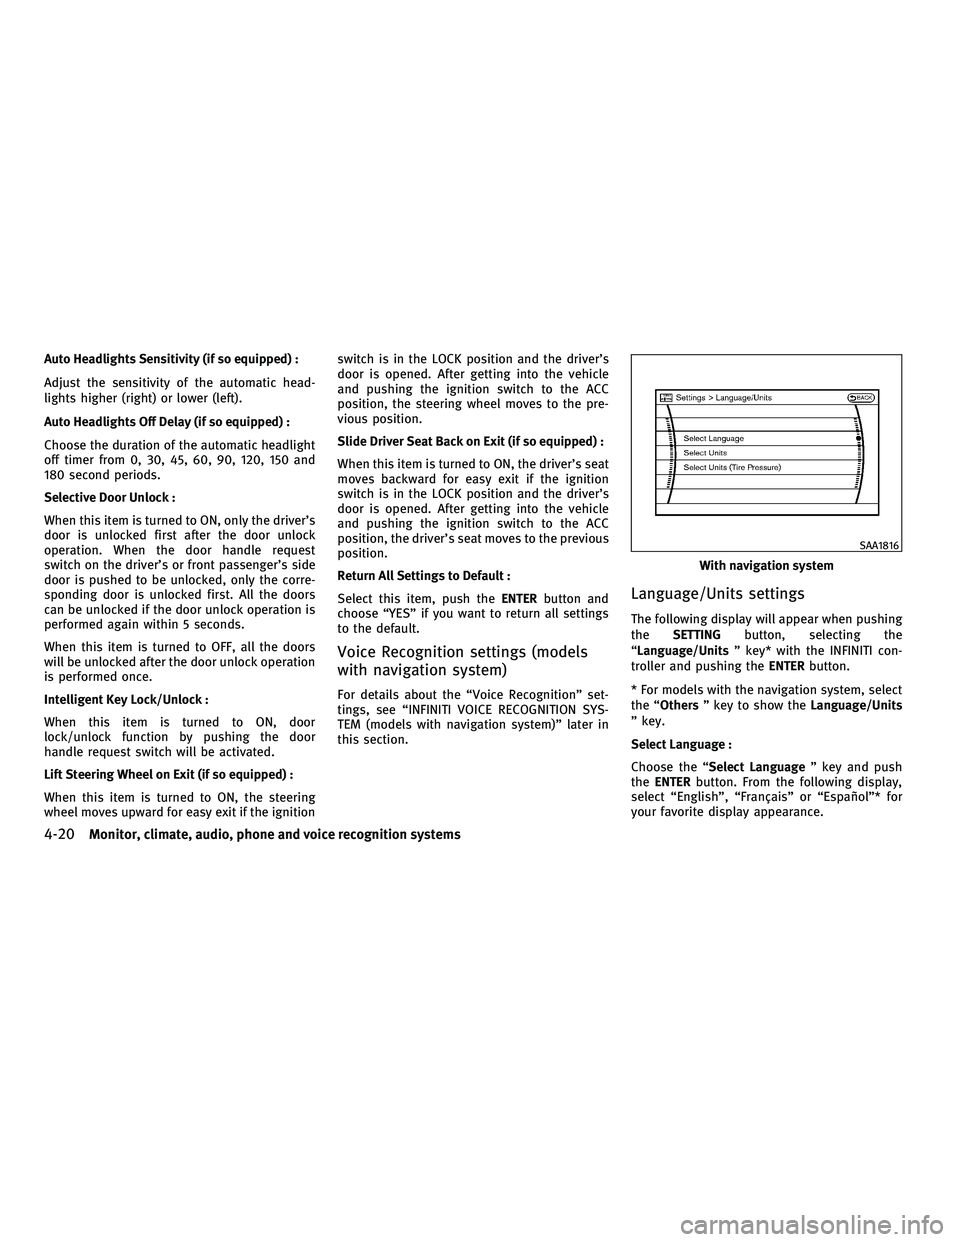
Language/Units settings
The following display will appear when pushing
the SETTING button, selecting the
ªLanguage/Units º key* with the INFINITI con-
troller and pushing the ENTERbutton.
* For models with the navigation system, select
the ªOthers º key to show the Language/Units
º key.
Select Language :
Choose the ª Select Language º key and push
the ENTER button. From the following display,
select ªEnglishº, ªFranÕaisº or ªEspaÞolº* for
your favorite display appearance.
With navigation system
SAA1816
4-20Monitor, climate, audio, phone and voice recognition systems
wÐ
Ð
05/14/09Ðpattie
X
Page 184 of 445
NOTE:
If you select the ªFranÕaisº key, French language
will be displayed. For more detail, refer to the
French Owner's Manual. To obtain a French Own-
er's Manual, please see ªOWNER'S
MANUAL/SERVICE MANUAL ORDER INFORMA-
TIONº in the ª9. Technical and consumer infor-
mationº section.
*: For models without navigation system only
Select Units :
Choose the ªSelect Unitsº key and push the
ENTER button. From the following display, se-
lect ªUSº (Mile, ÉF, MPG) or ªMetricº (km, ÉC,
L/100 km) for your favorite display appearance.
Select Units (Tire Pressure) :
Choose the ª Select Units (Tire Pressure) º key
and push the ENTERbutton. From the following
display, select ªkPaº or ªpsiº.HOW TO USE AUX BUTTON
Images being played can be switched to the
center display if NTSC compatible devices are
connected to the auxiliary input jacks on the
rear side of the center console. (See ªAUXILIARY
INPUT JACKSº later in this section.)
Push the DISC´AUX (with navigation) AUX(with-
out navigation) button to perform switching.
Pushing the DISC´AUXbutton (for models with
the navigation system) will switch the displays
as follows:
CD !CompactFlash* !DVD* !AUX !iPodT*
! Music Box* !CD
*: if so equipped
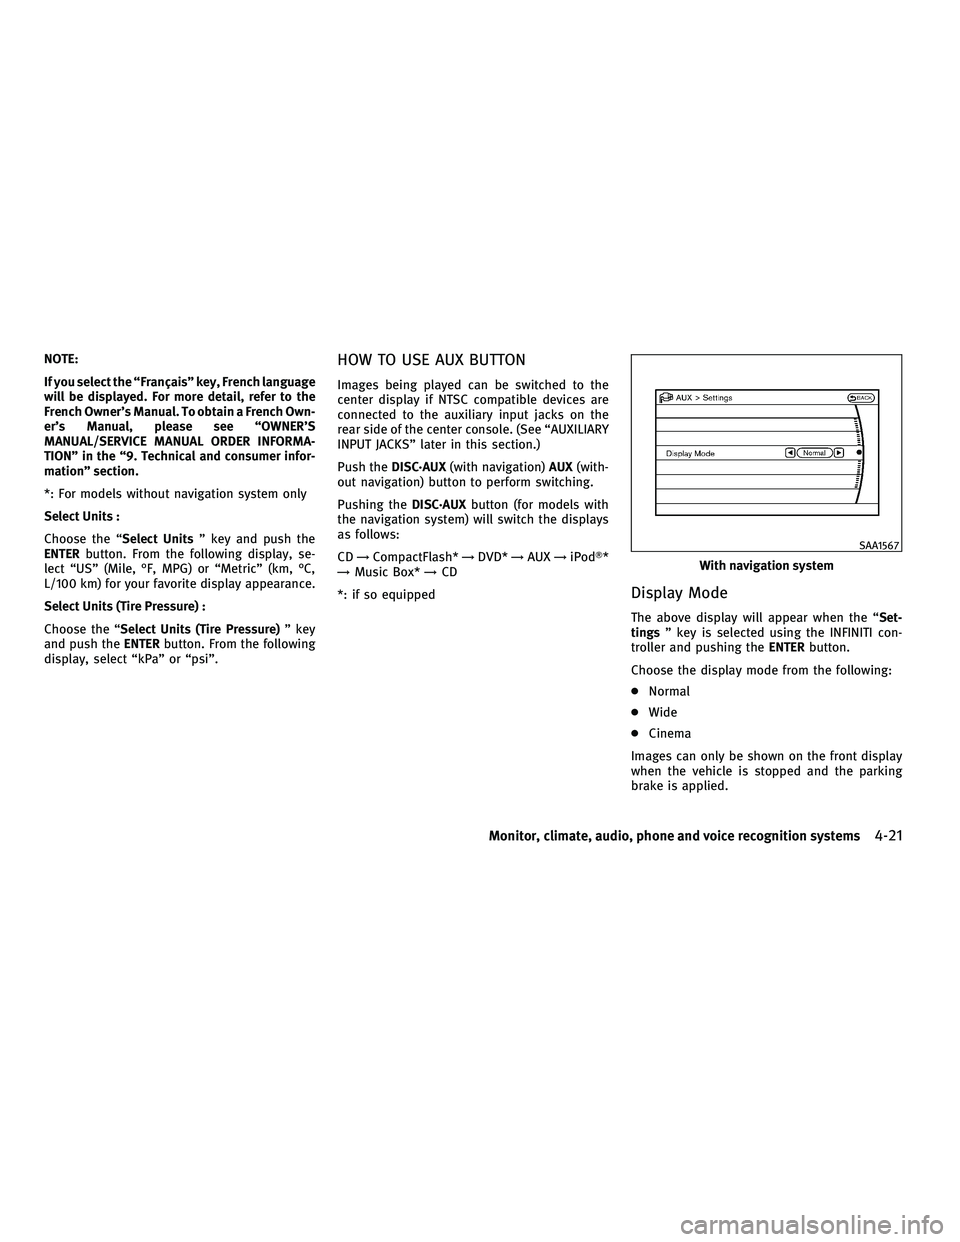
Display Mode
The above display will appear when the ª Set-
tings º key is selected using the INFINITI con-
troller and pushing the ENTERbutton.
Choose the display mode from the following:
c Normal
c Wide
c Cinema
Images can only be shown on the front display
when the vehicle is stopped and the parking
brake is applied.
With navigation system
SAA1567
Monitor, climate, audio, phone and voice recognition systems4-21
wÐ
Ð
05/19/09Ðtbrooks
X
Page 185 of 445
HOW TO USE DISC BUTTON (for
models without navigation system)
Push theDISCbutton to play the Compact Disc
(CD). See ªAUDIO SYSTEMº later in this section. When the selector lever is shifted into the R
(Reverse) position, the monitor display shows
the view to the rear of the vehicle.
The system is designed as an aid to the driver in
detecting large stationary objects to help avoid
damaging the vehicle. The system will not de-
tect small objects below the bumper and may
not detect objects close to the bumper or on the
ground.
WARNING
c
The rear view camera is a convenience but it
is not a substitute for proper backing up.
Always turn and check that it is safe to do so
before backing up. Always back up slowly.
c Objects viewed in the RearView Monitor dif-
fer from actual distance because a wide-
angle lens is used. Objects in the RearView
Monitor will appear visually opposite like
ones viewed in the inside and outside
mirrors.
c Make sure that the trunk is securely closed
when backing up.
c Underneath the bumper and the corner areas
of the bumper cannot be viewed on the Rear-
View Monitor because of its monitoring
range limitation. c
Do not put anything on the rear view camera.
The rear view camera is installed above the
license plate.
c When washing the vehicle with high-
pressure water, be sure not to spray it
around the camera. Otherwise, water may
enter the camera unit causing water conden-
sation on the lens, a malfunction, fire or an
electric shock.
c Do not strike the camera. It is a precision
instrument. Otherwise, it may malfunction
or cause damage resulting in a fire or an
electric shock.
CAUTION
There is a plastic cover over the camera. Do not
scratch the cover when cleaning dirt or snow
from the cover.
REARVIEW MONITOR (if so equipped)
4-22Monitor, climate, audio, phone and voice recognition systems
wÐ
Ð
05/14/09Ðpattie
X
Page 186 of 445
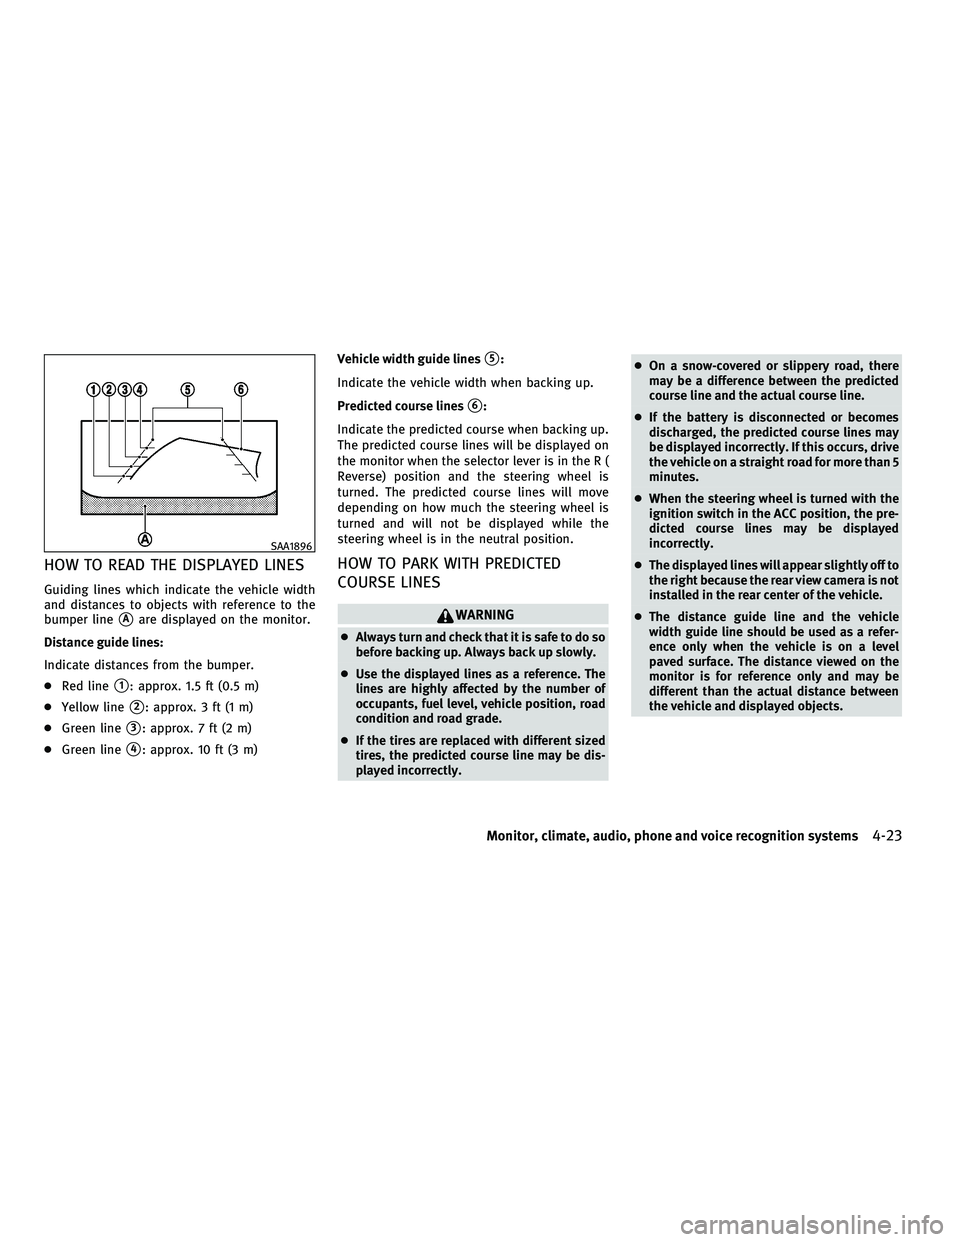
HOW TO READ THE DISPLAYED LINES
Guiding lines which indicate the vehicle width
and distances to objects with reference to the
bumper line
sAare displayed on the monitor.
Distance guide lines:
Indicate distances from the bumper.
c Red line
s1: approx. 1.5 ft (0.5 m)
c Yellow line
s2: approx. 3 ft (1 m)
c Green line
s3: approx. 7 ft (2 m)
c Green line
s4: approx. 10 ft (3 m) Vehicle width guide lines
s5:
Indicate the vehicle width when backing up.
Predicted course lines
s6:
Indicate the predicted course when backing up.
The predicted course lines will be displayed on
the monitor when the selector lever is in the R (
Reverse) position and the steering wheel is
turned. The predicted course lines will move
depending on how much the steering wheel is
turned and will not be displayed while the
steering wheel is in the neutral position.
HOW TO PARK WITH PREDICTED
COURSE LINES
WARNING
c Always turn and check that it is safe to do so
before backing up. Always back up slowly.
c Use the displayed lines as a reference. The
lines are highly affected by the number of
occupants, fuel level, vehicle position, road
condition and road grade.
c If the tires are replaced with different sized
tires, the predicted course line may be dis-
played incorrectly. c
On a snow-covered or slippery road, there
may be a difference between the predicted
course line and the actual course line.
c If the battery is disconnected or becomes
discharged, the predicted course lines may
be displayed incorrectly. If this occurs, drive
the vehicle on a straight road for more than 5
minutes.
c When the steering wheel is turned with the
ignition switch in the ACC position, the pre-
dicted course lines may be displayed
incorrectly.
c The displayed lines will appear slightly off to
the right because the rear view camera is not
installed in the rear center of the vehicle.
c The distance guide line and the vehicle
width guide line should be used as a refer-
ence only when the vehicle is on a level
paved surface. The distance viewed on the
monitor is for reference only and may be
different than the actual distance between
the vehicle and displayed objects.
SAA1896
Monitor, climate, audio, phone and voice recognition systems4-23
wÐ
Ð
05/14/09Ðpattie
X
Page 187 of 445
cWhen backing up the vehicle up a hill, ob-
jects viewed in the monitor are further than
they appear. When backing up the vehicle
down a hill, objects viewed in the monitor
are closer than they appear. Use the inside
mirror or glance over your shoulder to prop-
erly judge distances to other objects.
The vehicle width and predicted course lines are
wider than the actual width and course.
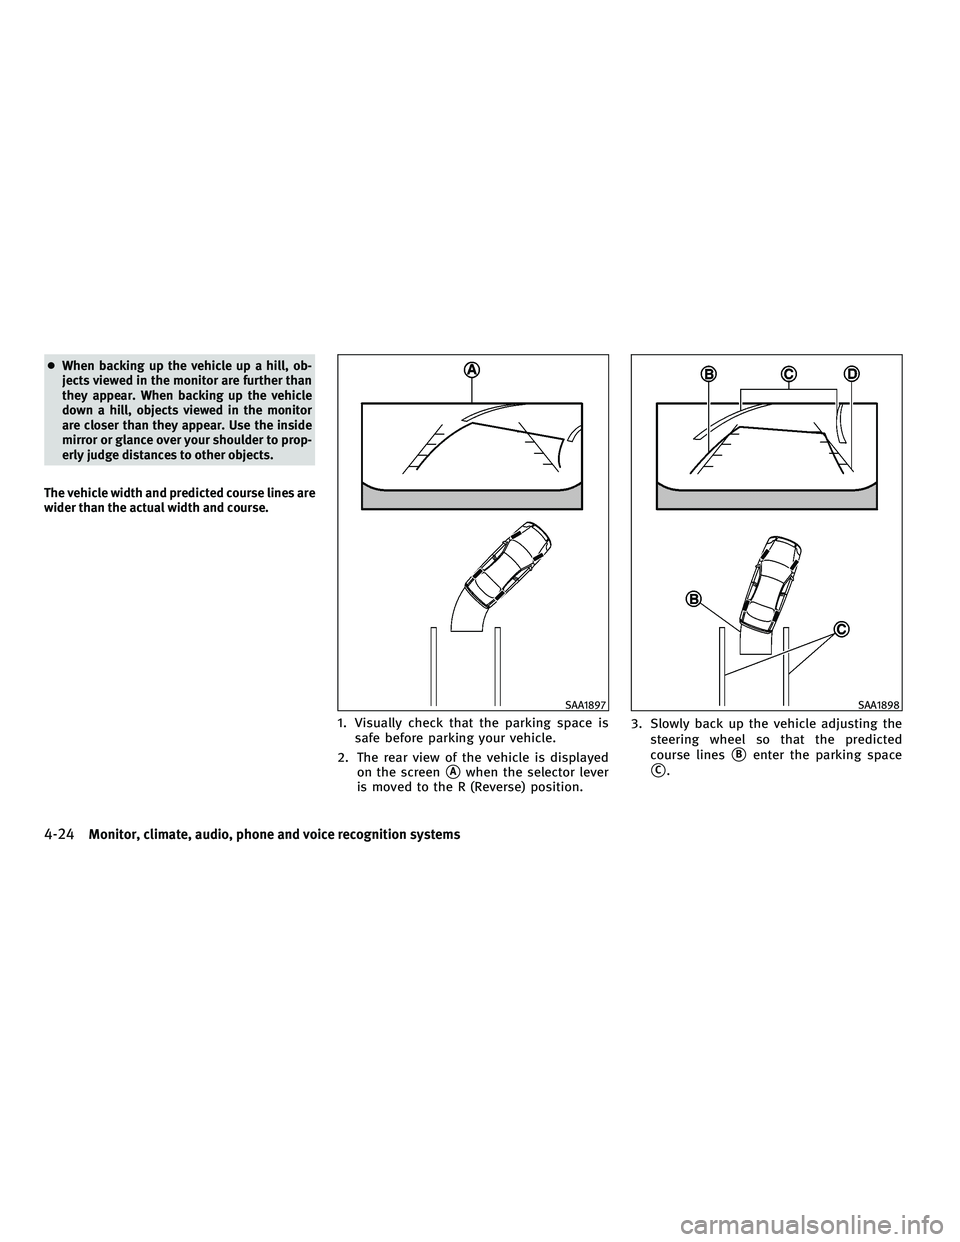
1. Visually check that the parking space is safe before parking your vehicle.
2. The rear view of the vehicle is displayed on the screen
sAwhen the selector lever
is moved to the R (Reverse) position. 3. Slowly back up the vehicle adjusting the
steering wheel so that the predicted
course linessBenter the parking space
sC.
SAA1897SAA1898
4-24Monitor, climate, audio, phone and voice recognition systems
wÐ
Ð
05/14/09Ðpattie
X
Page 188 of 445
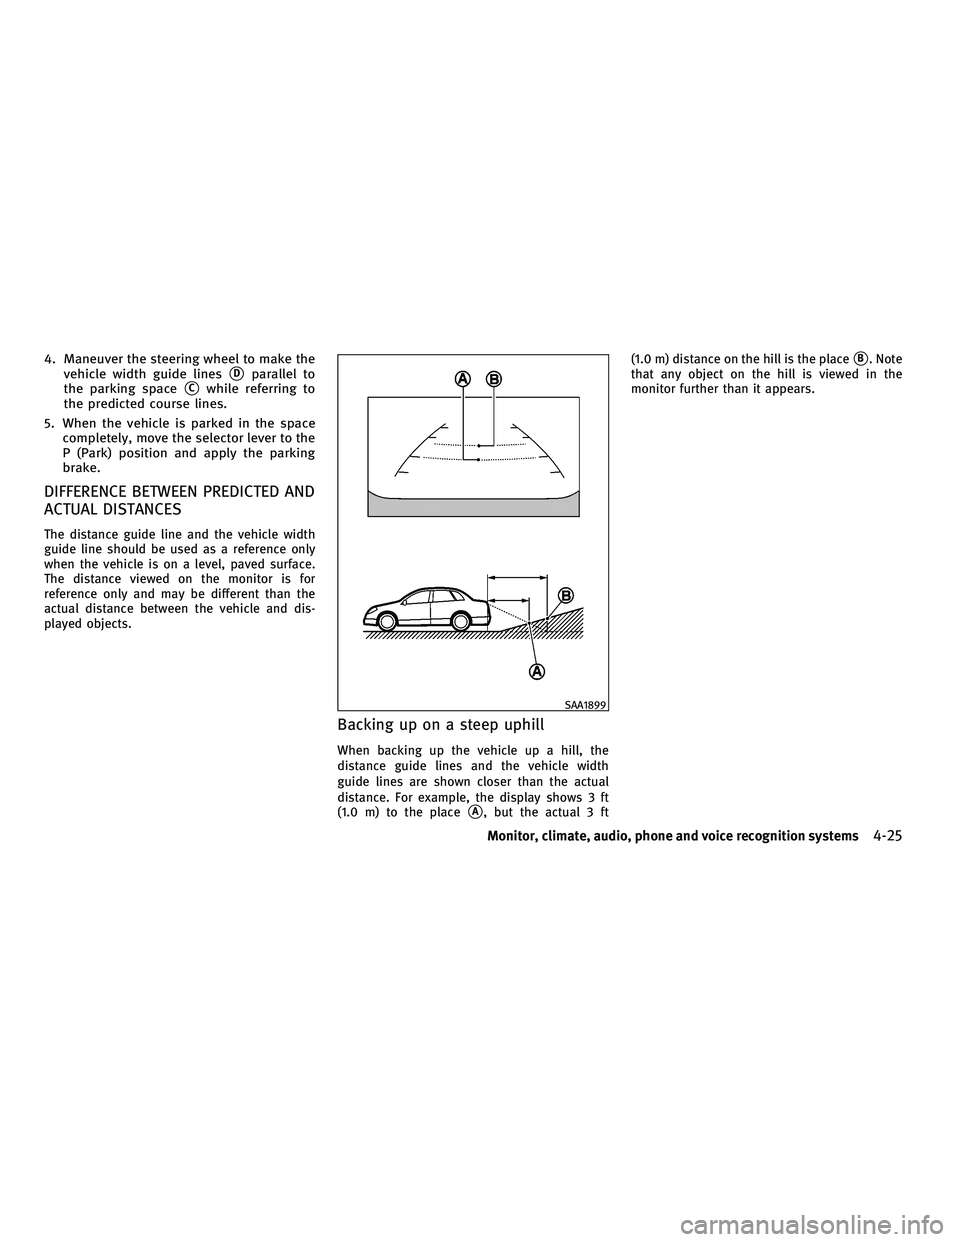
4. Maneuver the steering wheel to make thevehicle width guide lines
sDparallel to
the parking space
sCwhile referring to
the predicted course lines.
5. When the vehicle is parked in the space completely, move the selector lever to the
P (Park) position and apply the parking
brake.
DIFFERENCE BETWEEN PREDICTED AND
ACTUAL DISTANCES
The distance guide line and the vehicle width
guide line should be used as a reference only
when the vehicle is on a level, paved surface.
The distance viewed on the monitor is for
reference only and may be different than the
actual distance between the vehicle and dis-
played objects.
Backing up on a steep uphill
When backing up the vehicle up a hill, the
distance guide lines and the vehicle width
guide lines are shown closer than the actual
distance. For example, the display shows 3 ft
(1.0 m) to the place
sA, but the actual 3 ft (1.0 m) distance on the hill is the place
sB. Note
that any object on the hill is viewed in the
monitor further than it appears.
SAA1899
Monitor, climate, audio, phone and voice recognition systems4-25
wÐ
Ð
05/14/09Ðpattie
X
Page 189 of 445
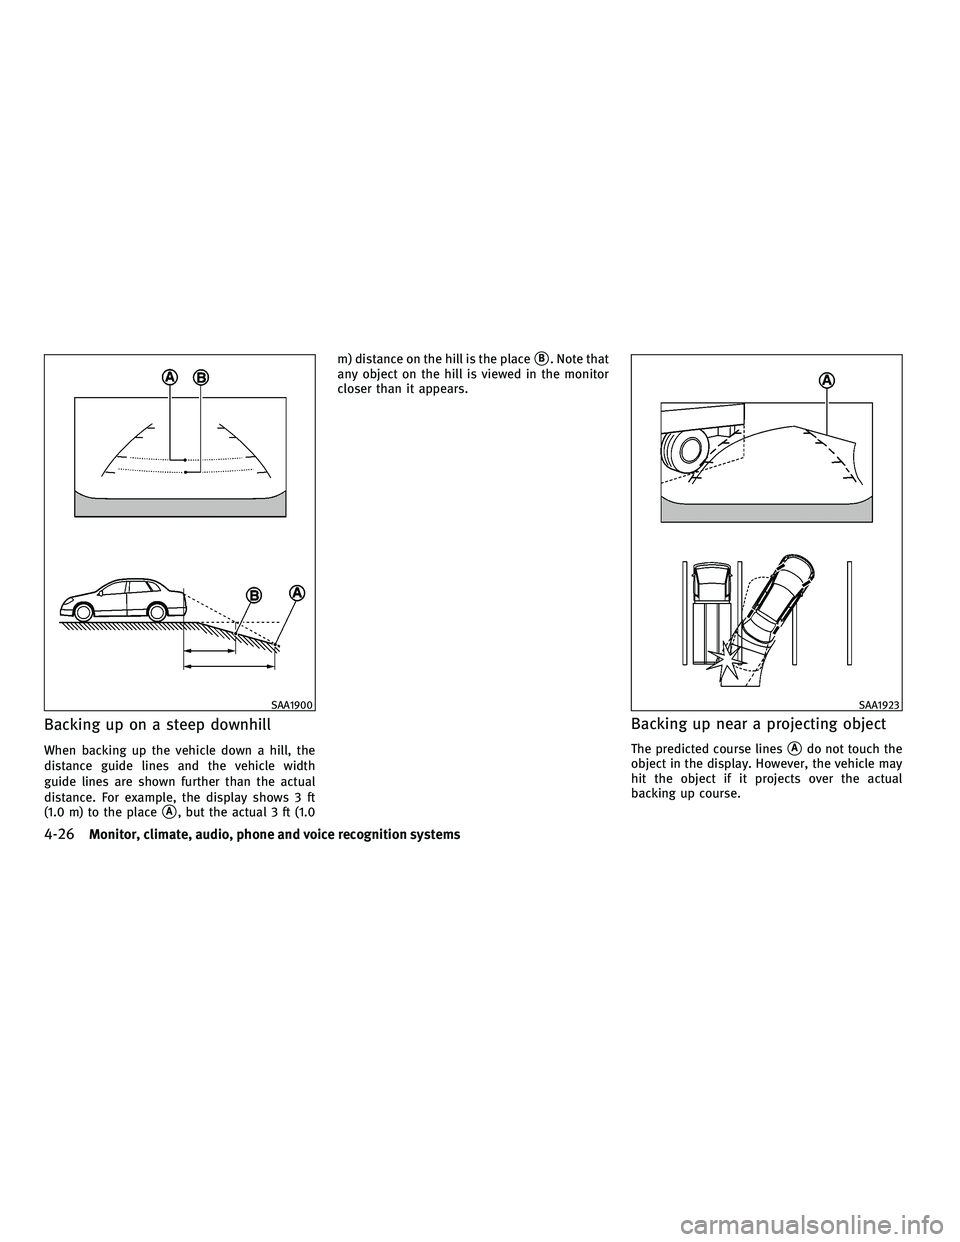
Backing up on a steep downhill
When backing up the vehicle down a hill, the
distance guide lines and the vehicle width
guide lines are shown further than the actual
distance. For example, the display shows 3 ft
(1.0 m) to the place
sA, but the actual 3 ft (1.0m) distance on the hill is the place
sB. Note that
any object on the hill is viewed in the monitor
closer than it appears.
Backing up near a projecting object
The predicted course linessAdo not touch the
object in the display. However, the vehicle may
hit the object if it projects over the actual
backing up course.
SAA1900SAA1923
4-26Monitor, climate, audio, phone and voice recognition systems
wÐ
Ð
05/14/09Ðpattie
X
Page 190 of 445
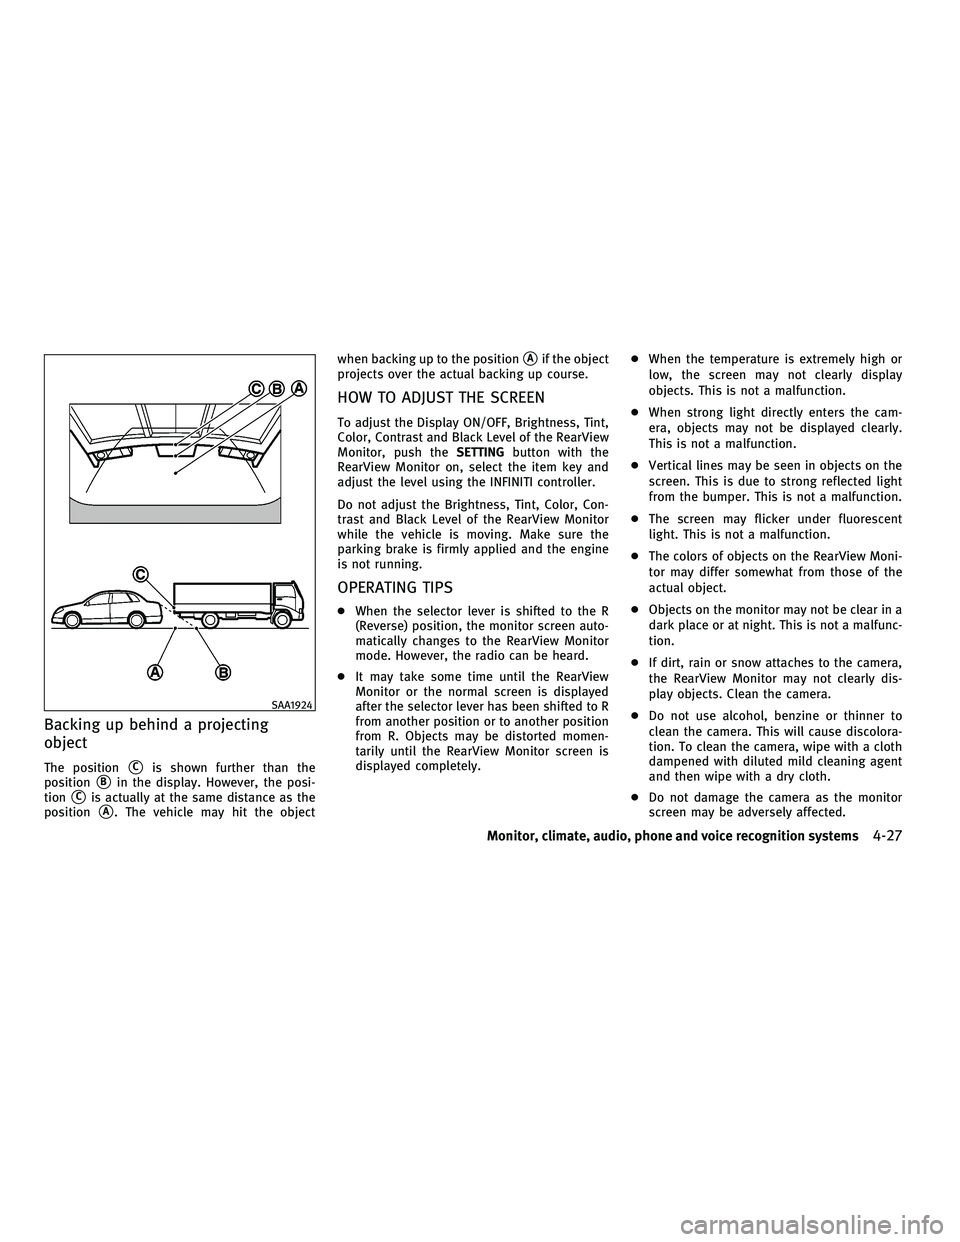
Backing up behind a projecting
object
The positionsCis shown further than the
position
sBin the display. However, the posi-
tion
sCis actually at the same distance as the
position
sA. The vehicle may hit the object when backing up to the position
sAif the object
projects over the actual backing up course.
HOW TO ADJUST THE SCREEN
To adjust the Display ON/OFF, Brightness, Tint,
Color, Contrast and Black Level of the RearView
Monitor, push the SETTINGbutton with the
RearView Monitor on, select the item key and
adjust the level using the INFINITI controller.
Do not adjust the Brightness, Tint, Color, Con-
trast and Black Level of the RearView Monitor
while the vehicle is moving. Make sure the
parking brake is firmly applied and the engine
is not running.
OPERATING TIPS
c When the selector lever is shifted to the R
(Reverse) position, the monitor screen auto-
matically changes to the RearView Monitor
mode. However, the radio can be heard.
c It may take some time until the RearView
Monitor or the normal screen is displayed
after the selector lever has been shifted to R
from another position or to another position
from R. Objects may be distorted momen-
tarily until the RearView Monitor screen is
displayed completely. c
When the temperature is extremely high or
low, the screen may not clearly display
objects. This is not a malfunction.
c When strong light directly enters the cam-
era, objects may not be displayed clearly.
This is not a malfunction.
c Vertical lines may be seen in objects on the
screen. This is due to strong reflected light
from the bumper. This is not a malfunction.
c The screen may flicker under fluorescent
light. This is not a malfunction.
c The colors of objects on the RearView Moni-
tor may differ somewhat from those of the
actual object.
c Objects on the monitor may not be clear in a
dark place or at night. This is not a malfunc-
tion.
c If dirt, rain or snow attaches to the camera,
the RearView Monitor may not clearly dis-
play objects. Clean the camera.
c Do not use alcohol, benzine or thinner to
clean the camera. This will cause discolora-
tion. To clean the camera, wipe with a cloth
dampened with diluted mild cleaning agent
and then wipe with a dry cloth.
c Do not damage the camera as the monitor
screen may be adversely affected.
SAA1924
Monitor, climate, audio, phone and voice recognition systems4-27
wÐ
Ð
05/14/09Ðpattie
X