display INFINITI QX56 2007 Factory Owners Manual
[x] Cancel search | Manufacturer: INFINITI, Model Year: 2007, Model line: QX56, Model: INFINITI QX56 2007Pages: 3061, PDF Size: 64.56 MB
Page 263 of 3061

TROUBLE DIAGNOSIS FOR SYMPTOMS
AT-193
< SERVICE INFORMATION >
D
E
F
G
H
I
J
K
L
MA
B
AT
N
O
P
1. Turn ignition switch “ON”.
2. Select "ECU INPUT SIGNALS" in "DATA MONITOR" mode for
"A/T" with CONSULT-II.
3. Read out "OD CONT SW" switch moving selector lever to each
position.
Without CONSULT-II
1. Turn ignition switch “ON”. (Do not start engine)
2. Check voltage between A/T device harness connector terminal
and ground.
OK or NG
OK >> GO TO 3.
NG >> Repair or replace damaged parts.
3.CHECK A/T FLUID LEVEL
Check the A/T fluid level. Refer to AT-13, "
Checking Automatic
Transmission Fluid (ATF)".
OK or NG
OK >> GO TO 4.
NG >> Refill ATF.
4.CHECK CONTROL CABLE
Check the control cable.
• Refer to AT-208, "
Checking of A/T Position".
OK or NG
OK >> GO TO 5.
NG >> Adjust control cable. Refer to AT-208, "
Adjustment of A/
T Position".
Monitor item Condition Display value
OD CONT SWWhen setting the selector
lever to "4" and "3" posi-
tion.ON
When setting selector le-
ver to other positions.OFF
LCIA0339E
Item Connector No. Terminal No. ConditionData
(Approx.)
4th position
switchM203 1 - GroundWhen setting
the selector le-
ver to "4" and
"3" position.0V
When setting
selector lever
to other posi-
tions.Battery volt-
age
LCIA0340E
SAT638A
LCIA0345E
Page 268 of 3061

AT-198
< SERVICE INFORMATION >
TROUBLE DIAGNOSIS FOR SYMPTOMS
1. Turn ignition switch “ON”.
2. Select "ECU INPUT SIGNALS" in "DATA MONITOR" mode for
"A/T" with CONSULT-II.
3. Read out "1 POSITION SW" switch moving selector lever to
each position.
Without CONSULT-II
1. Turn ignition switch “ON”. (Do not start engine)
2. Check voltage between A/T device harness connector terminal
and ground.
OK or NG
OK >> GO TO 3.
NG >> Repair or replace damaged parts.
3.CHECK A/T FLUID LEVEL
Check the A/T fluid level. Refer to AT-13, "
Checking Automatic
Transmission Fluid (ATF)".
OK or NG
OK >> GO TO 4.
NG >> Refill ATF.
4.CHECK CONTROL CABLE
Check the control cable.
• Refer to AT-208, "
Checking of A/T Position".
OK or NG
OK >> GO TO 5.
NG >> Adjust control cable. Refer to AT-208, "
Adjustment of A/
T Position".
5.CHECK A/T FLUID CONDITION
Monitor item Condition Display value
1 POSITION SWWhen setting the selector
lever to "1" position.ON
When setting selector le-
ver to other positions.OFF
LCIA0339E
Item Connector No. Terminal No. ConditionData
(Approx.)
1st position
switchM203 7 - GroundWhen setting
the selector le-
ver to "1" posi-
tion.0V
When setting
selector lever
to other posi-
tions.Battery volt-
age
LCIA0341E
SAT638A
LCIA0345E
Page 270 of 3061

AT-200
< SERVICE INFORMATION >
TROUBLE DIAGNOSIS FOR SYMPTOMS
1. Turn ignition switch “ON”.
2. Select "ECU INPUT SIGNALS" in "DATA MONITOR" mode for
"A/T" with CONSULT-II.
3. Read out "1 POSITION SW" moving switch selector lever to
each position.
Without CONSULT-II
1. Turn ignition switch “ON”. (Do not start engine)
2. Check voltage between A/T device harness connector terminal
and ground.
OK or NG
OK >> GO TO 3.
NG >> Repair or replace damaged parts.
3.CHECK A/T FLUID LEVEL
Check the A/T fluid level. Refer to AT-13, "
Checking Automatic
Transmission Fluid (ATF)".
OK or NG
OK >> GO TO 4.
NG >> Refill ATF.
4.CHECK CONTROL CABLE
Check the control cable.
• Refer to AT-208, "
Checking of A/T Position".
OK or NG
OK >> GO TO 5.
NG >> Adjust control cable. Refer to AT-208, "
Adjustment of A/
T Position".
5.CHECK A/T FLUID CONDITION
Monitor item Condition Display value
1 POSITION SWWhen setting the selector
lever to "1" position.ON
When setting selector le-
ver to other positions.OFF
LCIA0339E
Item Connector No. Terminal No. ConditionData
(Approx.)
1st position
switchM203 7 - GroundWhen setting
the selector le-
ver to "1" posi-
tion.0V
When setting
selector lever
to other posi-
tions.Battery volt-
age
LCIA0341E
SAT638A
LCIA0345E
Page 380 of 3061
ATC-10
< SERVICE INFORMATION >
PRECAUTIONS
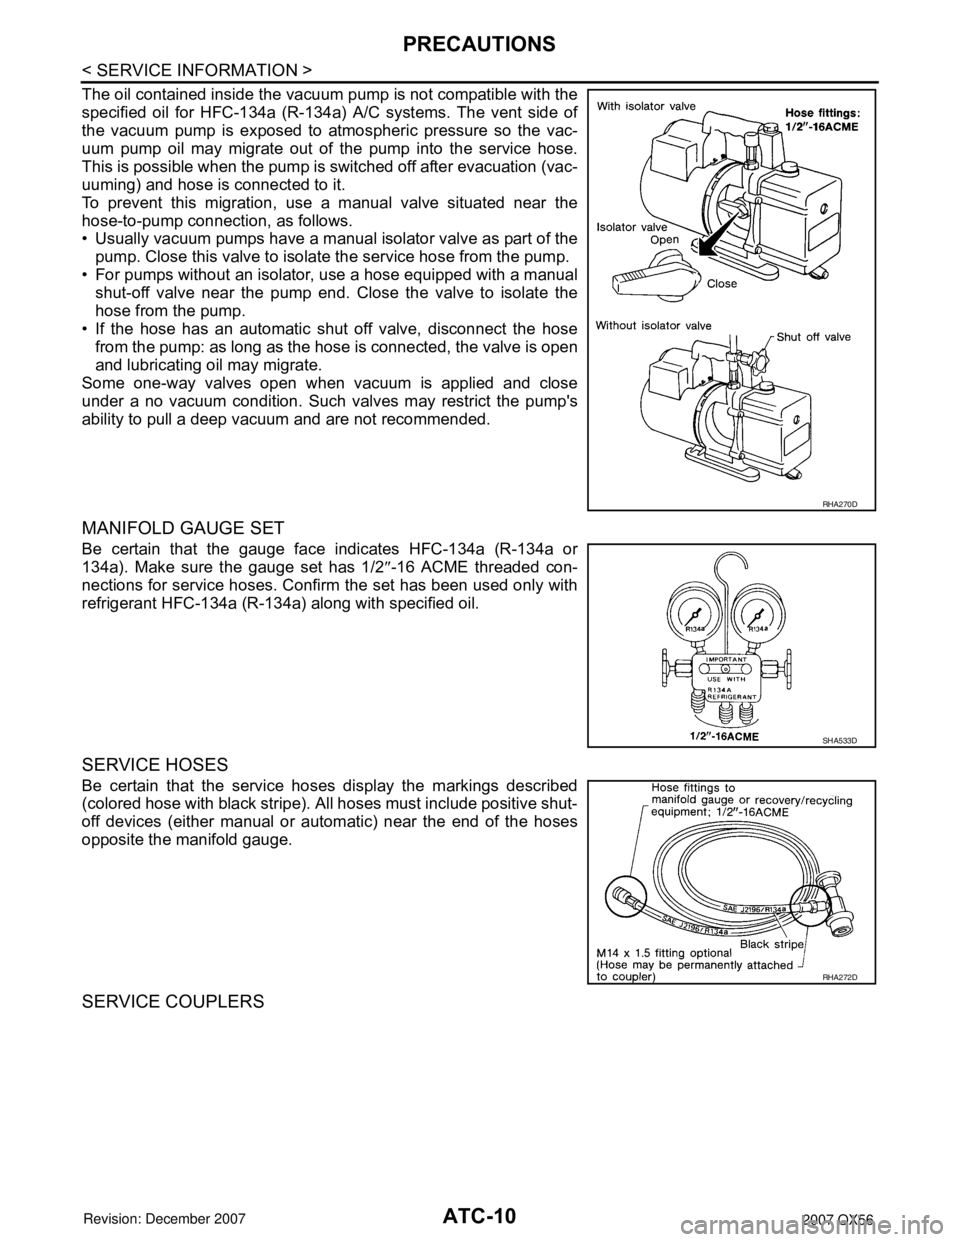
The oil contained inside the vacuum pump is not compatible with the
specified oil for HFC-134a (R-134a) A/C systems. The vent side of
the vacuum pump is exposed to atmospheric pressure so the vac-
uum pump oil may migrate out of the pump into the service hose.
This is possible when the pump is switched off after evacuation (vac-
uuming) and hose is connected to it.
To prevent this migration, use a manual valve situated near the
hose-to-pump connection, as follows.
• Usually vacuum pumps have a manual isolator valve as part of the
pump. Close this valve to isolat e the service hose from the pump.
• For pumps without an isolator, use a hose equipped with a manual shut-off valve near the pump end. Close the valve to isolate the
hose from the pump.
• If the hose has an automatic shut off valve, disconnect the hose from the pump: as long as the hose is connected, the valve is open
and lubricating oil may migrate.
Some one-way valves open when vacuum is applied and close
under a no vacuum condition. Such valves may restrict the pump's
ability to pull a deep vacuum and are not recommended.
MANIFOLD GAUGE SET
Be certain that the gauge face indicates HFC-134a (R-134a or
134a). Make sure the gauge set has 1/2 ″-16 ACME threaded con-
nections for service hoses. Confirm the set has been used only with
refrigerant HFC-134a (R-134a) along with specified oil.
SERVICE HOSES
Be certain that the service hoses display the markings described
(colored hose with black stripe). All hoses must include positive shut-
off devices (either manual or aut omatic) near the end of the hoses
opposite the manifold gauge.
SERVICE COUPLERS
RHA270D
SHA533D
RHA272D
Page 391 of 3061
OIL
ATC-21
< SERVICE INFORMATION >
C
D E
F
G H
I
K L
M A
B
AT C
N
O P
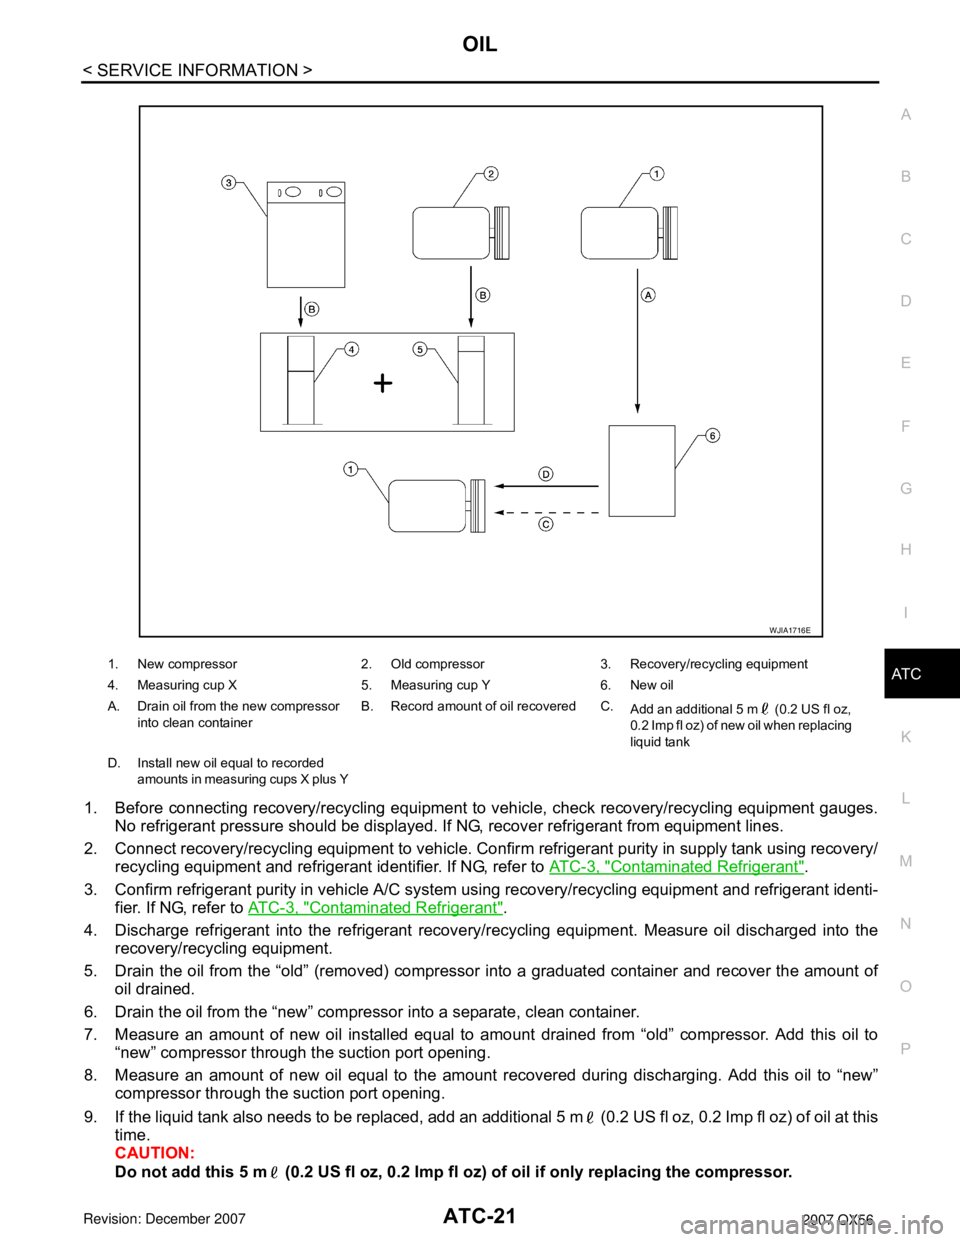
1. Before connecting recovery/recycling equipment to vehicle, check recovery/recycling equipment gauges.
No refrigerant pressure should be displayed. If NG, recover refrigerant from equipment lines.
2. Connect recovery/recycling equipment to vehicle. Confir m refrigerant purity in supply tank using recovery/
recycling equipment and refrigerant identifier. If NG, refer to AT C - 3 , "
Contaminated Refrigerant".
3. Confirm refrigerant purity in vehicle A/C system using recovery/recycling equipment and refrigerant identi-
fier. If NG, refer to AT C - 3 , "
Contaminated Refrigerant".
4. Discharge refrigerant into the refrigerant recove ry/recycling equipment. Measure oil discharged into the
recovery/recycling equipment.
5. Drain the oil from the “old” (removed) compress or into a graduated container and recover the amount of
oil drained.
6. Drain the oil from the “new” compressor into a separate, clean container.
7. Measure an amount of new oil installed equal to am ount drained from “old” compressor. Add this oil to
“new” compressor through the suction port opening.
8. Measure an amount of new oil equal to the amount recovered during discharging. Add this oil to “new” compressor through the suction port opening.
9. If the liquid tank also needs to be replaced, add an additional 5 m (0.2 US fl oz, 0.2 Imp fl oz) of oil at this
time.
CAUTION:
Do not add this 5 m (0.2 US fl oz, 0.2 Imp fl oz) of oil if only replacing the compressor.
1. New compressor 2. Old compressor 3. Recovery/recycling equipment
4. Measuring cup X 5. Measuring cup Y 6. New oil
A. Drain oil from the new compressor
into clean container B. Record amount of oil recovered C.
Add an additional 5 m (0.2 US fl oz,
0.2 Imp fl oz) of new oil when replacing
liquid tank
D. Install new oil equal to recorded amounts in measuring cups X plus Y
WJIA1716E
Page 394 of 3061

ATC-24
< SERVICE INFORMATION >
AIR CONDITIONER CONTROL
The relationship of these components is shown in the figure below:
Control OperationINFOID:0000000003533236
Front air control
DISPLAY SCREEN
Displays the operational status of the system.
AUTO SWITCH
• The compressor, intake door, air mix doors, outlet doors and blower speed are automatically controlled so
that the in-vehicle temperature will reach, and be mainta ined at the set temperature selected by the operator.
• When pressing AUTO switch, air inlet, air outlet, bl ower speed, and discharge air temperature are automati-
cally controlled.
WJIA1917E
WJIA1714E
Page 395 of 3061
AIR CONDITIONER CONTROLATC-25
< SERVICE INFORMATION >
C
DE
F
G H
I
K L
M A
B
AT C
N
O P
TEMPERATURE CONTROL DIAL (TEMPE RATURE CONTROL) (DRIVER SIDE)
Increases or decreases the set temperature.
TEMPERATURE CONTROL DIAL (TEMPERATURE CONTROL) (PASSENGER SIDE)
Increases or decreases the set temperature.
TEMPERATURE CONTROL DIAL (TEMPERA TURE AND MODE CONTROL) (REAR)
Increases or decreases the set temperature. The mode al so changes from foot at full hot setting, to foot/vent
mid-range (warm) setting, and then to panel on full cold setting.
RECIRCULATION ( ) SWITCH
• When REC switch is ON, REC switch indicator turns ON, and air inlet is set to REC.
• When REC switch is turned OFF, or when compressor is turned from ON to OFF, REC switch is automati-
cally turned OFF. REC mode can be re-entered by pressing REC switch again.
• REC switch is not operated when DEF switch is tu rned ON, at the D/F position or in floor position.
DEFROSTER ( ) SWITCH
Positions the air outlet doors to the defrost position. Al so positions the intake doors to the outside air position.
REAR WINDOW DEFOGGER SWITCH
When switch is ON, rear window and door mirrors are defogged.
OFF SWITCH
The compressor and blower are OFF, the intake doors are set to the outside air position, and the air outlet
doors are set to the foot (75% foot and 25% defrost) position.
A/C SWITCH
The compressor is ON or OFF.
(Pressing the A/C switch when the AUTO switch is ON will turn off the A/C switch and compressor.)
MODE SWITCH (FRONT)
Controls the air discharge outlets.
FRONT BLOWER CONTROL DIAL
Manually control the blower speed. Seven speeds are av ailable for manual control (as shown on the display
screen).
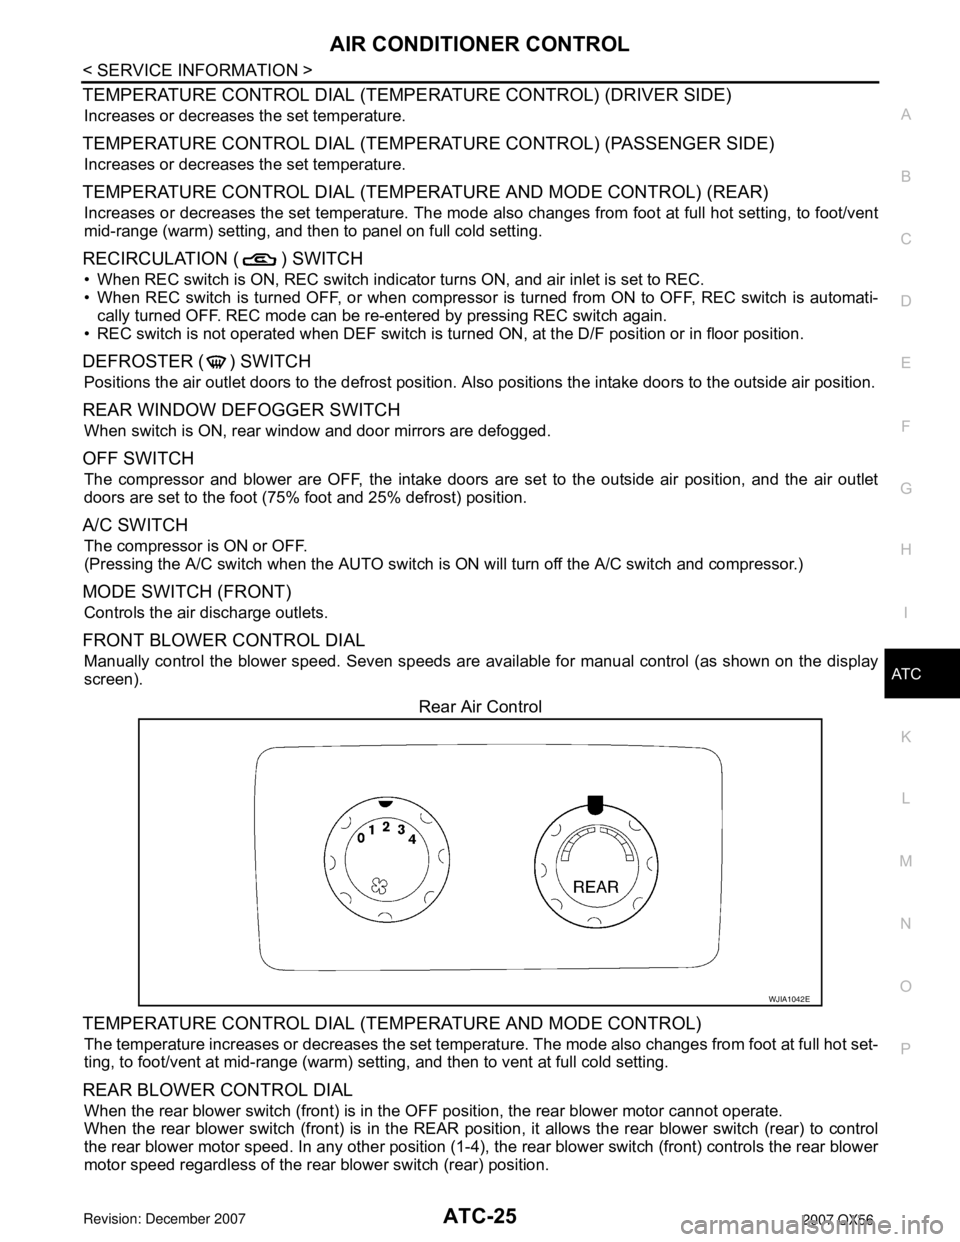
Rear Air Control
TEMPERATURE CONTROL DIAL (TEM PERATURE AND MODE CONTROL)
The temperature increases or decreases the set temperat ure. The mode also changes from foot at full hot set-
ting, to foot/vent at mid-range (warm) setti ng, and then to vent at full cold setting.
REAR BLOWER CONTROL DIAL
When the rear blower switch (front) is in the OFF position, the rear blower motor cannot operate.
When the rear blower switch (front) is in the REAR positi on, it allows the rear blower switch (rear) to control
the rear blower motor speed. In any other position (1-4), the rear blower switch (front) controls the rear blower
motor speed regardless of the rear blower switch (rear) position.
WJIA1042E
Page 400 of 3061
ATC-30
< SERVICE INFORMATION >
TROUBLE DIAGNOSIS
TROUBLE DIAGNOSIS
CONSULT-II Function (HVAC)INFOID:0000000003533241
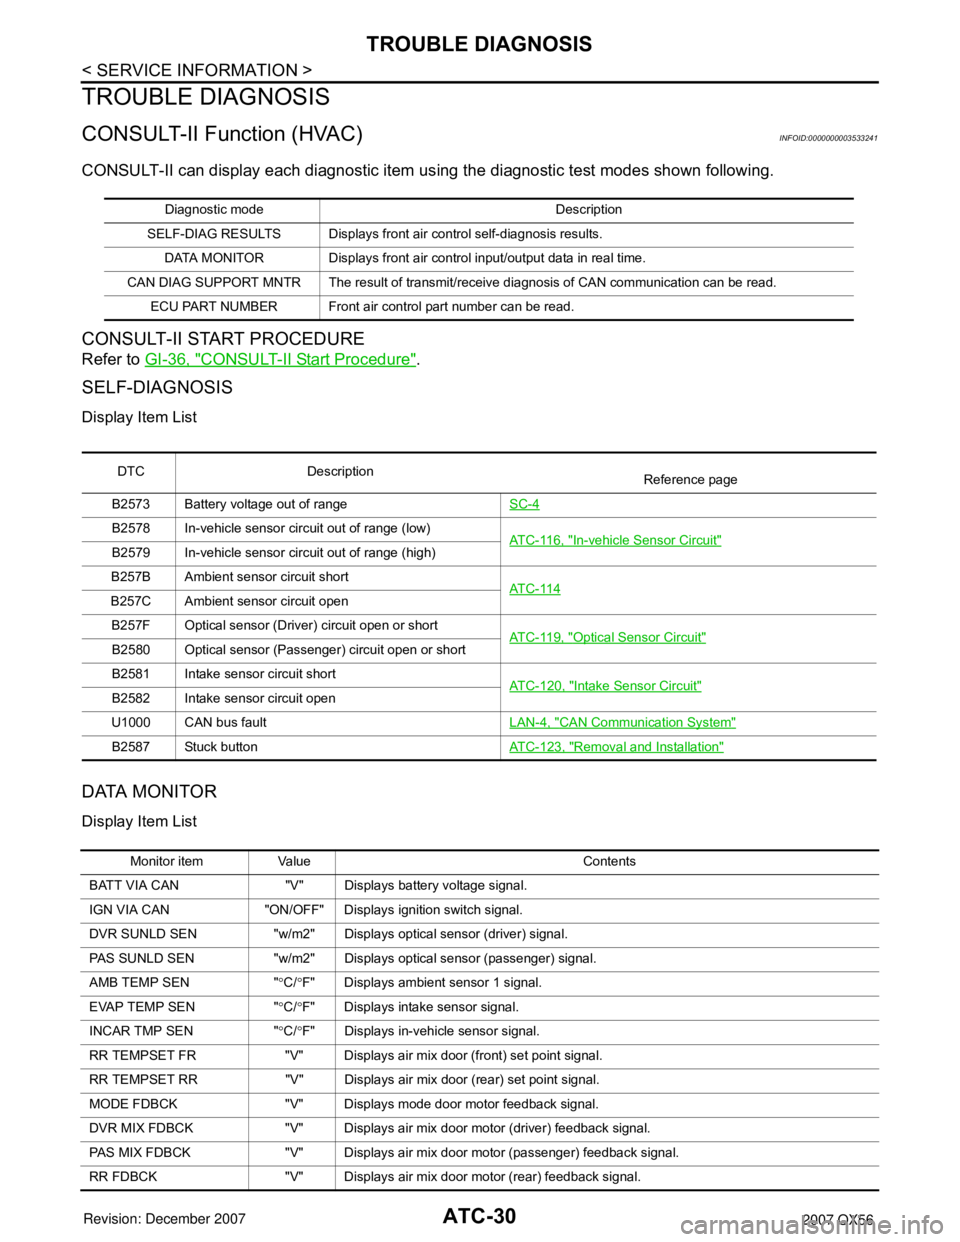
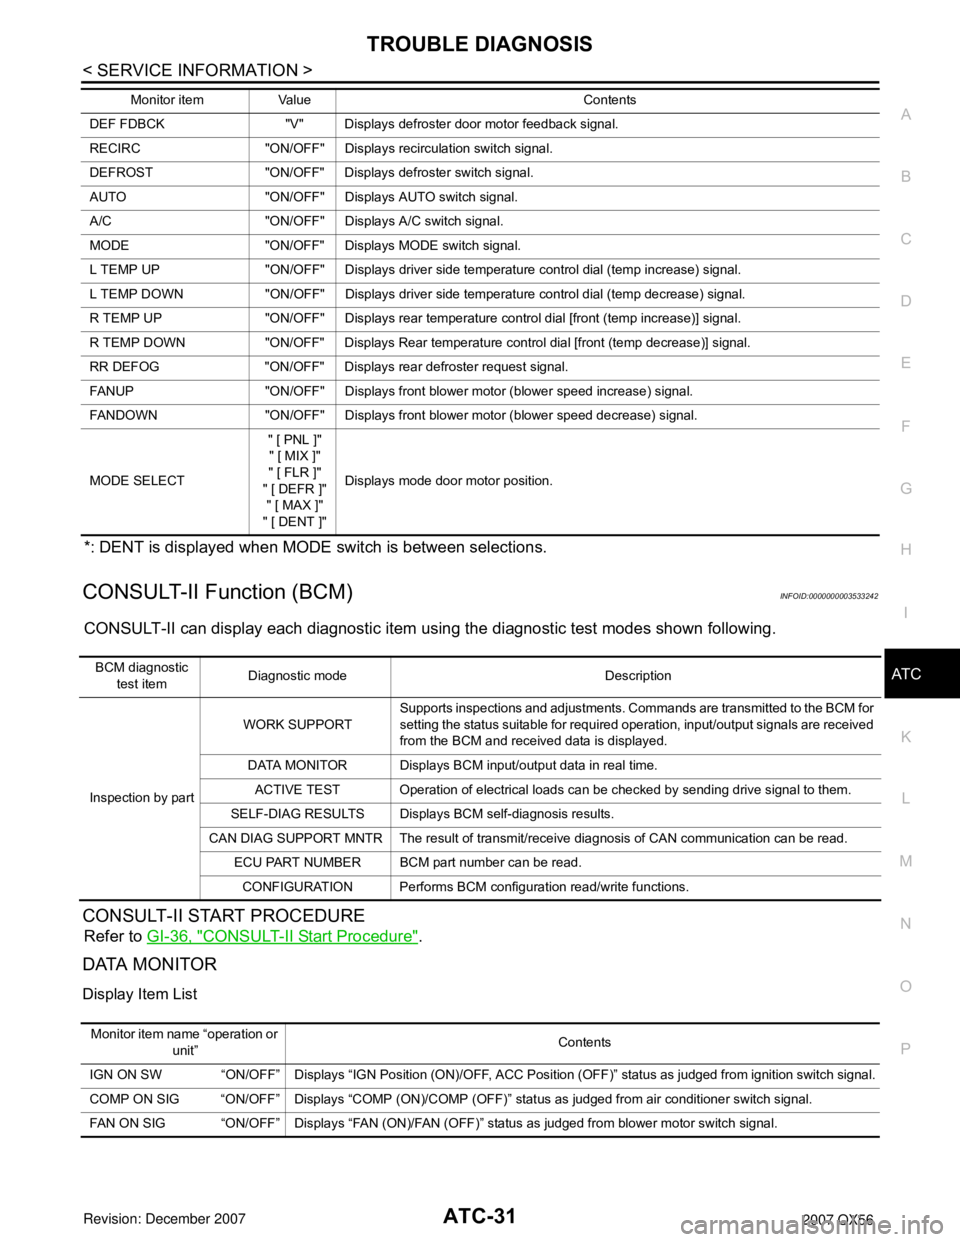
CONSULT-II can display each diagnostic item using the diagnostic test modes shown following.
CONSULT-II START PROCEDURE
Refer to GI-36, "CONSULT-II Start Procedure".
SELF-DIAGNOSIS
Display Item List
DATA MONITOR
Display Item List
Diagnostic mode Description
SELF-DIAG RESULTS Displays front ai r control self-diagnosis results.
DATA MONITOR Displays front air control input/output data in real time.
CAN DIAG SUPPORT MNTR The result of transmit/receive diagnosis of CAN communication can be read. ECU PART NUMBER Front air control part number can be read.
DTC Description Reference page
B2573 Battery voltage out of range SC-4
B2578 In-vehicle sensor circuit out of range (low)
AT C - 11 6 , "In-vehicle Sensor Circuit"B2579 In-vehicle sensor circuit out of range (high)
B257B Ambient sensor circuit short AT C - 11 4
B257C Ambient sensor circuit open
B257F Optical sensor (Driver) circuit open or short AT C - 11 9 , "
Optical Sensor Circuit"B2580 Optical sensor (Passenger) circuit open or short
B2581 Intake sensor circuit shortATC-120, "
Intake Sensor Circuit"B2582 Intake sensor circuit open
U1000 CAN bus fault LAN-4, "
CAN Communication System"
B2587 Stuck buttonATC-123, "Removal and Installation"
Monitor item Value Contents
BATT VIA CAN "V" Displays battery voltage signal.
IGN VIA CAN "ON/OFF" Displays ignition switch signal.
DVR SUNLD SEN "w/m2" Displays optical sensor (driver) signal.
PAS SUNLD SEN "w/m2" Displays optical sensor (passenger) signal.
AMB TEMP SEN " °C/ °F" Displays ambient sensor 1 signal.
EVAP TEMP SEN " °C/ °F" Displays intake sensor signal.
INCAR TMP SEN " °C/ °F" Displays in-vehicle sensor signal.
RR TEMPSET FR "V" Displays air mix door (front) set point signal.
RR TEMPSET RR "V" Displays air mi x door (rear) set point signal.
MODE FDBCK "V" Displays mode door motor feedback signal.
DVR MIX FDBCK "V" Displays air mix do or motor (driver) feedback signal.
PAS MIX FDBCK "V" Displays air mix door motor (passenger) feedback signal.
RR FDBCK "V" Displays air mix door motor (rear) feedback signal.
Page 401 of 3061
TROUBLE DIAGNOSISATC-31
< SERVICE INFORMATION >
C
DE
F
G H
I
K L
M A
B
AT C
N
O P
*: DENT is displayed when MODE switch is between selections.
CONSULT-II Function (BCM)INFOID:0000000003533242
CONSULT-II can display each diagnostic item us ing the diagnostic test modes shown following.
CONSULT-II START PROCEDURE
Refer to GI-36, "CONSULT-II Start Procedure".
DATA MONITOR
Display Item List
DEF FDBCK "V" Displays defroster door motor feedback signal.
RECIRC "ON/OFF" Disp lays recirculation switch signal.
DEFROST "ON/OFF" Displays defroster switch signal.
AUTO "ON/OFF" Displays AUTO switch signal.
A/C "ON/OFF" Displays A/C switch signal.
MODE "ON/OFF" Displays MODE switch signal.
L TEMP UP "ON/OFF" Displays driver side temperature control dial (temp increase) signal.
L TEMP DOWN "ON/OFF" Displays driver side temperature control dial (temp decrease) signal.
R TEMP UP "ON/OFF" Displays rear temperature control dial [front (temp increase)] signal.
R TEMP DOWN "ON/OFF" Displays Rear temperature control dial [front (temp decrease)] signal.
RR DEFOG "ON/OFF" Displays rear defroster request signal.
FANUP "ON/OFF" Displays front blower motor (blower speed increase) signal.
FANDOWN "ON/OFF" Displays front blower motor (blower speed decrease) signal.
MODE SELECT " [ PNL ]"
" [ MIX ]"
" [ FLR ]"
" [ DEFR ]" " [ MAX ]"
" [ DENT ]" Displays mode door motor position.
Monitor item Value Contents
BCM diagnostic
test item Diagnostic mode Description
Inspection by part WORK SUPPORT
Supports inspections and adjustments. Commands are transmitted to the BCM for
setting the status suitable for required operation, input/output signals are received
from the BCM and received data is displayed.
DATA MONITOR Displays BCM input/output data in real time. ACTIVE TEST Operation of electrical loads can be checked by sending drive signal to them.
SELF-DIAG RESULTS Displays BCM self-diagnosis results.
CAN DIAG SUPPORT MNTR The result of transmit/receive diagnosis of CAN communication can be read. ECU PART NUMBER BCM part number can be read.
CONFIGURATION Performs BCM configuration read/write functions.
Monitor item name “operation or unit” Contents
IGN ON SW “ON/OFF” Displays “IGN Position (ON)/OFF, ACC Position (OFF)” status as judged from ignition switch signal.
COMP ON SIG “ON/OFF” Displays “COMP (ON)/COMP (OFF)” stat us as judged from air conditioner switch signal.
FAN ON SIG “ON/OFF” Displays “FAN (ON)/FAN (OFF)” status as judged from blower motor switch signal.
Page 402 of 3061

ATC-32
< SERVICE INFORMATION >
TROUBLE DIAGNOSIS
How to Perform Trouble Diagnosis for Quick and Accurate Repair
INFOID:0000000003533243
WORK FLOW
SYMPTOM TABLE
Component Parts and Harness Connector LocationINFOID:0000000003533244
ENGINE COMPARTMENT
*1AT C - 5 0 , "Operational Check (Front)"
or AT C - 5 1 , "
Operational Check
(Rear)" .
SHA900E
Symptom Reference Page
A/C system does not come on. Go to Trouble Diagnosis Procedure for A/C System. AT C - 5 2
A/C system display is malfunctioning. Go to Navigation System. AV- 7 3
A/C system cannot be controlled. Go to Self-diagnosis Function.AT C - 4 8 , "
A/C Sys-
tem Self-Diagno-
sis Function"
Air outlet does not change.
Go to Trouble Diagnosis Procedure for Mode Door Motor. AT C - 5 4
Mode door motor is malfunctioning.
Discharge air temperature does not change.
Go to Trouble Diagnosis Procedure for Air Mix Door Motor. AT C - 5 9
Air mix door motor is malfunctioning.
Intake door does not change.
Go to Trouble Diagnosis Procedure for Intake Door Motor. AT C - 7 0
Intake door motor is malfunctioning.
Defroster door motor is malfunctioning. Go to Trouble Diagnosis Procedure for Defroster Door Motor. AT C - 7 4
Front blower motor operation is malfunction-
ing.Go to Trouble Diagnosis Procedure for Front Blower Motor.
AT C - 7 8
Rear blower motor operation is malfunction-
ing.Go to Trouble Diagnosis Procedure for Rear Blower Motor.
AT C - 8 5
Rear discharge air temperature and/or air
outlet does not change.Go to Trouble Diagnosis Procedure for Rear Air Control circuit.
AT C - 9 3
Magnet clutch does not engage. Go to Trouble Diagnosis Procedure for Magnet Clutch. AT C - 9 6
Insufficient cooling Go to Trouble Diagnosis Procedure for Insufficient Cooling.AT C - 1 0 0
Insufficient heating Go to Trouble Diagnosis Procedure for Insufficient Heating.AT C - 1 0 8
Noise Go to Trouble Diagnosis Procedure for Noise.AT C - 1 0 9
Self-diagnosis cannot be performed. Go to Trouble Diagnosis Procedure for Self-diagnosis. AT C - 111
Memory function does not operate. Go to Trouble Diagnosis Procedure for Memory Function.AT C - 11 2