torque ISUZU TFS SERIES 1997 User Guide
[x] Cancel search | Manufacturer: ISUZU, Model Year: 1997, Model line: TFS SERIES, Model: ISUZU TFS SERIES 1997Pages: 1600, PDF Size: 40.98 MB
Page 40 of 1600

4B-44 REAR AXLE
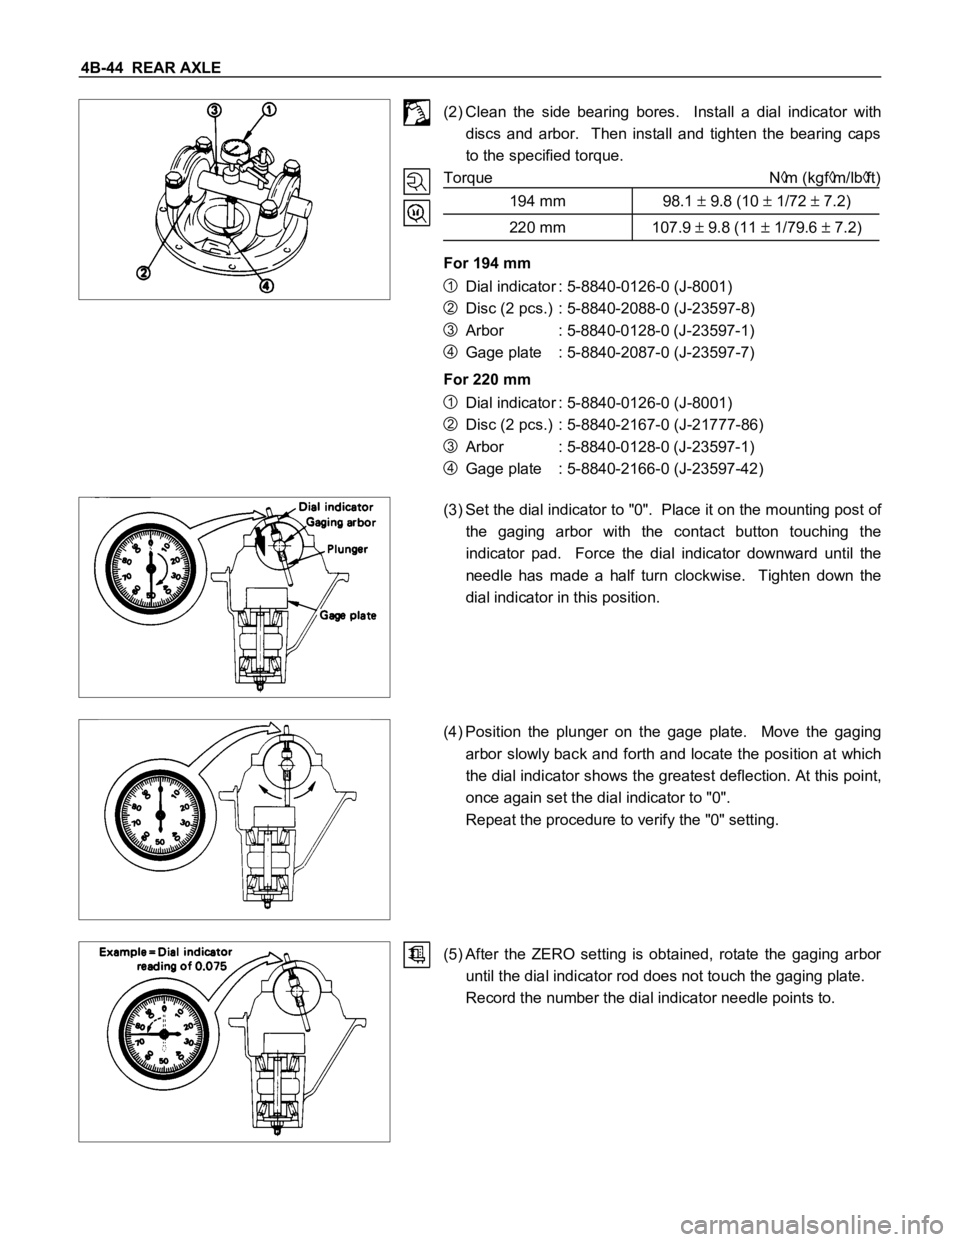
(2) Clean the side bearing bores. Install a dial indicator with
discs and arbor. Then install and tighten the bearing caps
to the specified torque.
Torque N
m (kgfm/lbft)
194 mm 98.1
9.8 (10 1/72 7.2)
220 mm 107.9 9.8 (11 1/79.6 7.2)
For 194 mm
1Dial indicator : 5-8840-0126-0 (J-8001)
2Disc (2 pcs.) : 5-8840-2088-0 (J-23597-8)
3Arbor : 5-8840-0128-0 (J-23597-1)
4Gage plate : 5-8840-2087-0 (J-23597-7)
For 220 mm
1Dial indicator : 5-8840-0126-0 (J-8001)
2Disc (2 pcs.) : 5-8840-2167-0 (J-21777-86)
3Arbor : 5-8840-0128-0 (J-23597-1)
4Gage plate : 5-8840-2166-0 (J-23597-42)
(3) Set the dial indicator to "0". Place it on the mounting post of
the gaging arbor with the contact button touching the
indicator pad. Force the dial indicator downward until the
needle has made a half turn clockwise. Tighten down the
dial indicator in this position.
(4) Position the plunger on the gage plate. Move the gaging
arbor slowly back and forth and locate the position at which
the dial indicator shows the greatest deflection. At this point,
once again set the dial indicator to "0".
Repeat the procedure to verify the "0" setting.
(5) After the ZERO setting is obtained, rotate the gaging arbor
until the dial indicator rod does not touch the gaging plate.
Record the number the dial indicator needle points to.
Page 43 of 1600

REAR AXLE 4B-47
4. Inner Bearing
Place the shim on the drive pinion with the chamfered side
turned toward the pinion head, then attach the inner bearing to
the pinion using an installer and a press.
Installer : 9-8522-1165-0
(J-6133-01)
NOTE :
Do not press on the roller cage.
Press only on the inner race.
5. Collapsible Spacer
Discard the used collapsible spacer and install a new one.
8. Oil Seal
Use the oil seal installer to install a new oil seal that has been
soaked in rear axle lubricant.
Installer : 9-8522-1275-0 (194 mm)
(J-24250)
: 5-8840-2165-0 (220 mm)
(J-37263)
10.Flange Nut and Washer
(1) Apply lubricant to pinion threads.
(2) Tighten the nut to the specified torque using the pinion
flange holder.
Pinion flange holder : 5-8840-0133-0 (194 mm)
(J-8614-01)
5-8840-2157-0 (220 mm)
(J-37221)
Flange Nut Torque N
m (kgfm/lbft)
194 mm 176.6 - 274.7 (18 - 28/130 - 202)
220 mm 245.3 - 294.3 (25 - 30/181 - 217)
Discard used flange nuts and install new ones.
Page 44 of 1600

4B-48 REAR AXLE
(3) Pinion bearing preload.
(a) Measure the bearing preload by using a torque wrench.
Note the scale reading required to rotate the flange.
(b) Continue tightening until the specified starting torque is
obtained.
Pinion Bearing Preload Starting Torque N
m (kgfm/lbft)
194 mm 64 - 113 (6.5 - 11.5/47 - 72)
220 mm 69 - 127 (7 - 13/51 - 94)
11.Backlash and Pre-load Adjusting Shim
(1) Attach the side bearing to the differential assembly without
shims. Support the opposite side using a pilot to prevent
bearing damage.
1Installer : 9-8522-1164-0 (194 mm)
(J-24244)
: 5-8840-2162-0 (220 mm)
(J-37257)
2Drive handle : 5-8840-0007-0
(J-8092)
3Pilot : 9-8521-1743-0
(J-8107-2)
(2) Position the differential cage assembly with the bearing
outer races to the side bearing bores of the carrier.
(3) Using two sets of feeler gauges, insert a feeler stock of
sufficient thickness between each bearing outer race and
the carrier to remove all end play. Make certain the feeler
stock is pushed to the bottom of the bearing bores.
Mount the dial indicator on the carrier so that the indicator
stem is at right angles to a tooth on the ring gear.
Dial indicator : 5-8840-0126-0
(J-8001)
Page 46 of 1600

4B-50 REAR AXLE
16.Bolt
Cap Bolt Torque N
m (kgfm/lbft)
194 mm 98.1
9.8 (10 1/72 7.2)
220 mm 107.9 9.8 (11 1/79.5 7.2)
Measure the amount of run-out of the ring gear at its rear face.
Run-Out mm(in)
Standard Limit
194 mm
220 mm0.02 (0.001) 0.05 (0.002)
Gear Tooth Contact Pattern Check and
Adjustment
Apply a thin coat of prussian blue or equivalent to the faces of
7 - 8 teeth of the ring gear. Check the impression of contact
obtained on the ring gear teeth and make necessary
adjustment as described below if the contact is abnormal.
Page 47 of 1600

REAR AXLE 4B-51
17.Differential Assembly
(1) Clean the faces of the rear axle case and differential carrier
and apply the recommended liquid gasket or its equivalent.
(2) Mount the differential case and the carrier assembly to the
rear axle case and tighten the nuts and bolts.
Torque N
m (kgfm/lbft)
Nut 37.3
3.9 (3.8 0.4/27 2.9)
bolt 24.5 5 (2.5 0.5/18 3.6)
Nut 44 14.7 (4.5 1.5/32.5 10.8)
Bolt 68.5 5 (6.5 0.5/47 3.6)220 mm 194 mm
(3) Install the axle shaft assemblies as instructed earlier in this
section under "Axle Shaft Reassembly".
(4) Fill the axle case with hypoid gear lubricant to just below the
filler hole.
Lubricant Capacity liter (US/UK gal.)
194 mm 1.5 (0.4/0.33)
220 mm 1.8 (0.48/0.4)
Check owners manual for correct type and viscosity of gear
lubricant required.
Page 55 of 1600

REAR AXLE 4B-59
3. OIL LEAKAGE
1) Differential Carrier Leakage
Checkpoint Trouble Cause Countermeasure
Correct the oil levelToo much gear oil NG
Reapply the liquid gasket
and/or tighten the lock nut to
the specified torque
Reapply the liquid gasket
Tighten the bolts to the
specified torque
Replace the oil seal
Ring gear thrust boltLoose lock nut and/or liquid
Liquid gasket seal bed
Loose bolts
Oil sealW orn or defective oil seal
Differential carrier
Clean the air breatherAir breatherClogged air breather
NG NG NG NG NG
OK OK OK
OK
Gear oil level
Page 56 of 1600

4B-60 REAR AXLE
2) Axle Case Leakage
Checkpoint Trouble Cause Countermeasure
Tighten the drain plug and/or
replace the gasket(s)Loose drain plug and/or
defective gasket(s) NG
Reapply the liquid gasket
Tighten the bolts to the
specified torque
Clean the air breather
Liquid gasket seal bad
Loose bolts
Air breatherClogged air breather
Differential carrier
Replace the axle caseAxle caseCracked axle case
NG NG NG NG
OK OK
OK
Oil filler and drain plug
Page 70 of 1600

FRONT WHEEL DRIVE 4C1-7
RECOMMENDED LIQUID GASKET
Type Brand Name Manufacture Remarks
RTV*
Silicon BaseThreeBond 1207B
ThreeBond 1207C
ThreeBond 1215Three Bond
Three Bond
Three BondFor Engine Repairs
For Axle Case
Repairs, T/M
Water Base ThreeBond 1141E Three Bond For Engine Repairs
SolventThreeBond 1104
BelcoBond 4
BelcoBond 401
BelcoBond 402Three bond
Isuzu
Isuzu
IsuzuFor Engine Repairs
AnerobicLOCTITE 515
LOCTITE 518Loctite
LoctiteAll
* RTV : Room Temperature Vulcanizer
Note :
1. It is very important that the liquid gaskets listed above or their exact equivalent be used on the vehicle.
2. Be careful to use the specified amount of liquid gasket.
Follow the manufacture's instructions at all times.
3. Be absolutely sure to remove all lubricants and moisture from the connecting surfaces before applying
the liquid gasket.
The connecting surfaces must be perfectly dry.
4. LOCTITE 515 and LOCTITE 518 harden upon contact with a metal surface.
Do not apply LOCTITE 515 or LOCTITE 518 between two metal surfaces having a clearance of greater
than 0.25 mm (0.01 in). Poor adhesion will result.
RECOMMENDED THREAD LOCKING AGENTS
LOCTITE Type LOCTITE Color Application Steps
LOCTITE 242 Blue1. Completely remove all lubricant and moisture from the bolts and
the female threaded surfaces of the parts to be joined.
The surfaces must be perfectly dry.
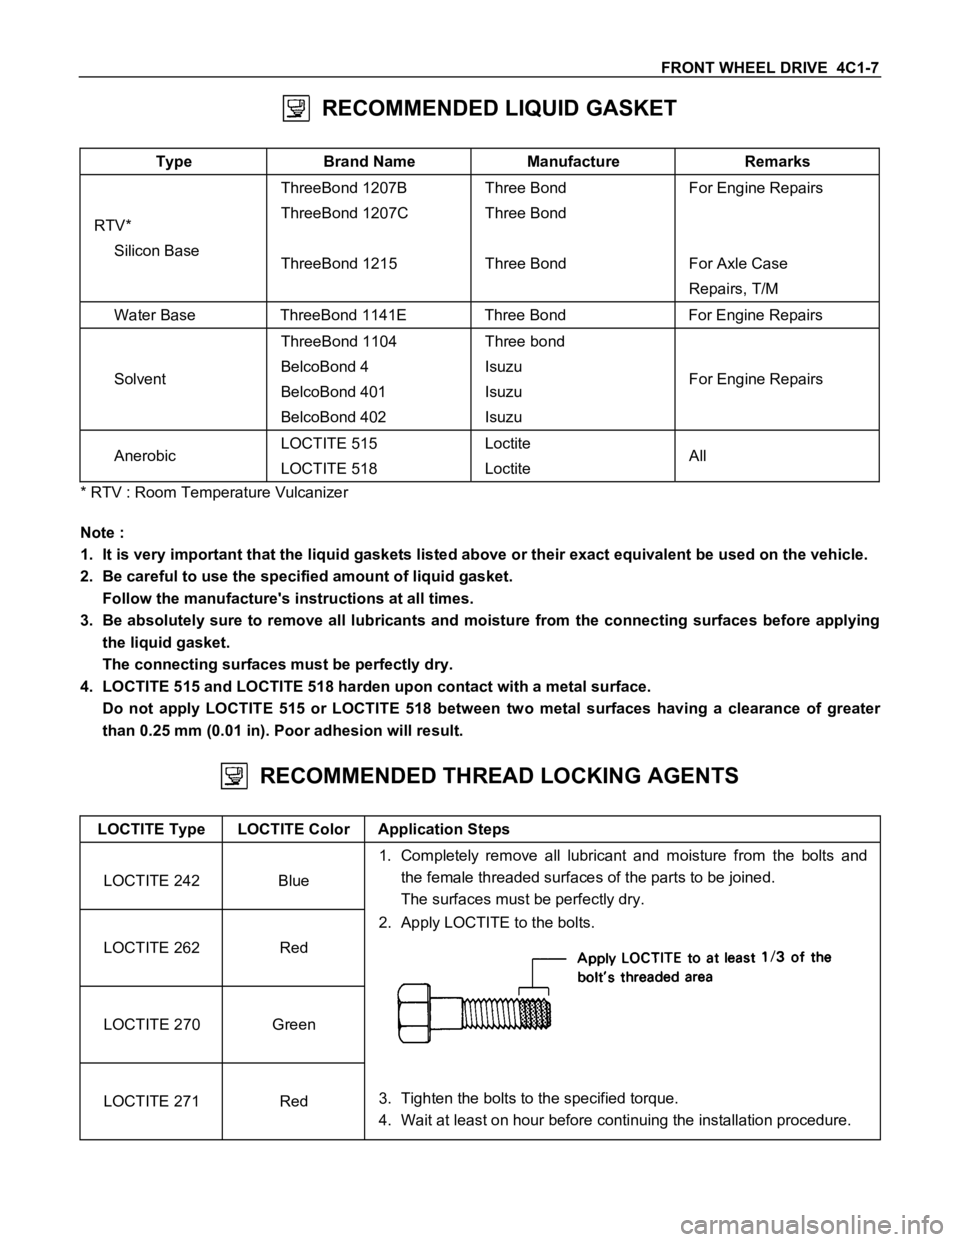
LOCTITE 262 Red2. Apply LOCTITE to the bolts.
LOCTITE 270 Green
LOCTITE 271 Red3. Tighten the bolts to the specified torque.
4. Wait at least on hour before continuing the installation procedure.
Page 77 of 1600

4C1-14 FRONT WHEEL DRIVE
Important Operations - Installation
5. Front Drive Axle Assembly
Place the front axle assembly in position under the vehicle
using a lifting jack.
3. Nut
Front Axle Mounting Nut Torque N
m (kgfm/lbft)
152.1
14.7 (15.5 1.5/112.1 10.8)
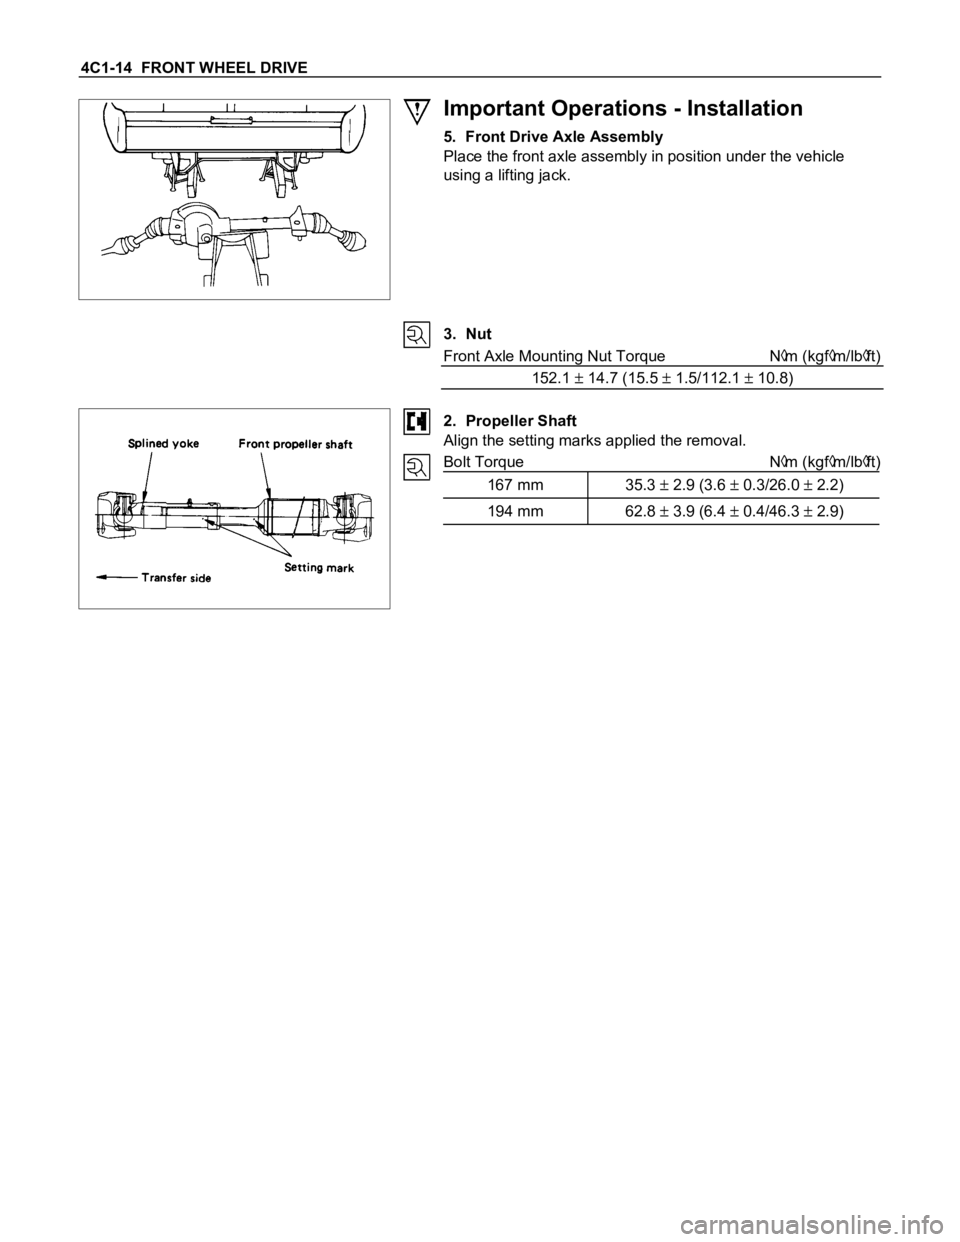
2. Propeller Shaft
Align the setting marks applied the removal.
Bolt Torque N
m (kgfm/lbft)
167 mm 35.3
2.9 (3.6 0.3/26.0 2.2)
194 mm 62.8 3.9 (6.4 0.4/46.3 2.9)
Page 83 of 1600

4C1-20 FRONT WHEEL DRIVE
Important Operations
10.Bolt
Bolt Torque N
m (kgfm/lbft)
82.4
7.8 (8.4 0.8/60.8 5.8)
13.Bellows
(1) Apply a thin coat of grease to the shaft for smooth
installation.
(2) Apply specified grease to the ½ space of the bellows.
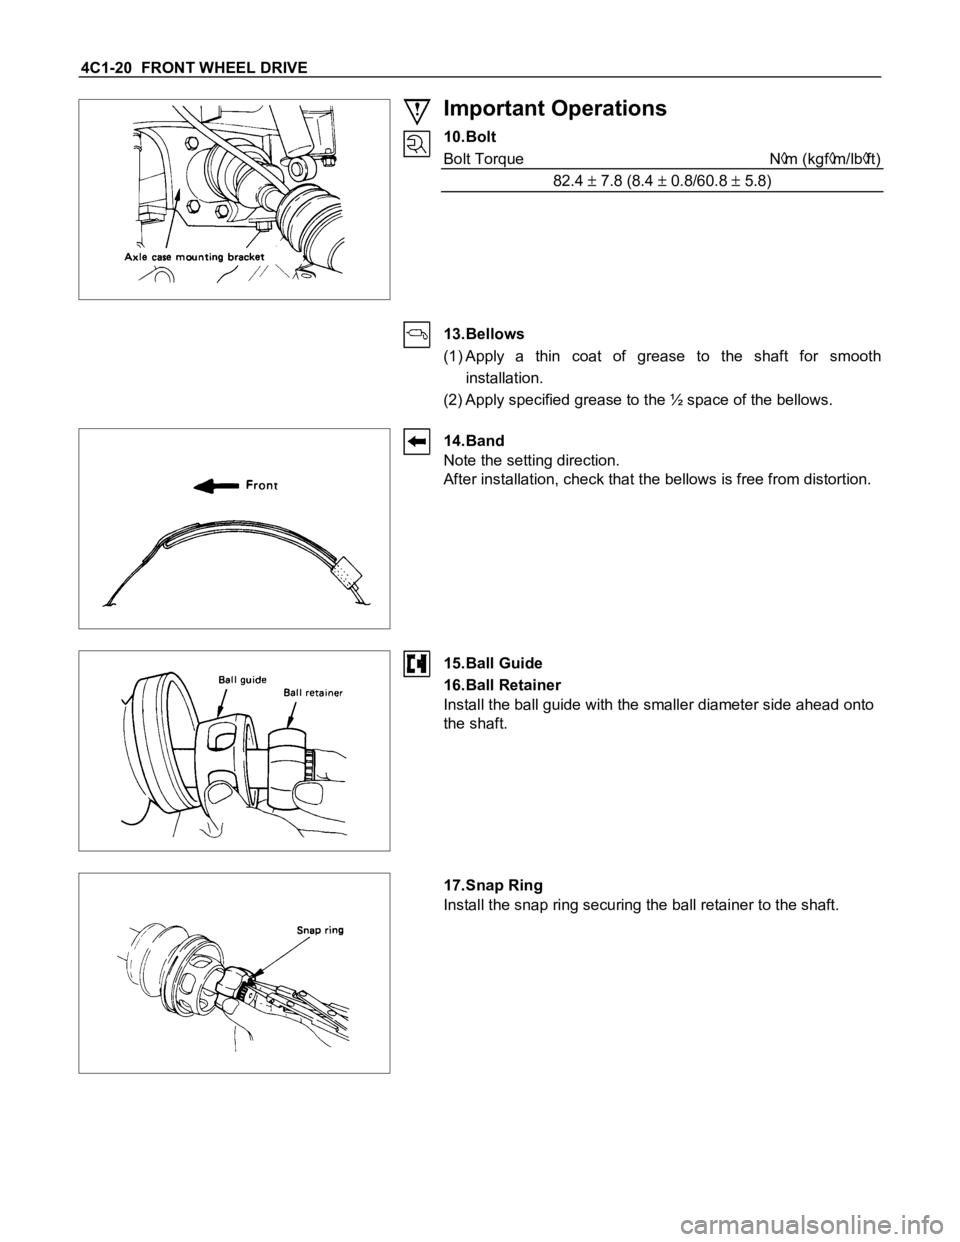
14.Band
Note the setting direction.
After installation, check that the bellows is free from distortion.
15.Ball Guide
16.Ball Retainer
Install the ball guide with the smaller diameter side ahead onto
the shaft.
17.Snap Ring
Install the snap ring securing the ball retainer to the shaft.