ISUZU TROOPER 1995 Workshop Manual
Manufacturer: ISUZU, Model Year: 1995, Model line: TROOPER, Model: ISUZU TROOPER 1995Pages: 1928
Page 1041 of 1928
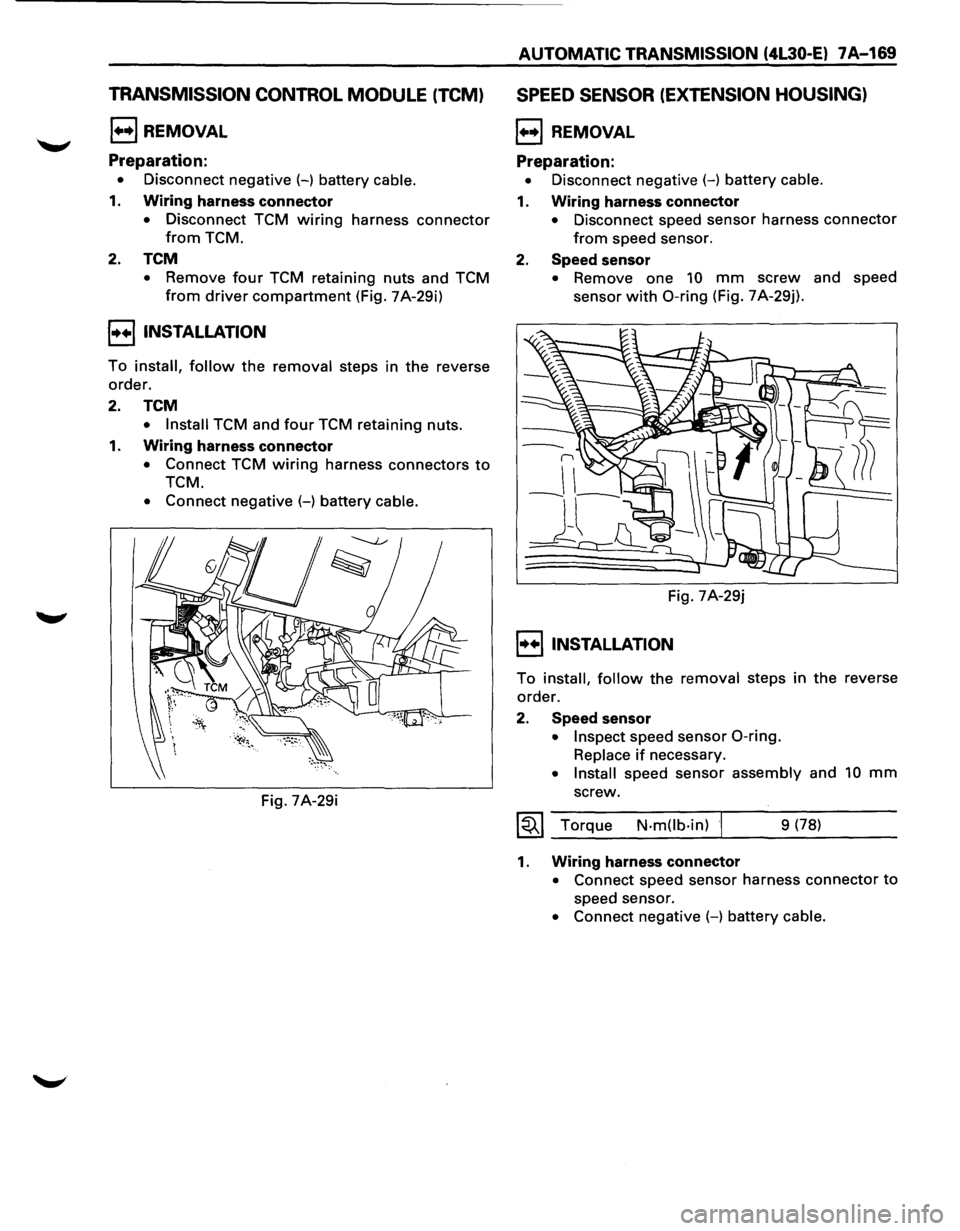
TRANSMISSION CONTROL MODULE (TCM)
1+•1 REMOVAL
Preparation:
• Disconnect negative (-) battery cable.
1. Wiring harness connector
• Disconnect TCM wiring harness connector
from TCM.
2. TCM
• Remove four TCM retaining nuts and TCM
from driver compartment (Fig. 7A-29i)
!•+I INSTALLATION
To install, follow the removal steps in the reverse
order.
2. TCM
• Install TCM and four TCM retaining nuts.
1. Wiring harness connector
• Connect TCM wiring harness connectors to
TCM.
• Connect negative (-) battery cable.
Fig. 7A-29i
AUTOMATIC TRANSMISSION (4L30-El 7A-169
SPEED SENSOR (EXTENSION HOUSING)
1+•1 REMOVAL
Preparation:
• Disconnect negative (-) battery cable.
1. Wiring harness connector
• Disconnect speed sensor harness connector
from speed sensor.
2. Speed sensor
• Remove one 10 mm screw and speed
sensor
with 0-ring (Fig. 7 A-29j).
Fig. 7A-29j
I•+IINSTALLATION
To install, follow the removal steps in the reverse
order.
2. Speed sensor
• Inspect speed sensor 0-ring.
Replace if necessary.
• Install speed sensor assembly and 10 mm
screw.
~~~ Torque N·mOb·in) 9 (78)
1. Wiring harness connector
• Connect speed sensor harness connector to
speed sensor.
• Connect negative (-) battery cable.
Page 1042 of 1928
7 A-170 AUTOMATIC TRANSMISSION (4L30-E)
TRANSMISSION OIL TEMPERATURE
SENSOR (ADAPTER CASE)
1•+1 REMOVAL
Preparation:
• Disconnect negative (-) battery cable.
•
Remove exhaust protector and exhaust pipe.
• Drain fluid.
•
Refer to "CHANGING TRANSMISSION FLUID".
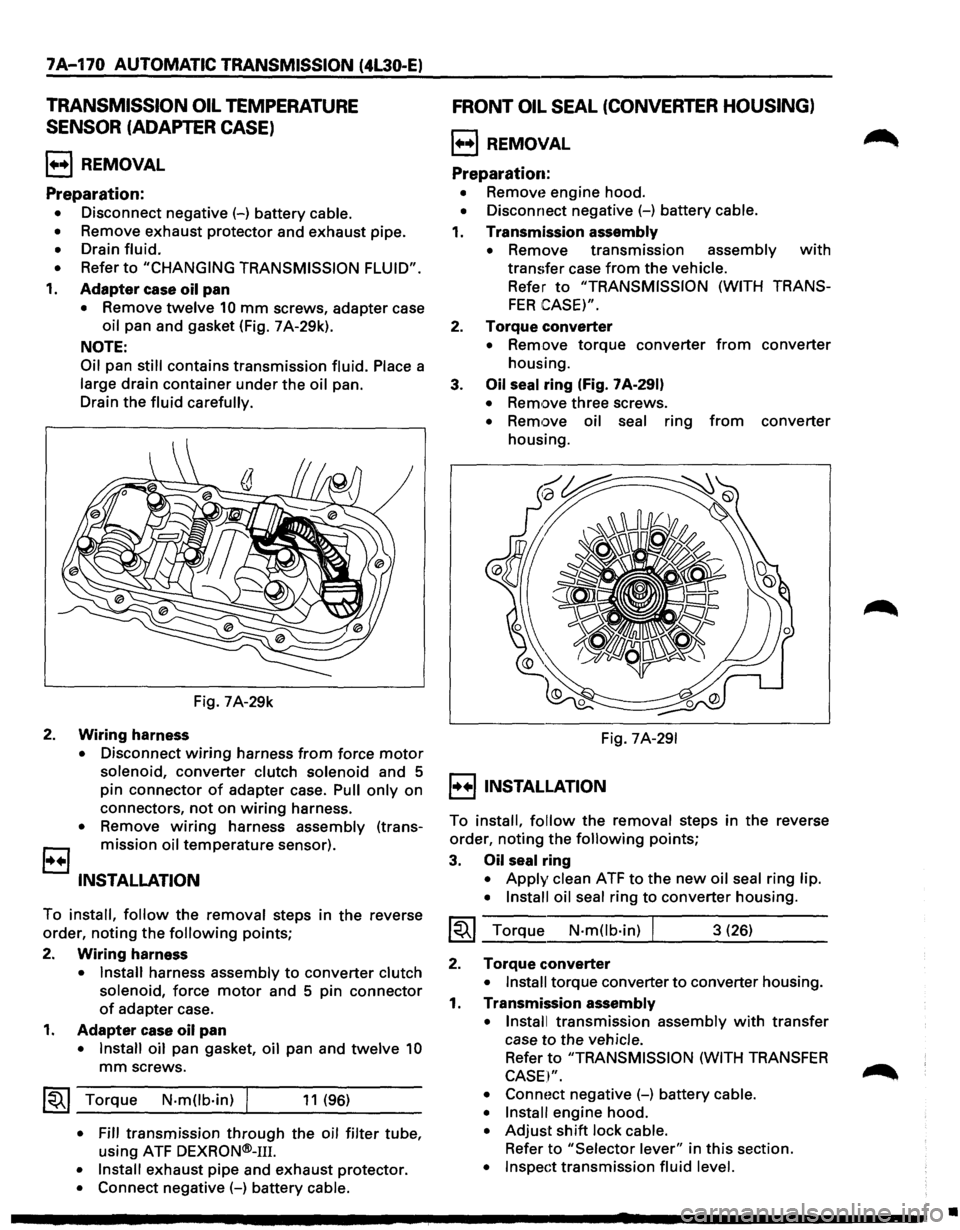
1. Adapter case oil pan
• Remove twelve 10 mm screws, adapter case
oil pan and gasket (Fig. 7 A-29k).
NOTE:
Oil
pan still contains transmission fluid. Place a
large drain container under the oil pan.
Drain the
fluid carefully.
Fig. 7A-29k
2. Wiring harness
• Disconnect wiring harness from force motor
solenoid, converter clutch solenoid and 5
pin connector
of adapter case. Pull only on
connectors,
not on wiring harness.
• Remove wiring harness assembly (trans
B mission oil temperature sensor).
INSTALLATION
To install, follow the removal steps in the reverse
order, noting the
following points;
2.
Wiring harness
• Install harness assembly to converter clutch
solenoid,
force motor and 5 pin connector
of adapter case.
1. Adapter case oil pan
• Install oil pan gasket, oil pan and twelve 10
mm screws.
~~~ Torque N·mOb·in) I 11 (96)
• Fill transmission through the oil filter tube,
using ATF
DEXRON®-111.
• Install exhaust pipe and exhaust protector.
• Connect negative (-) battery cable.
FRONT OIL SEAL (CONVERTER HOUSING)
l++l REMOVAL
Preparation:
• Removt~ engine hood.
• Disconnect negative (-) battery cable.
1. Transmission assembly
•
Remove transmission assembly with
transfer case from the vehicle.
Refer to "TRANSMISSION (WITH TRANS
FER CASE)".
2. Torque converter
• Remove torque converter from converter
housing.
3.
Oil seal ring (Fig. 7 A-291)
• Remove three screws.
• Remove oil seal ring from converter
housing.
Fig.
7A-291
I++IINSTALLATION
To install, follow the removal steps in the reverse
order, noting the
following points;
3. Oil seal ring
• Apply clean ATF to the new oil seal ring lip.
• Install oil seal
ring to converter housing.
~~~ Torque N·mOb·in) I 3 (26)
2. Torque converter
• Install torque converter to converter housing.
1. Transmission assembly
• Install
transmission assembly with transfer
case
to the vehicle.
Refer to "TRANSMISSION (WITH TRANSFER
CASE I".
• Connoct negative (-) battery cable.
• Install
engine hood.
• Adjust shift lock cable.
Refer to "Selector lever" in this section.
• Inspect transmission fluid level.
•
Page 1043 of 1928
REAR OIL SEAL (EXTENSION HOUSING)
l••l REMOVAL
Preparation:
• Disconnect negative (-) battery cable.
1. Transfer case assembly
• Remove transfer case assembly from the
vehicle.
Refer to "SECTION 70 TRANSFER CASE
(AfT')".
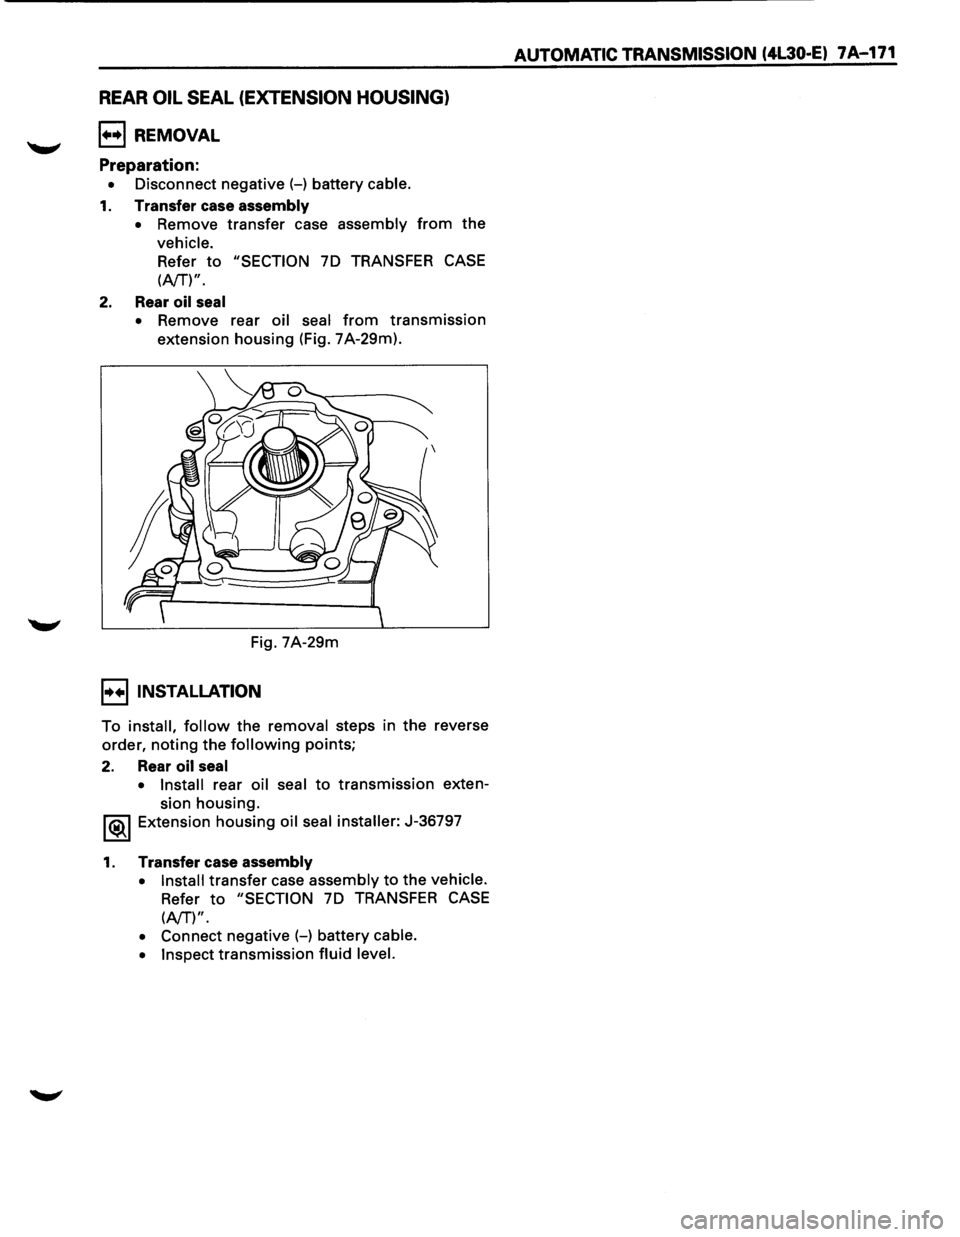
2. Rear oil seal
• Remove rear oil seal from transmission
extension housing (Fig. 7A-29m).
Fig. 7A-29m
I••IINSTALLATION
To install, follow the removal steps in the reverse
order,
noting the following points;
2. Rear oil seal
• Install rear oil seal to transmission exten
sion housing.
1®..1 Extension housing oil seal installer: J-36797
1. Transfer case assembly
• Install transfer case assembly to the vehicle.
Refer to "SECTION 70 TRANSFER CASE
(AfT')".
• Connect negative (-) battery cable.
• Inspect
transmission fluid level.
AUTOMATIC TRANSMISSION (4L30·E) 7A-171
Page 1044 of 1928

MEMO
··················\
-·······---------······----------\
-------------------------------· -----·-········----------")
7A-172 AUTOMATIC TRANSMISSION (4L30-E)
MEMO
··················\
-·······---------······----------\
-------------------------------· -----·-········-------------------------········-------------------------···\
··········
-------------------------------------------------------------------················\
-----·-·····-······------------·--········· ······-··-··········\
····------------------
-----------------------·-----------·-·-------------------------\
--------------··········-······------·\
-··········---·--······\
···· ------·····-·-······· -----------------
-----------------··············\
-····----------------------------·--·-······ ------------·-···· ... -·-------------------······------·················\
········ --·--·-····
·-------------------------------------········\
··················\
·········· .................. ··················\
······· ··················\
········------·····----···\
····-
········---·--········\
·-------------------····-·-···-··-··\
·········· .................... ··················\
········· ··················\
·····------·······----····\
··--
--··················\
---------····--····-··········\
···--------·············\
······· ... ................... -···· ....................................... .... ················
·················---·\
··················\
···· -...... ·········· ...... . ··················\
-··················\
··················\
··················\
···········--·-······\
····
··················\
···· ··················\
· ········-··········\
·· ··················\
·············-· ········-------·-·······\
··················\
···········-····-···\
··········
··············· ........................ ··-········--------······\
··················\
................... ....... .
·······----------·-········\
···------···· ··················\
······· .............................
----------------······-········\
-··········
··············----···\
··················\
···
··················\
--·-·················\
···
··········-········\
..... . ................... ··················\
·· ··················\
·····
··················\
··· ..... . ····· .............. .
··················\
········ ········· ......... . -··············. ··················\
·· ········ ··················\
······
•
Page 1045 of 1928
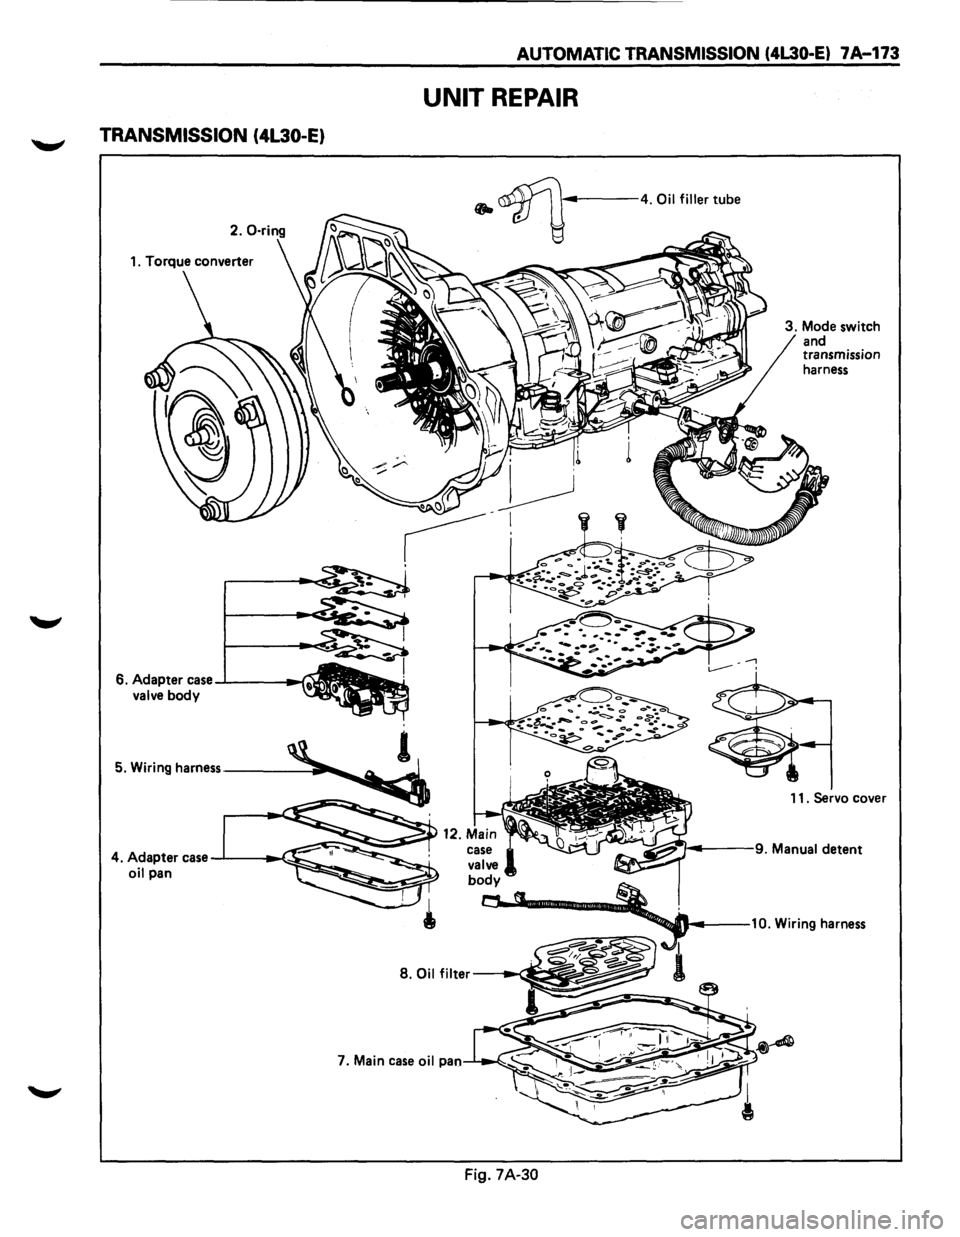
TRANSMISSION (4L30-E)
6. Adapter case -l------f valve body
AUTOMATIC TRANSMISSION (4L30-E) 7 A-173
UNIT REPAIR
• ~-----4. Oil filler tube
3. Mode switch
and
transmission
harness
11. Servo cover
case
valve body
~ §,.::•·• ~~--... ---10. Wiring harness
---1 ..... ~ 1 S.Oilfilter -~
I
Fig. 7A-30
Page 1046 of 1928
7A-174 AUTOMATIC TRANSMISSION (4L30·E)
1•!•1 biSASSEMBLV
During the disassembly and reassembly of the
following components, perform the following:
• Wash each part thoroughly and blow air
through each oil passage and groove to
eliminate blockage.
• Seal rings, roll pins and gaskets should be
replaced
with new parts.
• When assembling the components, apply
DEXRON®-m Automatic Transmission Fluid
(ATF)
to each seal, rotating part and sliding
part.
• Do not dip those parts having a facing, such as
drive plate for clutch or brake, in the cleaner
when washing it with solvent.
Also, always wash
it with new ATF two or
three times after cleaning with solvent.
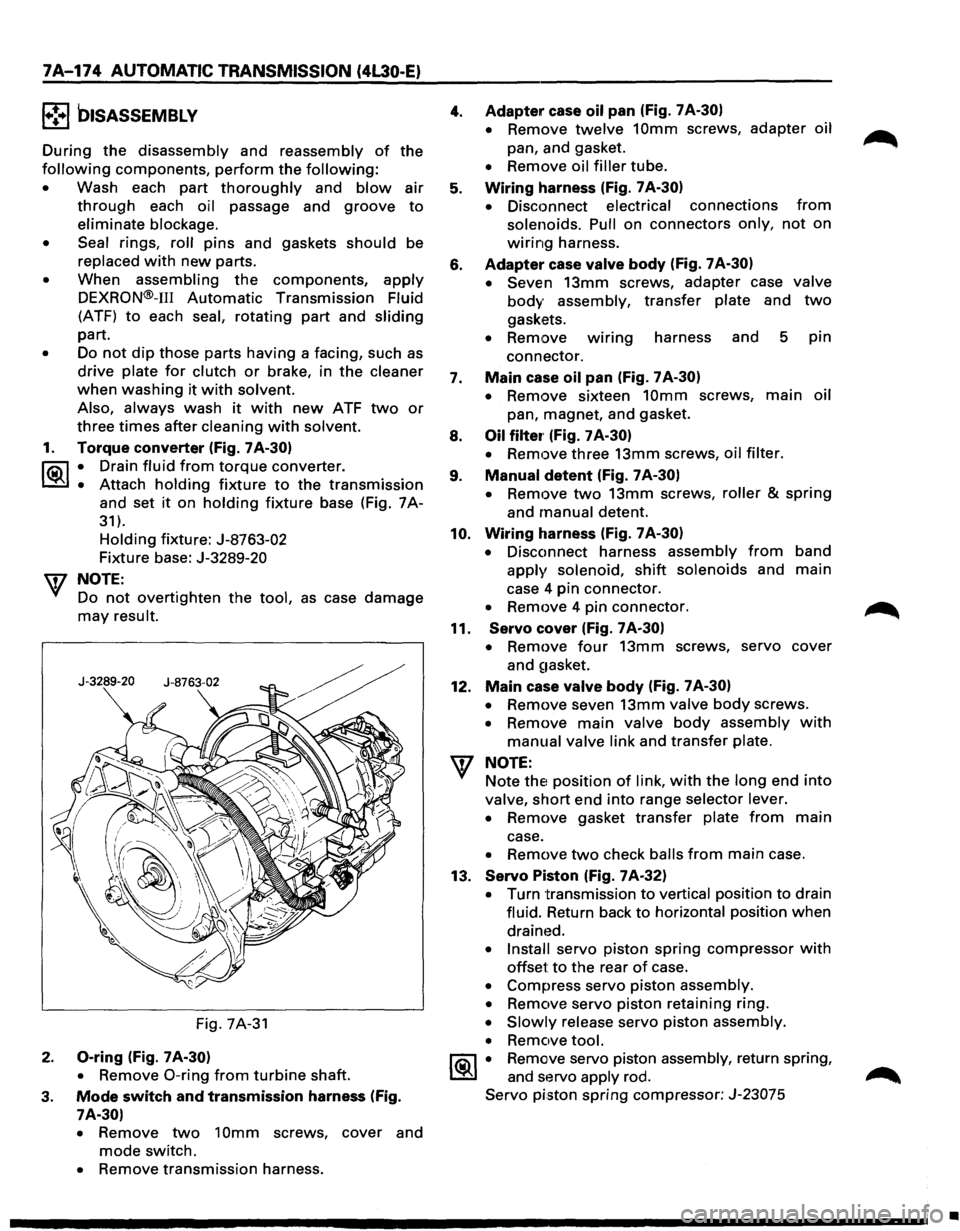
1. Torque converter (Fig. 7A-30)
l"i:\1 • Drain fluid from torque converter.
~ • Attach holding fixture to the transmission
and set it on holding fixture base (Fig. 7A-
31).
Holding fixture: J-8763-02
Fixture base: J-3289-20
w NOTE:
Do
not overtighten the tool, as case damage
may result.
Fig. 7A-31
2. 0-ring (Fig. 7 A-30)
•
Remove 0-ring from turbine shaft.
3. Mode switch and transmission harness (Fig.
7A-30)
•
Remove two 10mm screws, cover and
mode switch.
• Remove transmission harness.
4.
5.
6.
7.
8.
9.
10.
11.
12.
Adapter case oil pan (Fig. 7 A-30)
•
Remove twelve 10mm screws, adapter oil
pan, and gasket.
• Remove oil filler tube.
Wiring harness (Fig. 7 A-30)
•
Disconnect electrical connections from
solenoids. Pull on connectors only, not on
wiring harness.
Adapter case valve body (Fig. 7A-30)
• Seven
13mm screws, adapter case valve
body assembly, transfer plate and two
gaskets.
• Remove wmng harness and 5 pin
connector.
Main case oil pan (Fig. 7 A-30)
•
Remove sixteen 10mm screws, main oil
pan, magnet, and gasket.
Oil filter· (Fig. 7 A-30)
•
Remove three 13mm screws, oil filter.
Manual detent (Fig. 7 A-30)
•
Remove two 13mm screws, roller & spring
and manual detent.
Wiring harness (Fig. 7 A-30)
•
Disconnect harness assembly from band
apply solenoid, shift solenoids and main
case 4 pin connector.
• Remove 4 pin connector.
Servo cover (Fig. 7 A-30)
•
Remove four 13mm screws, servo cover
and
~1asket.
Main case valve body (Fig. 7 A-30)
•
Remove seven 13mm valve body screws.
• Remove main valve body assembly with
manual valve link and transfer plate.
NOTE: Note
thE! position of link, with the long end into
valve, short end into range selector lever.
• Remove gasket transfer plate from main
case.
• Remove two check balls from main case.
13.
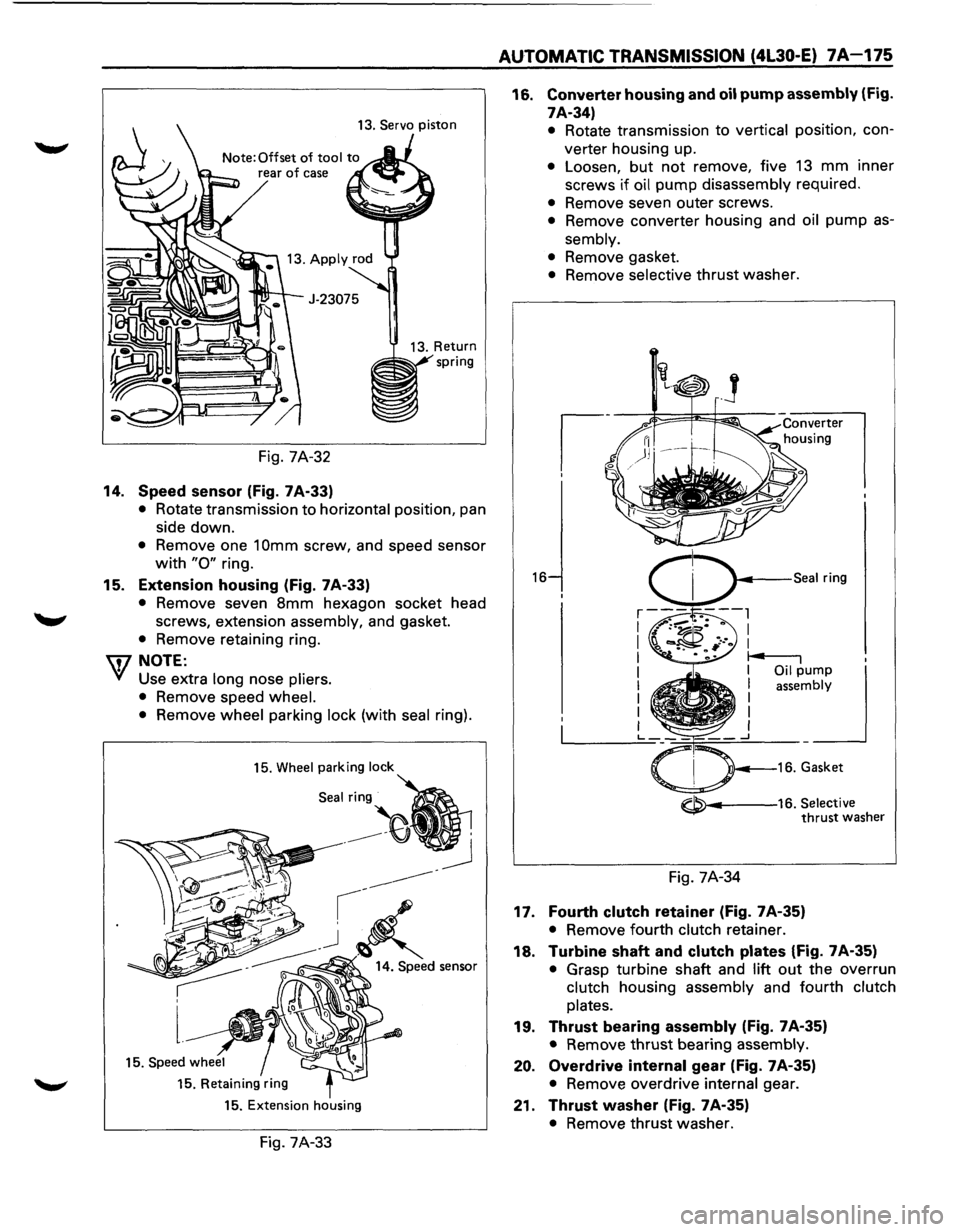
Servo Piston (Fig. 7A-32)
• Turn transmission to vertical position to drain
fluid. Return back
to horizontal position when
drained.
• Install servo piston spring compressor with
offset to the rear of case.
• Compress servo piston assembly.
• Remove servo piston retaining ring.
• Slowly release servo piston assembly.
• Remove tool.
1®.1 • Remove servo piston assembly, return spring,
and servo apply rod.
Servo piston spring compressor: J-23075
•
Page 1047 of 1928
13. Servo piston
Fig. 7A-32
14. Speed sensor (Fig. 7A-33)
• Rotate transmission to horizontal position, pan
side down.
• Remove one 1 Omm screw, and speed sensor
with "0" ring.
15. Extension housing (Fig. 7 A-33)
• Remove seven 8mm hexagon socket head
screws, extension assembly, and gasket.
• Remove retaining ring.
\fl NOTE:
V Use extra long nose pliers.
• Remove speed wheel.
• Remove wheel parking lock (with seal ring).
15. Wheel parking lock
Seal:~
15. Retaining ring
15. Extension housing
Fig. 7A-33
AUTOMATIC TRANSMISSION (4L30-E) 7A-175
16. Converter housing and oil pump assembly (Fig.
7A-34)
16
• Rotate transmission to vertical position, con
verter housing up.
• Loosen, but not remove, five 13 mm inner
screws
if oil pump disassembly required.
• Remove seven outer screws.
• Remove converter housing and oil pump as
sembly.
• Remove gasket.
• Remove selective thrust washer.
~---16. Selective thrust washer
Fig. 7A-34
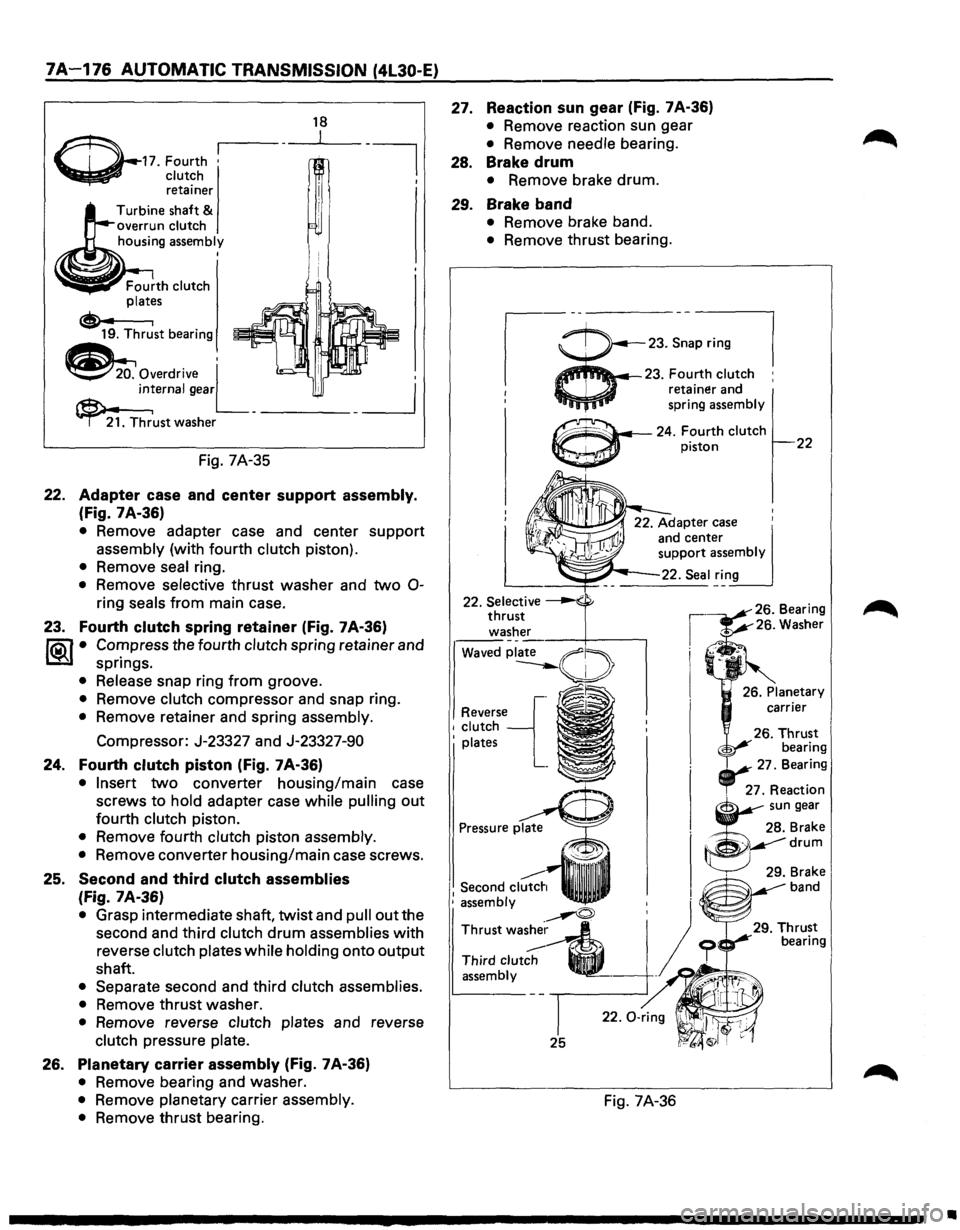
17. Fourth clutch retainer (Fig. 7A-35)
• Remove fourth clutch retainer.
18. Turbine shaft and clutch plates (Fig. 7A-35)
• Grasp turbine shaft and lift out the overrun
clutch housing assembly and fourth
clutch
plates.
19. Thrust bearing assembly (Fig. 7A-35)
• Remove thrust bearing assembly.
20. Overdrive internal gear (Fig. 7A-35)
• Remove overdrive internal gear.
21. Thrust washer (Fig. 7A-35)
• Remove thrust washer.
Page 1048 of 1928
7A-176 AUTOMATIC TRANSMISSION (4l30-E)
~-17. Fourth •
~ clutch retainer
Turbine shaft
& overrun clutch
housing assembly I
Fig. 7A-35
18
22. Adapter case and center support assembly.
(Fig. 7 A-36)
• Remove adapter case and center support
assembly (with fourth clutch piston).
• Remove seal ring.
• Remove selective thrust washer and two 0-
ring seals from main case.
23. Fourth clutch spring retainer (Fig. 7A-36)
~ • Cor:npress the fourth clutch spring retainer and
spnngs.
• Release snap ring from groove.
• Remove clutch compressor and snap ring.
• Remove retainer and spring assembly.
Compressor: J-23327 and J-23327-90
24. Fourth clutch piston (Fig. 7A-36)
• Insert two converter housing/main case
screws to
hold adapter case while pulling out
fourth clutch piston.
• Remove fourth clutch piston assembly.
•
Remove converter housing/main case screws.
25. Second and third clutch assemblies
(Fig. 7A-36)
• Grasp intermediate shaft, twist and pull out the
second and third
clutch drum assemblies with
reverse
clutch plates while holding onto output
shaft.
• Separate second and third clutch assemblies.
•
Remove thrust washer.
• Remove reverse clutch plates and reverse
clutch pressure plate.
26. Planetary carrier assembly (Fig. 7A-36)
• Remove bearing and washer.
• Remove planetary carrier assembly.
•
Remove thrust bearing.
27. Reaction sun gear (Fig. 7A-36)
• Remove reaction sun gear
• Remove needle bearing.
28. Brake drum
• Remove brake drum.
29. Brake band
• Remove brake band.
• Remove thrust bearing.
,-ii--23.~:.~
I 23. Fou_rth clutch :
1 reta~ner and
' spring
assembly
Reverse'-[. 1 clutch
' plates
~~~~ ..... -24. Fourth clutch piston 22
. 27. Re:~~~rn
Second
clutch : assembly
~
Thrustwa~~
Third clutch ._
assembly -
25
Fig. 7A-36
Brake drum
. 29. Brake
band
•
Page 1049 of 1928
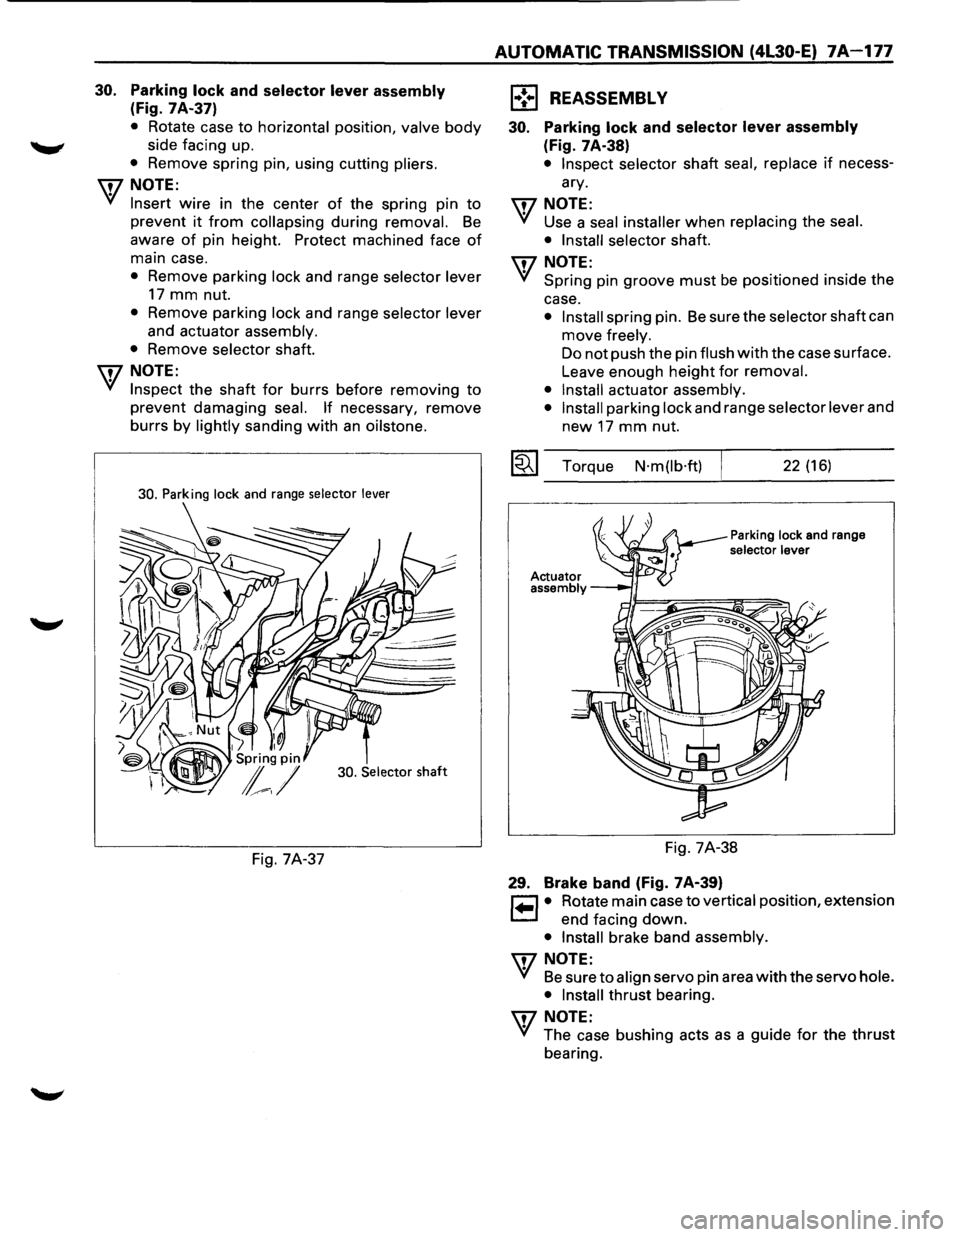
30. Parking lock and selector lever assembly
(Fig. 7A-37)
• Rotate case to horizontal position, valve body
side facing up.
• Remove spring pin, using cutting pliers.
\fl NOTE:
~ Insert wire in the center of the spring pin to
prevent it from collapsing during removal. Be
aware of pin height. Protect machined face of
main case.
• Remove parking lock and range selector lever
17 mm nut.
• Remove parking lock and range selector lever
and actuator assembly.
•
Remove selector shaft.
\fl NOTE:
~ Inspect the shaft for burrs before removing to
prevent damaging seal. If necessary, remove
burrs
by lightly sanding with an oilstone.
30. Parking lock and range selector lever
30. Selector
shaft
Fig. 7A-37
AUTOMATIC TRANSMISSION (4L30-E) 7A-177
1 .. ! .. 1 REASSEMBLY
30. Parking lock and selector lever assembly
(Fig. 7A-38)
• Inspect selector shaft seal, replace if necess
ary.
\fl NOTE:
~ Use a seal installer when replacing the seal.
• Install selector
shaft.
\fl NOTE:
~ Spring pin groove must be positioned inside the
case.
• Install spring pin. Be sure the selector shaft can
move
freely.
Do not push the pin flush with the case surface.
Leave enough
height for removal.
• Install
actuator assembly.
• Install
parking lock and range selector lever and
new 17 mm nut.
~~~ Torque N·m(lb·ft) 22 (16)
Parking lock and range selector lever
Fig. 7A-38
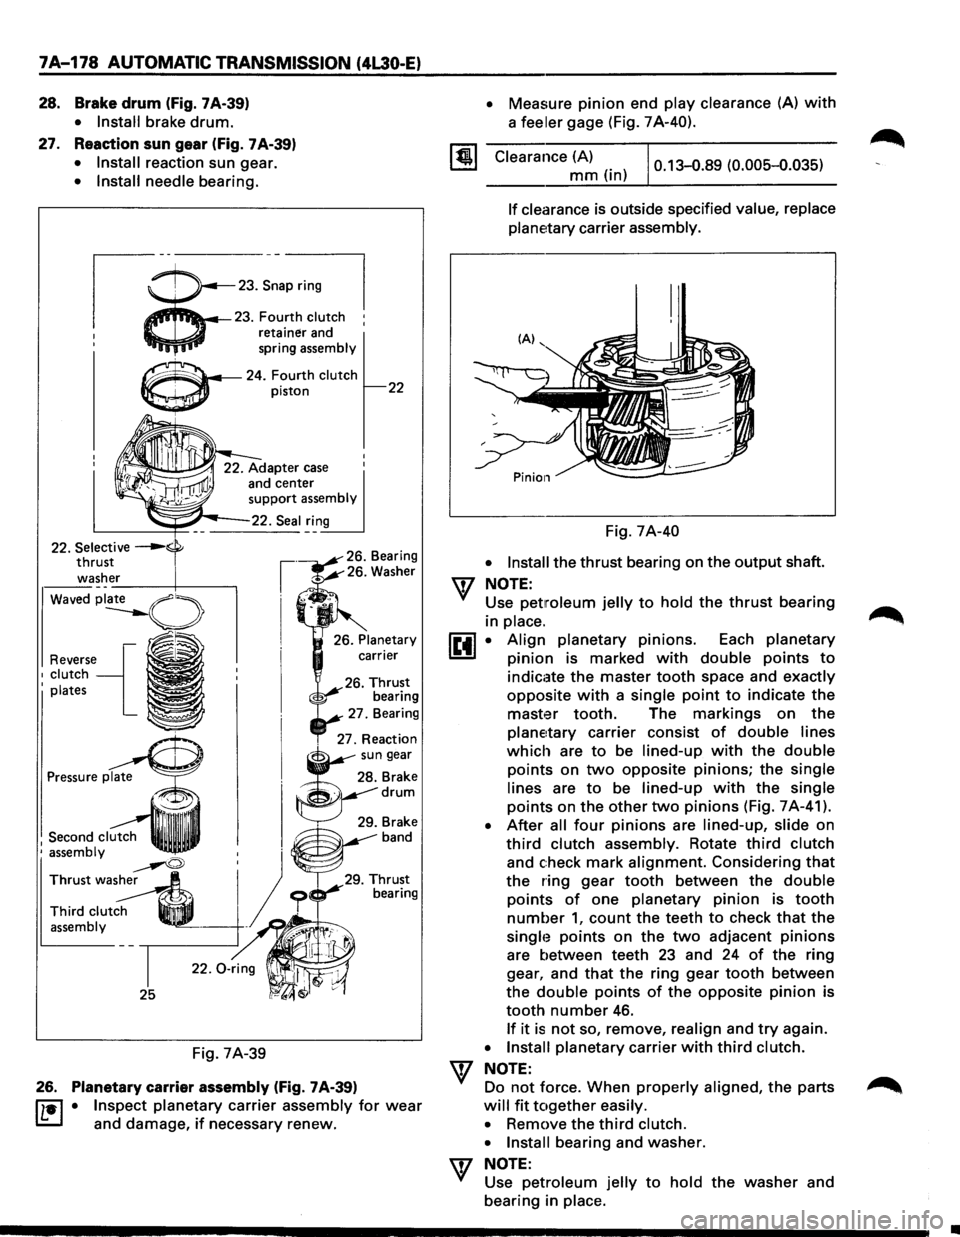
29. Brake band (Fig. 7A-39)
~ • Rotate main case to vertical position, extension
~ end facing down.
• Install brake band assembly.
\fl NOTE:
~ Be sure to align servo pin area with the servo hole.
• Install
thrust bearing.
\fl NOTE:
~ The case bushing acts as a guide for the thrust
bearing.
Page 1050 of 1928
7A-178 AUTOMATIC TRANSMISSION (4L30-E)
28. Brake drum (fig. 7 A-39)
27.
• Install brake drum.
Reaction sun gear (Fig. 7A-39)
• Install reaction sun gear.
• Install needle bearing.
23.S~a=l
4'i'fl._.l4--23. Fourth clutch :
retainer and
spring
assembly
~~..,...~---24. Fourth clutch
Waved
Reverse{ 1 clutch I plates
1 Second clutch ' assembly
~ Thrust wash~
Third clut~ q_ assembly .
25
Fig. 7A-39
piston
26. Planetary carrier assembly (Fig. 7 A-39)
22
IL•I • Inspect planetary carrier assembly for wear
and damage, if necessary renew.
• Measure pinion end play clearance (A) with
a feeler gage (Fig. 7A-40).
Clearance (A)
mm (in) 0.13-0.89 (0.005-0.035)
If clearance
is outside specified value, replace
planetary
carrier assembly.
Fig. 7A-40
• Install the thrust bearing on the output shaft.
\f NOTE:
Use petmleum jelly to hold the thrust bearing
in
place.
~·
•
Align planetary pinions. Each planetary
pinion is marked with double points to
indicate the master tooth space and exactly
opposite with a single point to indicate the
master tooth. The markings on the
planetary carrier consist of double lines
which are to be lined-up with the double
points on two opposite pinions; the single
lines
are to be lined-up with the single
points on the other two pinions (Fig. 7 A-41 ).
After all four pinions are lined-up, slide on
third clutch assembly. Rotate third clutch
and check mark alignment. Considering that
the ring gear tooth between the double
points of one planetary pinion is tooth
number 1, count the teeth to check that the
singh~ points on the two adjacent pinions
are between teeth 23 and 24 of the ring
gear, and
that the ring gear tooth between
the
double points of the opposite pinion is
tooth number 46.
If it is not so, remove, realign and try again.
• Install planetary carrier with third clutch.
\f NOTE:
Do not force. When properly aligned, the parts
will fit together easily.
•
Remove the third clutch.
• Install
bearing and washer.
\f NOTE:
Use petroleum jelly to hold the washer and
bearing in
place.
•