light ISUZU TROOPER 1995 Workshop Manual
[x] Cancel search | Manufacturer: ISUZU, Model Year: 1995, Model line: TROOPER, Model: ISUZU TROOPER 1995Pages: 1928
Page 710 of 1928
6E2-14 DRIVEABILITY AND EMISSIONS
DATA LINK CONNECTOR ''SCAN TOOLS''
The Engine Control Module (ECM) can communicate a
variety
of information through data link connector
terminal
"2". This data is transmitted at a high frequecy
which requires a
"Scan tool" for interpretation. There
are several
"Scan tools" available for reading this
information.
With an understanding
of the data which the tool
displays, and knowledge of the circuits involved, the
tool can be
very useful in obtaining information which
would be more difficult or impossible to obtain with
other equipment.
"Scan tools" do not make the use of diagnostic charts
unnecessary, nor
can they indicate exactly where a
problem is in a particular circuit. Trouble Tree
Charts
incorporate diagnosis procedures using a "Scan tool"
where possible and most charts require the use of a
"Scan tool" when it is applicable.
A "SCAN TOOL" THAT DISPLAYS FAUL TV
DATA SHOULD NOT BE USED AND THE
PROBLEM SHOULD BE REPORTED TO THE
MANUFACTURER. THE USE OF A FAUL TV
"SCAN TOOL" CAN RESULT IN MIS
DIAGNOSIS
AND UNNECESSARY PARTS
REPLACEMENT.
ECM's have two (2) modes for transmitting
information. The
following information will describe
the system operation in each
of the modes.
Data List (FO)
On engines that can be monitored in the "Open"
mode, certain parameters can be observed
without changing the engine operating
characteristics. The parameters capable
of being
read vary with engine families.
Most "Scan tools"
are programmed so that the system will go
directly into the data link connector mode
if the
"Open" mode is not available.
''SCAN TOOL'' LIMITATIONS AND USE
The "Scan tool" allows a quick check of sensors
and switches which are inputs
to the ECM. The
"Scan tool" allows one to manipulate wiring
harnesses or components under the hood while
observing the "Scan Tool" readout. This helps in
locating intermittents
with the engine not
running.
INTERMITTENT CONDITIONS
The "Scan tool" is helpful in cases of intermittent
operation. The
tool can be plugged in and
observed while driving the vehicle under the
condition
where the light comes "ON" momen- tarily,
or the
engine driveability is poor
momentarily.
If the problem seems to be related
to certain areas
that can be checked on the "Scan ~
tool", then those are the positions that should be
checked while driving the vehicle. If there does
not seem to
be any correlation between the
problem and any specific circuit, the
"Scan tool"
can be checked on each position, watching for a
period
of time to see if there is any change in the
readings that indicates intermittent operation.
The
"Scan tool" is also a useful and quick way of
comparing operating parameters of a poorly
operating engine with a known good one. For
example; A sensor may shift in
value but not set a
diagnostic trouble code. Comparing with a known
good vehicle may uncover the problem.
The
"Scan tool" has the ability to save time in
diagnosis and prevent the replacement
of good
parts. The key to using the
"Scan tool" success
fully
for diagnosis lies in the technicians ability to
understand the system he is trying to diagnose as
well as an understanding of the "Scan tool's"
limitations. Therefore, the technician should read
the tool operating manual to become familiar
with
the tool. The following information will describe
most of the "Scan tool" positions and how they
can be helpful in diagnosis.
"SCAN TOOL" POSITIONS
INJECTOR PULSE WIDTH
In this position, the reading is given in milli
seconds which is the on time that the ECM is
commanding to the injector(s).
CLOSED LOOP/OPEN LOOP
This position will indicate whether the engine
control system
is operating in open or closed
loop. Most systems go closed loop after a certain
amount of run time, when engine coolant
temperature
is high enough, and the oxygen
sensor becomes active.
TROUBLE CODES
Will display any trouble codes stored in the ECM
memory.
THROTTLE POSITION (TP) SENSOR
Values read will be the voltage as seen by the ~
ECM. The voltage should be the TP sensor
specification
with the throttle closed and go up to
about 5 volts with
wide open throttle.
•
Page 714 of 1928
6E2-18 DRIVEABILITV AND EMISSIONS
TOOLS NEEDED TO SERVICE THE SVSJEM
The system requires a data link connector read-out (Scan) tool, tachometer, test light, ohmmeter, digital voltmeter
with 10 megohms impedance (J-39200), vacuum gage and jumper wires for diagnosis. A test light or voltmeter
must be used when specified in the procedures. They must NOT be interchanged. For more complete information
on the operation
of these tools, see the manufacturer's instructions.
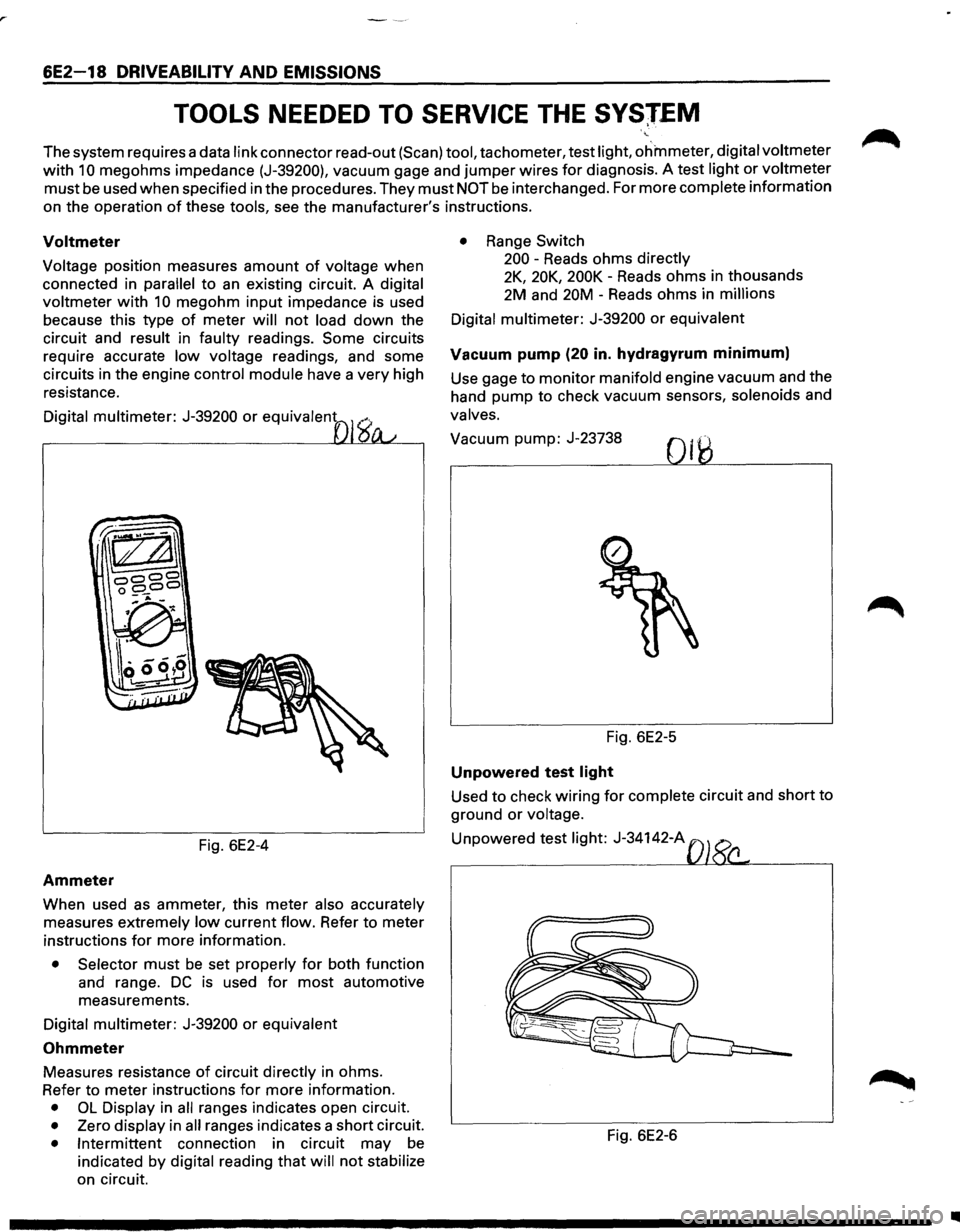
Voltmeter
Voltage position measures amount of voltage when
connected in
parallel to an existing circuit. A digital
voltmeter
with 10 megohm input impedance is used
because this type
of meter will not load down the
circuit and
result in faulty readings. Some circuits
require accurate
low voltage readings, and some
circuits in the engine
control module have a very high
resistance.
Digital multimeter: J-39200 or equivalent
Fig. 6E2-4
Ammeter
When used as ammeter, this meter also accurately
measures extremely low current flow. Refer to meter
instructions
for more information.
• Selector must be set properly for both function
and range.
DC is used for most automotive
measurements.
Digital multimeter: J-39200 or equivalent
Ohmmeter
Measures resistance of circuit directly in ohms.
Refer to meter instructions
for more information.
• OL Display in all ranges indicates open circuit.
• Zero display in all ranges indicates a short circuit.
• Intermittent connection in circuit may be
indicated by digital reading that will not stabilize
on circuit.
• Range Switch
200 -Reads ohms
directly
2K, 20K, 200K -Reads ohms in thousands
2M and 20M -Reads ohms in
millions
Digital multimeter:
J-39200 or equivalent
Vacuum pump (20 in. hydragyrum minimum)
Use gage to monitor manifold engine vacuum and the
hand pump to check vacuum sensors,
solenoids and
valves.
Vacuum pump: J-23738
Fig. 6E2-5
Unpowered test light
Used to check wiring for complete circuit and short to
ground
or voltage.
Unpowered test light: J-34142-A
Fig. 6E2-6
•
Page 715 of 1928
Tachometer
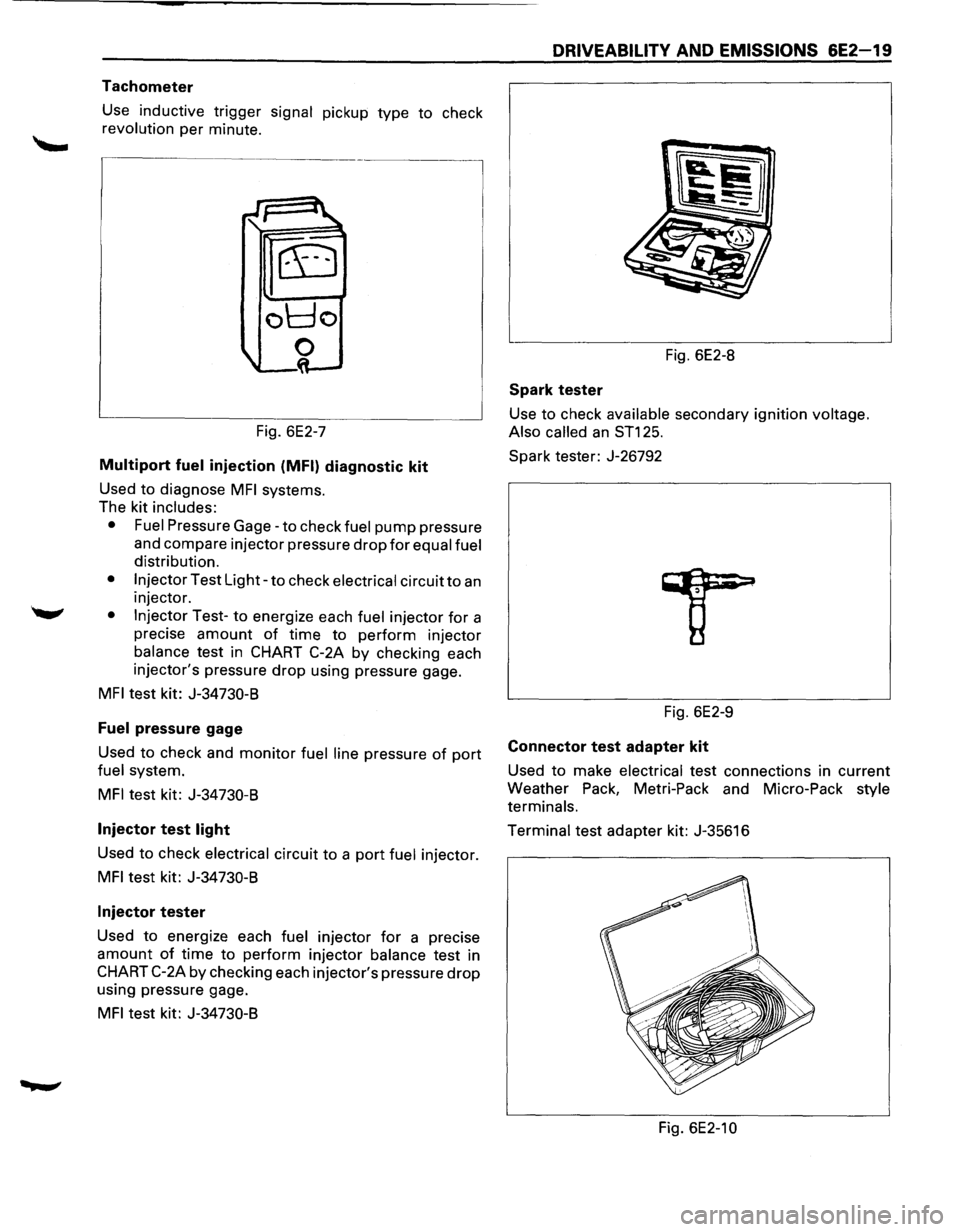
Use inductive trigger signal pickup type to check
revolution per minute.
Fig. 6E2-7
Multiport fuel injection (MFI) diagnostic kit
Used to diagnose MFI systems.
The kit
includes:
• Fuel
Pressure Gage-to check fuel pump pressure
and compare injector pressure
drop for equal fuel
distribution.
• Injector Test Light-to check electrical circuit to an
injector.
• Injector Test-to energize each fuel injector for a
precise
amount of time to perform injector
balance test in CHART C-2A by checking each
injector's pressure
drop using pressure gage.
MFI test kit: J-34730-8
Fuel pressure gage
Used to check and monitor fuel line pressure of port
fuel system.
MFI test kit: J-34730-8
Injector test light
Used to check electrical circuit to a port fuel injector.
MFI test kit: J-34730-8
Injector tester
Used to energize each fuel injector for a precise
amount of time to perform injector balance test in
CHART C-2A by checking each injector's pressure drop
using pressure gage.
MFI test kit: J-34730-8
DRIVEABILITY AND EMISSIONS 6E2-19
Fig. 6E2-8
Spark tester
Use to check available secondary ignition voltage.
Also called
an ST125.
Spark
tester: J-26792
Fig. 6E2-9
Connector test adapter kit
Used to make electrical test connections in current
Weather Pack, Metri-Pack and Micro-Pack
style
terminals.
Terminal test adapter kit: J-35616
Fig. 6E2-10
Page 722 of 1928
6E2-26 DRIVEABILITV AND EMISSIONS
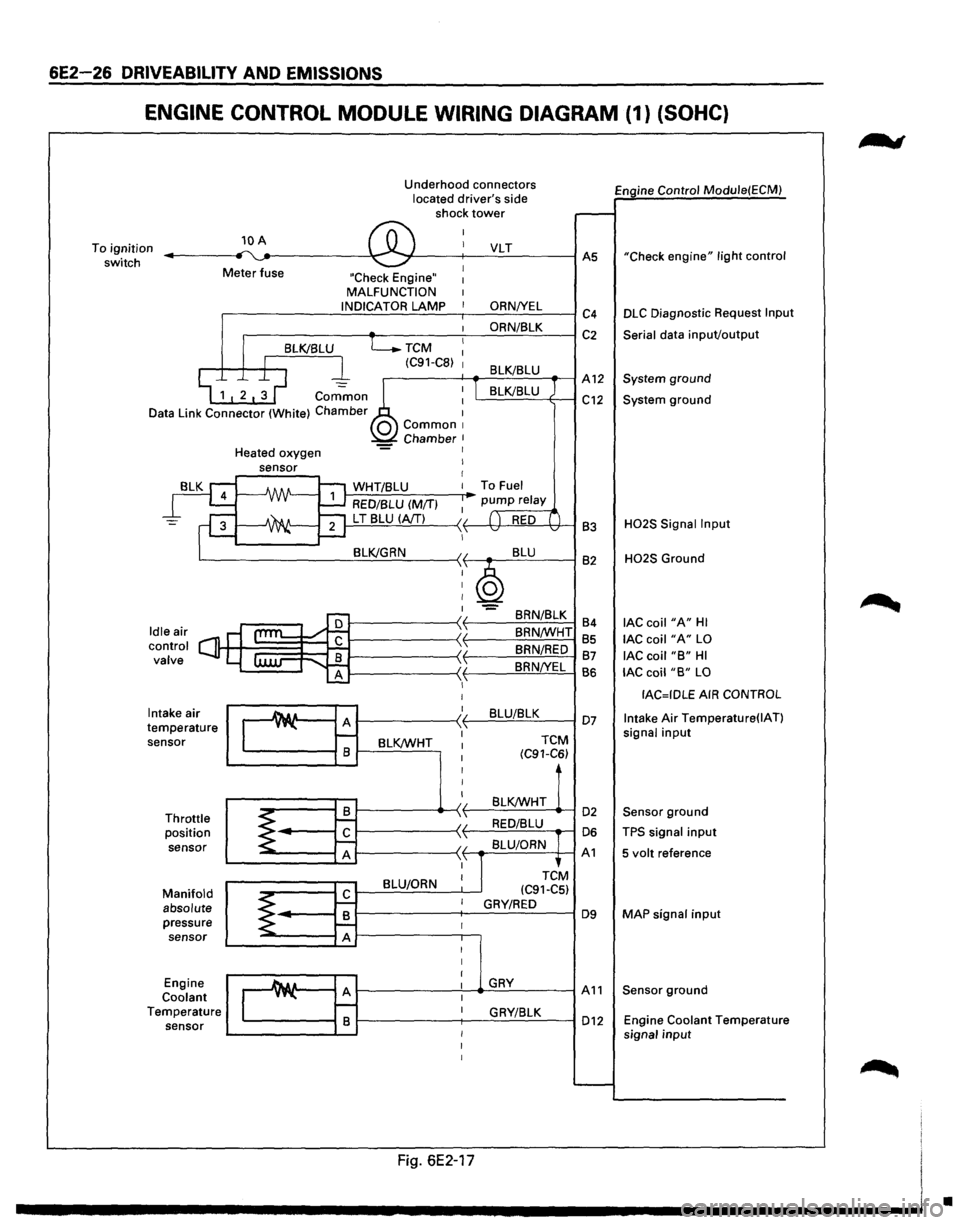
ENGINE CONTROL MODULE WIRING DIAGRAM (1) (SOHC}
To ignition
switch 10 A
Meter fuse Underhood
connectors
located driver's side
shock tower
"Check Engine" MALFUNCTION
.-----------..:.:.1 N.:.:D:..:.IC=A~T~O:..:.R.:....=:.LA..::.M.:..::P:..___-,--___.:O:..:.R.:.:.N::.._IY.....:E:..:L=----1 c4
.------~~----~~O:..:R:..:N/~8~L=-=K--~ C 2
TCM
(C91-C8)
Engine Control Module(ECM)
"Check
engine" light control
DLC Diagnostic Request Input
Serial
data inpuVoutput
.--------f---+-....::...::;_;__=---_-1 A 12 System ground
Common
Data Link Connector (White) Chamber L.....::.=::....=..:=-=----+---1 C12 System ground
Intake air
temperature sensor
Throttle position
sensor
Manifold absolute pressure sensor
Engine
Coolant Temperature sensor Heated
oxygen
J-,.:..:W:.:..H.:..:T.:.:I8:..:L:.:U:......__ __ ....-To Fuel
RED/BLU (M/T)
1---=-'L T'-.!8~L:!:U'--l(.::::A/T!....!...!....) ---< f------lt+-~!,!..._'H---1 83
BRN/8LK
84
8RN/WHT 85
BRN/RED 87
8RN!YEL
BS
1---------~~~B~L~U~/8~L~K~--I 07
BLK/WHT
TCM
(C91-C6)
BLK/WHT 1------------4>---< t-----=~:..:.:..:_.:..:_ ....... -1 02
1-----------~ f----'-=-'-==--....-1 06
1-----------~ f--.-::..:=.=.:....=..c~-+--1 A 1
BLU/ORN
H02S Signal Input
H02S Ground
lAC coil "A" HI
lAC coil "A" LO
lAC coil "B" HI
lAC coil "B" LO
IAC=IDLE AIR CONTROL
Intake
Air Temperature(IAT)
signal input
Sensor ground
TPS signal input
5 volt reference
MAP
signal input
1---------'----...._.G:=.:..:.RY-=--------1 A 11 Sensor ground
1-------;---.:::G:..:R_;_YI:...::8:..:L::..:K:__---I 012 Engine Coolant Temperature
signal input
Fig. 6E2-17
•
Page 724 of 1928
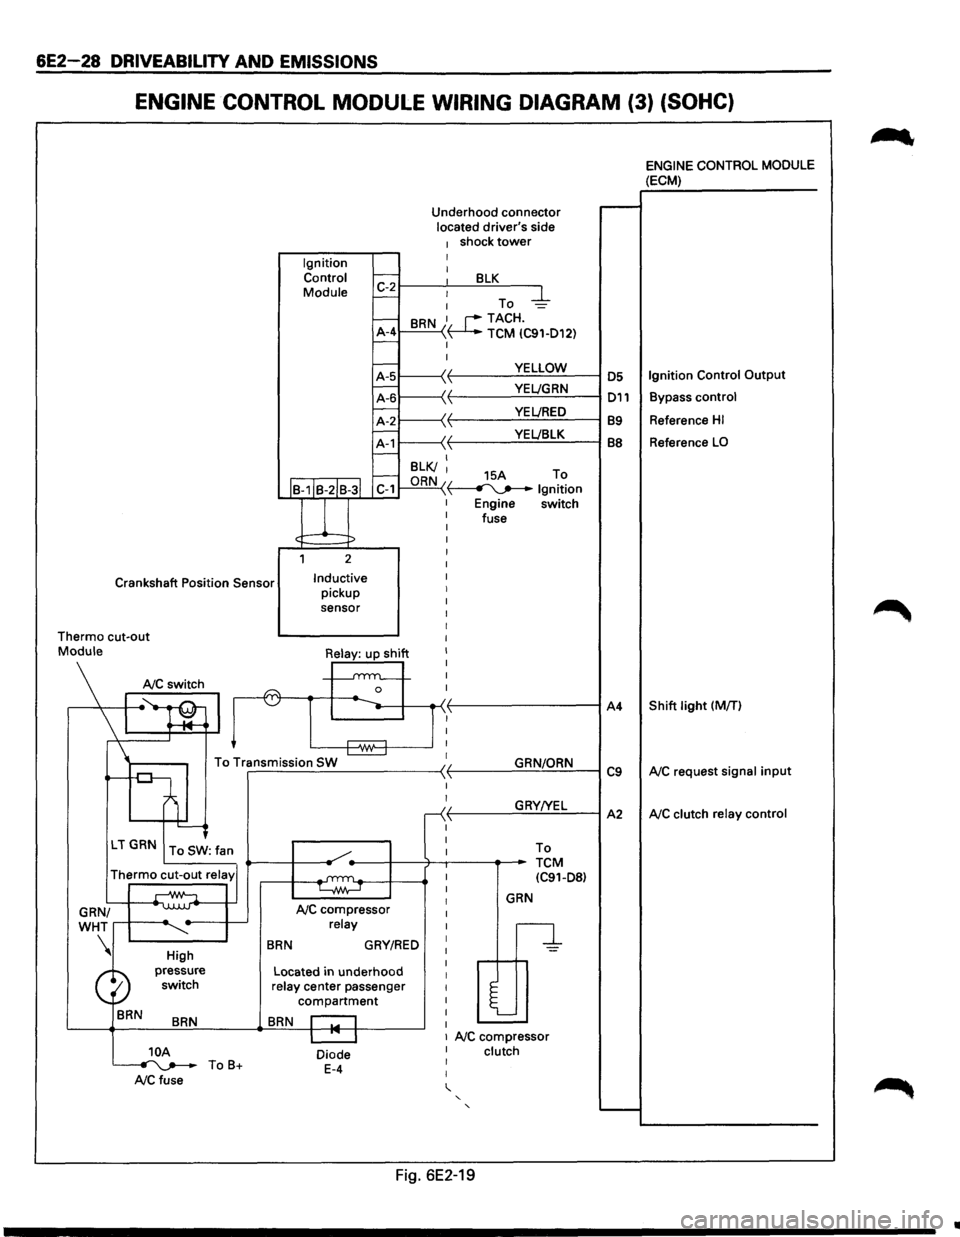
6E2-28 DRIVEABILITV AND EMISSIONS
ENGINE CONTROL MODULE WIRING DIAGRAM (3) (SOHC)
Ignition Control
Module Underhood
connector
located driver's side
1 shock tower I I 1:-2~--~~--~B~L~K~--~
- : To -4-
-BRN 1. r--TACH.
A-4 ~ TCM IC91-D12) -I
I
YELLOW
·~ YEL!GRN \ VEL/RED YEL!BLK
I--B-1IB-2IB-3l C-1
l
1 2
Crankshaft Position Sensor Inductive pickup
sensor I
I
I
I
Thermo cut-out I
I
I
I
I
n I
Mo\\I•Silj ~~
To Transmission SW ~ r-------------------~ -
'---<
LT GRN To SW: fan
Thermo cut-out relay'
GRN/
WHT
....--+-----~
BRN
High
pressure switch
BRN
NC compressor relay
BRN GRY/RED
Located in underhood relay center passenger
compartment
BRN r::-1
I
I
r
I
I
I
I
I
I
I
I
I
I
I
I
I
I
GRN/ORN
GRY!YEL To
TCM IC91-D8)
GRN
n
l
I I 1 NC compressor 10A ~ToB+ NCfuse
Diode E-4
I clutch I
I
' ' '
Fig. 6E2-19
A4
C9
A2
~
ENGINE CONTROL MODULE (ECM)
Reference HI
Reference LO
Shift light (MfT)
NC request signal input
NC clutch relay control
..
Page 725 of 1928
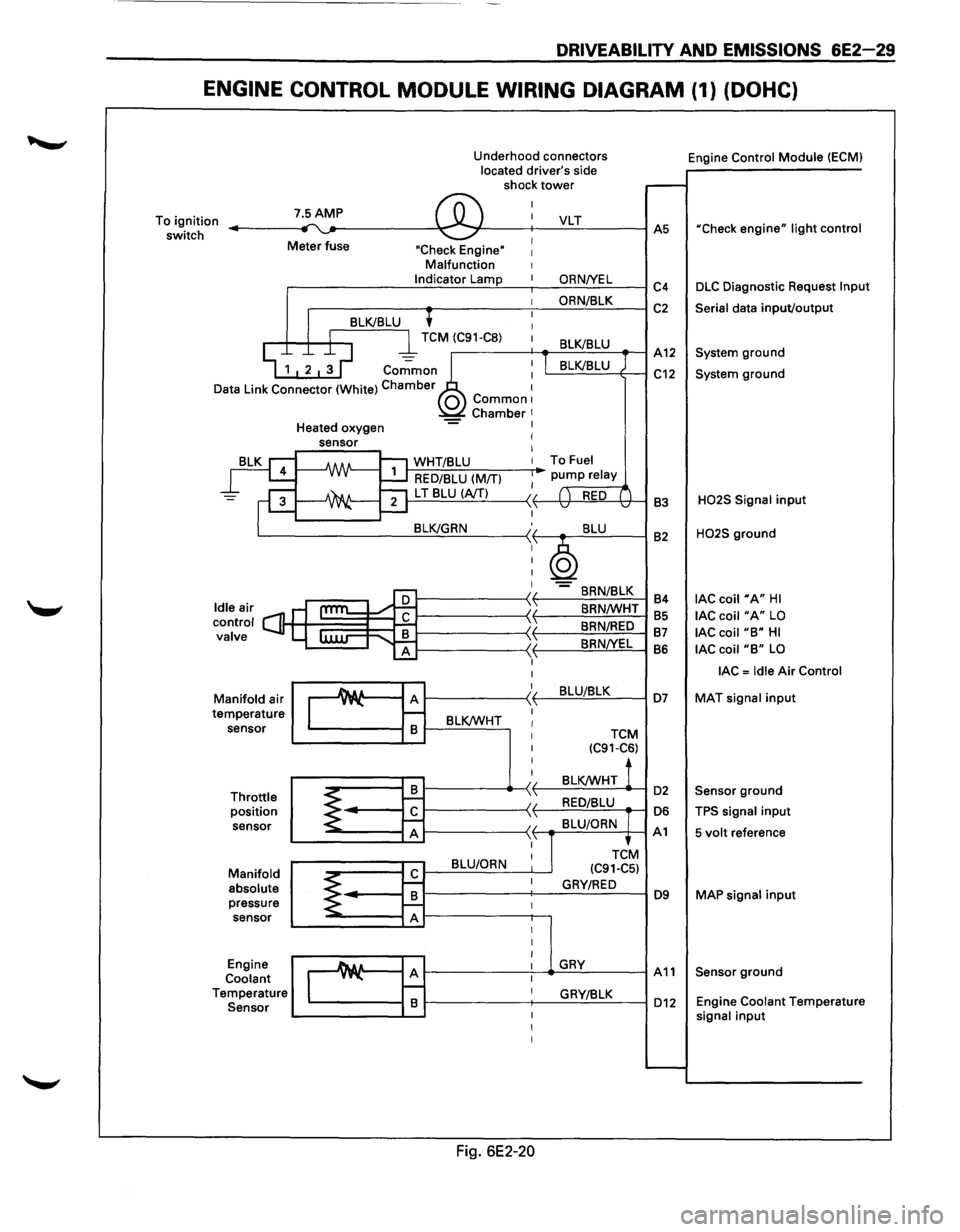
DRIVEABILITY AND EMISSIONS 6E2-29
ENGINE CONTROL MODULE WIRING DIAGRAM (1) (DOHC)
Underhood connectors
located driver's side
shock
tower
To ignition
switch 7.5AMP ,.... ~ ®
I
I
Meter fuse I "Check Engine" I Malfunction I Indicator Lamp I
I
'
I 8LK/8LU I
D
I l TCM (C91-C8) 1
~ 1 2 ~ ~ co.;;mo~~ : ata Link Connector (White) Chamber 1 0 Common1 Chamber 1 Heated oxygen -= I
rg
=F
leair s ontrol C] alve
ld c v
M
te anifold
air
mperature sensor
Throttle position sensor
Manifold absolute pressure sensor
Engine
Coolant
T emperature
Sensor
sensor I
I
-A/IN-1:'1 WHT/8LU I
~ RED/8LU (M/TI I
~ ""21 L T 8LU (A/TI II ....::....1 ,1,
8LK/GRN :,
I
I
I
I
cam l:
I
I
Au A )I y"-\1 r--
8 8LK/WHT I I
I
I
I
8 ~ 1--II
~ r£ \ 'I A ,1,
8LU/ORN I
r£ ~ I
8 ~ f--I A I
I
I
_A& a A I y"-I r--I 8 I
I
I
Fig. 6E2-20
VLT
ORNNEL
ORN/8LK
8LK/8LU
I 8LK/8LU
To Fuel
pump relay
( ) RED ( v v
8LU
~ -8RN/8LK
8RN/WHT
8RN/RED
8RNNEL
8LU/8LK
TCM (C91-C6)
8LK/WHT !
RED/8LU
8LU/ORN
TCtM
(C91-C5)
GRY/RED
GRY
GRY/8LK Engine
Control
Module (ECMI
.-----
AS "Check engine" light control
C4 DLC Diagnostic Request lnpu
C2 Serial data input/output
A12 System ground
C12 System ground
83
H02S Signal input
82 H02S ground
84
lAC coil "A" HI
85 lAC coil "A" LO
87 lAC coil "8" HI
86 lAC coil "8" LO
lAC = Idle Air Control
D7 MAT signal input
D2 Sensor ground
D6 TPS signal input
A1 5 volt reference
D9 MAP signal input
A11 Sensor ground
D12 Engine Coolant Temperatur e signal input
......__
Page 728 of 1928
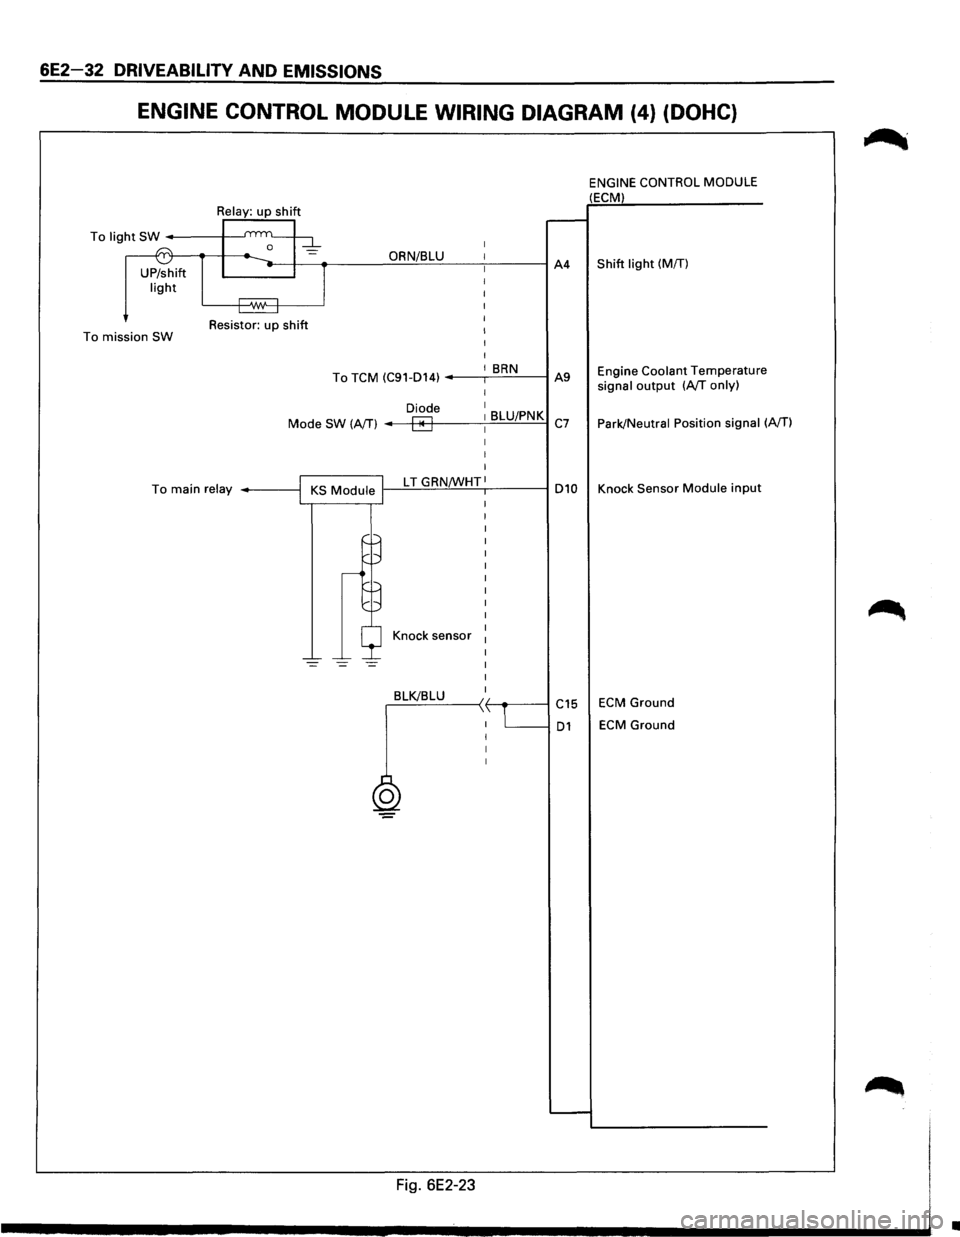
6E2-32 DRIVEABILITY AND EMISSIONS
ENGINE CONTROL MODULE WIRING DIAGRAM (4} (DOHC}
ENGINE CONTROL MODULE (ECM)
To light SW ------+---'
= i---(ST-ijl...._ __ -l---=--.---_gO!!R~N/~B~LU~-~---J A4 Shift light (MIT) UP/shift light
To mission SW Resistor: up shift
I
I BRN To TCM (C91-D14) ---.--=:.:.cc....:...._--t A9 Engine Coolant Temperature
signal output (A/T only)
Park/Neutral Position signal
(A/T) Diode I
I BLU/PNK C7 Mode SW (A/T)
I
To main relay ------l 1--=L T-'-=G-'-'-R'-"N/W'-'--'-"H.:....:T,1------i D10 Knock Sensor Module input
Knock sensor
=
,_BL_K!-'-B_L_U_--< ~~----1 C15 ECM Ground
D1 ECM Ground
0
Fig. 6E2-23
•
Page 730 of 1928
6E2-34 DRIVEABILITY AND EMISSIONS
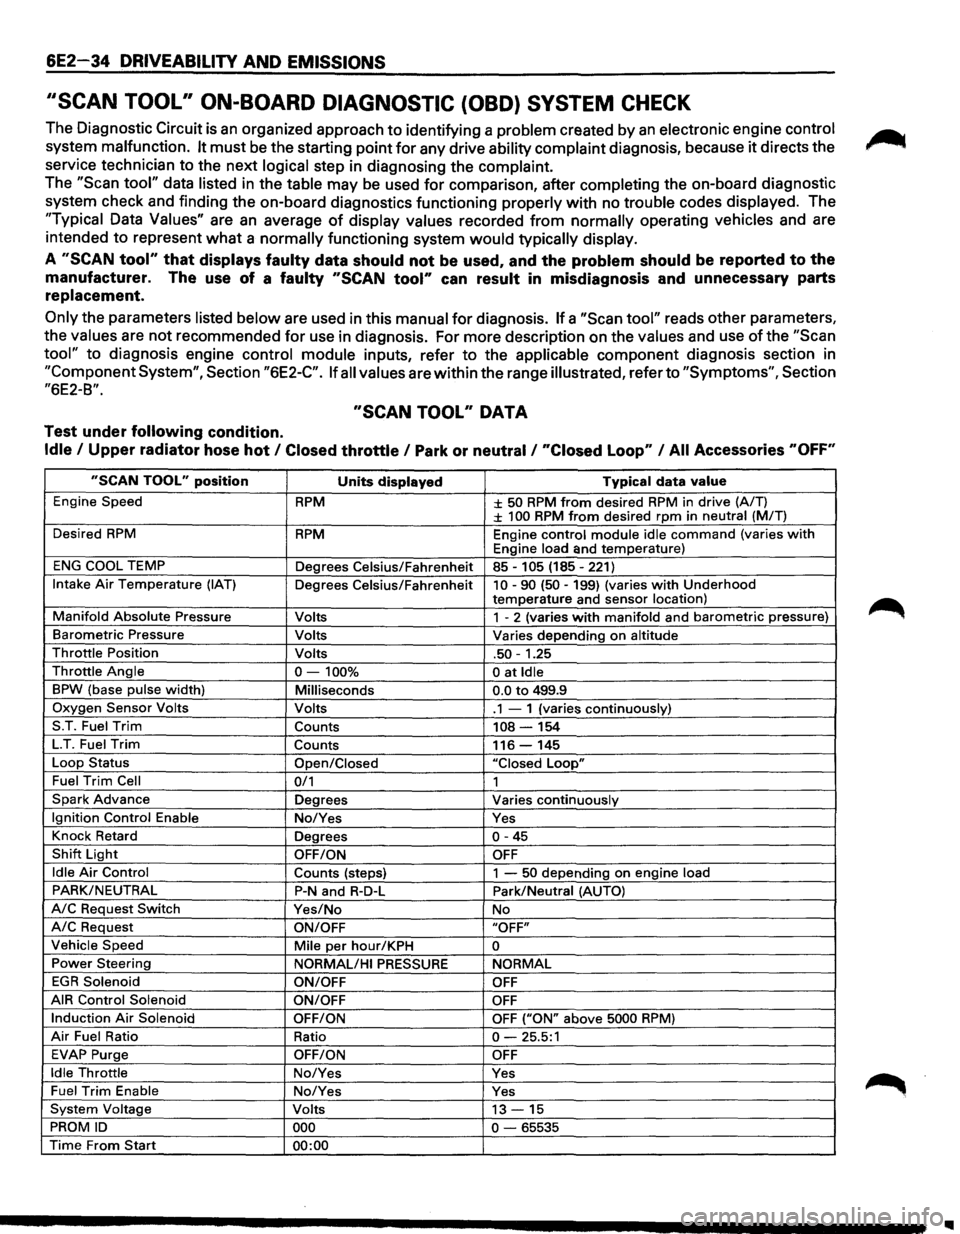
''SCAN TOOL" ON-BOARD DIAGNOSTIC (OBD) SYSTEM CHECK
The Diagnostic Circuit is an organized approach to identifying a problem created by an electronic engine control
system malfunction. It must be the starting point for any drive ability complaint diagnosis, because it directs the
service technician to the next
logical step in diagnosing the complaint.
The "Scan tool" data listed in the table may be used for comparison, after completing the on-board diagnostic
system check and finding the on-board diagnostics functioning
properly with no trouble codes displayed. The
"Typical Data Values" are an average of display values recorded from normally operating vehicles and are
intended
to represent what a normally functioning system would typically display.
A "SCAN tool" that displays faulty data should not be used, and the problem should be reported to the
manufacturer. The use of a faulty "SCAN tool" can result in misdiagnosis and unnecessary parts
replacement.
Only the parameters listed below are used in this manual for diagnosis. If a "Scan tool" reads other parameters,
the
values are not recommended for use in diagnosis. For more description on the values and use of the "Scan
tool" to diagnosis engine control module inputs, refer to the applicable component diagnosis section in
"Component System", Section "6E2-C". If all values are within the range illustrated, refer to "Symptoms", Section
"6E2-B".
"SCAN TOOL" DATA
Test under following condition.
Idle I Upper radiator hose hot I Closed throttle I Park or neutral I "Closed Loop" I All Accessories "OFF"
"SCAN TOOL" position Units displayed Typical data value
Engine Speed RPM ± 50 RPM from desired RPM in drive (A/T) ± 100 RPM from desired rpm in neutral (MIT)
Desired
RPM RPM Engine control module idle command (varies with Engine load and temperature)
ENG COOL TEMP
Degrees Celsius/Fahrenheit 85-105 (185-221)
Intake Air Temperature (IAT) Degrees Celsius/Fahrenheit 10-90 (50-199) (varies with Underhood
temperature and sensor location)
Manifold Absolute Pressure Volts 1 - 2 (varies with manifold and barometric pressure)
Barometric Pressure Volts Varies depending on altitude
Throttle Position Volts .50-1.25
Throttle Angle 0-100% 0 at Idle
BPW (base pulse width) Milliseconds 0.0 to 499.9
Oxygen Sensor Volts Volts .1 - 1 (varies continuously)
S.T. Fuel
Trim Counts 108-154
LT. Fuel Trim Counts 116-145
Loop Status
Open/Closed "Closed Loop"
Fuel Trim Cell 0/1 1
Spark Advance Degrees Varies continuously
Ignition Control Enable No/Yes Yes
Knock Retard
Degrees
0-45
Shift Light OFF/ON OFF
Idle Air Control
Counts (steps) 1 -50 depending on engine load
PARK/NEUTRAL P-N and R-D-L Park/Neutral (AUTO)
A/C Request Switch Yes/No No
A/C Request ON/OFF "OFF"
Vehicle Speed
Mile per hour/KPH 0
Power Steering
NORMAL/HI PRESSURE NORMAL
EGR Solenoid
ON/OFF OFF
AIR Control Solenoid
ON/OFF OFF
Induction Air Solenoid OFF/ON OFF ("ON" above 5000 RPM)
Air Fuel Ratio Ratio 0-25.5:1
EVAP Purge OFF/ON OFF
Idle Throttle No/Yes Yes
Fuel Trim Enable No/Yes Yes
System Voltage Volts 13-15
PROM ID 000 0-65535
Time From Start 00:00
Page 733 of 1928
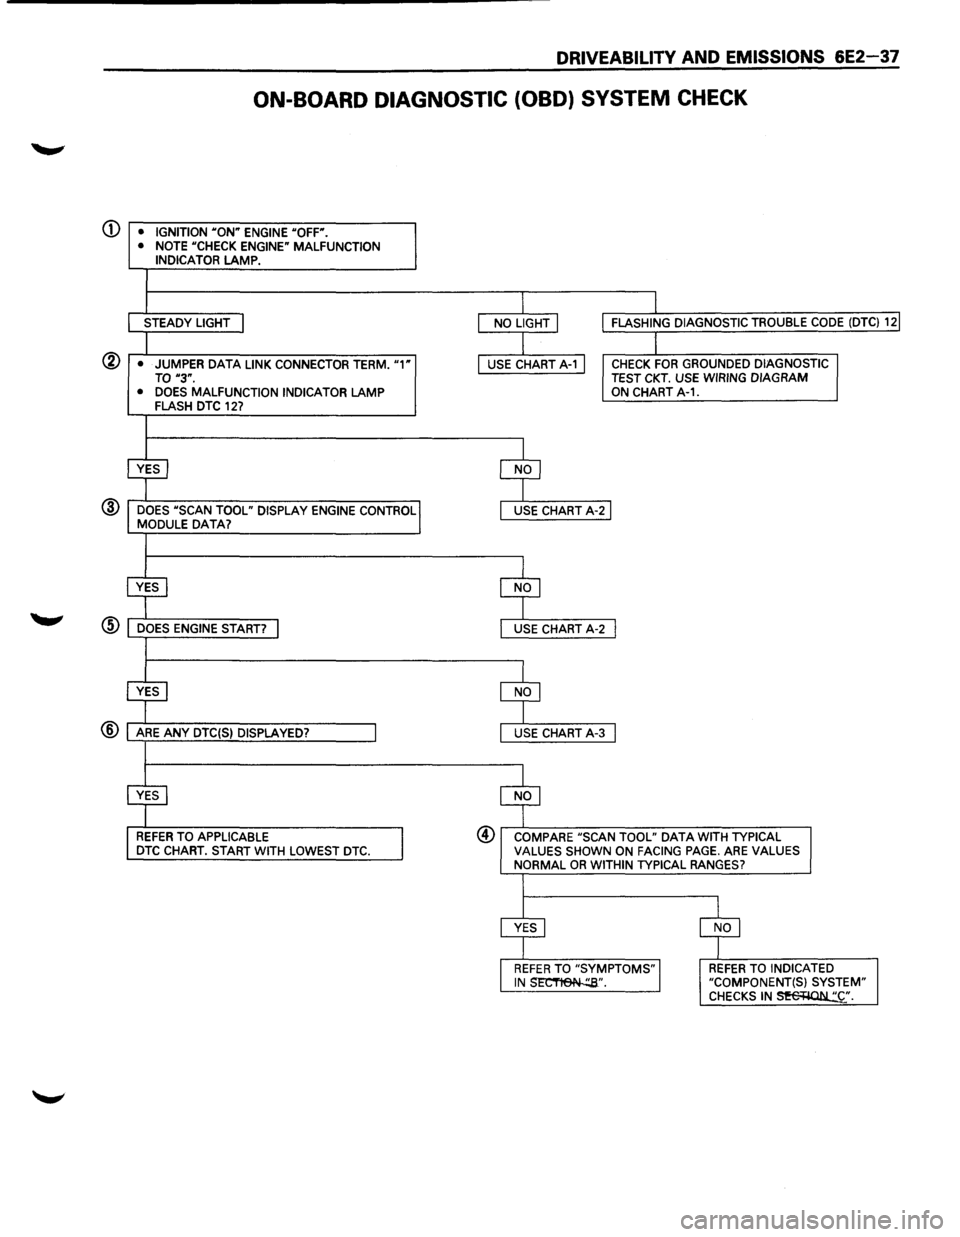
DRIVEABILITY AND EMISSIONS 6E2-37
ON-BOARD DIAGNOSTIC (OBD) SYSTEM CHECK
(j) • IGNITION "ON" ENGINE "OFF".
• NOTE "CHECK ENGINE" MALFUNCTION INDICATOR LAMP.
STEADY LIGHT
@ • JUMPER DATA LINK CONNECTOR TERM. "1" TO "3".
• DOES MALFUNCTION INDICATOR LAMP FLASH DTC 127
@ DOES "SCAN TOOL" DISPLAY ENGINE CONTROL MODULE DATA?
REFER TO APPLICABLE DTC CHART. START WITH LOWEST DTC.
CHECK FOR GROUNDED DIAGNOSTIC TEST CKT. USE WIRING DIAGRAM ON CHART A-1.
@ COMPARE "SCAN TOOL" DATA WITH TYPICAL VALUES SHOWN ON FACING PAGE. ARE VALUES NORMAL OR WITHIN TYPICAL RANGES?
REFER TO INDICATED "COMPONENT(S) SYSTEM" CHECKS IN~·.
Page 734 of 1928
6E2-38 DRIVEABILITV AND EMISSIONS
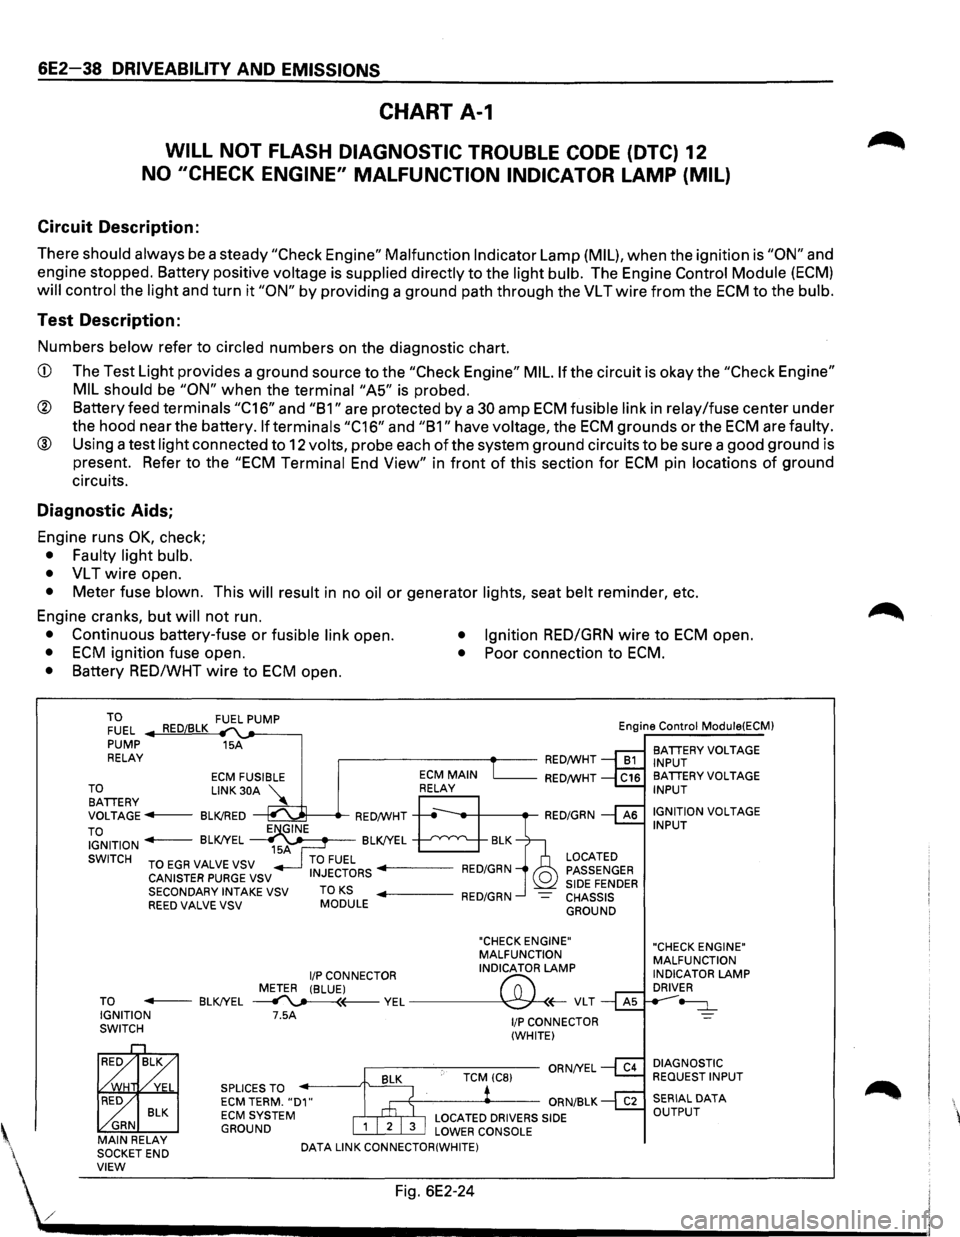
CHART A-1
WILL NOT FLASH DIAGNOSTIC TROUBLE CODE (DTC) 12
NO "CHECK ENGINE" MALFUNCTION INDICATOR LAMP (MIL)
Circuit Description:
There should always be a steady "Check Engine" Malfunction Indicator Lamp (MIL), when the ignition is "ON" and
engine stopped. Battery positive
voltage is supplied directly to the light bulb. The Engine Control Module (ECM)
will control the light and turn it "ON" by providing a ground path through the VL T wire from the ECM to the bulb.
Test Description:
Numbers below refer to circled numbers on the diagnostic chart.
CD The Test Light provides a ground source to the "Check Engine" MIL. If the circuit is okay the "Check Engine"
MIL should
be "ON" when the terminai"A5" is probed.
® Battery feed terminals "C16" and "B1" are protected by a 30 amp ECM fusible link in relay/fuse center under
the hood near the battery.
If terminals "C16" and "B1" have voltage, the ECM grounds or the ECM are faulty.
® Using a test light connected to 12 volts, probe each of the system ground circuits to be sure a good ground is
present. Refer to the
"ECM Terminal End View" in front of this section for ECM pin locations of ground
circuits.
Diagnostic Aids;
Engine runs OK, check;
• Faulty light bulb.
•
VL T wire open.
• Meter fuse blown. This will result in no oil or generator lights, seat belt reminder, etc.
Engine cranks, but
will not run.
• Continuous battery-fuse or fusible link open. • Ignition RED/GRN wire to ECM open.
• ECM ignition fuse open. • Poor connection to ECM.
• Battery RED/WHT wire to ECM open.
TO FUEL .._..,==~ ,__,__-----, PUMP 15A
RELAY .--------~~-RED/WHT Engine
Control
Module(ECM)
BATIERY VOLTAGE
INPUT
ECM FUSIBLE RED/WHT TO LINK 30A '\.. BATIERY ~ VOLTAGE---BLK!RED ~---.-RED/WHT
TO IGNITION - BLK!YEL ~~~-BLK!YEL --'--'~"'---..__
SWITCH TO EGR VALVE VSV
CANISTER PURGE VSV
SECONDARY INTAKE VSV
REED VALVE VSV TO KS MODULE
LOCATED
PASSENGER
SIDE FENDER CHASSIS GROUND
"CHECK ENGINE"
MALFUNCTION
I/P CONNECTOR INDICATOR LAMP
METER (BLUE)
("";:; TO - BLK!YEL ~(---VEL~(;-VLT IGNITION 7.5A SWITCH
BLK ~ GRN MAIN RELAY
SOCKETEND SPLICES
TO ECM TERM. "D1" ECM SYSTEM GROUND
DATA
LINK CONNECTOR(WHITE)
1/P CONNECTOR
(WHITE)
BA TIERY VOLTAGE INPUT
IGNITION
VOLTAGE INPUT
"CHECK ENGINE"
MALFUNCTION
INDICATOR
LAMP DRIVER
~
DIAGNOSTIC REQUEST INPUT
' VIEW Fig. 6E2-24
./ .................................... __________________________ _