ISUZU TROOPER 1995 Workshop Manual
Manufacturer: ISUZU, Model Year: 1995, Model line: TROOPER, Model: ISUZU TROOPER 1995Pages: 1928
Page 1171 of 1928
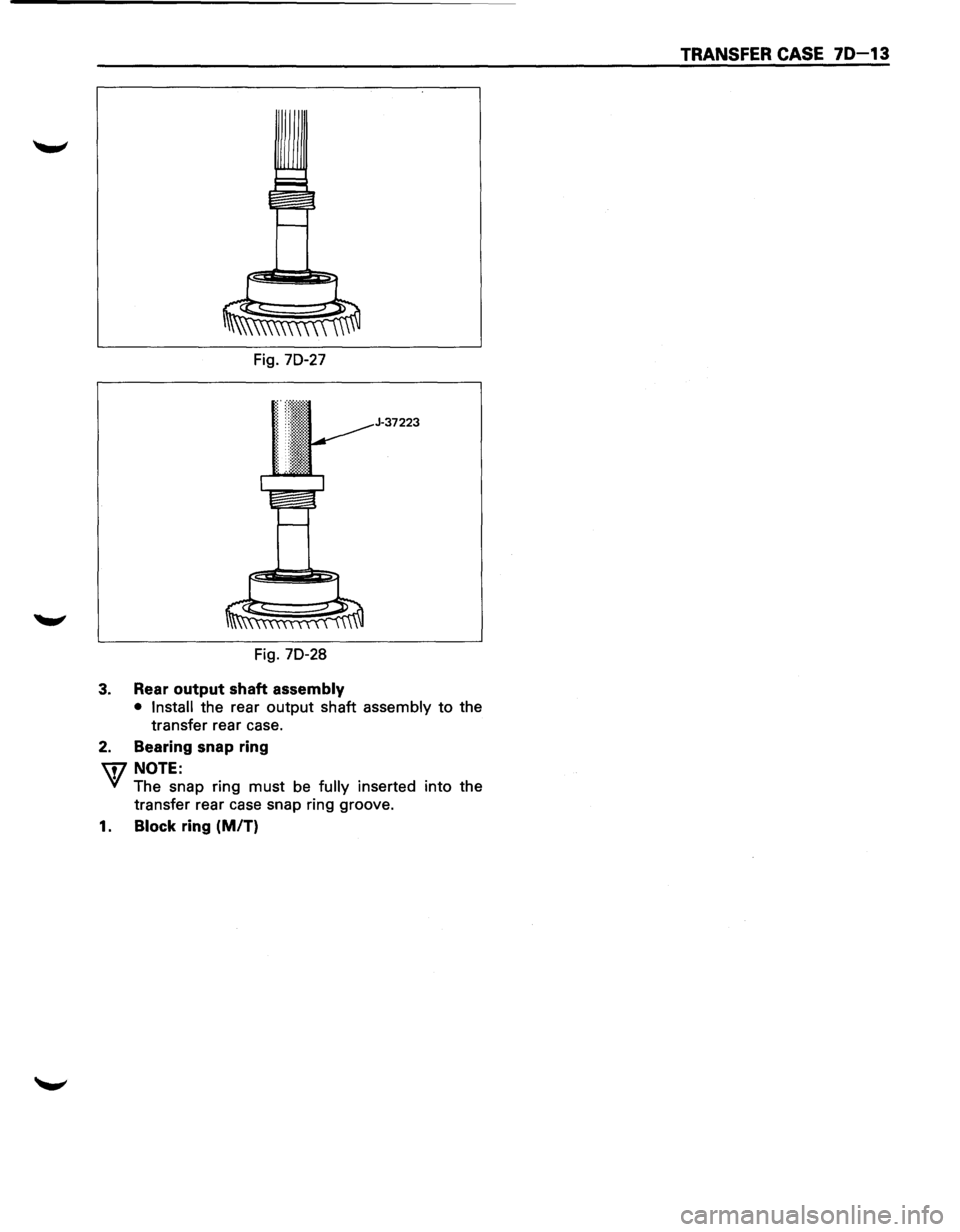
Fig. 70-27
J-37223
Fig. 70-28
3. Rear output shaft assembly
• Install the rear output shaft assembly to the
transfer rear case.
2. Bearing snap ring
'U7 NOTE:
VI The snap ring must be fully inserted into the
transfer rear case snap ring groove.
1. Block ring (MIT)
TRANSFER CASE 70-13
Page 1172 of 1928
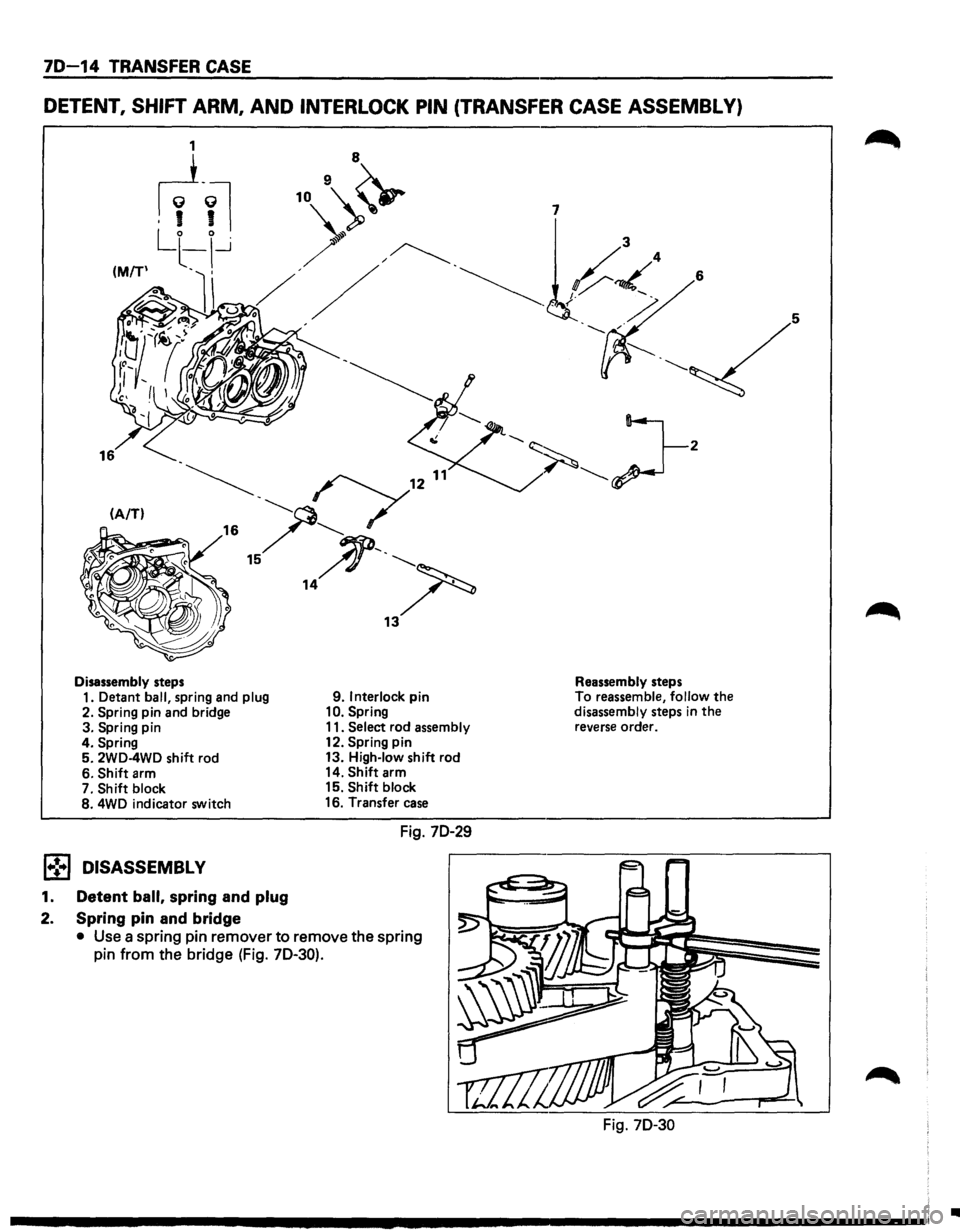
70-14 TRANSFER CASE
DETENT, SHIFT ARM, AND INTERLOCK PIN (TRANSFER CASE ASSEMBLY)
(A/T)
~. ('71211
16 / ........... -
15 ~·----~ 14 ~ • ~
13
Disassembly steps
1. Detant
ball, spring and plug 9. Interlock pin
2. Spring pin and bridge 10. Spring
3. Spring pin 11. Select rod assembly
4. Spring 12. Spring pin
5.
2WD-4WD shift rod 13. High-low shift
rod
6.
Shift arm 14. Shift arm
7.
Shift block 15. Shift block
8. 4WD indicator switch 16.
Transfer case
Fig. 70-29
1-! .. j DISASSEMBL V
1. Detent ball, spring and plug
2. Spring pin and bridge
• Use a spring pin remover to remove the spring
pin from the bridge (Fig.
70-30).
7
Reassembly steps
To reassemble, follow the disassembly steps in the reverse order.
Fig. 70-30
•
Page 1173 of 1928
3. Spring pin
4. Spring
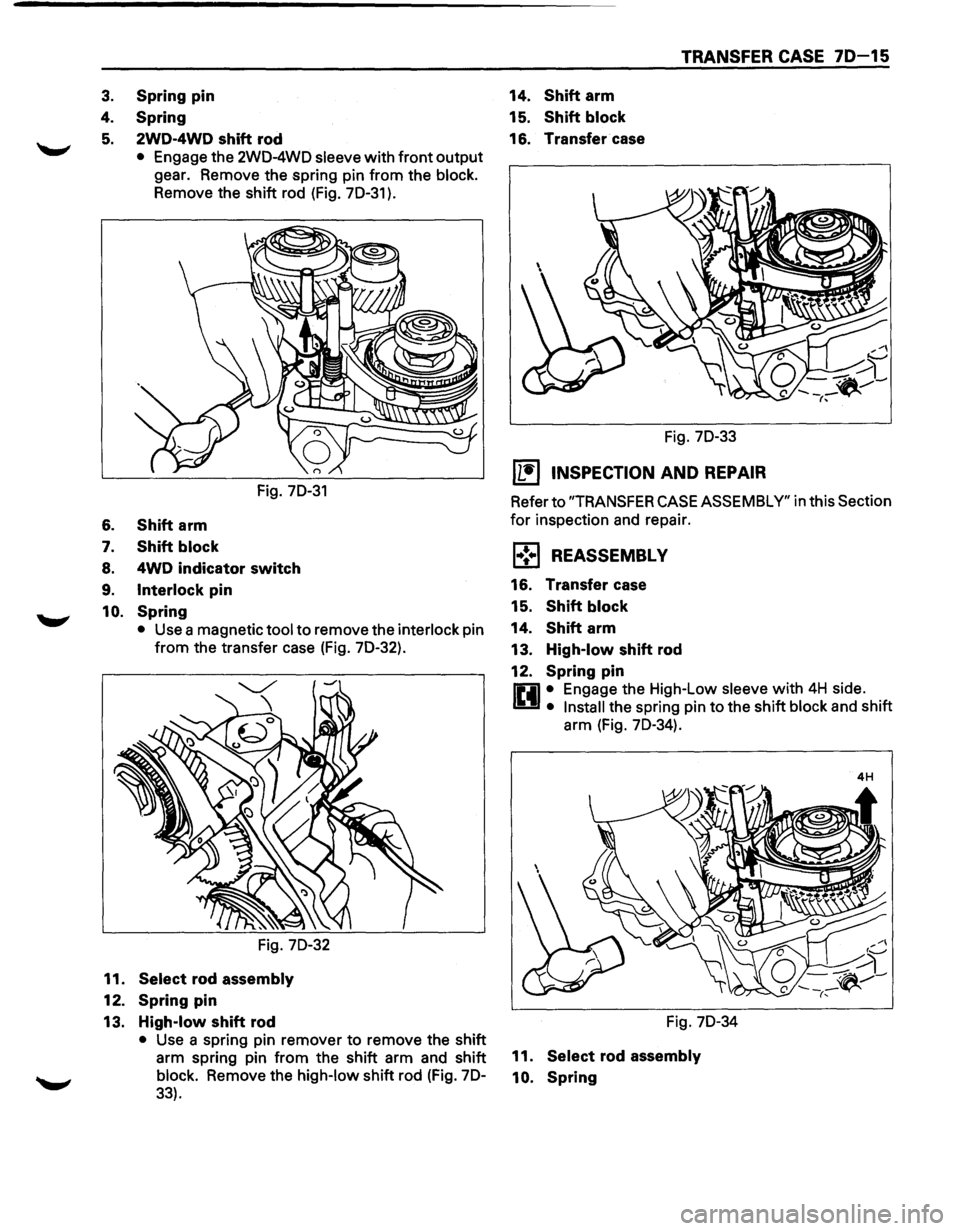
5. 2WD-4WD shift rod
• Engage the 2W0-4WO sleeve with front output
gear. Remove the spring pin from the
block.
Remove the shift rod (Fig. 70-31 ).
Fig. 70-31
6. Shift arm
7. Shift block
8. 4WD indicator switch
9. Interlock pin
10. Spring
• Use a magnetic tool to remove the interlock pin
from the transfer case (Fig.
70-32).
Fig. 70-32
11. Select rod assembly
12.
Spring pin
13. High-low shift rod
• Use a spring pin remover to remove the shift
arm spring pin from the shift arm and shift
block. Remove the high-low shift rod (Fig. 70-
33).
TRANSFER CASE 70-15
14. Shift arm
15.
Shift block
16. Transfer case
Fig. 70-33
11!) INSPECTION AND REPAIR
Refer to "TRANSFER CASE ASSEMBLY" in this Section
for inspection and repair.
1 .. !•1 REASSEMBL V
16. Transfer case
15.
Shift block
14. Shift arm
13.
High-low shift rod
12.
Spring pin
0 • Engage the High-Low sleeve with 4H side.
U • Install the spring pin to the shift block and shift
arm (Fig.
70-34).
Fig. 70-34
11. Select rod assembly
10. Spring
Page 1174 of 1928
70-16 TRANSFER CASE
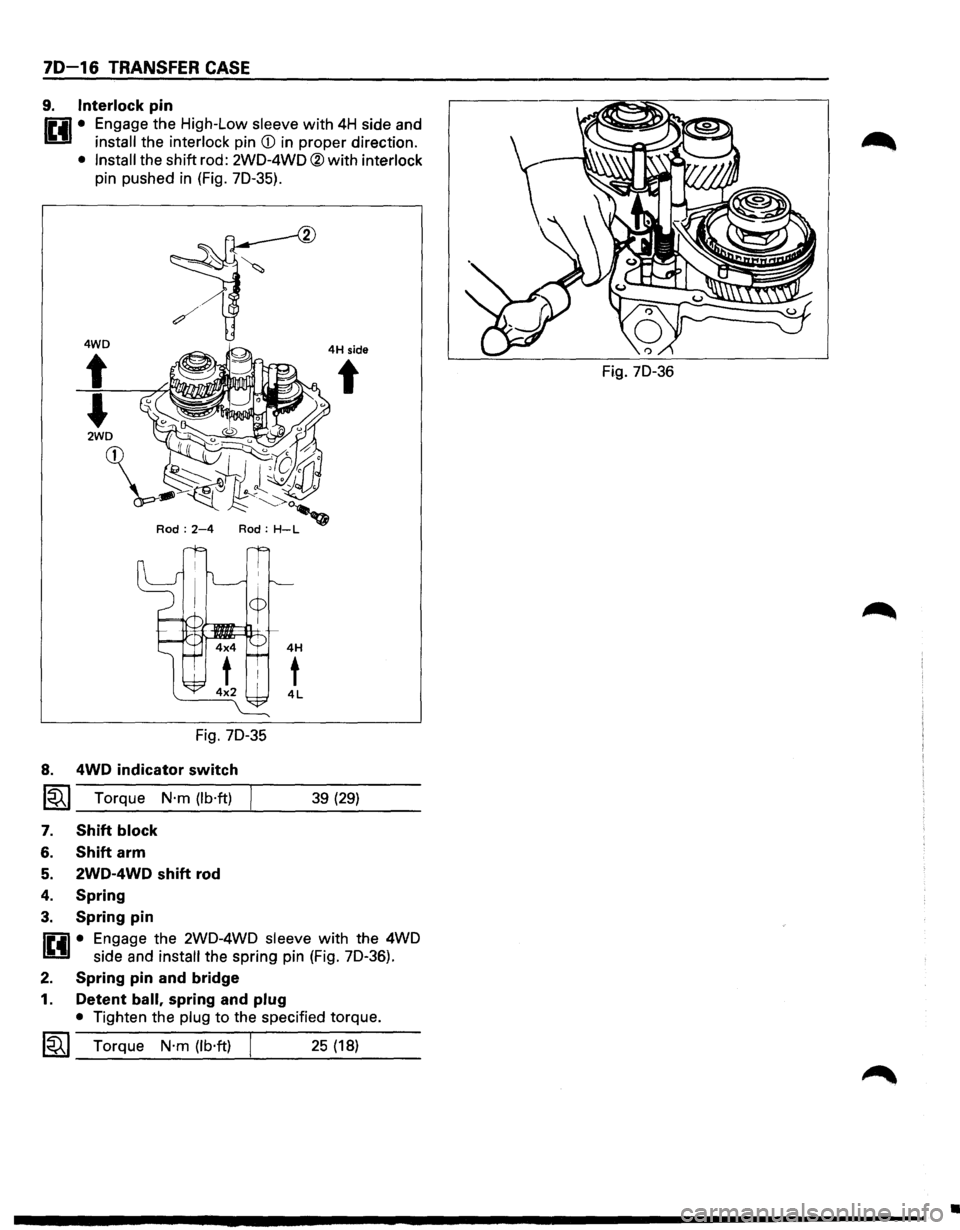
9. Interlock pin
r.:il • Engage the High-Low sleeve with 4H side and
U install the interlock pin CD in proper direction.
• Install the shift rod: 2W0-4WO ®with interlock
pin pushed in (Fig. 70-35).
Fig. 70-35
8. 4WD indicator switch
~~~ Torque N·m (lb·ft)
7. Shift block
6. Shift arm
5. 2WD-4WD shift rod
4. Spring
3. Spring pin
4H side
t
39 (29)
flil1 • Engage the 2W0-4WO sleeve with the 4WD
U side and install the spring pin (Fig. 70-36).
2. Spring pin and bridge
1. Detent ball, spring and plug
• Tighten the plug to the specified torque.
~~~ Torque N·m (lb·ft) I 25 (18)
Fig. 70-36
•
Page 1175 of 1928
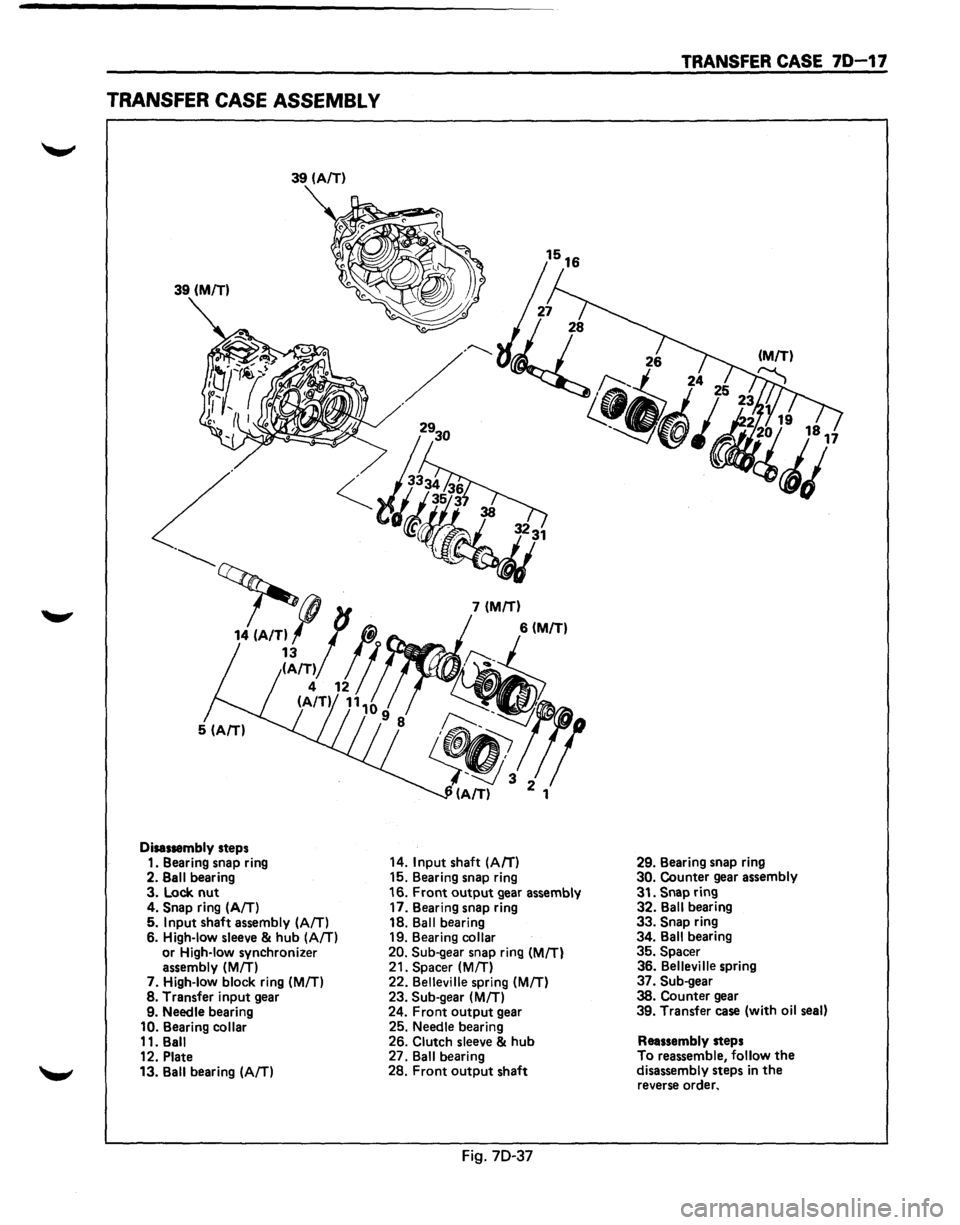
TRANSFER CASE ASSEMBL V
39 (AfT)
39
(MIT)
Disassembly steps
1. Bearing snap ring
2.
Sail bearing 3. Lock nut 4. Snap ring (AIT) 5. Input shaft assembly (AIT) 6. High-low sleeve & hub (AIT) or High-low synchronizer
assembly (MIT) 7. High-low block ring (MIT) 8. Transfer input gear
9. Needle bearing
10. Bearing collar 11. Ball
12. Plate
13. Ball bearing
(AIT)
14. Input shaft (A/T)
15. Bearing snap ring
16.
Front output gear assembly
17. Bearing snap ring
18.
Ball bearing
19. Bearing collar
20. Sub-gear snap ring (MIT) 21. Spacer (M/T)
22. Belleville spring (MIT) 23. Sub-gear (MIT) 24. Front output gear
25. Needle bearing
26.
Clutch sleeve & hub 27. Ball bearing
28. Front output shaft
Fig. 70-37
TRANSFER CASE 7D-17
29. Bearing snap ring 30. Counter gear assembly
31.
Snap ring 32. Ball bearing 33. Snap ring
34. Ball bearing
35. Spacer 36. Belleville spring
37. Sub-gear
38. Counter gear 39. Transfer case (with oil seal)
Reassembly steps
To reassemble,
follow the disassembly steps in the reverse order.
Page 1176 of 1928
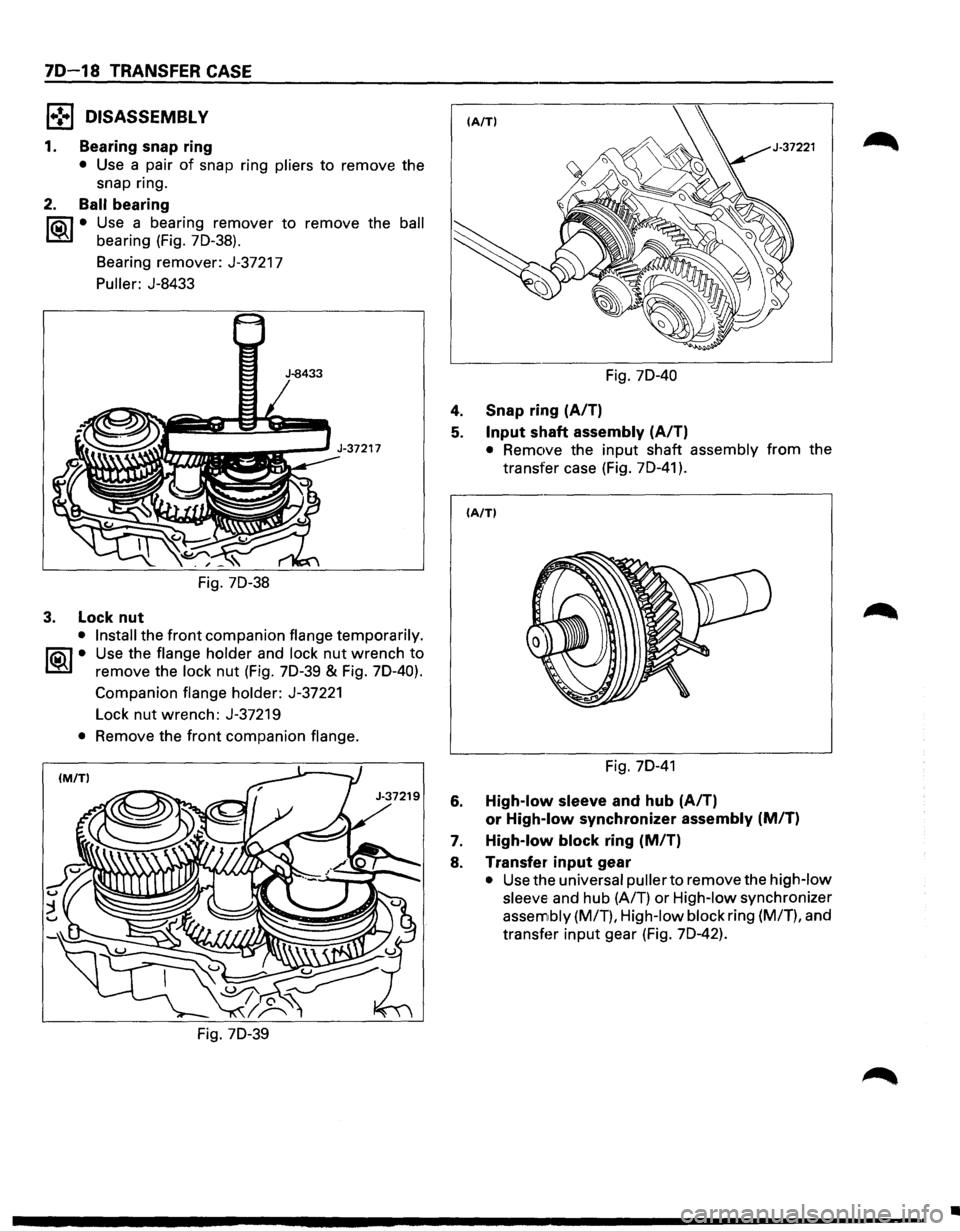
70-18 TRANSFER CASE
l•!•l DISASSEMBLY
1. Bearing snap ring
• Use a pair of snap ring pliers to remove the
snap ring.
2. Ball bearing
lia\1 • Use a bearing remover to remove the ball
~ bearing (Fig. 7D-38).
Bearing remover: J-37217
Puller: J-8433
Fig. 7D-38
3. Lock nut
• Install the front companion flange temporarily.
I®J • Use the flange holder and lock nut wrench to
remove the lock nut (Fig. 7D-39 & Fig. 70-40).
Companion
flange holder: J-37221
Lock
nut wrench: J-37219
• Remove the front companion flange.
Fig. 7D-39 Fig.
70-40
4. Snap ring
(A/T)
5. Input shaft assembly (A/T)
• Remove the input shaft assembly from the
transfer case (Fig.
7D-41 ).
IA/TI
Fig. 70-41
6. High-low sleeve and hub (A/T)
or
High-low synchronizer assembly (M/T)
7. High-low block ring (M/T)
8. Transfer input gear
• Use the universal puller to remove the high-low
sleeve
and hub (A/T) or High-low synchronizer
assembly (MIT), High-low block ring (M/T), and
transfer input gear (Fig. 7D-42).
•
Page 1177 of 1928
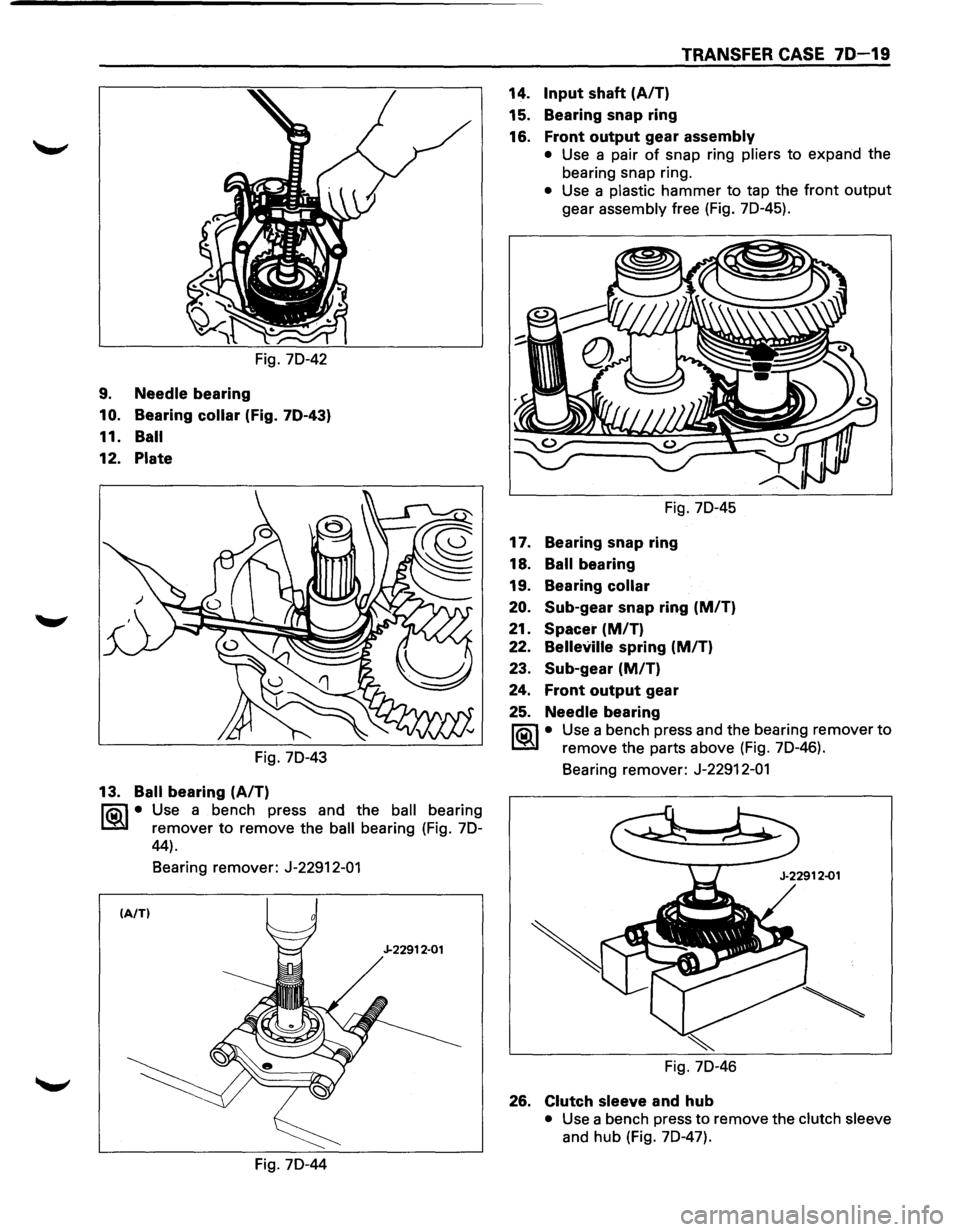
Fig. 70-42
9. Needle bearing
10. Bearing collar (Fig. 70-43)
11. Ball
12. Plate
Fig. 70-43
13. Ball bearing (AIT)
li0\1 • Use a bench press and the ball bearing
I.S!il remover to remove the ball bearing (Fig. 70-
44).
Bearing remover: J-22912-01
(AfT)
J-22912·01
Fig. 70-44
TRANSFER CASE 70-19
14. Input shaft (AIT)
15. Bearing snap ring
16.
Front output gear assembly
• Use a pair of snap ring pliers to expand the
bearing snap ring.
• Use a plastic hammer to tap the front output
gear assembly free (Fig. 70-45).
Fig. 70-45
17. Bearing snap ring
18.
Ball bearing
19. Bearing
collar
20. Sub-gear snap ring (MIT)
21. Spacer (MIT)
22. Belleville spring (MIT)
23. Sub-gear (MIT)
24. Front output gear
25. Needle bearing
li0\1 • Use a bench press and the bearing remover to
I.S!il remove the parts above (Fig. 70-46).
Bearing remover: J-22912-01
Fig.
70-46
26. Clutch sleeve and hub
• Use a bench press to remove the clutch sleeve
and hub (Fig.
70-47).
Page 1178 of 1928
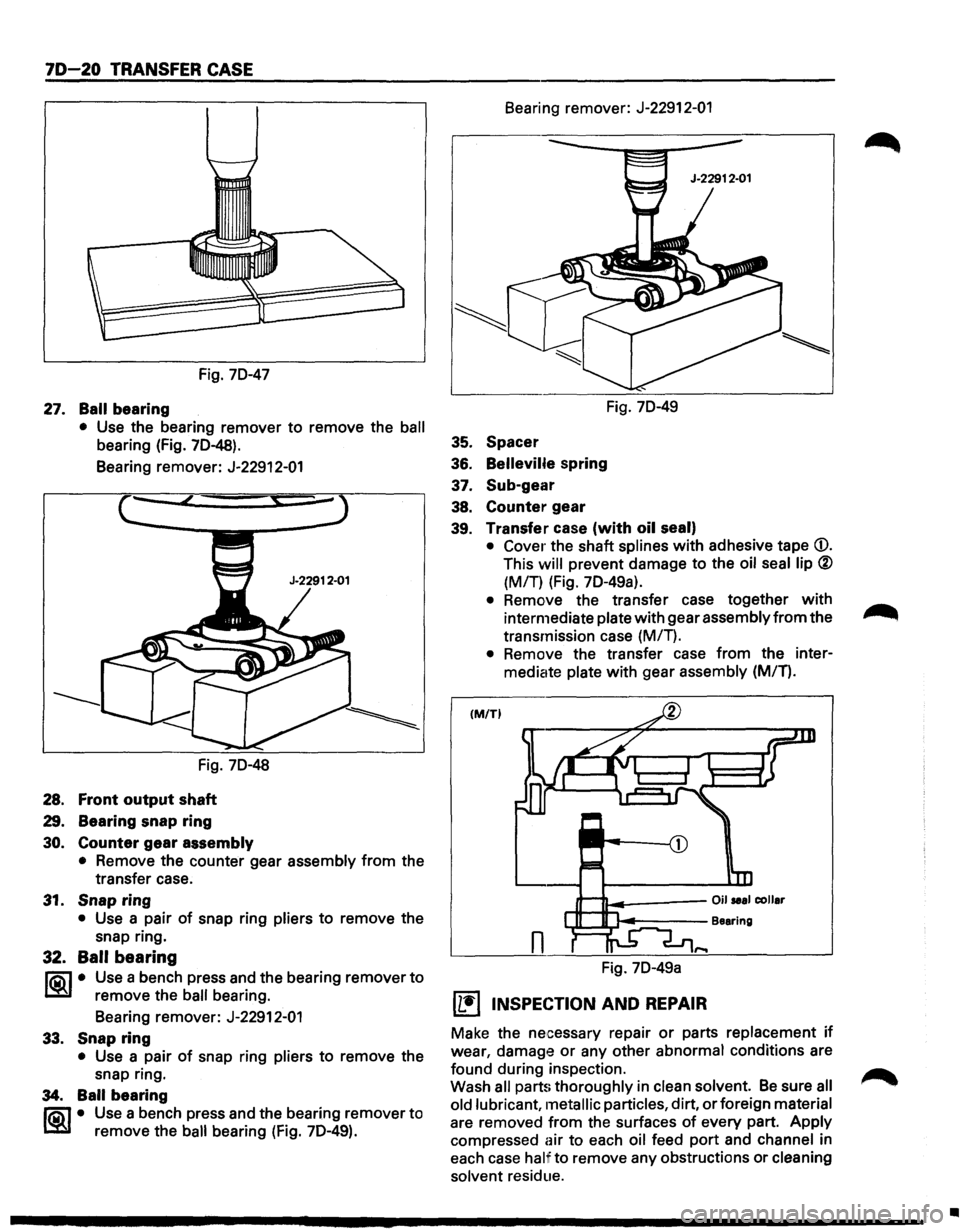
70-20 TRANSFER CASE
Fig. 70-47
27. Ball bearing
• Use the bearing remover to remove the ball
bearing (Fig. 70-48).
Bearing remover: J-22912-01
Fig. 70-48
28. Front output shaft
29. Bearing snap ring
30. Counter gear
assembly
• Remove the counter gear assembly from the
transfer case.
31. Snap ring
• Use a pair of snap ring pliers to remove the
snap ring.
32. Ball bearing
j®_j• Use a bench press and the bearing remover to
remove the ball bearing.
Bearing remover: J-22912-01
33. Snap ring
• Use a pair of snap ring pliers to remove the
snap ring.
34. Ball bearing
~ • Use a bench press and the bearing remover to
remove the
ball bearing (fig. 70-49). Bearing
remover: J-22912-01
Fig. 70-49
35. Spacer
36.
Bellevilfe spring
37. Sub-gear
38. Counter gear
39. Transfer case
(with oil seal)
• Cover the shaft splines with adhesive tape CD.
This will prevent damage to the oil seal lip ®
(MIT) (Fig. 70-49a).
• Remove the transfer case together with
intermediate plate with gear assembly from the ~
transmission case (MIT).
• Remove the transfer case from the inter
mediate plate
with gear assembly (MIT).
IM/TI
Fig. 70-49a
IL•I INSPECTION AND REPAIR
Make the necessary repair or parts replacement if
wear, damage or any other abnormal conditions are
found during inspection.
Wash
all parts thoroughly in clean solvent. Be sure all
old
lubricant, metallic particles, dirt, or foreign material
are removed from the surfaces
of every part. Apply
compressed
air to each oil feed port and channel in
each case
half to remove any obstructions or cleaning
solvent residue.
•
Page 1179 of 1928
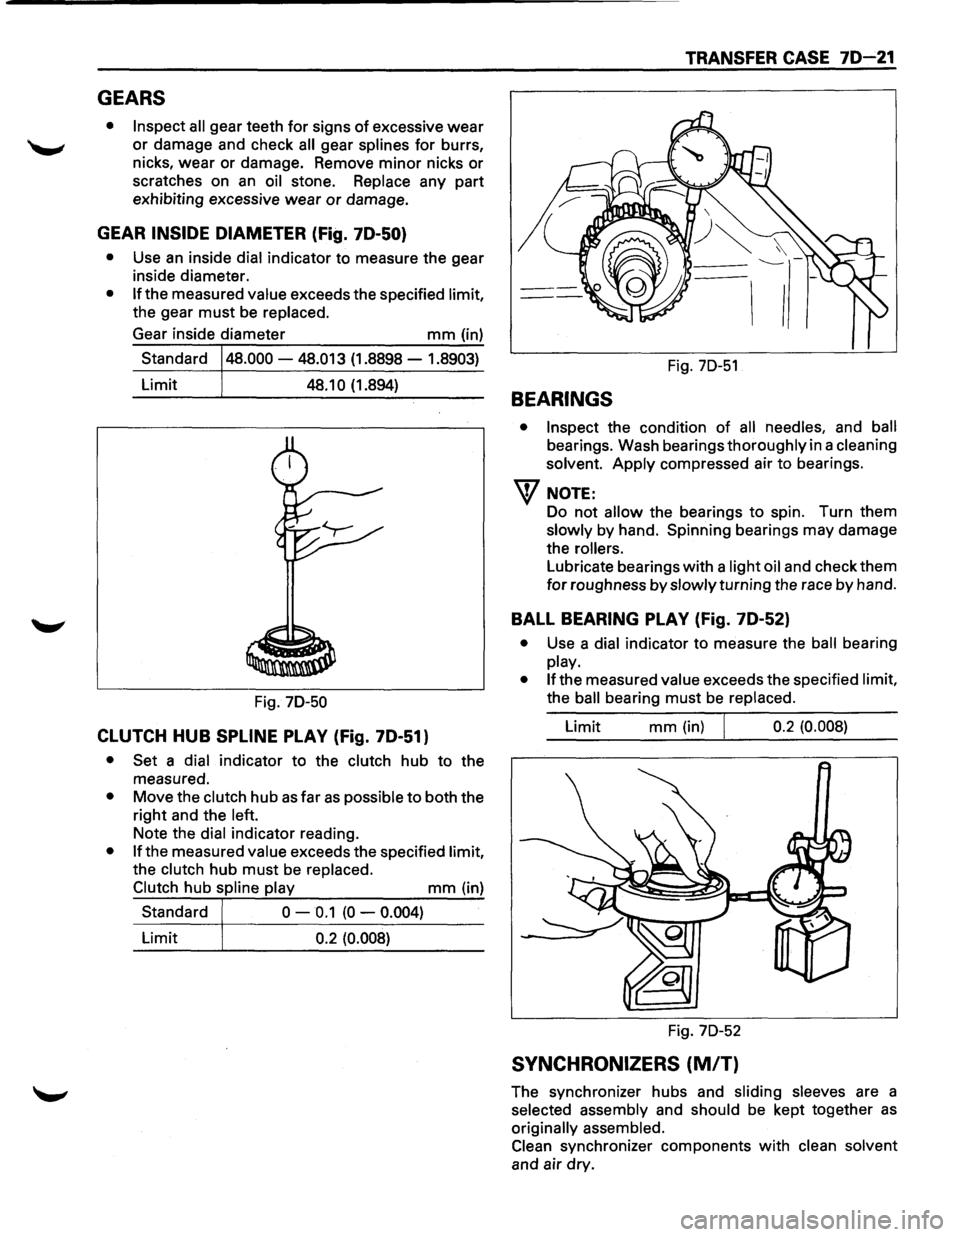
GEARS
• Inspect all gear teeth for signs of excessive wear
'--" or damage and check all gear splines for burrs,
nicks,
wear or damage. Remove minor nicks or
scratches on an oil stone. Replace any part
exhibiting excessive wear or damage.
GEAR INSIDE DIAMETER (Fig. 7D-50}
• Use an inside dial indicator to measure the gear
inside diameter.
• If the measured value exceeds the specified limit,
the gear
must be replaced.
Gear inside diameter
mm (in)
Standard
48.000 -48.013 (1.8898 -1.8903)
Limit 48.1 0 (1.894)
Fig.
70-50
CLUTCH HUB SPLINE PLAY (Fig. 7D-51)
• Set a dial indicator to the clutch hub to the
measured.
• Move the clutch hub as far as possible to both the
right and the left.
Note the dial indicator reading.
• If the measured value exceeds the specified limit,
the clutch hub
must be replaced.
Clutch hub spline play
mm (in)
Standard
0 -0.1 (0 -0.004)
Limit 0.2 (0.008)
TRANSFER CASE 7D-21
I I
Fig. 70-51
BEARINGS
• Inspect the condition of all needles, and ball
bearings. Wash bearings thoroughly in a cleaning
solvent.
Apply compressed air to bearings.
W NOTE:
Do not allow the bearings to spin. Turn them
slowly by hand. Spinning bearings may damage
the
rollers.
Lubricate bearings with a light oil and check them
for roughness by slowly turning the race by hand.
BALL BEARING PLAY (Fig. 7D-52}
• Use a dial indicator to measure the ball bearing
play.
• If the measured value exceeds the specified limit,
the
ball bearing must be replaced.
Limit
mm (in) I 0.2 (0.008)
Fig. 70-52
SYNCHRONIZERS (MIT)
The synchronizer hubs and sliding sleeves are a
selected assembly and should be kept together
as
originally assembled.
Clean synchronizer components
with clean solvent
and air dry.
Page 1180 of 1928
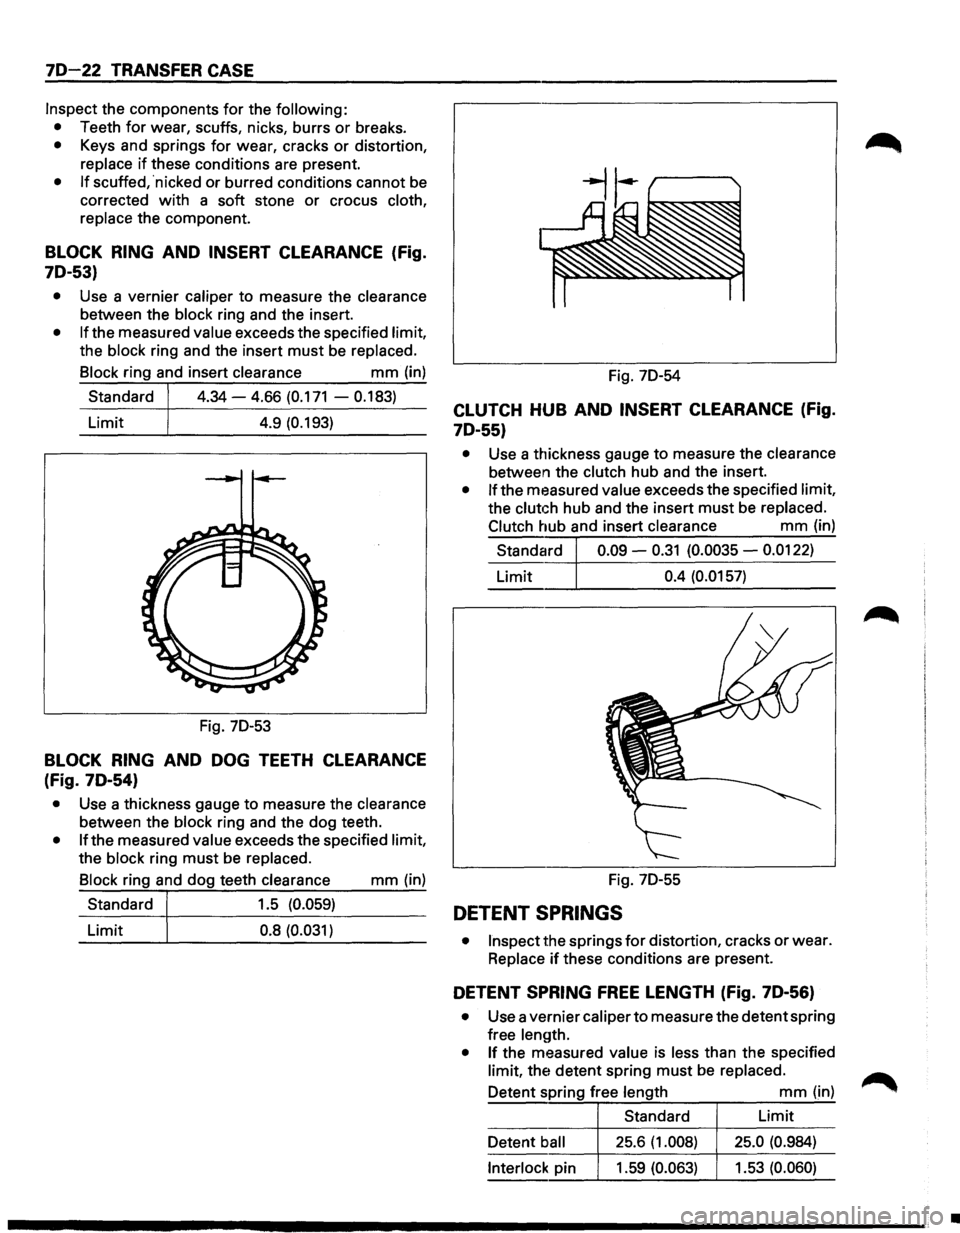
7D-22 TRANSFER CASE
Inspect the components for the following:
• Teeth for wear, scuffs, nicks, burrs or breaks.
• Keys and springs for wear, cracks or distortion,
replace
if these conditions are present.
• If scuffed, 'nicked or burred conditions cannot be
corrected with a soft stone or crocus cloth,
replace the component.
BLOCK RING AND INSERT CLEARANCE (Fig.
7D-53)
• Use a vernier caliper to measure the clearance
between the block ring and the insert.
• If the measured value exceeds the specified limit,
the block ring and the insert
must be replaced.
Block ring and insert clearance
mm (in)
Standard
4.34-4.66 (0.171 - 0.183)
Limit 4.9 (0.193)
Fig. 7D-53
BLOCK RING AND DOG TEETH CLEARANCE
(Fig. 7D-54)
• Use a thickness gauge to measure the clearance
between the block ring and the dog teeth.
• If the measured value exceeds the specified limit,
the block ring
must be replaced. Fig.
7D-54
CLUTCH HUB AND INSERT CLEARANCE (Fig.
7D-55)
• Use a thickness gauge to measure the clearance
between the clutch hub and the insert.
• If the measured value exceeds the specified limit,
the
clutch hub and the insert must be replaced.
Clutch hub and insert clearance
mm (in)
Standard 0.09 -
0.31 (0.0035 -0.0122)
Limit 0.4 (0.0157)
Block ring and dog teeth clearance
mm (in) Fig. 7D-55 ------~~--~------------------~ Standard 1.5 (0.059)
Limit 0.8
(0.031) DETENT SPRINGS
• Inspect the springs for distortion, cracks or wear.
Replace
if these conditions are present.
DETENT SPRING FREE LENGTH (Fig. 7D-56)
• Use a vernier caliper to measure the detent spring
free length.
• If the measured value is less than the specified
limit, the detent spring
must be replaced.
Detent spring free length
mm (in)
Standard Limit
Detent ball 25.6
(1.008) 25.0 (0.984)
Interlock pin 1.59 (0.063) 1.53
(0.060)
•