ISUZU TROOPER 1995 Workshop Manual
Manufacturer: ISUZU, Model Year: 1995, Model line: TROOPER, Model: ISUZU TROOPER 1995Pages: 1928
Page 171 of 1928
FRONT SUSPENSION 3C-7
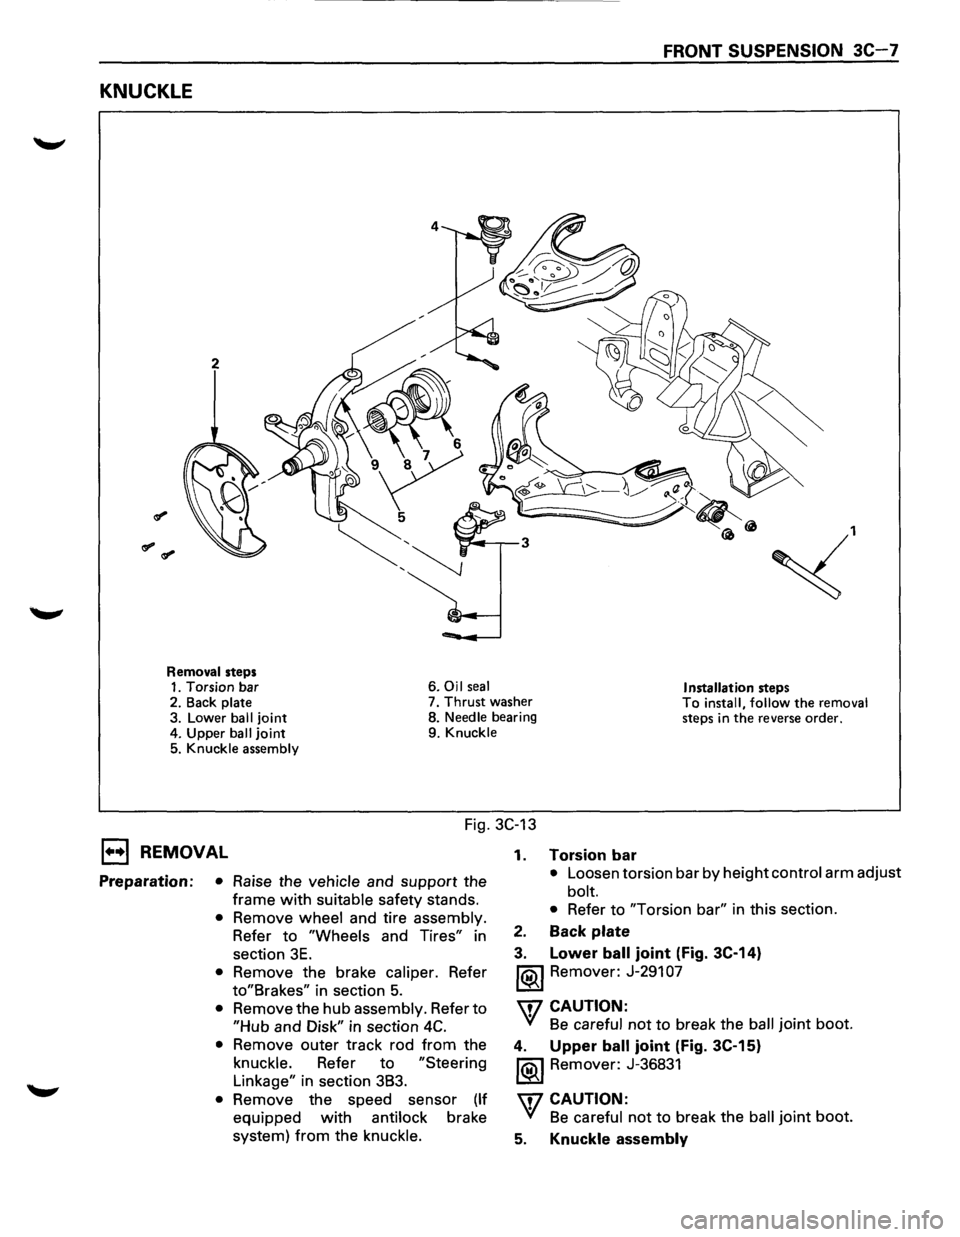
KNUCKLE
2
~,
Removal steps 1. Torsion bar 6. Oil seal Installation steps 2.
Back plate 7. Thrust washer To install, follow the removal steps in the reverse order. 3. Lower ball joint 8. Needle bearing
4. Upper
ball joint 9. Knuckle
5. Knuckle assembly
Fig. 3C-13
1••1 REMOVAL
Preparation: • Raise the vehicle and support the
frame
with suitable safety stands.
• Remove wheel and tire assembly.
Refer to
"Wheels and Tires" in
section
3E.
• Remove the brake caliper. Refer
to"Brakes" in section 5.
• Remove the hub assembly. Refer to
"Hub and Disk" in section 4C.
• Remove outer track rod from the
knuckle. Refer to
"Steering
Linkage" in section 3B3.
• Remove the speed sensor (If
equipped with antilock brake
system)
from the knuckle. 1.
Torsion bar
• Loosen
torsion bar by height control arm adjust
bolt.
• Refer to "Torsion bar" in this section.
2. Back plate
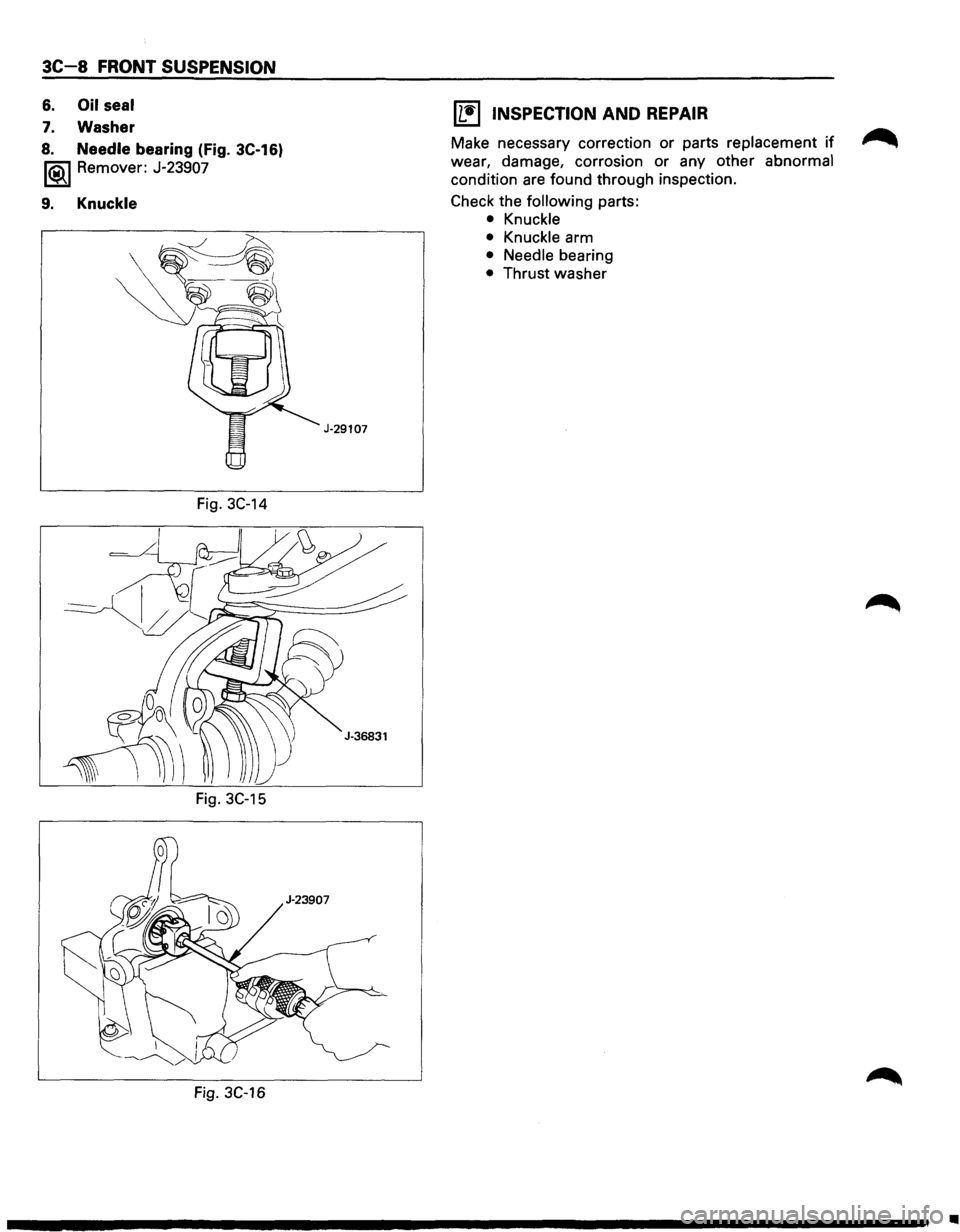
3. Lower ball joint (Fig. 3C-14)
1®.1 Remover: J-291 07
'\f7 CAUTION:
'(! Be careful not to break the ball joint boot.
4. Upper ball joint (Fig. 3C-15)
1®.1 Remover: J-36831
'\f7 CAUTION:
'(! Be careful not to break the ball joint boot.
5. Knuckle assembly
Page 172 of 1928
3C-8 FRONT SUSPENSION
6. Oil seal
7. Washer
8. Needle bearing (Fig. 3C-16)
1®.1 Remover: J-23907
9. Knuckle
Fig. 3C-14
Fig. 3C-15
Fig. 3C-16
J-29107
11!) INSPECTION AND REPAIR
Make necessary correction or parts replacement if ~
wear, damage, corrosion or any other abnormal
condition are found through inspection.
Check the
following parts:
• Knuckle
• Knuckle arm
• Needle bearing
• Thrust washer
•
Page 173 of 1928
I••IINSTALLATION
9. Knuckle
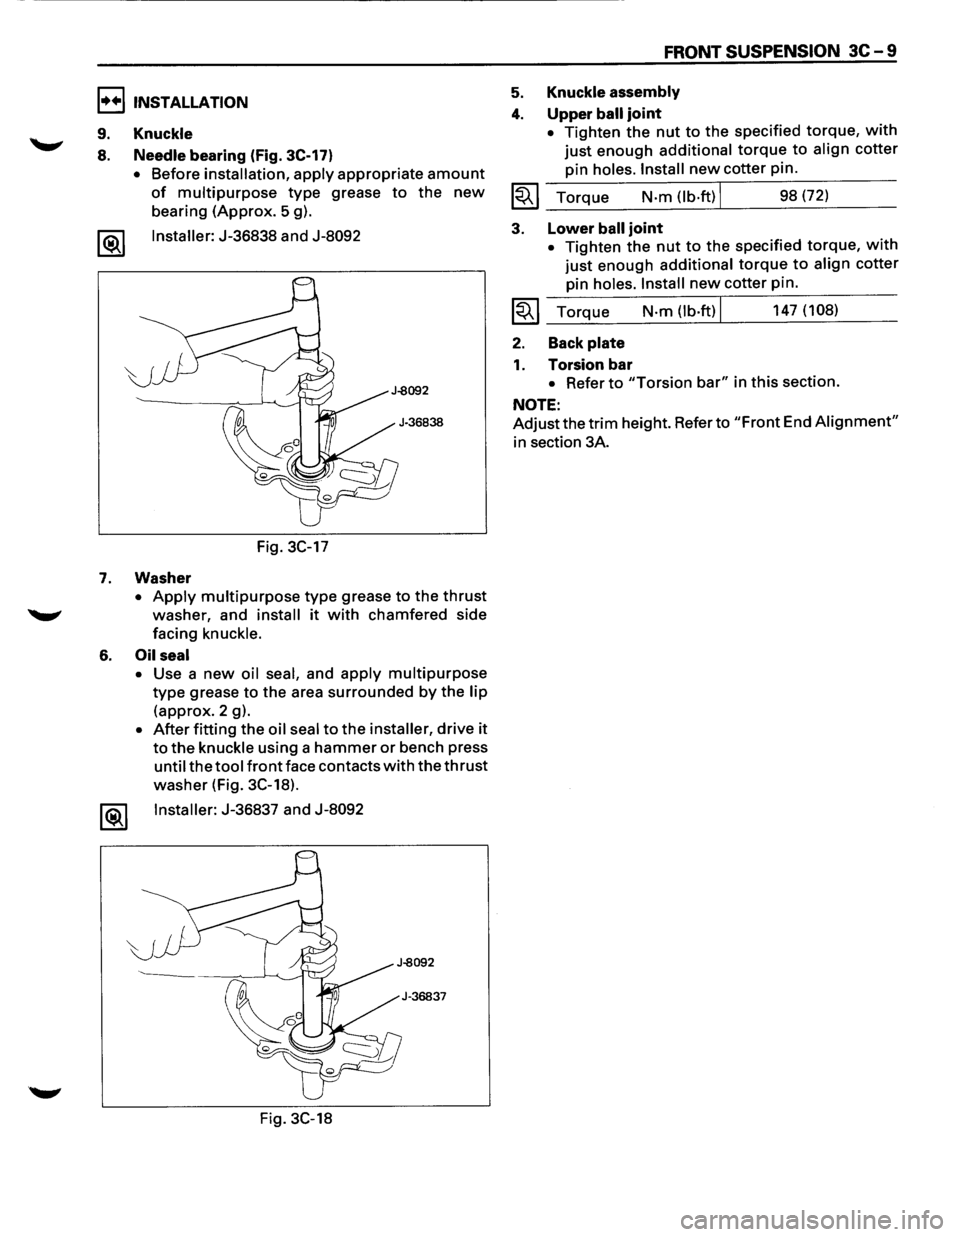
8. Needle bearing (Fig. 3C-17)
• Before installation, apply appropriate amount
of multipurpose type grease to the new
bearing (Approx. 5 g).
1®.1 Installer: J-36838 and J-8092
Fig. 3C-17
7. Washer
• Apply multipurpose type grease to the thrust
washer, and install it with chamfered side
facing
knuckle.
6. Oil seal
• Use a new oil seal, and apply multipurpose
type grease to the area surrounded by the lip
(approx. 2 g).
• After fitting the oil seal to the installer, drive it
to the knuckle using a hammer or bench press
until the tool front face contacts with the thrust
washer (Fig. 3C-18).
Installer:
J-36837 and J-8092
Fig. 3C-18
FRONT SUSPENSION 3C-9
5. Knuckle assembly
4. Upper ball joint
• Tighten the nut to the specified torque, with
just enough additional torque to align cotter
pin holes. Install new cotter pin.
~~~ Torque N·m (lb·ftl I 98 (72)
3. Lower ball joint
• Tighten the nut to the specified torque, with
just enough additional torque to align cotter
pin holes. Install new cotter pin.
~~~ Torque N·m (lb·ftl I 147 (108)
2. Back plate
1. Torsion bar
• Refer to "Torsion bar" in this section.
NOTE:
Adjust the trim height. Refer to "Front End Alignment"
in section 3A.
Page 174 of 1928
3C-1 0 FRONT SUSPENSION
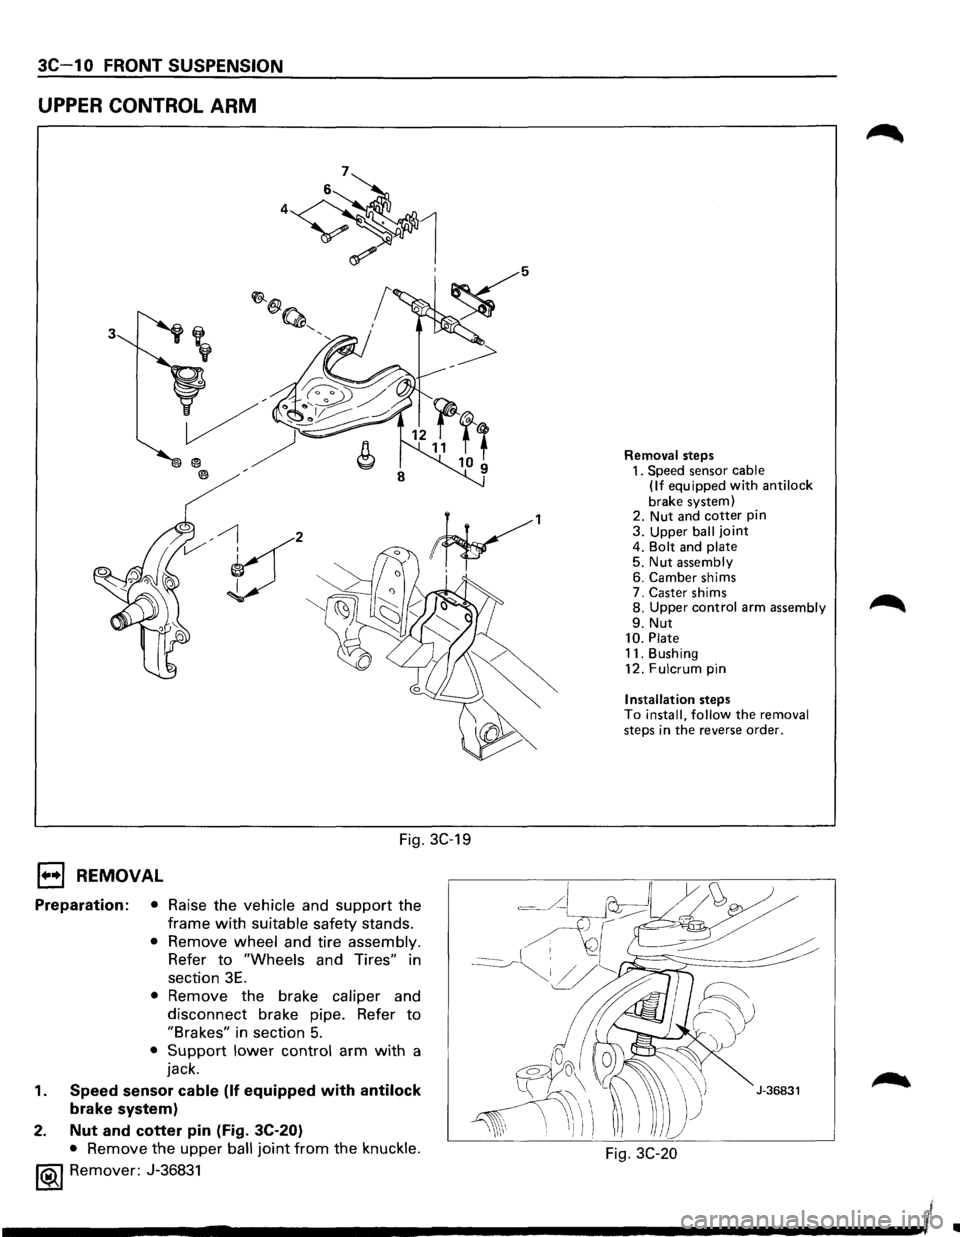
UPPER CONTROL ARM
3
V' , I
Fig. 3C-19
1••1 REMOVAL
Preparation: • Raise the vehicle and support the
frame
with suitable safety stands.
• Remove wheel and tire assembly.
Refer
to "Wheels and Tires" in
section
3E.
• Remove the brake caliper and
disconnect brake pipe. Refer
to
"Brakes" in section 5.
• Support lower control arm with a
jack.
1. Speed sensor cable (If equipped with antilock
brake system)
2.
Nut and cotter pin (Fig. 3C-20)
• Remove the upper ball joint from the knuckle.
1®.1 Remover: J-36831
Removal steps 1. Speed sensor cable
(If equipped with anti lock
brake system)
2. Nut and cotter pin 3. Upper ball joint 4. Bolt and plate 5. Nut assembly 6. Camber shims
7. Caster shims
8.
Upper control arm assembly
9. Nut 10. Plate 11. Bushing
12. Fulcrum pin
Installation steps To install, follow the removal steps in the reverse order.
Fig. 3C-20
Ill
Page 175 of 1928
\fl CAUTION:
'V Be careful not to break the ball joint boot.
3. Upper ball joint
4. Bolt and plate
5. Nut assembly
6. Camber shims
• Note the positions and number of shims.
7. Caster shims
• Note the positions and number of shims.
8. Upper control arm assembly
9. Nut
10. Plate
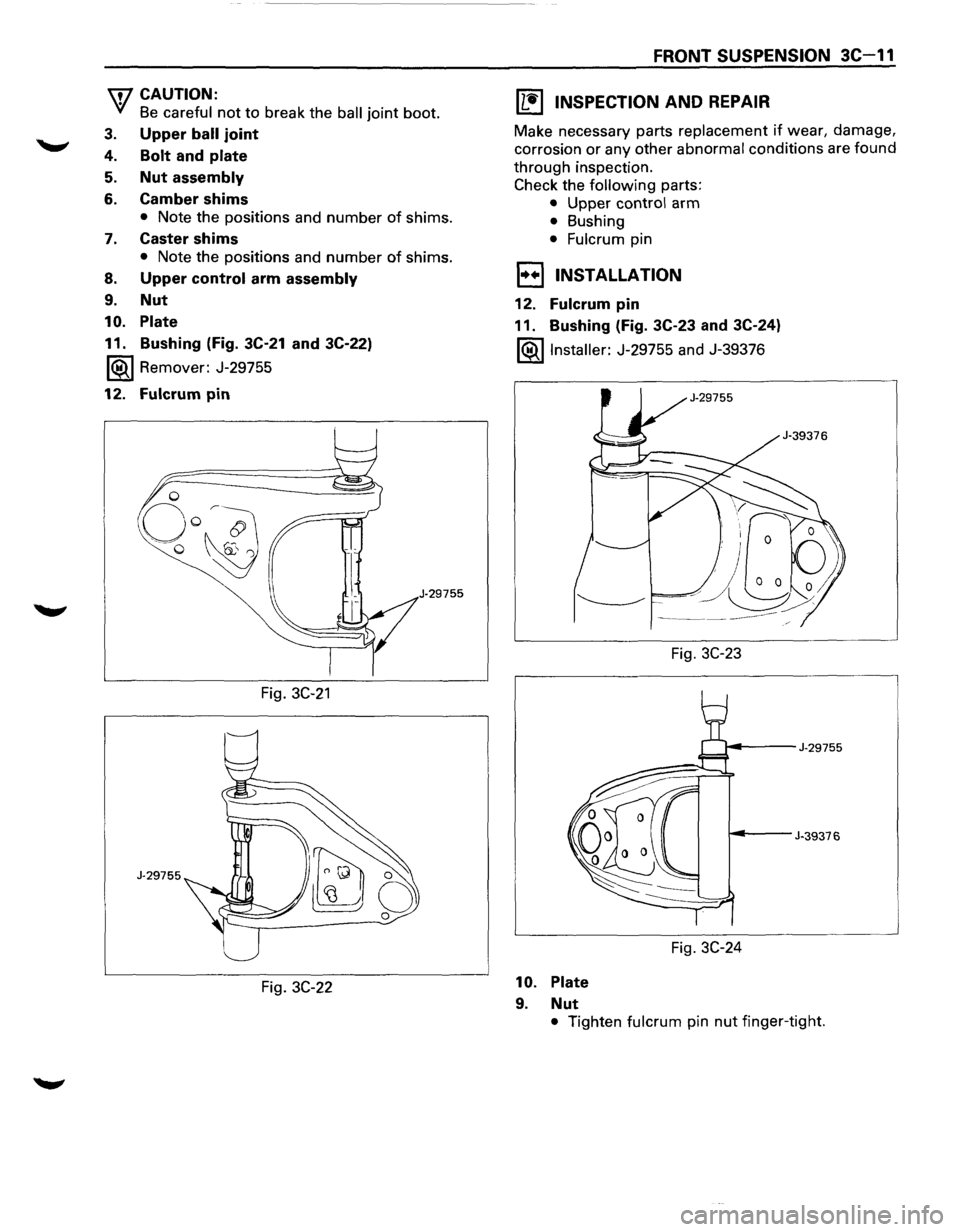
11. Bushing (Fig. 3C-21 and 3C-22)
1®.1 Remover: J-29755
12. Fulcrum pin
J·29755
Fig. 3C-21
J-29755
Fig. 3C-22
FRONT SUSPENSION 3C-11
IL•I INSPECTION AND REPAIR
Make necessary parts replacement if wear, damage,
corrosion or any other abnormal conditions are found
through inspection.
Check the following parts:
• Upper control arm
• Bushing
• Fulcrum pin
1••1 INSTALLATION
12. Fulcrum pin
11. Bushing (Fig. 3C-23 and 3C-24)
l®.llnstaller: J-29755 and J-39376
Fig.
3C-23
~---J-29755
~--J-39376
Fig. 3C-24
10. Plate
9. Nut
• Tighten fulcrum pin nut finger-tight.
Page 176 of 1928
3C-12 FRONT SUSPENSION
NOTE:
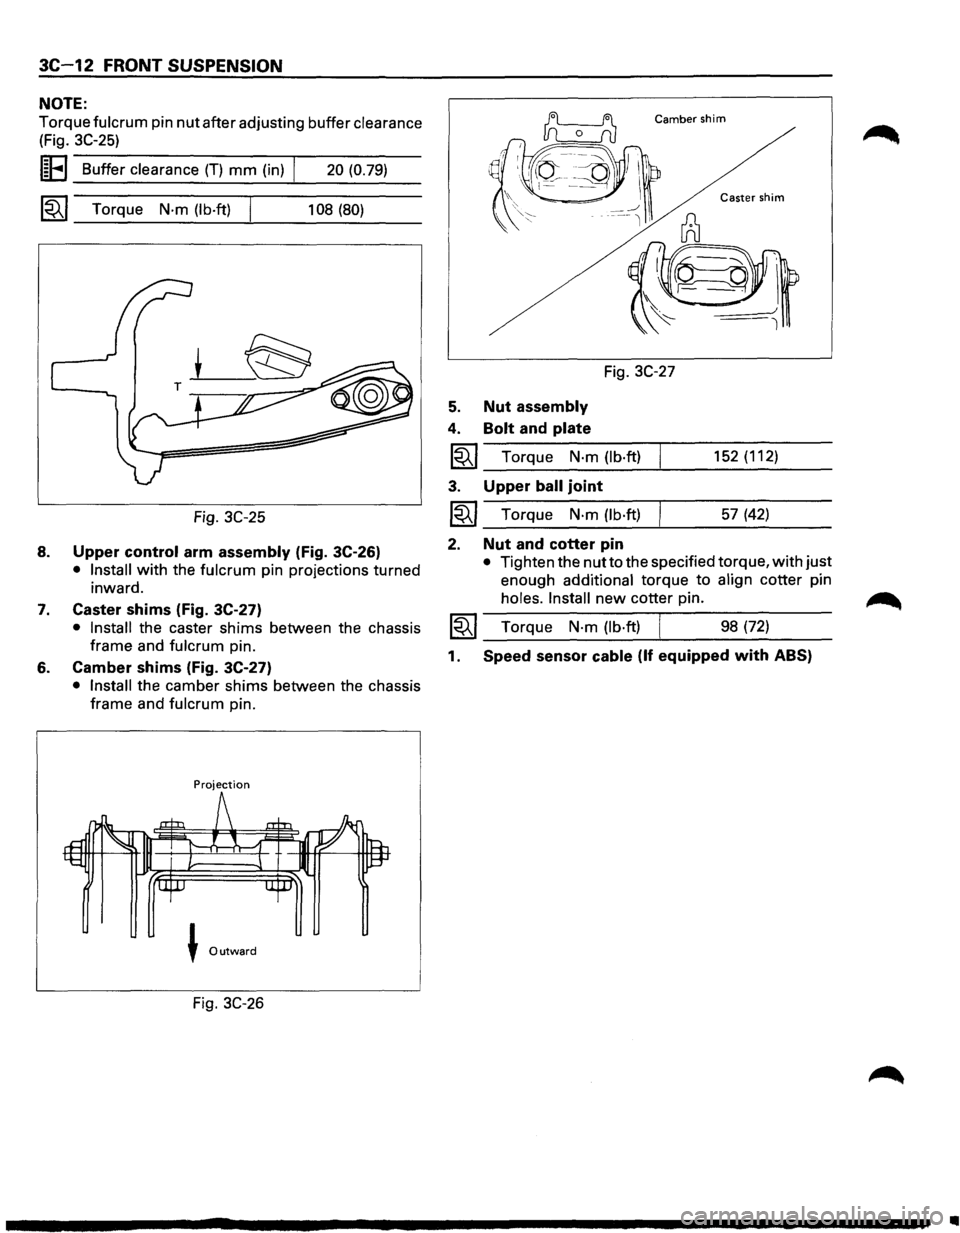
Torque fulcrum pin nut after adjusting buffer clearance
(Fig. 3C-25)
I~EI Buffer clearance (T) mm (in) I 20 (0.79)
~~~ Torque N·m (lb·ft) I 108 (80)
Fig. 3C-25
8. Upper control arm assembly (Fig. 3C-26)
• Install with the fulcrum pin projections turned
inward.
7. Caster shims (Fig. 3C-27)
• Install the caster shims between the chassis
frame and
fulcrum pin.
6. Camber shims (Fig. 3C-27)
• Install the camber shims between the chassis
frame and
fulcrum pin.
Projection
J Outward
Fig. 3C-26
Camber shim
Fig. 3C-27
5. Nut assembly
4. Bolt and plate
1~1 Torque N·m (lb·ft)
3. Upper ball joint
~~~ Torque N·m (lb·ft)
2. Nut and cotter pin
152 (112)
57 (42)
• Tighten the nut to the specified torque, with just
enough
additional torque to align cotter pin
holes. Install new cotter pin.
1~1 Torque N·m (lb·ft) I 98 (72)
1. Speed sensor cable (If equipped with ABS)
•
Page 177 of 1928
FRONT SUSPENSION 3C-13
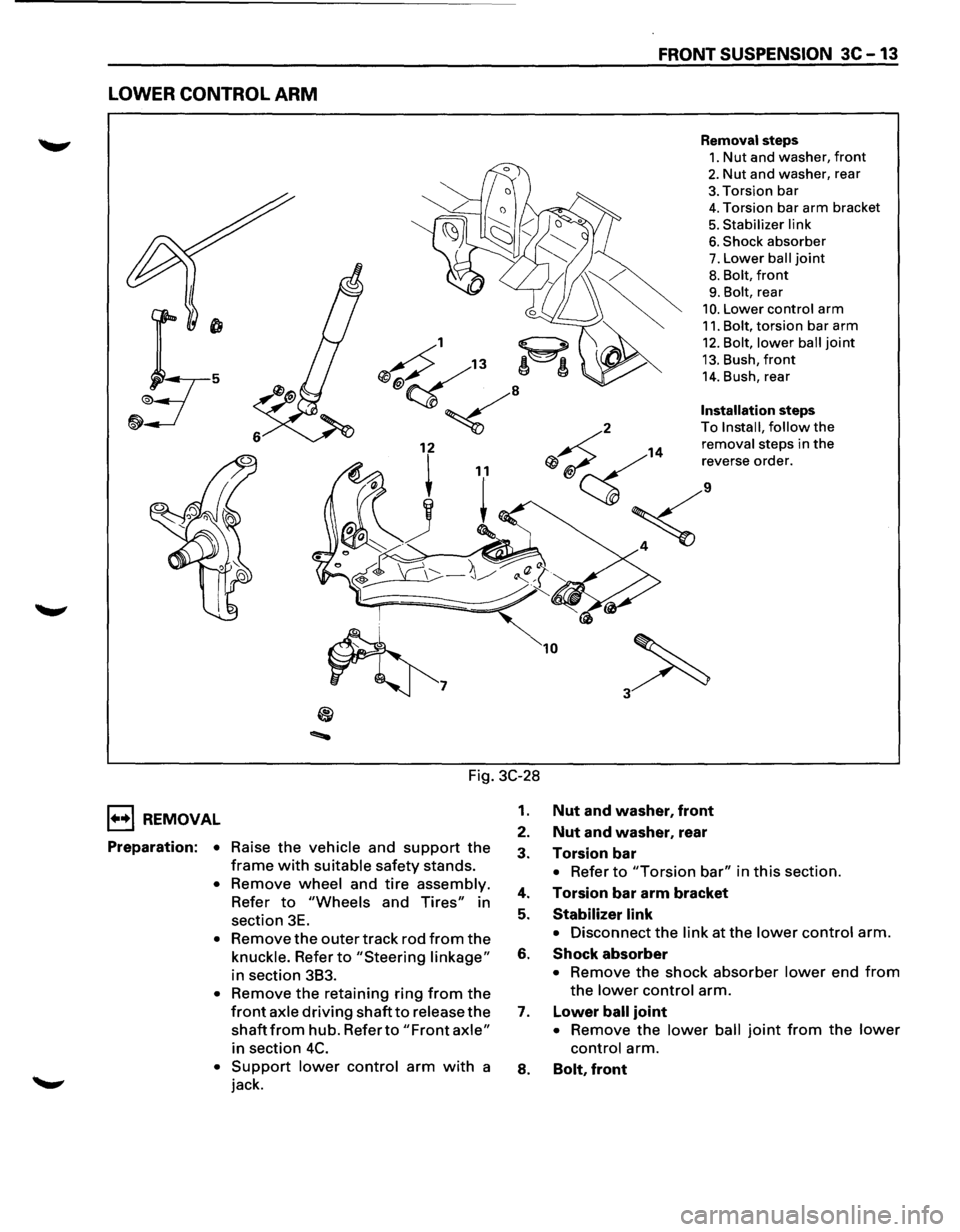
LOWER CONTROL ARM
Removal steps
1. Nut and washer, front
2. Nut and washer, rear
3. Torsion bar
4. Torsion bar arm bracket
5. Stabilizer link
6. Shock absorber
7. Lower ball joint
8. Bolt, front
9. Bolt, rear
10. Lower control arm
11. Bolt, torsion bar arm
12. Bolt, lower ball joint
13. Bush, front
14. Bush, rear
Installation steps
2 To
Install, follow the
14
removal steps in the
Qj ~ ';ve"'e mde,.
;<
~7
10
Fig. 3C-28
1••1 REMOVAL
Preparation: • Raise the vehicle and support the
frame with suitable safety stands.
• Remove wheel and tire assembly.
Refer to "Wheels and Tires" in
section 3E.
• Remove the outer track rod from the
knuckle. Refer to "Steering linkage"
in section 383.
• Remove the retaining ring from the
front axle driving shaft to release the
shaft from hub. Refer to "Front axle"
in section 4C.
• Support lower control arm with a
jack.
1. Nut and washer, front
2. Nut and washer, rear
3. Torsion bar
• Refer to "Torsion bar" in this section.
4. Torsion bar arm bracket
5. Stabilizer link
• Disconnect the link at the lower control arm.
6. Shock absorber
• Remove the shock absorber lower end from
the lower control arm.
7. Lower ball joint
• Remove the lower ball joint from the lower
control arm.
8. Bolt, front
Page 178 of 1928
3C-14 FRONT SUSPENSION
9. Bolt, rear
10. Lower control arm
11.
Bolt, torsion bar arm
12.
Bolt, lower ball joint
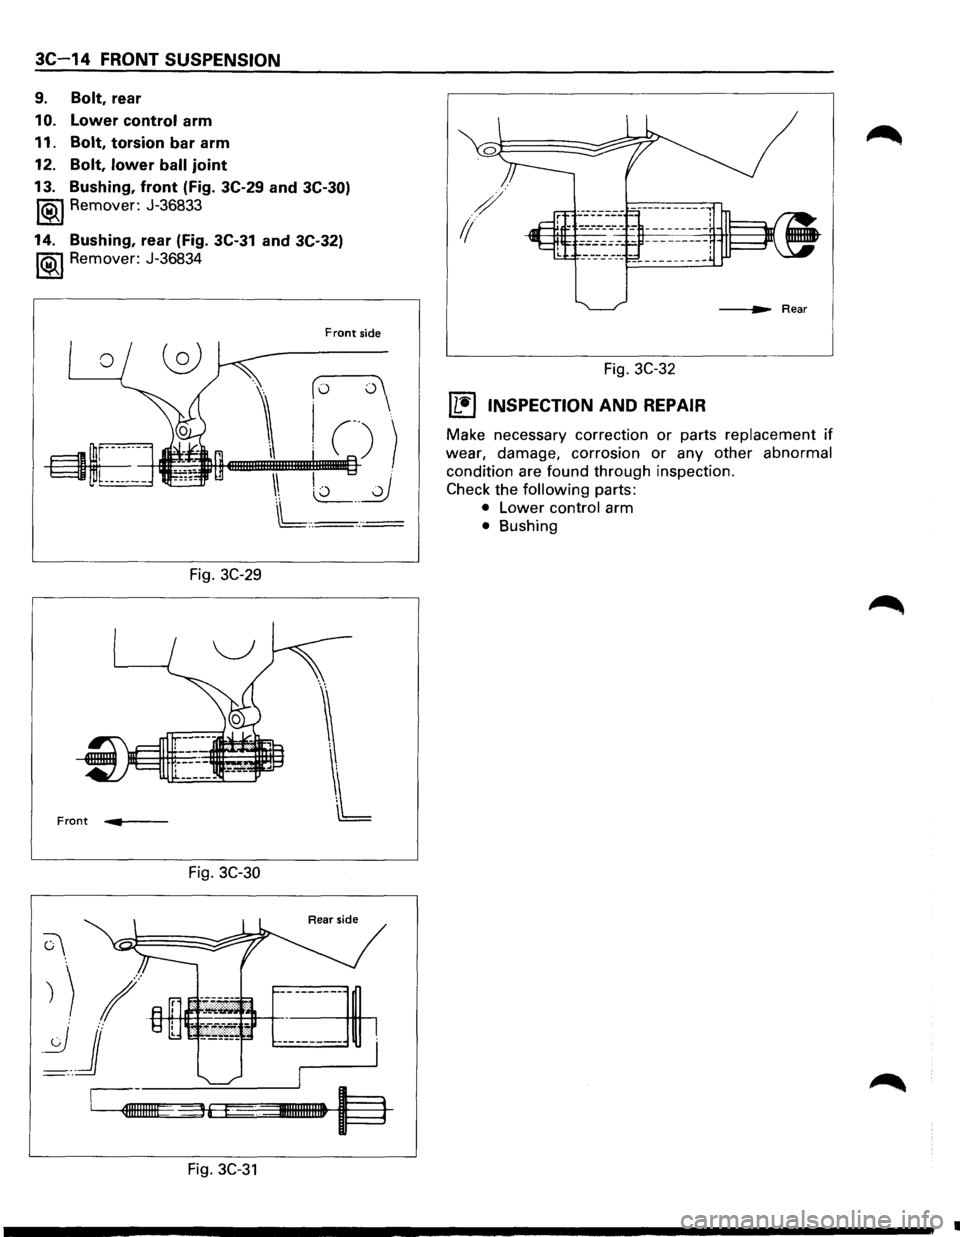
13. Bushing, front (Fig. 3C-29 and
3C-30)
1®.1 Remover: J-36833
14. Bushing, rear (Fig. 3C-31 and 3C-32)
1®..1 Remover: J-36834
Fig. 3C-29
Front .... .,. __ _
Fig. 3C-30
C\.
Front side
(o o
I C))
\ L2_ __ _0
L,._· .:=
Rear side
) ) 1+-H!-H++----+-ff--+-----------
~j r---------
~I~IIIIIIE36 I· %31111111111111 l==l
Fig. 3C-31
/
1/
Fig. 3C-32
(1!] INSPECTION AND REPAIR
Make necessary correction or parts replacement if
wear, damage, corrosion or any other abnormal
condition are found through inspection.
Check the
following parts:
• Lower control arm
• Bushing
•
Page 179 of 1928
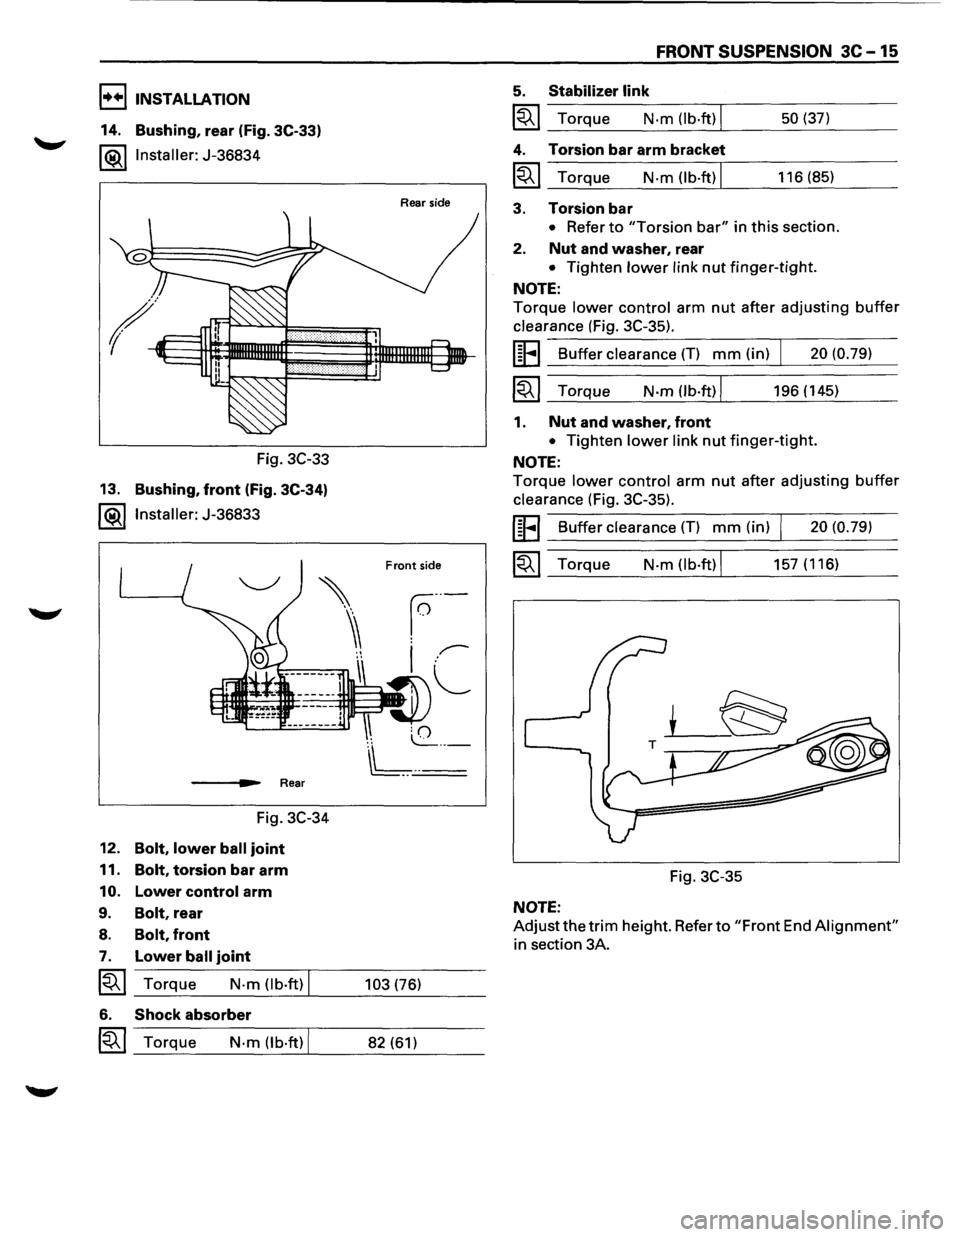
I••IINSTALLATION
14. Bushing, rear (Fig. 3C-33)
l®.llnstaller: J-36834
Fig. 3C-33
13.
Bushing, front (Fig. 3C-34)
l®llnstaller: J-36833
___ ..,._. Rear
Fig. 3C-34
12.
Bolt, lower ball joint
11. Bolt, torsion bar arm
10. Lower control arm
9. Bolt, rear
8. Bolt, front
7. Lower ball joint
~~~ Torque N-m (lb·ft) I
6. Shock absorber
~~~ Torque N-m (lb·ft) I
Rear side
Front side
103 (76)
82 (61)
FRONT SUSPENSION 3C-15
5. Stabilizer link
~~~ Torque N·m (lb·ft) I
4. Torsion bar arm bracket
~~~ Torque N-m (lb.ft) I
3. Torsion bar
50 (37)
116 (85)
• Refer to "Torsion bar" in this section.
2. Nut and washer, rear
• Tighten lower link nut finger-tight.
NOTE:
Torque lower control arm nut after adjusting buffer
clearance (Fig. 3C-35).
UFI Buffer clearance (T) mm (in) I 20 (0.79)
~~~ Torque N-m(lb·ft)l 196(145)
1. Nut and washer, front
• Tighten lower link nut finger-tight.
NOTE:
Torque lower control arm nut after adjusting buffer
clearance (Fig. 3C-35).
UFI Buffer clearance (T) mm (in) I 20 (0.79)
~~~ Torque N-m (lb·ft) I 157 (116)
Fig. 3C-35
NOTE:
Adjustthetrim height. Refer to "Front End Alignment"
in section 3A.
Page 180 of 1928
3C-16 FRONT SUSPENSION
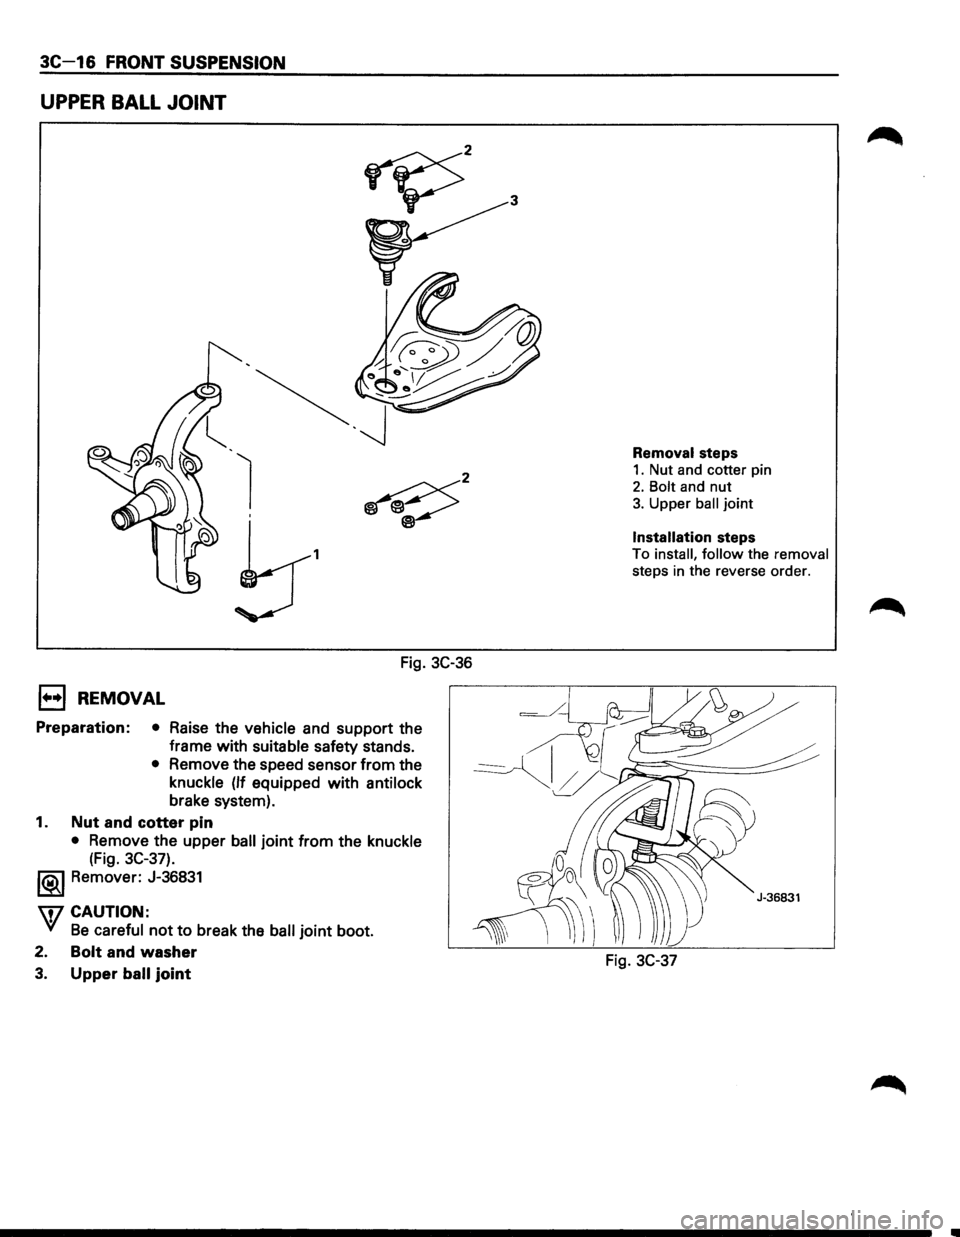
UPPER BALL JOINT
1
Fig. 3C-36
E) REMOVAL
Preparation: • Raise the vehicle and support the
frame with
suitable safety stands.
• Remove the speed sensor from the
knuckle
(If equipped with antilock
brake system).
1. Nut and cotter pin
• Remove the upper ball joint from the knuckle
(Fig. 3C-37).
l®..l Remover: J-36831
\fl CAUTION:
VI Be careful not to break the ball joint boot.
2.
Bolt and washer
3. Upper ball joint
Removal steps
1. Nut and cotter pin
2. Bolt and nut
3. Upper ball joint
Installation steps
To install, follow the removal
steps in the reverse order.
Fig. 3C-37