fuel cap ISUZU TROOPER 1995 User Guide
[x] Cancel search | Manufacturer: ISUZU, Model Year: 1995, Model line: TROOPER, Model: ISUZU TROOPER 1995Pages: 1928
Page 586 of 1928
If! (;
6A 1-28 ENGINE (V6 3.2L DOHC AND SOHC)
21. Fan pulley assembly
• Tighten fixing bolt to the specified torque.
~ Torque N·m (lb·ft) I 22 (16)
20.
Power steering pump
• Tighten pump fixing bolts to the specified
torque.
~ Torque N·m (lb·ft) 56 (41)
19. Generator drive belt
• Engage and adjust.
• Refer to Section 68 "Drive belt adjustment".
18. Air Conditioning compressor drive belt
• Engage and adjust.
• Refer to Section 68 "Drive belt adjustment".
17. Power steering pump drive belt
• Engage and adjust.
• Refer to Section 68 "Drive belt adjustment".
16. Fuelhoses
• Connect surely the hoses and install the bolts
on the head cover.
15. Common chamber
• Tighten bolts and nuts to the specified torque.
Bolts
~~~ Torque N·m (lb·ft) 24 (17)
Nuts
~~~ Torque N·m (lb·ft) 24 (17)
14. Exhaust Gas Recirculation Valve assembly
• Tighten bolts to the specified torque.
Exhaust Gas
Recirculation Valve Side
~~~ Torque N·m (lb·in) I 8 (69)
Exhaust Manifold Side
~~~ Torque N·m (lb·ft) 28 (21)
13. Evaporative Emission Canister Purge hose
12.
Fuel Pressure Control Valve vacuum hose
11. Positive
Crankcase Ventilation hose
9. Throttle body
• Tighten bolts to the specified torque.
~~~ Torque N·m (lb·ft) I 19 (14)
10. Vacuum hoses
• Connect vacuum hoses on canister Vacuum
Switching
Valve and Exhaust Gas Recirculation
Vacuum Switching Valve to the throttle body.
8. Ignition Control Module assembly
• Tighten bolts to the specified torque and
connect connector.
~~~ Torque N·m (lb·ft) 19 (14)
7.
6.
5.
4.
High tension cables
Connectors
• Connect each connector carefully.
Vacuum booster hose
Accelerator Pedal cable
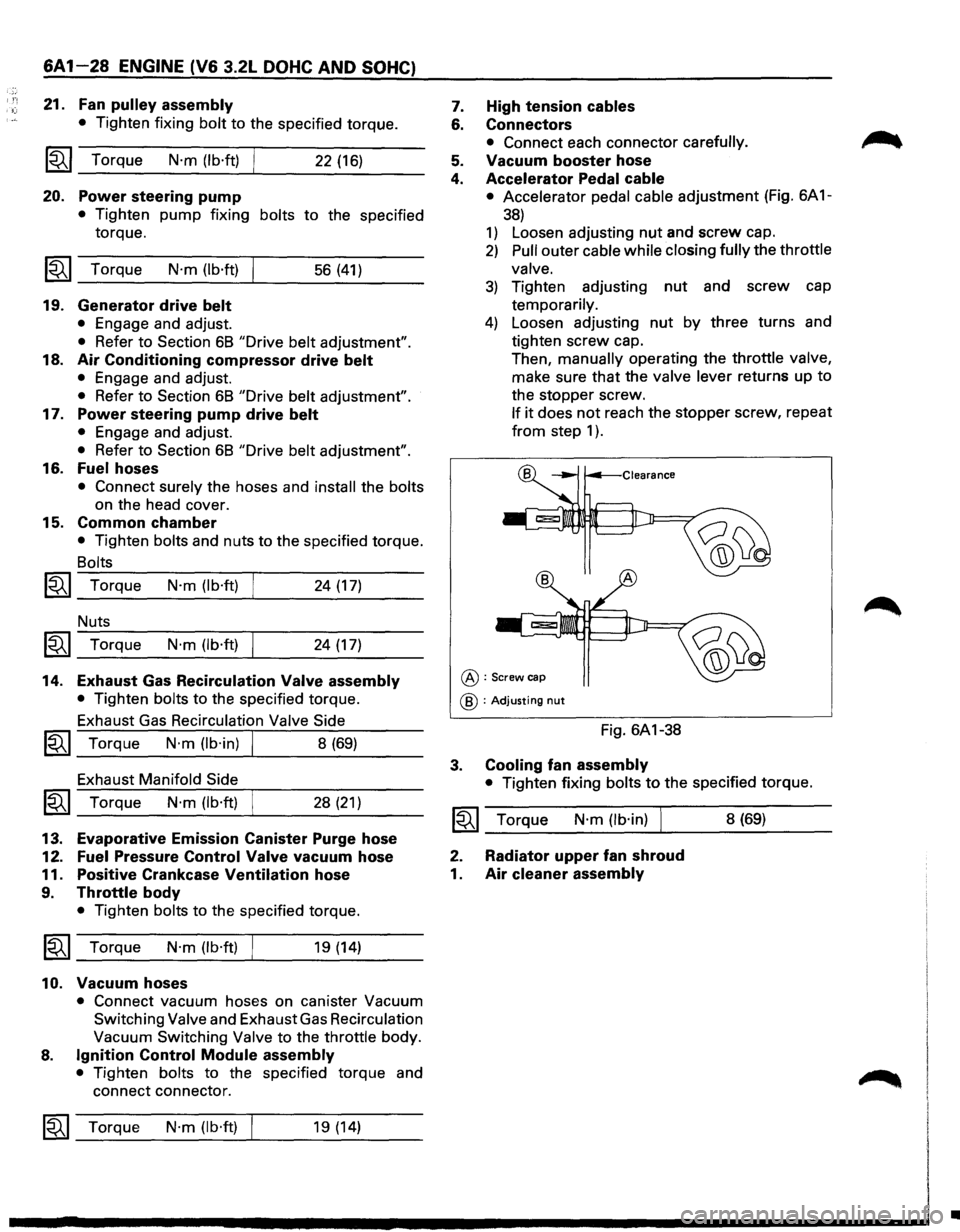
• Accelerator pedal cable adjustment (Fig. 6A 1-
38)
1) Loosen adjusting nut and screw cap.
2) Pull outer cable while closing fully the throttle
valve.
3) Tighten adjusting nut and screw cap
temporarily.
4) Loosen adjusting nut by three turns and
tighten screw cap.
Then,
manually operating the throttle valve,
make sure that the valve lever returns up to
the stopper screw.
If it does not reach the stopper screw, repeat
from step 1 ) .
@:Screw cap
@ :Adjusting nut
Fig. 6A1-38
3. Cooling fan assembly
• Tighten fixing bolts to the specified torque.
~~~ Torque N·m (lb·in) I 8 (69)
2. Radiator upper fan shroud
1. Air
cleaner assembly
•
Page 590 of 1928
6A 1-32 ENGINE (V6 3.2L DOHC AND SOHC)
15. Exhaust Gas Recirculation Valve assembly
• Tighten bolts to the specified torque.
Exhaust
Gas Recirculation Valve Side
~~~ Torque N·m (lb·in) J 8 (69)
Exhaust Manifold Side
1~1 Torque N·m (lb·ft) 28 (21)
14. Evaporative Emission Canister Purge hose
13.
Fuel Pressure Control Valve vacuum hose
12. Positive Crankcase
Ventilation hose
10. Throttle body
• Tighten bolts to the specified torque.
Torque
N·m (lb·ft) 19 (14)
11. Vacuum hoses
• Connect vacuum hoses on canister Vacuum
Switching Valve and Exhaust Gas Recirculation
Vacuum Switching Valve
to the throttle body.
9. Ignition Control Module assembly
~ • Tighten bolts to the specified torque and
~ connector.
Torque
N·m (lb·ft)
8. High tension cables
7. Connectors
• Connect each connector.
6. Vacuum booster hose
5. Canister vacuum hose
4. Accelerator Pedal cable
19 (14)
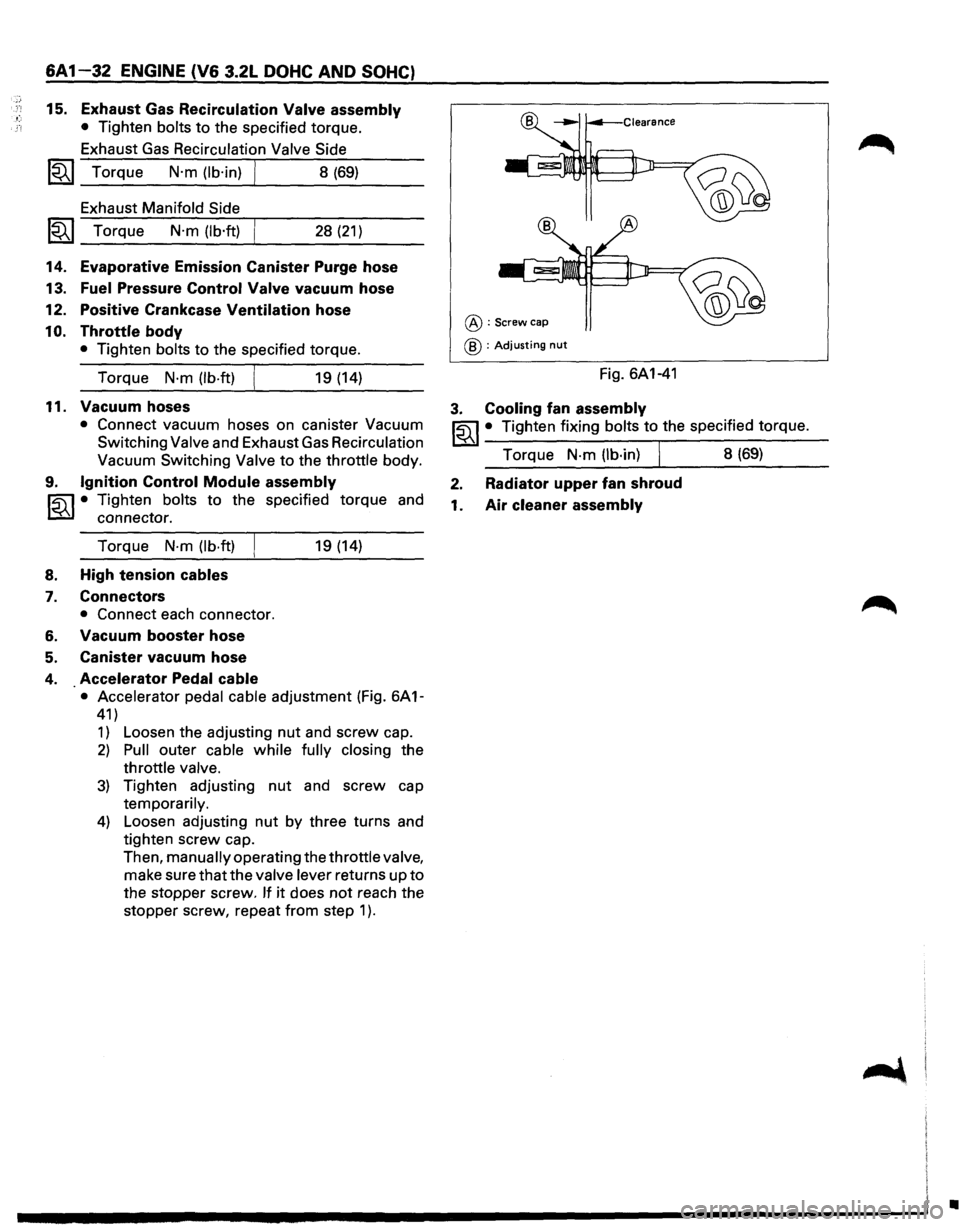
• Accelerator pedal cable adjustment (Fig. 6A 1-
41)
1) Loosen the adjusting nut and screw cap.
2) Pull outer cable while fully closing the
throttle valve.
3) Tighten adjusting nut and screw cap
temporarily.
4) Loosen adjusting nut by three turns and
tighten screw cap.
Then, manually operating the throttle valve,
make sure
that the valve lever returns up to
the stopper screw. If it does not reach the
stopper screw, repeat
from step 1 ).
@:Screw cap
@ : Adjusting nut
Fig. 6A1-41
3. Cooling fan assembly
~~~· Tighten fixing bolts to the specified torque.
Torque
N·m (lb·in) I 8 (69)
2. Radiator upper fan shroud
1.
Air cleaner assembly
•
Page 595 of 1928
19. Power steering pump drive belt
• Engage and adjust.
• Refer to Section 6B "Drive belt adjustment".
18. Fuel hoses
• Connectthe hoses securely and install the bolts
on the head cover.
17. Common chamber
~~~ • Tighten bolts and nuts to the specified torque.
Bolts
Torque N·m (lb·ft) 24 (17)
Nuts
Torque
N·m (lb·ft) 24 (17)
16. Common chamber duct
~~~ • Tighten bolts and nuts to the specified torque.
Bolts
Torque N·m (lb·ft) 24 (17)
Nuts
Torque
N·m (lb·ft) 24 (17)
• Connect the ground cable.
15. Exhaust Gas Recirculation Valve assembly
~~~ • Tighten bolts to the specified torque.
Exhaust Gas
Recirculation Valve side
Torque
N·m (lb·in) 8 (69)
Exhaust manifold side
Torque
N·m (lb·ft) 28 (21)
14. Evaporative Emission Canister Purge hose
13. Fuel Pressure
Control Valve vacuum hose
12. Positive
Crankcase Ventilation hose
10. Throttle body
~~~ • Tighten bolts to the specified torque.
Torque
N·m (lb·ft) I 19 (14)
11. Vacuum hoses
• Connect vacuum hoses on canister Vacuum
Switching
Valve and Exhaust Gas Recirculation
Vacuum Switching Valve to the throttle body.
9. Ignition Control Module assembly
~ • Tighten bolts to the specified torque and
L:::6.l connect connector.
Torque
N·m (lb·ft) 19 (14)
8. High tension cables
7. Connectors
• Connect each connector carefully.
6. Vacuum booster hose
ENGINE (V6 3.2L DOHC AND SOHC) 6A1-37
5. Canister vacuum hose
4. Accelerator Pedal cable
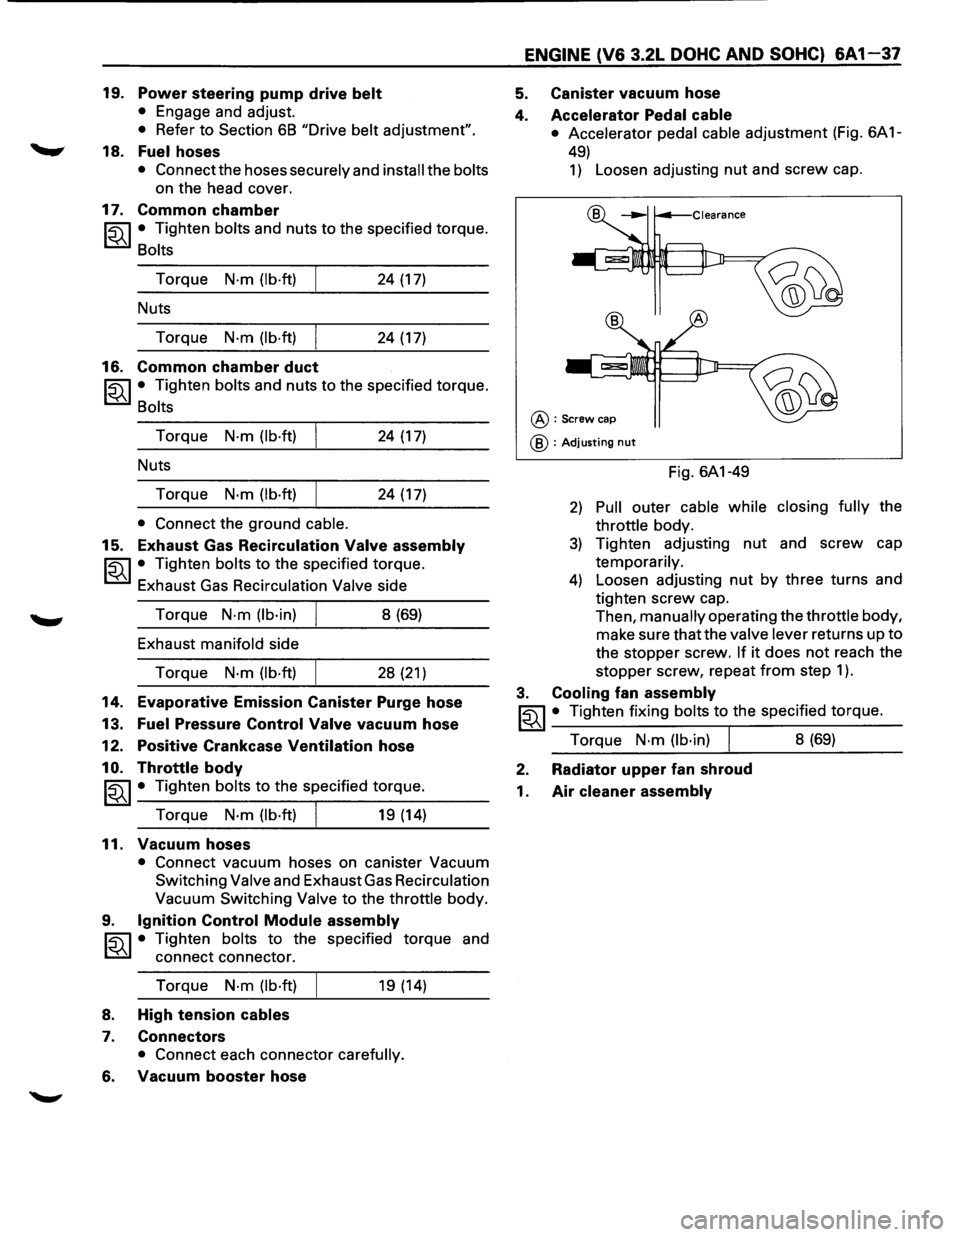
• Accelerator pedal cable adjustment (Fig. 6A 1-
49)
1) Loosen adjusting nut and screw cap.
@:Screw cap
@ : Adjusting nut
Fig. 6A1-49
2) Pull outer cable while closing fully the
throttle body.
3) Tighten adjusting nut and screw cap
temporarily.
4) Loosen adjusting nut by three turns and
tighten
screw cap.
Then,
manually operating the throttle body,
make sure that the
valve lever returns up to
the stopper screw. If it does not reach the
stopper screw, repeat
from step 1 ).
3. Cooling fan assembly
~~~· Tighten fixing bolts to the specified torque.
Torque
N·m (lb·in) I 8 (69)
2. Radiator upper fan shroud
1. Air cleaner assembly
Page 603 of 1928
16. Common chamber
~~~· Tighten bolts and nuts to the specified torque.
Bolts
Torque N·m (lb·ft) 24 (17)
Nuts
Torque
N·m (lb·ft) 24 (17)
15. Exhaust Gas Recirculation Valve assembly
• Tighten bolts to the specified torque.
Exhaust Gas
Recirculation Valve Side
~~~ Torque N·m (lb·in) I 8 (69)
Exhaust Manifold Side
~~~ Torque N·m (lb·ft) 28 (21)
14. Evaporative Emission Canister Purge hose
13.
Fuel Pressure Control Valve vacuum hose
12. Positive
Crankcase Ventilation hose
11.
Throttle body
~~~· Tighten bolts to the specified torque.
Torque
N·m (lb·ft) I 19 (14)
10. Vacuum hoses
• Connect vacuum hoses on canister Vacuum
Switching Valve and Exhaust Gas Recirculation
Vacuum
Switching Valve to the throttle body.
• Connect Engine Coolant hose and also connect
Idler Air Control Valve and Throttle Position
Sensor connectors.
9. Ignition Control Module assembly
~ • Tighten bolts to the specified torque
~ connect connector. and
Torque
N·m (lb·ft) 19 (14)
8. High tension cables
7. Connectors
• Connect each connector without fail.
6. Vacuum booster hose
5. Canister vacuum hose
ENGINE (V6 3.2L DOHC AND SOHC) 6A 1-45
4. Accelerator Pedal cable
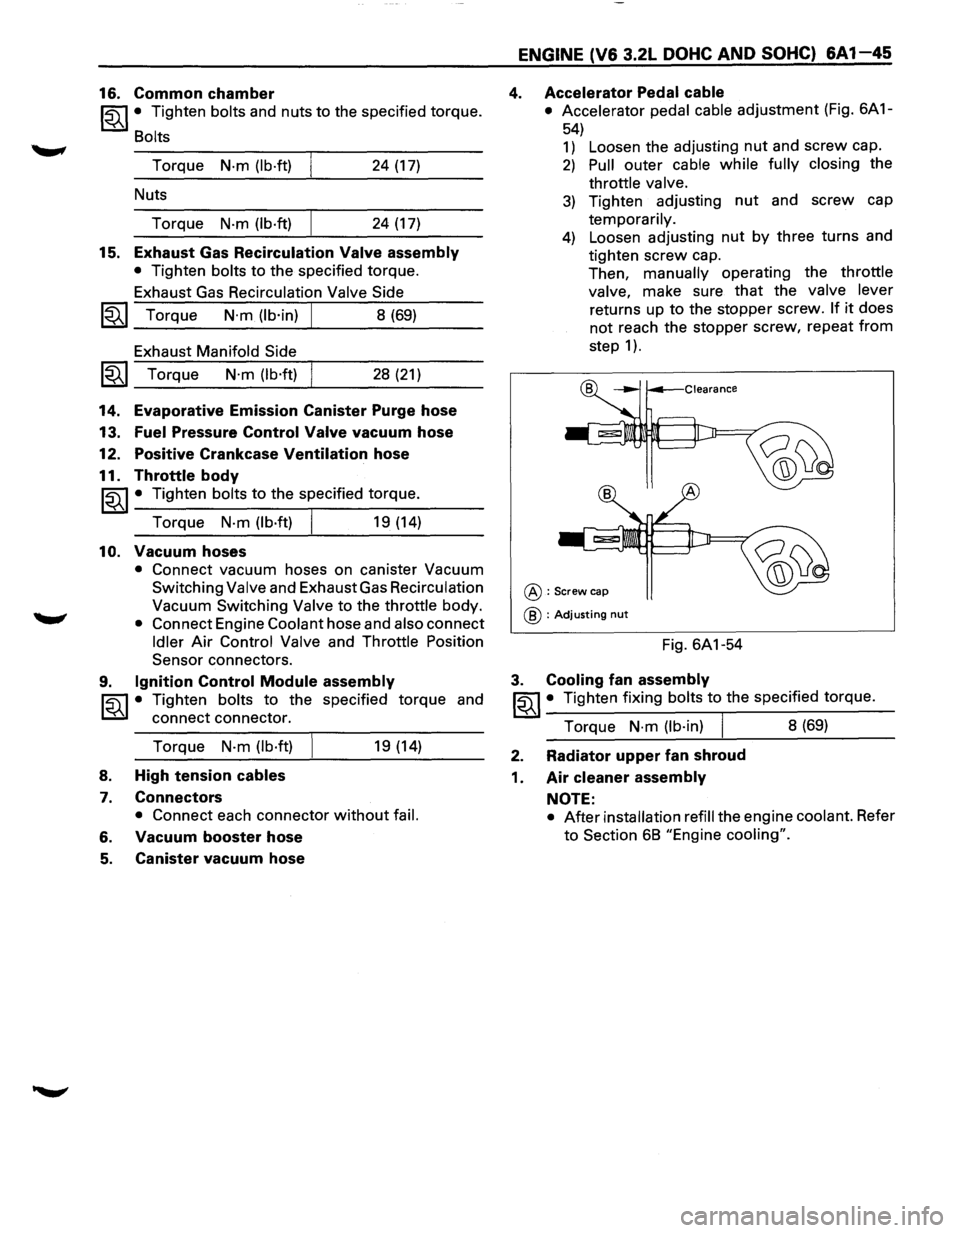
• Accelerator pedal cable adjustment (Fig. 6A 1-
54)
1) Loosen the adjusting nut and screw cap.
2) Pull outer cable while fully closing the
throttle valve.
3) Tighten adjusting nut and screw cap
temporarily.
4) Loosen adjusting nut by three turns and
tighten
screw cap.
Then,
manually operating the throttle
valve, make sure that the valve lever
returns up to the stopper screw. If it does
not reach the stopper screw, repeat
from
step 1 ).
@:Screw cap
@ : Adjusting nut
Fig. 6A1-54
3. Cooling fan assembly
~~~· Tighten fixing bolts to the specified torque.
Torque
N·m (lb·in) I 8 (69)
2. Radiator upper fan shroud
1. Air cleaner assembly
NOTE:
• After installation refill the engine coolant. Refer
to Section 68 "Engine cooling".
Page 607 of 1928
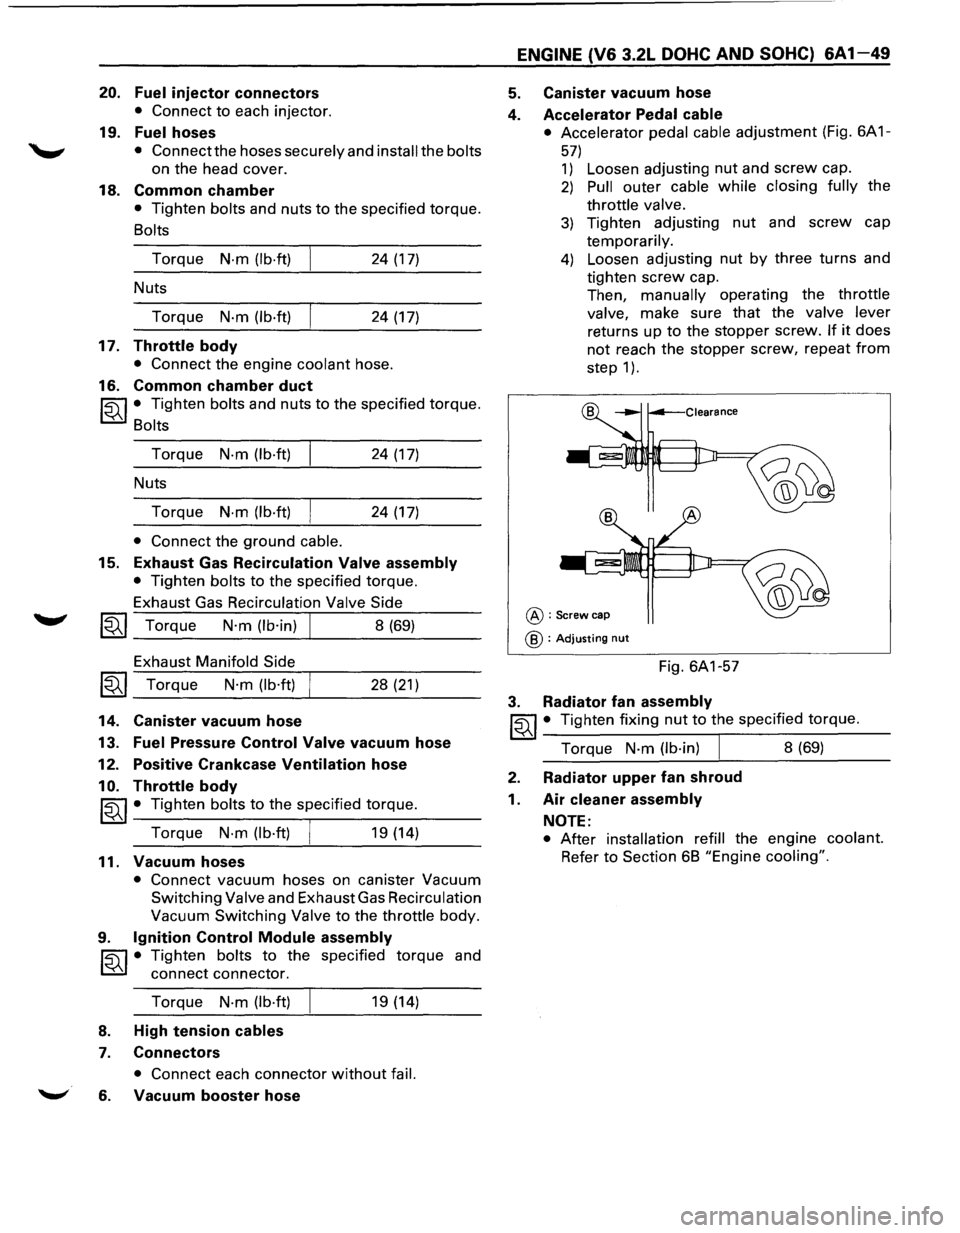
20. Fuel injector connectors
• Connect to each injector.
19. Fuel hoses
• Connect the hoses securely and install the bolts
on the head cover.
18. Common chamber
• Tighten bolts and nuts to the specified torque.
Bolts
Torque N·m (lb·ft) 24 (17)
Nuts
Torque
N·m (lb·ft) 24 (17)
17. Throttle body
• Connect the engine coolant hose.
16. Common chamber duct
~~~ • Tighten bolts and nuts to the specified torque.
Bolts
Torque N-m (lb·ft) 24 (17)
Nuts
Torque
N·m (lb·ft) 24 (17)
• Connect the ground cable.
15. Exhaust Gas Recirculation Valve assembly
• Tighten bolts to the specified torque.
Exhaust Gas Recirculation
Valve Side
~~~ Torque N·m (lb·in) I 8 (69)
Exhaust Manifold Side
~~~ Torque N·m (lb·ft) 28 (21)
14. Canister vacuum hose
13.
Fuel Pressure Control Valve vacuum hose
12. Positive
Crankcase Ventilation hose
10. Throttle body
~~~· Tighten bolts to the specified torque.
Torque
N·m (lb·ft) I 19 (14)
11. Vacuum hoses
• Connect vacuum hoses on canister Vacuum
Switching Valve and Exhaust Gas Recirculation
Vacuum Switching Valve to the throttle body.
9. Ignition Control Module assembly
~~~· Tighten bolts to the specified torque and
connect connector.
Torque
N-m (lb·ft) 19 (14)
8. High tension cables
7. Connectors
• Connect each connector without fail.
~· 6. Vacuum booster hose
ENGINE (V6 3.2L DOHC AND SOHC) 6A 1-49
5. Canister vacuum hose
4. Accelerator Pedal
cable
• Accelerator pedal cable adjustment (Fig. 6A 1-
57)
1) Loosen adjusting nut and screw cap.
2) Pull outer cable while closing fully the
throttle valve.
3) Tighten adjusting nut and screw cap
temporarily.
4) Loosen adjusting nut by three turns and
tighten
screw cap.
Then,
manually operating the throttle
valve,
make sure that the valve lever
returns up to the stopper screw. If it does
not reach the stopper screw, repeat from
step 1 ).
@:Screw cap
@ : Adjusting nut
Fig. 6A1-57
3. Radiator fan assembly
~~~· Tighten fixing nut to the specified torque.
Torque
N-m (lb·in) I 8 (69)
2. Radiator upper fan shroud
1. Air cleaner assembly
NOTE:
• After installation refill the engine coolant.
Refer to Section 6B "Engine cooling".
Page 643 of 1928
ENGINE FUEL 6C-1
SECTION 6C
ENGINE FUEL
CONTENTS
General Description ....................... .
Fuel Metering ............................ .
On-Vehicle Service ........................ .
Fuel Filter ................................. .
In Tank Fuel Filter ............................. .
Fuel Pump Flow Test ........................ .
Fuel Pump Assembly ........................ .
Fuel Pump Relay .............................. ..
6C-1
6C-2
6C-3
6C-3
6C-4
6C-4
6C-5
6C-5
Fuel Tank .......................................... ..
Fuel Gage Unit ................................. ..
Fuel Filler Cap .................................... .
Accelerator Pedal Control ............... ..
Accelerator Pedal Control Cable ..
Accelerator Pedal ......................... .
Air
Cleaner Filter ........................... .
Main Data and Specifications ............... .
Torque Specifications ......................
..
6C-6
6C-7
6C-7
6C-8
6C-8
6C-9
6C-10
6C-11
6C-11
GENERAL DESCRIPTION
When working on the fuel system, there are several
things to keep in mind:
• Any time the fuel system is being worked on,
disconnect the negative battery
cable except for
those tests where battery voltage is required.
• Always keep a dry chemical (Class 8) fire extin
guisher near the work area.
• Replace all pipes with the same pipe and fittings
that were removed.
• Clean and inspect "0" rings. Replace if required.
• Always relieve the line pressure before servicing
any fuel system components.
• Do not attempt repairs on the fuel system until you
have read the instructions and checked the pic
tures
relating to that repair.
• Adhere to all Notices and Cautions.
All gasoline engines are designed to use only unleaded
gasoline. Unleaded gasoline
must be used for proper
emission control system operation. Its use will also
minimize spark plug fouling and extend engine oil life.
Using leaded gasoline can damage the emission
control system and could result in loss of emission
warranty coverage.
All cars are equipped with an Evaporative Emission
Control System. The purpose of the system is to
minimize the escape offuel vapors to the atmosphere.
Information on this system will be found in Section
6E2.
Page 645 of 1928
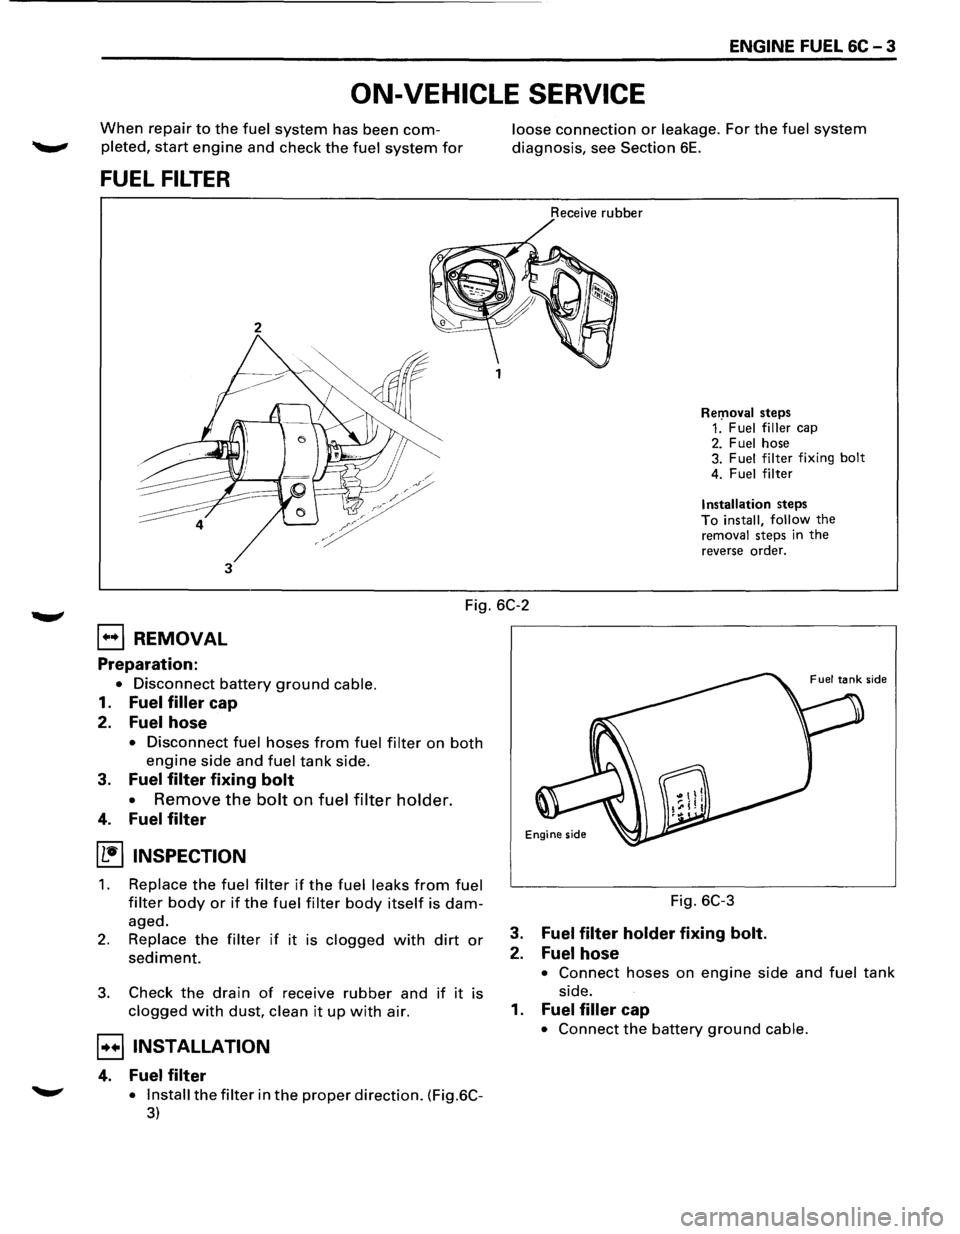
ENGINE FUEL 6C - 3
ON-VEHICLE SERVICE
When repair to the fuel system has been com
pleted, start engine and check the fuel system for
FUEL FILTER
2
3
loose connection or leakage. For the fuel system
diagnosis, see Section 6E.
Receive rubber
Rer:noval steps 1. Fuel filler cap 2. Fuel hose
3. Fuel filter fixing bolt
4. Fuel filter
Installation steps To install, follow the removal steps in the
reverse order.
Fig. 6C-2
EJ REMOVAL
Preparation:
• Disconnect battery ground cable.
1. Fuel filler cap
2. Fuel hose
• Disconnect fuel hoses from fuel filter on both
engine side and fuel tank side.
3. Fuel filter fixing bolt
•
Remove the bolt on fuel filter holder.
4. Fuel filter
(1!] INSPECTION
1. Replace the fuel filter if the fuel leaks from fuel
filter body or if the fuel filter body itself is dam
aged.
2. Replace the filter if it is clogged with dirt or
sediment.
3. Check the drain of receive rubber and if it is
clogged with dust, clean it up with air.
B INSTALLATION
4. Fuel filter
.......,. • Install the filter in the proper direction. (Fig.6C-
3)
Fig. 6C-3
3. Fuel filter holder fixing bolt.
2. Fuel hose
• Connect hoses on engine side and fuel tank
side.
1. Fuel filler cap
• Connect the battery ground cable.
Page 647 of 1928
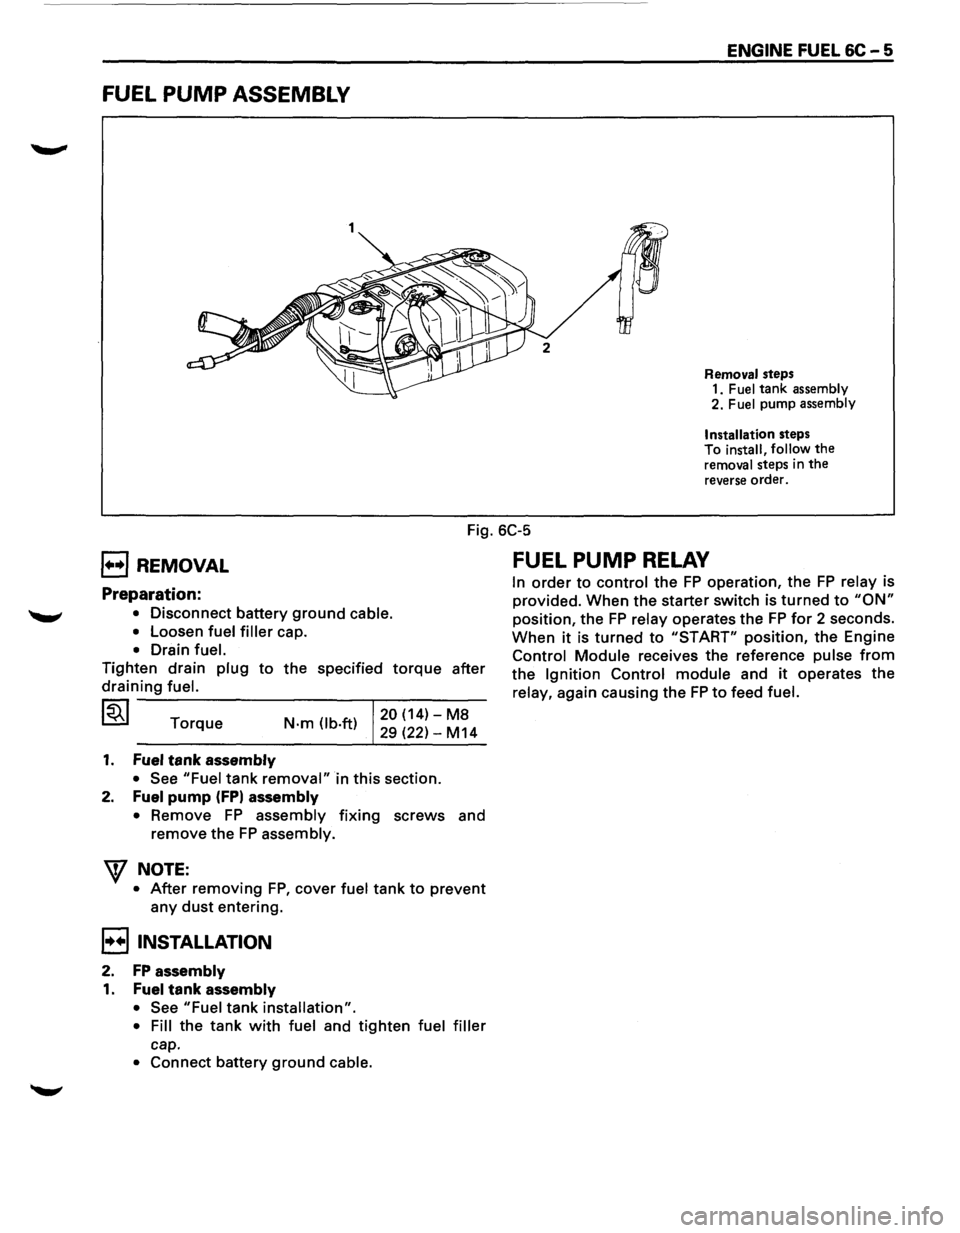
FUEL PUMP ASSEMBLY
1
ENGINE FUEL 6C-5
Removal steps
1. Fuel tank assembly 2. Fuel pump assembly
Installation
steps
To install, follow the removal steps in the reverse order.
Fig. 6C-5
B REMOVAL
Preparation:
• Disconnect battery ground cable.
•
Loosen fuel filler cap.
• Drain fuel.
Tighten drain plug to the specified torque after
draining fuel.
~ Torque N·m (lb.ft) 20 (14)-M8
29 (22)-M14
1. Fuel tank assembly
•
See "Fuel tank removal" in this section.
2. Fuel pump (FPI assembly
• Remove FP assembly fixing screws and
remove the FP assembly.
"'\f NOTE:
• After removing FP, cover fuel tank to prevent
any dust entering.
B INSTALLATION
2. FP assembly
1. Fuel tank assembly
• See "Fuel tank installation".
• Fill the tank with fuel and tighten fuel filler
cap.
• Connect battery ground cable.
FUEL PUMP RELAY
In order to control the FP operation, the FP relay is
provided. When the starter switch is turned to "ON"
position, the FP relay operates the FP for 2 seconds.
When it is turned to "START" position, the Engine
Control Module receives the reference pulse from
the Ignition Control module and it operates the
relay, again causing the FP to feed fuel.
Page 648 of 1928
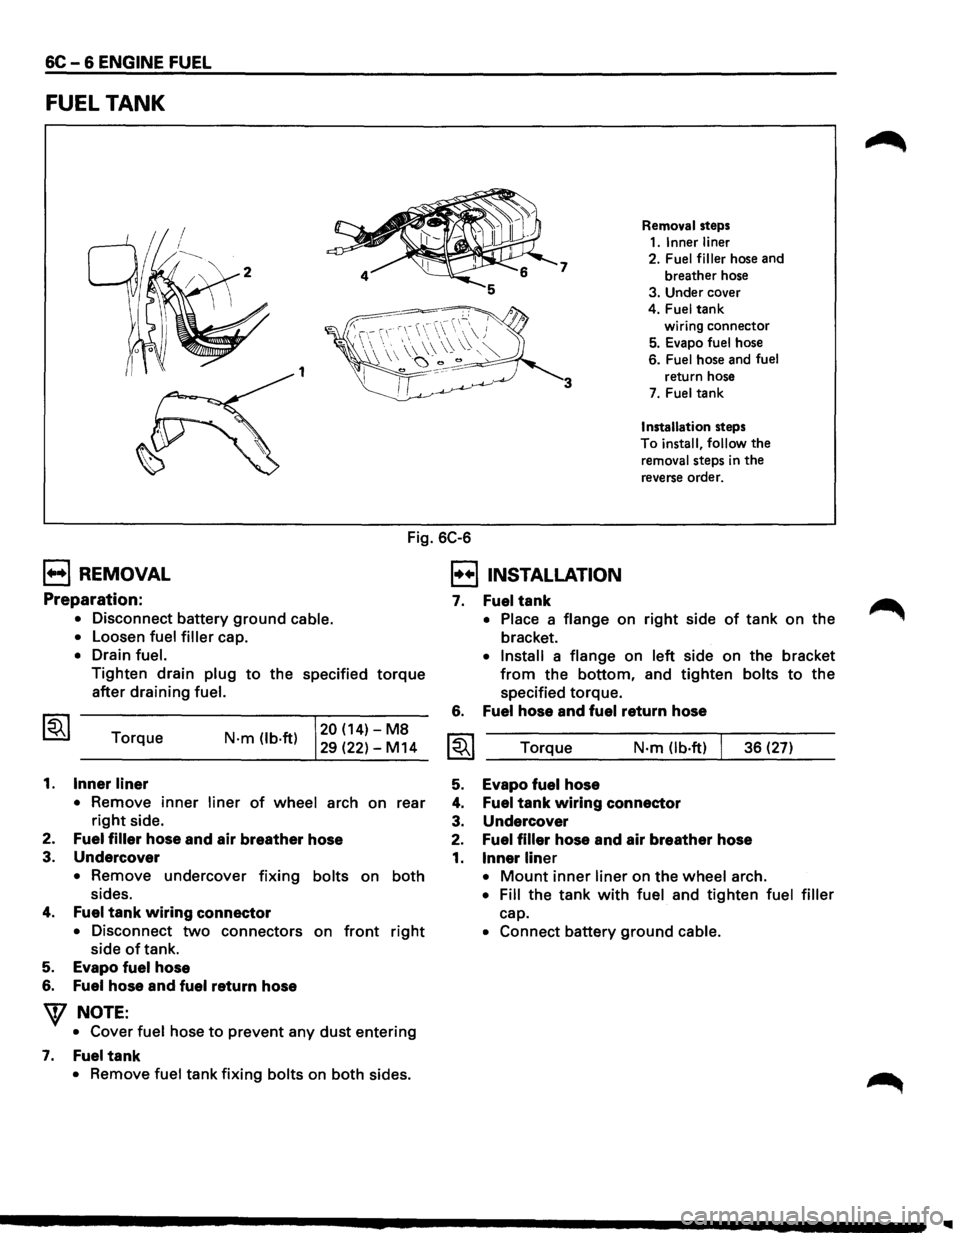
6C-6 ENGINE FUEL
FUEL TANK
7
1 3
Removal steps
1.1nnerliner
2. Fuel filler hose and
breather hose
3. Under cover
4.
Fuel tank
wiring connector
5. Evapo fuel hose
6.
Fuel hose and fuel
return hose
7. Fuel tank
Installation steps
To
install, follow the
removal steps in the
reverse order.
Fig. 6C-6
B REMOVAL
Preparation:
• Disconnect battery ground cable.
•
Loosen fuel filler cap.
• Drain fuel.
Tighten drain plug to the specified torque
after draining fuel.
Torque
1. Inner liner
N·m (lb·ft) 20 (14)-M8
29 (22)-M14
• Remove
inner liner of wheel arch on rear
right side.
2.
Fuel filler hose and air breather hose
3.
Undercover
• Remove undercover fixing bolts on both
sides.
4. Fuel tank wiring connector
• Disconnect two connectors on front right
side of tank.
5. Evapo fuel hose
6. Fuel hose and fuel return hose
W NOTE:
• Cover fuel hose to prevent any dust entering
7. Fuel tank
• Remove fuel tank fixing bolts on both sides.
I!!] INSTALLATION
7.
6.
Fuel tank
• Place a flange on right side of tank on the
bracket.
• Install a flange on left side on the bracket
from the bottom, and tighten bolts to the
specified torque.
Fuel hose and fuel return hose
Torque N·m Ob·ft) 36 (27)
5. Evapo fuel hose
4. Fuel tank wiring connector
3. Undercover
2. Fuel filler hose and air breather hose
1. Inner liner
• Mount inner liner on the wheel arch.
• Fill the tank with fuel and tighten fuel filler
cap.
• Connect battery ground cable.
Page 649 of 1928
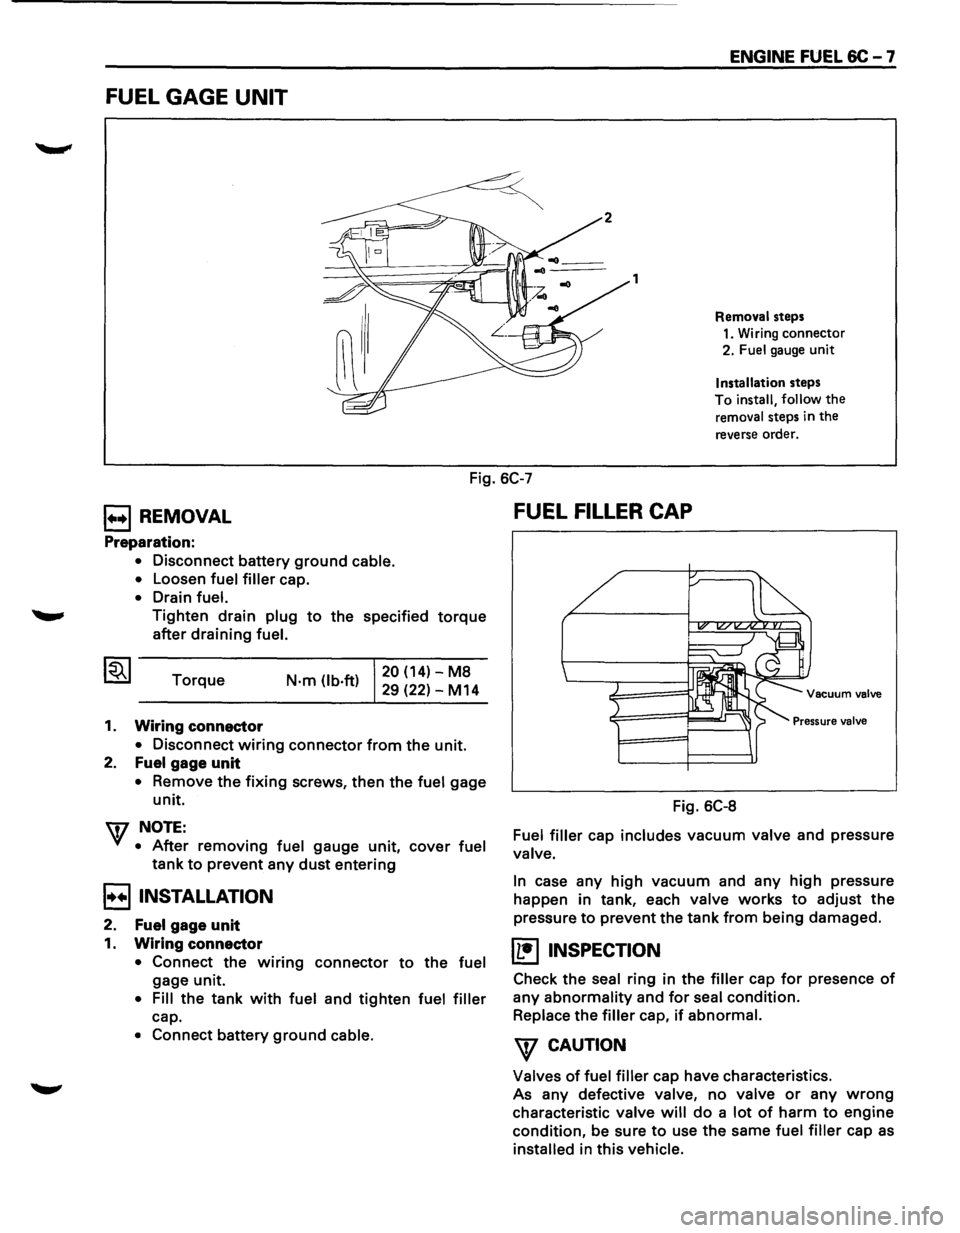
FUEL GAGE UNIT
1
ENGINE FUEL 6C - 7
Removal steps
1. Wiring connector
2. Fuel gauge unit
Installation steps
To
install, follow the
removal steps in the
reverse order.
Fig. 6C-7
E3REMOVAL ~F_U_E_L_F_IL_L_ER __ C_A_P ____________ ~
Preparation:
• Disconnect battery ground cable.
•
Loosen fuel filler cap.
• Drain fuel.
Tighten drain plug to the specified torque
after draining fuel.
Torque
1. Wiring connector
N-m (lb·ft) 20 (14)-M8
29 (22)-M14
• Disconnect wiring connector from the unit.
2. Fuel
gage unit
• Remove the fixing screws, then the fuel gage
unit.
w NOTE:
• After removing fuel gauge unit, cover fuel
tank to prevent any dust entering
B INSTALLATION
2. Fuel gage unit
1. Wiring connector
• Connect the wiring connector to the fuel
gage unit.
• Fill the tank with fuel and tighten fuel filler
cap.
• Connect battery ground cable.
Vacuum valve
Pressure valve
Fig. 6C-8
Fuel filler cap includes vacuum valve and pressure
valve.
In
case any high vacuum and any high pressure
happen in tank, each
valve works to adjust the
pressure to prevent the tank from being damaged.
(1!] INSPECTION
Check the seal ring in the filler cap for presence of
any abnormality and for seal condition.
Replace the filler cap, if abnormal.
\f CAUTION
Valves of fuel filler cap have characteristics.
As any defective valve, no valve or any wrong
characteristic valve will do a lot of harm to engine
condition, be sure to use the same fuel filler cap as
installed in this vehicle.