mirror ISUZU TROOPER 1995 User Guide
[x] Cancel search | Manufacturer: ISUZU, Model Year: 1995, Model line: TROOPER, Model: ISUZU TROOPER 1995Pages: 1928
Page 1445 of 1928
-n ce· 0) I w 0 N
(
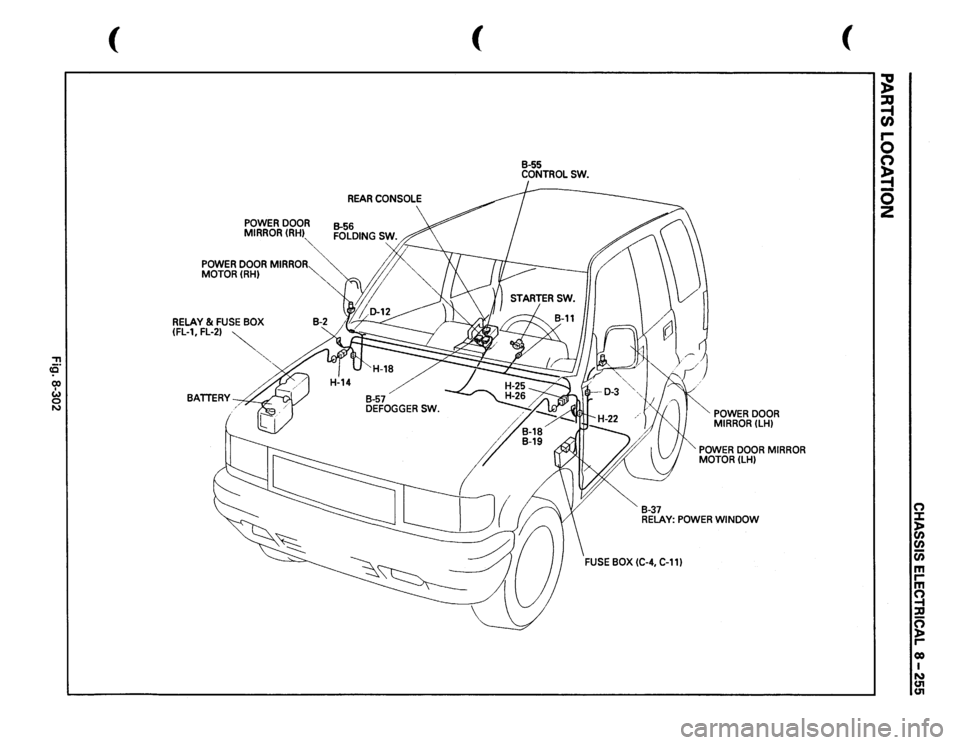
POWER
DOOR
MIRROR(RHI
""~
POWER
DOOR
MIRROR
MOTOR(RH)
RELAY
& FUSE
BOX
(FL-1,
FL-2)
~
"",
BATTERY~
(
REAR
CONSOLE
B-55 CONTROLSW.
B-37
POWER
DOOR
MIRROR
(LH)
". POWER
DOOR
MIRROR
MOTOR(LH)
RELAY:
POWER
WINDOW
(
~ ~ r-0 (') ~ -0 z
(") ::I: )> en
en iii m rm ~ :a n )> r-eo I N U'1 U'1
Page 1448 of 1928
8 -258 CHASSIS ELECTRICAL
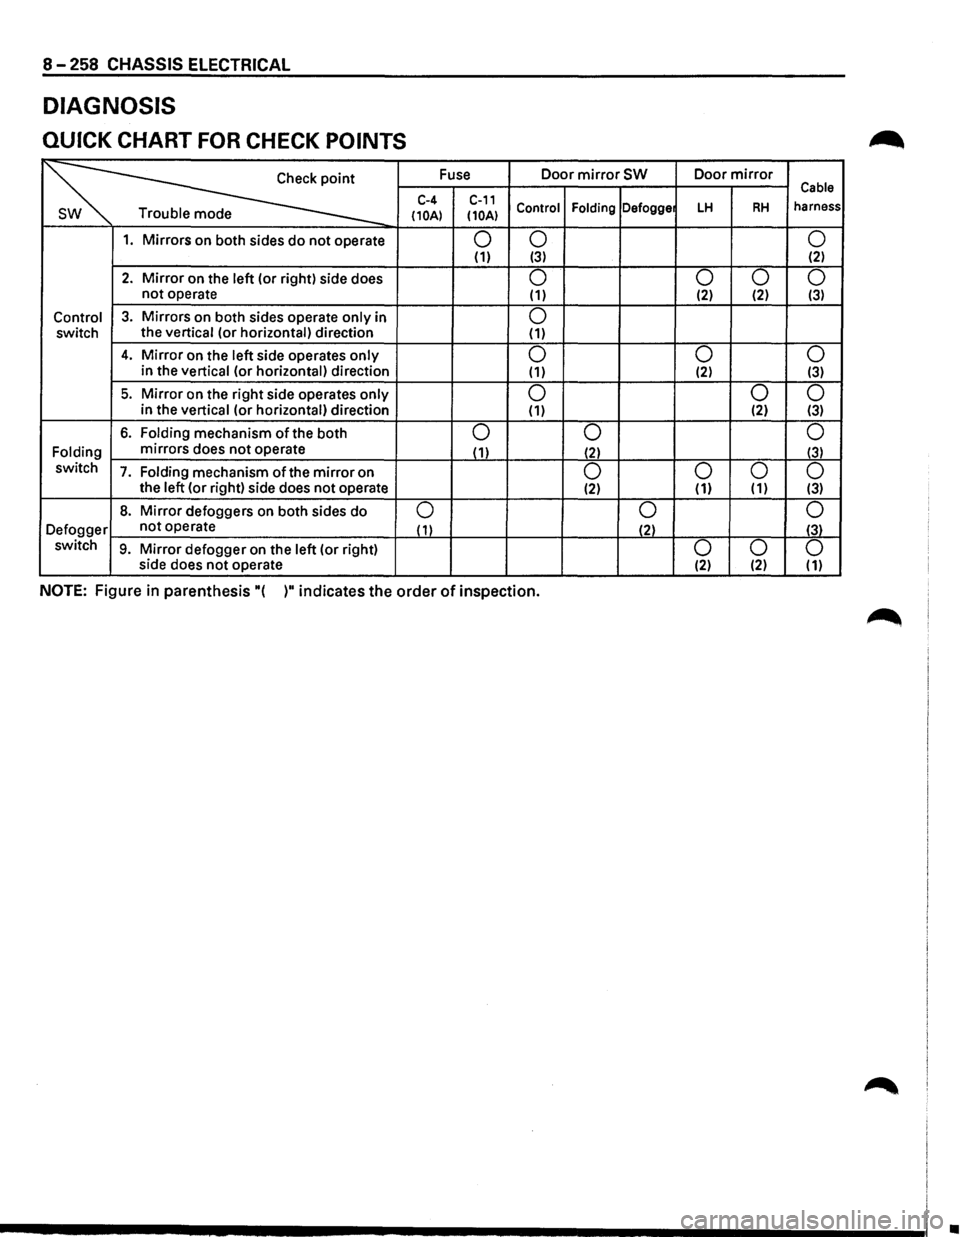
DIAGNOSIS
QUICK CHART FOR CHECK POINTS
~
Fuse Door mirror SW Door mirror Cable C-4 C-11 Control Folding Defogge LH RH harness Trouble mode (10A) (10A)
1. Mirrors on both sides do not operate 0 0
0 (1) (3) (2)
2. Mirror on the left (or right) side does 0 0 0 0 not operate (1) (2) (2) (3)
Control 3. Mirrors on both sides operate only in 0 switch the vertical
(or horizontal) direction (1)
4. Mirror on the left side operates only 0 0 0 in
the vertical (or horizontal) direction (1) (2) (3)
5. Mirror on
the right side operates only 0 0 0 in the vertical (or horizontal) direction (1) (2) (3)
6. Folding
mechanism of the both 0 0 0
Folding mirrors
does not operate (1)
(2) (3)
switch 7. Folding mechanism ofthe mirror on 0 0
0
0 the left (or right) side does not operate (2) (1) (1) (3)
8. Mirror defoggers
on both sides do 0 0
0
Defogger not
operate ( 1) (2) (3)
switch 9. Mirror defogger on the left (or right) 0 0
0 side does not operate (2) (2) (1)
NOTE: Figure in parenthesis "( )" indicates the order of inspection.
•
Page 1449 of 1928
CHASSIS ELECTRICAL 8-259
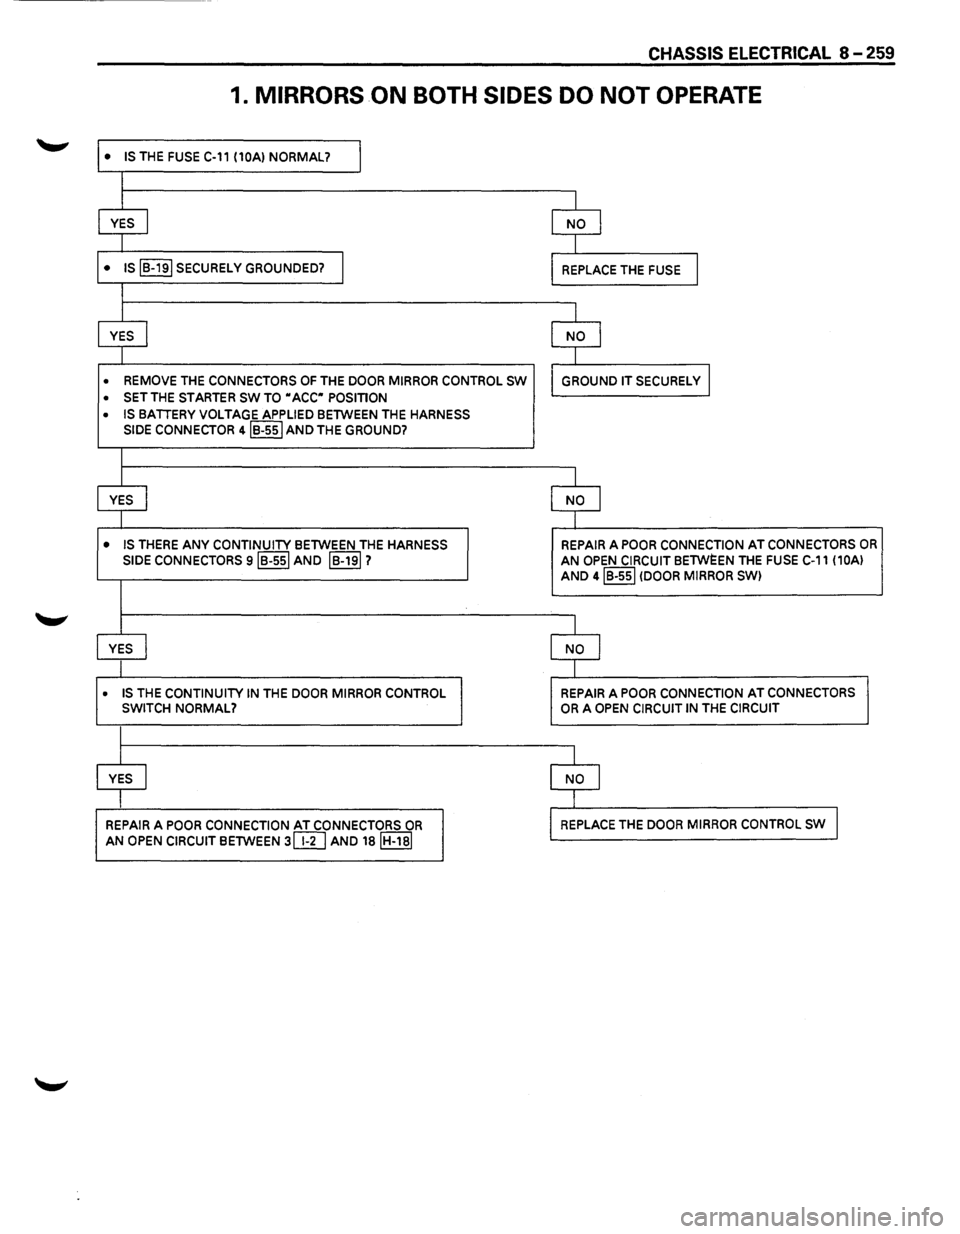
1. MIRRORS ON BOTH SIDES DO NOT OPERATE
• IS THE FUSE C-11 (10AI NORMAL? I
I
YES
I NO I
I
• IS IB-191 SECURELY GROUNDED? I REPLACE THE FUSE I
I
YES
j NO I
I
• REMOVE THE CONNECTORS OF THE DOOR MIRROR CONTROL SW GROUND IT SECURELY I
• SET THE STARTER SW TO "ACC" POSITION
• IS BATTERY VOLTAGE APPLIED BETWEEN THE HARNESS
SIDE
CONNECTOR 4IB-55I AND THE GROUND?
I
YES
j NO I
I
• IS THERE ANY CONTINUITY BETWEEN THE HARNESS REPAIR A POOR CONNECTION AT CONNECTORS OR
SIDE CONNECTORS siB-551 AND IB-191? AN OPEN CIRCUIT BETWEEN THE FUSE C-11 (10AI
AND 4IB-55I (DOOR MIRROR SWI
I
YES
I NO I
I
• IS THE CONTINUITY IN THE DOOR MIRROR CONTROL REPAIR A POOR CONNECTION AT CONNECTORS
SWITCH NORMAL? OR A OPEN CIRCUIT IN THE CIRCUIT
I
YES
I NO I
I
REPAIR
A POOR CONNECTION AT CONNECTORS OR REPLACE THE DOOR MIRROR CONTROL SW I
AN OPEN CIRCUIT BETWEEN 3@] AND 18IH-18I
Page 1450 of 1928
8-260 CHASSIS ELECTRICAL
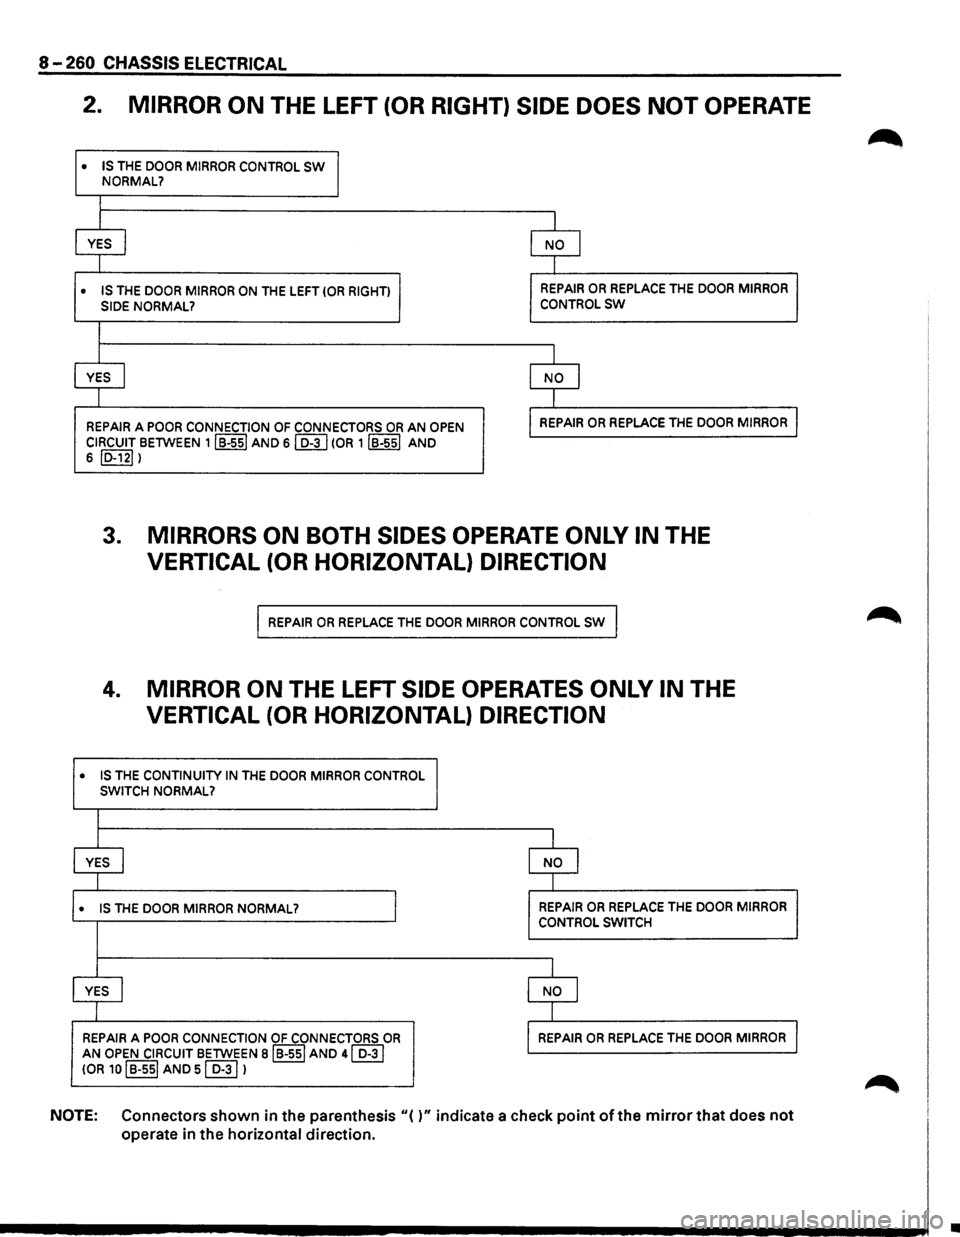
2. MIRROR ON THE LEFT (OR RIGHT) SIDE DOES NOT OPERATE
• IS THE DOOR MIRROR CONTROL SW
•
NORMAL?
I
I
I
YES I NO I
I I
IS THE DOOR MIRROR ON THE LEFT (OR RIGHT) REPAIR OR REPLACE THE DOOR MIRROR
SIDE NORMAL? CONTROLSW
I
I I
YES I NO I
1 I
REPAIR A POOR CONNECTION OF CONNECTORS OR AN OPEN REPAIR OR REPLACE THE DOOR MIRROR
CIRCUIT BETWEEN 1IB-ssl AND sl D-3 I (OR 1 IB-551 AND
6 ID-121 I
3. MIRRORS ON BOTH SIDES OPERATE ONLY IN THE
VERTICAL (OR HORIZONTAL) DIRECTION
REPAIR OR REPLACE THE DOOR MIRROR CONTROL SW
4. MIRROR ON THE LEFT SIDE OPERATES ONLY IN THE
VERTICAL (OR HORIZONTAL) DIRECTION
• IS THE CONTINUITY IN THE DOOR MIRROR CONTROL SWITCH NORMAL?
I
YES I NO I
I
• IS THE DOOR MIRROR NORMAL? I REPAIR OR REPLACE THE DOOR MIRROR
CONTROL SWITCH
I
YES I NO I
I
REPAIR A POOR CONNECTION OF CONNECTORS OR REPAIR OR REPLACE THE DOOR MIRROR
AN OPEN CIRCUIT BETWEEN BIB-551 AND 41 D-31
!OR 10 I B-ssl AND sl D-31 1
NOTE: Connectors shown in the parenthesis "( )" indicate a check point of the mirror that does not
operate in the horizontal direction.
•
Page 1451 of 1928
CHASSIS ELECTRICAL 8-261
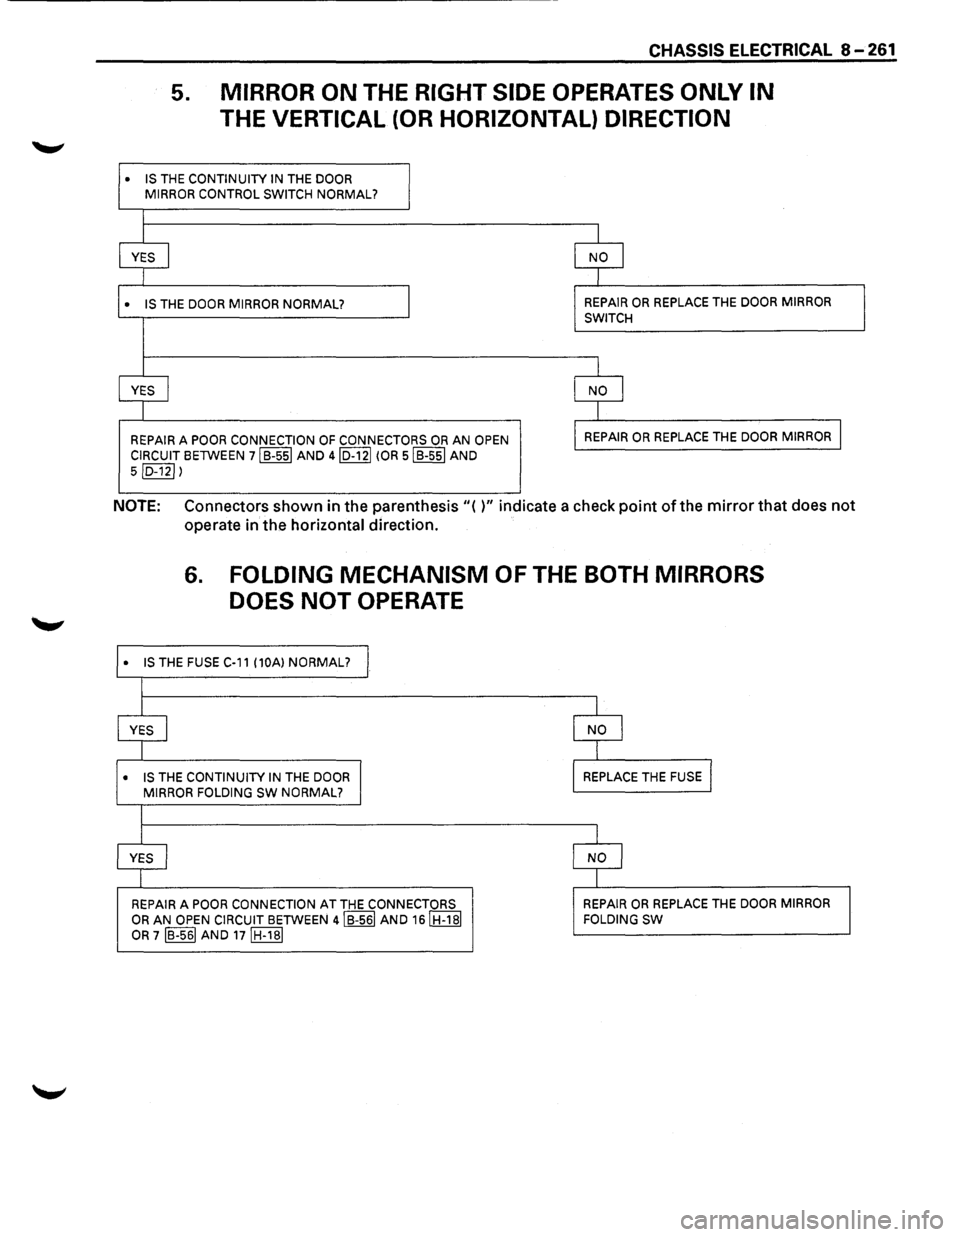
5. MIRROR ON THE RIGHT SIDE OPERATES ONLY IN
THE VERTICAL (OR HORIZONTAL) DIRECTION
• IS THE CONTINUITY IN THE DOOR
MIRROR CONTROL SWITCH NORMAL?
l
YES I NO I
1
• IS THE DOOR MIRROR NORMAL? REPAIR OR REPLACE THE DOOR MIRROR
SWITCH
I
YES
I NO I
1
REPAIR A POOR CONNECTION OF CONNECTORS OR AN OPEN REPAIR OR REPLACE THE DOOR
MIRROR I
CIRCUIT BETWEEN 7IB-55I AND 4ID-12I (OR 5IB-55I AND
5ID-12I l
NOTE: Connectors shown in the parenthesis"( )" indicate a check point of the mirror that does not
operate in the horizontal direction.
•
•
6. FOLDING MECHANISM OF THE BOTH MIRRORS
DOES NOT
OPERATE
IS THE FUSE C-11 (10A) NORMAL? I
I
L I
YES
I NO I
I T
IS THE CONTINUITY IN THE DOOR I MIRROR FOLDING SW NORMAL? REPLACE THE
FUSE l
I
I l
YES j NO l
I I
REPAIR
A POOR CONNECTION AT THE CONNECTORS REPAIR OR REPLACE THE DOOR
MIRROR
OR AN OPEN CIRCUIT BETWEEN 4IB-56I AND 16IH-1BI
OR 7 IB-561 AND 17IH-1BI FOLDING
SW
Page 1452 of 1928
8 -262 CHASSIS ELECTRICAL
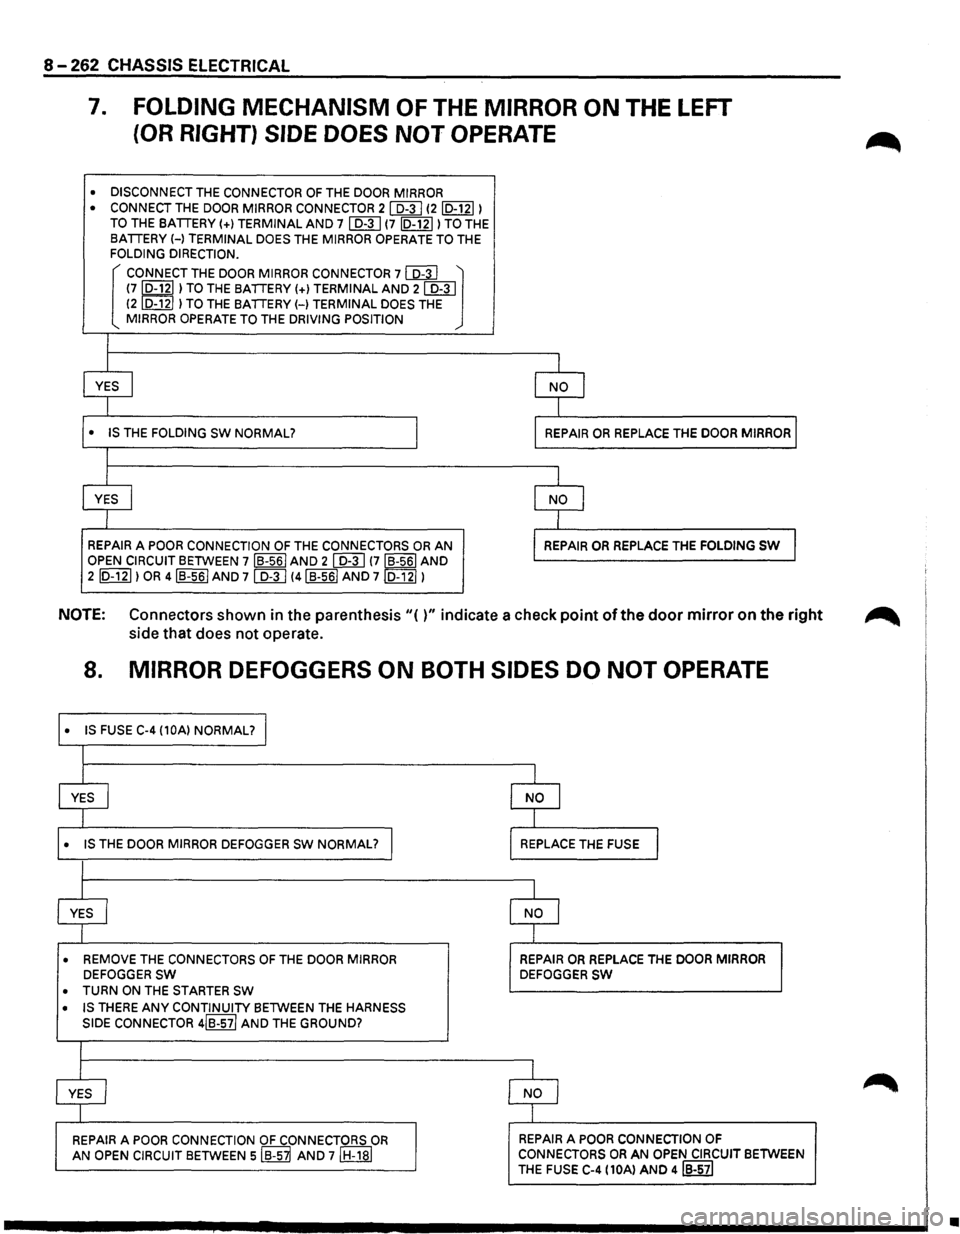
7. FOLDING MECHANISM OF THE MIRROR ON THE LEFT
(OR RIGHT) SIDE DOES NOT OPERATE
• DISCONNECT THE CONNECTOR OF THE DOOR MIRROR
• CONNECT THE DOOR MIRROR CONNECTOR 21 D-31 12ID-12I) TO THE BATTERY(+) TERMINAL AND 7 I D-3 I (7 ID-121) TO THE
BATTERY H TERMINAL DOES THE MIRROR OPERATE TO THE FOLDING DIRECTION.
[ CONNECT THE DOOR MIRROR CONNECTOR 7 co:3J ~ (7,D-121 ) TO THE BATTERY(+) TERMINAL AND 21 D-31 (2 D-12 ) TO THE BATTERY H TERMINAL DOES THE MIRROR OPERATE TO THE DRIVING POSITION
I
I
1
YES I I NO I
I I
• IS THE FOLDING SW NORMAL? I I REPAIR OR REPLACE
THE DOOR MIRROR I
I
I
1
YES I l NO I
I J
REPAIR A POOR CONNECTION OF THE CONNECTORS OR AN l REPAIR OR REPLACE THE FOLDING SW J OPEN CIRCUIT BETWEEN 7 IB-561 AND 2 I D-3 I !7IB-56I AND
2 ID-121) OR 4IB-56I AND 71 D-31 !4IB-56I AND 7ID-12I)
NOTE: Connectors shown in the parenthesis"()" indicate a check point of the door mirror on the right ~
side that does not operate.
8. MIRROR DEFOGGERS ON BOTH SIDES DO NOT OPERATE
• IS FUSE C-4 (10A) NORMAL? J
I
I I
YES
I NO I
I t
• IS THE DOOR MIRROR DEFOGGER sw NORMAL? I REPLACE THE FUSE I
I
l 1
YES I NO I
I I
• REMOVE THE CONNECTORS OF THE DOOR MIRROR REPAIR OR REPLACE THE DOOR MIRROR DEFOGGER SW DEFOGGER SW
• TURN ON THE STARTER SW
• IS THERE ANY CONTINUITY BETWEEN THE HARNESS
SIDE
CONNECTOR 4IB-57/ AND THE GROUND?
I
I
1
YES I NO I
I I
REPAIR A POOR CONNECTION OF CONNECTORS OR REPAIR A POOR CONNECTION OF
AN OPEN CIRCUIT BETWEEN siB-S~ AND 7IH-18I CONNECTORS OR AN OPEN CIRCUIT BETWEEN
THE
FUSE C-4 (10Al AND 4IB-57I
•
Page 1453 of 1928
CHASSIS ELECTRICAL 8-263
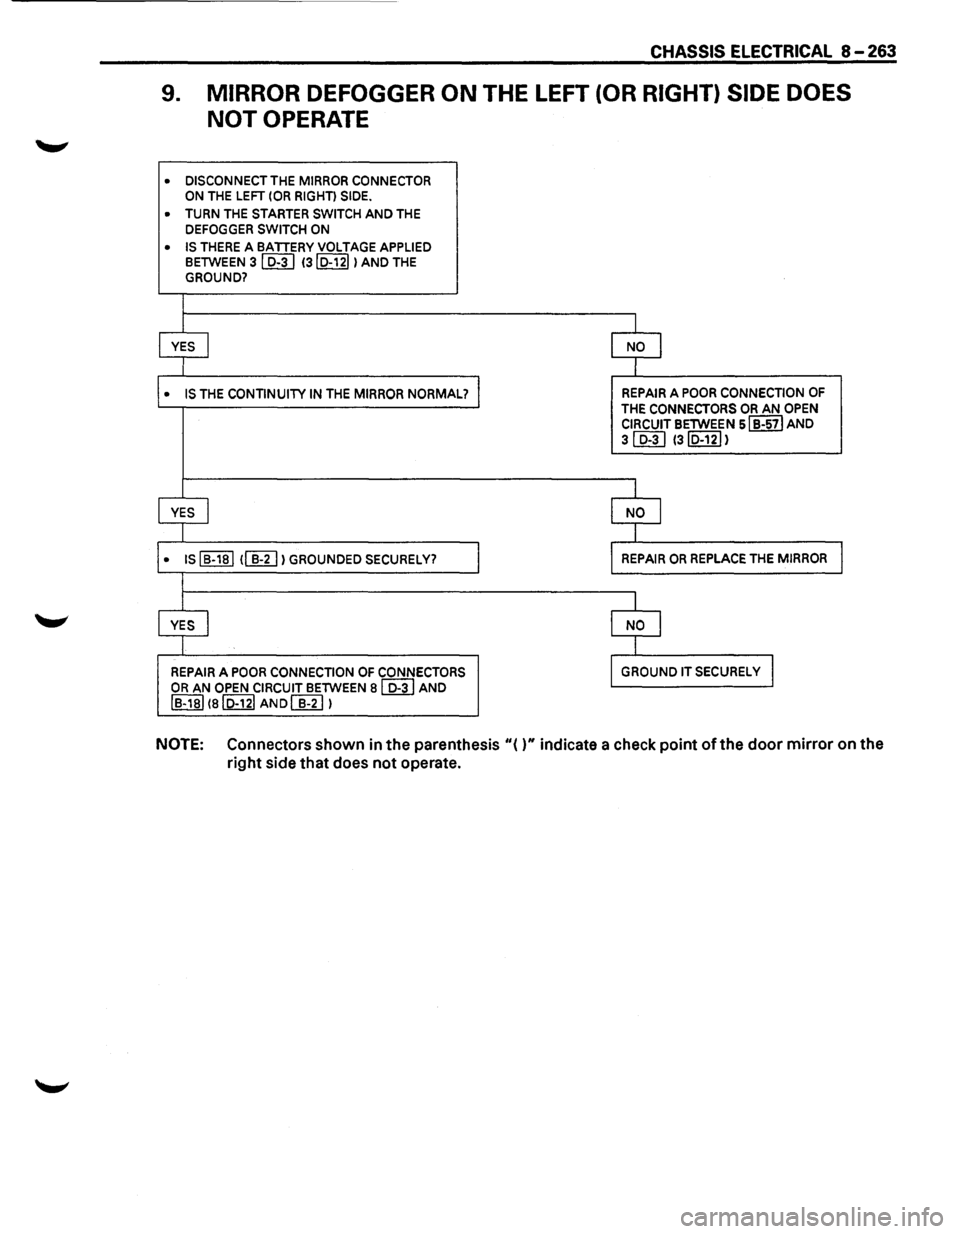
9. MIRROR DEFOGGER ON THE LEFT (OR RIGHT) SIDE DOES
NOT OPERATE
• DISCONNECT THE MIRROR CONNECTOR ON THE LEFT (OR RIGHT) SIDE.
• TURN THE STARTER SWITCH AND THE
DEFOGGER SWITCH ON
• IS THERE A BATTERY VOLTAGE APPLIED BETWEEN 31 D-31 13ID-12I I AND THE GROUND?
I
YES I NO I
l
• IS THE CONTINUITY IN THE MIRROR NORMAL? REPAIR A POOR CONNECTION OF
THE CONNECTORS OR AN OPEN
CIRCUIT BETWEEN sl B-571 AND
31 D-31 13ID-12I 1
I
YES I NO I
J
• IS I B-181 1(&[] I GROUNDED SECURELY? REPAIR OR REPLACE THE MIRROR
I
YES I NO I
I
REPAIR A POOR CONNECTION OF CONNECTORS GROUND IT SECURELY I
OR AN OPEN CIRCUIT BETWEEN al D-3 I AND
IB-1BI(aiD-12I AND~ 1
NOTE: Connectors shown in the parenthesis"()" indicate a check point of the door mirror on the
right side
that does not operate.
Page 1454 of 1928
8-264 CHASSIS ELECTRICAL
STARTER SWITCH
Refer to "START AND CHARGING" in this section.
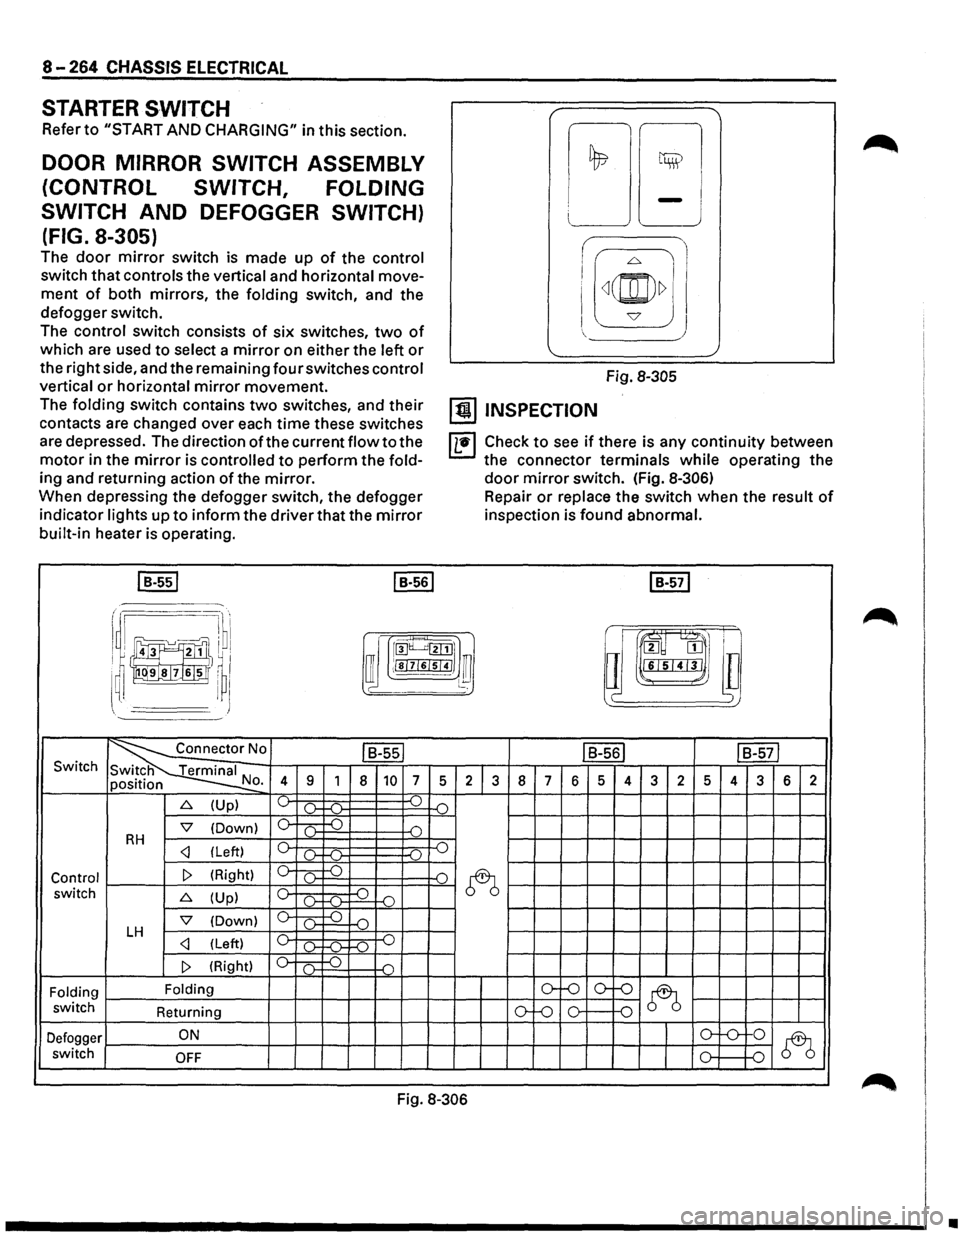
DOOR MIRROR SWITCH ASSEMBLY
(CONTROL SWITCH, FOLDING
SWITCH
AND DEFOGGER SWITCH)
(FIG. 8-305)
The door mirror switch is made up of the control
switch that controls the vertical and horizontal move
ment of both mirrors, the folding switch, and the
defogger switch.
The control switch consists of six switches, two of
which are used to select a mirror on either the left or
the right side, and the remaining four switches control
vertical or horizontal mirror movement.
The folding switch contains two switches, and their
contacts are changed over each time these switches
are depressed. The direction of the current flow to the
motor in the mirror is controlled to perform the fold
ing and returning action of the mirror.
When depressing the defogger switch, the defogger
indicator lights up to inform the driver that the mirror
built-in heater is operating.
I B-551 I B-561
i I I
!;l ~
LJ -J
I
I[~(@)~] J
Fig. 8-305
[!) INSPECTION
IL•I Check to see if there is any continuity between
the connector terminals while operating the
door mirror switch. (Fig. 8-306)
Repair or replace the switch when the result of
inspection is found abnormal.
I B-571
r .·~·· I ~ru·l
~~J!]}I ~ rroo~~l]
i !)~~1,1
a m
I ~ I ffi ;!sl7l6lsl41 ~ l~ lll"L•I'J'I•J ~~~
~' I J )
~0 ls-ssl IB-561 IB-571 Switch
N 4 9 1 8 10 7 5 2 3 8 7 6 5 4 3 2 5 4 3 6 2 o.
6. (Up) ~ ).. ...( ) .(")
'7 (Down) 0 c .) D RH c _.)
~ switch 6. (Up) c ~ -o ()-f-(l-
'7 (Down) 0 ( ) D LH c _.)
Folding Folding o-f-0 o--()
~ switch
Returning ()-Lo 0 0
Defogger ON o-'-0-
0
~ switch OFF 0 D
Fig. 8-306
•
Page 1455 of 1928
CHASSIS ELECTRICAL 8-265
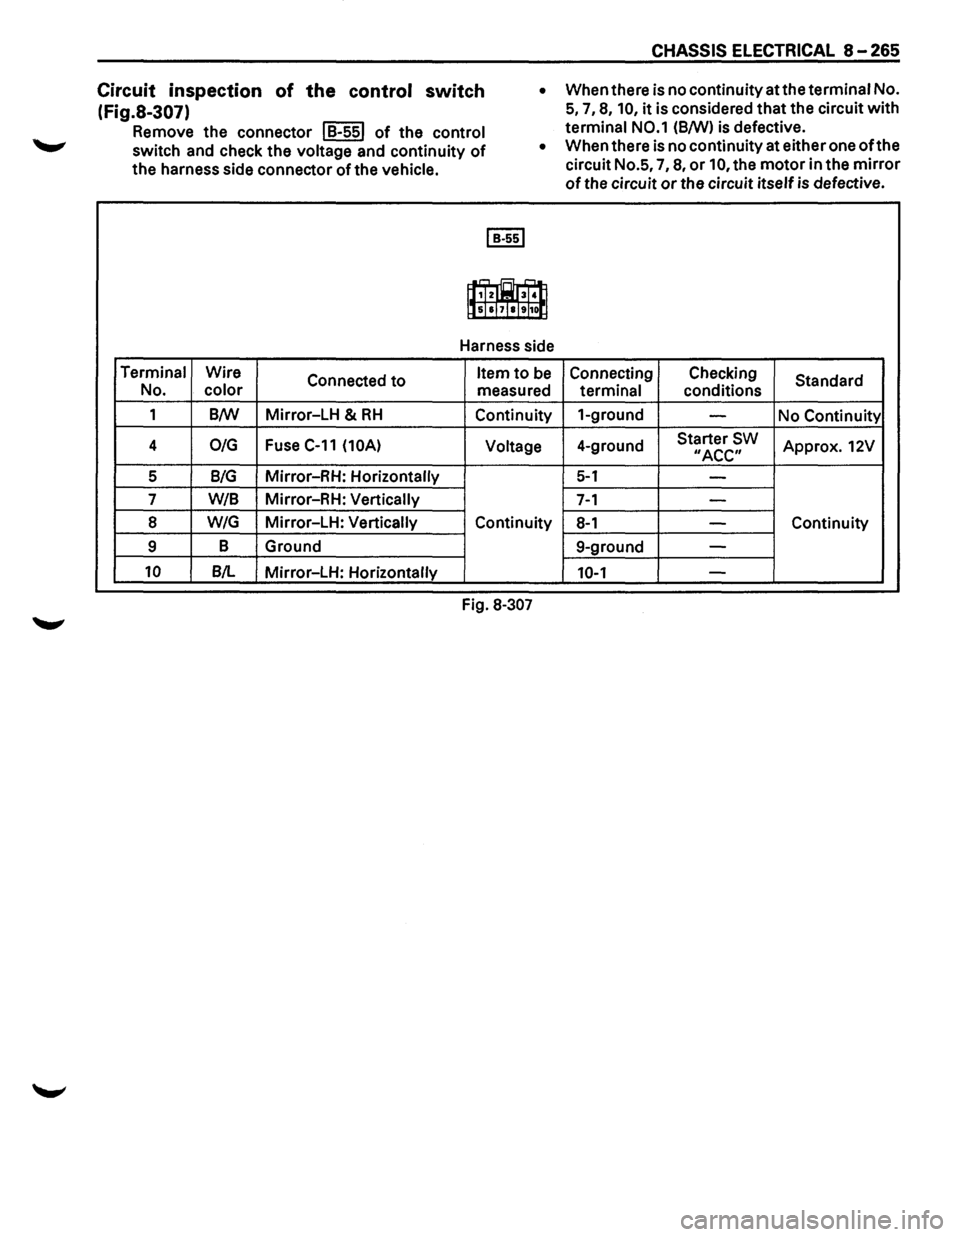
Circuit inspection of the control switch
(Fig.S-307)
Remove the connector I B-55l of the control
switch and check the voltage and continuity of
the harness side connector of the vehicle. •
When
there is no continuity at the terminal No.
5, 7, 8, 10, it is considered that the circuit with
terminal N0.1 (8/W) is defective.
Terminal Wire
Connected to No. color
1 B/W Mirror-LH & RH
4 0/G Fuse C-11 (10A)
5 B/G Mirror-RH: Horizontally
7
W/8 Mirror-RH: Vertically
8 W/G Mirror-LH: Vertically
9 B
Ground
10 B/L Mirror-LH: Horizontally •
When
there is no continuity at either one of the
circuit No.5,
7, 8, or 10, the motor in the mirror
of the circuit or the circuit itself is defective.
I B·55l
,...., = ....,,
1f,Tz003T•ll lls]sl7laltl1o[j
Harness side
Item to be Connecting Checking
Standard
measured
terminal conditions
Continuity 1-ground
-No
Continuity
Voltage 4-ground Starter SW Approx. 12V "ACC"
5-1 -
7-1 -
Continuity 8-1 -Continuity
9-ground
-
10-1 -
Fig. 8-307
Page 1456 of 1928
8-266 CHASSIS ELECTRICAL
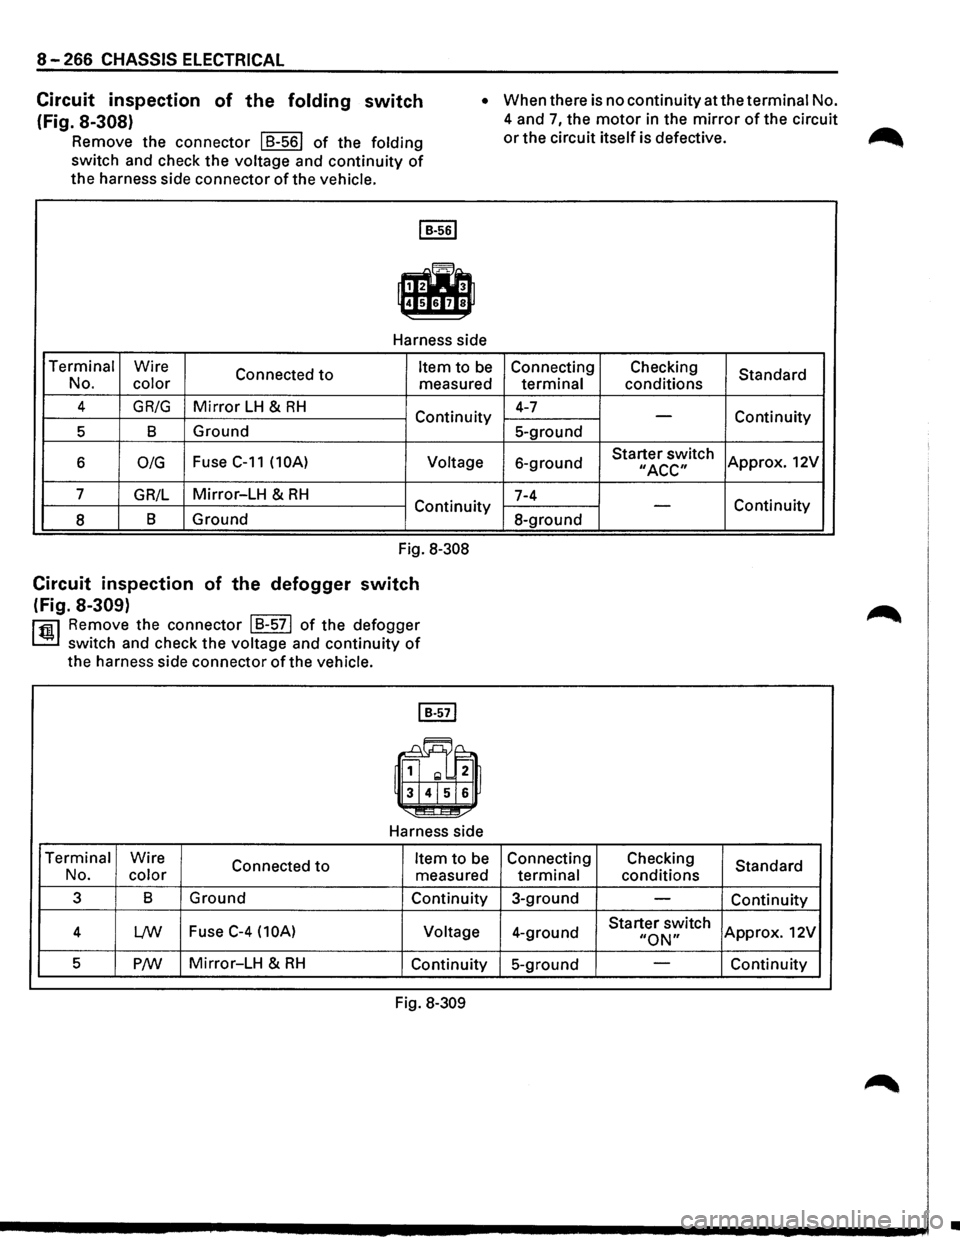
Circuit inspection of the folding switch
(Fig. 8-308)
Remove the connector I 8-561 of the folding
switch and check the voltage and
continuity of
the harness side connector of the vehicle.
• When there is no continuity at the terminal No.
4 and
7, the motor in the mirror of the circuit
or the circuit itself is defective.
I B·56l
f.lh
Harness side
Terminal Wire
Connected
to Item to be Connecting
No. color
measured terminal
4
GR/G Mirror LH & RH Continuity 4-7
5 8 Ground 5-ground
6
0/G Fuse C-11 (10A) Voltage
6-ground
7
GR/L Mirror-LH & RH 7-4
Continuity
8 8
Ground
8-ground
Fig. 8-308
Circuit inspection of the defogger switch
(Fig. 8-309)
rfiil Remove the connector I 8-571 of the defogger
~ switch and check the voltage and continuity of
the harness side connector ofthe vehicle.
Harness side
Terminal Wire
Connected
to No. color
Item to be Connecting
measured terminal
3 8
Ground
Continuity 3-ground
4
L/W Fuse C-4 (10A) Voltage
4-ground
5
P/W Mirror-LH & RH Continuity 5-ground
Fig. 8-309 Checking
conditions
-
Starter switch II ACC"
-
Checking
conditions
Starter switch
"ON"
Standard
Continuity
Approx. 12V
Continuity
Standard
Continuity
Approx. 12V
Continuity
•