oil ISUZU TROOPER 1995 User Guide
[x] Cancel search | Manufacturer: ISUZU, Model Year: 1995, Model line: TROOPER, Model: ISUZU TROOPER 1995Pages: 1928
Page 57 of 1928
The refrigeration cycle includes the following four
processes as the refrigerant changes repeatedly
from liquid to gas and back to liquid while circulat
ing.
EVAPORATION
The refrigerant is changed from a liquid to a gas in
side
the evaporator. The refrigerant mist that enters
the evaporator vaporizes readily. The liquid refrige
rant removes
the required quantity of heat (latent
heat of vaporization) from the air around the evap
orator core cooling fins and rapidly vaporizes.
Removing the heat cools the air, which is then
radiated
from the fins and lowers the temperature of
the air inside the vehicle.
The refrigerant liquid sent from the expansion valve
and the vaporized refrigerant gas are both present
inside the
evaporator and the liquid is converted to
gas.
With this change from liquid to gas, the pressure
inside
the evaporator must be kept low enough for
vaporization to occur at a lower temperature.
Because of that, the vaporized refrigerant is sucked
into the compressor.
COMPRESSION
The refrigerant is compressed by the compressor
until it is easily liquefied at normal temperature.
The vaporized
refrigerant in the evaporator is sucked
into the compressor. This action maintains the
refrigerant inside the evaporator at a low pressure
so
that it can easily vaporize, even at low tempera
tures close to ooc (32°F).
Also, the refrigerant sucked into the compressor is
compressed inside the
cylinder to increase the
pressure and temperature to values such that the
refrigerant can easily liquefy at normal ambient
temperatures.
CONDENSATION
The refrigerant inside the condenser is cooled by the
outside air and changes from gas to liquid.
The high temperature, high pressure gas coming
from the compressor is cooled and liquefied by the
condenser with outside air and accumulated in the
receiver/drier. The heat radiated to the outside air by
the high temperature, high pressure gas in the
compressor is called heat of condensation. This is
the total quantity of heat (heat of vaporization) the
refrigerant removes
from the vehicle interior via the
evaporator and the work (calculated as the quantity
of heat) performed for compression.
'-' EXPANSION
The expansion valve lowers the pressure of the
refrigerant liquid so that it can easily vaporize.
AIR CONDITIONING 1 B -3
The process of lowering the pressure to encourage
vaporization before the
liquefied refrigerant is sent
to the evaporator is called expansion. In addition,
the expansion valve controls the flow rate of the
refrigerant liquid while decreasing the pressure.
That is, the quantity of refrigerant liquid vaporized
inside
the evaporator is determined by the quantity
of heat which must be removed at a prescribed
vaporization temperature.
It is important that the
quantity of refrigerant be controlled to exactly the
right value.
COMPRESSOR
It compressor performs two main functions:
It compresses low-pressure and low-temperature
refrigerant vapor from the evaporator into high
pressure and high-temperature
refrigerant vapor to
the condenser. And it pumps refrigerant and
refrigerant
oil through the air conditioning system.
This vehicle is equipped with five-vane rotary com
pressor.
The
thermo sensor is installed to the front head of
the compressor to protect it by stopping its
operation when the refrigerant gas is insufficient or
when the temperature is abnormally high.
• OFF ...... 160 ±soc (320.0 ± 9.0°F)
• ON
...... 135 ±soc (27S.O ± 9.0°F)
The specified amount of the compressor oil is 1SOcc
(S.O fl.oz.).
The oil used in the HFC-134a system compressor
differs from that used in R-12 systems.
Also, compressor oil to be used varies according to
the compressor model. Be sure to avoid mixing two
or more different types of oil.
If the wrong oil is used, lubrication will be poor and
the compressor will seize or malfunction.
The magnetic clutch connector is a waterproof
type.
MAGNETIC CLUTCH
The compressor is driven by the drive belt from the
crank
pulley of the engine. If the compressor is ac
tivated each
time the engine is started, this causes
too much load to the engine. The magnetic clutch
transmits the power from the engine to the com
pressor and activates it when the air conditioning is
"ON". Also, it cuts off the power from the engine to
the compressor when the air conditioning is "OFF".
(Magnetic clutch repair procedure can be found in
Section 1 D.)
Page 63 of 1928
DIAGNOSIS
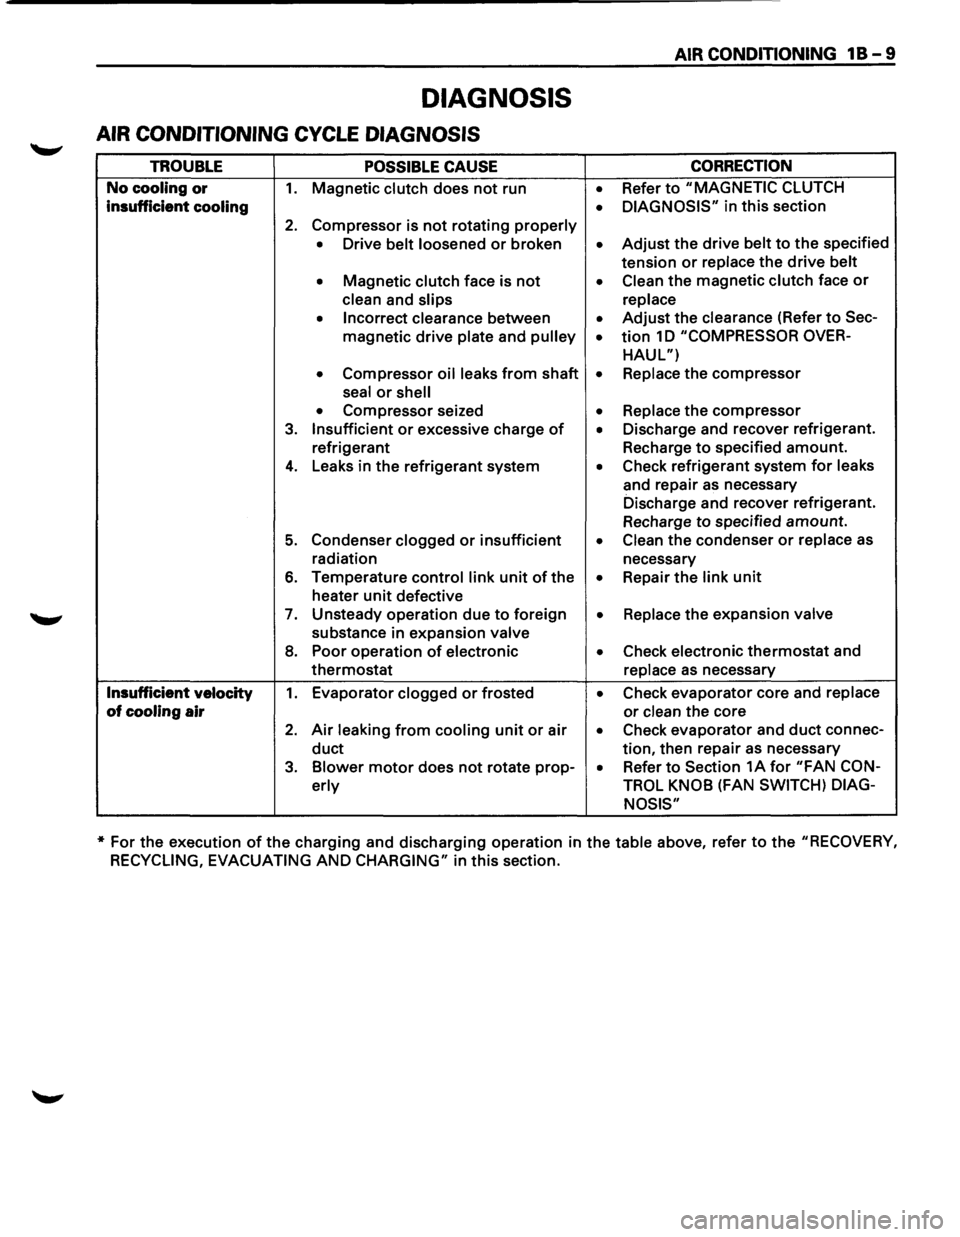
AIR CONDITIONING CYCLE DIAGNOSIS
TROUBLE POSSIBLE CAUSE
No cooling or 1. Magnetic clutch does not run
insufficient cooling
2. Compressor is not rotating properly
• Drive belt loosened or broken
• Magnetic clutch face is not
clean and slips
• Incorrect clearance between
magnetic
drive plate and pulley
• Compressor oil leaks from shaft
seal
or shell
• Compressor seized
3. Insufficient or excessive charge of
refrigerant
4. Leaks in the refrigerant system
5. Condenser clogged or insufficient
radiation
6. Temperature control link unit of the
heater
unit defective
7. Unsteady operation due to foreign
substance in expansion valve
8. Poor operation of electronic
thermostat
Insufficient velocity 1. Evaporator clogged or frosted
of cooling air
2. Air leaking from cooling unit or air
duct
3. Blower motor does not rotate prop-
erly
AIR CONDITIONING 1 B - 9
CORRECTION
• Refer to "MAGNETIC CLUTCH
• DIAGNOSIS" in this section
• Adjust the drive belt to the specified
tension
or replace the drive belt
• Clean the magnetic clutch face or
replace
• Adjust the clearance (Refer to Sec-
• tion 1 D "COMPRESSOR OVER-
HAUL")
• Replace the compressor
• Replace the compressor
• Discharge and recover refrigerant.
Recharge
to specified amount.
• Check refrigerant system for leaks
and repair
as necessary
Discharge and recover refrigerant.
Recharge
to specified amount.
• Clean the condenser or replace as
necessary
• Repair the link unit
• Replace the expansion valve
• Check electronic thermostat and
replace
as necessary
• Check evaporator core and replace
or clean the core
• Check evaporator and duct connec-
tion, then repair as necessary
• Refer to Section 1A for "FAN CON-
TROL KNOB
(FAN SWITCH) DIAG-
NOSIS"
* For the execution of the charging and discharging operation in the table above, refer to the "RECOVERY,
RECYCLING, EVACUATING
AND CHARGING" in this section.
Page 73 of 1928
AIR CONDITIONING 1 B -19
ON-VEHICLE SERVICE
GENERAL REPAIR PROCEDURE
Precautions for Replacement or Repair of Air
Conditioning Parts
There are certain procedures, practices and pre
cautions
that should be followed when servicing air
conditioning systems:
• Keep your work area clean.
•
Always wear safety goggle and protective gloves
when working on refrigerant systems.
• Beware of the danger of carbon monoxide fumes
caused by running the engine.
• Beware of discharged refrigerant in enclosed or
improperly ventilated garages.
• Always disconnect the negative battery cable and
discharge and recover the refrigerant
whenever
repairing the air conditioning system.
• When discharging and recovering the refrigerant,
do not allow refrigerant to discharge too fast; it
will draw compressor oil out of the system.
• Keep moisture and contaminants out of the sys
tem.
When disconnecting or removing any lines
or parts, use plugs or caps to close the fittings
immediately.
Never remove the caps or plugs until the lines or
parts are reconnected or installed.
•
When disconnecting or reconnecting the lines,
use
two wrenches to support the line fitting, to
prevent from twisting or other damage.
• Always install new 0-rings whenever a connec
tion is disassembled.
• Before connecting any hoses or lines, apply new
specified compressor oil to the 0-rings.
• When removing and replacing any parts which
require discharging the refrigerant circuit, the
operations described in
this section must be per
formed in the following sequence:
1. Use the J-39500 (ACR4
: HFC-134a Refrigerant
Recovery/Recycling/Recharging/System)
or
equivalent to thoroughly discharge and re
cover
the refrigerant.
2. Remove and replace the defective part.
3.
After evacuation, charge the air conditioning
system and check for leaks.
Repair of Refrigerant Leaks
Refrigerant Line Connections
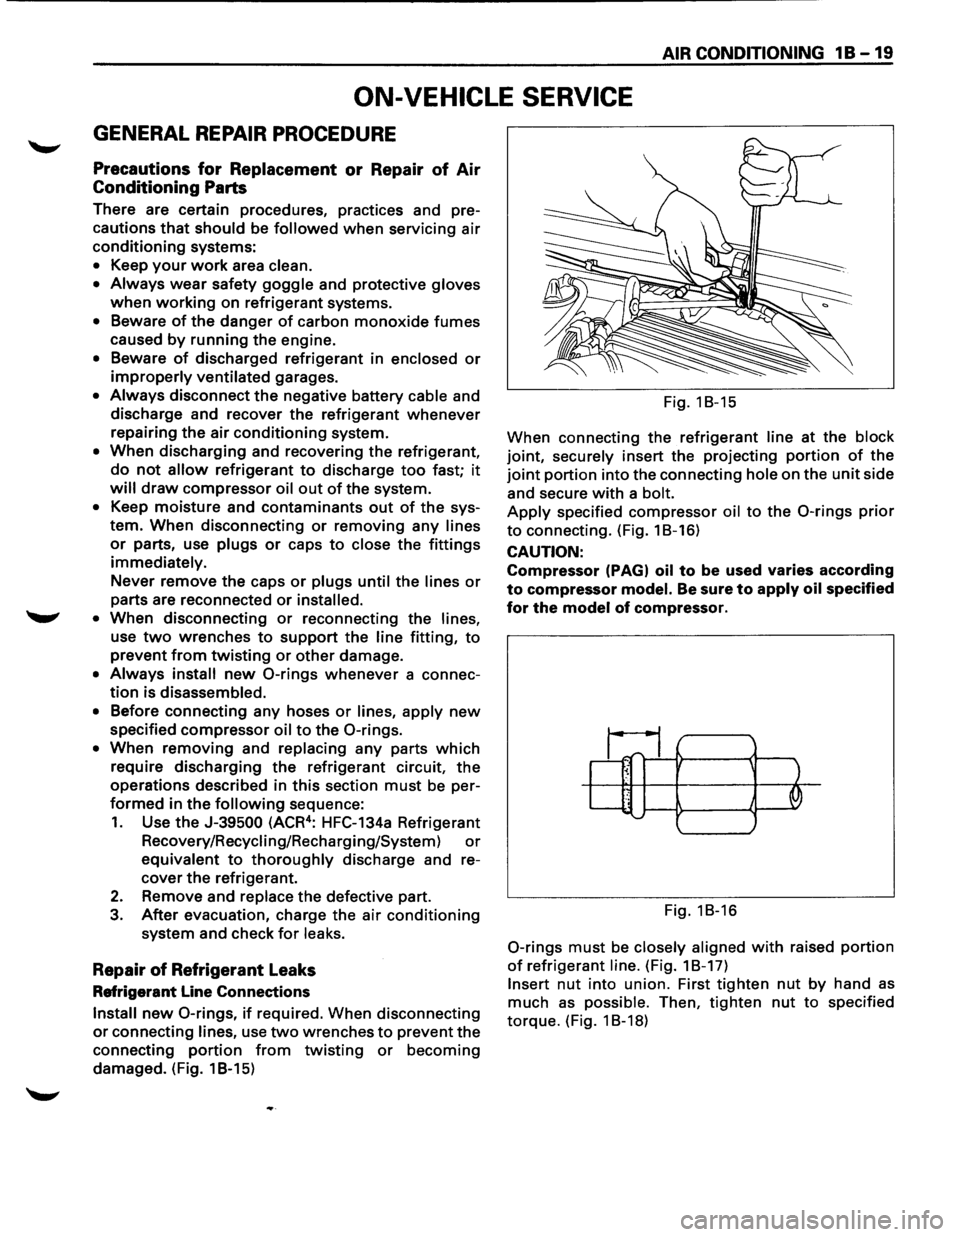
Install new 0-rings, if required. When disconnecting
or connecting lines, use two wrenches to prevent the
connecting
portion from twisting or becoming
damaged. (Fig. 1 B-15) Fig.
18-15
When connecting the refrigerant
line at the block
joint, securely insert the projecting portion of the
joint portion into the connecting hole on the unit side
and secure
with a bolt.
Apply specified compressor oil to the 0-rings prior
to connecting. (Fig. 18-16)
CAUTION:
Compressor (PAGI oil to be used varies according
to compressor model. Be sure to apply oil specified
for the model of compressor.
~1;1_ ~ ' .. J '--......
Fig. 18-16
0-rings must be closely aligned with raised portion
of refrigerant line. (Fig. 18-17)
Insert nut into union. First tighten nut by hand as
much as possible. Then, tighten nut to specified
torque. (Fig. 1 8-18)
Page 74 of 1928
1 B -20 AIR CONDITIONING
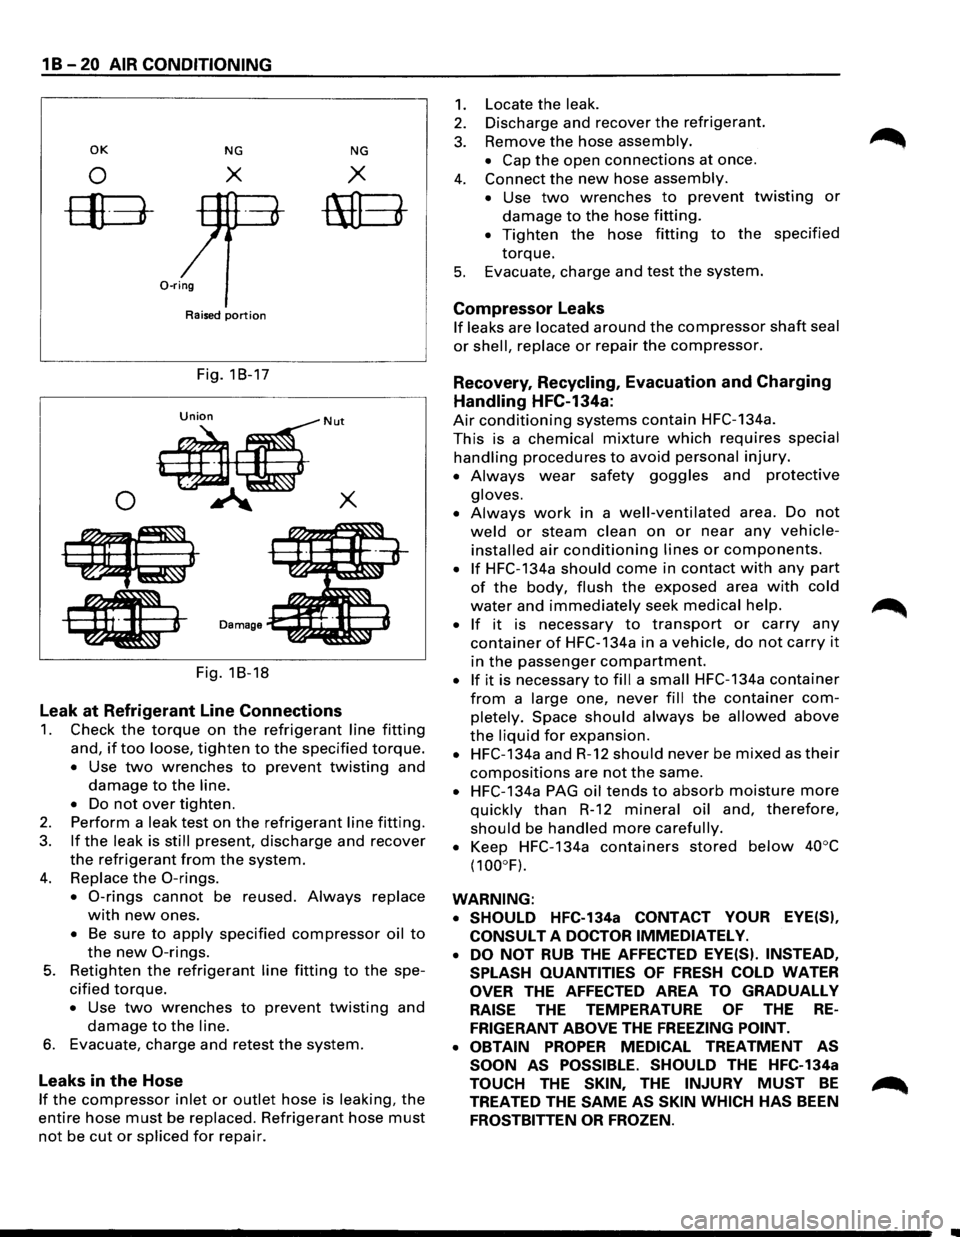
OK NG NG
0 X X
ffB-mEt
0-ring
Raised portion
Fig. 18-17
0
Fig. 18-18
Leak at Refrigerant Line Connections
1. Check the torque on the refrigerant line fitting
and, if too loose, tighten to the specified torque.
• Use two wrenches to prevent twisting and
damage to the line.
•
Do not over tighten.
2. Perform a leak test on the refrigerant line fitting.
3. If the leak is still present, discharge and recover
the refrigerant from the system.
4. Replace the 0-rings.
• 0-rings cannot be reused. Always replace
with new ones.
• Be sure to apply specified compressor oil to
the new 0-rings.
5. Retighten the refrigerant line fitting to the spe
cified torque.
• Use two wrenches to prevent twisting and
damage to the line.
6. Evacuate, charge and retest the system.
Leaks in the Hose
If the compressor inlet or outlet hose is leaking, the
entire hose must be replaced. Refrigerant hose must
not be cut or spliced for repair.
1.
2.
3.
4.
5.
Locate the leak.
Discharge and recover the refrigerant.
Remove
the hose assembly.
• Cap the open connections at once.
Connect
the new hose assembly.
•
Use two wrenches to prevent twisting or
damage to the hose fitting.
• Tighten the hose fitting to the specified
torque.
Evacuate, charge and test the system.
Compressor Leaks
If leaks are located around the compressor shaft seal
or shell, replace or repair the compressor.
Recovery, Recycling, Evacuation and Charging
Handling HFC-134a:
Air conditioning systems contain HFC-134a.
This is a chemical mixture which requires special
handling procedures to avoid personal injury.
• Always wear safety goggles and protective
gloves.
•
Always work in a well-ventilated area. Do not
weld or steam clean on or near any vehicle
installed air conditioning lines or components.
• If HFC-134a should come in contact with any part
of the body, flush the exposed area with cold
water and immediately seek medical help.
•
If it is necessary to transport or carry any
container of HFC-134a in a vehicle, do not carry it
in the passenger compartment.
• If it is necessary to fill a small HFC-134a container
from a large one, never fill the container com
pletely. Space should always be allowed above
the liquid for expansion.
• HFC-134a and R-12 should never be mixed as their
compositions are not the same.
• HFC-134a PAG oil tends to absorb moisture more
quickly than R-12 mineral oil and, therefore,
should be handled more carefully.
•
Keep HFC-134a containers stored below 40°C
(100°F).
WARNING: • SHOULD
HFC-134a CONTACT YOUR EYE(S),
CONSULT
A DOCTOR IMMEDIATELY.
•
DO NOT RUB THE AFFECTED EYE(S). INSTEAD,
SPLASH QUANTITIES
OF FRESH COLD WATER
OVER THE AFFECTED AREA TO GRADUALLY
RAISE THE TEMPERATURE OF THE RE
FRIGERANT ABOVE THE FREEZING POINT.
• OBTAIN
PROPER MEDICAL TREATMENT AS
SOON
AS POSSIBLE. SHOULD THE HFC-134a
TOUCH THE SKIN, THE INJURY MUST BE
TREATED THE SAME AS SKIN WHICH HAS BEEN
FROSTBITTEN OR FROZEN.
Page 79 of 1928
5. Refrigerant line connector
• When removing the line connector, the con
necting part
should immediately be plugged
or capped to prevent foreign matter from
being mixed into the line.
6. Compressor
l••liNSTALLATION
6. Compressor
• Tighten the compressor fixing bolts to the
specified torque.
~~~ Torque N·m (lb·ft) 19 (14)
5. Refrigerant line connector
• Tighten the refrigerant line connector fixing
bolts to the specified torque.
~~~ Torque N·m (lb.ft) 15 (11)
• 0-rings cannot be reused. Always replace
with new ones.
1~1 • Be sure to apply new compressor oil to the 0-
rings when connecting refrigerant lines.
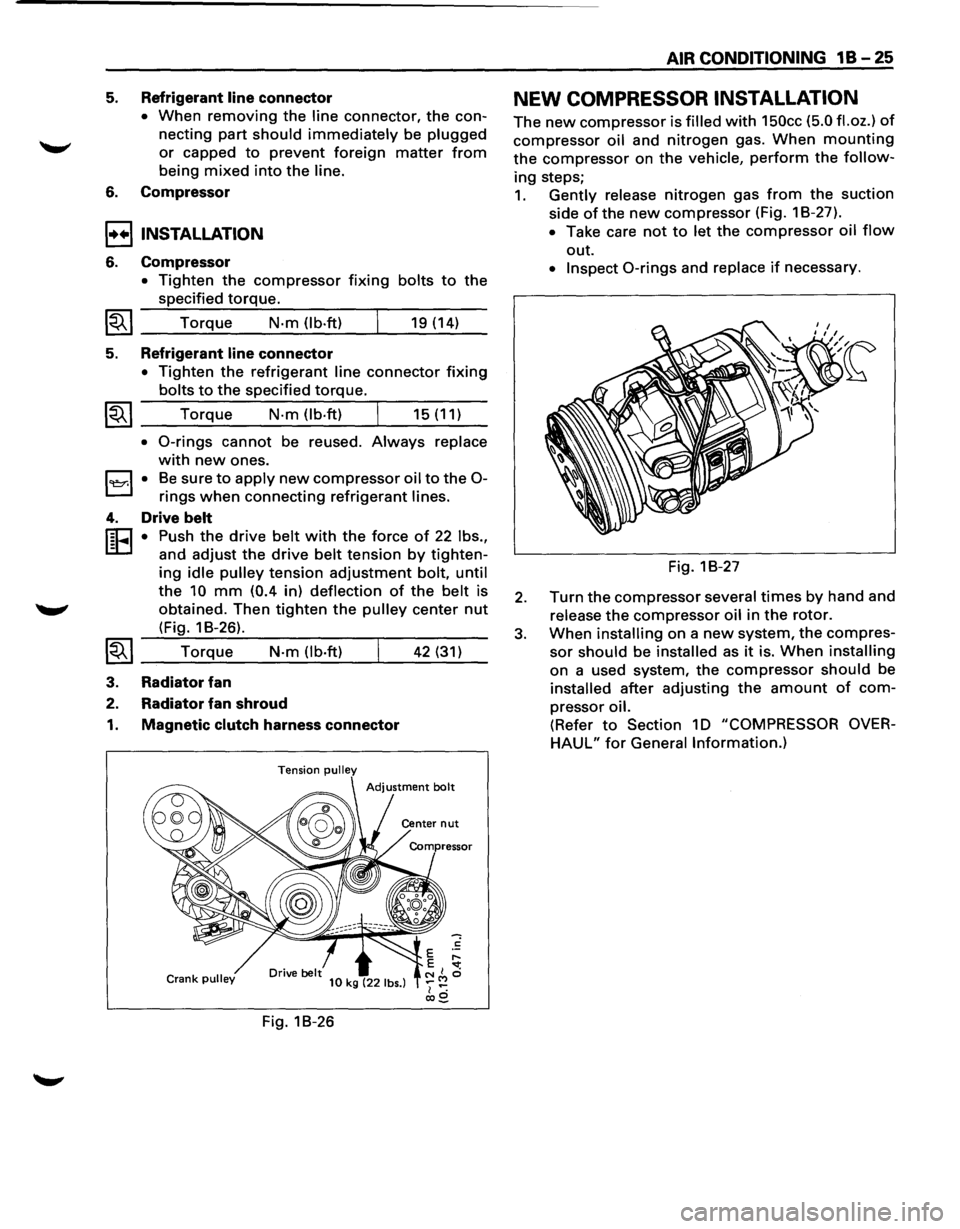
4. Drive belt
r:cJ • Push the drive belt with the force of 22 lbs.,
L:D and adjust the drive belt tension by tighten-
ing idle pulley tension adjustment bolt, until
the 10 mm (0.4 in) deflection of the belt is
obtained. Then
tighten the pulley center nut
(Fig. 1 B-26).
~~I __ T_o_r_!q_ue.:...._ __ N_·m__;_(l_b_·ft....:..) _ __,_ __ 4_2....:..(_31_)_
3. Radiator fan
2. Radiator fan shroud
1. Magnetic clutch harness connector
Tension pulley
Crank pulley 10 kg (22 lbs.)
Fig. 18-26
AIR CONDITIONING 1 B -25
NEW COMPRESSOR INSTALLATION
The new compressor is filled with 150cc (5.0 fl.oz.) of
compressor oil and nitrogen gas. When mounting
the compressor on the vehicle, perform the follow
ing steps;
1. Gently release nitrogen gas from the suction
side
ofthe new compressor (Fig. 18-27).
• Take care not to let the compressor oil flow
out.
• Inspect 0-rings and replace if necessary.
Fig. 18-27
2. Turn the compressor several times by hand and
release
the compressor oil in the rotor.
3. When installing on a new system, the compres
sor should be installed as it is. When installing
on a used system, the compressor should be
installed after adjusting the amount of com
pressor oil.
(Refer to Section 10 "COMPRESSOR OVER
HAUL" for General Information.)
Page 80 of 1928
1 B -26 AIR CONDITIONING
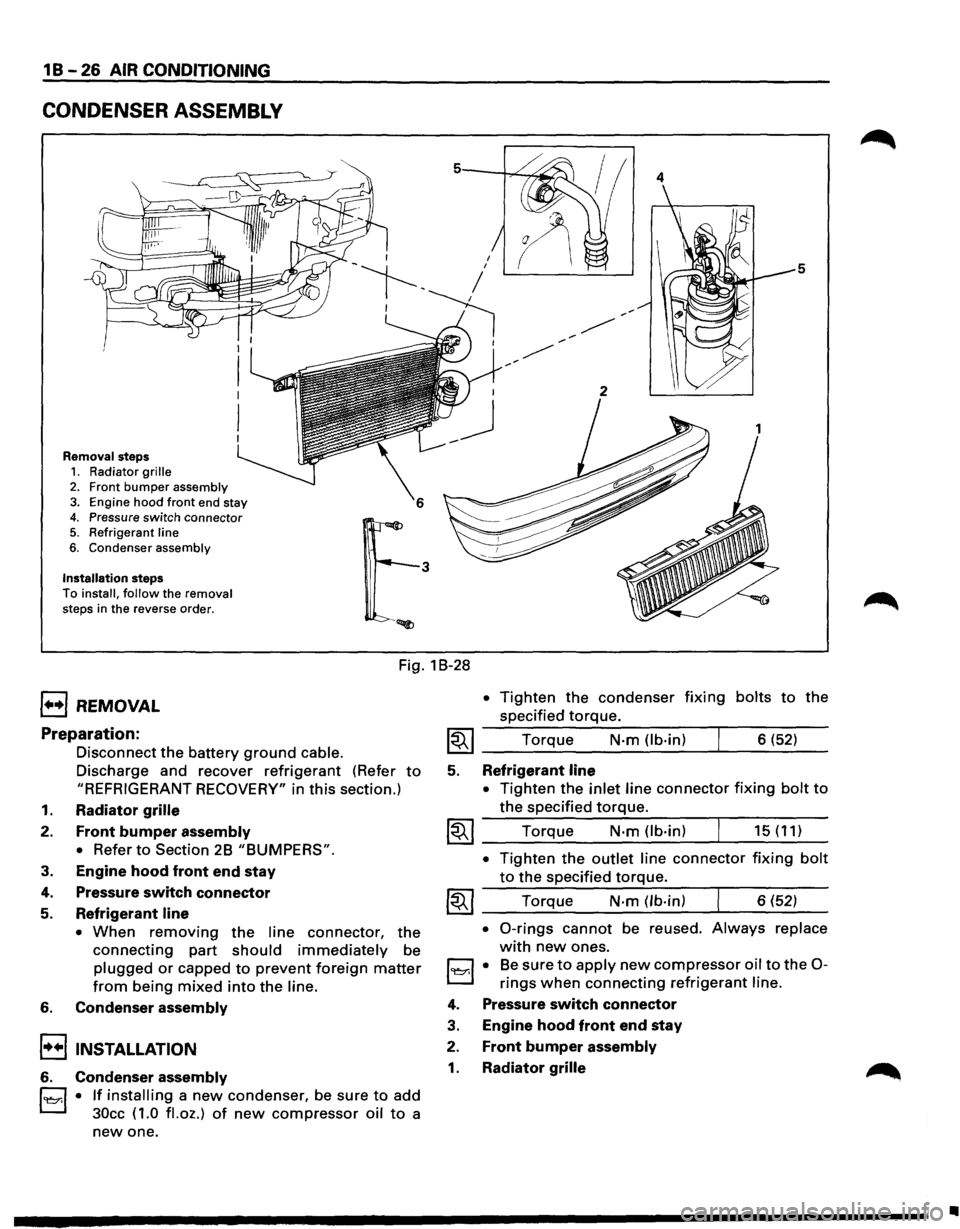
CONDENSER ASSEMBLY
Removal steps 1. Radiator grille
2. Front bumper assembly 3. Engine hood front end stay
4. Pressure switch connector 5. Refrigerant line
6. Condenser assembly
Installation steps To install, follow the removal
steps in the reverse order.
4
5
Fig. 1 B-28
1••1 REMOVAL
Preparation:
Disconnect the battery ground cable.
Discharge and recover refrigerant (Refer to
"REFRIGERANT RECOVERY" in this section.)
1. Radiator grille
2. Front bumper assembly
•
Refer to Section 2B "BUMPERS".
3. Engine hood front end stay
4. Pressure switch connector
5. Refrigerant line
• When removing the line connector, the
connecting part should immediately be
plugged or capped to prevent foreign matter
from being mixed into the line.
6. Condenser assembly
!••I INSTALLATION
6. Condenser assembly
l'l::r.l • If installing a new condenser, be sure to add
30cc ( 1.0
fl. oz.) of new compressor oil to a
new one.
• Tighten the condenser fixing bolts to the
specified
torque.
~~~ Torque N·m (lb-in) 6 (52)
5. Refrigerant line
•
Tighten the inlet line connector fixing bolt to
the specified torque.
~~~ Torque N·m (lb-in) 15 (11)
• Tighten the outlet line connector fixing bolt
to the specified torque.
~~~ Torque N-m (lb-in) 6 (52)
• 0-rings cannot be reused. Always replace
with new ones.
l'l::r.l • Be sure to apply new compressor oil to the 0-
rings when connecting refrigerant line.
4. Pressure switch connector
3. Engine hood front end stay
2. Front bumper assembly
1. Radiator grille
•
Page 81 of 1928
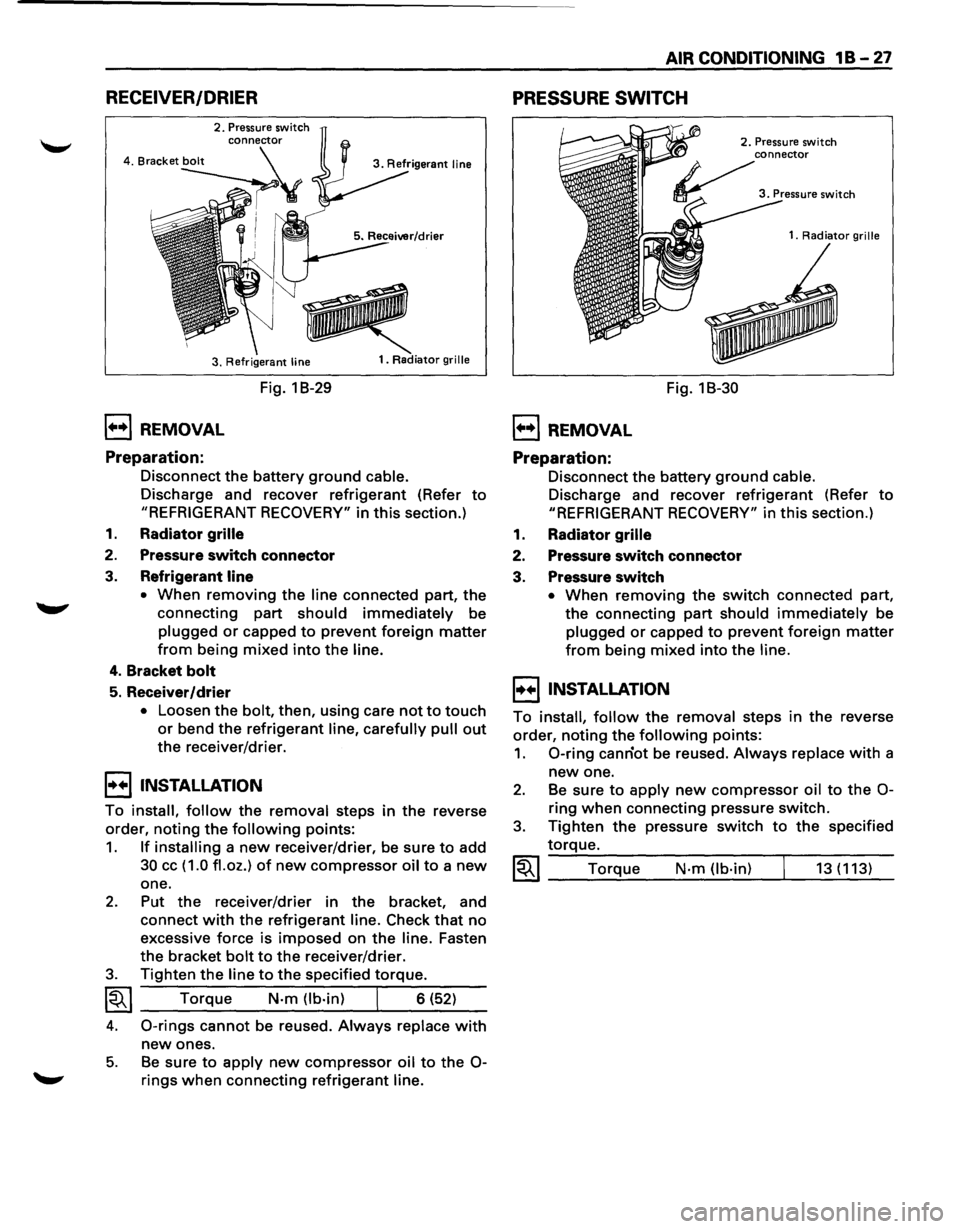
RECEIVER/DRIER
2. Pressure switch
3. Refrigerant
line
1••1 REMOVAL
Preparation:
Fig. 1 B-29
1. Radiator grille
Disconnect the battery ground cable.
Discharge and recover refrigerant (Refer to
"REFRIGERANT RECOVERY" in this section.)
1. Radiator grille
2. Pressure switch connector
3. Refrigerant line
•
When removing the line connected part, the
connecting part
should immediately be
plugged or capped to prevent foreign matter
from being mixed into the line.
4. Bracket bolt
5. Receiver/drier
• Loosen the bolt, then, using care not to touch
or bend the refrigerant line, carefully pull out
the receiver/drier.
I••I•NSTALLATION
To install, follow the removal steps in the reverse
order,
noting the following points:
1. If installing a new receiver/drier, be sure to add
30 cc ( 1.0 fl. oz.) of new compressor oil to a new
one.
2. Put the receiver/drier in the bracket, and
connect
with the refrigerant line. Check that no
excessive force is imposed on the line. Fasten
the bracket
bolt to the receiver/drier.
3. Tighten the line to the specified torque.
~~~ Torque N-m (lb-in) I 6 (52)
4. 0-rings cannot be reused. Always replace with
new ones.
5. Be sure to apply new compressor oil to the 0-
rings when connecting refrigerant line.
AIR CONDITIONING 1 B -27
PRESSURE SWITCH
1••1 REMOVAL
Preparation:
Fig. 18-30
2. Pressure switch
1.
Radiator grille
Disconnect the battery ground cable.
Discharge and recover refrigerant (Refer to
"REFRIGERANT RECOVERY" in this section.)
1. Radiator grille
2. Pressure switch connector
3. Pressure switch
• When removing the switch connected part,
the connecting
part should immediately be
plugged or capped to prevent foreign matter
from being mixed into the line.
I••IINSTALLATION
To install, follow the removal steps in the reverse
order,
noting the following points:
1. 0-ring canriot be reused. Always replace with a
new one.
2. Be sure to apply new compressor oil to the 0-
ring when connecting pressure switch.
3. Tighten the pressure switch to the specified
torque.
~~~ Torque N·m (lb-in) 13 (113)
Page 83 of 1928
I••IINSTALLATION
To install, follow the removal steps in the reverse
order,
noting the following points:
1. To install a new evaporator assembly, add 50cc
(1.7 fl.oz.) of new compressor oil to a new core.
2. Tighten the refrigerant outlet line to the
specified torque.
~~~ Torque N·m (lb.ft) 25 (18)
AIR CONDITIONING 1 B-29
3. Tighten the refrigerant inlet line to the specified
torque.
~~~ Torque N·m (lb·ft) 15 (11)
4. 0-rings cannot be reused. Always replace with
new ones.
5. Be sure to apply new compressor oil to the 0-
rings when connecting lines.
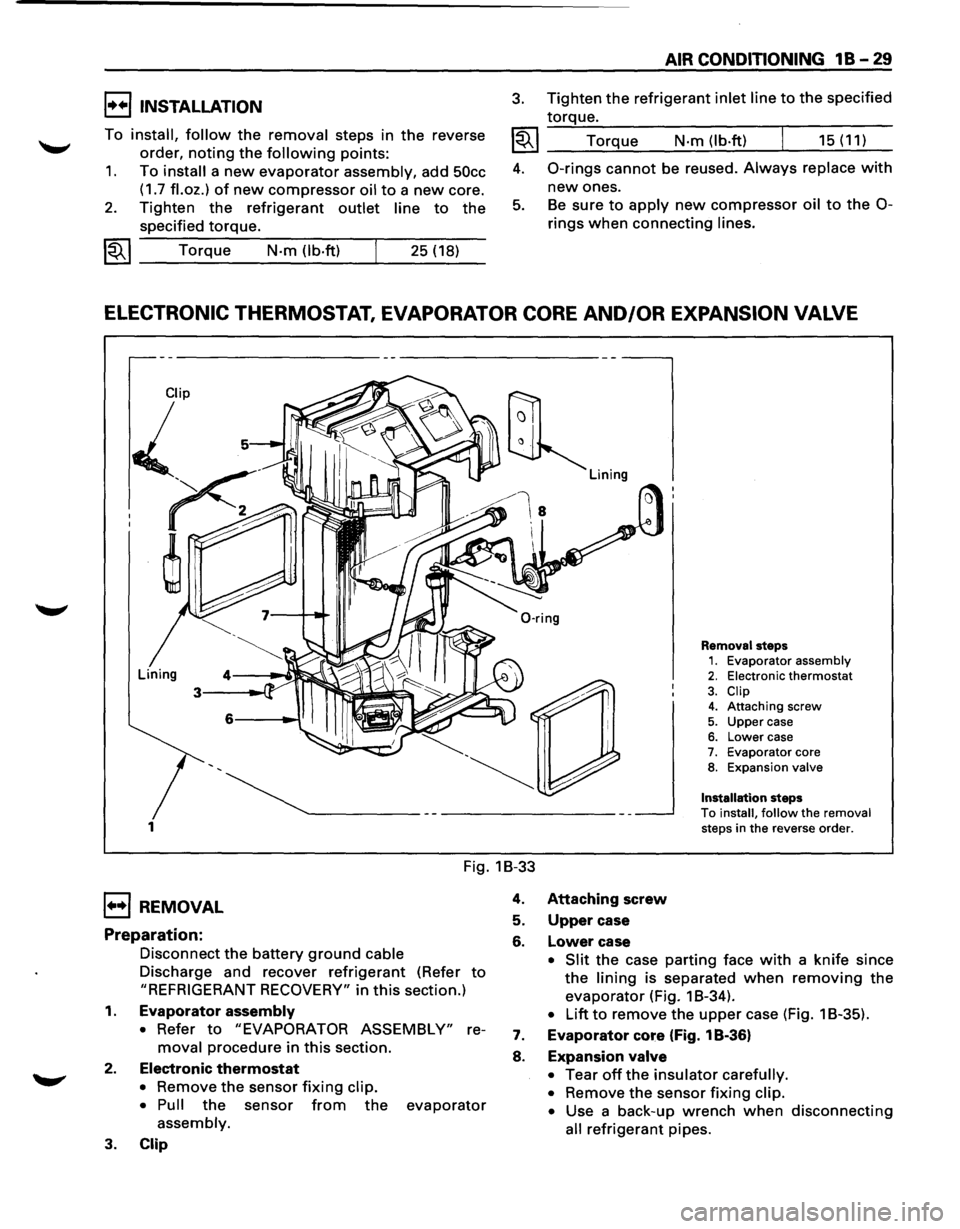
ELECTRONIC THERMOSTAT, EVAPORATOR CORE AND/OR EXPANSION VALVE
1
Removal steps 1. Evaporator assembly 2. Electronic thermostat
3. Clip 4. Attaching screw
5. Upper case 6. Lower case 7. Evaporator core 8. Expansion valve
Installation
steps
To install, follow the removal steps in the reverse order.
Fig. 1B-33
1••1 REMOVAL
Preparation:
Disconnect the battery ground cable
Discharge and recover refrigerant (Refer to
"REFRIGERANT RECOVERY" in this section.)
1. Evaporator assembly
• Refer to "EVAPORATOR ASSEMBLY" re
moval procedure in this section.
2. Electronic thermostat
• Remove the sensor fixing clip.
• Pull
the sensor from the evaporator
assembly.
3. Clip
4. Attaching screw
5. Upper case
6. Lower case
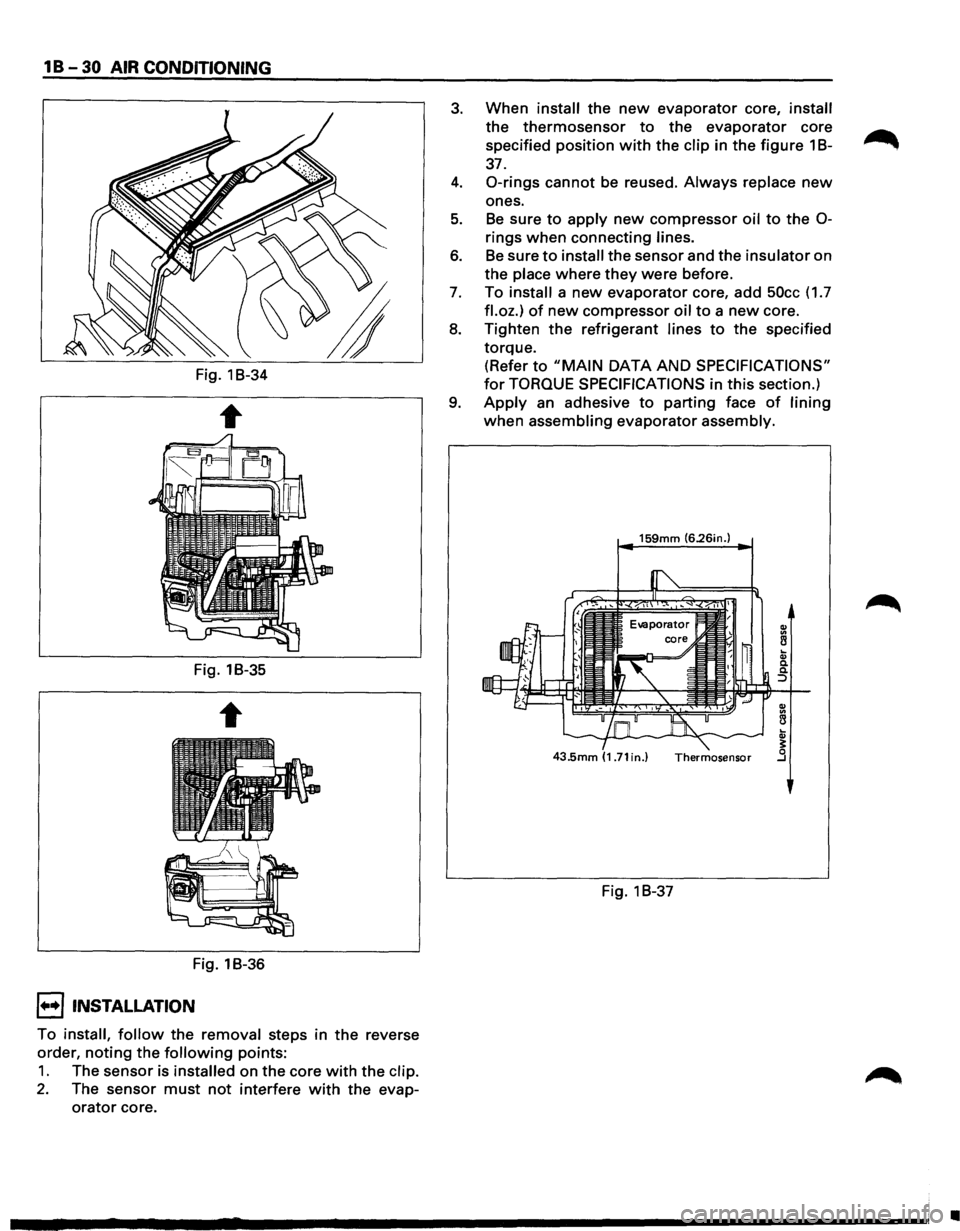
• Slit the case parting face with a knife since
the lining is separated when removing the
evaporator (Fig. 1 B-34).
• Lift to remove the upper case (Fig. 1 B-35).
7. Evaporator core (Fig. 1 B-36)
8. Expansion valve
•
Tear off the insulator carefully.
•
Remove the sensor fixing clip.
•
Use a back-up wrench when disconnecting
all refrigerant pipes.
Page 84 of 1928
1 B -30 AIR CONDITIONING
Fig. 1B-34
Fig. 1B-35
Fig. 1B-36
I••! INSTALLATION
To install, follow the removal steps in the reverse
order,
noting the following points:
1. The sensor is installed on the core with the clip.
2. The sensor must not interfere with the evap
orator core.
3. When install the new evaporator core, install
the thermosensor to the evaporator core
specified position
with the clip in the figure 1 B-~
37.
4. 0-rings cannot be reused. Always replace new
ones.
5. Be sure to apply new compressor oil to the 0-
rings when connecting lines.
6. Be sure to install the sensor and the insulator on
the place where
they were before.
7. To install a new evaporator core, add 50cc (1.7
fl.oz.) of new compressor oil to a new core.
8. Tighten the refrigerant lines to the specified
torque. (Refer
to "MAIN DATA AND SPECIFICATIONS"
for TORQUE SPECIFICATIONS in this section.)
9. Apply an adhesive to parting face of lining
when assembling evaporator assembly.
159mm (6.26in.)
Fig. 1 B-37
•
Page 86 of 1928
1 B -32 AIR CONDITIONING
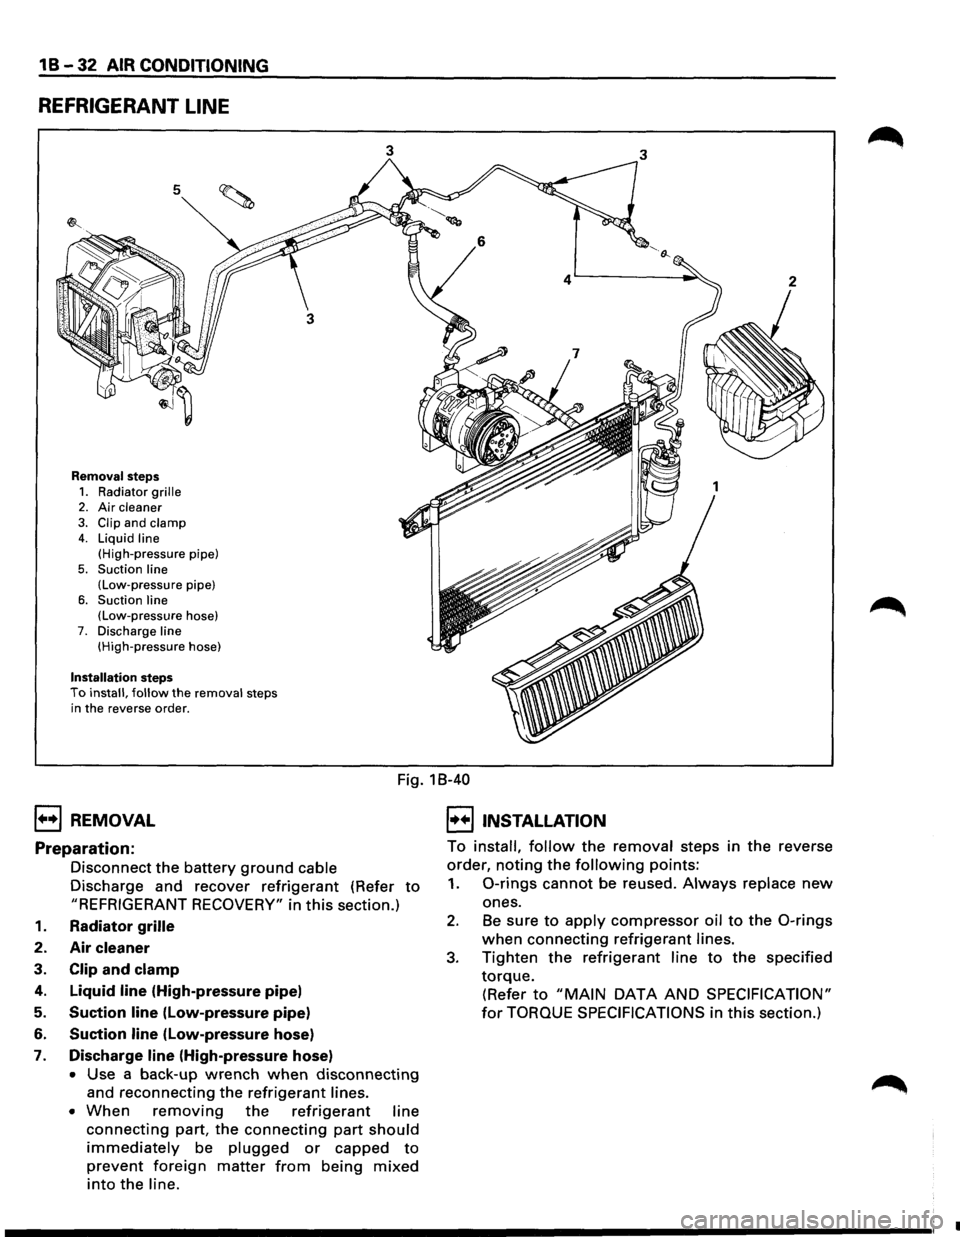
REFRIGERANT LINE
5
Removal steps
1. Radiator grille 2. Air cleaner
3. Clip and clamp 4. Liquid line
(High-pressure pipe)
5. Suction line (Low-pressure pipe)
6. Suction line (Low-pressure hose) 7. Discharge line (High-pressure hose)
Installation steps To install, follow the removal steps
in the reverse order.
3 3
1++1 REMOVAL
Fig. 18-40
I••IINSTALLATION
Preparation:
Disconnect the battery ground cable
Discharge and recover
refrigerant (Refer to
"REFRIGERANT RECOVERY" in this section.)
1. Radiator grille
2. Air cleaner
3. Clip and clamp
4. Liquid line (High-pressure pipe)
5. Suction line (Low-pressure pipe)
6. Suction line (low-pressure hose)
7. Discharge line (High-pressure hose)
• Use a back-up wrench when disconnecting
and reconnecting the refrigerant lines.
• When removing the refrigerant line
connecting part, the connecting part should
immediately be plugged or capped to
prevent foreign matter from being mixed
into the line. To
install,
follow the removal steps in the reverse
order,
noting the following points:
1. 0-rings cannot be reused. Always replace new
ones.
2. Be sure to apply compressor oil to the 0-rings
when connecting refrigerant lines.
3. Tighten the refrigerant line to the specified
torque.
(Refer to "MAIN DATA AND SPECIFICATION"
for TORQUE SPECIFICATIONS in this section.)
•