ignition ISUZU TROOPER 1995 Owner's Guide
[x] Cancel search | Manufacturer: ISUZU, Model Year: 1995, Model line: TROOPER, Model: ISUZU TROOPER 1995Pages: 1928
Page 398 of 1928
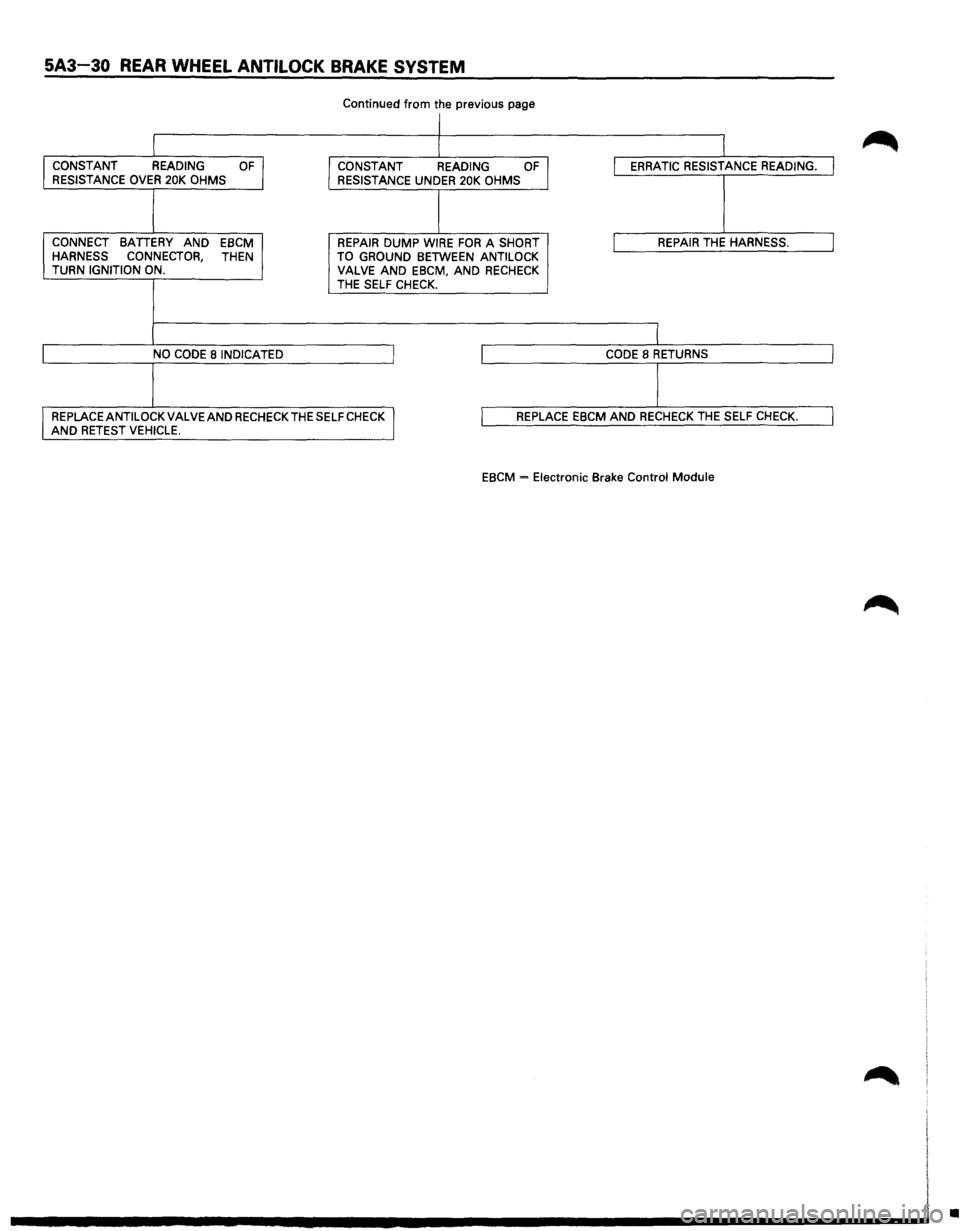
5A3-30 REAR WHEEL ANTILOCK BRAKE SYSTEM
Continued from the previous page
I
I CONSTANT READING OF CONSTANT READING OF I ERRATIC RESISTANCE READING. I RESISTANCE OVER 20K OHMS
RESISTANCE UNDER 20K OHMS
l CONNECT BA TIERY AND
EBCM REPAIR DUMP WIRE FOR A SHORT I REPAIR THE HARNESS. J HARNESS CONNECTOR, THEN TO GROUND BETWEEN ANTILOCK TURN IGNITION ON.
VALVE AND EBCM, AND RECHECK THE SELF CHECK.
l NO CODE 81NDICATED I I CODE 8 RETURNS I
l REPLACE ANTI LOCK VALVE AND RECHECK THE SELF CHECK I I REPLACE EBCM AND RECHECK THE SELF CHECK. I AND RETEST VEHICLE.
EBCM = Electronic Brake Control Module
•
Page 400 of 1928
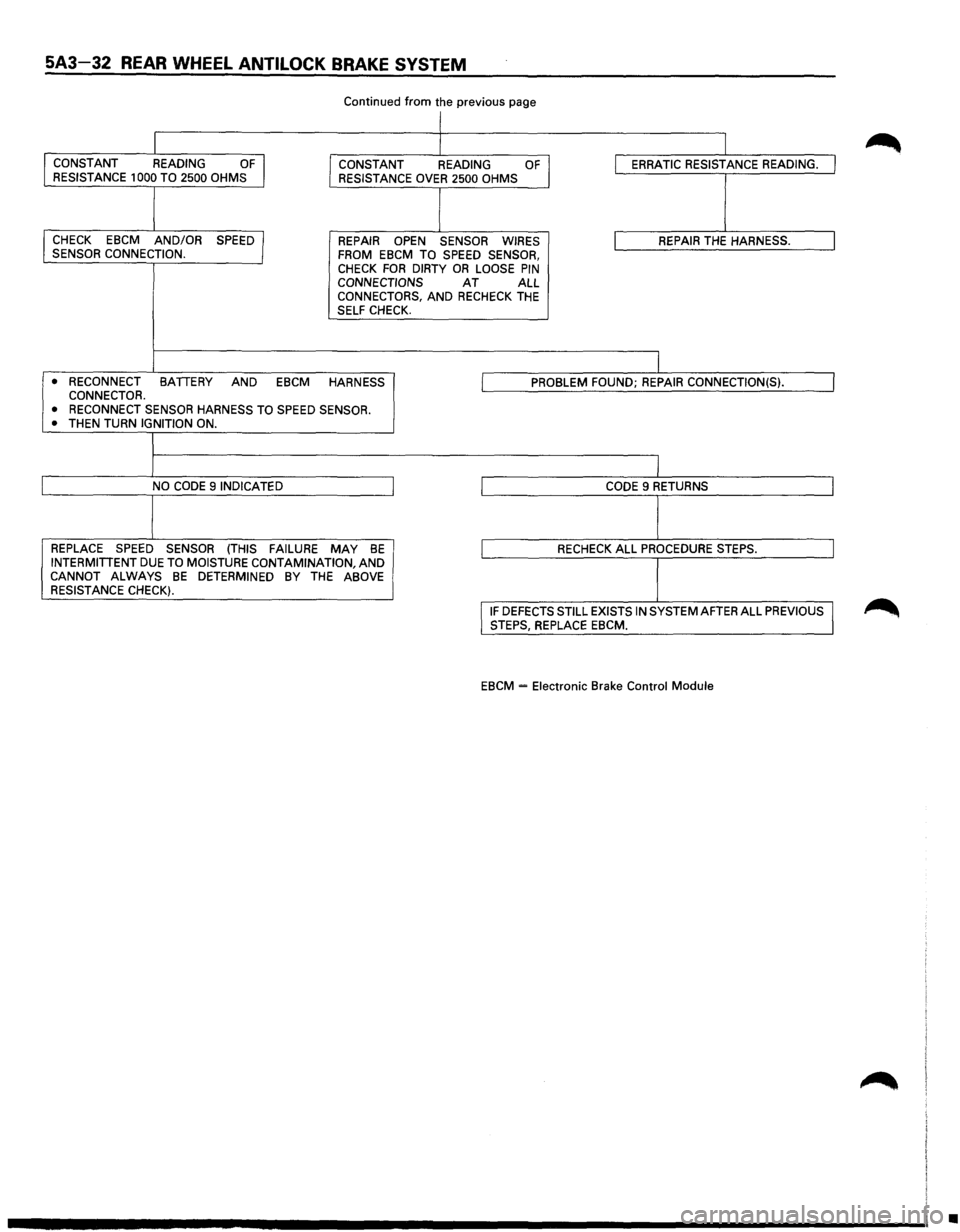
5A3-32 REAR WHEEL ANTILOCK BRAKE SYSTEM
Continued from the previous page
I
I CONSTANT READING OF I CONSTANT
READING OF I ERRATIC RESISTANCE READING. I RESISTANCE 1000 TO 2500 OHMS
RESISTANCE OVER 2500 OHMS
I CHECK
EBCM AND/OR SPEED I SENSOR CONNECTION. REPAIR
OPEN SENSOR
WIRES FROM EBCM TO SPEED SENSOR, I REPAIR THE HARNESS. I
CHECK FOR DIRTY OR LOOSE PIN CONNECTIONS AT ALL CONNECTORS, AND RECHECK THE SELF CHECK.
1 • RECONNECT BATIERY AND EBCM HARNESS I PROBLEM FOUND; REPAIR CONNECTION(S). I CONNECTOR.
• RECONNECT SENSOR HARNESS TO SPEED SENSOR.
• THEN TURN IGNITION ON.
1 NO CODE 9 INDICATED I CODE 9 RETURNS I
J REPLACE
SPEED SENSOR (THIS
FAILURE MAY BE l RECHECK ALL PROCEDURE STEPS. I INTERMITIENT DUE TO MOISTURE CONTAMINATION, AND
J
CANNOT ALWAYS BE DETERMINED BY THE ABOVE
RESISTANCE CHECK).
IIF DEFECTS STILL EXISTS IN SYSTEM AFTER ALL PREVIOUS I STEPS, REPLACE EBCM.
EBCM
= Electronic Brake Control Module
•
Page 402 of 1928
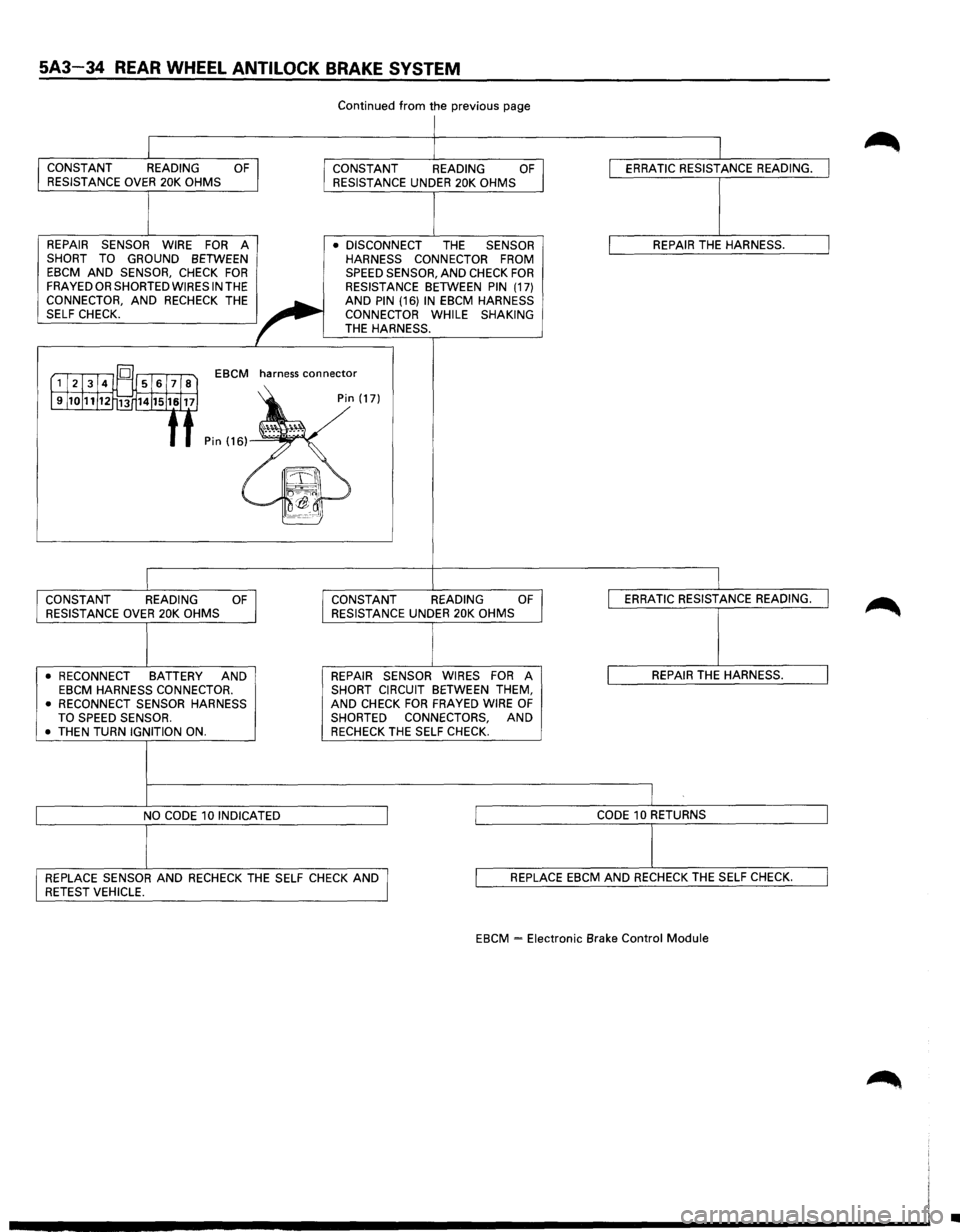
5A3-34 REAR WHEEL ANTILOCK BRAKE SYSTEM
CONSTANT READING OF RESISTANCE OVER 20K OHMS
REPAIR SENSOR WIRE
FOR A SHORT TO GROUND BETWEEN EBCM AND SENSOR, CHECK FOR FRAYED OR SHORTED WIRES IN THE CONNECTOR, AND RECHECK THE SELF CHECK.
Continued from the previous page
I
CONSTANT READING OF RESISTANCE UNDER 20K OHMS
• DISCONNECT
THE SENSOR
HARNESS CONNECTOR FROM
SPEED SENSOR, AND CHECK FOR RESISTANCE BETWEEN PIN (17)
AND PIN (16) IN EBCM HARNESS
CONNECTOR WHILE SHAKING
THE HARNESS.
= [',...,J-2.,..1-3..--14....,l~'l's...,, 1-6-.-17, la"'l EBCM
harness connector
l9l10111112t~ 14Jl5116117) :) Pin (17)
f f Pin (166~,~~.
!.TJ -I
~~···~
CONSTANT READING OF RESISTANCE OVER 20K OHMS
• RECONNECT
BATTERY AND EBCM HARNESS CONNECTOR.
• RECONNECT SENSOR HARNESS
TO SPEED SENSOR.
•
THEN TURN IGNITION ON.
NO
CODE 10 INDICATED CONSTANT
READING
OF I RESISTANCE UNDER 20K OHMS
REPAIR SENSOR WIRES
FOR A SHORT CIRCUIT BETWEEN THEM,
AND CHECK FOR FRAYED WIRE OF SHORTED CONNECTORS, AND RECHECK THE SELF CHECK.
I l
I ERRATIC RESISTANCE READING. I
l REPAIR THE HARNESS. I
I
ERRATIC RESISTANCE READING. I
I REPAIR THE HARNESS. I
I CODE 10 RETURNS I
I REPLACE SENSOR AND RECHECK THE SELF CHECK AND I RETEST VEHICLE. l REPLACE EBCM AND RECHECK THE SELF CHECK. I
EBCM -Electronic Brake Control Module
•
Page 404 of 1928
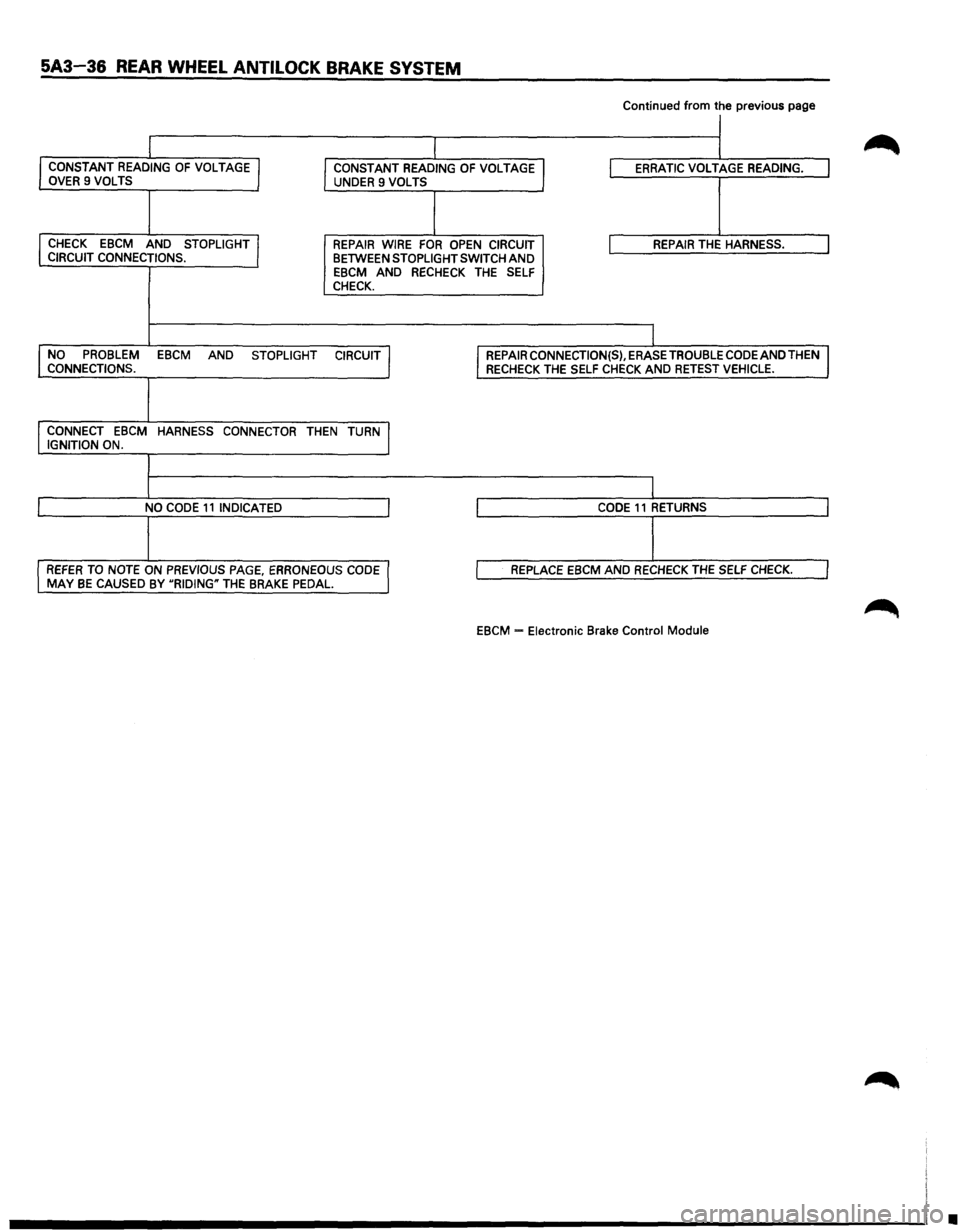
5A3-36 REAR WHEEL ANTILOCK BRAKE SYSTEM
Continued from the previous page
I
I CONSTANT READING OF VOLTAGE I CONSTANT READING OF VOLTAGE I ERRATIC VOLTAGE READING. I OVER 9 VOLTS UNDER 9 VOLTS
I CHECK EBCM AND STOPLIGHT I REPAIR WIRE FOR OPEN CIRCUIT I REPAIR THE HARNESS. I CIRCUIT CONNECTIONS. BETWEEN STOPLIGHT SWITCH AND EBCM AND RECHECK THE SELF CHECK.
I
I NO PROBLEM EBCM AND STOPLIGHT CIRCUIT J I REPAIRCONNECTION(S),ERASETROUBLECODEANDTHEN I CONNECTIONS. RECHECK THE SELF CHECK AND RETEST VEHICLE.
I CONNECT EBCM HARNESS CONNECTOR THEN TURN I IGNITION ON.
l
I NO CODE 11 INDICATED I I CODE 11 RETURNS J
I I REFER TO NOTE ON PREVIOUS PAGE, ERRONEOUS CODE l I REPLACE EBCM AND RECHECK THE SELF CHECK. I MAY BE CAUSED BY "RIDING" THE BRAKE PEDAL.
EBCM = Electronic Brake Control Module
•
Page 414 of 1928
5A4-4 4-WHEEL ANTILOCK BRAKE SYSTEM (ABS)
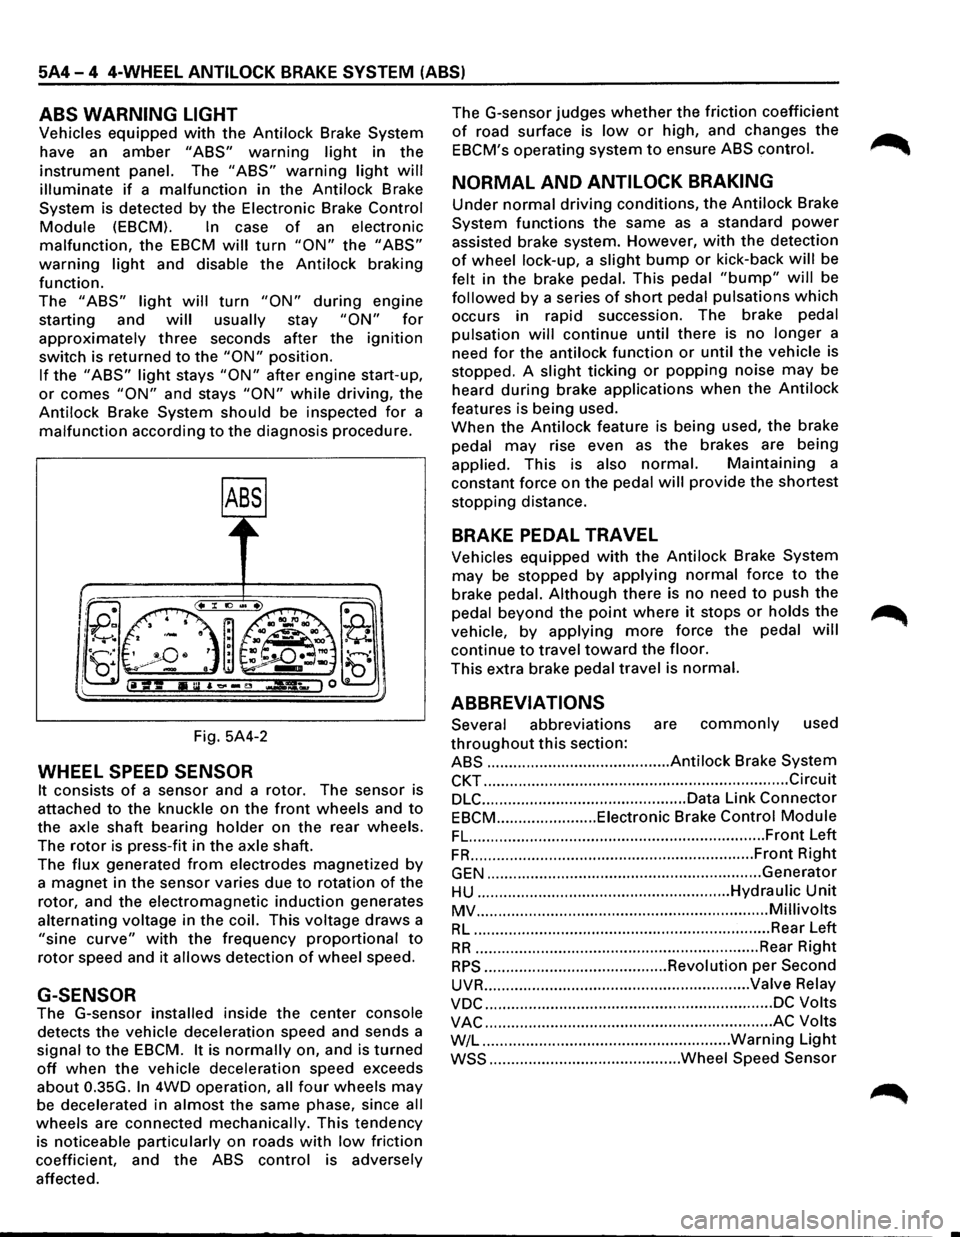
ABS WARNING LIGHT
Vehicles equipped with the Antilock Brake System
have an
amber "ABS" warning light in the
instrument panel. The "ABS" warning light will
illuminate if a malfunction in the Antilock Brake
System is detected by the Electronic Brake
Control
Module (EBCM). In case of an electronic
malfunction, the EBCM will turn "ON" the "ABS"
warning light and disable the Antilock braking
function.
The
"ABS" light will turn "ON" during engine
starting and
will usually stay "ON" for
approximately three seconds after the ignition
switch is returned to the "ON" position.
If the "ABS" light stays "ON" after engine start-up,
or comes "ON" and stays "ON" while driving, the
Antilock Brake System should be inspected
for a
malfunction according to the diagnosis procedure.
Fig. 5A4-2
WHEEL SPEED SENSOR
It consists of a sensor and a rotor. The sensor is
attached
to the knuckle on the front wheels and to
the axle shaft bearing holder on the rear wheels.
The
rotor is press-fit in the axle shaft.
The
flux generated from electrodes magnetized by
a magnet in the sensor varies due to rotation of the
rotor, and the electromagnetic
induction generates
alternating voltage in
the coil. This voltage draws a
"sine curve" with the frequency proportional to
rotor speed and it allows detection of wheel speed.
G-SENSOR
The G-sensor installed inside the center console
detects the vehicle deceleration speed and sends a
signal
to the EBCM. It is normally on, and is turned
off when the vehicle deceleration speed exceeds
about 0.35G.
In 4WD operation, all four wheels may
be decelerated in almost the same phase, since all
wheels are connected mechanically. This tendency
is noticeable particularly on roads
with low friction
coefficient, and the
ABS control is adversely
affected. The
G-sensor judges
whether the friction coefficient
of road surface is low or high, and changes the
EBCM's operating system to ensure ABS control.
NORMAL AND ANTILOCK BRAKING
Under normal driving conditions, the Antilock Brake
System functions the same
as a standard power
assisted brake system. However, with the detection
of wheel lock-up, a slight bump or kick-back will be
felt in the brake pedal. This pedal
"bump" will be
followed by a series of short pedal pulsations which
occurs in rapid succession. The brake pedal
pulsation
will continue until there is no longer a
need
for the antilock function or until the vehicle is
stopped. A
slight ticking or popping noise may be
heard
during brake applications when the Antilock
features is being used.
When the
Antilock feature is being used, the brake
pedal
may rise even as the brakes are being
applied. This is also
normal. Maintaining a
constant force on the pedal
will provide the shortest
stopping distance.
BRAKE PEDAL TRAVEL
Vehicles equipped with the Antilock Brake System
may be stopped by applying normal force to the
brake pedal.
Although there is no need to push the
pedal beyond the
point where it stops or holds the ~
vehicle, by applying more force the pedal will
continue to travel toward the floor.
This extra brake pedal travel is normal.
ABBREVIATIONS
Several abbreviations are commonly used
throughout this section:
ABS .......................................... Antilock Brake System
CKT ...................................................................... Circuit
DLC ............................................... Data Link Connector
EBCM ....................... Eiectronic Brake Control Module
FL. ................................................................... Front Left
FR ................................................................. Front Right
GEN ............................................................... Generator
HU .......................................................... Hydraulic Unit
MV ................................................................... Millivolts
RL .................................................................... Rear Left
RR ................................................................. Rear Right
RPS .......................................... Revolution per Second
UVR ............................................................. Valve Relay
VDC .................................................................. DC Volts
VAC .................................................................. AC Volts
W/L .........................................................
Warning Light
WSS ............................................ Wheel Speed Sensor
Page 415 of 1928
4-WHEEL ANTILOCK BRAKE SYSTEM (ABS) 5A4-5
DIAGNOSIS
GENERAL INFORMATION
ABS troubles can be classified to two types, those
which can be detected by the ABS warning light
and those which can be detected as a vehicle
abnormality by the driver.
In either case, locate the fault in accordance with
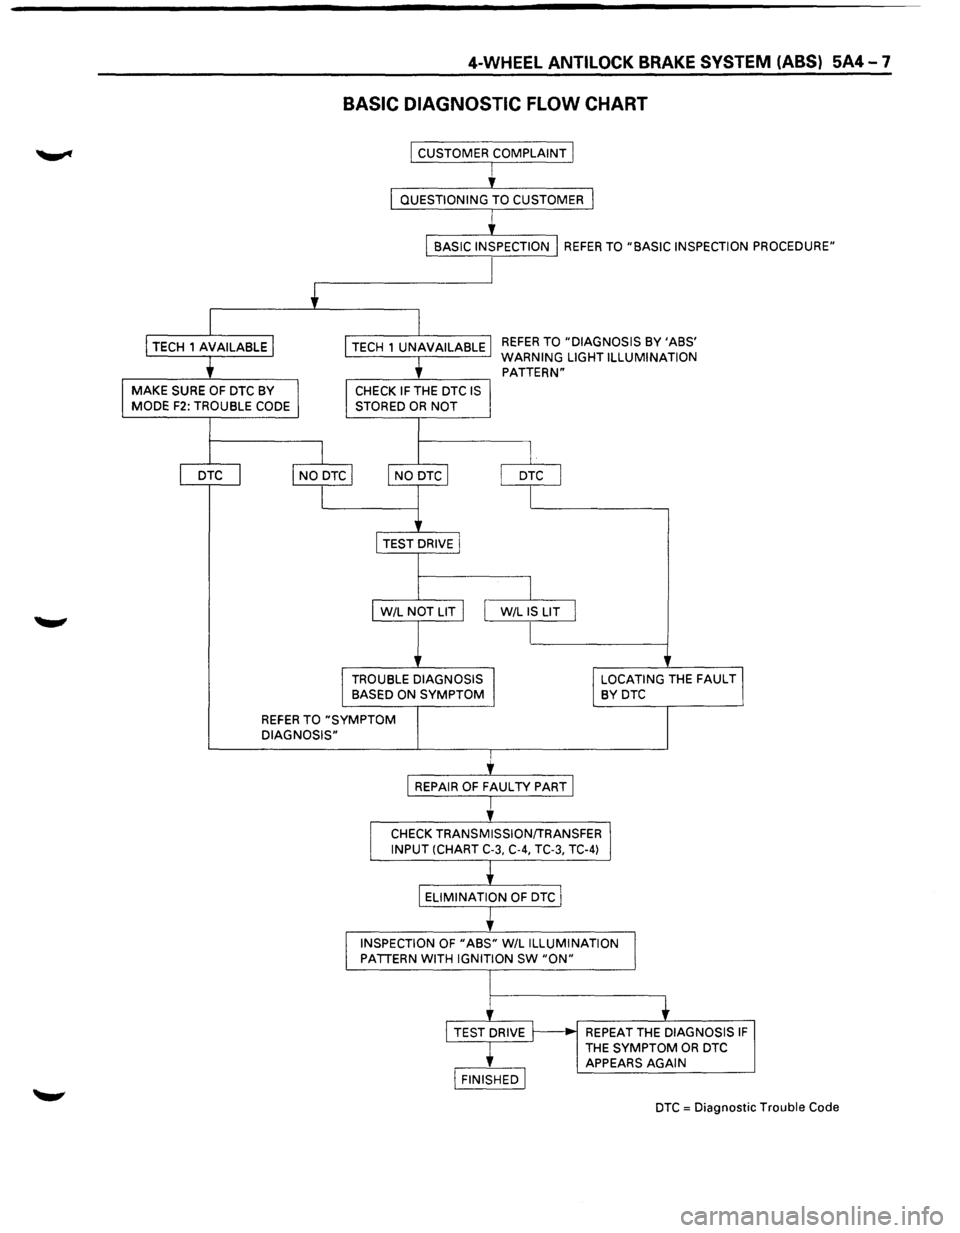
the "BASIC DIAGNOSTIC FLOWCHART" and repair.
Please refer to Section 5A, 5A1, 5A2, 5C for the
diagnosis
of mechanical troubles such as brake
noise, brake
judder (brake pedal or vehicle vibration
felt when braking), uneven braking, and parking
brake
trouble.
ABS SYSTEM SERVICE PRECAUTIONS
Required Tools and Items
Box Wrench
• Brake Fluid
Special Tool
Some diagnosis procedures in this section require
the installation of a special tool.
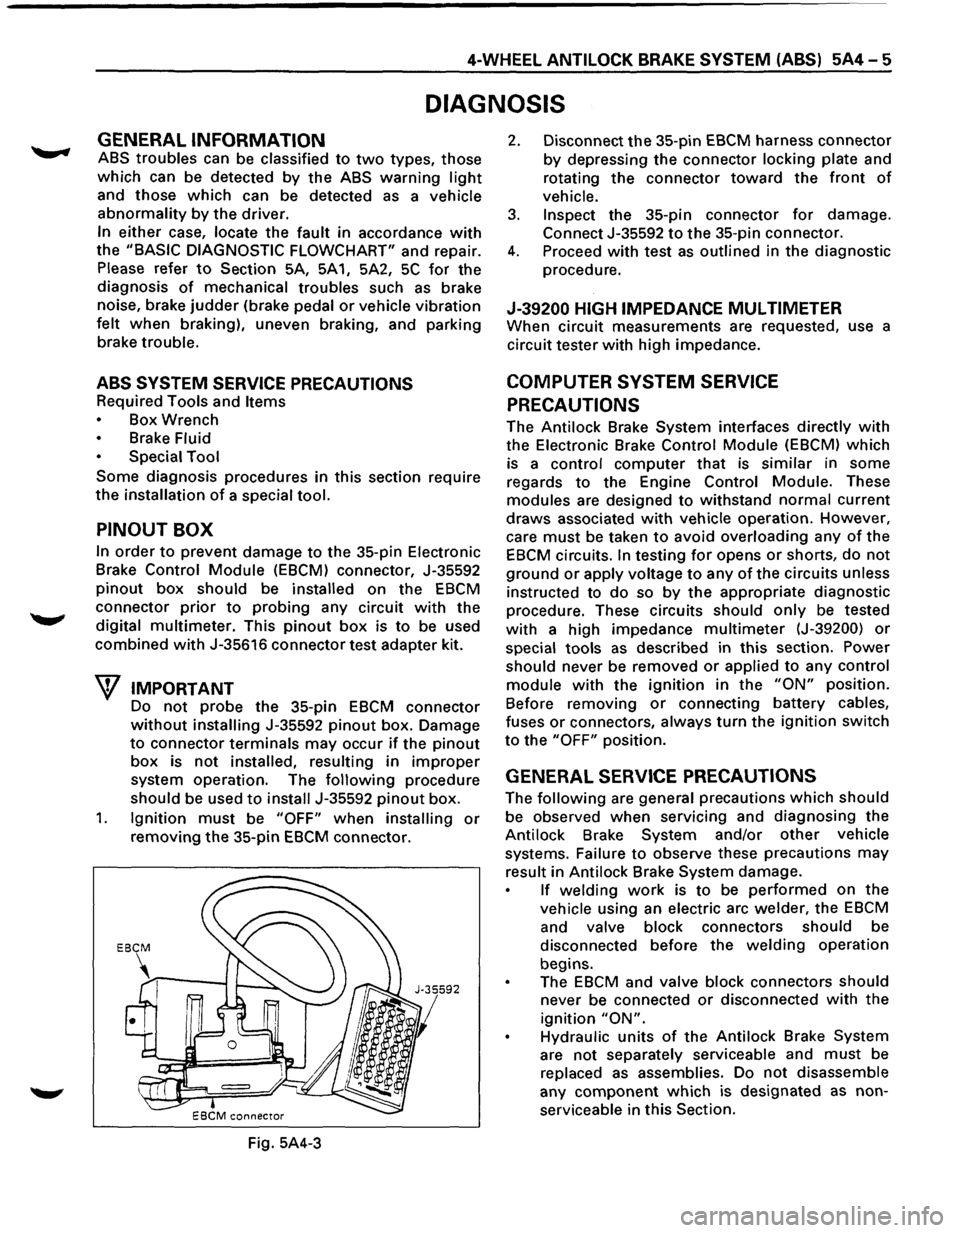
PINOUT BOX
In order to prevent damage to the 35-pin Electronic
Brake
Control Module (EBCM) connector, J-35592
pinout box should be installed on the EBCM
connector prior to probing any circuit with the
digital
multimeter. This pinout box is to be used
combined with J-35616 connector test adapter kit.
W IMPORTANT
Do not probe the 35-pin EBCM connector
without installing J-35592 pinout box. Damage
to connector terminals may occur if the pinout
box is not installed, resulting in improper
system operation. The following procedure
should be used to install J-35592 pinout box.
1. Ignition must be "OFF" when installing or
removing the 35-pin EBCM connector.
Fig. 5A4-3
2. Disconnect the 35-pin EBCM harness connector
by depressing the connector locking plate and
rotating
the connector toward the front of
vehicle.
3. Inspect the 35-pin connector for damage.
Connect J-35592 to the 35-pin connector.
4. Proceed with test as outlined in the diagnostic
procedure.
J-39200 HIGH IMPEDANCE MUL TIMETER
When circuit measurements are requested, use a
circuit tester
with high impedance.
COMPUTER SYSTEM SERVICE
PRECAUTIONS
The Antilock Brake System interfaces directly with
the Electronic Brake Control Module (EBCM) which
is a
control computer that is similar in some
regards
to the Engine Control Module. These
modules are designed to withstand normal current
draws associated with vehicle operation. However,
care
must be taken to avoid overloading any of the
EBCM circuits. In testing for opens or shorts, do not
ground or apply voltage to any of the circuits unless
instructed to
do so by the appropriate diagnostic
procedure. These circuits should only be tested
with a high impedance multimeter (J-39200) or
special tools as described in this section. Power
should never be removed or applied to any control
module with the ignition in the "ON" position.
Before removing
or connecting battery cables,
fuses
or connectors, always turn the ignition switch
to the "OFF" position.
GENERAL SERVICE PRECAUTIONS
The following are general precautions which should
be observed when servicing and diagnosing the
Antilock Brake System and/or
other vehicle
systems. Failure
to observe these precautions may
result in Antilock Brake System damage.
If welding work is to be performed on the
vehicle using an electric arc welder, the EBCM
and valve block connectors should be
disconnected before the
welding operation
begins.
The
EBCM and valve block connectors should
never be connected or disconnected with the
ignition "ON".
Hydraulic units of the Antilock Brake System
are not separately serviceable and must be
replaced
as assemblies. Do not disassemble
any
component which is designated as non
serviceable in
this Section.
Page 416 of 1928
5A4-6 4-WHEEL ANTILOCK BRAKE SYSTEM (ABS)
If only rear wheels are rotated using jacks or
drum tester, the system will diagnose a speed
sensor
malfunction and the "ABS" warning
light will illuminate. But actually no trouble
exists. After inspection stop the engine once
and re-start it,
then make sure that the "ABS"
warning light does not illuminate.
If the battery has been discharged
The engine may stall if the battery has been
completely discharged and the engine is started via
a
jumper cable. This is because the Antilock Brake
System (ABS) requires a
large quantity of
electricity. In this case, wait until the battery is
recharged,
or set the ABS to a non-operative state
by removing the fuse for the ABS (40A). After the
battery has been recharged, stop the engine and
install the ABS fuse. Start the engine again, and
confirm that the ABS warning light does not light.
NOTE ON INTERMITTENTS
As with virtually any electronic system, it is difficult
to identify an intermittent failure. In such a case
duplicating the system malfunction during a test
drive
or a good description of vehicle behavior from
the customer may be helpful in locating a "most
likely" failed component or circuit. The symptom
diagnosis chart may also be useful in isolating the
failure. Most intermittent problems are caused by
faulty electrical connections or wiring. When an
intermittent failure is encountered, check suspect
circuits for:
Suspected harness damage.
• Poor mating of connector halves or terminals
not fully seated in the connector body (backed
out).
Improperly formed or damaged terminals.
TEST DRIVING ABS COMPLAINT
VEHICLES
In case that there has been an abnormality in the
lighting pattern of "ABS" warning light, the fault
can be located in accordance with the "DIAGNOSIS
BY 'ABS' WARNING LIGHT ILLUMINATION
PATTERN". In case of such trouble as can be
detected
by the driver as a vehicle symptom,
however, it is necessary to give a test drive
following the test procedure mentioned below,
thereby reproducing the symptom for trouble
diagnosis on a symptom basis:
1. Start the engine and make sure that the "ABS"
W/L goes OFF. If the W/L remains ON, it
means that the Diagnostic Trouble Code (DTC)
is stored. Therefore, read the code and
locate
the fault.
2. Start the vehicle and accelerate to 30 km/h (19
mph) or more.
3. Slowly brake and stop the vehicle completely.
4. Then restart the vehicle and accelerate to 40
km/h (25 mph) or more.
5. Brake at a time so as to actuate the ABS and ... ~
stop the vehicle.
6. Be cautious of abnormality during the test. If
theW/Lis actuated while driving, read the DTC
and locate the fault.
7. If the abnormality is not reproduced by the
test, make best efforts
to reproduce the
situation reported
by the customer.
8. If the abnormality has been detected, repair in
accordance
with the "SYMPTOM DIAGNOSIS".
NOTE:
Be sure to give a test drive on a wide, even
road
with a small traffic.
If an abnormality is detected, be sure to
suspend the test and start
trouble diagnosis at
once.
II ABS" WARNING LIGHT
When ABS trouble occurs to actuate "ABS"
warning light, the trouble code corresponding to
the trouble is stored in the EBCM. Only ordinary
brake is available with ABS being unactuated. Even
when "ABS" warning light is actuated, if the starter
switch is set
ON after setting it OFF once, the EBCM
checks
up on the entire system and, if there is no
abnormality, judges ABS to work currently and the
warning light is lit normally even though the
trouble code is stored.
NOTE:
Illumination of the "ABS" warning light
indicates that antilock braking is no longer
available. Power assisted braking without
antilock control is still available.
NORMAL OPERATION
II ABS" WARNING LIGHT
When the ignition is first moved from "OFF" to
"RUN", the amber "ABS" warning light will turn
"ON". The "ABS" warning light will turn "ON"
during engine starting and will usually stay "ON"
for approximately three seconds after the ignition
switch is returned to the "ON" position. The
warning light should remain "OFF" at all other
times.
•
Page 417 of 1928
4-WHEEL ANTILOCK BRAKE SYSTEM (ABS) 5A4-7
BASIC DIAGNOSTIC FLOW CHART
I CUSTOMER COMPLAINT I
I
' I QUESTIONING TO CUSTOMER 1
I
BASIC INSPECTION I REFER TO "BASIC INSPECTION PROCEDURE"
+
I
I TECH 1 AVAILABLE I
I TECH 1 UNAVAILABLE REFER TO "DIAGNOSIS BY 'ABS'
t
WARNING LIGHT ILLUMINATION
PATTERN"
I MAKE SURE OF DTC BY I MODE F2: TROUBLE CODE I CHECK IF THE DTC IS STORED OR NOT
I I
I DTC I I NO DTC I I NO
DTC I
I DTC I
I I
I TEST
DRIVEl
I
I W/L NOT LIT I I W/L IS LIT I
I
I TROUBLE DIAGNOSIS I BASED ON SYMPTOM I LOCATING THE FAUL Tj BYDTC
REFER TO "SYMPTOM
DIAGNOSIS"
I REPAIR OF FAUL TV PART I
I
CHECK TRANSMISSION/TRANSFER~ INPUT (CHART C-3, C-4, TC-3, TC-4)
ELIMINATION
OF DTC I
I
INSPECTION OF "ABS" W/L ILLUMINATION
1 PATTERN WITH IGNITION SW "ON"
+ I TEST DRIVE ~ REPEAT THE DIAGNOSIS IF
THE SYMPTOM OR DTC
APPEARS AGAIN
I FINISHED I
DTC = Diagnostic Trouble Code
Page 420 of 1928
5A4-10 4-WHEEL ANTILOCK BRAKE SYSTEM (ABS)
TECH 1 TOOL
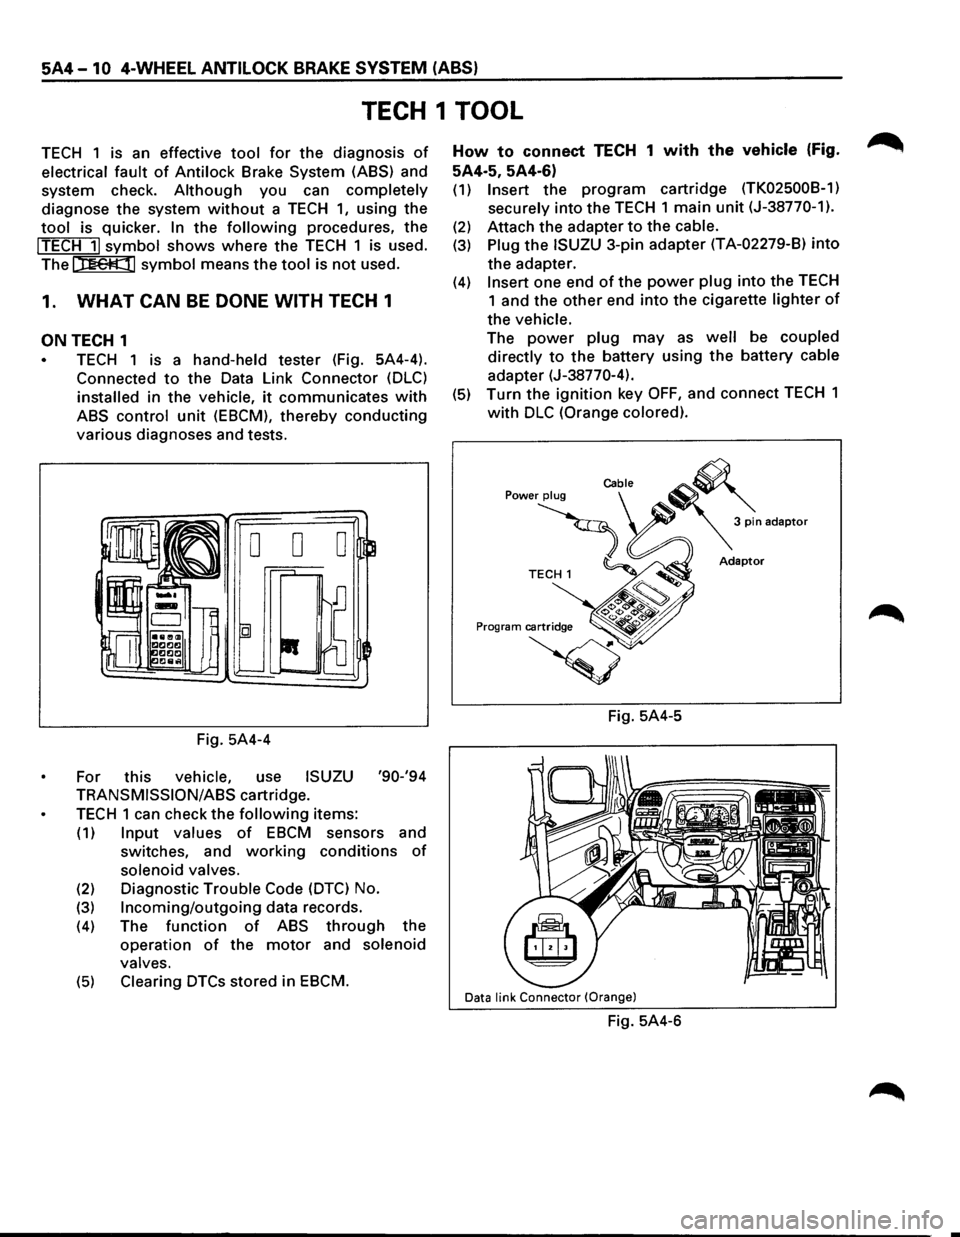
TECH 1 is an effective tool for the diagnosis of
electrical fault of Antilock Brake System (ASS) and
system check.
Although you can completely
diagnose the system without a TECH 1, using the
tool is quicker. In the following procedures, the
!TECH 11 symbol shows where the TECH 1 is used.
The
t::nettll symbol means the tool is not used.
1. WHAT CAN BE DONE WITH TECH 1
ON TECH 1
TECH 1 is a hand-held tester (Fig. 5A4-4).
Connected
to the Data Link Connector (DLC)
installed in the vehicle, it communicates with
ABS control unit (EBCM), thereby conducting
various diagnoses and tests.
Fig. 5A4-4
For this
vehicle, use ISUZU '90-'94
TRANSMISSION/ASS cartridge.
TECH 1 can check the following items:
(1) Input values of EBCM sensors and
switches, and
working conditions of
solenoid valves.
(2) Diagnostic Trouble Code (DTC) No.
(3) Incoming/outgoing data records.
(4) The function of ABS through the
operation
of the motor and solenoid
valves.
(5) Clearing DTCs stored in EBCM.
How to connect TECH 1 with the vehicle (Fig.
5A4·5, 5A4-6)
(1) Insert the program cartridge (TK02500B-1)
securely
into the TECH 1 main unit (J-38770-1).
(2) Attach the adapter to the cable.
(3) Plug the ISUZU 3-pin adapter (T A-02279-8) into
the adapter.
(4) Insert one end of the power plug into the TECH
1 and the other end into the cigarette lighter of
the vehicle.
The power plug may as well be coupled
directly
to the battery using the battery cable
adapter (J-38770-4).
(5) Turn the ignition key OFF, and connect TECH 1
with DLC (Orange colored).
Fig. 5A4-5
Data link Connector (Orange)
Fig. 5A4-6
Page 421 of 1928
4-WHEEL ANTILOCK BRAKE SYSTEM (ABS) 5A4-11
2. HOW TO USE TECH 1
Operating procedure for TECH 1
After connecting with the vehicle, turn the ignition
key
ON and follow the flow chart.
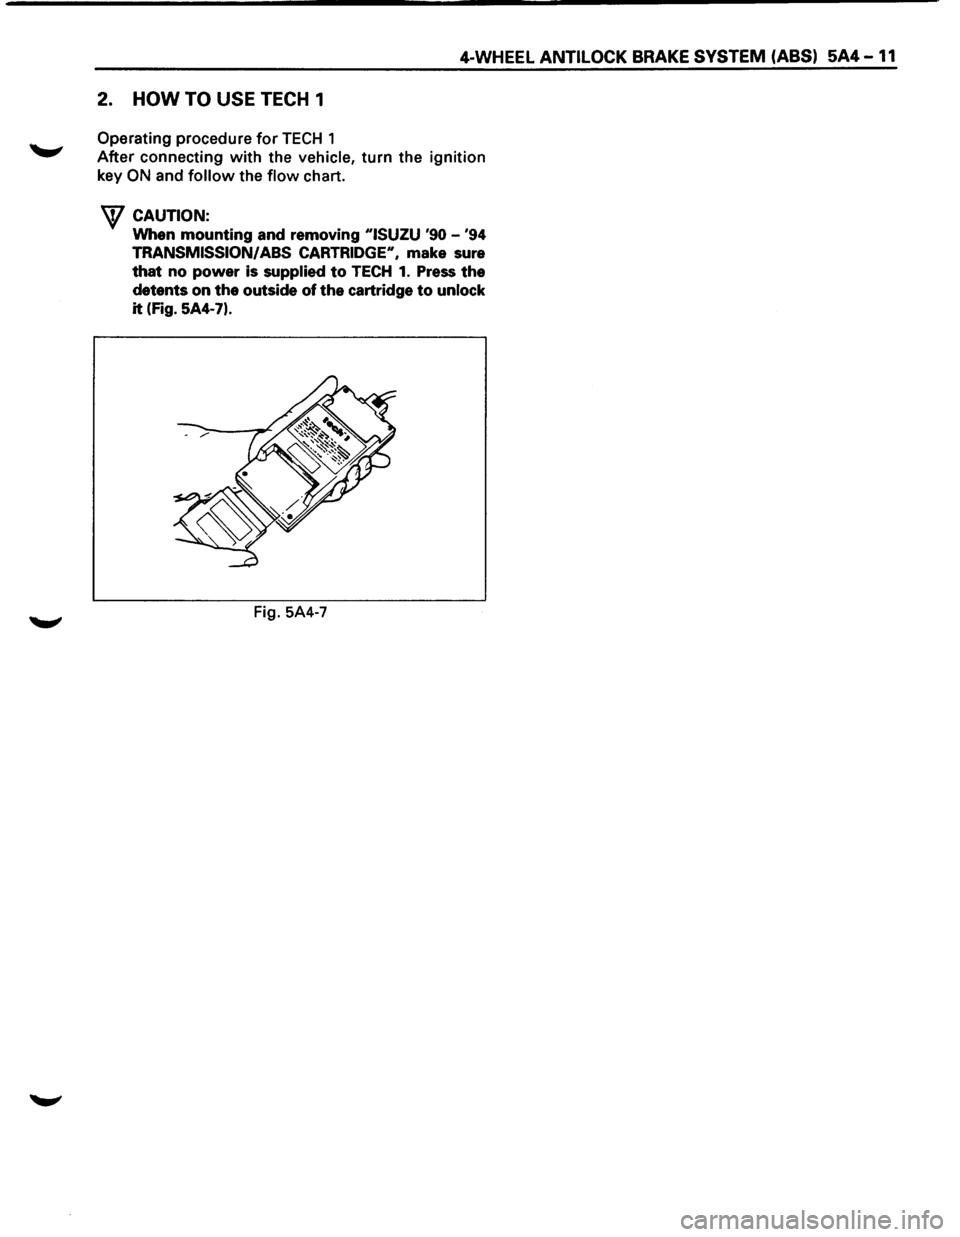
W CAUTION:
When mounting and removing "ISUZU '90 -'94
TRANSMISSION/ ABS CARTRIDGE", make sure
that no power is supplied to TECH 1. Press the
detents on the outside of the cartridge to unlock
it (Fig. 5A4-7).
Fig. 5A4-7