suspension ISUZU TROOPER 1995 Owner's Guide
[x] Cancel search | Manufacturer: ISUZU, Model Year: 1995, Model line: TROOPER, Model: ISUZU TROOPER 1995Pages: 1928
Page 184 of 1928
3C-20 FRONT SUSPENSION
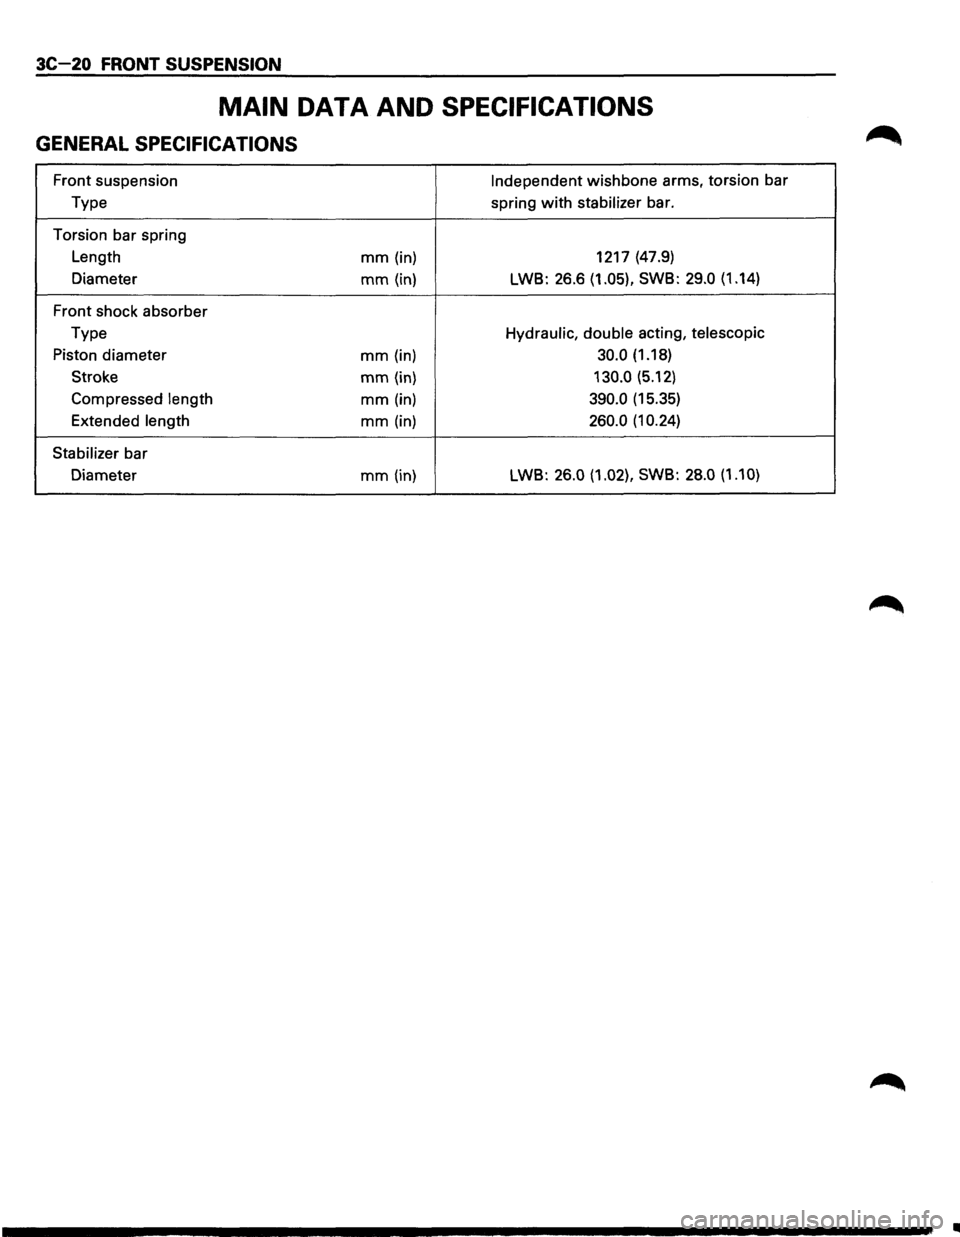
MAIN DATA AND SPECIFICATIONS
GENERAL SPECIFICATIONS
Front suspension Independent wishbone arms, torsion bar
Type spring
with stabilizer bar.
Torsion bar spring
Length
mm (in) 1217
(47.9)
Diameter
mm (in) LWB: 26.6 (1.05), SWB: 29.0 (1.14)
Front shock absorber
Type
Hydraulic, double acting, telescopic
Piston diameter mm (in) 30.0 (1.18)
Stroke
mm (in) 130.0 (5.12)
Compressed
length mm (in) 390.0 (15.35)
Extended
length mm (in) 260.0 (1 0.24)
Stabilizer
bar
Diameter
mm (in) LWB: 26.0 (1.02),
SWB: 28.0 (1.10)
•
Page 185 of 1928
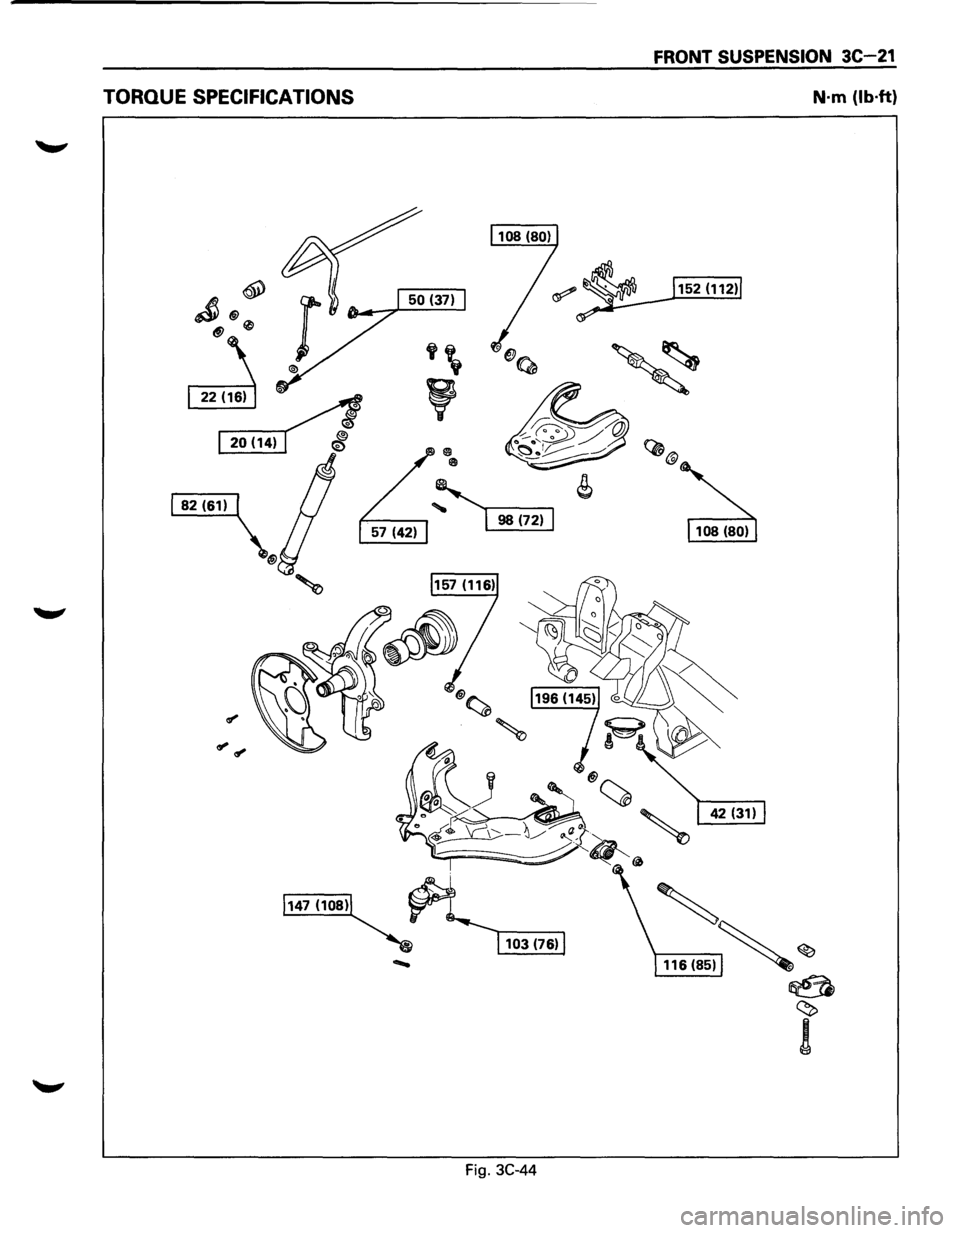
TORQUE SPECIFICATIONS
Fig. 3C-44
FRONT SUSPENSION 3C-21
N·m (lb·ft)
' 116(85)~ ~
~
~
!
Page 186 of 1928
3C 22 FRONT SUSPENSION
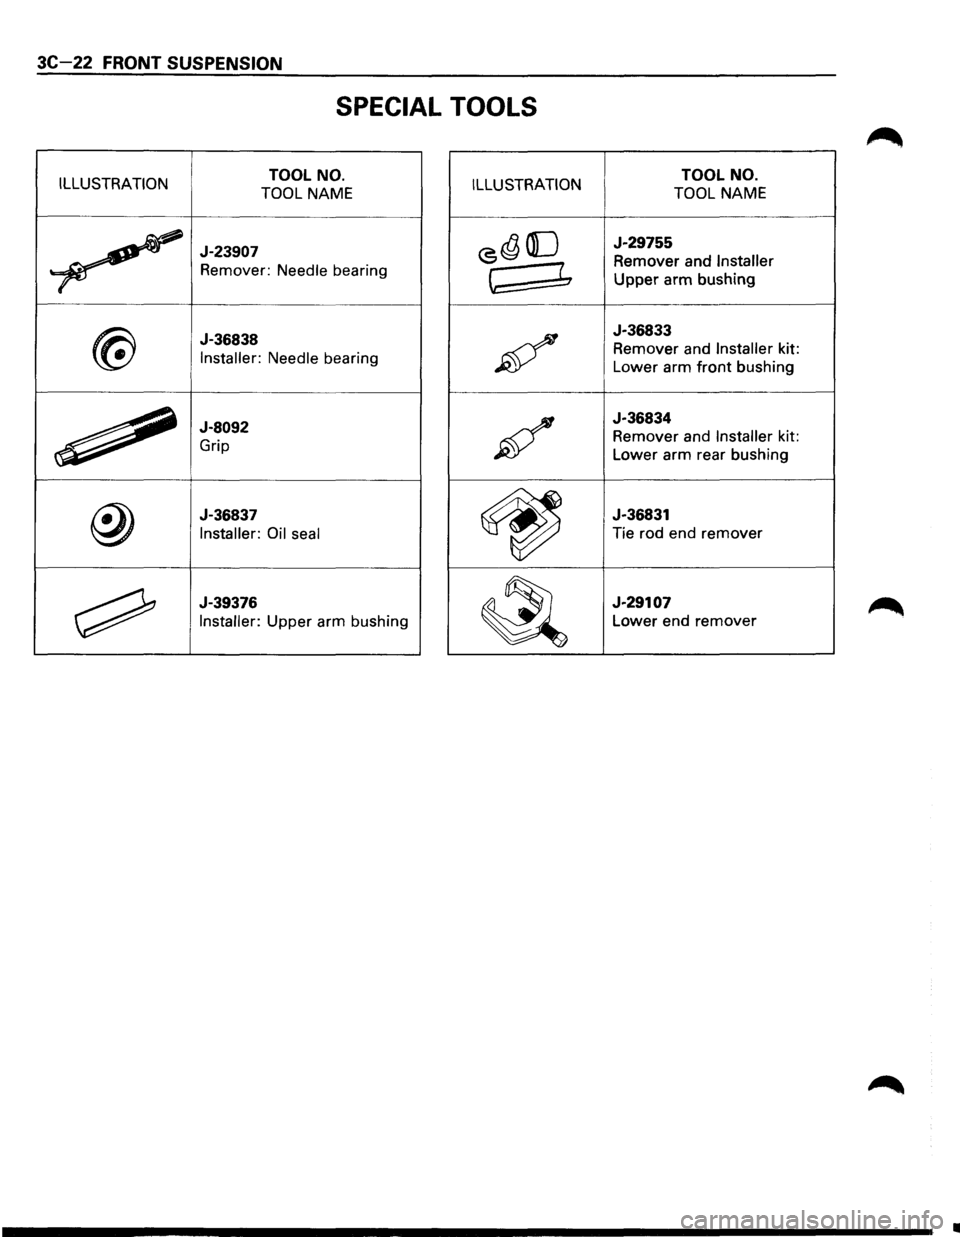
SPECIAL TOOLS
ILLUSTRATION TOOL NO.
TOOL NAME ILLUSTRATION TOOL NO.
TOOL NAME
~
J-23907
Remover: Needle bearing
<5~ ([] J-29755
Remover and Installer
~ ~ Upper arm bushing
@
J-36838
Installer: Needle bearing ~
J-36833
Remover and Installer kit:
Lower arm
front bushing
~
J-8092
Grip ;6/
J-36834
Remover and Installer kit:
Lower arm rear bushing
@
J-36837
Installer: Oil seal
~
J-36831
Tie rod end remover
~
J-39376
Installer: Upper arm bushing
~
J-29107
Lower end remover
•
Page 187 of 1928
REAR SUSPENSION 30-1
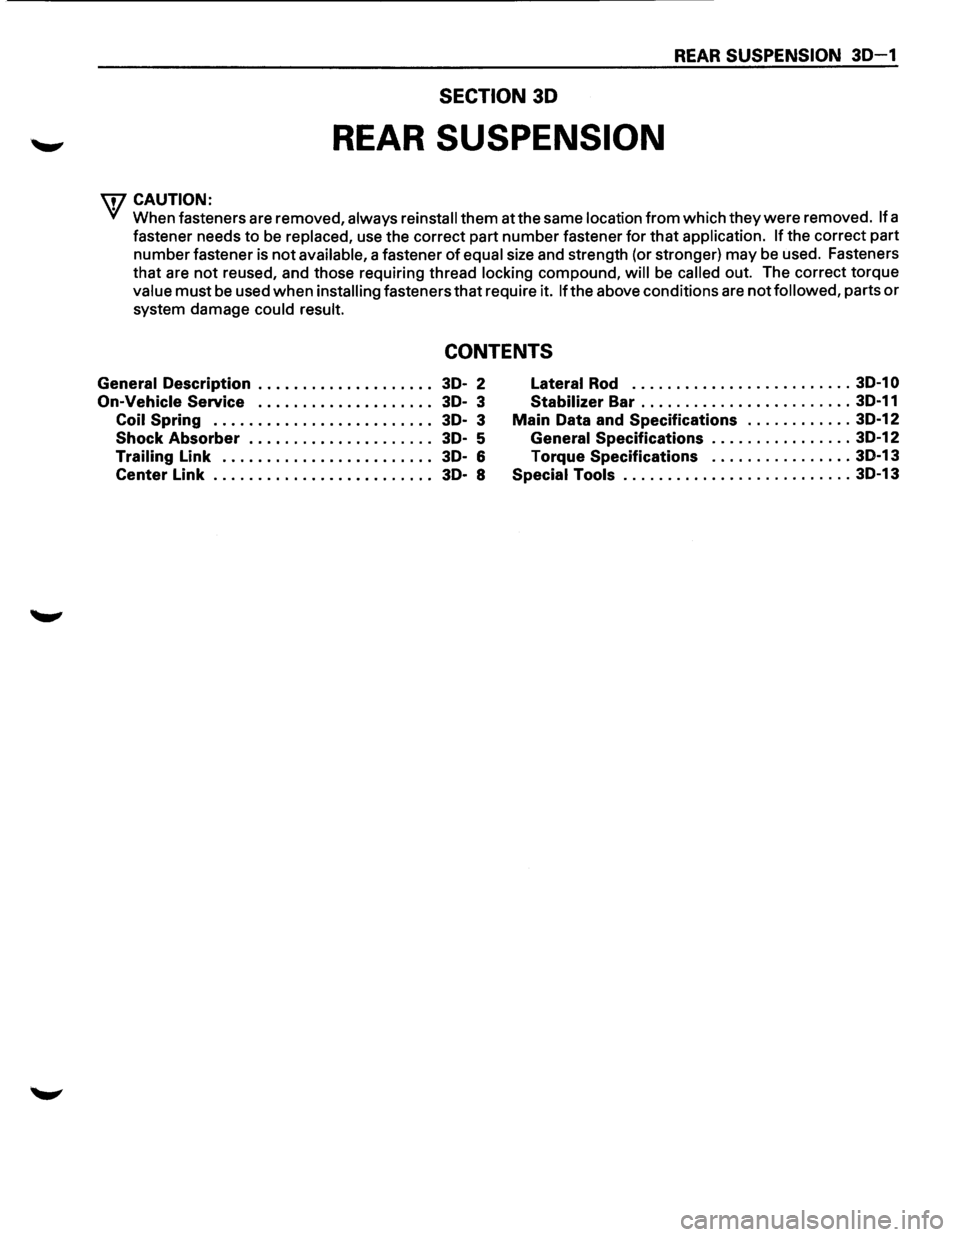
SECTION 30
REAR SUSPENSION
WCAUTION:
VI When fasteners are removed, always reinstall them at the same location from which they were removed. If a
fastener needs to be
replaced, use the correct part number fastener for that application. If the correct part
number fastener is
not available, a fastener of equal size and strength (or stronger) may be used. Fasteners
that are
not reused, and those requiring thread locking compound, will be called out. The correct torque
value must be used when installing fasteners that require it. If the above conditions are not followed, parts or
system damage could result.
CONTENTS
General Description . . . . . . . . . . . . . . . . . . . . 3D-2
On-Vehicle Service .................... 3D-3
Coil Spring . .
. . . . . . . . . . . . . . . . . . . . . . . 3D· 3
Shock
Absorber . . . . . . . . . . . . • . . . . . . . . 3D-5
Trailing Link . .
. . . . . . . . . . . . . . . . . . . . . . 3D-6
Center
Link . . • . . . . . . . . . . • . . . . . . . . . . . 3D-8
Lateral Rod ......................... 3D-1 0
Stabilizer Bar ........................ 3D-11
Main Data and Specifications ............ 3D-12
General Specifications ................ 3D-12
Torque Specifications
................ 30-13
Special Tools .......................... 3D-13
Page 188 of 1928
30-2 REAR SUSPENSION
GENERAL DESCRIPTION
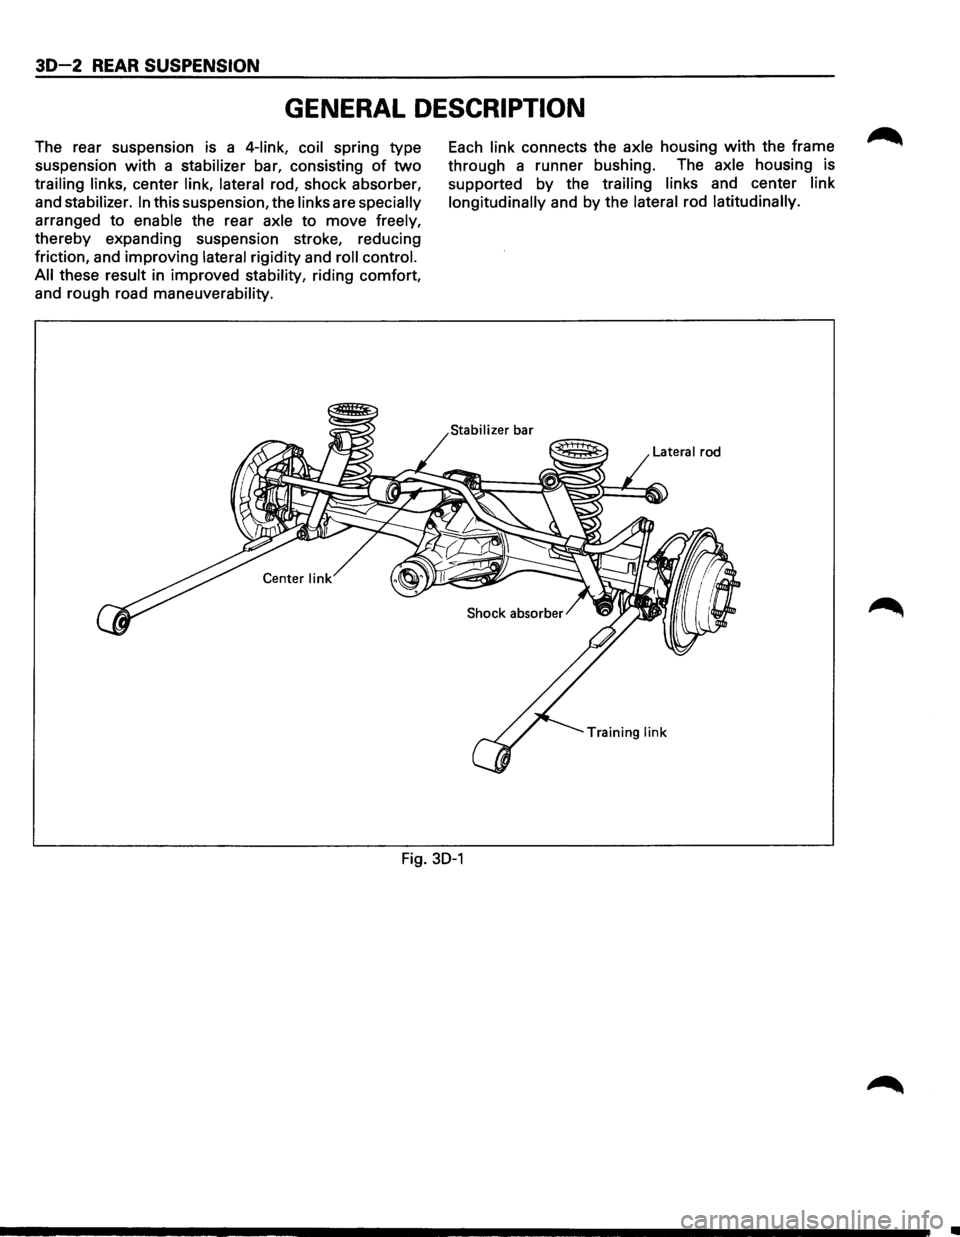
The rear suspension is a 4-link, coil spring type
suspension
with a stabilizer bar, consisting of two
trailing links, center link, lateral rod, shock absorber,
and
stabilizer. In this suspension, the links are specially
arranged to enable the rear axle to move freely,
thereby expanding suspension stroke, reducing
friction, and improving
lateral rigidity and roll control.
All
these result in improved stability, riding comfort,
and rough road
maneuverability.
Each link connects the axle housing with the frame
through a runner bushing. The
axle housing is
supported
by the trailing links and center link
longitudinally
and by the lateral rod latitudinally.
Lateral rod
Training
link
Fig. 30-1
•
Page 189 of 1928
REAR SUSPENSION 30-3
ON-VEHICLE SERVICE
COIL SPRING
3
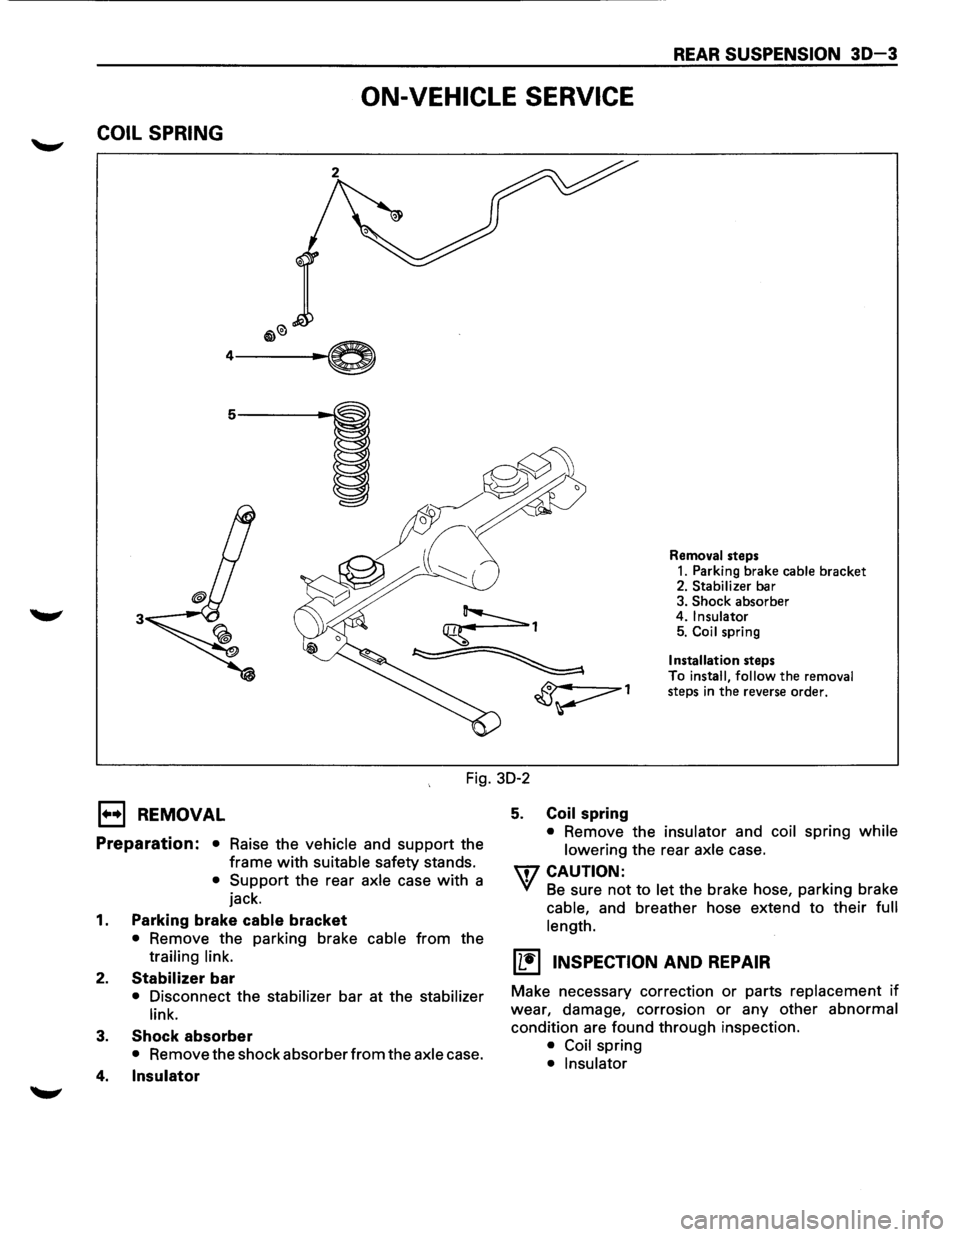
Removal steps
1. Parking brake cable bracket 2. Stabilizer bar
3. Shock absorber
4. Insulator 5. Coil spring
Installation steps
To install,
follow the removal
steps in the reverse order.
Fig. 30-2
E) REMOVAL
Preparation: • Raise the vehicle and support the
frame
with suitable safety stands.
• Support the rear axle case with a
jack.
1. Parking brake cable bracket
• Remove the parking brake cable from the
trailing link.
2. Stabilizer bar
• Disconnect the stabilizer bar at the stabilizer
link.
3. Shock absorber
• Remove the shock absorber from the axle case.
4. Insulator
5. Coil spring
• Remove the insulator and coil spring while
lowering
the rear axle case.
U7 CAUTION:
VI Be sure not to let the brake hose, parking brake
cable, and breather hose extend to their full
length.
(L!] INSPECTION AND REPAIR
Make necessary correction or parts replacement if
wear, damage, corrosion or any other abnormal
condition are found through inspection.
• Coil spring
• Insulator
Page 190 of 1928
30-4 REAR SUSPENSION
I••IINSTALLATION
5. Coil spring
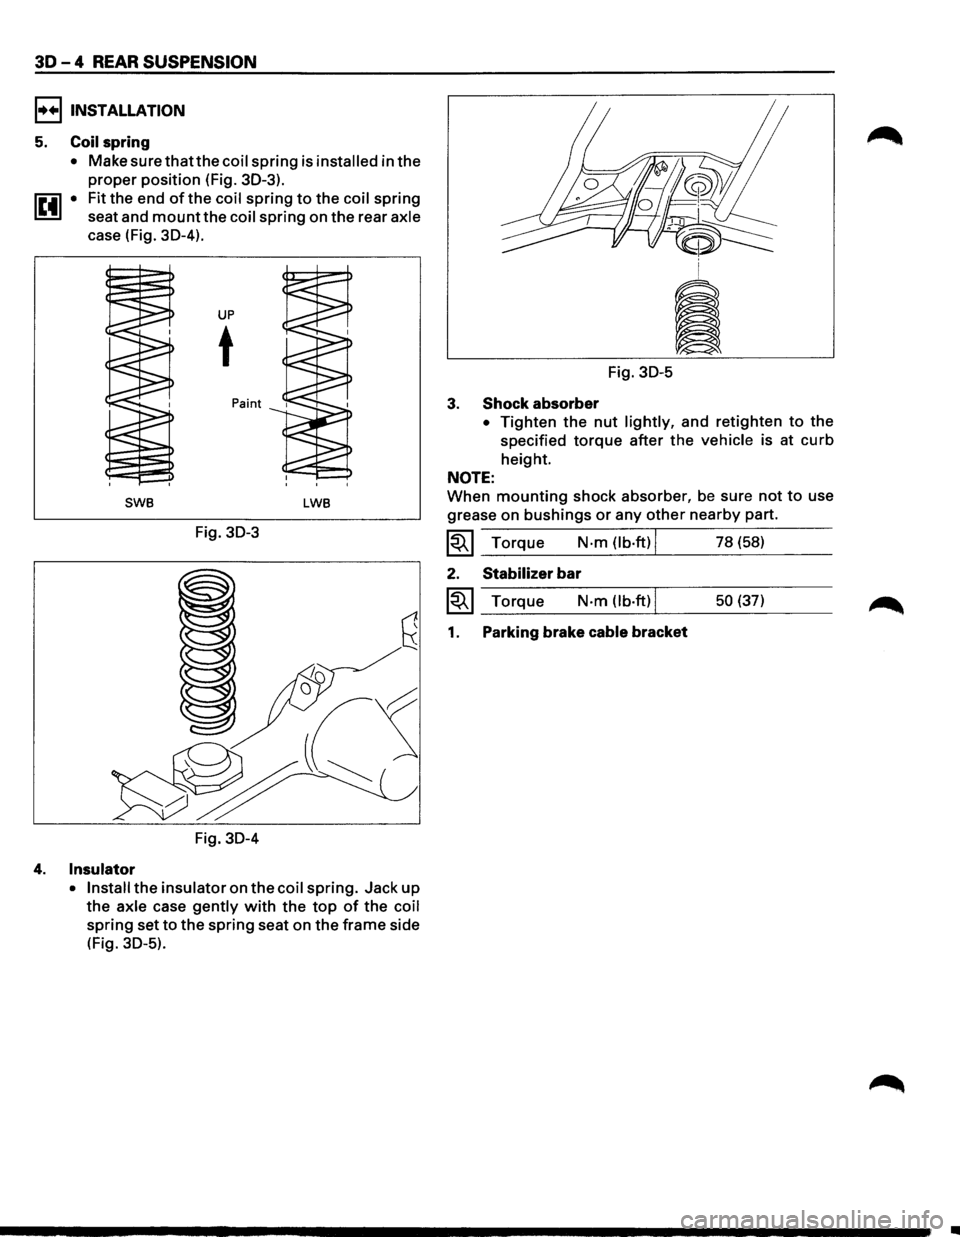
• Make surethatthecoil spring is installed in the
proper position (Fig. 30-3).
1~41 • Fit the end of the coil spring to the coil spring
seat and
mount the coil spring on the rear axle
case (Fig. 30-4).
UP
t
Paint
SWB LWB
Fig. 30-3
Fig. 30-4
4. Insulator
• Install the insulator on the coil spring. Jack up
the axle case gently with the top of the coil
spring set to the spring seat on the frame side
(Fig.
30-5).
Fig. 30-5
3. Shock absorber
• Tighten the nut lightly, and retighten to the
specified
torque after the vehicle is at curb
height.
NOTE:
When mounting shock absorber, be sure not to use
grease on
bushings or any other nearby part.
~~~ Torque N·m (lb.ft) I 78 (58)
2. Stabilizer bar
~~~ Torque N·m (lb·ft) I 50 (37)
1. Parking brake cable bracket
•
Page 191 of 1928
SHOCK ABSORBER
REAR SUSPENSION 30-5
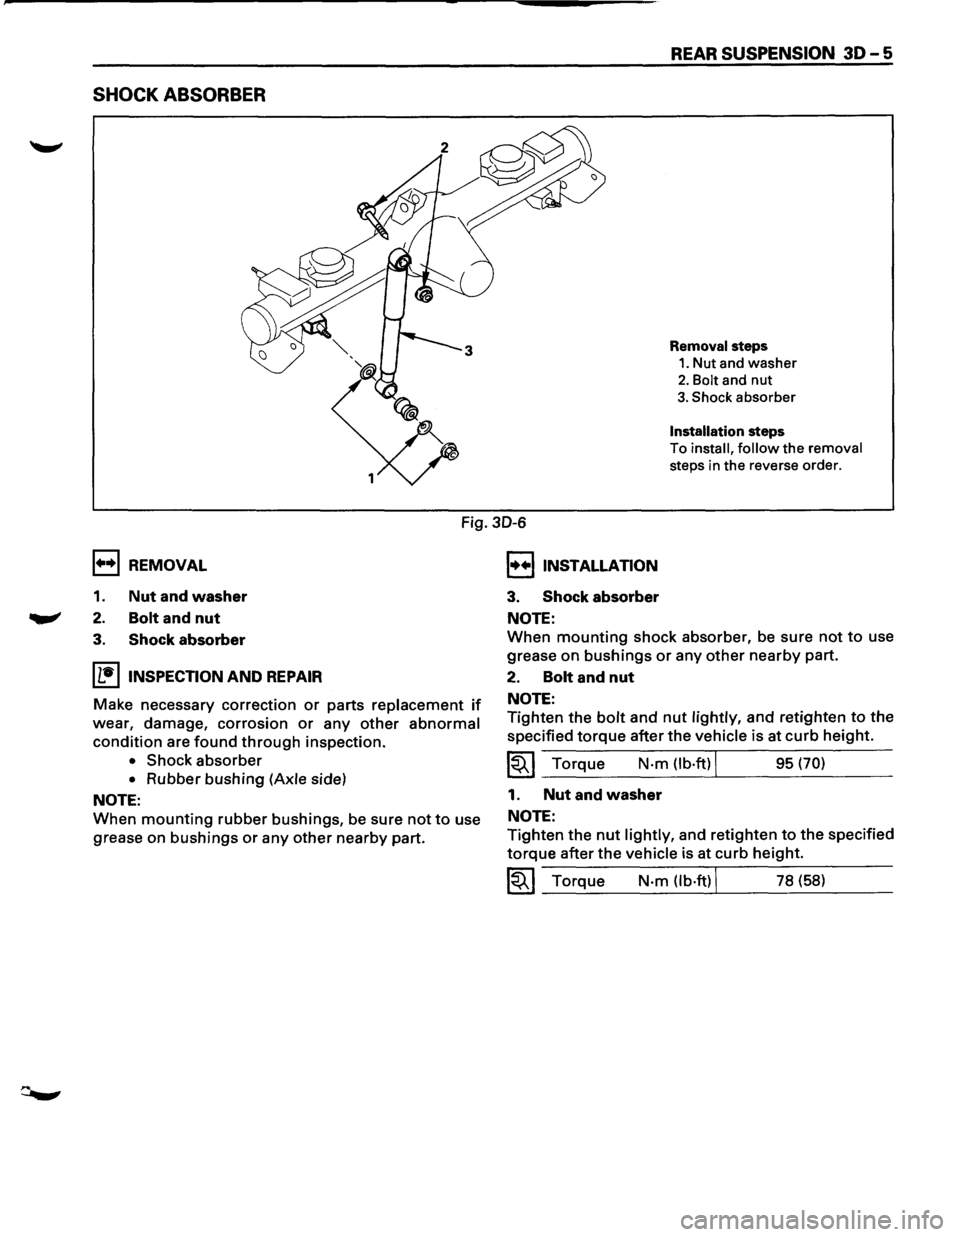
Removal steps
1. Nut and washer
2. Bolt and nut
3. Shock absorber
Installation steps
To
install, follow the removal
steps in the reverse order.
1++1 REMOVAL
1. Nut and washer
2. Bolt and nut
Fig. 30-6
I••IINSTALLATION
3. Shock absorber
NOTE:
3. Shock absorber
IL•IINSPECTION AND REPAIR
Make necessary correction or parts replacement if
wear, damage, corrosion or any other abnormal
condition are found through inspection.
• Shock absorber
• Rubber bushing (Axle side)
NOTE:
When mounting rubber bushings, be sure not to use
grease
on bushings or any other nearby part.
When mounting shock absorber, be sure not to use
grease
on bushings or any other nearby part.
2. Bolt and nut
NOTE:
Tighten the bolt and nut lightly, and retighten to the
specified torque after the vehicle is at curb height.
~~~ Torque N·m (lb·ftl J 95 (70)
1. Nut and washer
NOTE:
Tighten the nut lightly, and retighten to the specified
torque after the vehicle is at curb height.
~~~ Torque N·m (lb·ftl J 78 (58)
Page 192 of 1928
···------
30-6 REAR SUSPENSION
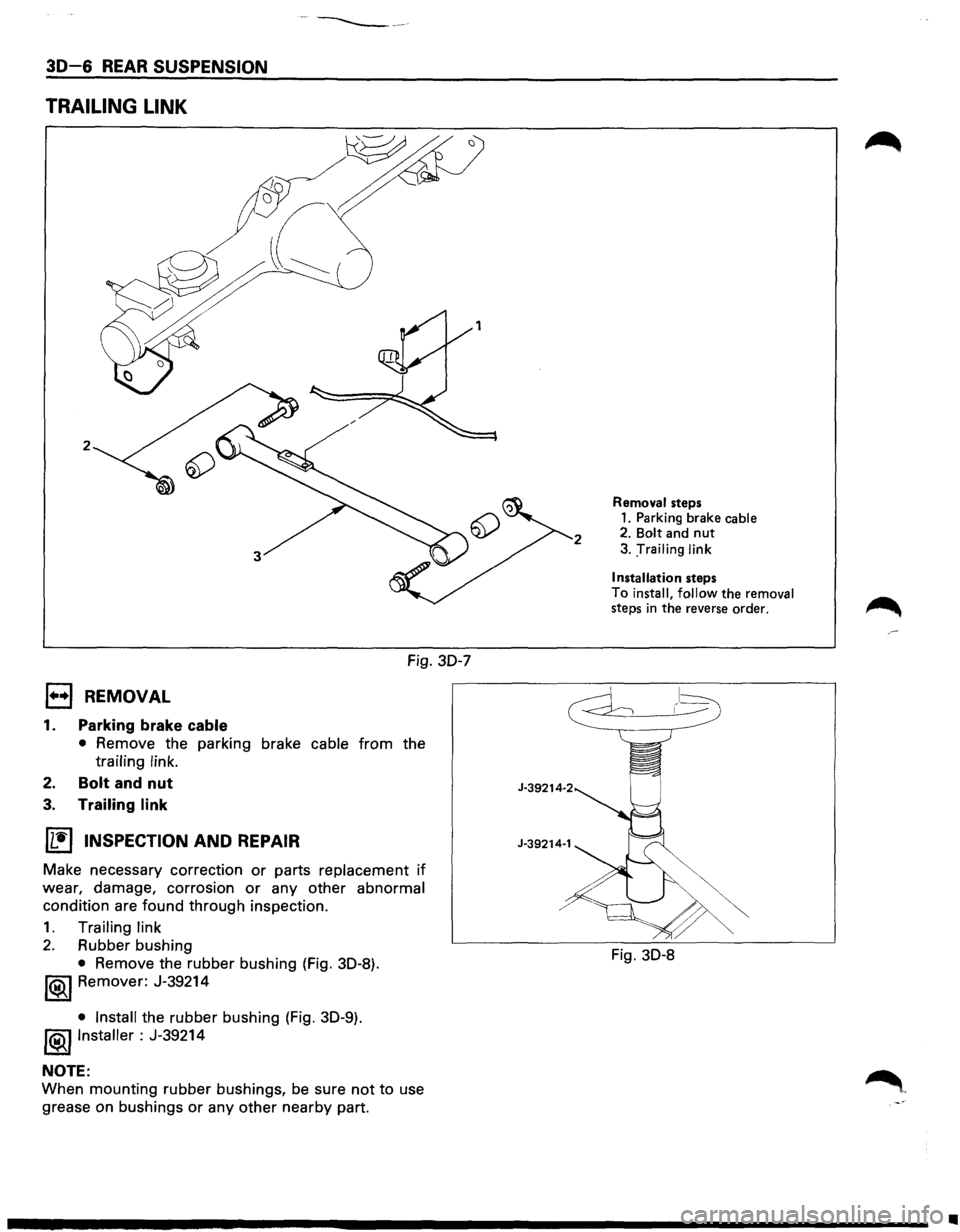
TRAILING LINK
2
Fig. 30-7
l••l REMOVAL
1. Parking brake cable
• Remove the parking brake cable from the
trailing link.
2. Bolt and nut
3. Trailing link
IL•I INSPECTION AND REPAIR
Make necessary correction or parts replacement if
wear, damage, corrosion or any other abnormal
condition are found through inspection.
1. Trailing link
2. Rubber bushing
• Remove the rubber bushing (Fig. 30-8).
1®..1 Remover: J-39214
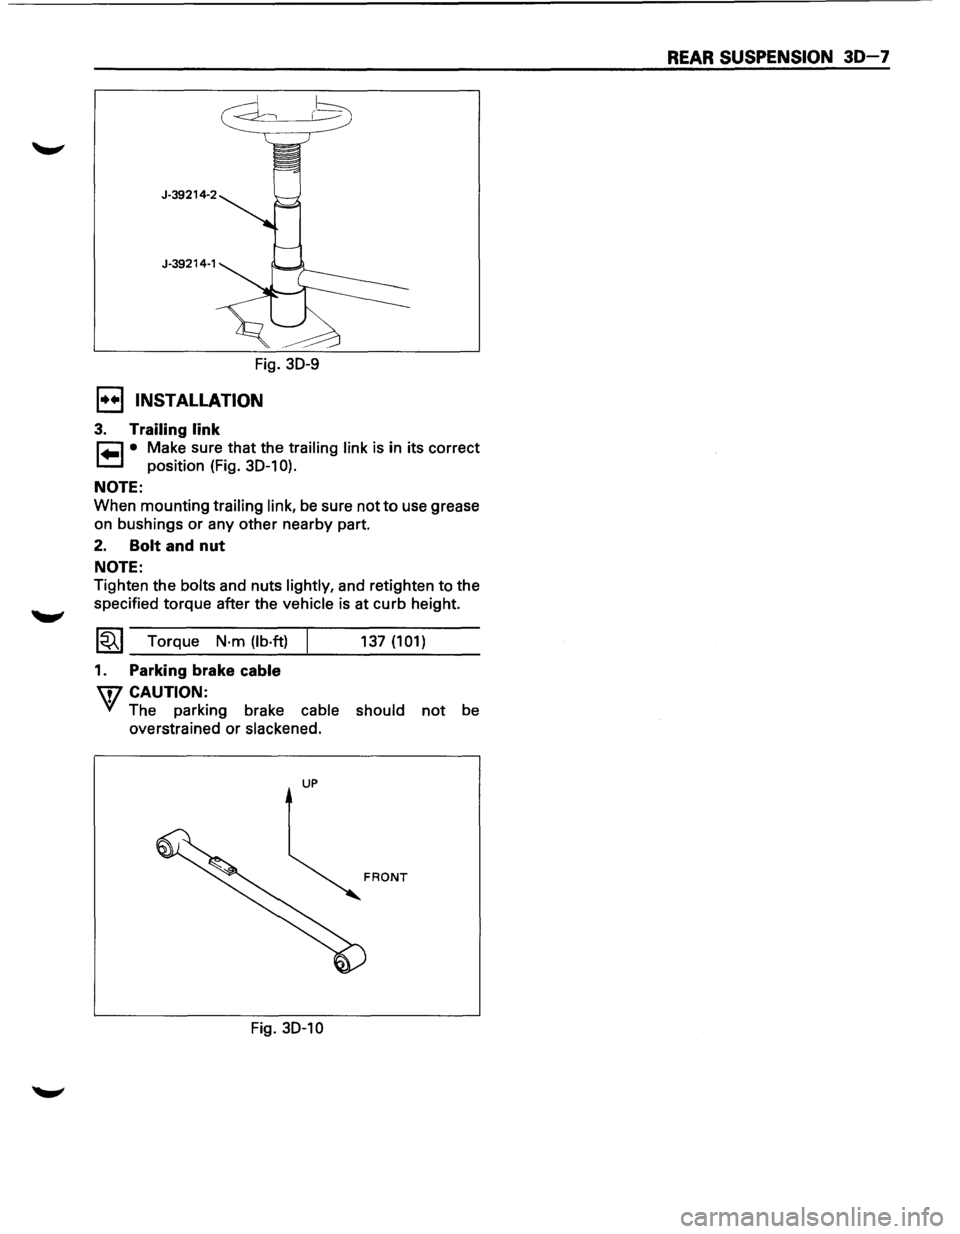
• Install the rubber bushing (Fig. 30-9).
!®I Installer : J-39214
NOTE:
When mounting rubber bushings, be sure not to use
grease on bushings
or any other nearby part.
2
J-39214·2
J-39214·1
Removal steps 1. Parking brake cable 2. Bolt and nut
3. :rrailing link
I
nsta llatio n steps
To install, follow the removal steps in the reverse order. ~
..----- 1-~
Fig. 30-8
•
Page 193 of 1928
J-39214-2 J-39214-1
Fig. 30-9
1••1 INSTALLATION
3. Trailing link
~ • Make sure that the trailing link is in its correct
1.=.1 position (Fig. 30-1 0).
NOTE:
When mounting trailing link, be sure not to use grease
on bushings or any other nearby part.
2. Bolt and nut
NOTE:
Tighten the bolts and nuts lightly, and retighten to the
specified torque after the
vehicle is at curb height.
1~1 Torque N·m (lb·ft)
1. Parking brake cable
W CAUTION:
137 (101)
VI The parking brake cable should not be
overstrained or
slackened.
UP
Fig. 30-10
REAR SUSPENSION 30-7