steering ISUZU TROOPER 1995 Service Manual
[x] Cancel search | Manufacturer: ISUZU, Model Year: 1995, Model line: TROOPER, Model: ISUZU TROOPER 1995Pages: 1928
Page 156 of 1928
381-18 POWER STEERING GEAR AND PUMP
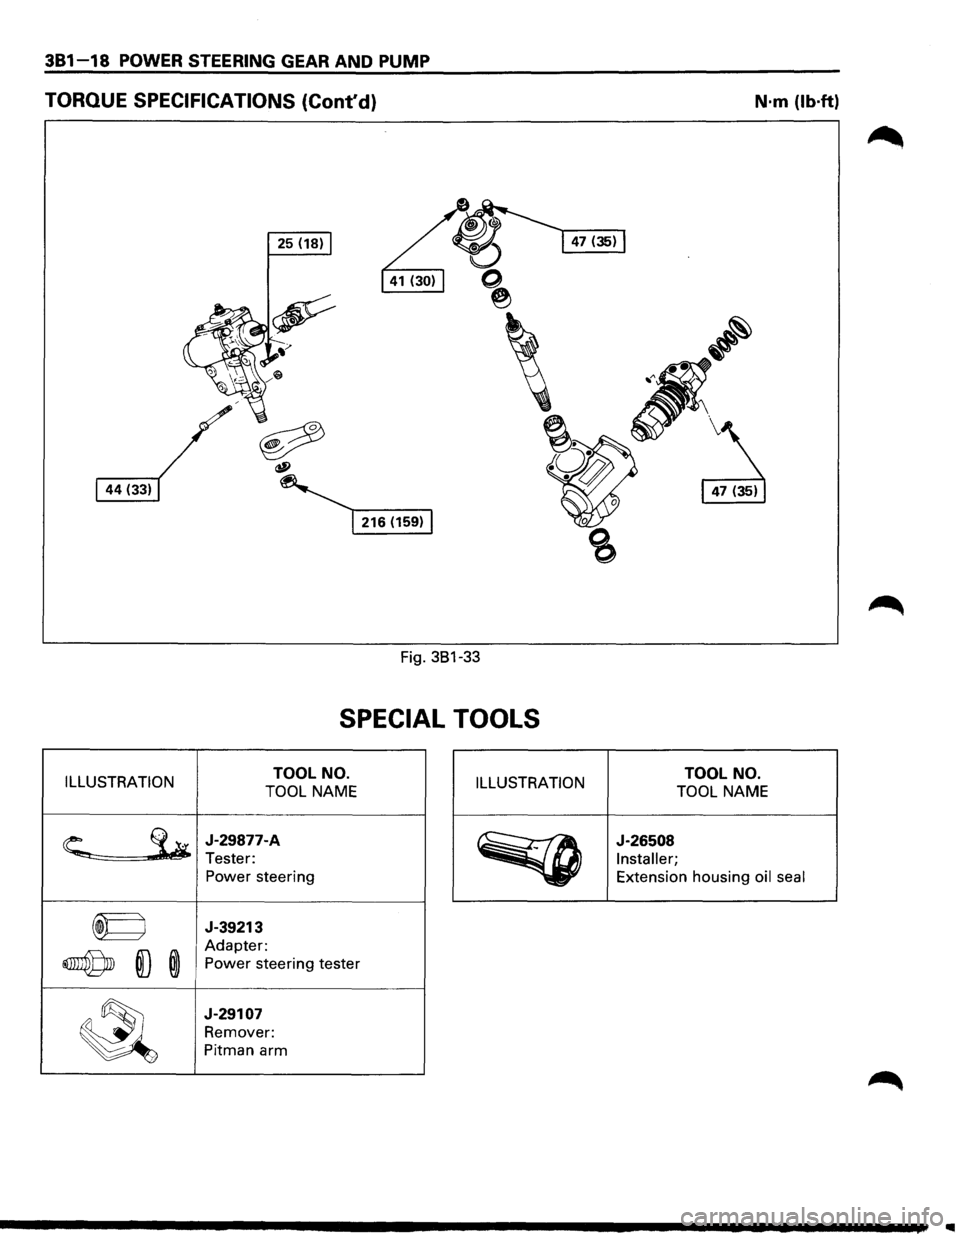
TORQUE SPECIFICATIONS (Cont'd) N·m (lb·ft)
25 (18)
Fig. 381-33
SPECIAL TOOLS
ILLUSTRATION TOOL
NO.
TOOL NAME ILLUSTRATION TOOL
NO.
TOOL NAME
~
J-29877-A
Tester: Power steering
~
J-26508
Installer;
Extension housing oil seal
~ J-39213
~ ID ®
Adapter:
Power steering tester
~
J-29107
Remover:
Pitman arm
Page 157 of 1928
STEERING LINKAGE 383-1
SECTION 383
STEERING LINKAGE
w CAUTION:
• When fasteners are removed, always reinstall them at the same location from which they were removed. If a
fastener needs
to be replaced, use the correct part number fastener for that application. If the correct part
number fastener is not available, a fastener of equal size and strength (or stronger) may be used. Fasteners
that are not reused, and those requiring thread locking compound, will be called out. The correct torque
value must be used when installing fasteners that require it. If the above conditions are not followed, parts or
system damage could result.
CONTENTS
General Description . . . . . . . . . . . . . . . . . . . . 383-1
On-Vehicle Service .................... 383-2
Center Track Rod Assembly . . . . . . . . . . . 383-2
Outer Track Rod Assembly . . . . . . . . . . . . 383-4
Relay Lever . . . . . . . . . . . . . . . . . . . . . . . . . 383-6 Main
Data
and Specifications ............ 383-8
Torque Specifications
................ 383-8
Special Tools .......................... 383-8
GENERAL DESCRIPTION
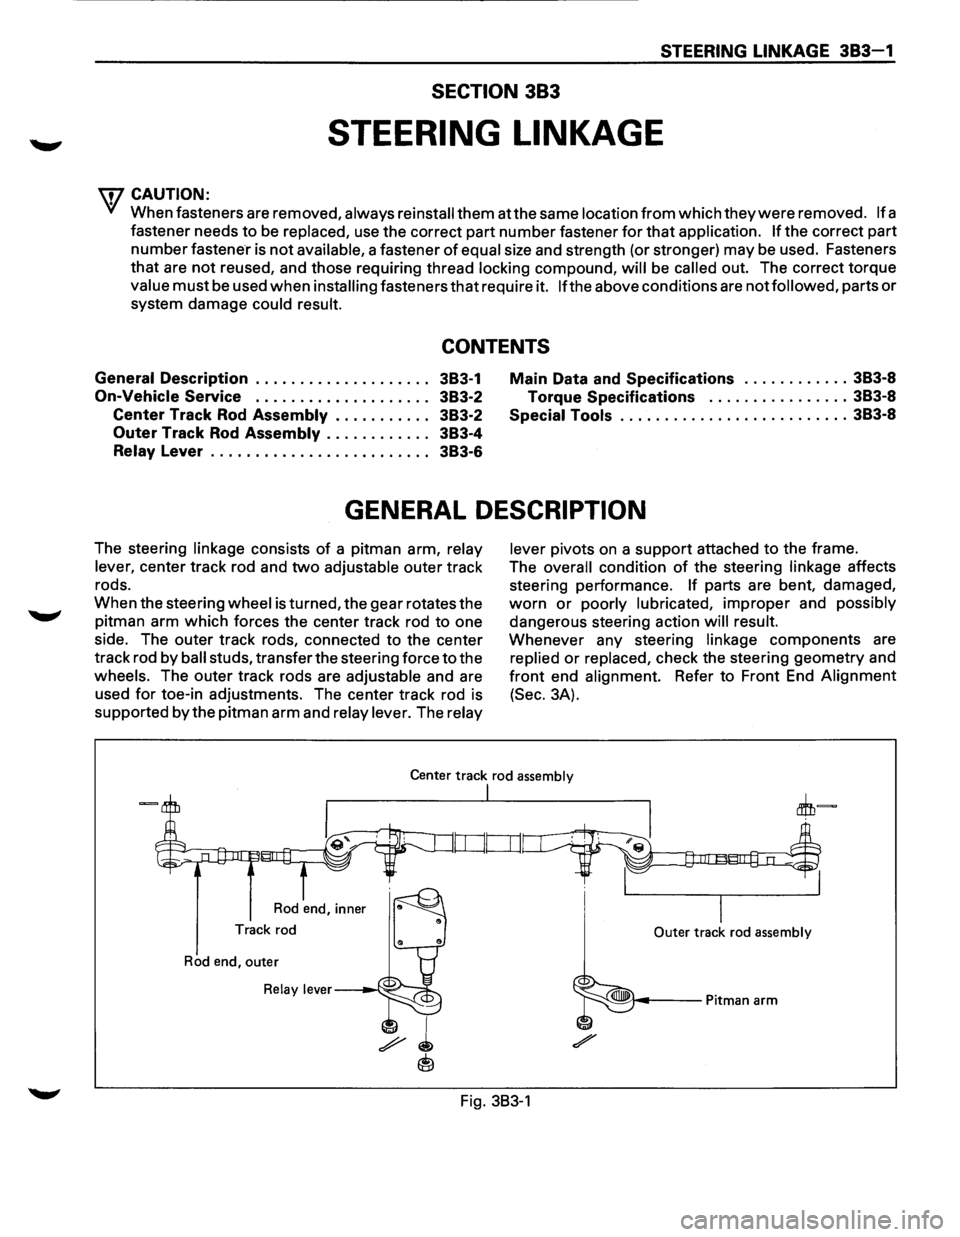
The steering linkage consists of a pitman arm, relay
lever,
center track rod and two adjustable outer track
rods.
When the steering
wheel is turned, the gear rotates the
pitman arm
which forces the center track rod to one
side. The outer track rods, connected to the center
track rod
by ball studs, transfer the steering force to the
wheels. The outer track rods are adjustable and are
used
for toe-in adjustments. The center track rod is
supported
by the pitman arm and relay lever. The relay lever
pivots
on a support attached to the frame.
The
overall condition of the steering linkage affects
steering performance.
If parts are bent, damaged,
worn or poorly lubricated, improper and possibly
dangerous steering action will result.
Whenever any steering linkage components are
replied or replaced, check the steering geometry and
front end alignment. Refer to Front End Alignment
(Sec. 3A).
Center track rod assembly
Rod end, inner
Track rod
Rod end, outer
Relay lever---~·--:;:::jo
I
I Outer track rod assembly
Fig. 383-1
Page 158 of 1928
383-2 STEERING LINKAGE
ON-VEHICLE SERVICE
CENTER TRACK ROD ASSEMBL V
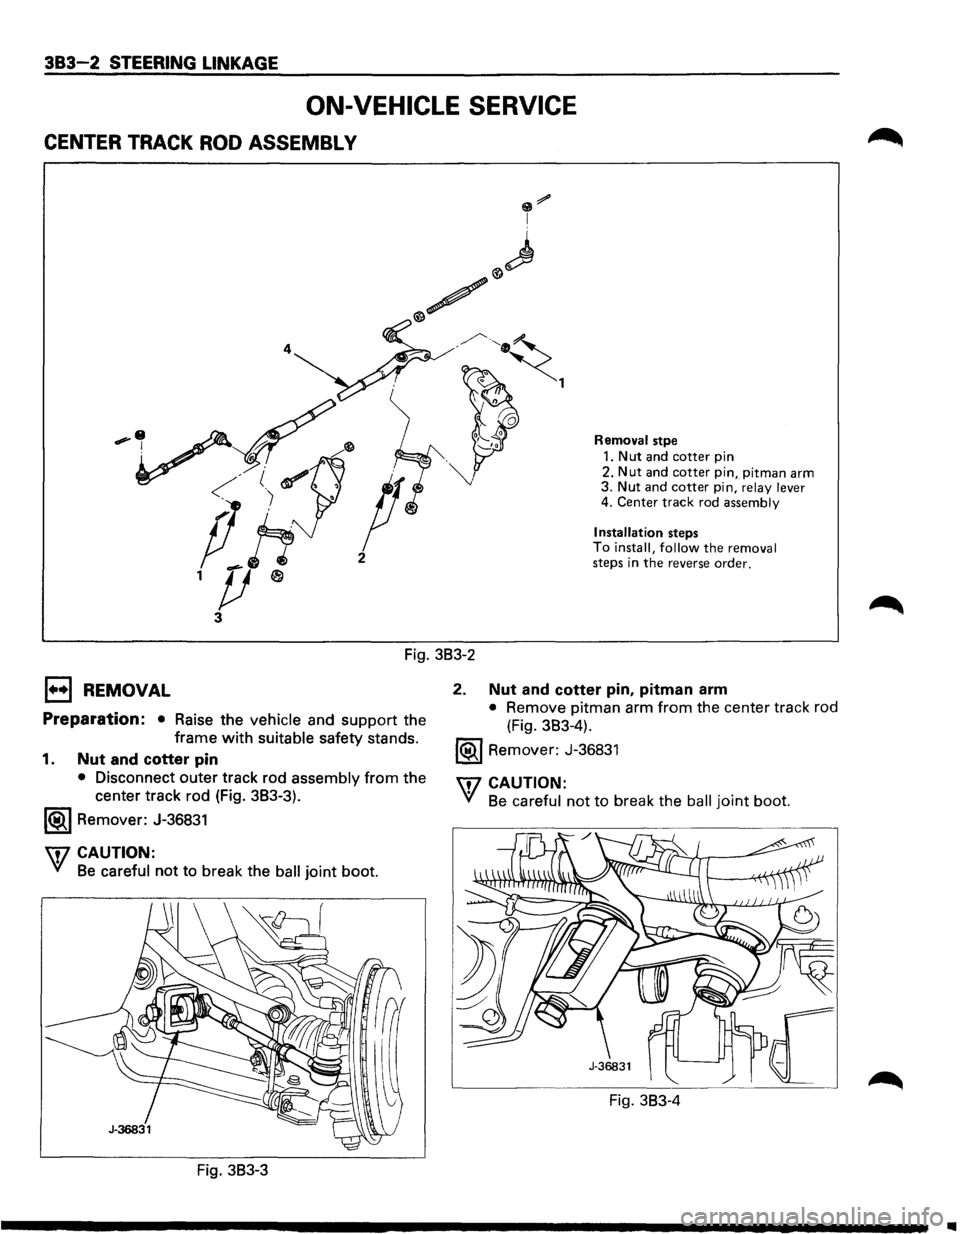
Removal stpe
1. Nut and cotter pin
2.
Nut and cotter pin, pitman arm 3. Nut and cotter pin, relay lever 4. Center track rod assembly
Installation
steps To install, follow the removal steps in the reverse order.
Fig. 3B3-2
1••1 REMOVAL
Preparation: • Raise the vehicle and support the
frame
with suitable safety stands.
1. Nut and cotter pin
• Disconnect outer track rod assembly from the
center track rod (Fig. 3B3-3).
1®.1 Remover: J-36831
U7 CAUTION:
V/ Be careful not to break the ball joint boot.
Fig. 3B3-3
2. Nut and cotter pin, pitman arm
• Remove pitman arm from the center track rod
(Fig. 3B3-4).
1®1 Remover: J-36831
\f7 CAUTION:
VI Be careful not to break the ball joint boot.
Fig. 3B3-4
..
Page 159 of 1928
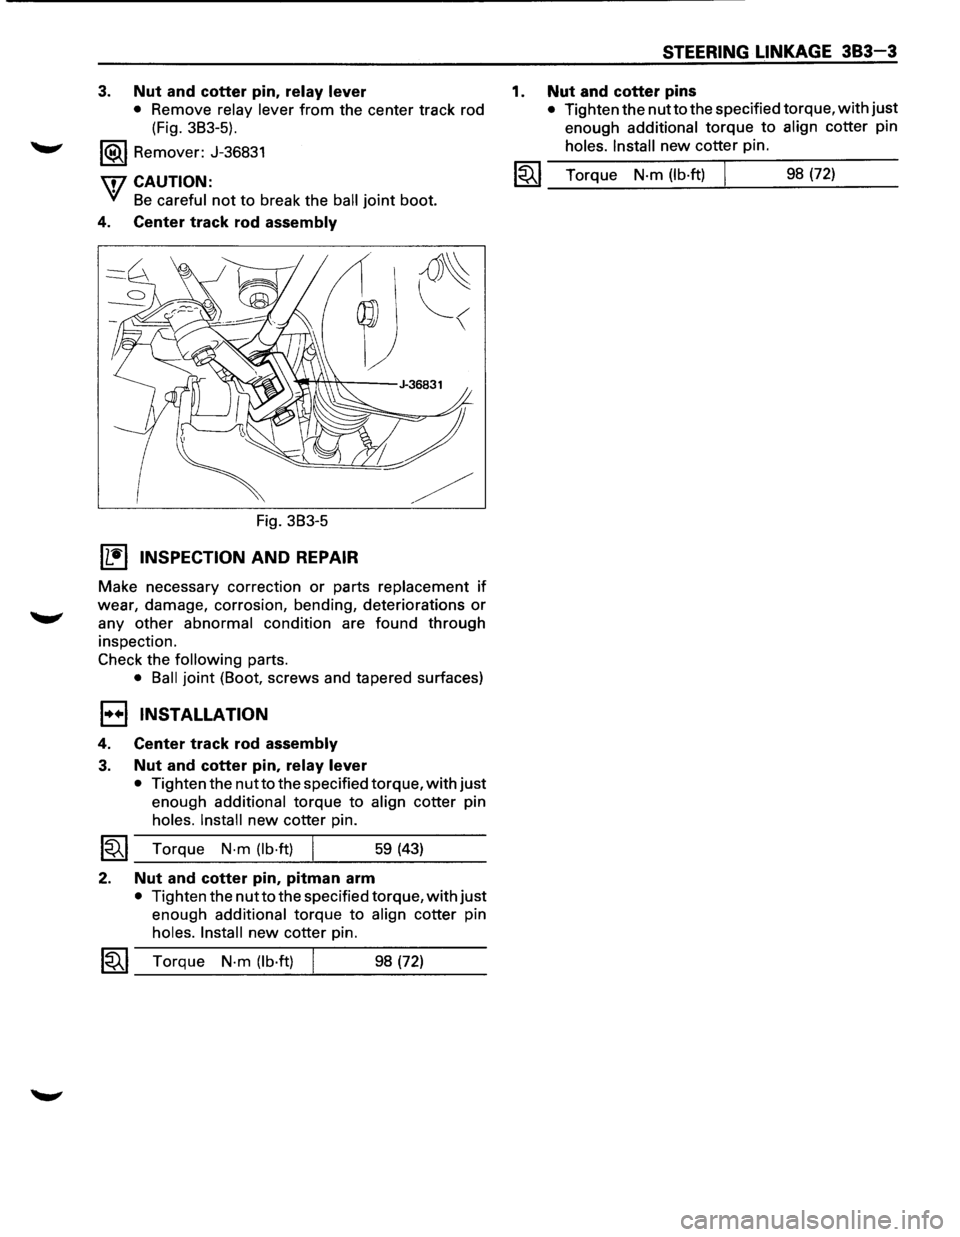
3. Nut and cotter pin, relay lever
• Remove relay lever from the center track rod
(Fig. 3B3-5).
1®.1 Remover: J-36831
\flCAUTION:
'VI Be careful not to break the ball joint boot.
4. Center track rod assembly
Fig. 3B3-5
Wtl INSPECTION AND REPAIR
~
Make necessary correction or parts replacement if
wear, damage, corrosion, bending, deteriorations or
any other abnormal condition are found through
inspection.
Check the
following parts.
• Ball joint (Boot, screws and tapered surfaces)
1••1 INSTALLATION
4. Center track rod assembly
3. Nut and cotter pin, relay lever
• Tighten the nutto the specified torque, with just
enough additional torque to align cotter pin
holes. Install new cotter pin.
~~~ Torque N·m (lb·ft) 59 (43)
2. Nut and cotter pin, pitman arm
• Tighten the nut to the specified torque, with just
enough additional torque to align cotter pin
holes. Install new cotter pin.
1~1 Torque N-m (lb·ft) 98 (72)
1.
STEERING LINKAGE 383-3
Nut and cotter pins
• Tighten the nutto the specified torque, with just
enough
additional torque to align cotter pin
holes. Install new cotter pin.
I~I_T_o_rq..;...u_e_N_·m_(l_b_·ft_) ___t_ ___ 9_8_(7_2_) __ _
Page 160 of 1928
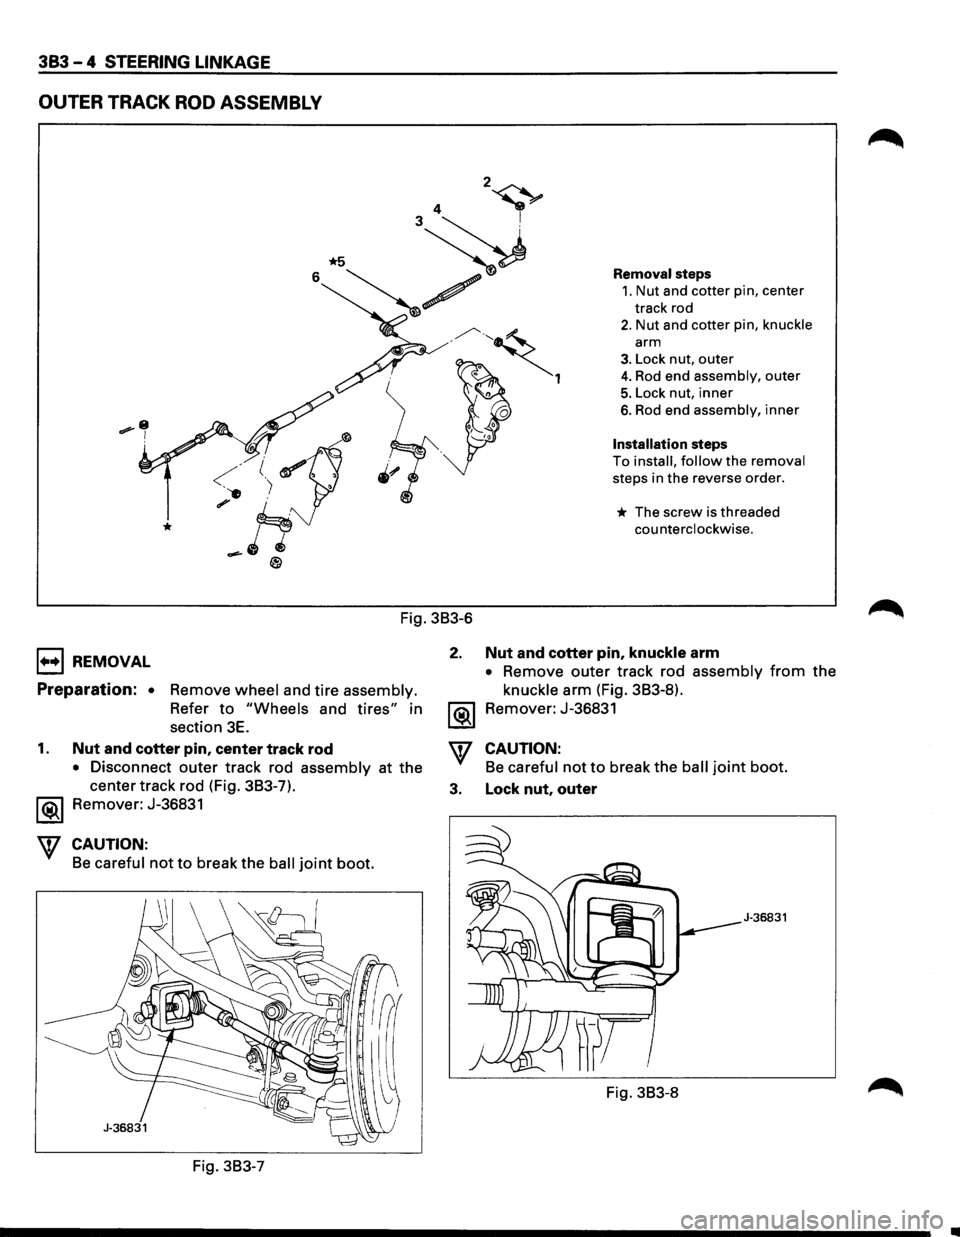
383 - 4 STEERING LINKAGE
OUTER TRACK ROD ASSEMBLY
1+•1 REMOVAL
Fig. 3B3-6
2.
Preparation: • Remove wheel and tire assembly.
Refer to "Wheels and tires" in
section
3E. ~
Removal steps
1. Nut and cotter pin, center
track rod
2. Nut and cotter pin, knuckle
arm
3. Lock nut, outer
4. Rod end assembly, outer
5. Lock nut, inner
6. Rod end assembly, inner
Installation steps
To install, follow the removal
steps in the reverse order.
* The screw is threaded
counterclockwise.
Nut and cotter pin, knuckle arm
• Remove outer track rod assembly from the
knuckle arm (Fig. 3B3-8).
Remover: J-36831
1. Nut and cotter pin, center track rod
• Disconnect outer track rod assembly at the
center track rod (Fig. 3B3-7).
'\f CAUTION:
Be careful not to break the ball joint boot.
3. Lock nut, outer Remover: J-36831
CAUTION:
Be careful not to break the ball joint boot.
J-36831
Fig. 3B3-8
Fig. 3B3-7
Page 161 of 1928
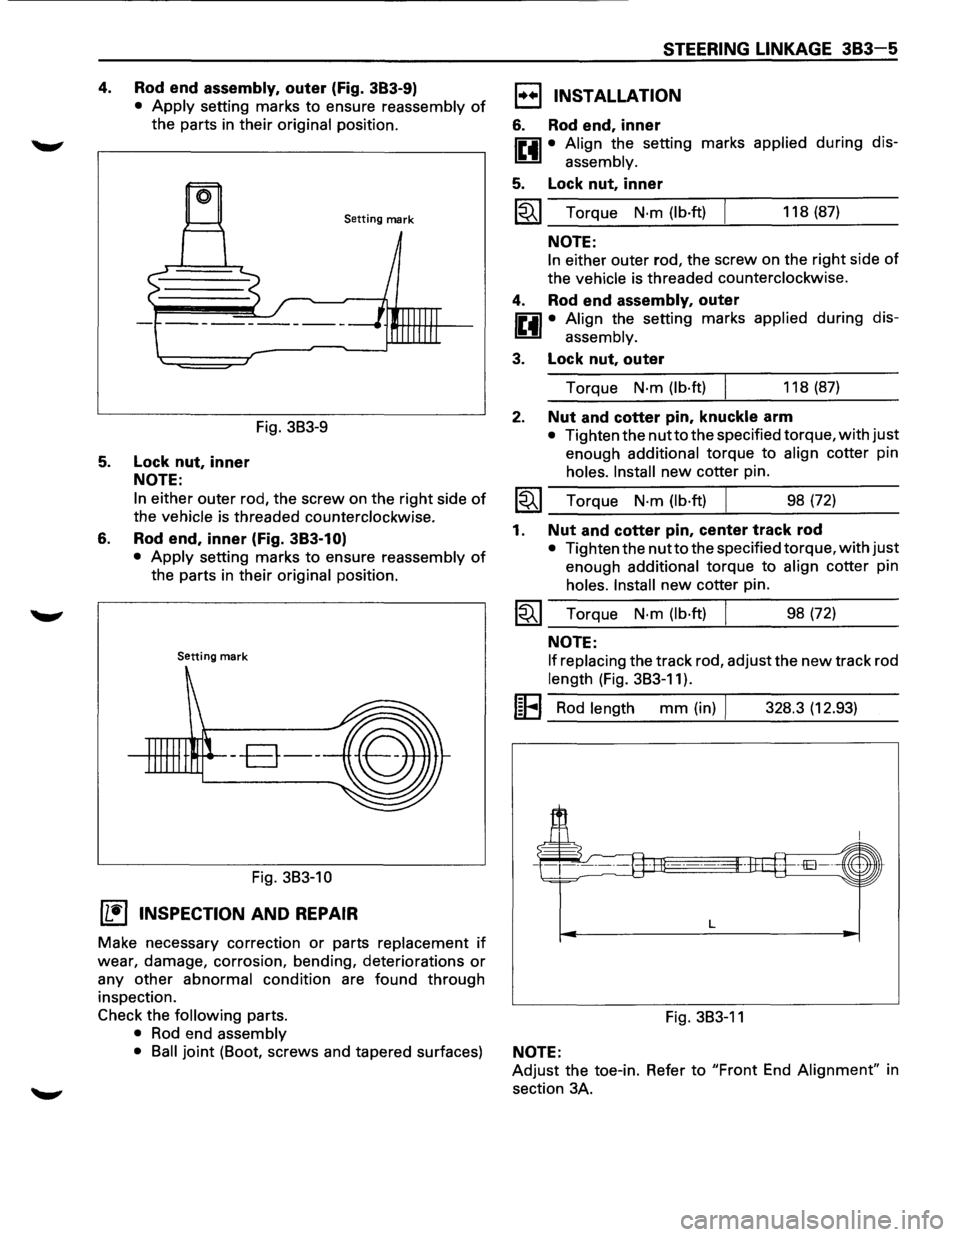
4. Rod end assembly, outer (Fig. 383-9)
• Apply setting marks to ensure reassembly of
the parts in their original position.
Setting mark
Fig. 3B3-9
5. Lock nut, inner
NOTE:
6.
In either outer rod, the screw on the right side of
the vehicle is threaded counterclockwise.
Rod end, inner (Fig. 383-1 O)
• Apply setting marks to ensure reassembly of
the parts in their original position.
Setting mark
--B--
Fig. 3B3-10
(1!] INSPECTION AND REPAIR
Make necessary correction or parts replacement if
wear, damage, corrosion, bending, deteriorations or
any other abnormal condition are found through
inspection.
Check the
following parts.
• Rod end assembly
STEERING LINKAGE 383-5
1••1 INSTALLATION
6. Rod end, inner
IP.il • Align the setting marks applied during dis-
~ assembly.
5. Lock nut, inner
~~~ Torque N·m (lb·ft) 118 (87)
NOTE:
In either outer rod, the screw on the right side of
the vehicle is threaded counterclockwise.
4. Rod end assembly, outer
IP.il • Align the setting marks applied during dis-
~ assembly.
3. Lock nut, outer
Torque N·m (lb·ft) 118 (87)
2. Nut and cotter pin, knuckle arm
• Tighten the nutto the specified torque, with just
enough additional torque to align cotter pin
holes. Install new cotter pin.
~~~ Torque N·m (lb·ft) ___ ______._ ___ _ 98 (72)
1. Nut and cotter pin, center track rod
• Tighten the nutto the specified torque, with just
enough additional torque to align cotter pin
holes. Install new cotter pin.
~~~ Torque N·m (lb·ft) 98 (72)
NOTE:
If replacing
the track rod, adjust the new track rod
length (Fig. 3B3-11).
I~EI Rod length mm (in) I 328.3 (12.93)
L
Fig. 3B3-11
• Ball joint (Boot, screws and tapered surfaces) NOTE:
Adjust the toe-in. Refer to "Front End Alignment" in
section 3A.
Page 162 of 1928
383-6 STEERING LINKAGE
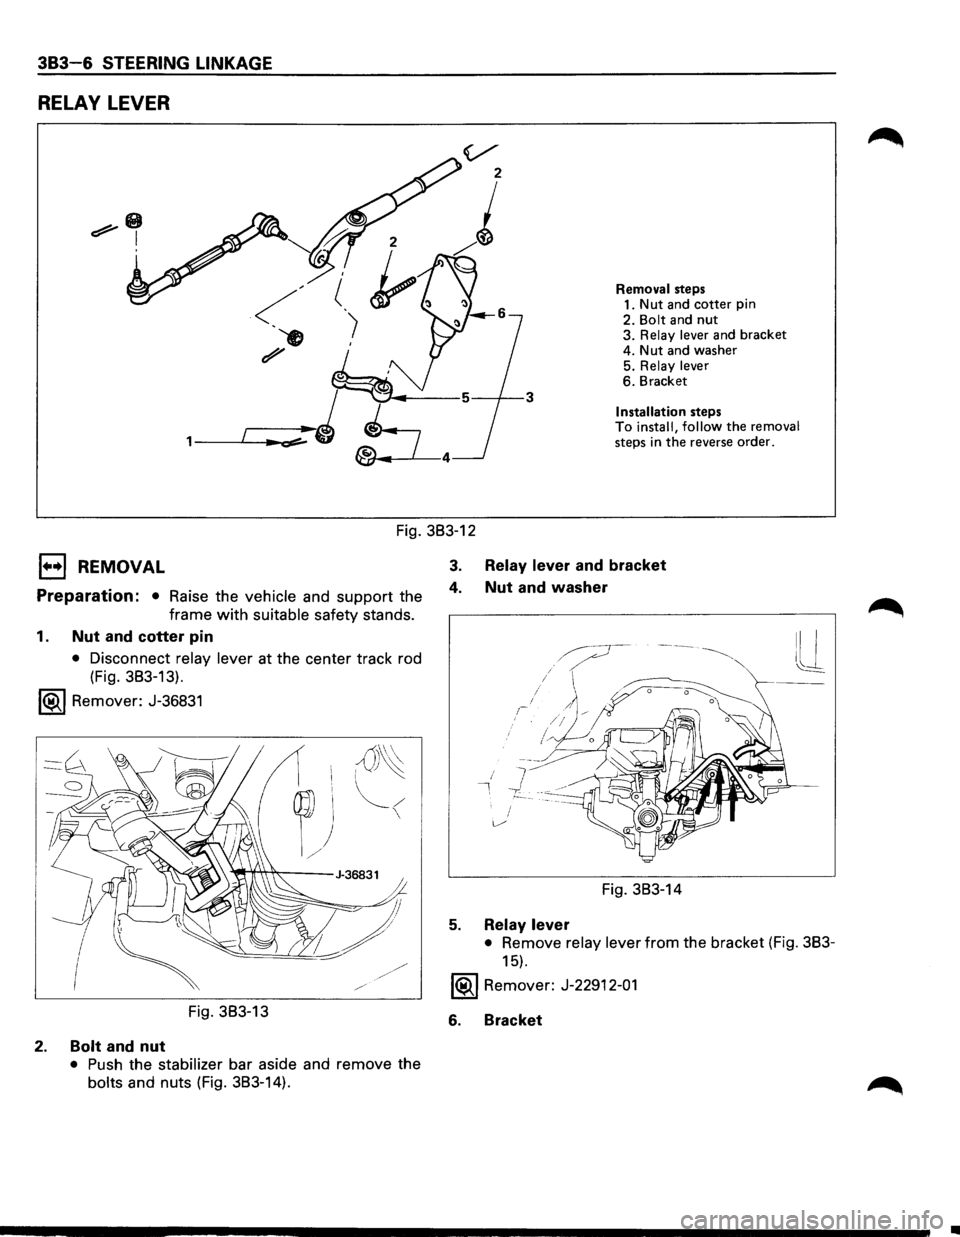
RELAY LEVER
v
'
z
)
'
Removal steps
1. Nut and cotter pin
2. Bolt and nut 3. Relay lever and bracket
~
, __ ,.___ ... ~:;r:=--~J L •--~---3
4. Nut and washer
5. Relay lever 6. Bracket
Installation steps
®--L---4
To install, follow the removal steps in the reverse order.
Fig. 383-12
EJ REMOVAL
Preparation: • Raise the vehicle and support the
frame with suitable safety stands.
1. Nut and cotter pin
• Disconnect relay lever at the center track rod
(Fig. 383-13).
1®..1 Remover: J-36831
Fig. 383-13
2. Bolt and nut
• Push the stabilizer bar aside and remove the
bolts and nuts (Fig. 383-14).
3. Relay lever and bracket
4. Nut and washer
7 I, -y
Fig. 383-14
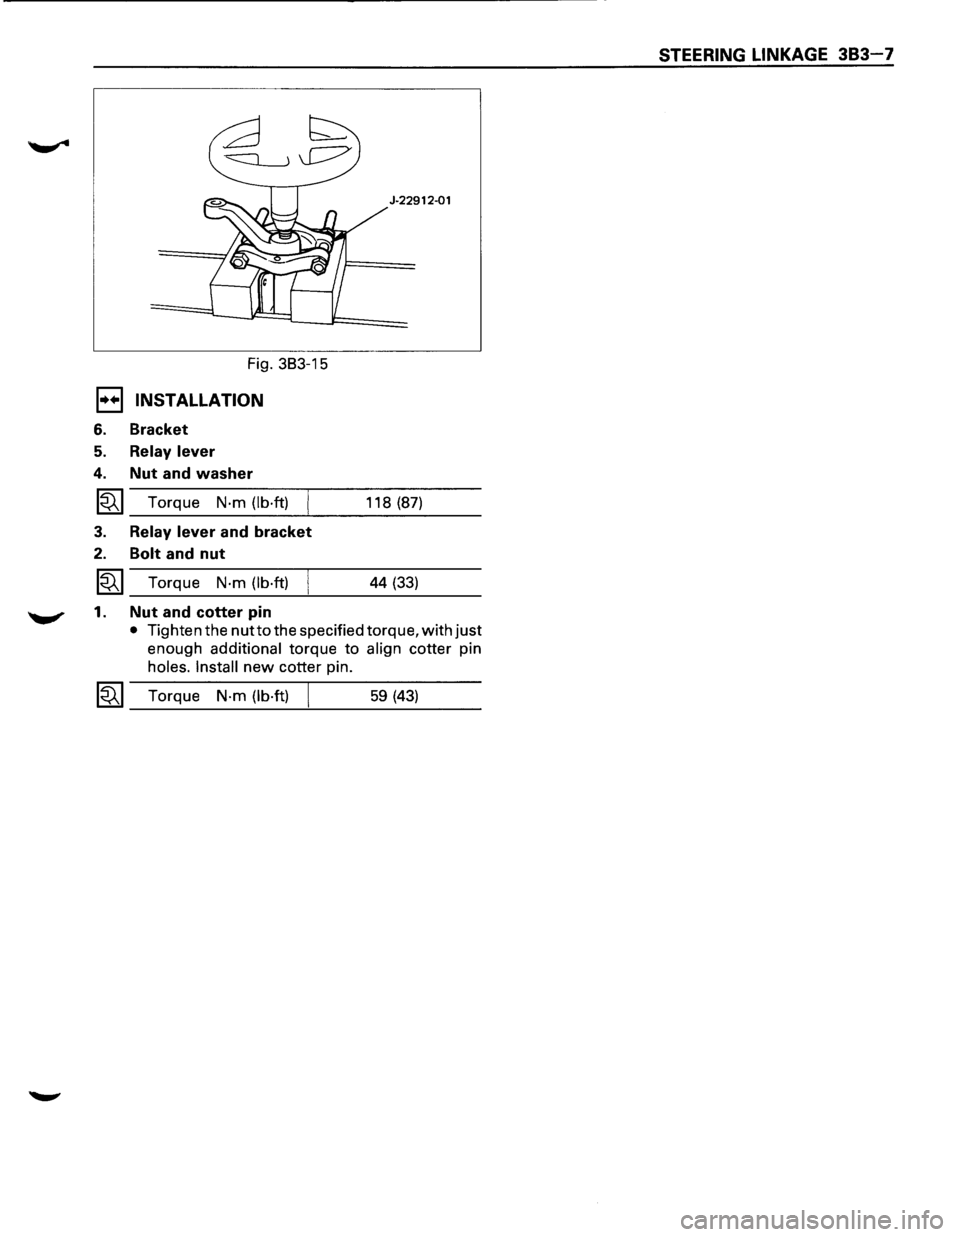
5. Relay lever
• Remove relay lever from the bracket (Fig. 383-
15).
1®..1 Remover: J-22912-01
6. Bracket
..
Page 163 of 1928
STEERING LINKAGE 383-7
J-22912·01
Fig. 383-15
E1 INSTALLATION
6. Bracket
5. Relay lever
4. Nut and washer
~ Torque N·m (lb·ft) 118 (87)
3. Relay lever and bracket
2. Bolt and nut
~ Torque N·m (lb·ft) I 44 (33)
.._.,. 1 . Nut and cotter pin
• Tighten the nut to the specified torque, with just
enough additional torque to align cotter pin
holes.
Install new cotter pin.
~ Torque N·m (lb·ft) I 59 (43)
Page 164 of 1928
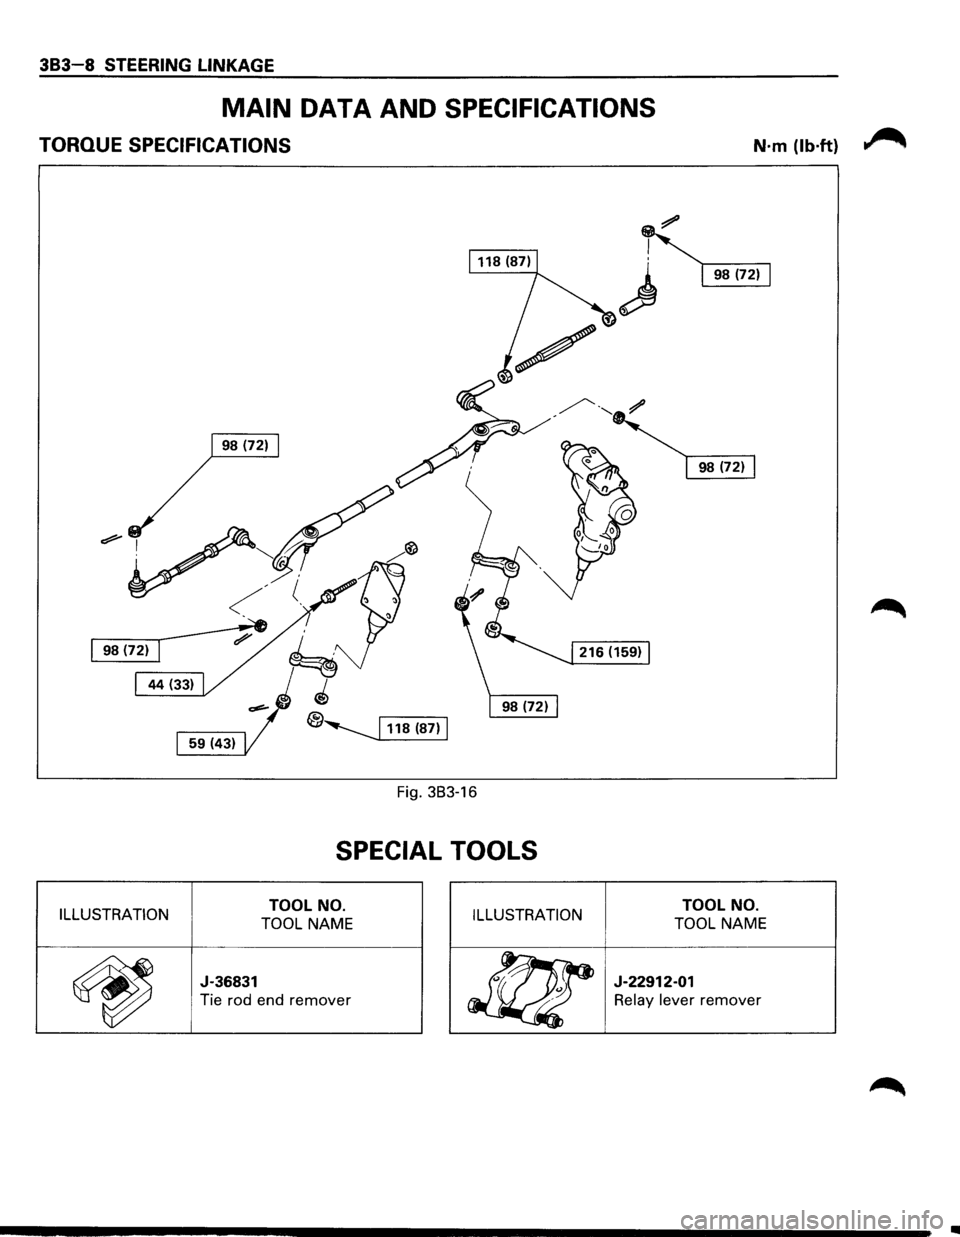
383-8 STEERING LINKAGE
MAIN DATA AND SPECIFICATIONS
TORQUE SPECIFICATIONS N·m (lb·ft)
Fig. 383-16
SPECIAL TOOLS
ILLUSTRATION TOOL NO.
TOOL NAME
TOOL NO.
TOOL NAME ILLUSTRATION
~
J-36831
Tie rod end remover
J-22912-01
Relay lever remover
..
Page 165 of 1928
FRONT SUSPENSION 3C-1
SECTION 3C
FRONT SUSPENSION
'\f CAUTION:
When fasteners are removed, always reinstall them at the same location from which they were removed.
If a fastener needs to be replaced, use the correct part number fastener for that application. If the correct
part
number fastener is not available, a fastener of equal size and strength (or stronger) may be used.
Fasteners
that are not reused, and those requiring thread locking compound, will be called out. The correct
torque value must be used when installing fasteners that require it. If the above conditions are not
followed, parts or system damage could result.
Refer to section 3A in this manual for the wheel alignment procedure.
CONTENTS
General Description .. .. .. .. .. .. .. .. .. .. .. .. .. .. . 3C- 1
On-Vehicle Service .............................. 3C-3
Shock Absorber . . . . . . . . . . . . . . . . . . . . . . . . . . . . . . . 3C-3
Stabilizer Bar . .. .. . .. .. ..
.. . .. .. . .. .. .. . .. .. .. . 3C- 4
Torsion Bar
.................................... 3C-5
Knuckle . .
. . . . . . . . . . . . . . . . . . . . . . . . . . . . . . . . . . . . . . 3C-7
Upper
Control Arm ........................... 3C-10
Lower Control Arm ........................... 3C-13
Upper Ball Joint ............................... 3C- 16
Lower
Ball Joint ............................... 3C-18
Main Data and Specifications.................. 3C-20
General
Specifications . .
. . . . . . . . . . . . . . . . . . . . . 3C-
20
Torque Specifications ........................ 3C-21
Special Tools ..................................... 3C-22
GENERAL DESCRIPTION
The front suspension is designed to allow each wheel
to compensate for changes in the road surface level
without greatly affecting the opposite wheel. Each
wheel is independently connected to the frame by a
steering
knuckle, ball joint assemblies, and upper and
lower control arms. The front wheels are held in
proper relationship to each other by two outer track
rods
which are connected to steering arms on the
knuckles and to a center track rod.
All models have a front suspension system consisting
of control arms, stabilizer bar, shock absorber and a
torsion bar. The front end of the torsion bar is
attached
to the lower control arm. The rear of the
torsion bar is mounted into a height control arm at the
crossmember. Vehicle trim height is controlled by
adjusting this arm.
Shock absorbers are
mounted between the brackets
on the
frame and the lower control arms. The lower
portion of each shock absorber is attached to the
lower control arm by a bolt and nut. The upper portion
of each shock absorber extends through a frame
bracket and is secured with two rubber bushings,
three retainers and a nut.
Ball joint assemblies are bolted to the outer end of the
upper and lower control arm and are attached to the
steering
knuckle by nuts and cotter pins.
The
inner ends of the upper control arm have pressed
in bushings.
Bolts, passing through the bushing,
attach the control arm to the frame. The inner ends of
the lower control arm are attached to the frame by
bolts passing through the bushings, which are
pressed in the frame.
Side
roll of the front suspension is controlled by a
spring steel stabilizer bar. It is mounted in rubber
bushings, which are held to the crossmember by
brackets. The ends of the stabilizer bar are connected
to the lower control arms by links.