check engine ISUZU TROOPER 1995 Repair Manual
[x] Cancel search | Manufacturer: ISUZU, Model Year: 1995, Model line: TROOPER, Model: ISUZU TROOPER 1995Pages: 1928
Page 525 of 1928
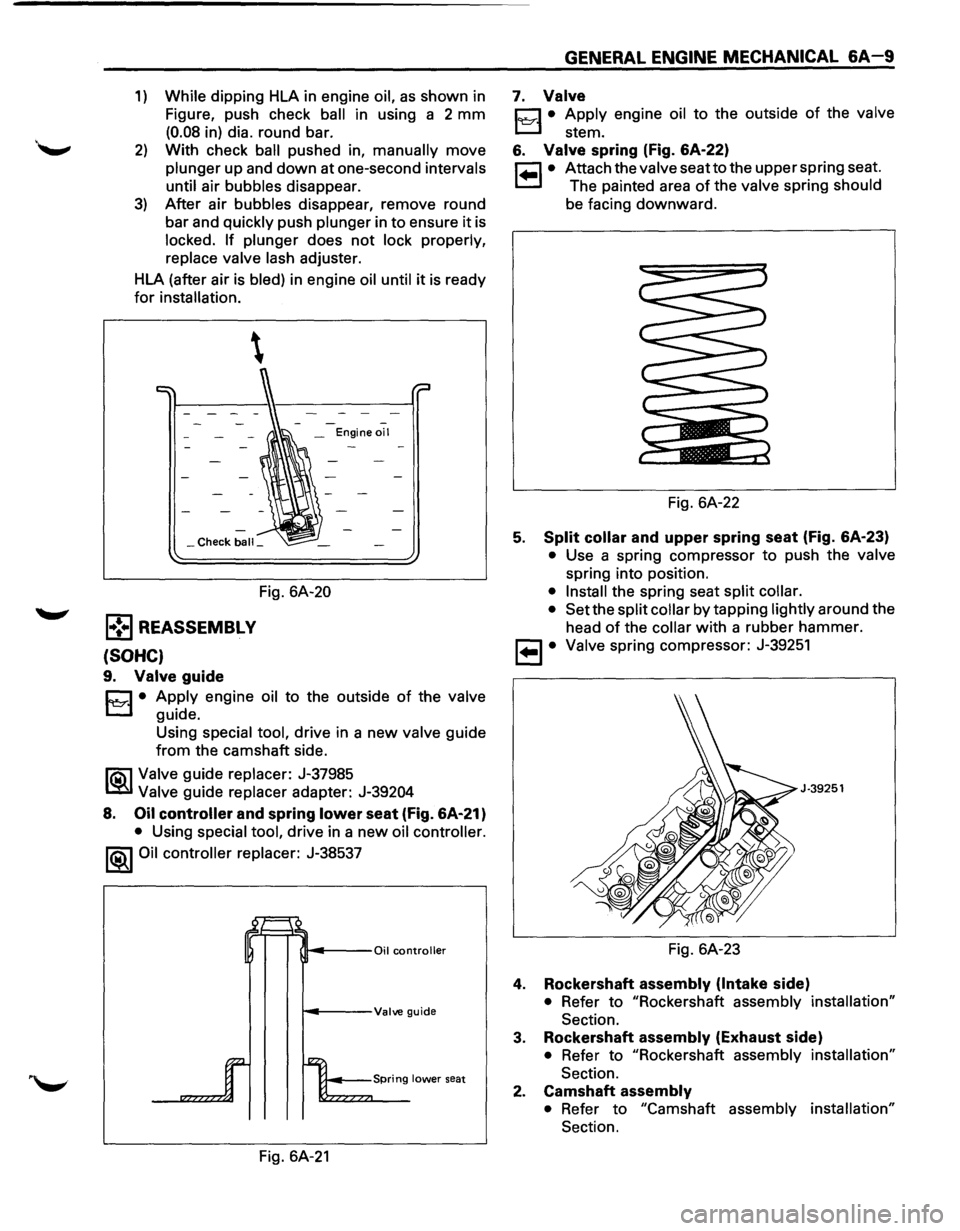
1) While dipping HLA in engine oil, as shown in
Figure, push check
ball in using a 2 mm
(0.08 in) dia. round bar.
2) With check ball pushed in, manually move
plunger up and down at one-second intervals
until
air bubbles disappear.
3) After air bubbles disappear, remove round
bar and
quickly push plunger in to ensure it is
locked. If plunger does not lock properly,
replace valve lash adjuster.
HLA (after air is
bled) in engine oil until it is ready
for installation.
-_ Engine oil
_Check ball_
Fig. 6A-20
l•!•l REASSEMBL V
(SOHC)
9. Valve guide
C1 • Apply engine oil to the outside of the valve
t..::::.l guide.
Using
special tool, drive in a new valve guide
from the camshaft side.
li5\l Valve guide replacer: J-37985
~ Valve guide replacer adapter: J-39204
8. Oil controller and spring lower seat (fig. 6A·21)
• Using special tool, drive in a new oil controller.
1®.1 Oil controller replacer: J-38537
~---Valve guide
Fig. 6A-21
GENERAL ENGINE MECHANICAL 6A-9
7. Valve
C1 • Apply engine oil to the outside of the valve
t..::::.l stem.
6. Valve spring (fig. 6A-22)
r=l • Attach the valve seatto the upper spring seat.
1.=.1 The painted area of the valve spring should
be facing downward.
Fig. 6A-22
5. Split collar and upper spring seat (Fig. 6A-23)
• Use a spring compressor to push the valve
spring into position.
• Install the spring seat split collar.
• Set
the split collar by tapping lightly around the
head
of the collar with a rubber hammer.
, ... ,. Valve spring compressor: J-39251
J·39251
Fig. 6A-23
4. Rockershaft assembly (Intake side)
• Refer to "Rockershaft assembly installation"
Section.
3. Rockershaft assembly (Exhaust side)
• Refer to "Rockershaft assembly installation"
Section.
2. Camshaft assembly
• Refer to "Camshaft assembly installation"
Section.
Page 536 of 1928
6A-20 GENERAL ENGINE MECHANICAL
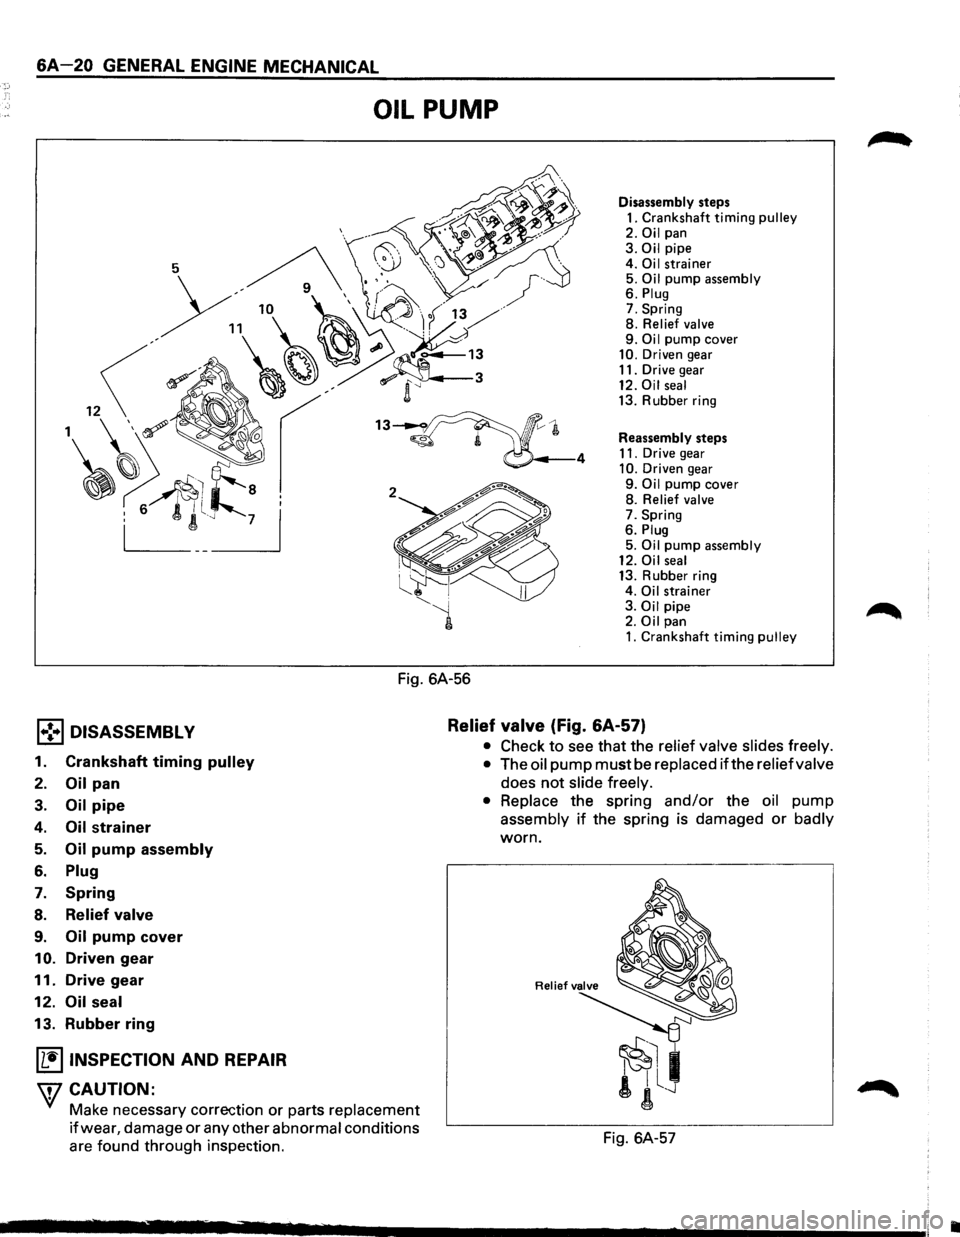
OIL PUMP
Fig. 6A-56
Disassembly steps 1. Crankshaft timing pulley 2. Oil pan 3. Oil pipe
4. Oi I strainer 5. Oil pump assembly 6. Plug 7. Spring
8. Relief valve 9. Oil pump cover 10. Driven gear 11. Drive gear 12. Oil seal 13. Rubber ring
Reassembly steps
11. Drive
gear 10. Driven gear 9. Oil pump cover
8. Relief valve 7. Spring
6. Plug 5. Oil pump assembly 12. Oil seal 13. Rubber ring
4. Oil strainer
3. Oil pipe 2. Oil pan 1. Crankshaft timing pulley
l•!•l DISASSEMBLY Relief
valve (Fig. 6A-57)
1. Crankshaft timing pulley
2. Oil pan
3. Oil pipe
4. Oil strainer
5. Oil pump assembly
6. Plug
7. Spring
8. Relief valve
9. Oil pump cover
10. Driven gear
11. Drive gear
12. Oil seal
13. Rubber ring
~ INSPECTION AND REPAIR
\fl CAUTION:
VI Make necessary correction or parts replacement
if wear, damage or any other abnormal conditions
are found through inspection.
• Check to see that the relief valve slides freely.
• The oil pump must be replaced ifthe relief valve
does
not slide freely.
• Replace the spring and/or the oil pump
assembly if the spring is damaged or badly
worn.
Fig. 6A-57
•
Page 537 of 1928
Body and gears
The pump assembly must be replaced if one or
more of the conditions below is discovered
during inspection.
• Badly worn or damaged driven gear guide.
• Badly worn driving gear drive face.
• Badly scratched or scored body sliding face or
driven gear.
• Badly worn or damaged gear teeth.
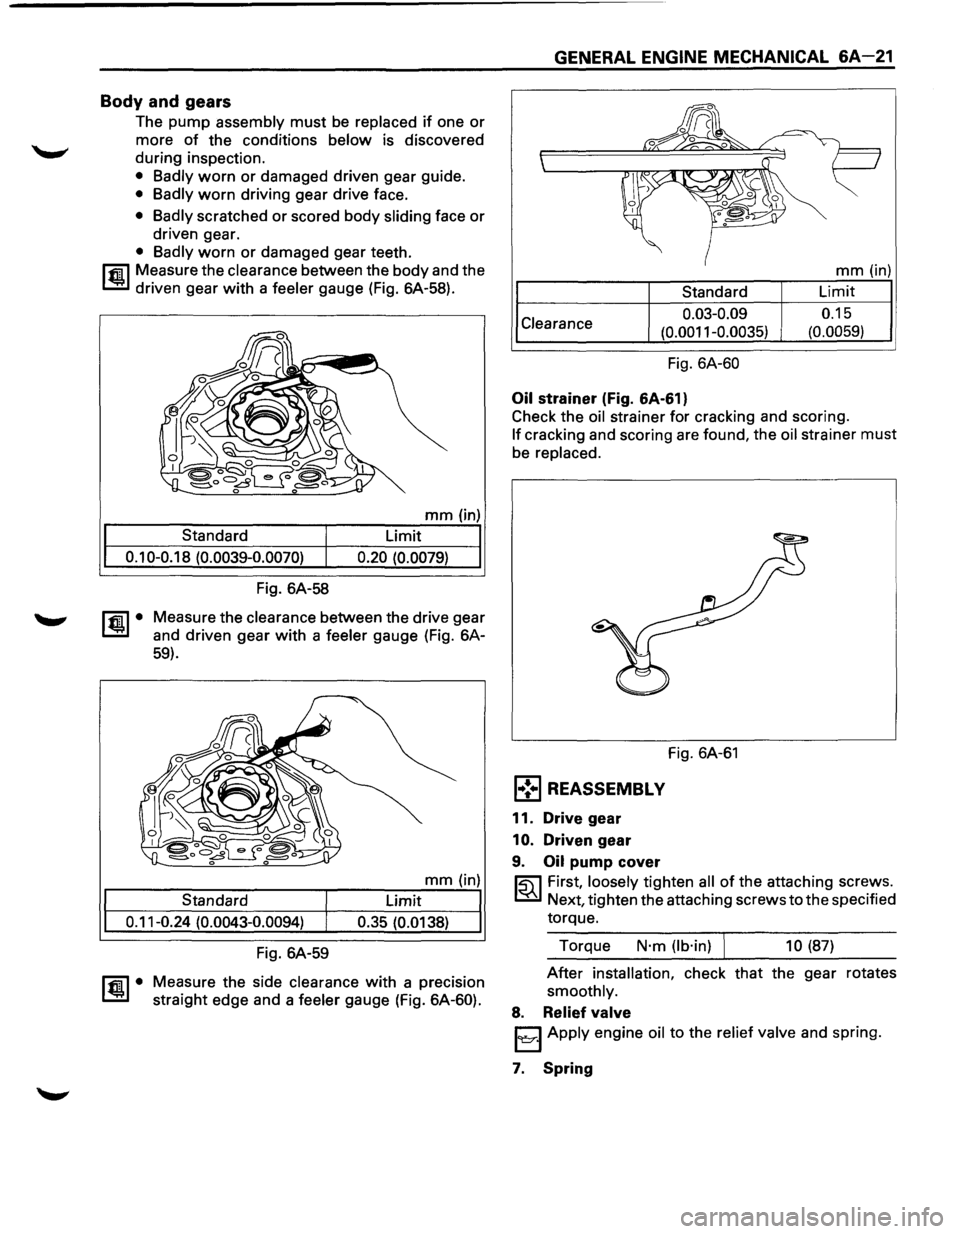
~ Measure the clearance between the body and the
I..!:.J driven gear with a feeler gauge (Fig. 6A-58).
mm (in)
Standard
Limit
0.10-0.18 (0.0039-0.0070) 0.20 (0.0079)
~·
Fig. 6A-58
Measure the
clearance between the drive gear
and driven gear
with a feeler gauge (Fig. 6A-
59).
mm (in)
Standard Limit
0.11-0.24
(0.0043-0.0094) 0.35 (0.0138)
Fig. 6A-59
ltm.l• Measure the side clearance with a precision
straight edge and a
feeler gauge (Fig. 6A-60).
GENERAL ENGINE MECHANICAL 6A-21
Clearance
Standard
0.03-0.09
(0.0011-0.0035)
Fig. 6A-60
Oil strainer (Fig. 6A-61)
mm (in)
Limit
0.15
(0.0059)
Check the
oil strainer for cracking and scoring.
If cracking and scoring are found, the oil strainer must
be replaced.
Fig. 6A-61
l•!•l REASSEMBLY
11. Drive gear
1
0. Driven gear
9. Oil pump cover
~ First, loosely tighten all of the attaching screws.
~ Next, tighten the attaching screws to the specified
torque.
Torque
N·m (lb·in) ) 10 (87)
After installation, check that the gear rotates
smoothly.
8. Relief valve
I~J Apply engine oil to the relief valve and spring.
7. Spring
Page 540 of 1928
6A-24 GENERAL ENGINE MECHANICAL
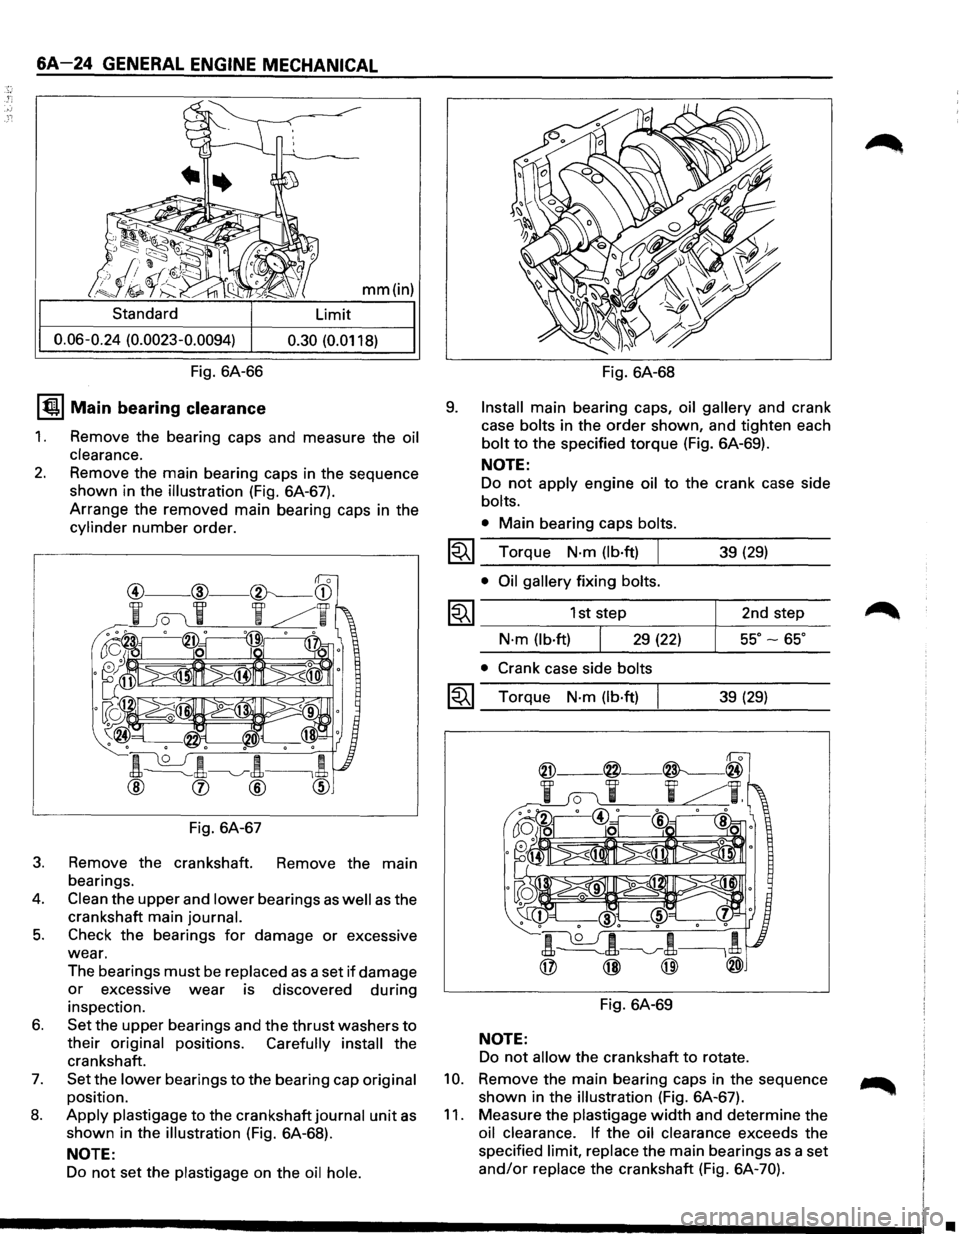
mm(in)
Standard Limit
0.06-0.24 (0.0023-0.0094) 0.30 (0.0118)
Fig. 6A-66 Fig. 6A-68
IQI Main bearing clearance
1. Remove the bearing caps and measure the oil
clearance.
2. Remove the main bearing caps in the sequence
shown in the
illustration (Fig. 6A-67).
Arrange the removed main bearing caps in the
cylinder number order.
Fig. 6A-67
3. Remove the crankshaft. Remove the main
bearings.
4. Clean the upper and lower bearings as well as the
crankshaft main
journal.
5. Check the bearings for damage or excessive
wear.
The bearings
must be replaced as a set if damage
or excessive wear is discovered during
inspection.
6. Set the upper bearings and the thrust washers to
their original positions. Carefully install the
crankshaft.
7. Set the lower bearings to the bearing cap original
position.
8. Apply plastigage to the crankshaft journal unit as
shown in the illustration (Fig. 6A-68).
NOTE:
Do not set the plastigage on the oil hole.
9. Install main bearing caps, oil gallery and crank
case
bolts in the order shown, and tighten each
bolt to the specified torque (Fig. 6A-69).
~
~
~
NOTE:
Do not apply engine oil to the crank case side
bolts.
•
Main bearing caps bolts.
Torque N·m (lb·ft) I 39 (29)
• Oil gallery fixing bolts.
1st step 2nd step
N·m (lb·ft) 29 (22) 55°-65°
• Crank case side bolts
Torque N·m (lb·ft) 39 (29)
Fig. 6A-69
NOTE:
Do not allow the crankshaft to rotate.
10. Remove the main bearing caps in the sequence
shown in the
illustration (Fig. 6A-67).
11. Measure the plastigage width and determine the
oil clearance. If the oil clearance exceeds the
specified
limit, replace the main bearings as a set
and/or replace the crankshaft (Fig. 6A-70).
•
Page 543 of 1928
l•!•l REASSEMBL V
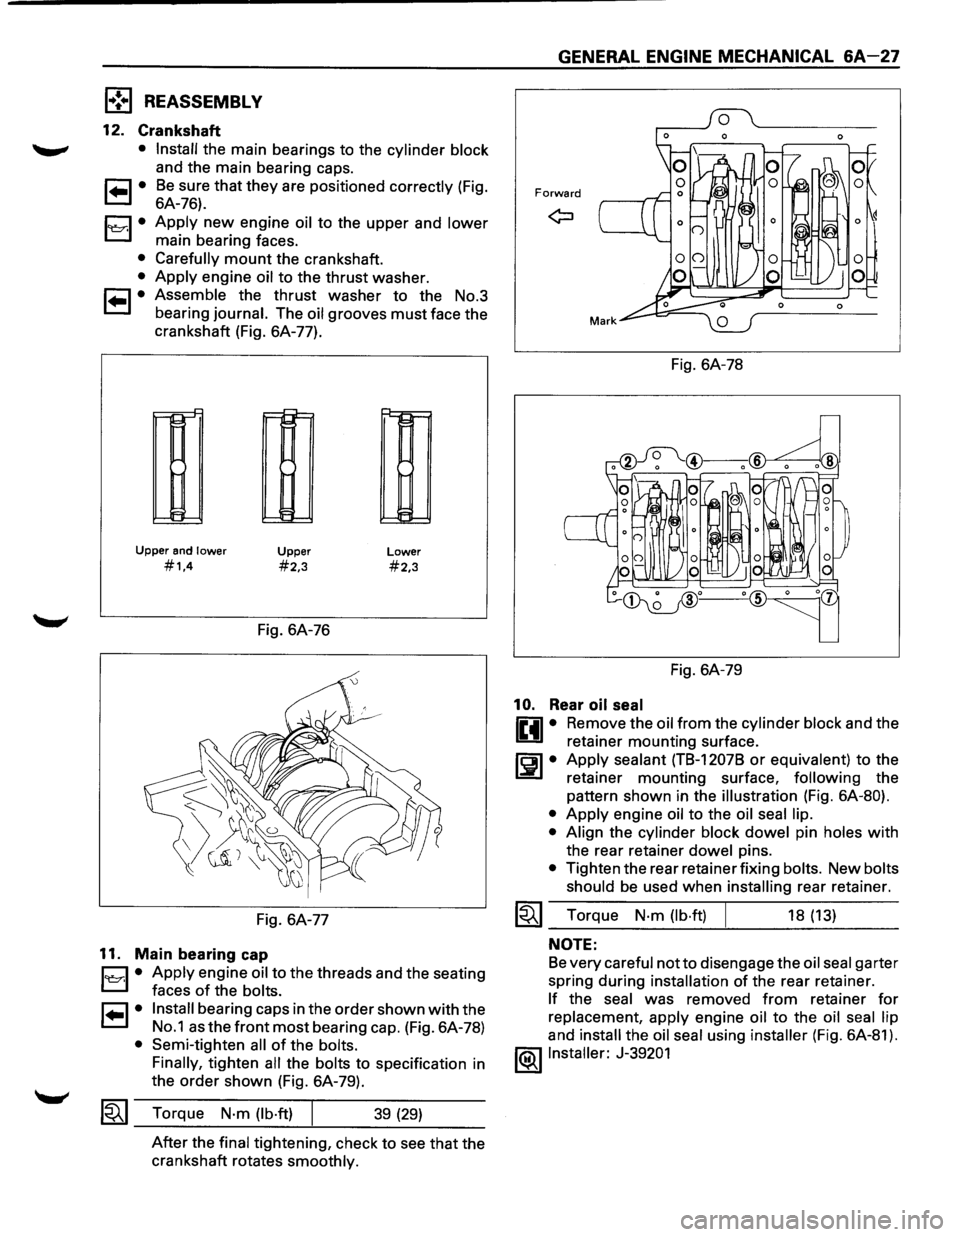
12. Crankshaft
• Install the main bearings to the cylinder block
and the main bearing caps.
1 .. 1• Be sure that they are positioned correctly (Fig.
6A-76).
1~1· Apply new engine oil to the upper and lower
main bearing faces.
• Carefully mount the crankshaft.
• Apply engine oil to the thrust washer.
1 .. 1• Assemble the thrust washer to the No.3
bearing
journal. The oil grooves must face the
crankshaft (Fig. 6A-77).
Upper and lower
#1.4
~
~
IH
t=
Upper
#2,3
Fig. 6A-76
Fig. 6A-77
11. Main bearing cap
Lower
#2,3
B • Apply engine oil to the
threads and the seating
' faces
of the bolts.
r=1 • Install bearing caps in the order shown with the
L:::.l No.1 as the front most bearing cap. (Fig. 6A-78)
• Semi-tighten all of the bolts.
Finally,
tighten all the bolts to specification in
the
order shown (Fig. 6A-79).
1~1 Torque N·m (lb·ft) 39 (29)
After the final tightening, check to see that the
crankshaft rotates
smoothly.
GENERAL ENGINE MECHANICAL 6A-27
Forward
Fig. 6A-78
Fig. 6A-79
10. Rear oil seal
liill • Re~ove the oil_from the cylinder block and the
U retainer mounting surface.
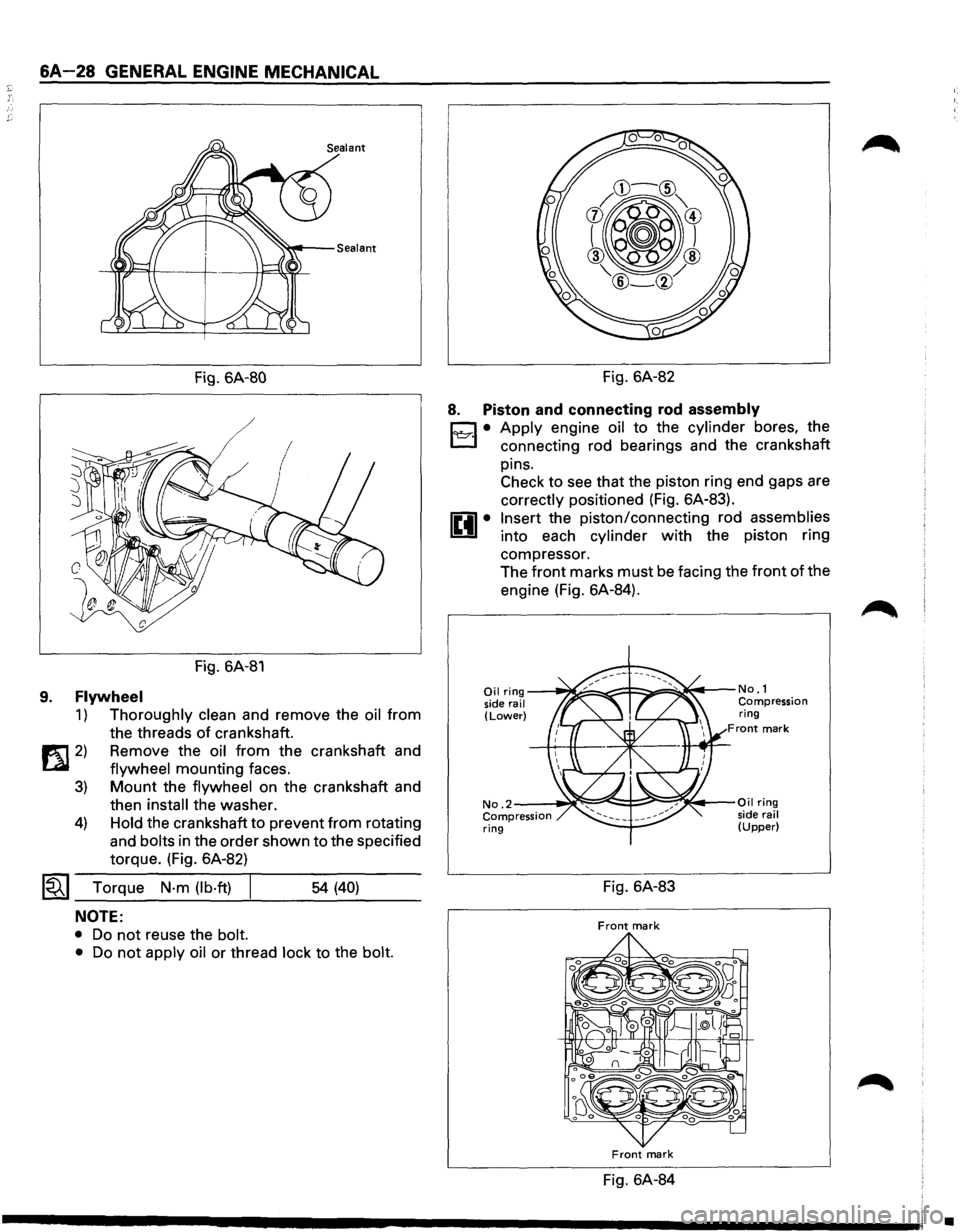
rEil • Apply sealant (TB-1207B or equivalen_t) to the
1.:::!!.1 retainer mounting surface, follow~ng the
pattern shown in the
illustration (Fig. 6A-80).
• Apply engine oil to the oil seal lip.
• Align
the cylinder block dowel pin holes with
the rear retainer dowel pins.
• Tighten the rear retainer fixing bolts. New bolts
should
be used when installing rear retainer.
~~~ Torque N·m (lb·ft) 18 (13)
NOTE:
Be very careful notto disengage the oil seal garter
spring during
installation of the rear retainer.
If the seal was removed from retainer for
replacement, apply engine oil to the oil seal lip
and install the oil seal using installer (Fig. 6A-81).
l®llnstaller: J-39201
Page 544 of 1928
6A-28 GENERAL ENGINE MECHANICAL
Fig. 6A-80
/
Fig. 6A-81
9. Flywheel
1) Thoroughly clean and remove the oil from
the threads
of crankshaft.
1!t1 2) Remove the oil from the crankshaft and
LQI flywheel mounting faces.
3) Mount the flywheel on the crankshaft and
then
install the washer.
4) Hold the crankshaft to prevent from rotating
and
bolts in the order shown to the specified
torque. (Fig. 6A-82)
~~~ Torque N·m (lb·ft) I ___ ___,_ ___ _ 54 (40)
NOTE:
• Do not reuse the bolt.
•
Do not apply oil or thread lock to the bolt.
Fig. 6A-82
8. Piston and connecting rod assembly
D • Apply engine oil to the cylinder bores, the
l:J connecting rod bearings and the crankshaft
pins. Check to see that the piston ring end gaps are
correctly positioned (Fig. 6A-83).
Insert the piston/connecting rod assemblies
into each cylinder with the piston ring
compressor. The
front marks must be facing the front of the
engine (Fig. 6A-84).
Oil ring ---~====-~::F::::::.===~~t---No. 1
side rail Compression (Lower) ring Front mark
No .2--~~:::::=:e!::::!-;::::!!;~~·-Oil ring
Compression side rail ring (Upper)
Fig. 6A-83
Front mark
Front mark
Fig. 6A-84
•
Page 545 of 1928
1£41• Match the numbered caps with the numbers on
the connecting rods.
Align the punched marks
on the connecting rods and caps.
1'l:::r.1• Apply engine oil to the threads and seating
faces
of the nuts.
• Tighten the nuts
~~~ Torque N·m (lb·ft) 54 (40)
7.
After tightening the cap nuts, check to see that
the crankshaft rotates smoothly.
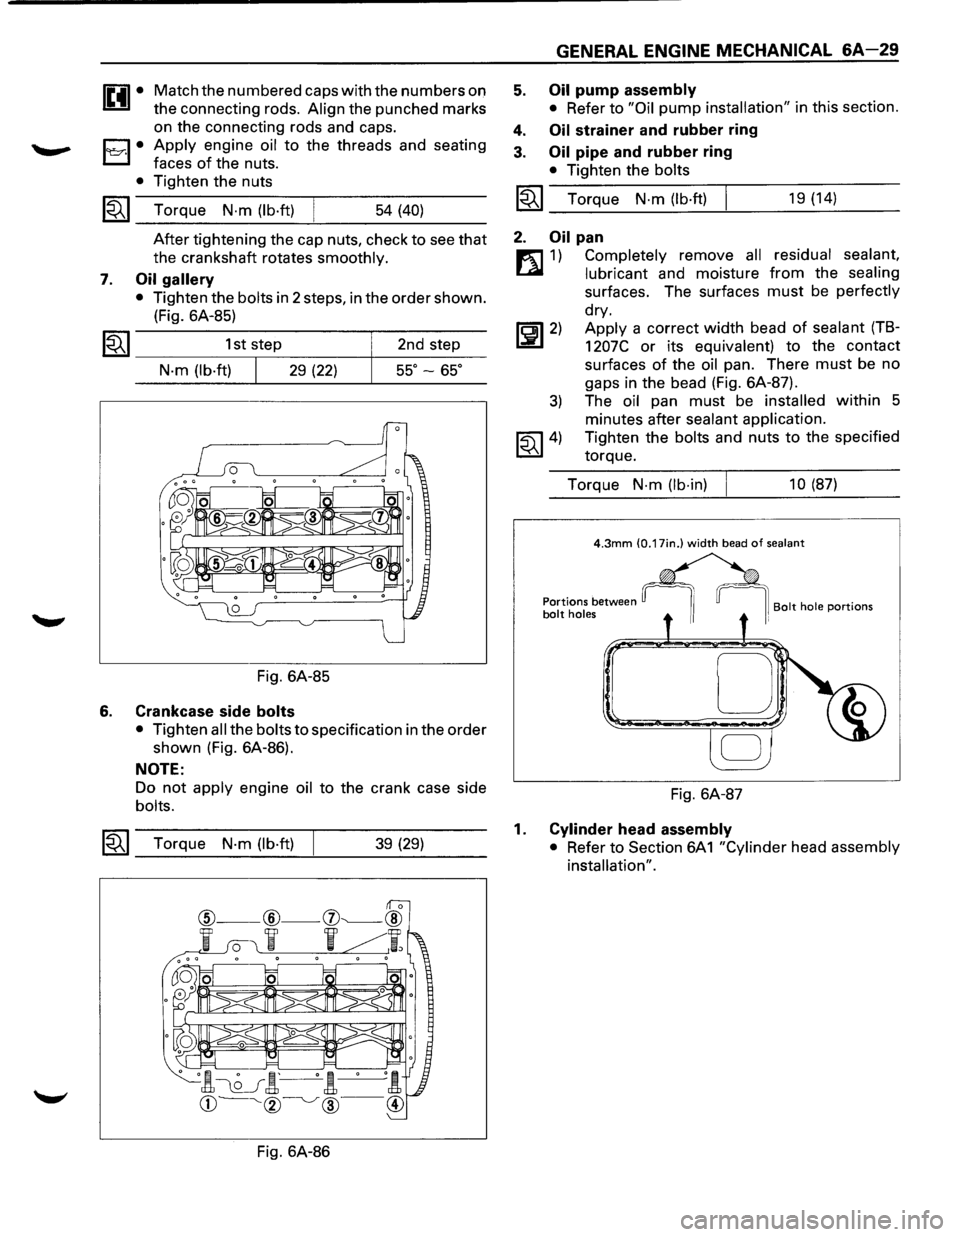
Oil gallery
• Tighten the bolts in 2 steps, in the order shown.
(Fig. 6A-85)
1~1 _________ 1_s_t,s_te~p ________ ~ __ 2_n_d __ st_e~p---
N·m (lb·ft) 29 (22) 55° -65°
Fig. 6A-85
6. Crankcase side bolts
• Tighten all the bolts to specification in the order
shown (Fig. 6A-86).
NOTE:
Do not apply engine oil to the crank case side
bolts.
~~~ Torque N·m (lb·ft) 39 (29)
Fig. 6A-86
5.
4.
3.
GENERAL ENGINE MECHANICAL 6A-29
Oil pump assembly
• Refer to "Oil pump installation" in this section.
Oil strainer and rubber ring
Oil pipe and rubber ring
• Tighten the bolts
I~I_T_o_rq...:....u_e_N_·_m_(:.._lb_·ft....:.)---!. ___ 1_9 _(1_4_) __ _
2. Oil pan
m 1) Completely remove all residual sealant,
~ lubricant and moisture from the sealing
surfaces. The surfaces must be perfectly
dry.
~~~2) Apply a correct width bead of sealant (TB-
1207C or its equivalent) to the contact
surfaces
of the oil pan. There must be no
gaps in the bead (Fig. 6A-87).
3) The oil pan must be installed within 5
minutes after
sealant application.
~~~4) Tighten the bolts and nuts to the specified
torque.
Torque
N-m (lb-in) 10 (87)
D
Fig. 6A-87
1. Cylinder head assembly
• Refer to Section 6A
1 "Cylinder head assembly
installation".
Page 547 of 1928
J-24086-SA ~---Press ram
Fig. 6A-90
10. Piston
11. Connecting rod
[1!) INSPECTION AND REPAIR
PISTON
AND PISTON RING
Pistons
Piston
Carefully clean away all the carbon adhering to the
piston head and the piston ring grooves.
NOTE:
Never use a wire brush to clean the pistons. Damage
will result.
Visually
check each piston for cracking, scoring, and
other signs
of excessive wear.
If any of the above conditions are present, the piston
must be replaced.
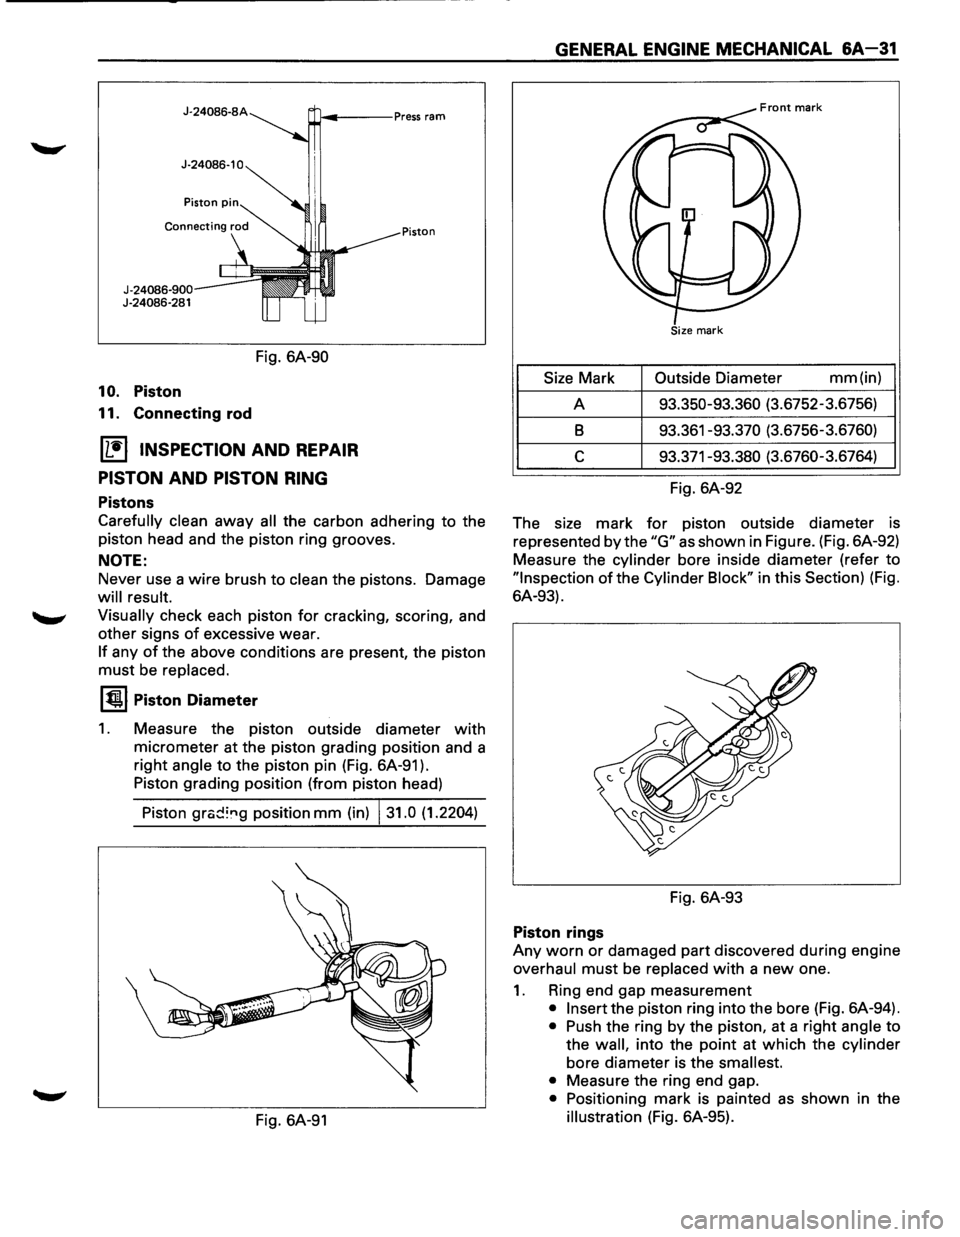
1~1 Piston Diameter
1. Measure the piston outside diameter with
micrometer at the piston grading position and a
right
angle to the piston pin (Fig. 6A-91 ).
Piston grading position (from piston head)
Piston
grc;d~"g position mm (in) 131.0 (1.2204)
Fig. 6A-91
GENERAL ENGINE MECHANICAL &A-31
Size Mark Outside
Diameter mm (in)
A 93.350-93.360 (3.6752-3.6756)
8 93.361 -93.370 (3.6756-3.6760)
c 93.371-93.380 (3.6760-3.6764)
Fig. 6A-92
The size mark
for piston outside diameter is
represented
by the "G" as shown in Figure. (Fig. 6A-92)
Measure the
cylinder bore inside diameter (refer to
"Inspection of the Cylinder Block" in this Section) (Fig.
6A-93).
Fig. 6A-93
Piston rings
Any worn or damaged part discovered during engine
overhaul must be replaced with a new one.
1. Ring end gap measurement
• Insert the piston ring into the bore (Fig. 6A-94).
• Push the ring by the piston, at a right angle to
the
wall, into the point at which the cylinder
bore diameter is the smallest.
•
Measure the ring end gap.
• Positioning mark is painted as shown in the
illustration (Fig. 6A-95).
Page 549 of 1928
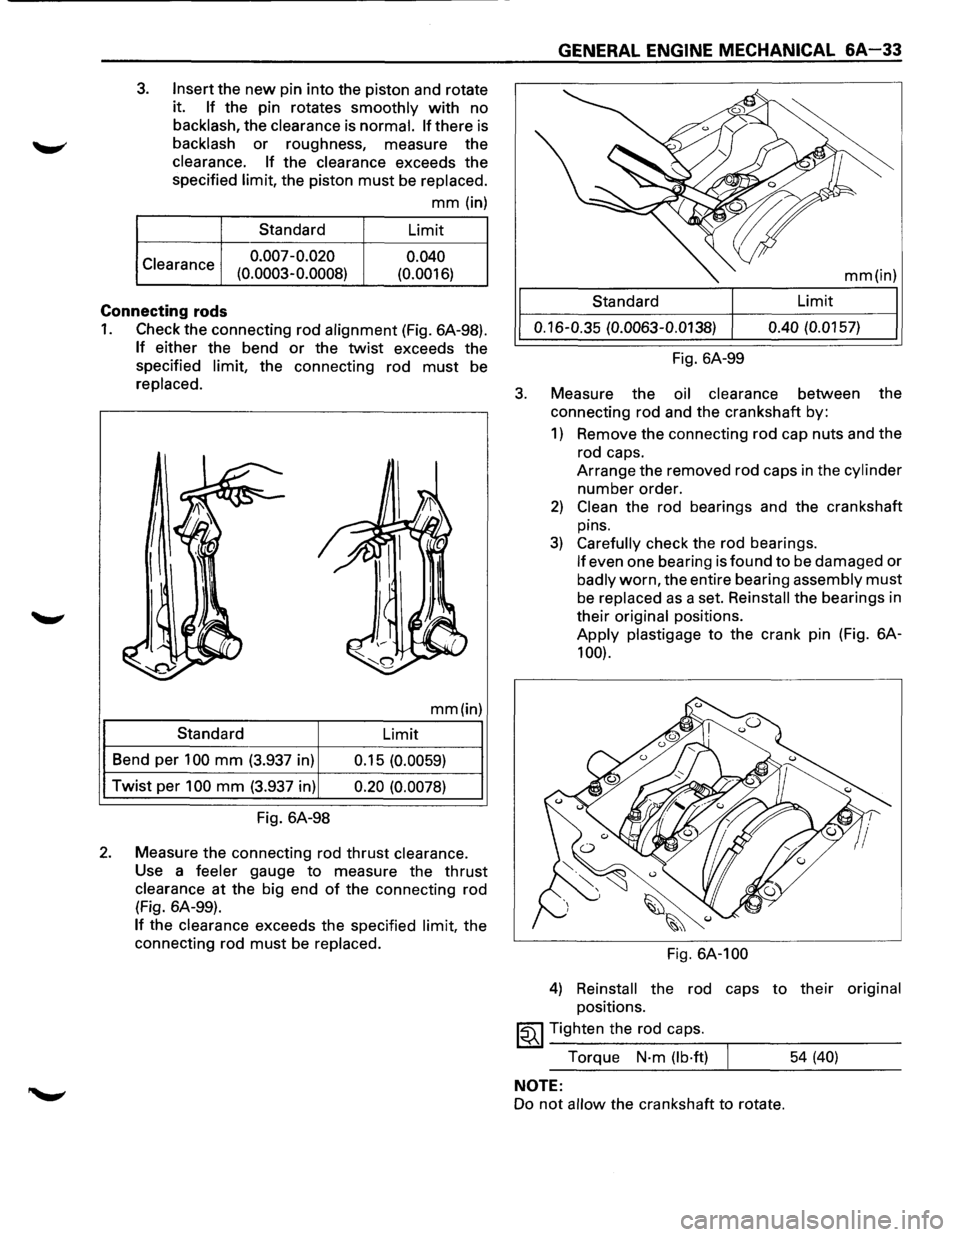
3. Insert the new pin into the piston and rotate
it.
If the pin rotates smoothly with no
backlash, the clearance is normal. If there is
backlash or roughness, measure the
clearance. If the clearance exceeds the
specified
limit, the piston must be replaced.
mm (in)
Standard Limit
Clearance 0.007-0.020
0.040
(0.0003-0.0008) (0.0016)
Connecting rods
1. Check the connecting rod alignment (Fig. 6A-98).
If either the bend or the twist exceeds the
specified
limit, the connecting rod must be
replaced.
mm(in)
Standard
Limit
Bend per
100 mm (3.937 in)
0.15 (0.0059)
Twist per 100 mm (3.937 in) 0.20 (0.0078)
Fig. 6A-98
2. Measure the connecting rod thrust clearance.
Use a feeler gauge to measure the thrust
clearance at the big end of the connecting rod
(Fig. 6A-99).
If the clearance exceeds the specified limit, the
connecting rod
must be replaced.
3.
GENERAL ENGINE MECHANICAL 6A-33
mm(in)
Standard Limit
0.16-0.35
(0.0063-0.0138) 0.40
(0.0157)
Fig. 6A-99
Measure the
oil clearance between the
connecting rod and the crankshaft by:
1) Remove the connecting rod cap nuts and the
rod caps.
Arrange the removed rod caps in the
cylinder
number order.
2) Clean the rod bearings and the crankshaft
pins.
3) Carefully check the rod bearings.
If even one bearing is found to be damaged or
badly worn, the entire bearing assembly must
be replaced as a set. Reinstall the bearings in
their
original positions.
Apply plastigage to the crank pin (Fig. 6A-
100).
Fig. 6A-100
4) Reinstall the rod caps to their original
positions.
~~~ Tighten the rod caps.
Torque
N·m (lb·ft) 54 (40)
NOTE:
Do not allow the crankshaft to rotate.
Page 551 of 1928
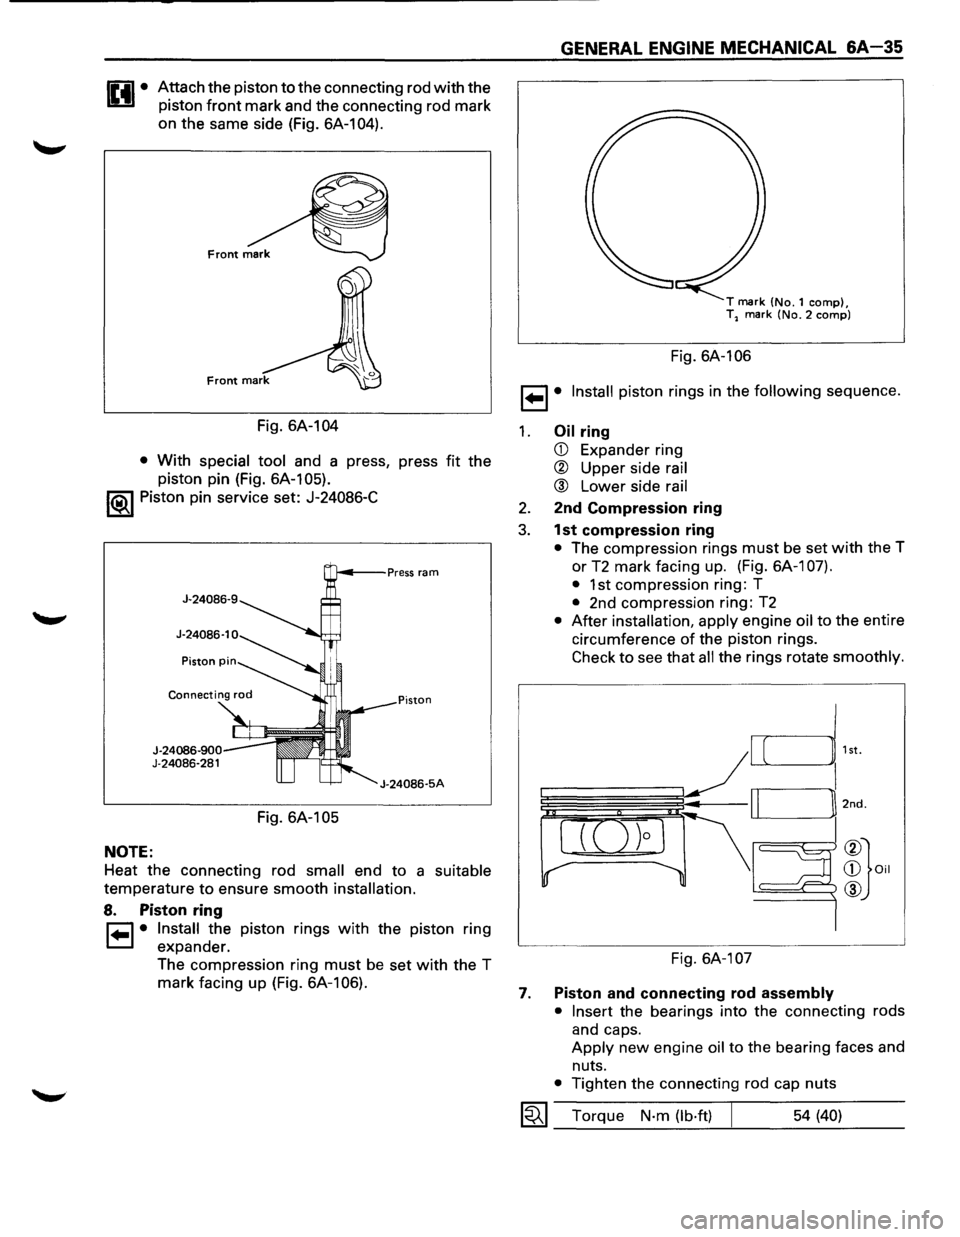
Attach the piston to the connecting rod with the
piston
front mark and the connecting rod mark
on the same side (Fig. 6A-104).
Fig. 6A-104
• With special tool and a press, press fit the
piston pin (Fig. 6A-105).
1®1 Piston pin service set: J-24086-C
NOTE:
J-24086-900 J-24086-281
Fig. 6A-105
J-24086-5A
Heat the connecting rod small end to a suitable
temperature to ensure smooth installation.
8. Piston ring
r=1 • Install the piston rings with the piston ring
1=.1 expander.
The compression ring
must be set with the T
mark facing up (Fig. 6A-106).
GENERAL ENGINE MECHANICAL &A-35
T mark (No.1 comp), T2 mark (No.2 comp)
Fig. 6A-106
1 ... 1• Install piston rings in the following sequence.
1. Oil ring
CD Expander ring
® Upper side rail
® Lower side rail
2. 2nd Compression ring
3. 1st compression ring
• The compression rings must be set with the T
or
T2 mark facing up. (Fig. 6A-1 07).
•
1st compression ring: T
• 2nd compression ring: T2
• After installation, apply engine oil to the entire
circumference
of the piston rings.
Check to see that all the rings rotate smoothly.
Fig. 6A-107
7. Piston and connecting rod assembly
• Insert
the bearings into the connecting rods
and caps.
Apply new engine oil to the bearing faces and
nuts.
• Tighten the connecting rod cap nuts
1~1 Torque N·m (lb·ft) 54 (40)