heater JAGUAR X308 1998 2.G Workshop Manual
[x] Cancel search | Manufacturer: JAGUAR, Model Year: 1998, Model line: X308, Model: JAGUAR X308 1998 2.GPages: 2490, PDF Size: 69.81 MB
Page 2175 of 2490

Installation
12. Disconnect seat motor and squab heater harness multiplugs.
13. Slacken and remove four bolts securing seat frame to floor
and remove seat from vehicle.
1. Position seat in vehi cle and fit but do not tighten four bolts
securing frame to floor.
2. Fit and fully tighten the two bolt s securing squab frame to rear
panel.
3. Fully tighten bolts securing frame to floor.
4. Connect seat motor and squab heater harness multiplugs.
5. Position side trim panel and carefully pass seat belt lower
anchor through escutcheon and trim aperture.
6. Fit and tighten seat belt anchor securing bolt.
7. Position side trim and push do wnwards to engage keyhole on
squab outer fixing.
8. Position trim lower end over st ud and fit and fully seat new
scrivet.
9. Position seat cushion for access and connect cushion heater
harness multiplug.
10. Push seat cushion rearwards to engage it in rear securing
lugs.
Page 2191 of 2490
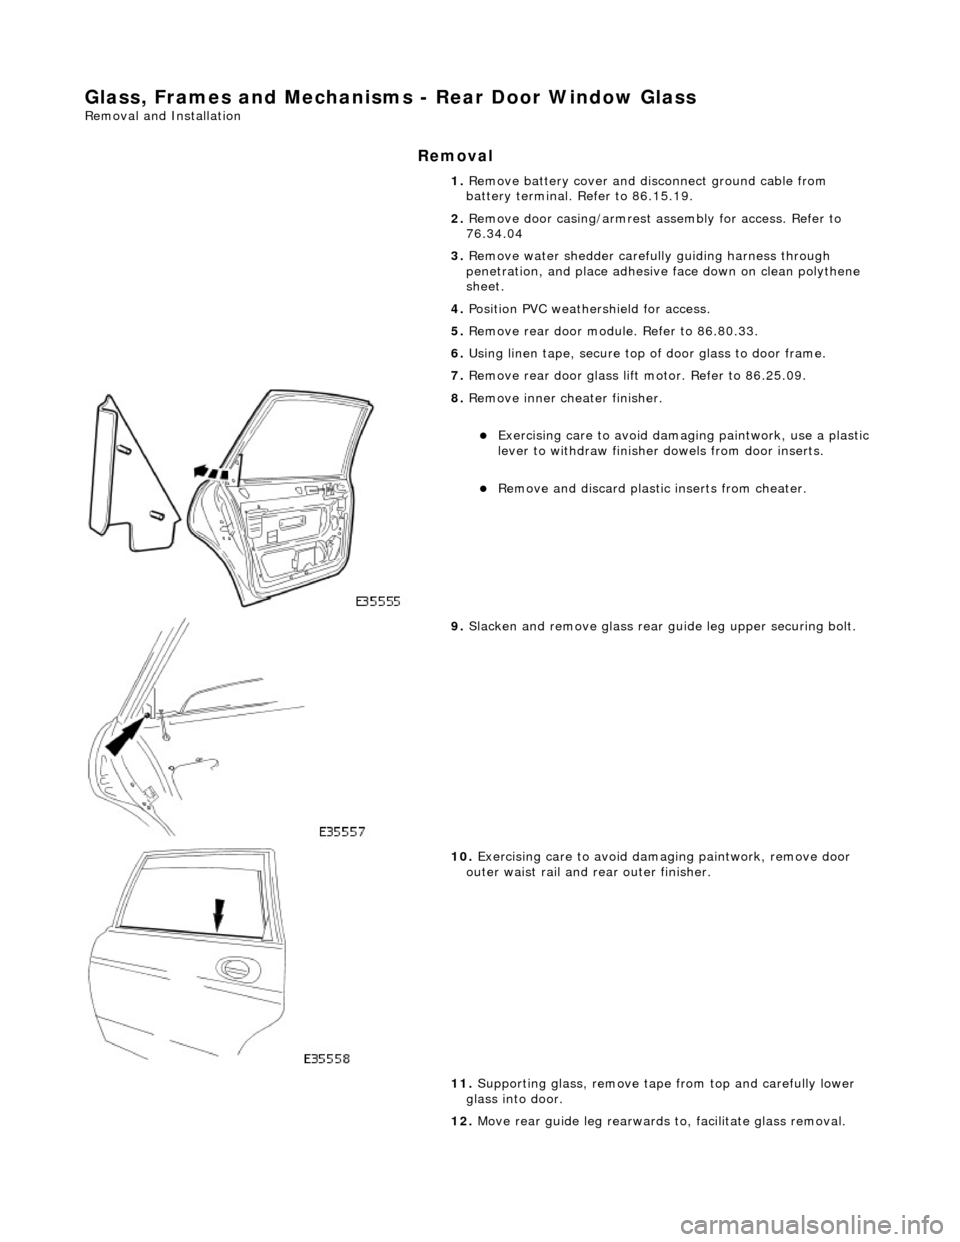
Glass, Frames and Mechanisms - Rear Door Window Glass
Removal and Installation
Removal
1. Remove battery cover and disc onnect ground cable from
battery terminal. Refer to 86.15.19.
2. Remove door casing/armrest as sembly for access. Refer to
76.34.04
3. Remove water shedder carefu lly guiding harness through
penetration, and place adhesive face down on clean polythene
sheet.
4. Position PVC weathe rshield for access.
5. Remove rear door module. Refer to 86.80.33.
6. Using linen tape, secure top of door glass to door frame.
7. Remove rear door glass lift motor. Refer to 86.25.09.
8. Remove inner cheater finisher.
пЃ¬Exercising care to avoid dama ging paintwork, use a plastic
lever to withdraw finisher dowels from door inserts.
пЃ¬Remove and discard plasti c inserts from cheater.
9. Slacken and remove glass rear guide leg upper securing bolt.
10. Exercising care to avoid damaging paintwork, remove door
outer waist rail and rear outer finisher.
11. Supporting glass, remove tape from top and carefully lower
glass into door.
12. Move rear guide leg rearwards to, facilitate glass removal.
Page 2193 of 2490
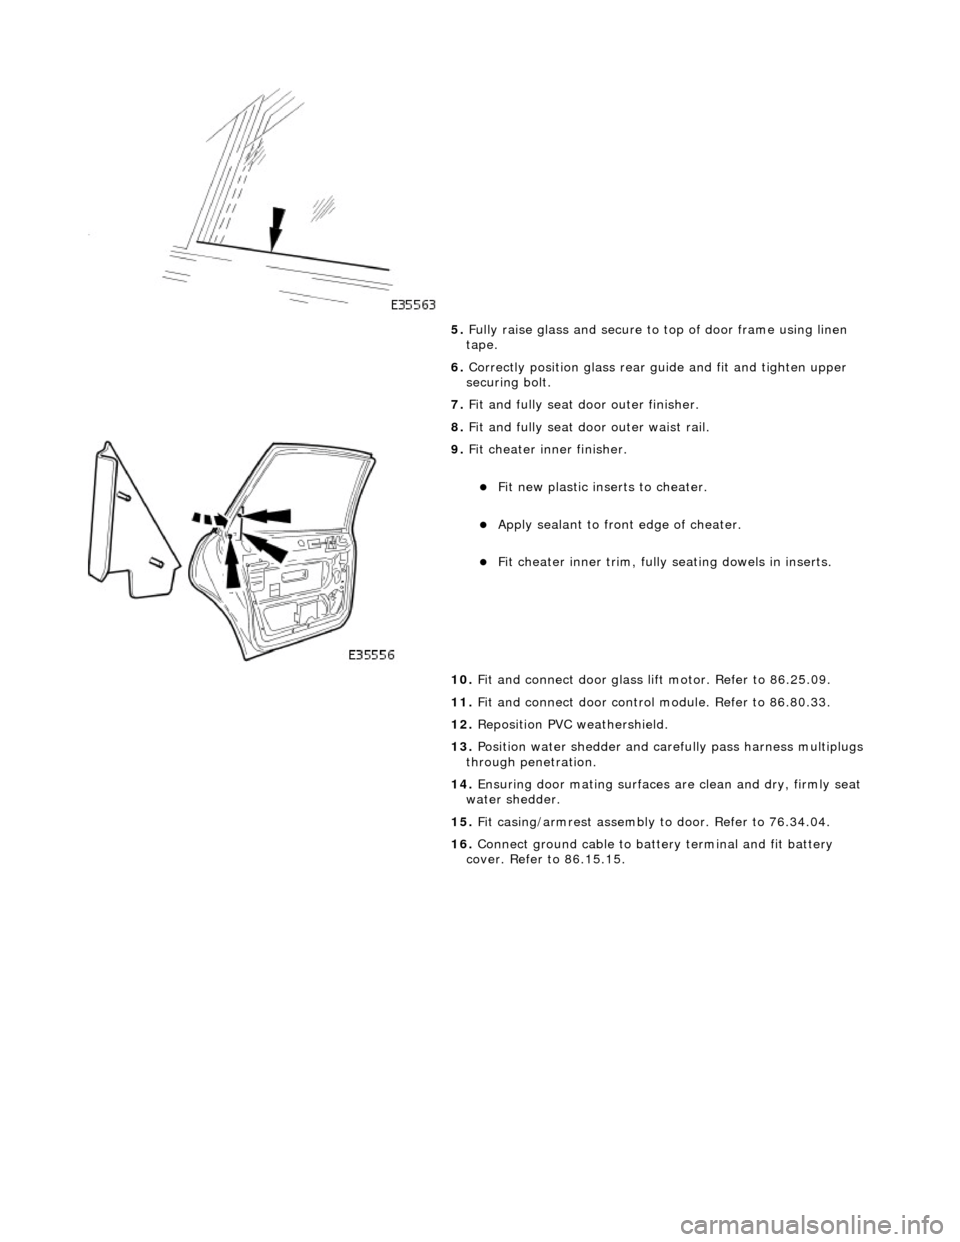
5. Fully raise glass and secure to top of door frame using linen
tape.
6. Correctly position glass rear guide and fit and tighten upper
securing bolt.
7. Fit and fully seat d oor outer finisher.
8. Fit and fully seat door outer waist rail.
9. Fit cheater i nner finisher.
пЃ¬Fit new plastic inserts to cheater.
пЃ¬Apply sealant to front edge of cheater.
пЃ¬Fit cheater inner trim, fully se ating dowels in inserts.
10. Fit and connect door glass lift motor. Refer to 86.25.09.
11. Fit and connect door control module. Refer to 86.80.33.
12. Reposition PVC weathershield.
13. Position water shedder and carefully pass harness multiplugs
through penetration.
14. Ensuring door mating surfaces ar e clean and dry, firmly seat
water shedder.
15. Fit casing/armrest assembly to door. Refer to 76.34.04.
16. Connect ground cable to batt ery terminal and fit battery
cover. Refer to 86.15.15.
Page 2228 of 2490
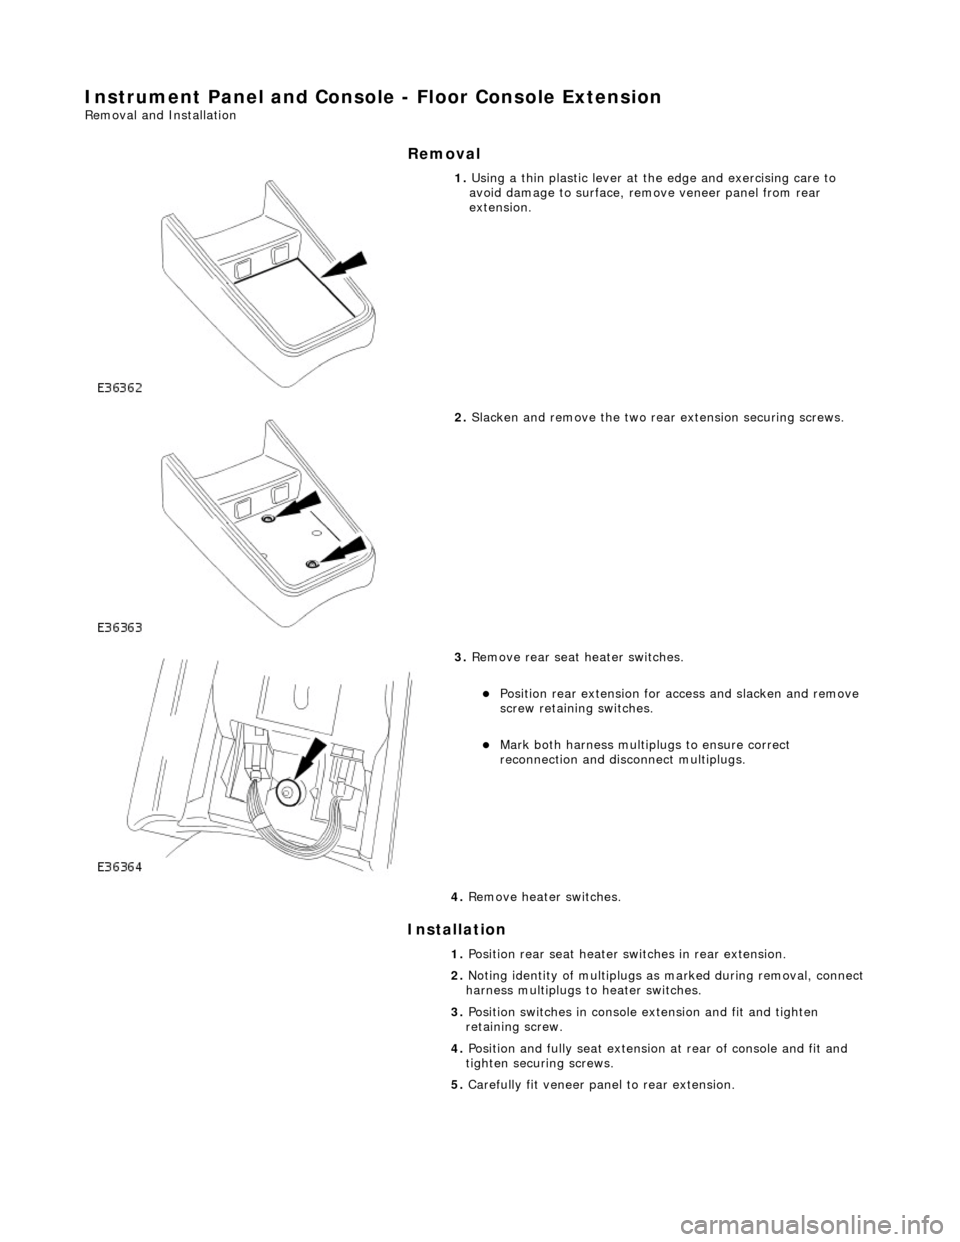
Instrument Panel and Console - Floor Console Extension
Removal and Installation
Removal
Installation
1. Using a thin plastic lever at th e edge and exercising care to
avoid damage to surface, remove veneer panel from rear
extension.
2. Slacken and remove the two rear extension securing screws.
3. Remove rear seat heater switches.
пЃ¬Position rear extension for access and slacken and remove
screw retaining switches.
пЃ¬Mark both harness multip lugs to ensure correct
reconnection and disconnect multiplugs.
4. Remove heater switches.
1. Position rear seat heater switches in rear extension.
2. Noting identity of multiplugs as marked during removal, connect
harness multiplugs to heater switches.
3. Position switches in console extension and fit and tighten
retaining screw.
4. Position and fully seat extension at rear of console and fit and
tighten securing screws.
5. Carefully fit veneer panel to rear extension.
Page 2304 of 2490
Installation
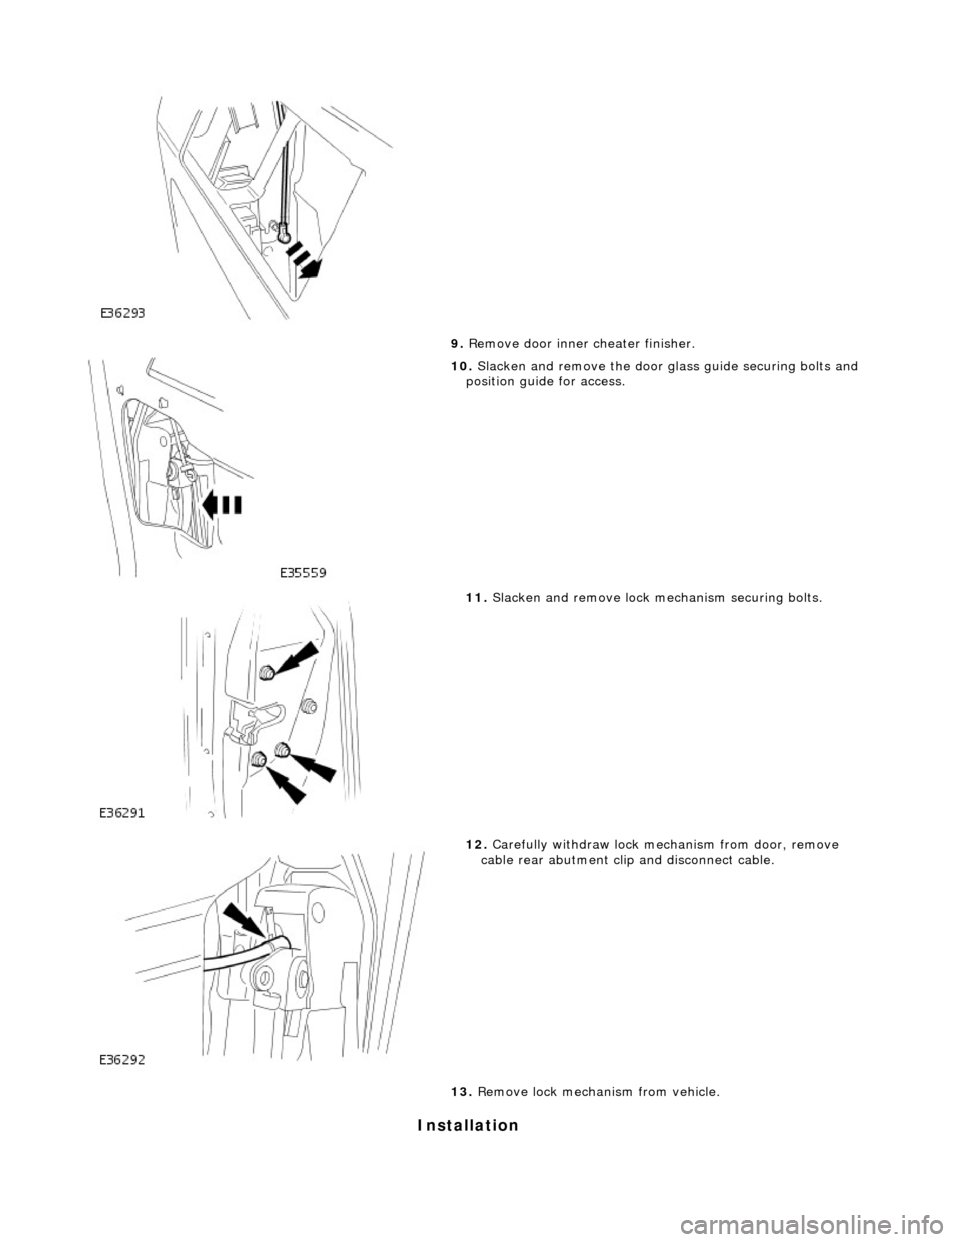
9. Remove door inner cheater finisher.
10. Slacken and remove the door glass guide securing bolts and
position guide for access.
11. Slacken and remove lock mechanism securing bolts.
12. Carefully withdraw lock me chanism from door, remove
cable rear abutment clip and disconnect cable.
13. Remove lock mechan ism from vehicle.
Page 2305 of 2490

1.
Position lock mechanism at door and connect operating cable.
2. Fit and fully seat cable rear abutment securing clip.
3. Fit and fully seat lock mechanism in door and fit and tighten
securing bolts.
4. Align glass guide and fit and tighten securing bolts.
5. Fit and fully seat inner cheater finisher.
6. Align and connect inner operating rod to lock mechanism.
7. Fit outer door handle operating rod to lock
8. Check for satisfactory door handle operation.
9. Reposition inner plastic sheet.
10. Connect lock actuator harness multiplug and fit to mounting
bracket.
11. Connect ground cable to battery terminal. Refer to 86.15.15.
12. From driver door, check for satisfactory operation of locking
system.
13. Disconnect ground cable from battery terminal. Refer to
86.15.19.
14. Ensure that water shedder contact area of door is clean and
dry.
15. Position water shedder at d oor and carefully pass door
harness through.
16. Fit and firmly seat water shedde r on door ensuring satifactory
adhesion.
17. Fit door casing. Refer to 76.34.04.
18. Fit door casing veneer panel. Refer to 76.47.12.
19. Connect ground cable to battery terminal and fit battery
cover. Refer to 86.15.15.
Page 2384 of 2490
Generally, resistance spot welding equipment used in the motor vehicle repair industry does not produce welds of equivalent strength to those achieved during manufactu re. The expression 'single row of resistance spot welds' indicates that the spots
should be spaced on a pitch of 19mm to 25mm, which normally results in mo re spot welds than those produced in the
original factory joint.
Resistance spot welds should be removed using a resistance spot weld cutter. If the new joint is to be MIG plug welded, old
resistance spot welds should be cut from the panel to be reta ined and the resulting holes used for plug welding. Suitable
holes may also be drilled or punched; 8,0 mm dia for sect ions up to 1,6 mm, and 10,0 mm dia for thicker sections.
PLASTICS-EXPLANATORY NOTES
Plastic component and trim materials
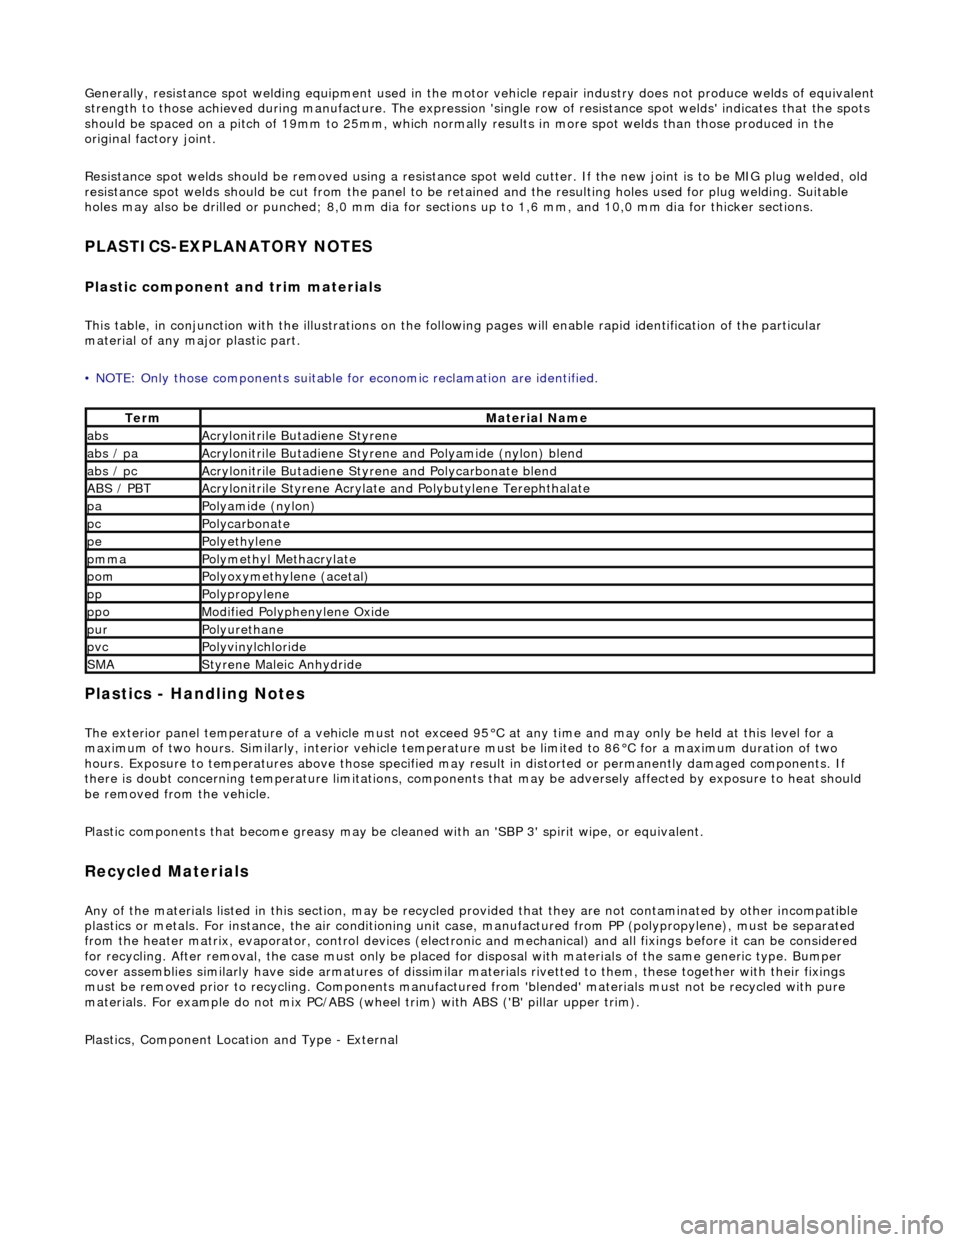
This table, in conjunction with the illu strations on the following pages will enable rapid identification of the particular
material of any major plastic part.
• NOTE: Only those components suitable for economic reclamation are identified.
Plastics - Handling Notes
The exterior panel temperature of a vehicle must not exceed 95В°C at any time and may only be held at this level for a
maximum of two hours. Similarly, interior vehicle temperatur e must be limited to 86В°C for a maximum duration of two
hours. Exposure to temperatures above those specified may result in distorted or permanently damaged components. If
there is doubt concerning temperature limitations, components that may be adversel y affected by exposure to heat should
be removed from the vehicle.
Plastic components that become greasy may be clea ned with an 'SBP 3' spirit wipe, or equivalent.
Recycled Materials
Any of the materials listed in this section, may be recycled provided that they ar e not contaminated by other incompatible
plastics or metals. For instan ce, the air conditioning unit case, manufactur ed from PP (polypropylene), must be separated
from the heater matrix, evaporator, contro l devices (electronic and mechanical) and all fixings before it can be considered
for recycling. After removal, the case mu st only be placed for disposal with materials of the same generic type. Bumper
cover assemblies similarly have side arma tures of dissimilar materials rivetted to them, these together with their fixings
must be removed prior to recy cling. Components manufactured from 'blended' materials must not be recycled with pure
materials. For example do not mix PC/ABS (wheel trim) with ABS ('B' pillar upper trim).
Plastics, Component Location and Type - External
TermMaterial Name
absAcrylonitrile Butadiene Styrene
abs / paAcrylonitrile Butadiene Styrene and Polyamide (nylon) blend
abs / pcAcrylonitrile Butadiene Styrene and Polycarbonate blend
ABS / PBTAcrylonitrile Styrene Acrylate and Polybutylene Terephthalate
paPolyamide (nylon)
pcPolycarbonate
pePolyethylene
pmmaPolymethyl Methacrylate
pomPolyoxymethylene (acetal)
ppPolypropylene
ppoModified Polyphenylene Oxide
purPolyurethane
pvcPolyvinylchloride
SMAStyrene Maleic Anhydride