JAGUAR X308 1998 2.G Workshop Manual
X308 1998 2.G
JAGUAR
JAGUAR
https://www.carmanualsonline.info/img/21/7640/w960_7640-0.png
JAGUAR X308 1998 2.G Workshop Manual
Trending: Overflow, washer fluid, index, gas tank size, manual radio set, SOLENOID, Airbag module
Page 2181 of 2490
Glass, Frames and Mechanisms - Door Window Control Switch Bulb
Removal and Installation
Removal
1. Remove casing/armrest asse mbly from door. Refer to
76.34.01.
2. Slacken and remove armres t front securing screw
3. Position armrest for access, slacken and remove two
switchpack securing screws and remove switchpack assembly from armrest.
4. Invert switchpack and using a small flat bladed screwdriver
rotate bulb holder 1/8 turn counterclockwise.
5. Remove bulb from switchpack base.
Page 2182 of 2490
Installation
1.
Fit illumination bulb in switchpa ck base and using a small flat
bladed screwdriver, rotate it 1/ 8 turn clockwise to fully seat.
2. Fit switchpack to armrest. Refer to 86.25.03.
3. Fit casing/armrest assembly to door. Refer to 76.34.01.
Page 2183 of 2490
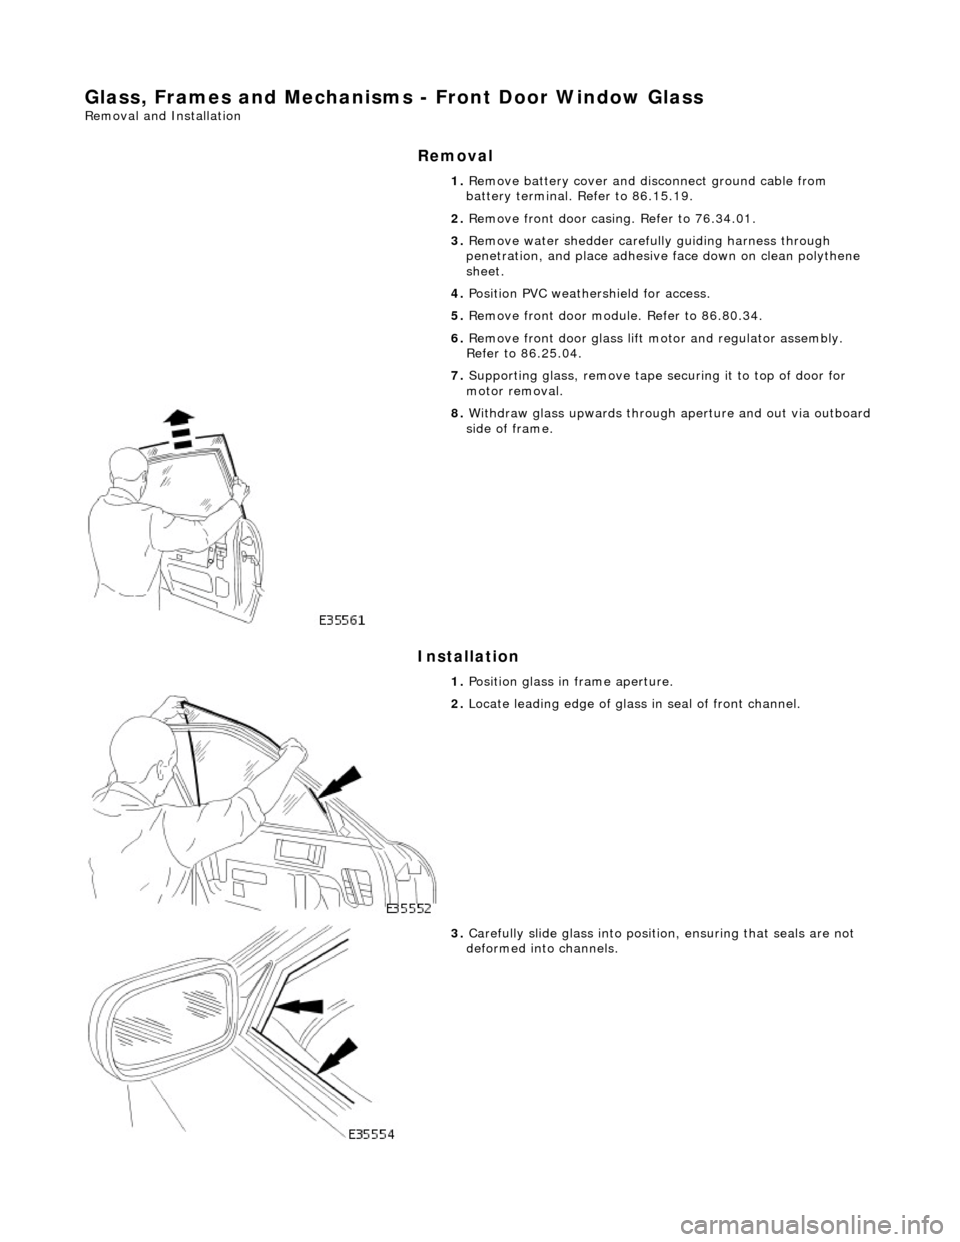
Glass, Frames and Mechanisms - Front Door Window Glass
Removal and Installation
Removal
Installation
1. Remove battery cover and disc onnect ground cable from
battery terminal. Refer to 86.15.19.
2. Remove front door casing. Refer to 76.34.01.
3. Remove water shedder carefu lly guiding harness through
penetration, and place adhesive face down on clean polythene
sheet.
4. Position PVC weathe rshield for access.
5. Remove front door modu le. Refer to 86.80.34.
6. Remove front door glass lift motor and regulator assembly.
Refer to 86.25.04.
7. Supporting glass, remove tape securing it to top of door for
motor removal.
8. Withdraw glass upwards through aperture and out via outboard side of frame.
1. Position glass in frame aperture.
2. Locate leading edge of glass in seal of front channel.
3. Carefully slide glass into position, ensuring that seals are not
deformed into channels.
Page 2184 of 2490
4.
Fully raise glass and using linen tape, secure to top of door
frame.
5. Fit door glass lift motor. Refer to 86.25.04.
6. Fit door module. Refer to 86.80.34.
7. Reposition PVC inne r weathershield.
8. Position water shedder and carefully pass harness multiplugs
through penetration.
9. Ensuring door mating surfaces ar e clean and dry, firmly seat
water shedder.
10. Fit door casing. Refer to 76.34.01.
11. Connect ground cable to batter y terminal and fit cover to
battery. Refer to 86.15.15.
Page 2185 of 2490
Glass, Frames and Mechanisms - Front Door Window Glass Weatherstrip
Removal and Installation
Removal
Installation
1.
Pull seal out of door frame channelling and discard seal.
2. Clean channelling ensuring that any residual adhesive is
removed.
1. Avoiding adhesive at ends, apply a suitable dry lubricant to
seal.
2. Commencing at front of frame, feed seal into channelling
ensuring it is uniformly tensioned and free from kinks.
3. Wipe residual lubricant fro m adhesive contact areas.
4. Remove protective tape from en ds and press adhesive firmly
onto frame.
5. Clean any excess lubricant from external surfaces and check
that door shuts correctly.
Page 2186 of 2490
Glass, Frames and Mechanisms - Front Door Window Regulator and Motor
Removal and Installation
Removal
1. Ensure that door glass is in fully up position.
2. Remove battery cover and disc onnect ground cable from
battery terminal. Refer to 86.15.19.
3. Remove casing/armrest asse mbly from door. Refer to
76.34.01.
4. Remove water shedder carefu lly guiding harness through
penetration, and place adhesive face down on clean polythene
sheet.
5. Position PVC inner weat hershield for access.
6. Remove front door modu le. Refer to 86.80.34.
7. Using linen tape, secure to p of glass to door frame.
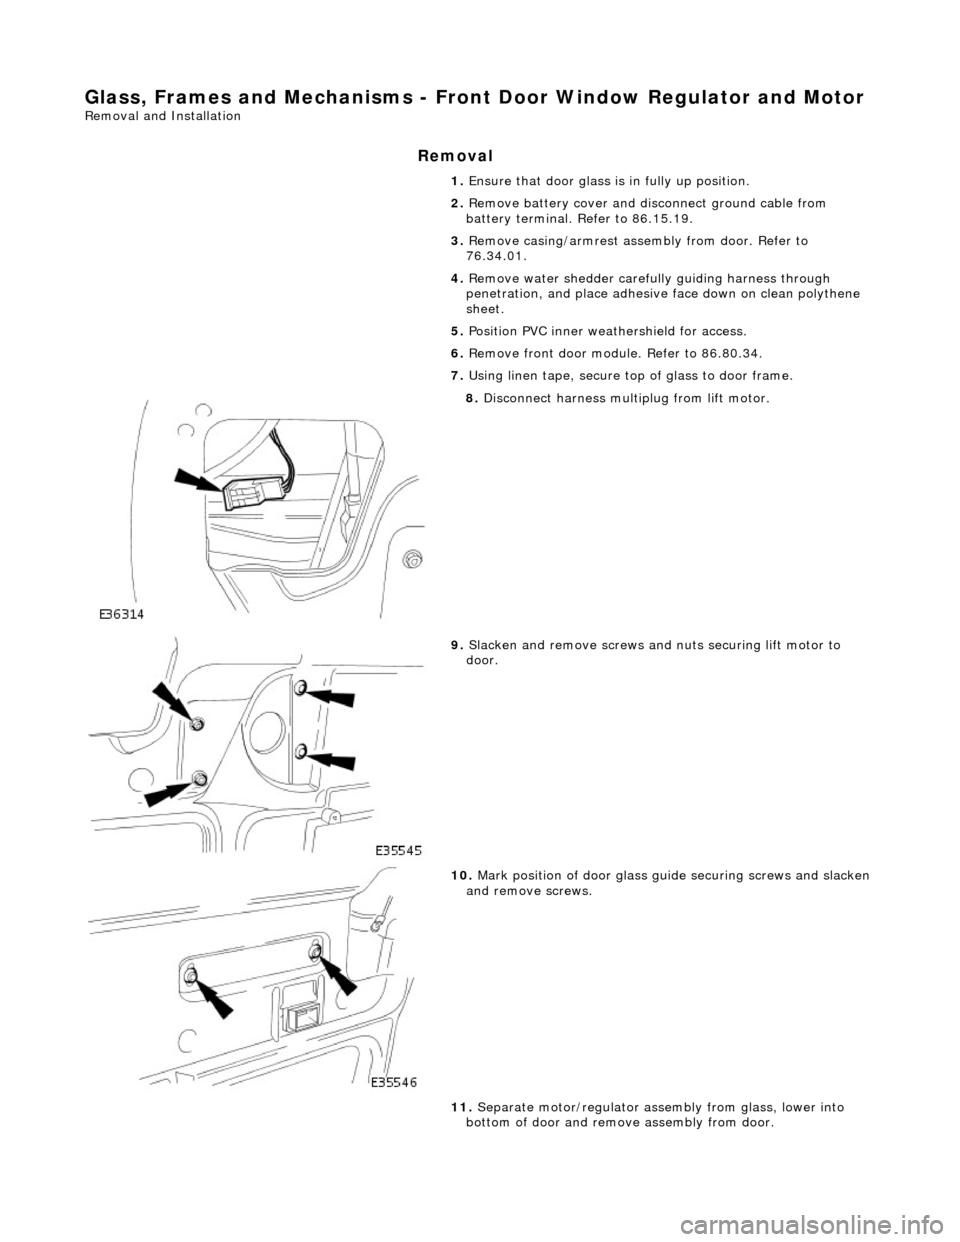
8. Disconnect harness mult iplug from lift motor.
9. Slacken and remove screws and nuts securing lift motor to
door.
10. Mark position of door glass gu ide securing screws and slacken and remove screws.
11. Separate motor/regulator assembly from glass, lower into
bottom of door and remove assembly from door.
Page 2187 of 2490
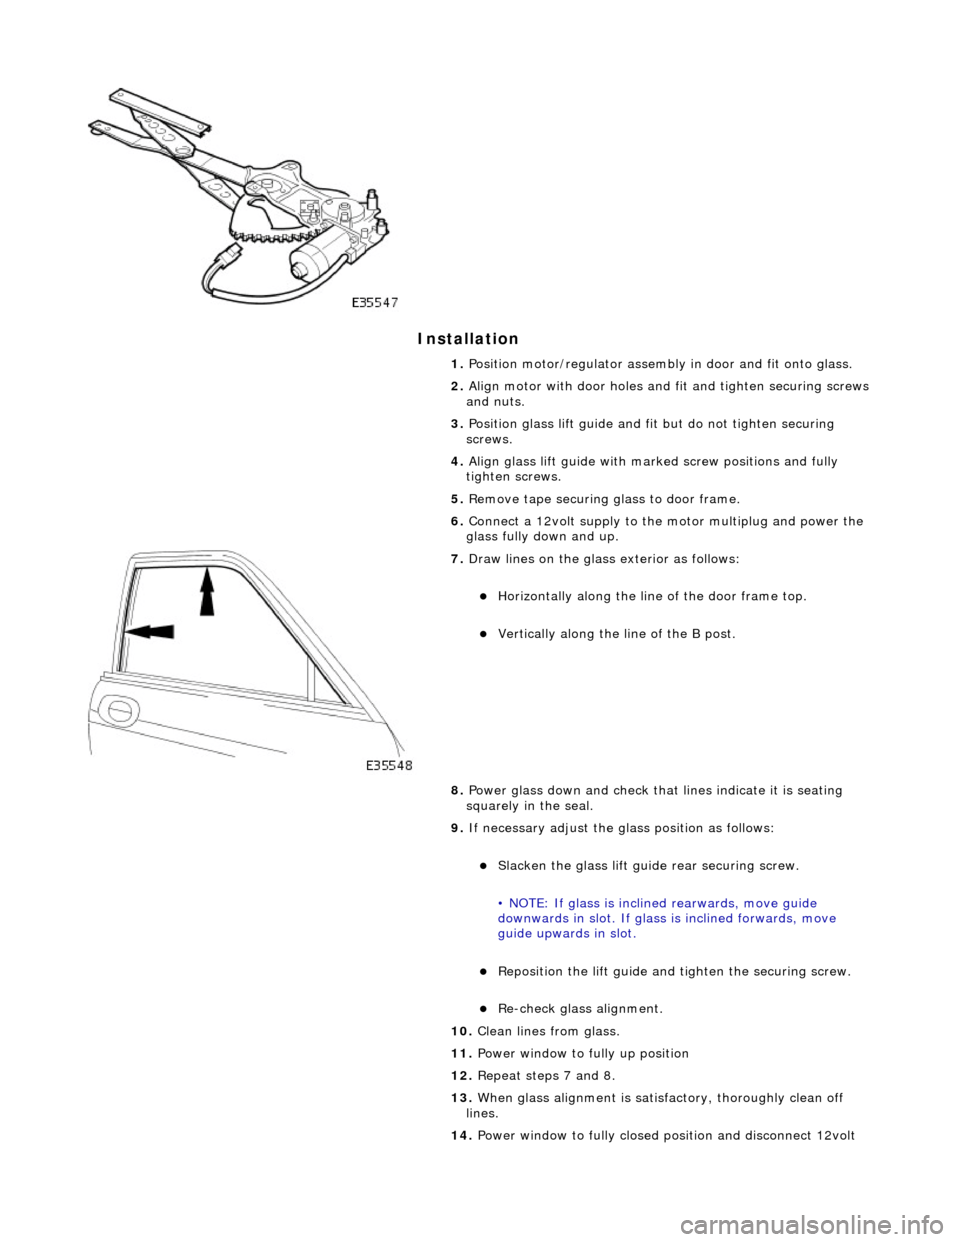
Installation
1. Position motor/regulator assembly in door and fit onto glass.
2. Align motor with door holes and fit and tighten securing screws
and nuts.
3. Position glass lift guide and fi t but do not tighten securing
screws.
4. Align glass lift guide with marked screw positions and fully
tighten screws.
5. Remove tape securing glass to door frame.
6. Connect a 12volt supply to the motor multiplug and power the
glass fully down and up.
7. Draw lines on the glass exterior as follows:
Horizontally along the line of the door frame top.
Vertically along the line of the B post.
8. Power glass down and check that lines indicate it is seating
squarely in the seal.
9. If necessary adjust the glass position as follows:
Slacken the glass lift guid e rear securing screw.
• NOTE: If glass is inclin ed rearwards, move guide
downwards in slot. If glass is inclined forwards, move
guide upwards in slot.
Reposition the lift guide and tighten the securing screw.
Re-check glass alignment.
10. Clean lines from glass.
11. Power window to fully up position
12. Repeat steps 7 and 8.
13. When glass alignment is satisf actory, thoroughly clean off
lines.
14. Power window to fully closed po sition and disconnect 12volt
Page 2188 of 2490
supply from motor multiplug.
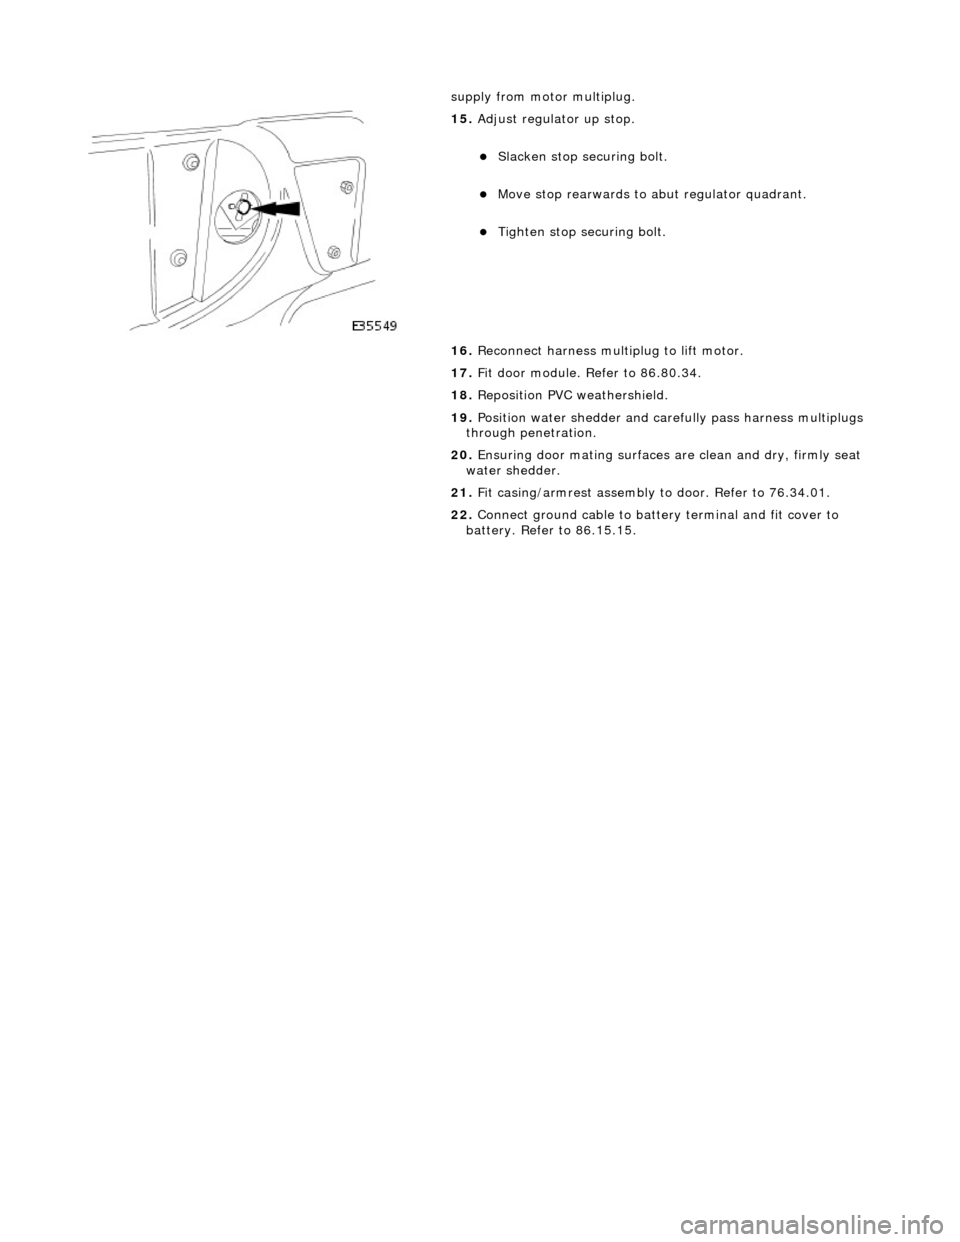
15.
Adjust regulator up stop.
Slacken stop securing bolt.
Move stop rearwards to abut regulator quadrant.
Tighten stop securing bolt.
16. Reconnect harness multiplug to lift motor.
17. Fit door module. Refer to 86.80.34.
18. Reposition PVC weathershield.
19. Position water shedder and carefully pass harness multiplugs
through penetration.
20. Ensuring door mating surfaces ar e clean and dry, firmly seat
water shedder.
21. Fit casing/armrest assembly to door. Refer to 76.34.01.
22. Connect ground cable to batter y terminal and fit cover to
battery. Refer to 86.15.15.
Page 2189 of 2490
Glass, Frames and Mechanisms - Front Door Window Regulator Motor
Removal and Installation
Removal
Installation
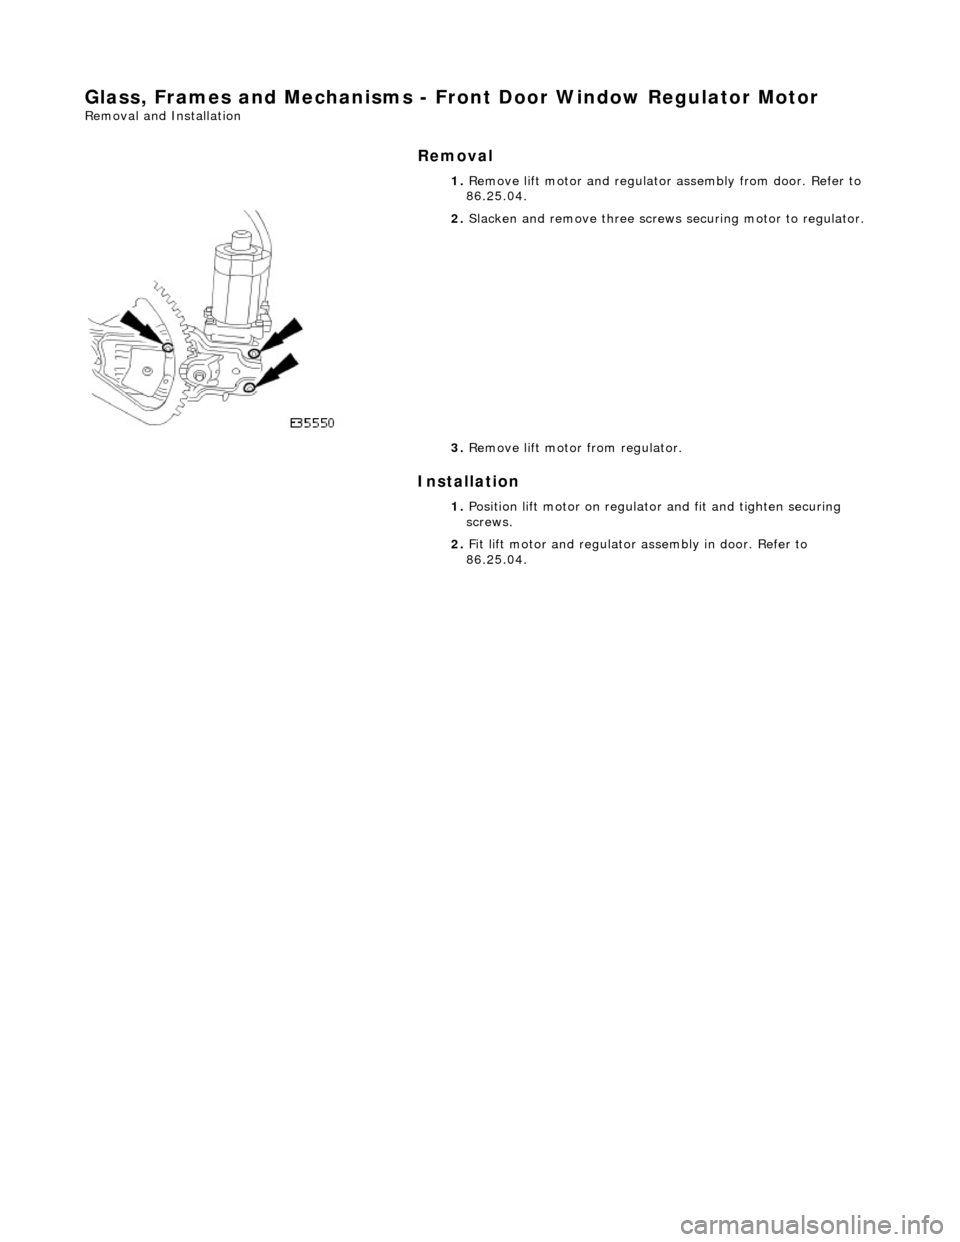
1.
Remove lift motor and regulator assembly from door. Refer to
86.25.04.
2. Slacken and remove th ree screws securing motor to regulator.
3. Remove lift motor from regulator.
1. Position lift motor on regulator and fit and tighten securing
screws.
2. Fit lift motor and regulator assembly in door. Refer to
86.25.04.
Page 2190 of 2490
Glass, Frames and Mechanisms - Front Door Window Control Switch
Removal and Installation
Removal
Installation
1.
Remove casing/armrest asse mbly from door. Refer to
76.34.01.
2. Slacken and remove armres t front securing screw.
3. Position armrest for access, slacken and remove two
switchpack securing screws and remove switchpack assembly from armrest.
4. Slacken and remove screws securing veneer panel to
switchpack.
1. Position veneer panel on sw itchpack and fit and tighten
securing screws.
2. Position switchpack assembly on armrest and fit and tighten
securing screws.
3. Fit and tighten screw securing fr ont of armrest to door casing.
4. Fit casing/armrest assembly to door. Refer to 76.34.01.
Trending: manifold, high beam, parking brake, transmission, open bonnet, Passenger air bag, engine coolant


