throttle JAGUAR X308 1998 2.G Owner's Manual
[x] Cancel search | Manufacturer: JAGUAR, Model Year: 1998, Model line: X308, Model: JAGUAR X308 1998 2.GPages: 2490, PDF Size: 69.81 MB
Page 652 of 2490
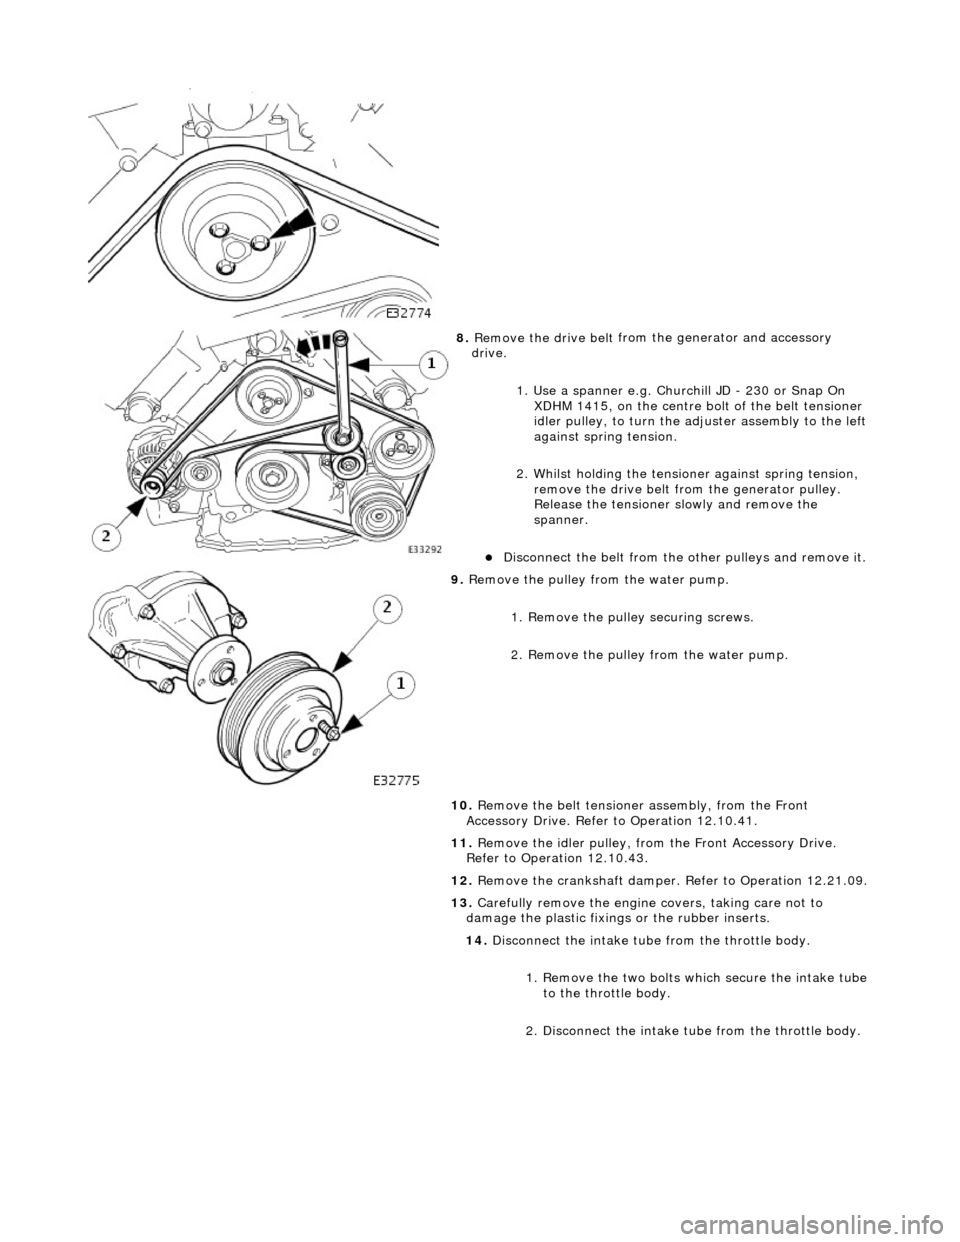
8. Remove the drive belt
from
the generator and accessory
drive.
1. Use a spanner e.g. Churchill JD - 230 or Snap On XDHM 1415, on the centre bo lt of the belt tensioner
idler pulley, to turn the adju ster assembly to the left
against spring tension.
2. Whilst holding the tensioner against spring tension, remove the drive belt from the generator pulley.
Release the tensioner sl owly and remove the
spanner.
D i
sconnect the belt from the
other pulleys and remove it.
9. Remove t
he pulley from the water pump.
1. Remove the pulley securing screws.
2. Remove the pulley from the water pump.
10. Remove the belt tensione r assembly, from the Front
Accessory Drive. Refer to Operation 12.10.41.
11. Remove the idler pulley, from the Front Accessory Drive.
Refer to Operation 12.10.43.
12. Remove the crankshaft damper. Refer to Operation 12.21.09.
13. Carefully remove the engine covers, taking care not to
damage the plasti c fixings or the rubber inserts.
14. Disconnect the intake tube from the throttle body.
1. Remove the two bolts which secure the intake tube to the throttle body.
2. Disconnect the intake tube from the throttle body.
Page 653 of 2490
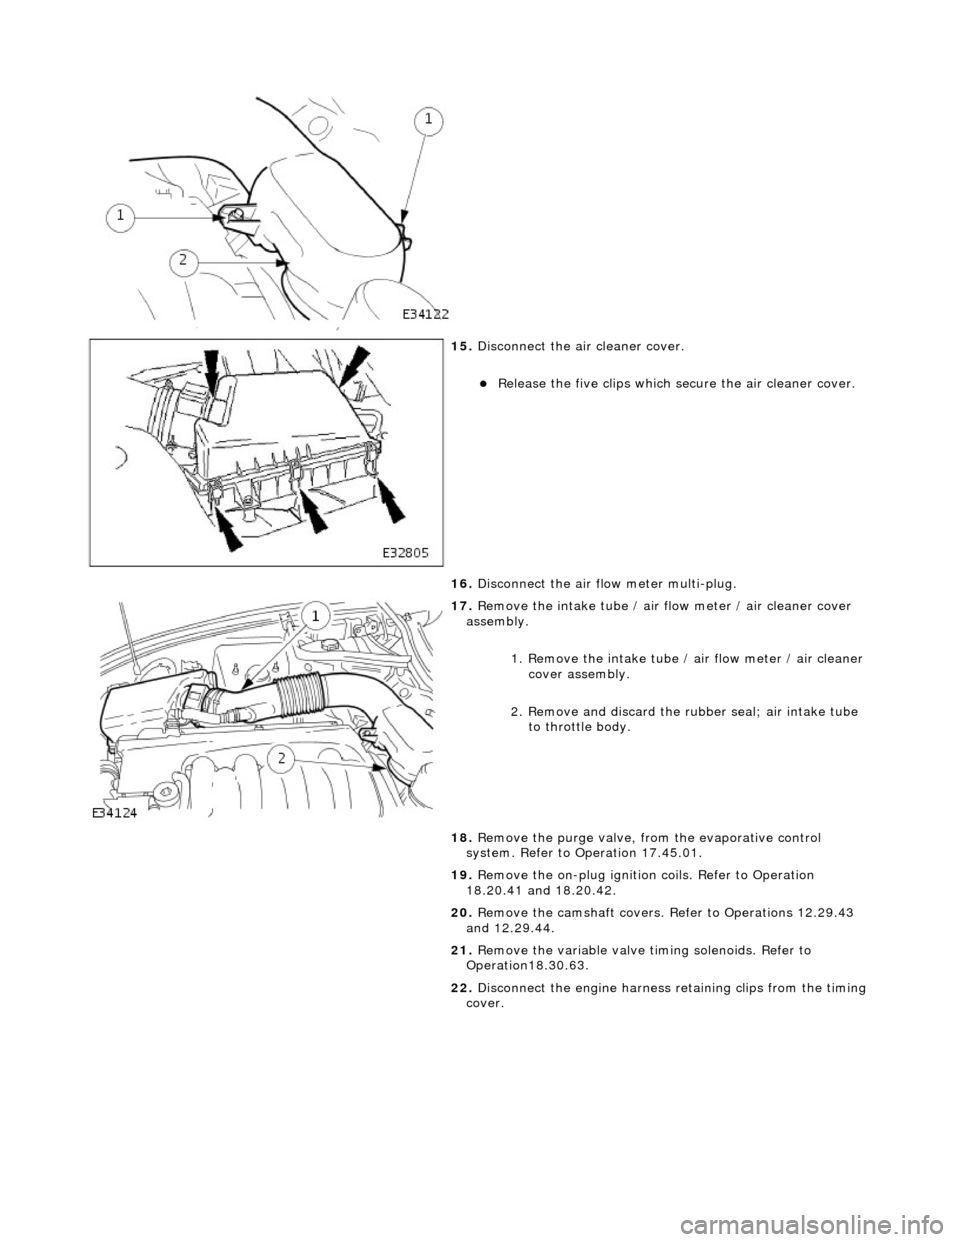
15
.
Disconnect the air cleaner cover.
R
elease the five clips which se
cure the air cleaner cover.
16. Disconnect the air flow meter multi-plug.
17
.
Remove the intake tube / air flow meter / air cleaner cover
assembly.
1. Remove the intake tube / air flow meter / air cleaner
cover assembly.
2. Remove and discard the ru bber seal; air intake tube
to throttle body.
18. Remove the purge valve, fro m the evaporative control
system. Refer to Operation 17.45.01.
19. Remove the on-plug ignition coils. Refer to Operation
18.20.41 and 18.20.42.
20. Remove the camshaft covers. Refer to Operations 12.29.43
and 12.29.44.
21. Remove the variable valve ti ming solenoids. Refer to
Operation18.30.63.
22. Disconnect the engine harness retaining clips from the timing
cover.
Page 657 of 2490
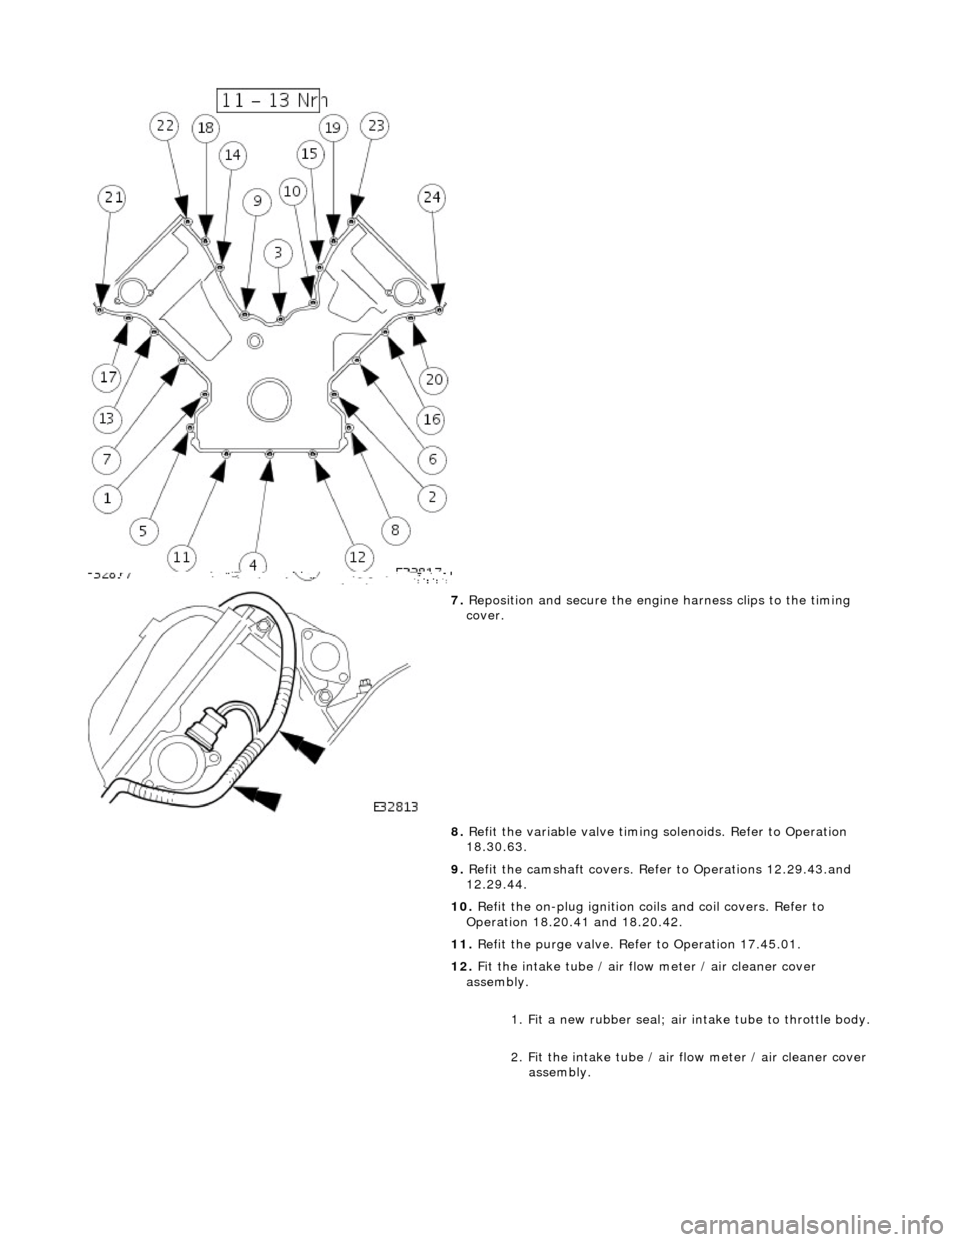
7. Reposition and secure the engine harness clips to the timing
cover.
8. Refit the variable valve timing solenoids. Refer to Operation
18.30.63.
9. Refit the camshaft covers. Refer to Operations 12.29.43.and
12.29.44.
10. Refit the on-plug ignition coils and coil covers. Refer to
Operation 18.20.41 and 18.20.42.
11. Refit the purge valve. Refer to Operation 17.45.01.
12. Fit the intake tube / air flow meter / air cleaner cover
assembly.
1. Fit a new rubber seal; air in take tube to throttle body.
2. Fit the intake tube / air flow meter / air cleaner cover
assembly.
Page 658 of 2490
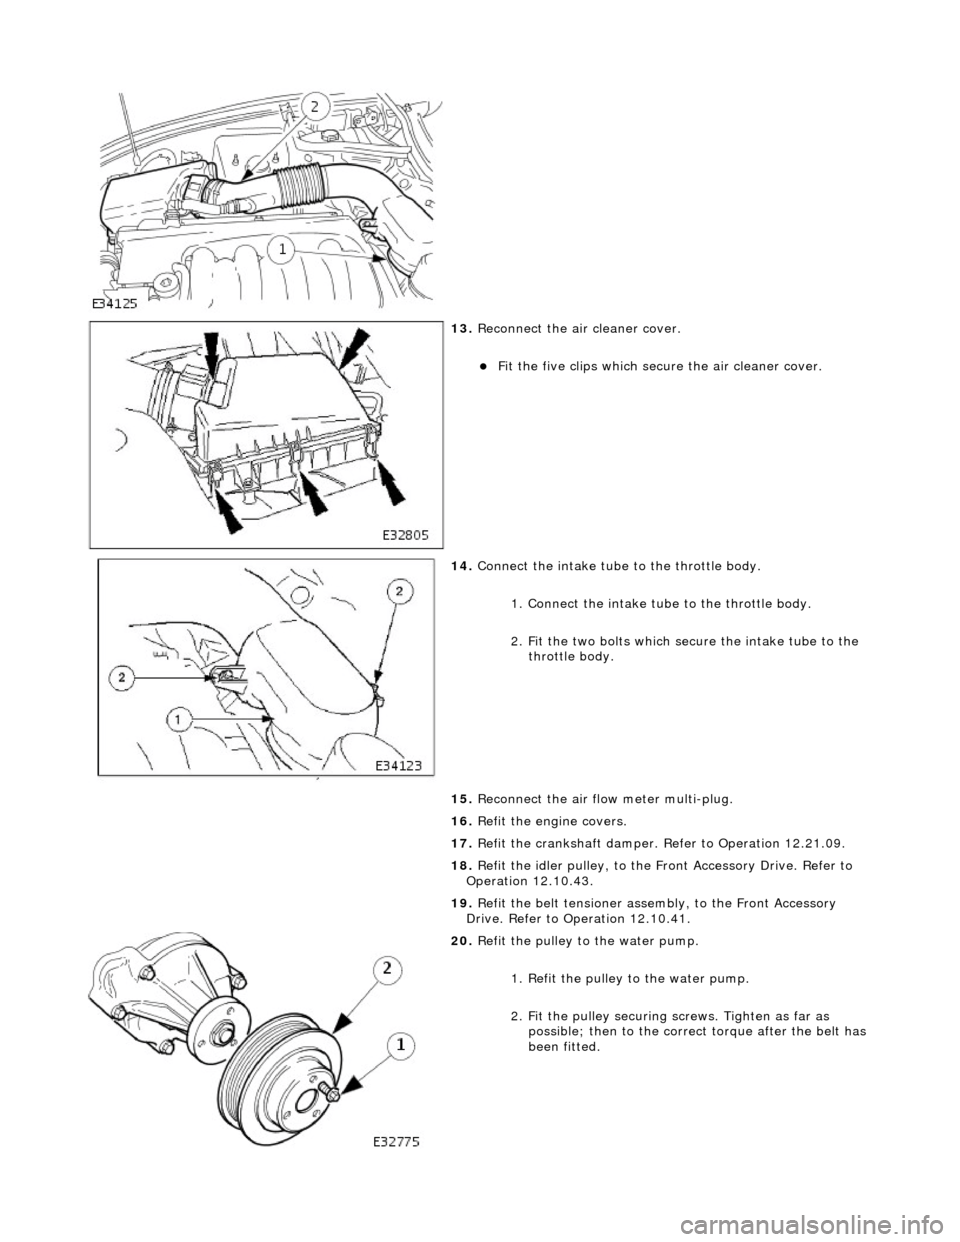
13. Reconnect the air cleaner cover.
Fit the five clips which secu re the air cleaner cover.
14. Connect the intake tube to the throttle body.
1. Connect the intake tube to the throttle body.
2. Fit the two bolts which secure the intake tube to the throttle body.
15. Reconnect the air flow meter multi-plug.
16. Refit the engine covers.
17. Refit the crankshaft damper. Refer to Operation 12.21.09.
18. Refit the idler pulley, to the Front Accessory Drive. Refer to
Operation 12.10.43.
19. Refit the belt tensioner assembly, to the Front Accessory
Drive. Refer to Operation 12.10.41.
20. Refit the pulley to the water pump.
1. Refit the pulley to the water pump.
2. Fit the pulley securing screws. Tighten as far as
possible; then to the correct torque after the belt has
been fitted.
Page 705 of 2490
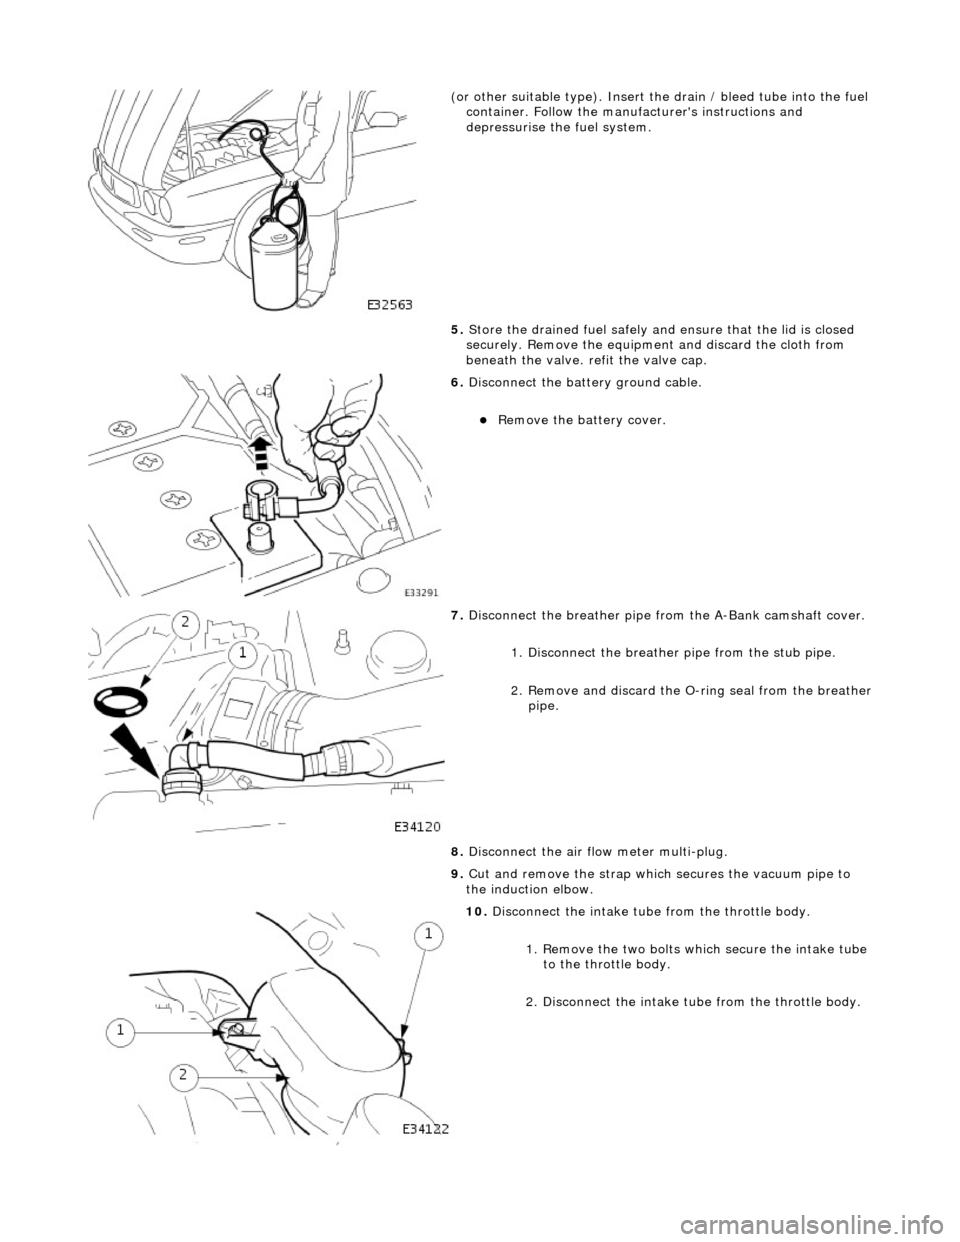
(or other sui
table type). Insert the drain / bleed tube
into the fuel
container. Follow the manufa cturer's instructions and
depressurise the fuel system.
5. Store the drained fuel safely and ensure that the lid is closed
securely. Remove the equipmen t and discard the cloth from
beneath the valve. refit the valve cap.
6. Di
sconnect the batt
ery ground cable.
R
emove the battery cover.
7. Disconnect the breather pipe fro m the
A-Bank camshaft cover.
1. Disconnect the breather pipe from the stub pipe.
2. Remove and discard the O-ring seal from the breather
pipe.
8. Disconnect the air fl ow meter multi-plug.
9. Cut and remove the strap which secures the vacuum pipe to
the induction elbow.
10
.
Disconnect the intake tube from the throttle body.
1. Remove the two bolts which secure the intake tube to the throttle body.
2. Disconnect the intake tube from the throttle body.
Page 706 of 2490
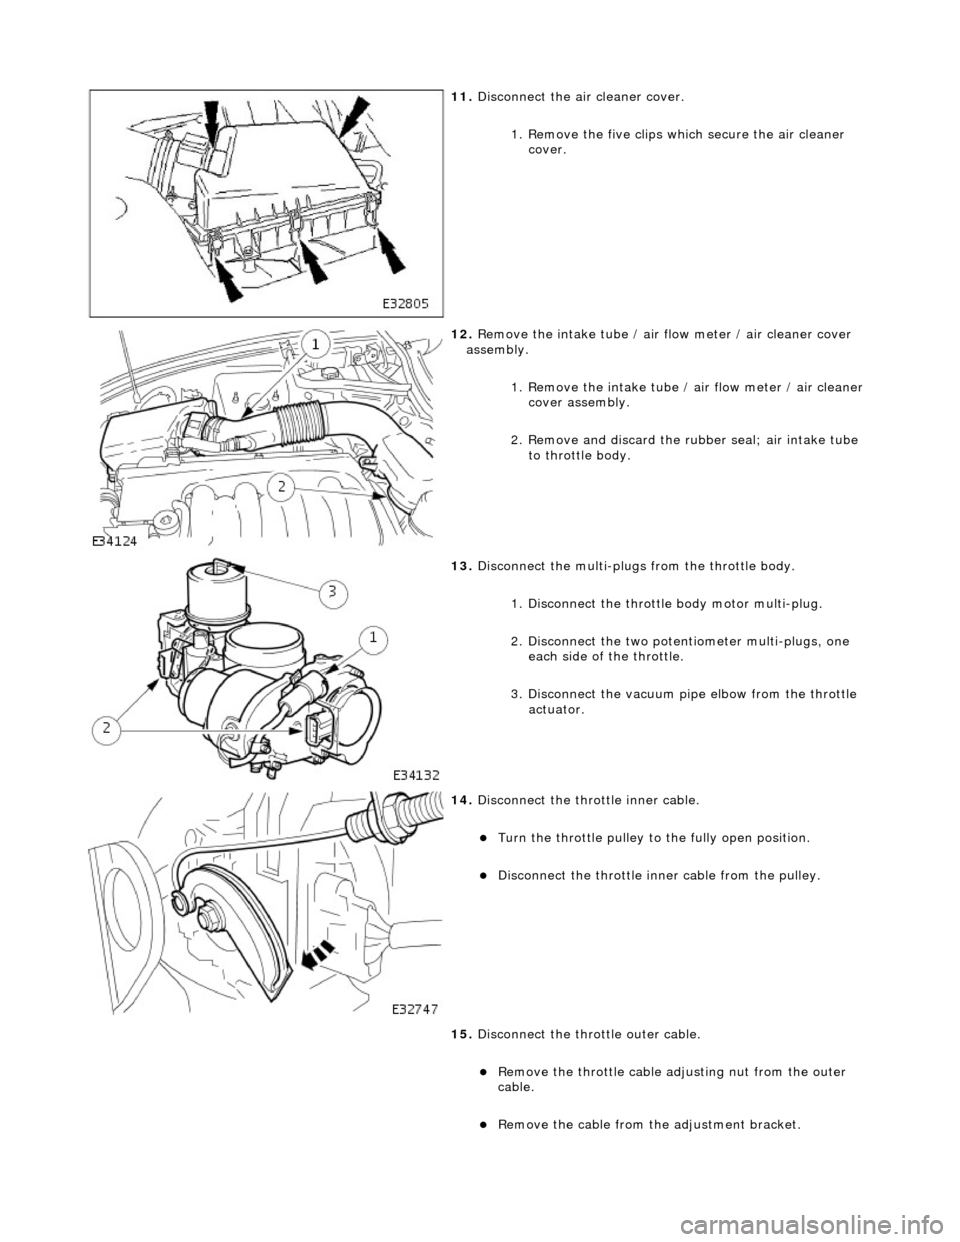
11. Disconnect the air cleaner cover.
1. Remove the five clips wh ich secure the air cleaner
cover.
12. Remove the intake tube / air flow meter / air cleaner cover
assembly.
1. Remove the intake tube / air flow meter / air cleaner
cover assembly.
2. Remove and discard the ru bber seal; air intake tube
to throttle body.
13. Disconnect the multi-plug s from the throttle body.
1. Disconnect the throttle body motor multi-plug.
2. Disconnect the two potentiometer multi-plugs, one each side of the throttle.
3. Disconnect the vacuum pi pe elbow from the throttle
actuator.
14. Disconnect the throttle inner cable.
Turn the throttle pulley to the fully open position.
Disconnect the throttle in ner cable from the pulley.
15. Disconnect the throttle outer cable.
Remove the throttle cable adjusting nut from the outer
cable.
Remove the cable from the adjustment bracket.
Page 707 of 2490

16. Disconnect the coolant hoses from the throttle body.
Release the clip which secures the coolant return hose and
disconnect the hose. Fit a blanking plug to the hose to
prevent water leakage.
Release the clip which secures the coolant feed hose and
disconnect the hose. Fit a blanking plug to the hose to
prevent water leakage.
17. Disconnect the multi-plug, located on the bracket under the
left side of th e throttle body.
18. Remove the throttle bo dy securing bolts.
19. Remove the throttle body.
1. Remove the throttle body from the induction elbow.
2. Remove and discard the throttle body gasket.
Page 711 of 2490

Installation
32. Remove and discard the sixt een sealing rings from the
injectors.
33. Remove the throttle induction elbow from the inlet manifold.
1. Remove the seven bolts which secure the throttle induction elbow.
2. Remove the elbow.
3. Remove the induction elbow seal from the manifold.
1. Clean all parts and relevant mating faces.
2. Fit the fuel pressure regulator to the manifold.
1. Lubricate and fit a new O-ri ng seal to the regulator.
2. Fit the pressure regulator to the manifold.
3. Fit the two bolts which secu re the pressure regulator.
3. Fit the fuel feed pipe to the manifold.
1. Lubricate and fit a new O-ri ng seal to the feed pipe.
Page 712 of 2490
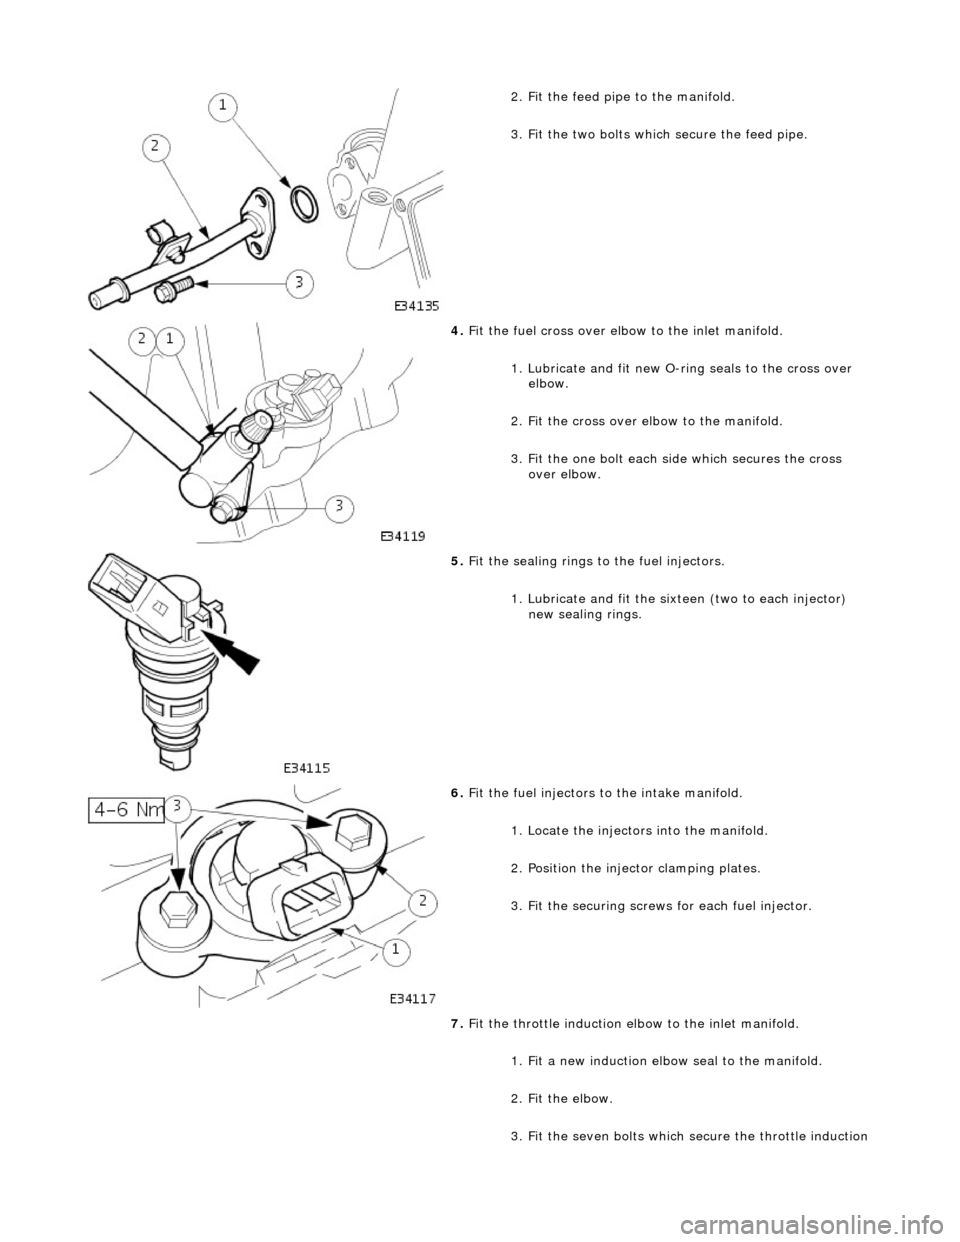
2. Fit the feed pipe to the manifold.
3. Fit the two bolts which secure the feed pipe.
4. Fit the fuel cross over elbow to the inlet manifold.
1. Lubricate and fit new O-ri ng seals to the cross over
elbow.
2. Fit the cross over elbow to the manifold.
3. Fit the one bolt each side which secures the cross over elbow.
5. Fit the sealing rings to the fuel injectors.
1. Lubricate and fit the sixteen (two to each injector) new sealing rings.
6. Fit the fuel injectors to the intake manifold.
1. Locate the injectors into the manifold.
2. Position the injector clamping plates.
3. Fit the securing screws for each fuel injector.
7. Fit the throttle induction elbow to the inlet manifold.
1. Fit a new induction elbow seal to the manifold.
2. Fit the elbow.
3. Fit the seven bolts which secure the throttle induction
Page 714 of 2490
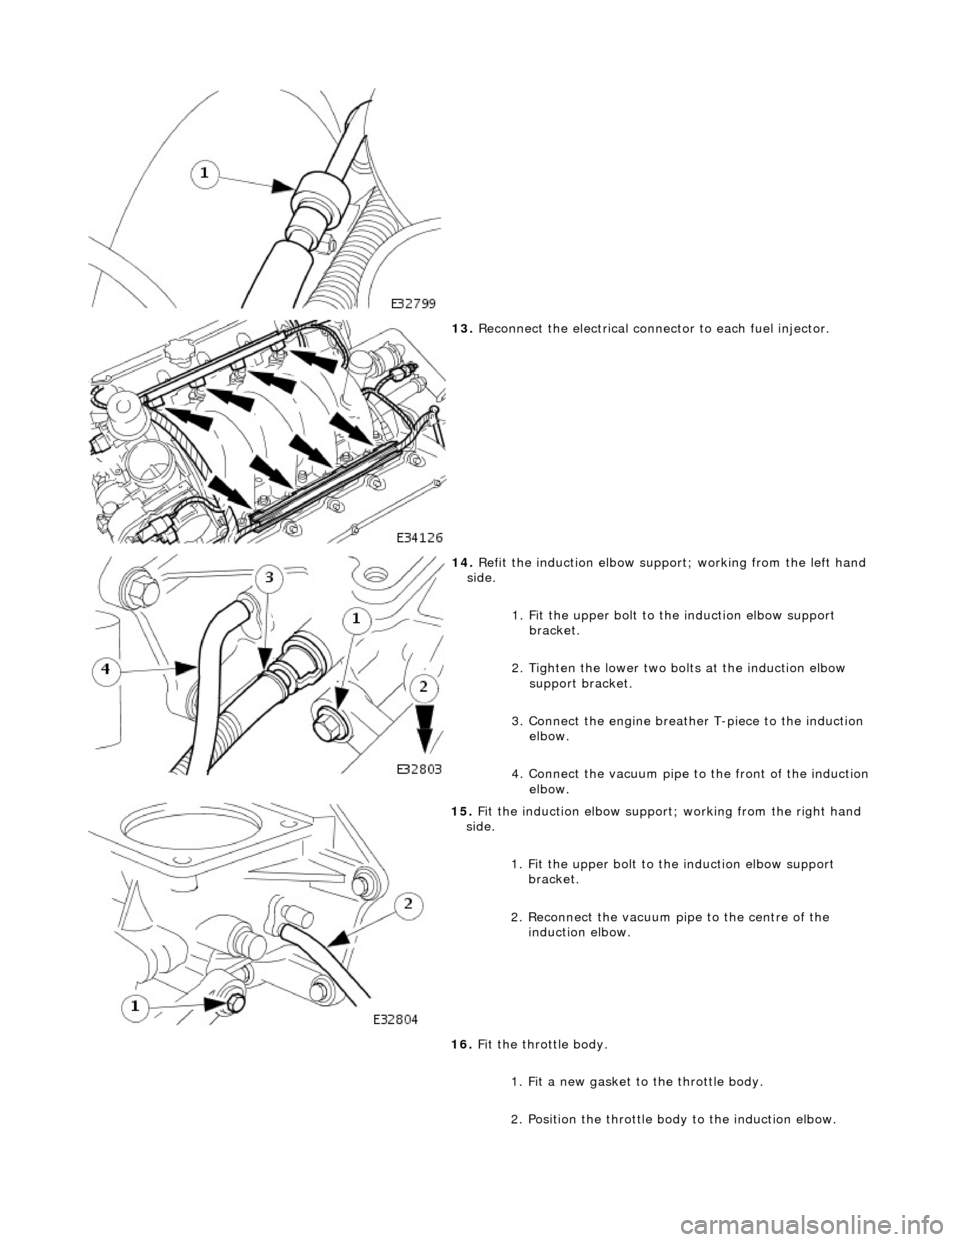
13. Reconnect the electrical connector to each fuel injector.
14. Refit the induction elbow support ; working from the left hand
side.
1. Fit the upper bolt to the induction elbow support
bracket.
2. Tighten the lower two bolts at the induction elbow support bracket.
3. Connect the engine breather T-piece to the induction elbow.
4. Connect the vacuum pipe to the front of the induction
elbow.
15. Fit the induction elbow support; working from the right hand
side.
1. Fit the upper bolt to the induction elbow support
bracket.
2. Reconnect the vacuum pi pe to the centre of the
induction elbow.
16. Fit the throttle body.
1. Fit a new gasket to the throttle body.
2. Position the throttle body to the induction elbow.