ECU JAGUAR X308 1998 2.G Owner's Guide
[x] Cancel search | Manufacturer: JAGUAR, Model Year: 1998, Model line: X308, Model: JAGUAR X308 1998 2.GPages: 2490, PDF Size: 69.81 MB
Page 100 of 2490

12. Position verti
cal link/ hub asse
mbly on lower ball joint taper
pin, install nut and tighten to 60-80Nm.
13 . Position verti
cal link/ hub asse
mbly on upper ball joint taper
pin.
14 . Install nu
t securing upper ball jo
int to vertical link and tighten
to 60-80Nm.
15. Position tie rod ball joint taper pin on steering arm and install
and tighten nut to 71-85Nm.
Page 102 of 2490
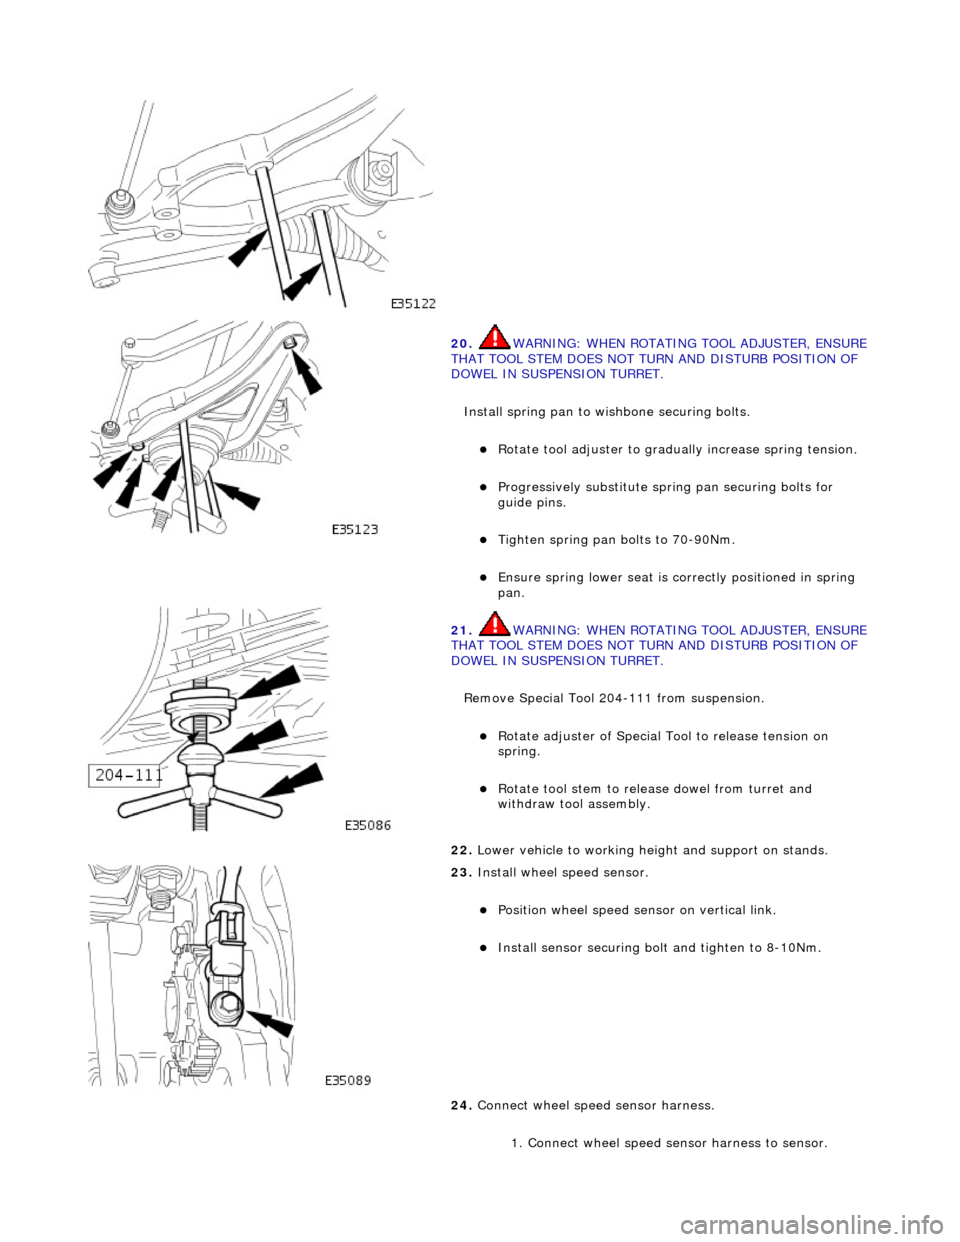
20. WARNING: WHE
N ROTATING TOOL ADJUSTER, ENSURE
THAT TOOL STEM DOES NOT TU RN AND DISTURB POSITION OF
DOWEL IN SUSPENSION TURRET.
Install spring pan to wishbone securing bolts.
Ro t
ate tool adjuster to gradua
lly increase spring tension.
Pr
ogressively substitute spri
ng pan securing bolts for
guide pins.
Tighten spring pan
bolts to 70-90Nm.
Ensure spri
ng
lower seat is co
rrectly positioned in spring
pan.
21 . WARNING: WHE
N ROTATING TOOL ADJUSTER, ENSURE
THAT TOOL STEM DOES NOT TU RN AND DISTURB POSITION OF
DOWEL IN SUSPENSION TURRET.
Remove Special Tool 204-111 from suspension.
Rotat
e adjuster of Special Tool to release tension on
spring.
R o
tate tool stem to release dowel from turret and
withdraw tool assembly.
22 . Lower vehi
cle to working heig
ht and support on stands.
23 . Inst
all wheel speed sensor.
Posi
ti
on wheel speed sensor on vertical link.
Instal
l sensor securing bolt
and tighten to 8-10Nm.
24. Connect wheel speed sensor harness.
1. Connect wheel speed sensor harness to sensor.
Page 103 of 2490

2.
Using new tiestraps secure wheel speed sensor
harness to upper wishbone.
25
.
Install brake calipers.
R
emove tie supporting brake caliper.
1. Install caliper on carrier.
2. Install guide pins and tighten to 25-30Nm.
3. Install guide pin dust caps.
4. Install caliper spring clip.
26
.
Position and partially tighten wishbone rear eccentric bolt.
R
otate eccentric bolt to align large graduation with mark
made during removal.
27
.
Position and partially tighten wishbone front eccentric bolt.
R
otate eccentric bolt to align large graduation with mark
made during removal.
P
artially tighten bolt.
28. Fit road wheel. Refer to Section 100-02.
29. Raise vehicle, remove stands and lower vehicle onto road
wheels.
30. Ensuring graduation mark remains aligned, finally tighten
wishbone rear eccentric bolt to 113-153Nm.
Page 110 of 2490
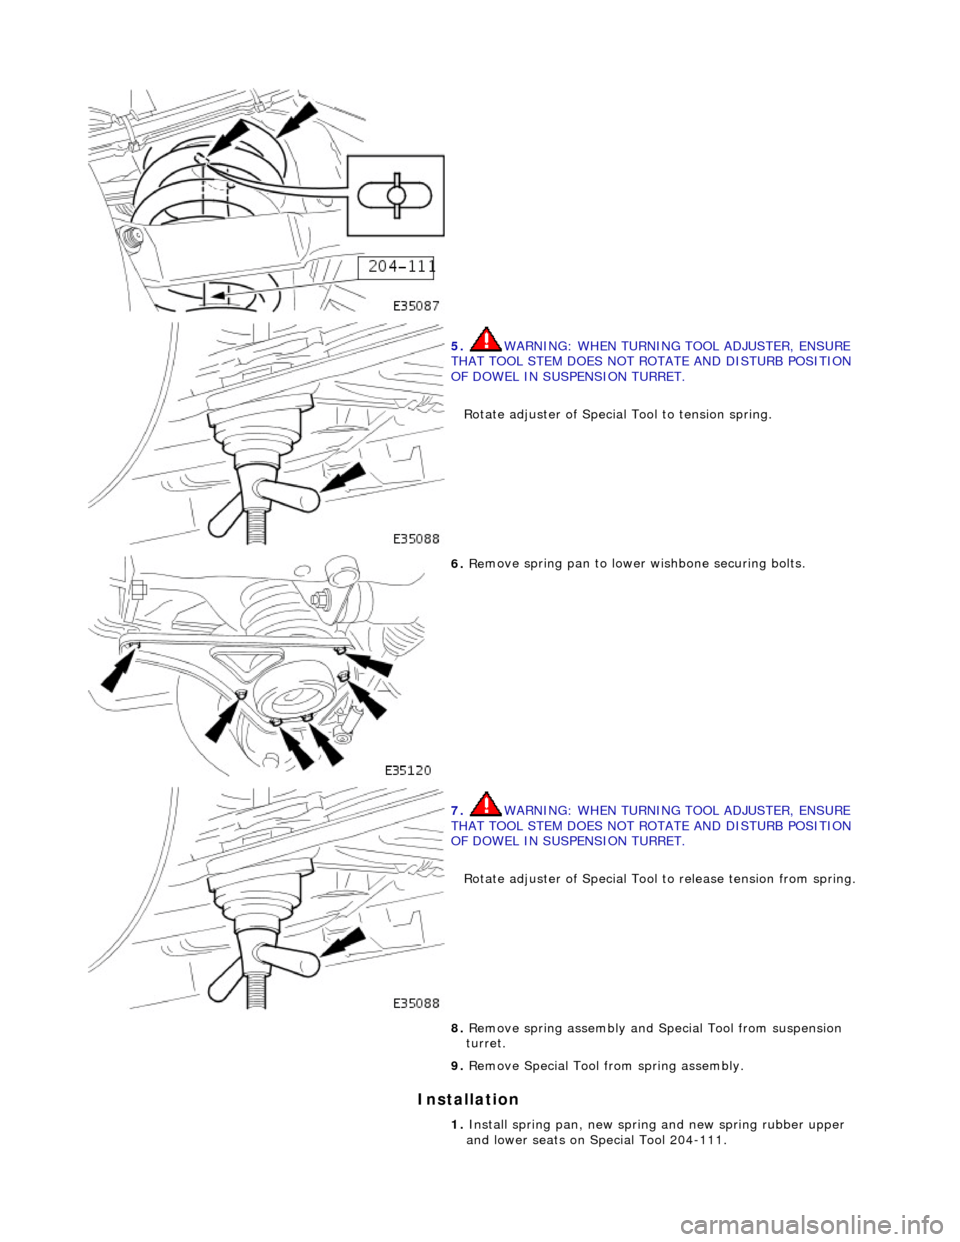
In
stallation
5.
WA
RNING: WHEN TURNING TOOL ADJUSTER, ENSURE
THAT TOOL STEM DOES NOT ROTATE AND DISTURB POSITION
OF DOWEL IN SUSPENSION TURRET.
Rotate adjuster of Special Tool to tension spring.
6. Re
move spring pan to lower
wishbone securing bolts.
7. WA
RNING: WHEN TURNING TOOL ADJUSTER, ENSURE
THAT TOOL STEM DOES NOT ROTATE AND DISTURB POSITION
OF DOWEL IN SUSPENSION TURRET.
Rotate adjuster of Special Tool to release tension from spring.
8. Re
move spring assembly and Special Tool from suspension
turret.
9. Remove Special Tool from spring assembly.
1. Install spring pan, new spring and new spring rubber upper
and lower seats on Special Tool 204-111.
Page 111 of 2490
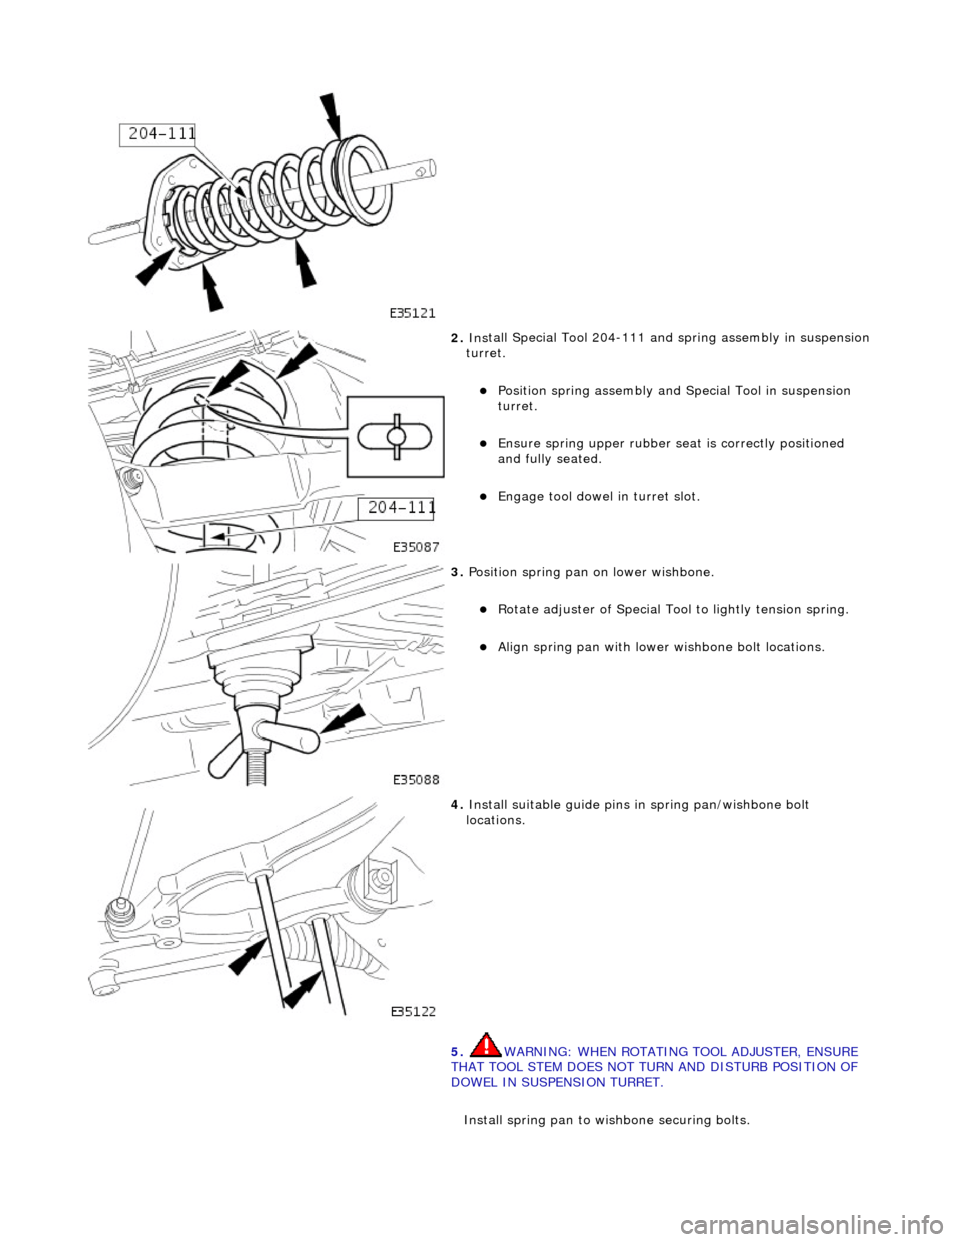
2. Ins
tall Special Tool 204-111 and spring assembly in suspension
turret.
P
osition spring assembly and Special Tool in suspension
turret.
Ensure spri
ng upper rubber se
at is correctly positioned
and fully seated.
Engage tool
dowel in turret slot.
3. Position spr
ing pan on lower wishbone.
Ro
tate adjuster of Special Tool to lightly tension spring.
Al
ign spring pan with lower wishbone bolt locations.
4. Inst
all suitable guide pins in
spring pan/wishbone bolt
locations.
5. WARNING: WHEN ROTATING TOOL ADJUSTER, ENSURE
THAT TOOL STEM DOES NOT TU RN AND DISTURB POSITION OF
DOWEL IN SUSPENSION TURRET.
Install spring pan to wishbone securing bolts.
Page 112 of 2490

Rot
ate tool adjuster to gradua
lly increase spring tension.
Pr
ogressively substitute spri
ng pan securing bolts for
guide pins.
Ti ghten spring pan
securing bolts to 70-90Nm.
6. WARNING: WHE N
ROTATING TOOL ADJUSTER, ENSURE
THAT TOOL STEM DOES NOT TU RN AND DISTURB POSITION OF
DOWEL IN SUSPENSION TURRET.
Remove Special Tool 204-111 from suspension.
Ensure spri ng
lower rubber seat
is correctly positioned and
fully seated.
R otat
e adjuster of Special Tool to release tension on
spring.
7. Ro
tate tool stem to release
dowel from turret and withdraw
tool assembly.
8. Lower vehicle to working heig ht and support on stands.
9. Install road wheel. Re fer to Section 100-02.
10. Raise vehicle, remove stands and lower vehicle onto road
wheels.
Page 114 of 2490
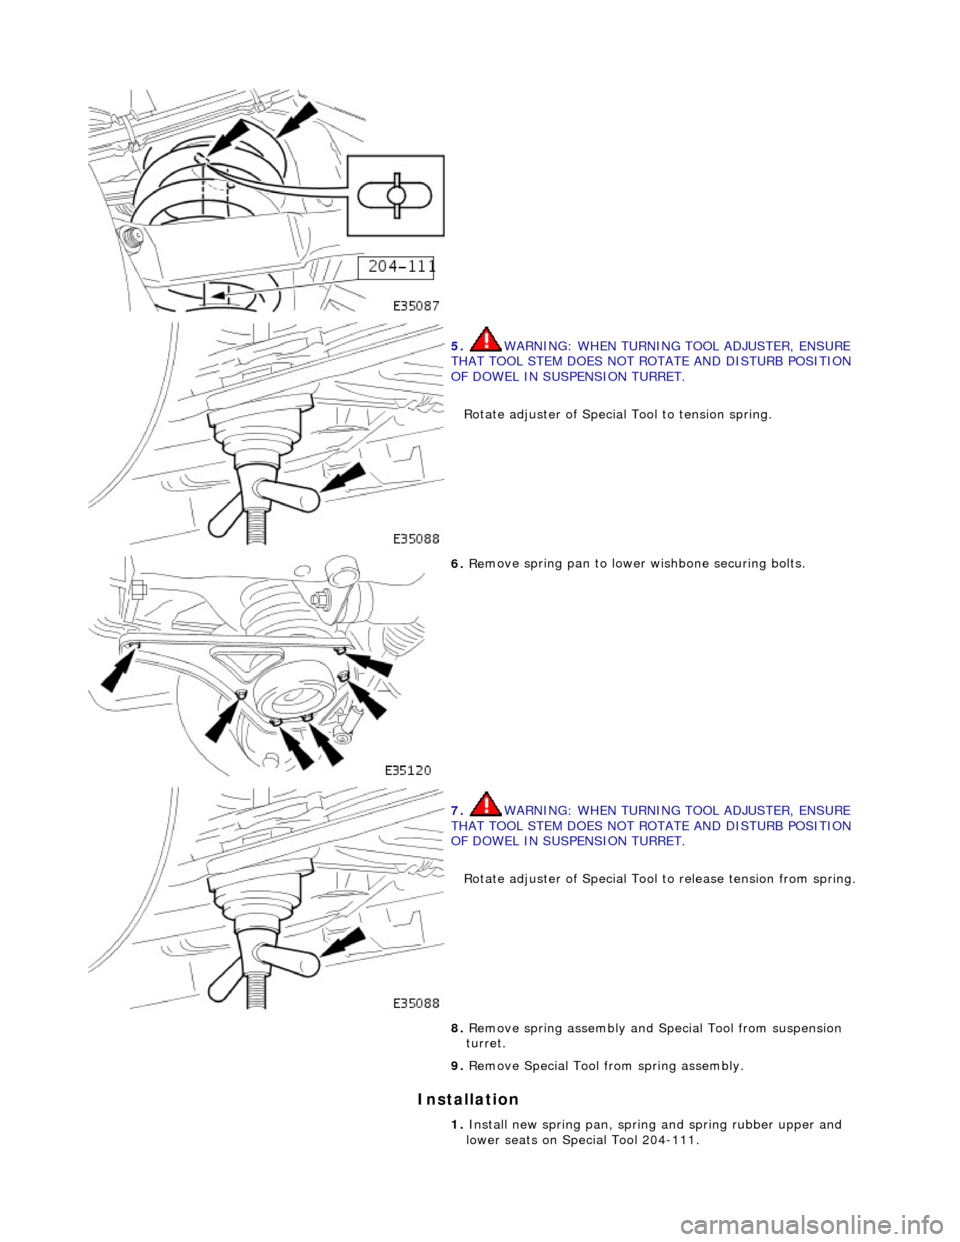
In
stallation
5.
WA
RNING: WHEN TURNING TOOL ADJUSTER, ENSURE
THAT TOOL STEM DOES NOT ROTATE AND DISTURB POSITION
OF DOWEL IN SUSPENSION TURRET.
Rotate adjuster of Special Tool to tension spring.
6. Re
move spring pan to lower
wishbone securing bolts.
7. WA
RNING: WHEN TURNING TOOL ADJUSTER, ENSURE
THAT TOOL STEM DOES NOT ROTATE AND DISTURB POSITION
OF DOWEL IN SUSPENSION TURRET.
Rotate adjuster of Special Tool to release tension from spring.
8. Re
move spring assembly and Special Tool from suspension
turret.
9. Remove Special Tool from spring assembly.
1. Install new spring pan, spring and spring rubber upper and
lower seats on Special Tool 204-111.
Page 115 of 2490
2. Ins
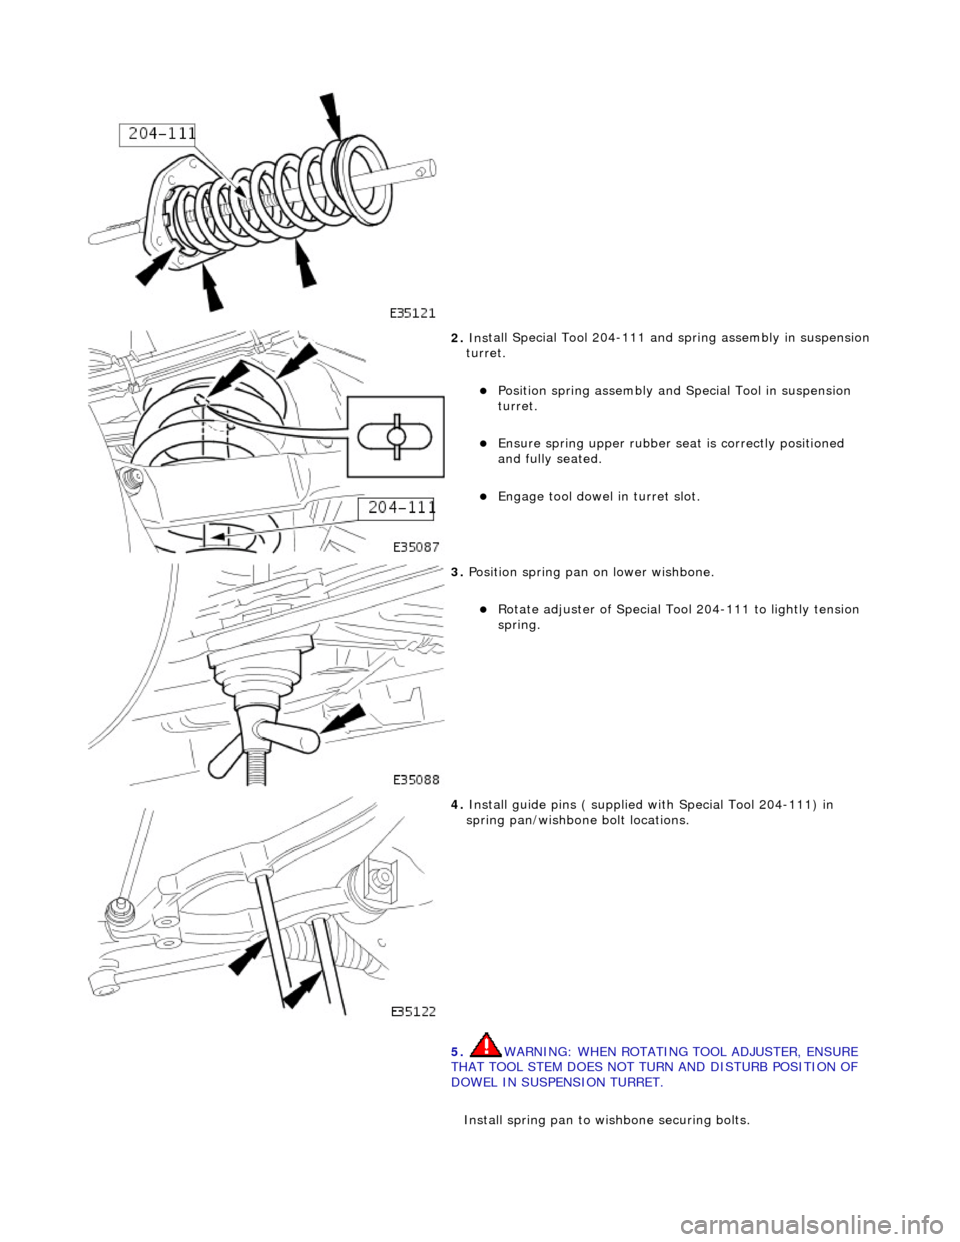
tall Special Tool 204-111 and spring assembly in suspension
turret.
P
osition spring assembly and Special Tool in suspension
turret.
Ensure spri
ng upper rubber se
at is correctly positioned
and fully seated.
Engage tool
dowel in turret slot.
3. Position spr
ing pan on lower wishbone.
R
otate adjuster of Special Tool 204-111 to lightly tension
spring.
4. Install guide pins ( su
pplied wi
th Special Tool 204-111) in
spring pan/wishbone bolt locations.
5. WARNING: WHEN ROTATING TOOL ADJUSTER, ENSURE
THAT TOOL STEM DOES NOT TU RN AND DISTURB POSITION OF
DOWEL IN SUSPENSION TURRET.
Install spring pan to wishbone securing bolts.
Page 116 of 2490

Align sp
ring pan with lower wishbone bolt locations.
Rot
ate tool adjuster to gradua
lly increase spring tension.
P
r
ogressively install but do no
t tighten spring pan securing
bolts.
Ti ghten spring pan
securing bolts to 70-90Nm.
Ensure spri
ng
lower rubber seat is correctly positioned in
spring pan.
6. WARNING: WHE N
ROTATING TOOL ADJUSTER, ENSURE
THAT TOOL STEM DOES NOT TU RN AND DISTURB POSITION OF
DOWEL IN SUSPENSION TURRET.
Remove Special Tool 204-111 from suspension.
Rotat
e adjuster of Special Tool to release tension on
spring.
R otate
tool stem to release dowel from turret.
With
draw tool and adaptor
.assembly.
7.
Lower vehi cle to work
ing heig
ht and support on stands.
8. Install road wheel. Re fer to Section 100-02.
9. Raise vehicle, remove stands and lower vehicle onto road
wheels.
10. Carry out steering geometry an d wheel alignment checks and
if necessary adjust. Refer to 57.65.01.
11. Carry out steering geometry an d wheel alignment checks and
if necessary adjust. Refer to 57.65.01.
Page 117 of 2490
Front Suspension - Fro
nt Stabilizer Bar
Re
moval and Installation
Materials
S
pecification
Cas
trol NTR
Remov
al
Na
me
R
ubber Suspension Insulator Lube
1. Raise front of vehicle and support on stands. Refer to Section
100-02.
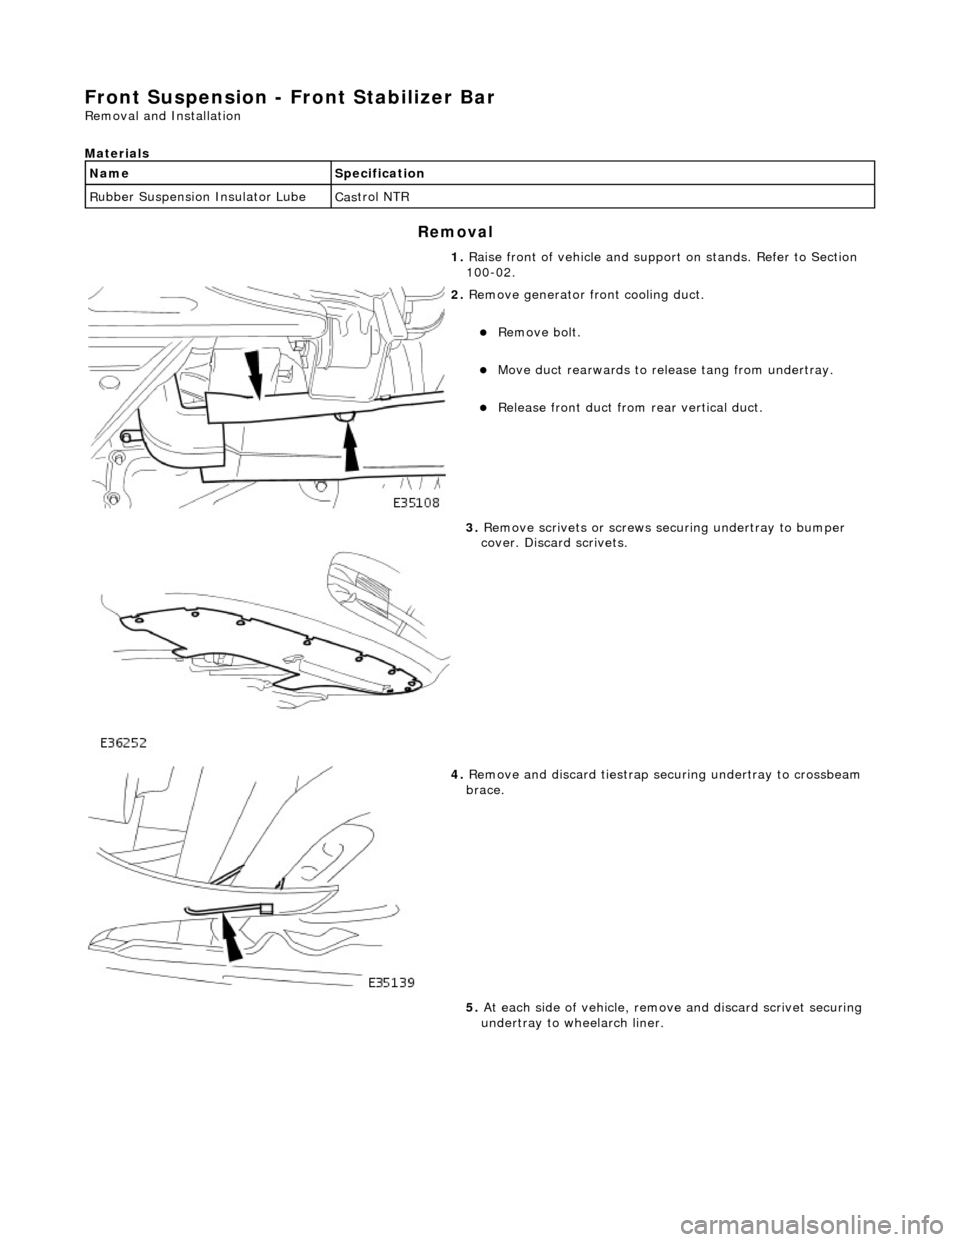
2. R
emove generator front cooling duct.
Re
move bolt.
Move duct rea
rwards to rele
ase tang from undertray.
R
elease front duct from rear vertical duct.
3. R
emove scrivets or screws se
curing undertray to bumper
cover. Discard scrivets.
4. R
emove and discard tiestrap securing undertray to crossbeam
brace.
5. At each side of vehicle, remo ve and discard scrivet securing
undertray to wheelarch liner.