battery JAGUAR X308 1998 2.G Workshop Manual
[x] Cancel search | Manufacturer: JAGUAR, Model Year: 1998, Model line: X308, Model: JAGUAR X308 1998 2.GPages: 2490, PDF Size: 69.81 MB
Page 2220 of 2490

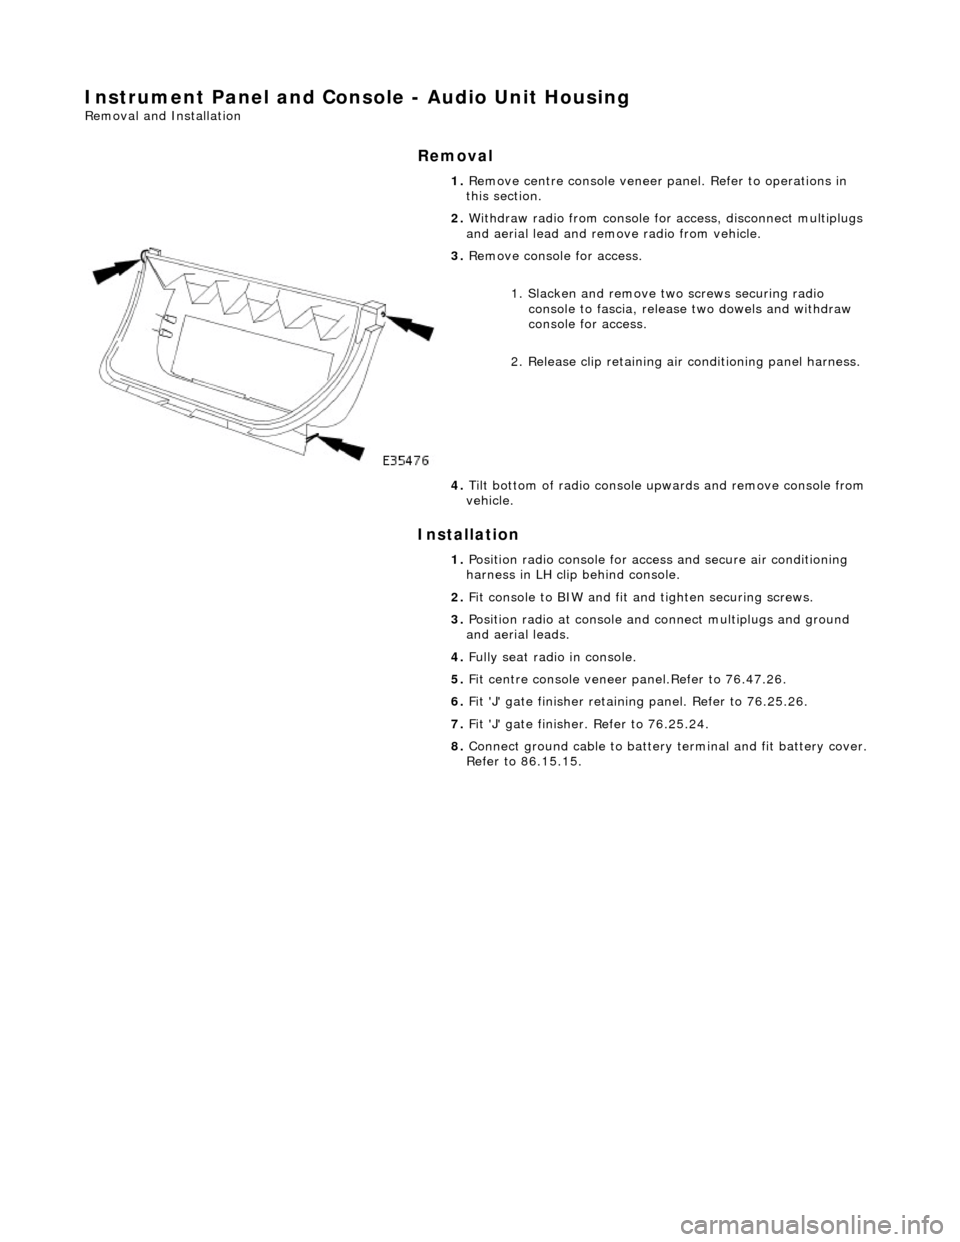
Instrument Panel and Console - Audio Unit Housing
Removal and Installation
Removal
Installation
1.
Remove centre console veneer pa nel. Refer to operations in
this section.
2. Withdraw radio from console for access, disconnect multiplugs
and aerial lead and remo ve radio from vehicle.
3. Remove console for access.
1. Slacken and remove tw o screws securing radio
console to fascia, release two dowels and withdraw
console for access.
2. Release clip retaining air conditioning panel harness.
4. Tilt bottom of radio console upwards and remove console from
vehicle.
1. Position radio console for access and secure air conditioning
harness in LH clip behind console.
2. Fit console to BIW and fit an d tighten securing screws.
3. Position radio at console and connect multiplugs and ground
and aerial leads.
4. Fully seat radio in console.
5. Fit centre console veneer panel.Refer to 76.47.26.
6. Fit 'J' gate finisher retain ing panel. Refer to 76.25.26.
7. Fit 'J' gate finisher . Refer to 76.25.24.
8. Connect ground cable to battery terminal and fit battery cover.
Refer to 86.15.15.
Page 2221 of 2490

Instrument Panel and Console - Climate Control Assembly Housing
Removal and Installation
Removal
Installation
1. Move 'J' gate selector to position 'D.'
2. Remove battery cover and disc onnect ground cable from
battery terminal. Refer to 86.15.19.
3. Remove 'J' gate finish er. Refer to 76.25.24.
4. Remove 'J' gate finisher reta ining plate.Refer to 76.25.26.
5. Remove centre console veneer panel. Refer to 76.47.26.
6. Remove radio and console. Refer to operations in this section.
7. Disconnect air conditioning panel flying lead multiplug (blue)
in LH side of transmission tunnel.
8. Slacken and remove remaining screw securing air
conditioning panel console to BIW.
9. Withdraw air conditioning panel and console for access and
disconnect the harness multiplug behind panel.
10. Remove air conditioning panel from vehicle.
11. Remove panel from console.
1. Fit air conditioning panel to console.
Page 2222 of 2490

2.
Position air conditioning panel and console at centre console
and connect multiplugs.
3. Fully seat air conditioning pa nel and console on BIW bracket
and fit and tighten securing screw.
4. Fit radio and console. Refer to operations in this section.
5. Fit centre console veneer panel. Refer to operations in this
section.
6. Fit 'J' gate surround. Refer to operations in this section.
7. Fit 'J' gate finisher. Refer to operations in this section.
8. Connect ground cable to battery terminal and fit battery cover.
Refer to 86.15.15.
9. Return 'J' gate selector to position 'P'.
Page 2224 of 2490

Instrument Panel and Console - Floor Console
Removal and Installation
Removal
1. Turn ignition switch to posi tion II and apply footbrake.
2. Move gear selector to the the 'D' position. and release
footbrake.
3. Turn ignition switch to position'O'
4. Remove battery cover and disc onnect ground cable from
battery terminal. Refer to 86.15.19.
5. Where fitted, remove centre cons ole rear extension. Refer to
76.25.05.
6. Remove fascia centre veneer panel. Refer to 76.47.06.
7. Using a thin plastic lever, ca refully release the rear air
distribution control grill tang s at top and sides and remove
grill complete with veneer panel and control.
8. Disconnect cigar lighter and ashtray illumination harness
(white) multiplug at RH rear. of console.
9. Slacken and remove the two co nsole rear securing screws.
10. Remove 'J' gate finisher and veneer panel. Refer to 76.25.24
and 76.25.26.
11. Remove fascia centre veneer panel. Refer to 76.47.06.
Page 2226 of 2490

multiplug.
11.
Where applicable, install console rear extension. Refer to
76.25.05.
12. Fit and firmly seat air distribu tion control grill to rear of
console.
13. Move 'J' gate selector to 'P'.
14. Connect ground cable to batt ery terminal and fit battery
cover. refer to 86.15.15.
Page 2227 of 2490

Instrument Panel and Console - Floor Console Ashtray
Removal and Installation
Removal
Installation
1.
Remove battery cover and disc onnect ground cable from
battery terminal. Refer to 86.15.19.
2. Remove center console for access . Refer to operations in this
section.
3. Open ashtray lid and remove cigar lighter.
4. Remove cigar lighter housing.
пЃ¬Remove tape securing harnes s to console underside..
пЃ¬Slacken and remove retaining ring from underside and
remove housing complete with cable.
5. Release bulb housing tangs and withdraw bulb and housing
from underside complete with flying lead.
6. Position console for access, slacken and remove the four
ashtray securing screws and remove ashtray from console.
1. Position ashtray on center console.
2. Fit and tighten the four ashtray securing screws.
3. Fit and fully seat cigar lighter housing in ashtray and fit and
tighten retaining ring.
4. Fit cigar lighter housing and illumination bulb.
5. Tape cables to underside of console.
6. Fit cigar lighter in housing.
7. Close ashtray lid.
8. Fit center console assembly. Refer to 76..
9. Connect multiplug at rear of centre console.
10. Fit centre console rear air distribution control grill.
11. Connect earth cable to battery te rminal and fit battery cover.
Refer to 86.15.15.
Page 2229 of 2490

Instrument Panel and Console - Floor Console Finish Panel
Removal and Installation
Removal
1. Apply handbrake and turn ignition key to II.
2. Depress brake pedal, move gear selector to position N and turn
ignition key to O.
3. Remove battery cover and di sconnect cable from earth
terminal. Refer to Section 86.15.19.
4. Remove 'J 'gate finisher. Refer to 76.25.24.
5. Slacken and remove the two nuts and two screws securing
the retaining panel.
6. Position retaining panel for access, disconnect SPORT mode
and cruise control ON/OFF swit ch multiplugs and remove
retaining panel complete with switches.
7. Remove and discard bushes from retaining plate.
8. Carefully withdraw veneer pane l, releasing front locating
tongue from upper slot in comsole.
Page 2230 of 2490

Installation
1. Position veneer panel on consol e, ensuring that front tongue
locates correctly in console upper slot.
2. Fit and fully seat new bush es in retaining panel.
3. Position retaining panel complete with SPORT mode and cruise
control ON/OFF switches for ac cess and connect multiplugs.
4. fully seat retaining panel and fi t and tighten securing nuts and
screws.
5. Fit 'J' gate surround finisher. Refer to 76.25.24.
6. Move gear selector to position P.
7. Connect cable to battery earth te rminal and fit battery cover.
Refer to Section 86.15.15.
Page 2239 of 2490

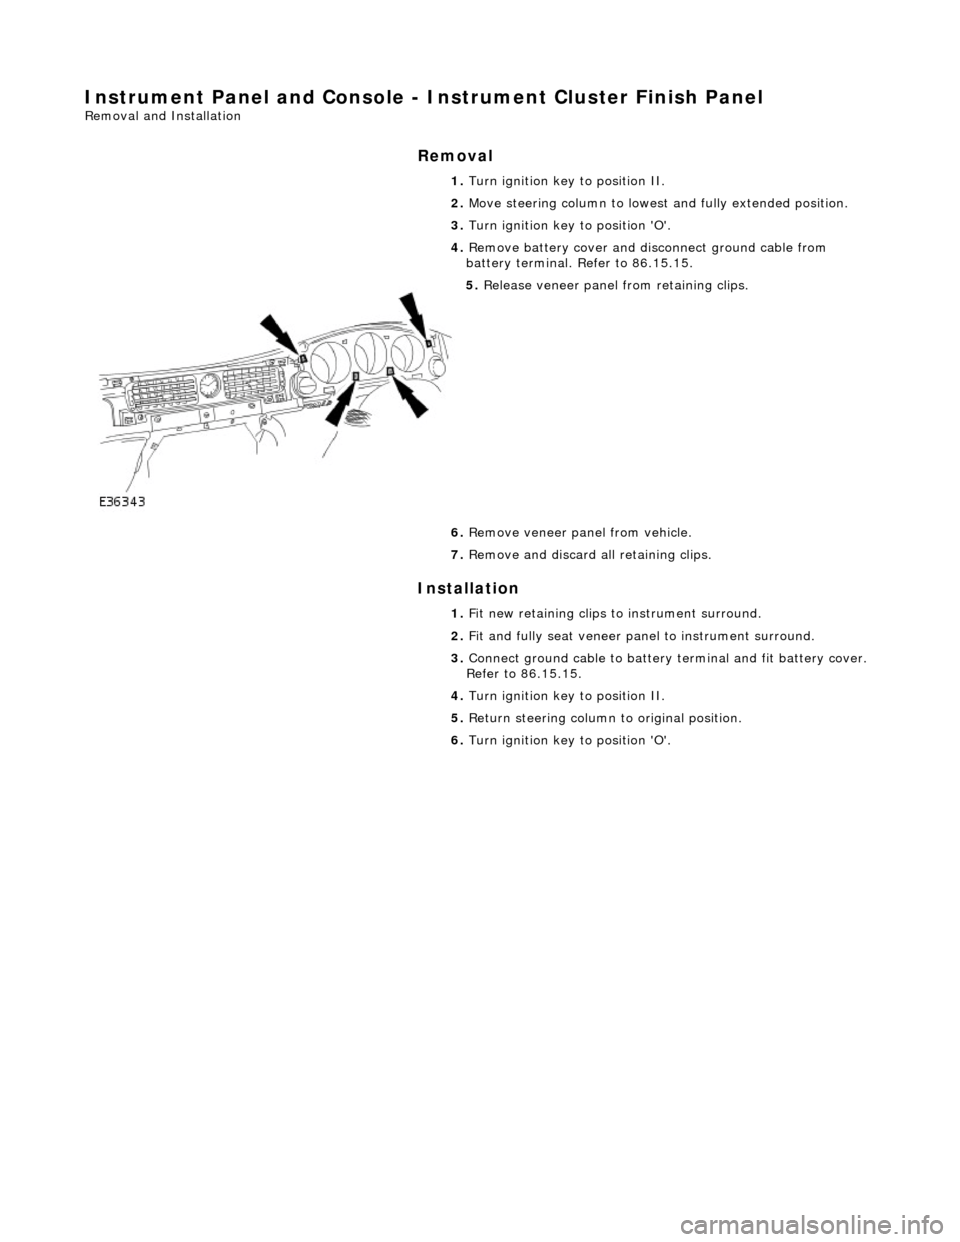
Instrument Panel and Console - Instrument Cluster Finish Panel
Removal and Installation
Removal
Installation
1.
Turn ignition key to position II.
2. Move steering column to lowest and fully extended position.
3. Turn ignition key to position 'O'.
4. Remove battery cover and disc onnect ground cable from
battery terminal. Refer to 86.15.15.
5. Release veneer panel from retaining clips.
6. Remove veneer panel from vehicle.
7. Remove and discard all retaining clips.
1. Fit new retaining clips to instrument surround.
2. Fit and fully seat veneer pa nel to instrument surround.
3. Connect ground cable to battery terminal and fit battery cover.
Refer to 86.15.15.
4. Turn ignition key to position II.
5. Return steering column to original position.
6. Turn ignition key to position 'O'.
Page 2240 of 2490

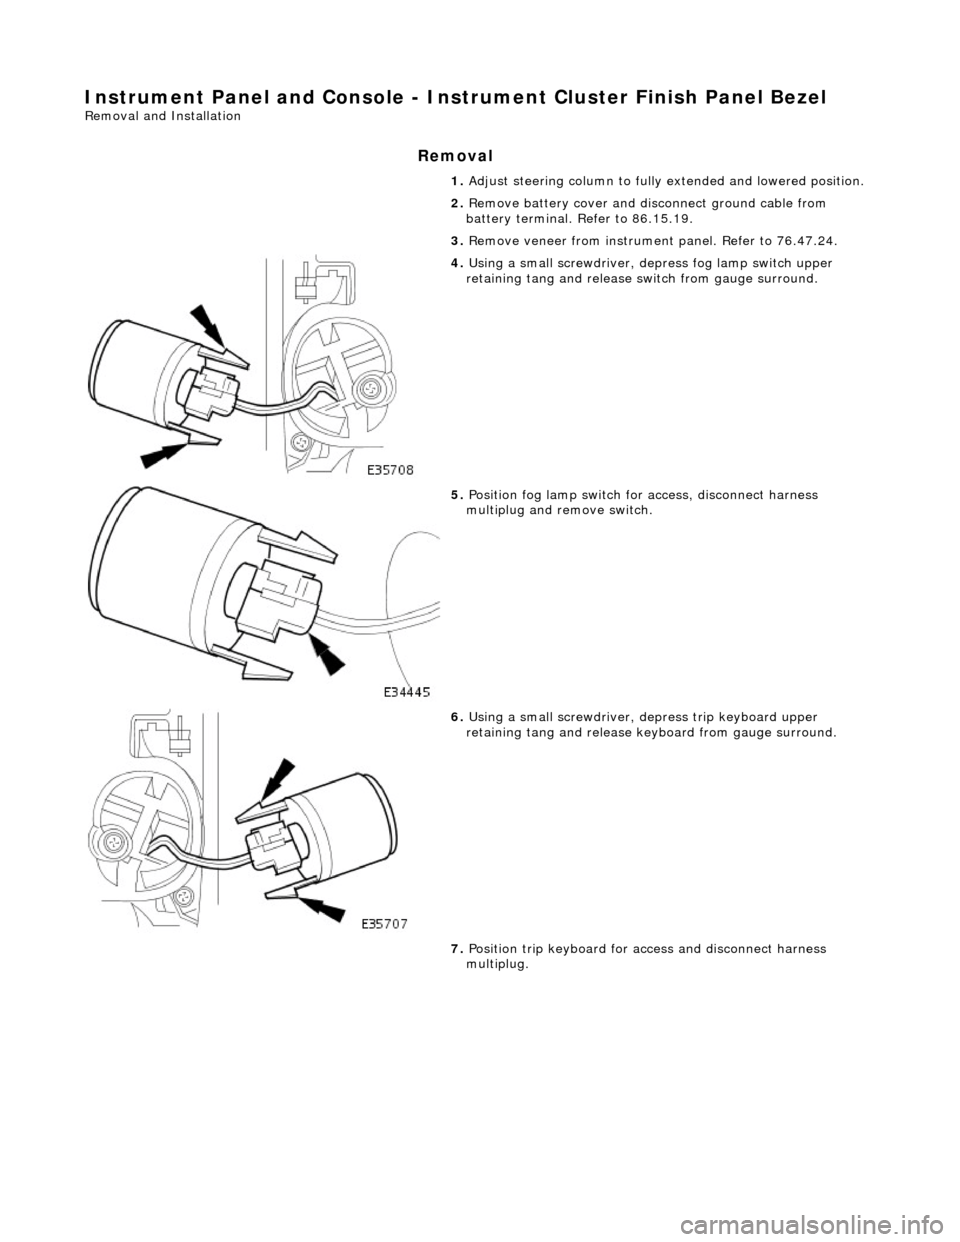
Instrument Panel and Console - Instrument Cluster Finish Panel Bezel
Removal and Installation
Removal
1. Adjust steering column to full y extended and lowered position.
2. Remove battery cover and disc onnect ground cable from
battery terminal. Refer to 86.15.19.
3. Remove veneer from instrument panel. Refer to 76.47.24.
4. Using a small screwdriver, de press fog lamp switch upper
retaining tang and release sw itch from gauge surround.
5. Position fog lamp switch fo r access, disconnect harness
multiplug and remove switch.
6. Using a small screwdriver, depress trip keyboard upper
retaining tang and release ke yboard from gauge surround.
7. Position trip keyboard for ac cess and disconnect harness
multiplug.