chain JAGUAR X308 1998 2.G Workshop Manual
[x] Cancel search | Manufacturer: JAGUAR, Model Year: 1998, Model line: X308, Model: JAGUAR X308 1998 2.GPages: 2490, PDF Size: 69.81 MB
Page 10 of 2490

В В В В В В В В В В В В В В В В В В В В
В В В В В В В В В В В В В В В В В В В В В В В В В В В В В В В В В В В В В В В В В В В В В В В В В В В В В В В В В В В В В В В В В В В В В В В В В В В В В В В В В В В В В В В В В В В В В В В В В В В В Flexplate
В VehiclesВ With
out:В
SuperchargerВ (12.53.13)В
В В В В В В В В В В В В В В В В В В В В Flexplate
В VehiclesВ With:В Supercharger В (12.53.13) В
В В В В В В В В В В В В В В В В В В В В Intake
В Camshaft В LH В (12.13.16) В
В В В В В В В В В В В В В В В В В В В В Intake
В Camshaft В RH В (12.13.14) В
В В В В В В В В В В В В В В В В В В В В Intake
В Manifo
ldВ (30.15.01) В
В В В В В В В В В В В В В В В В В В В В Intake
В Manifold В Gaskets В (30.15.08) В
В В В В В В В В В В В В В В В В В В В В Intake
В Manifold В LHВ (18.50.26) В
В В В В В В В В В В В В В В В В В В В В Intake
В Manifold В RH В (18.50.25) В
В В В В В В В В В В В В В В В В В В В В Intake
В Manifold В Gasket В LHВ (18.50.28) В
В В В В В В В В В В В В В В В В В В В В Intake
В Manifold В Gasket В RH В (18.50.27) В
В В В В В В В В В В В В В В В В В В В В Oil
В Pan В (12.60.44) В
В В В В В В В В В В В В В В В В В В В В Oil
В Pan В Gasket В (12.60.38) В
В В В В В В В В В В В В В В В В В В В В Oil
В PressureВ SwitchВ (88.25.07) В
В В В В В В В В В В В В В В В В В В В В Oil
В Pump В VehiclesВ Without:В SuperchargerВ (12.60.26)В
В В В В В В В В В В В В В В В В В В В В Oil
В Pump В VehiclesВ With:В Supercharger В (12.60.26) В
В В В В В В В В В В В В В В В В В В В В Primary
В Timing В Chain В LHВ 4.0L, В VehiclesВ Wit
hout: В SuperchargerВ (12.65.67)В
В В В В В В В В В В В В В В В В В В В В Primary
В Timing В Chain В LHВ 3.2L/4.0L,В VehiclesВ With: В Supercharger В (12.65.67) В
В В В В В В В В В В В В В В В В В В В В Primary
В Timing В Chain В RH В (12.65.66) В
В В В В В В В В В В В В В В В В В В В В Primary
В Timing В Chain В InnerВ Guide В LHВ (12.65.58) В
В В В В В В В В В В В В В В В В В В В В Primary
В Timing В Chain В InnerВ Guide В RH В (12.65.60) В
В В В В В В В В В В В В В В В В В В В В Primary
В Timing В Chain В Outer В Guide В LHВ (12.65.61) В
В В В В В В В В В В В В В В В В В В В В Primary
В TimingВ Chain В Outer В Gu
ide В RH В (12.65.57) В
В В В В В В В В В В В В В В В В В В В В Primary
В Timing В Chain В Tensioner В LHВ (12.65.55) В
В В В В В В В В В В В В В В В В В В В В Primary
В Timing В Chain В Tensioner В RH В (12.65.54) В
В В В В В В В В В В В В В В В В В В В В Secondary
В Timing В Chain В LH В (12.65.69) В
В В В В В В В В В В В В В В В В В В В В Secondary
В Timing В Chain В RH В (12.65.68) В
В В В В В В В В В В В В В В В В В В В В Secondary
В Timing В Chain В Tensioner В LHВ 4.0L,В VehiclesВ Without: В Supercharger В В
В В В В В В В В В (12.65.64)
В
В В В В В В В В В В В В В В В В В В В В Secondary
В Timing В Chain В Tensioner В LHВ 3.2L/4.0L, В VehiclesВ With:В SuperchargerВ В
В В В В В В В В В (12.65.64)
В
В В В В В В В В В В В В В В В В В В В В Secondar
yВ Timing В Chain В Tensioner В RH В 4.0L,В VehiclesВ Without: В Supercharger В В
В В В В В В В В В (12.65.63)
В
В В В В В В В В В В В В В В В В
В В В В В В В В В В В В В В В В В В В В В В В В В В В В В В В В В В В В В В В В В В В В В В В В В В В В В В В В
Secondar yВ Timing В Ch
ain
В Tensioner В RH В 3.2L/4.0L, В VehiclesВ With:В SuperchargerВ В
(12.65.63) В
Upper В Oil В Pan В 3.2L В (12.60.48) В
Upper В Oil В Pan В 4.0L, В VehiclesВ Without:В SuperchargerВ (12.60.48)В
Upper В Oil В Pan В 4.0L, В VehiclesВ With:В Supercharger В (12.60.48) В
Page 263 of 2490
O
ne locking wheel nut is fitted to each road wheel and can on
ly be removed by using the correctly coded socket. For road
wheels with exposed wheel nuts, each locking wheel nut is provided with a cover, which is removed using the cover removal
tool.
Locking wheel nuts have different coded keyway combinations with corresponding coded sockets. The correct socket, and
cover removal tool are supplied with the vehicle toolkit. Sets of sockets are available to Jaguar dealers.
Temporary Spare Wheel
•
NOTE: When using this type of spare wheel note that:
пЃ¬Speed
must not exceed 80 km/h (50 mph).
пЃ¬The normal ro
ad wheel must be reinstalled as soon as possible.
пЃ¬On
ly one temporary wheel may be installed to the vehicle.
пЃ¬Tracti
on control (where fitted
) must be switched OFF.
In certain markets, the spare wheel supplied with the vehicle is of the temporary-use type, it is narrower than the normal
road wheel and takes up less room in the luggage compartment.
Tire
s
The
radial ply tires shown in the 204-04
Specification Section are recommended by Jaguar to meet the high speed
performance of the vehicle. Only tires of identical specification may be fitted as replacements. Unde r no circumstances must
cross-ply tires be fitted.
Tire Inflation Pressures
Al
l recommended tires, including winter tire
s, must be inflated to the pressures shown in the 204-04 Specification Section.
Inflation pressures must only be checked when the tires are cold.
Tire Replac
ement and Wheel-Interchanging
W
hen renewal of tires is necessary, it is
preferable to fit a complete set. If two replacement tires are fitted (to one axle),
they must be of the same manufacturer and type as those on the other axle.
No attempt must be made to interchange wh eels from the front to the rear or vice-versa, as wear produc es a characteristic
pattern on each tire depending upon its po sition on the vehicle. If this position is changed after wear has occurred, the
performance of the tire w ill be adversely affected.
It should be remembered that new tires must be balanced befo re installing to the vehicle.
Win
ter Tires
•
NOTE: Speed must not exceed 210 km/h (131 mph) when winter tires are installed.
Jaguar recommended winter tires as specified in 204-04 Specification Section must only be fitted in complete four-wheel
sets of the same type and size.
Snow Chains and Spike Spider Traction System
Jagu
ar recommended snow chains, must on
ly be installed when using 16 inch wheels with 255/60 R16 winter tires.
• NOTE: When using snow chains or the spike spider traction system, note that:
пЃ¬Snow ch
ains and the spike spider
traction system must only be fitted to the rear wheels.
пЃ¬O
nly Jaguar recommended snow chains and spik
e spider traction system must be used.
пЃ¬The m
aximum permissible speed with winter tires and snow chains or the spike spider traction system fitted is 48
km/h (30 mph).
пЃ¬Tracti
on control (where fitted) must be
switched OFF when using snow chains or the spike spider traction system.
Page 264 of 2490
пЃ¬Snow chain
s and the spike spider tr
action system must not be used on roads which are clear of snow.
The Jaguar recommended spike spider tracti on system can be used on all wheel and tire sizes, except the temporary spare
wheel.
Asym metric
Tires
Some
tir
es recommended by Jaguar are as
ymmetric. Inner and outer markers embossed on the tire walls must be observed
to ensure the correct installati on of the tire to the wheel.
Tread We
ar Indicator
• NO
TE: Tire condition must comply with prevailing local legislation.
Tread wear indicators are molded into the bottom of the tr ead grooves across the width of the tire. The tire must be
renewed when tread wear indicators become visible at the surface of the tread.
Page 521 of 2490
Engine System - General Infor
mation - Engine
Description an
d Operation
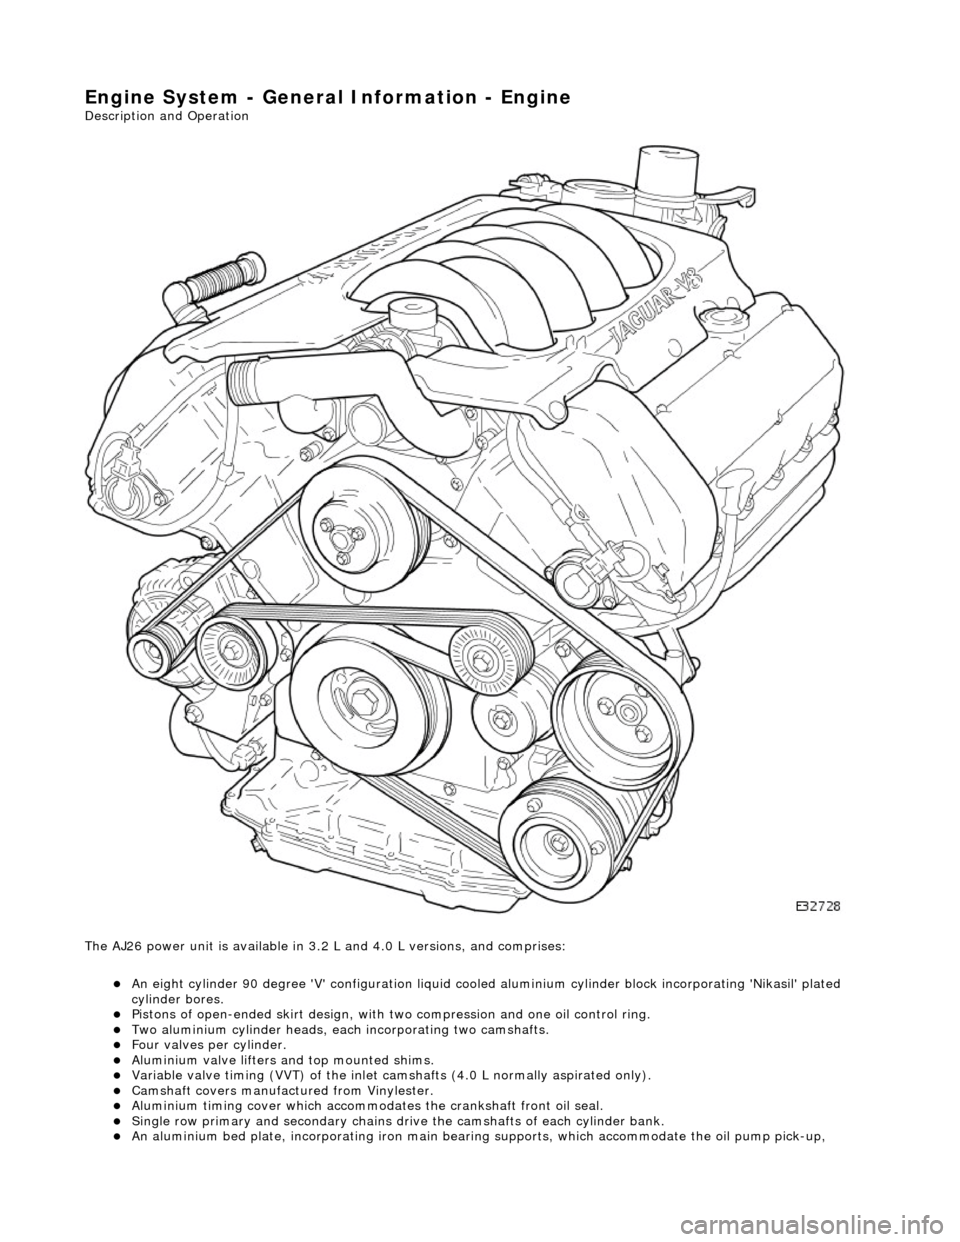
The AJ26 power unit is available in 3.2 L and 4.0 L versions, and comprises:
пЃ¬An eight cylinder 9
0 degree 'V' config
uration liquid cooled aluminium cylinder block incorporating 'Nikasil' plated
cylinder bores.
пЃ¬Pi
stons of open-ended skirt design, with
two compression and one oil control ring.
пЃ¬Two al
uminium cylinder heads, each
incorporating two camshafts.
пЃ¬F
our valves per cylinder.
пЃ¬Al
uminium valve lifters and top mounted shims.
пЃ¬Vari
able valve timing (VVT) of the inlet camshafts (4.0 L normally aspirated only).
пЃ¬Camshaft
covers manufactured from Vinylester.
пЃ¬Al
uminium timing cover which accommodat
es the crankshaft front oil seal.
пЃ¬Sin
gle row primary and secondary chains dr
ive the camshafts of each cylinder bank.
пЃ¬An alu
minium bed pl
ate, incorporating iron main bearing supports, which accomm odate the oil pump pick-up,
Page 530 of 2490
Engi
ne -
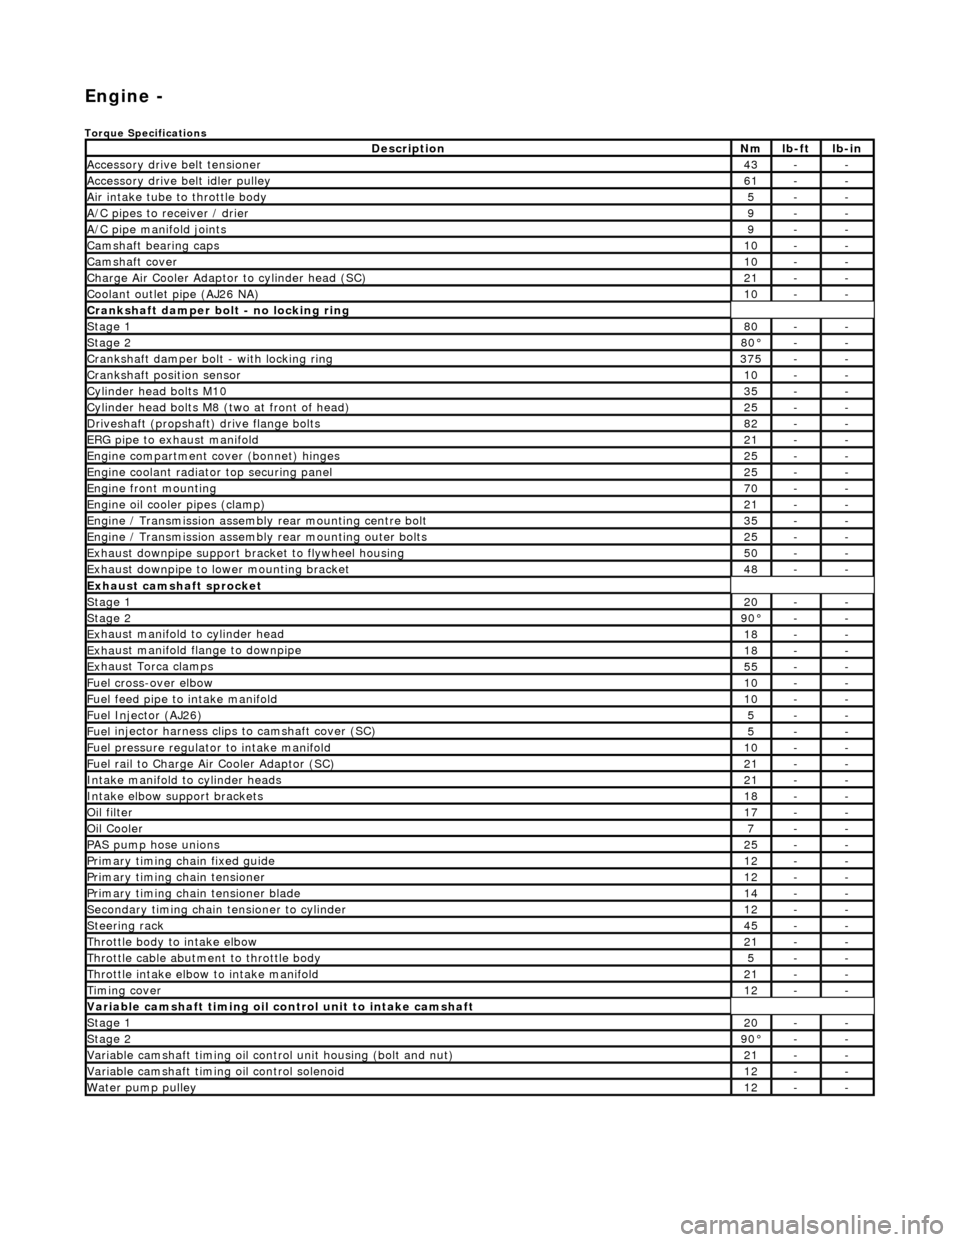
Torqu
e Specifications
De
s
cription
Nmlb
-
ft
lb
-
in
A
ccessory
drive belt tensioner
43--
A
ccessory
drive belt idler pulley
61--
Air in
ta
ke tube to throttle body
5--
A/C
pipes t
o receiver / drier
9--
A/C pipe m
anifold joints
9--
Camsh
aft bearin
g caps10--
Ca
msh
aft cove
r10--
Ch
arge Air Co
oler Adaptor to cylinder head (SC)
21--
Co
olan
t outlet pipe (AJ26 NA)
10--
Cran
kshaft damper bolt - no lockin
g ring
St
ag
e 1
80--
Stag
e 2
80В°--
C
r
ankshaft damper bolt - with locking ring
37
5--
Cra
nkshaft position sensor
10--
Cy
li
nder head bolts M10
35--
Cy
lin
der head bolts M8 (two at front of head)
25--
Driv
es
haft (propshaft) drive flan
ge bo
l
ts
82--
ERG p
i
pe to exhaust manifold
21--
Engi
ne compartment cover (bonnet) hinges
25--
En
gine
coolant radiator top securing panel
25--
E
ng
ine front mounting
70--
En
gine
oil cooler pipes (clamp)
21--
En
gi
ne / Transmission assembly rear mounting centre bolt
35--
En
gi
ne / Transmission assembly rear mounting outer bolts
25--
Ex
ha
ust downpipe support bracket to flywheel housing
50--
Ex
ha
ust downpipe to lower mounting bracket
48--
E
x
haust camshaft sprocket
St
age 120--
Stage 290 В°--
Ex
haust manifold to cylinder head
18--
Ex
ha
ust manifold flange to downpipe
18--
E
x
haust Torca clamps
55--
Fuel cross-over elbo
w
10--
Fu
el f
eed pipe to intake manifold
10--
Fuel
Injector (AJ
26)
5--
Fuel
injector ha
rness clips to camshaft cover (SC)
5--
Fu
el p
ressure re
gu
l
ator to intake manifold
10--
F
u
el rail to Char
ge
A
ir Cooler Adaptor (SC)
21--
In
ta
ke manifold to cylinder heads
21--
Inta
ke elbow support brackets
18--
Oil f
i
lter
17--
Oil C
o
oler
7--
P
AS pu
mp hose unions
25--
P
r
imary timing chain fixed guide
12--
P
r
imary timing chain tensioner
12--
Pr
imary timing chain tensioner blade
14--
S
e
condary timing chain tensioner to cylinder
12--
S
t
eerin
g ra
ck45--
Thro
ttle body to intake elbow
21--
Th
ro
ttle cable abutment to throttle body
5--
Th
ro
ttle intake elbow to intake manifold
21--
Ti
mi
ng cover
12--
Variable camshaft t
i
ming oil control unit to intake camshaft
St
ag
e 1
20--
St
ag
e 2
90
В°--
Var
iable camshaft timing oil control unit housing (bolt and nut)
21--
Va
ria
ble camshaft timi
ng oil control solenoid
12--
Wa
ter pump pulley
12--
Page 565 of 2490

Engine - Crankshaft
Inner Sp
rocket4.0L NA V8 - AJ27
In-v
ehicle Repair
Remov
al
S
pecial Tool(s)
Camshaft setting
3
03 - 530
T
iming chain tensioning
303 - 532
Wedges, primary ch
ain
303 - 533
Cranksh
aft setting
303 - 531
1. Open the engine compartment and fit paintwork protection
sheets.
2. Set the engine compartment cover to the service access
position.
3. Di
sconnect the batt
ery ground cable.
пЃ¬R
emove the battery cover.
4. Remove the Timing Co ver. Refer to Operation 12.65.01 in this
Section.
5. Remove the VVT bush carrier from the A-Bank.
1. Remove the three bolts which secure the carrier to the cylinder block.
Page 568 of 2490

18. L
oosen the bolt which secures
the VVT unit to the camshaft.
19 . Re
move the primary ch
ain tensioner bolts.
20 . R
emove the tensioner assembly.
1. Remove the tensioner.
2. Remove the tensioner back-plate.
21. Remove the chain tensioner blade.
1. Remove the pivot bolt which secures the tensioner blade.
2. Remove the tensioner blade.
Page 569 of 2490

22
.
Remove the chain from the VVT unit and from the crankshaft
pulley.
23
.
Remove the camshaft locking tool 303 - 530 and transfer it to
the B-Bank camshafts, aligning the shafts slightly as necessary.
24
.
Loosen the bolt which secures the sprocket to the camshaft.
25
.
Loosen the bolt which secures the VVT unit to the camshaft.
26. Remove the primary ch ain tensioner bolts.
Page 570 of 2490
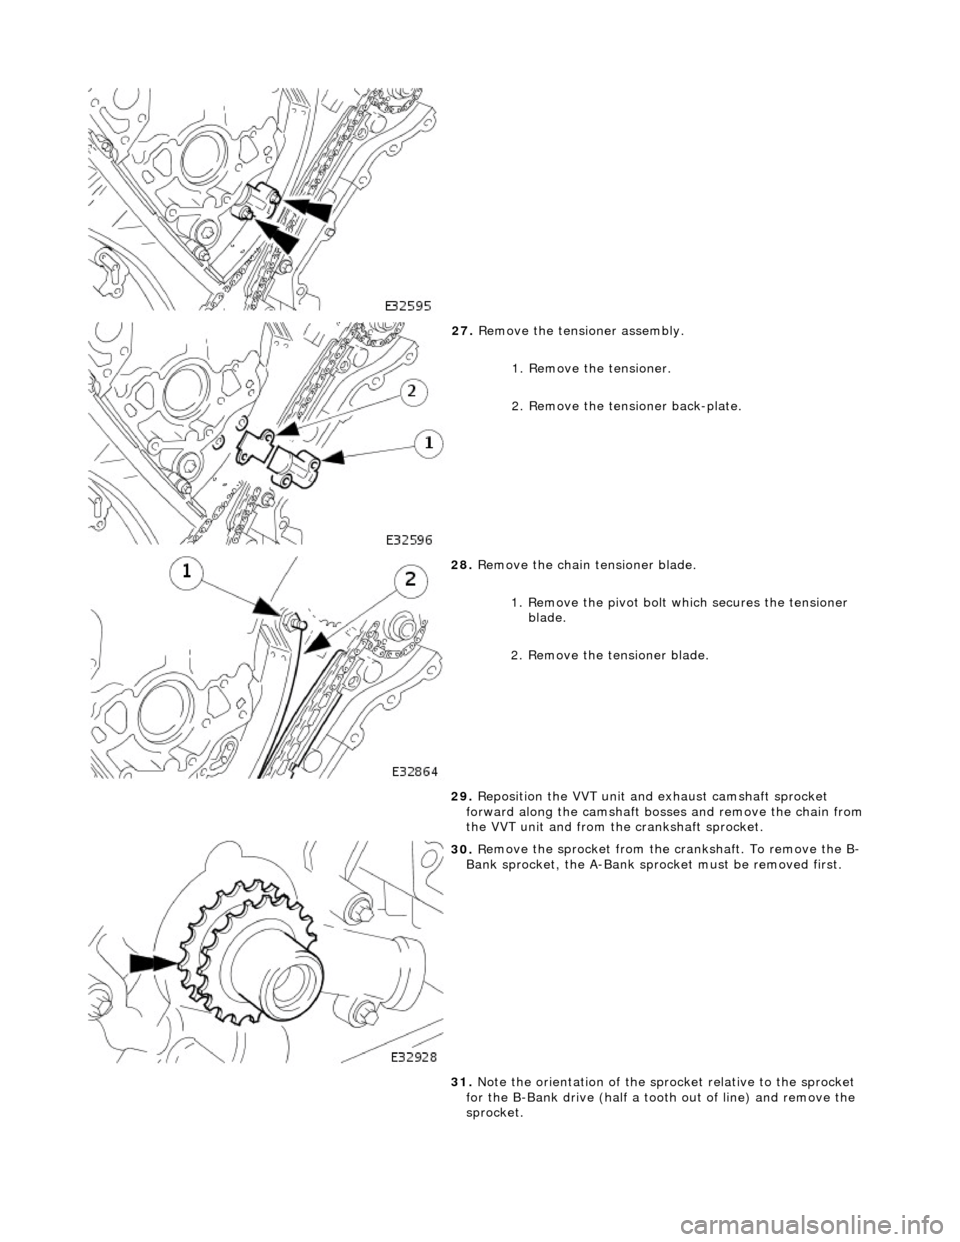
27. R
emove the tensioner assembly.
1. Remove the tensioner.
2. Remove the tensioner back-plate.
28. R
emove the chain tensioner blade.
1. Remove the pivot bolt which secures the tensioner blade.
2. Remove the tensioner blade.
29. Reposition the VVT unit and exhaust camshaft sprocket
forward along the camshaft bosses and remove the chain from
the VVT unit and from th e crankshaft sprocket.
30 . R
emove the sprocket from the
crankshaft. To remove the B-
Bank sprocket, the A-Bank spro cket must be removed first.
31. Note the orientation of the spro cket relative to the sprocket
for the B-Bank drive (half a toot h out of line) and remove the
sprocket.
Page 571 of 2490

I
nstallation
32
.
Clean and inspect all relevant components.
1. F
it the sprockets to the crankshaft.
пЃ¬Th
e teeth of the A-Bank and the B-Bank sprockets on the
crankshaft must be out of phas e with each other. If they
are in-phase after fitting, remove the A-Bank sprocket,
turn it on its vertical axis and refit it.
2. F
it the chain tensioning tool 303 - 532 to the exhaust camshaft
sprocket, B-Bank.
пЃ¬Re
position the sprocket (and
the VVT unit) for the most
advantageous position for use of the tool.
пЃ¬R
emove the tool.
3. R
efit the primary timing chain, B-Bank.
1. Fit the primary chain over the crankshaft sprocket and the VVT unit sprocket. There must be no slack on
the drive side of the primary chain and the VVT unit
must not be rotate d on the camshaft.
пЃ¬Sl
ide the VVT and exhaust sprocket fully rearwards onto
the respective camshafts.
4. Fit the primary chain tensioner blade.
1. Position the tensioner blade to the cylinder block.