JAGUAR XFR 2010 1.G Owner's Manual
XFR 2010 1.G
JAGUAR
JAGUAR
https://www.carmanualsonline.info/img/21/7642/w960_7642-0.png
JAGUAR XFR 2010 1.G Owner's Manual
Page 894 of 3039
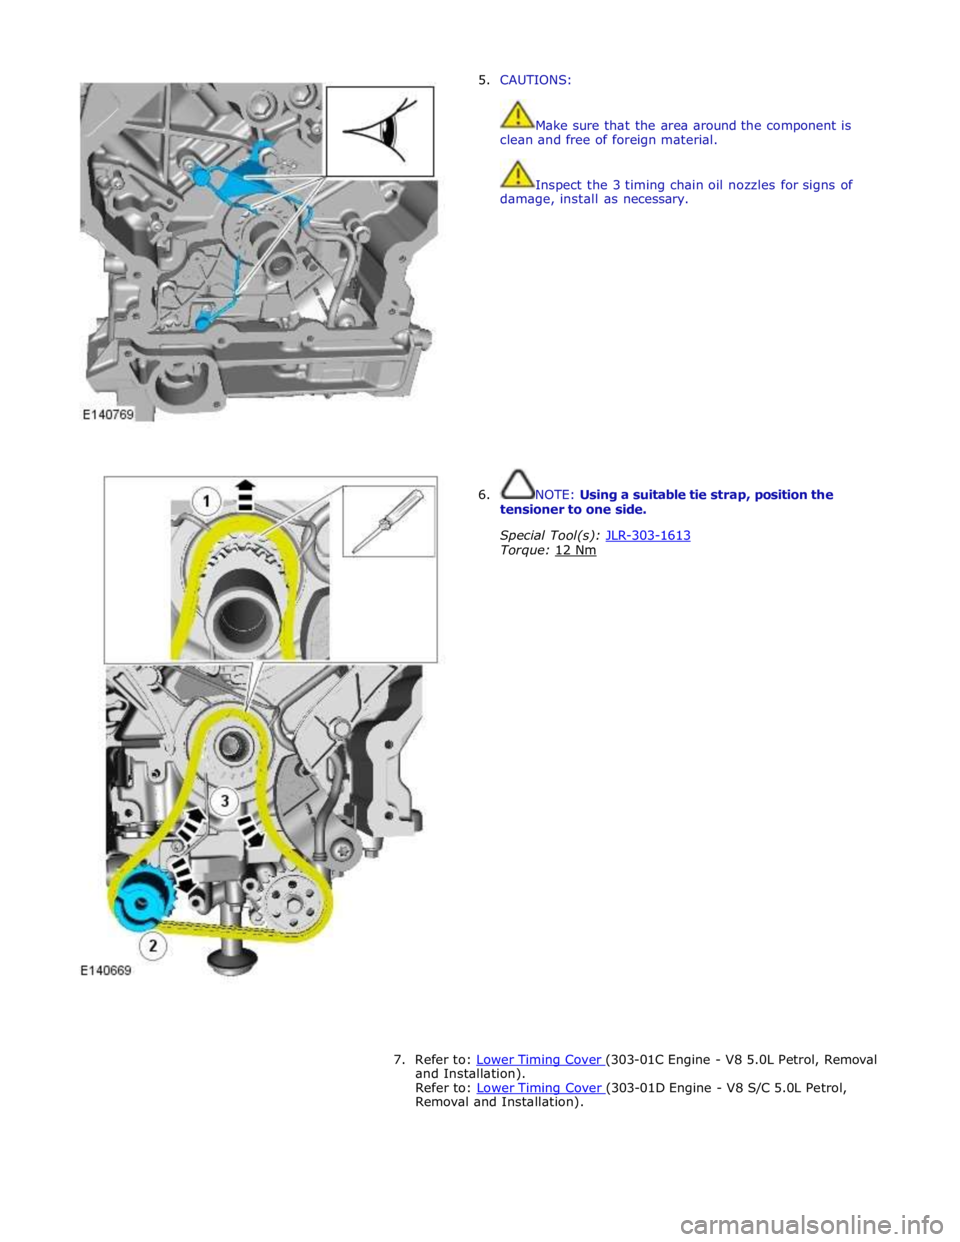
5. CAUTIONS:
Make sure that the area around the component is
clean and free of foreign material.
Inspect the 3 timing chain oil nozzles for signs of
damage, install as necessary.
6. NOTE: Using a suitable tie strap, position the
tensioner to one side.
Special Tool(s): JLR-303-1613 Torque: 12 Nm
7. Refer to: Lower Timing Cover (303-01C Engine - V8 5.0L Petrol, Removal and Installation).
Refer to: Lower Timing Cover (303-01D Engine - V8 S/C 5.0L Petrol, Removal and Installation).
Page 899 of 3039

Engine - V8 S/C 5.0L Petrol - Valve Clearance Check
General Procedures
Check Published: 10-Jul-2013
1. Refer to: Battery Disconnect and Connect (414-01 Battery, Mounting and Cables, General Procedures).
2. WARNING: Do not work on or under a vehicle supported only by a jack.
Always support the vehicle on safety stands.
Raise and support the vehicle.
3. Refer to: Valve Cover LH (303-01D Engine - V8 S/C 5.0L Petrol, Removal and Installation).
4. Refer to: Valve Cover RH (303-01D Engine - V8 S/C 5.0L Petrol, Removal and Installation).
5. CAUTIONS:
Rotate the engine clockwise until the camshafts are positioned as
shown.
Do not rotate the crankshaft counterclockwise. The timing chains
may bind causing engine damage.
Camshaft lobes must be 180 degrees away from each valve tappet
or valve clearance will be incorrect.
NOTE: Using feeler gauge check the gap between the tappet and
the camshaft lobe and check against specifications table.
Using feeler gauge check the gap between the tappet and the
camshaft lobe and check against specifications table.
Repeat for the remaining valve tappets.
Page 1005 of 3039
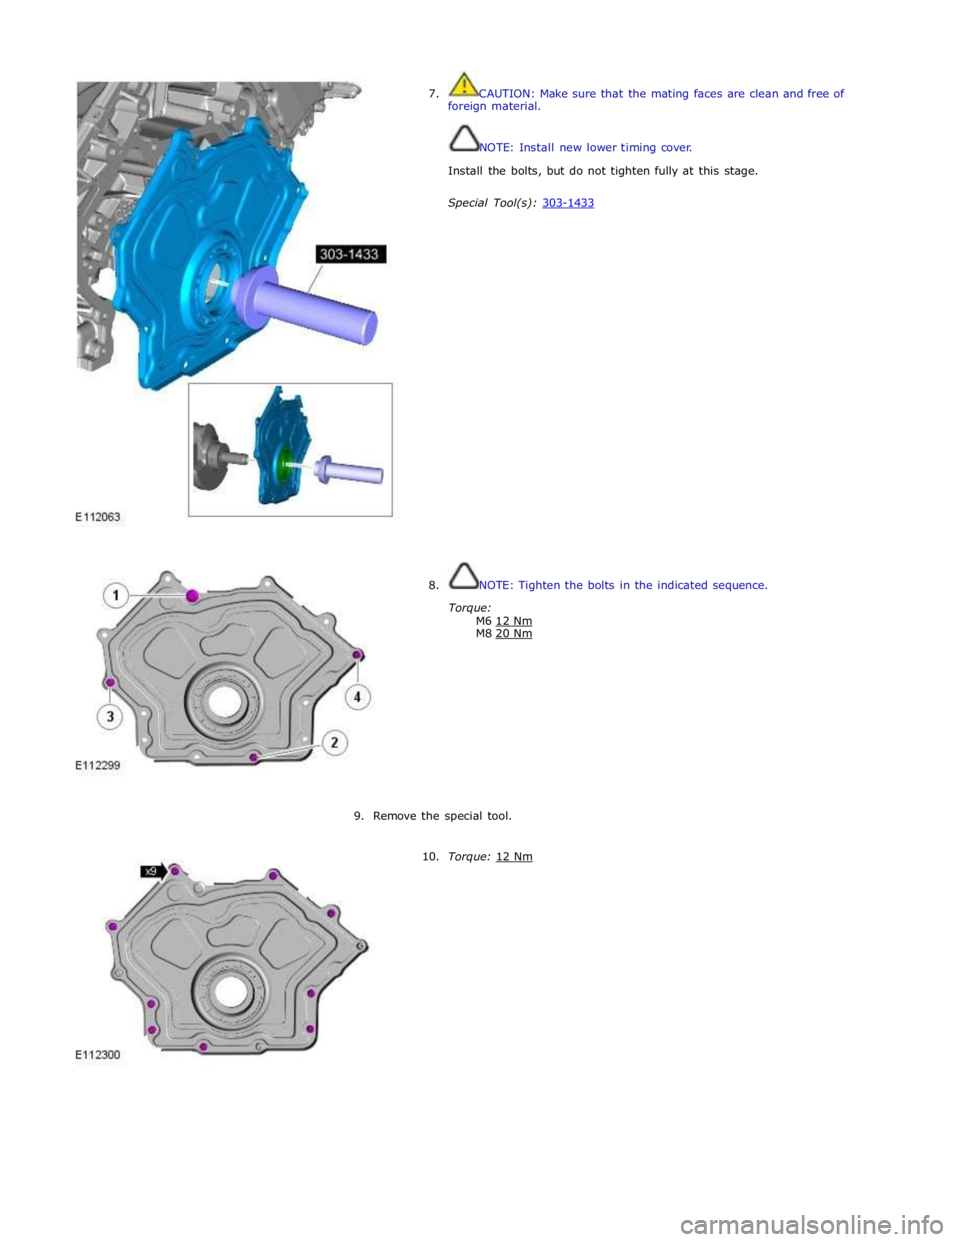
7. CAUTION: Make sure that the mating faces are clean and free of
foreign material.
NOTE: Install new lower timing cover.
Install the bolts, but do not tighten fully at this stage.
Special Tool(s): 303-1433
8. NOTE: Tighten the bolts in the indicated sequence.
Torque:
M6 12 Nm M8 20 Nm
9. Remove the special tool.
10. Torque: 12 Nm
Page 1018 of 3039
Engine - V8 S/C 5.0L Petrol - Oil Pump
Removal and Installation
Removal Published: 07-Oct-2011
1. Refer to: Battery Disconnect and Connect (414-01 Battery, Mounting and Cables, General Procedures).
2. WARNING: Make sure to support the vehicle with axle stands.
Raise and support the vehicle.
3. Refer to: Oil Pan Extension (303-01C Engine - V8 5.0L Petrol, Removal and Installation).
4. NOTE: Tsubaki timing drive only.
5. NOTE: INA timing drive only.
Page 1022 of 3039
6. NOTE: Tsubaki timing drive only.
Install the lower timing chain making sure the coloured
chain links align correctly with the fuel rail high-pressure
fuel pumps camshaft and crankshaft sprocket markings.
Page 1023 of 3039
7. CAUTION: Make sure that the tensioner spring is
correctly located.
NOTE: Tsubaki timing drive only.
Torque: 21 Nm
8. NOTE: INA timing drive only.
Install the lower timing chain making sure the coloured
chain links align correctly with the fuel rail high-pressure
fuel pumps camshaft and crankshaft sprocket markings.
Page 1024 of 3039
9. CAUTION: Make sure that the tensioner spring is
correctly located.
NOTE: INA timing drive only.
Torque: 21 Nm
10. Refer to: Oil Pan Extension (303-01C Engine - V8 5.0L Petrol, Removal and Installation).
11. Refer to: Battery Disconnect and Connect (414-01 Battery, Mounting and Cables, General Procedures).
Page 1025 of 3039

Engine - V8 S/C 5.0L Petrol - Timing Cover
Removal and Installation
Removal
NOTE: Removal steps in this procedure may contain installation details. Published: 12-Sep-2011
1. Refer to: Battery Disconnect and Connect (414-01 Battery, Mounting and Cables, General Procedures).
2. WARNING: Make sure to support the vehicle with axle stands.
Raise and support the vehicle.
3. Refer to: Accessory Drive Belt (303-05D Accessory Drive - V8 S/C 5.0L Petrol, Removal and Installation).
4. Refer to: Accessory Drive Belt Tensioner (303-05D Accessory Drive - V8 S/C 5.0L Petrol, Removal and Installation).
5. Refer to: Thermostat Housing - Vehicles With: Supercharger (303-03C Engine Cooling - V8 5.0L Petrol/V8 S/C 5.0L Petrol, Removal and
Installation).
6. Refer to: Valve Cover LH (303-01D Engine - V8 S/C 5.0L Petrol, Removal and Installation).
7. Refer to: Valve Cover RH (303-01D Engine - V8 S/C 5.0L Petrol, Removal and Installation).
8. Refer to: Crankshaft Pulley (303-01D Engine - V8 S/C 5.0L Petrol, Removal and Installation).
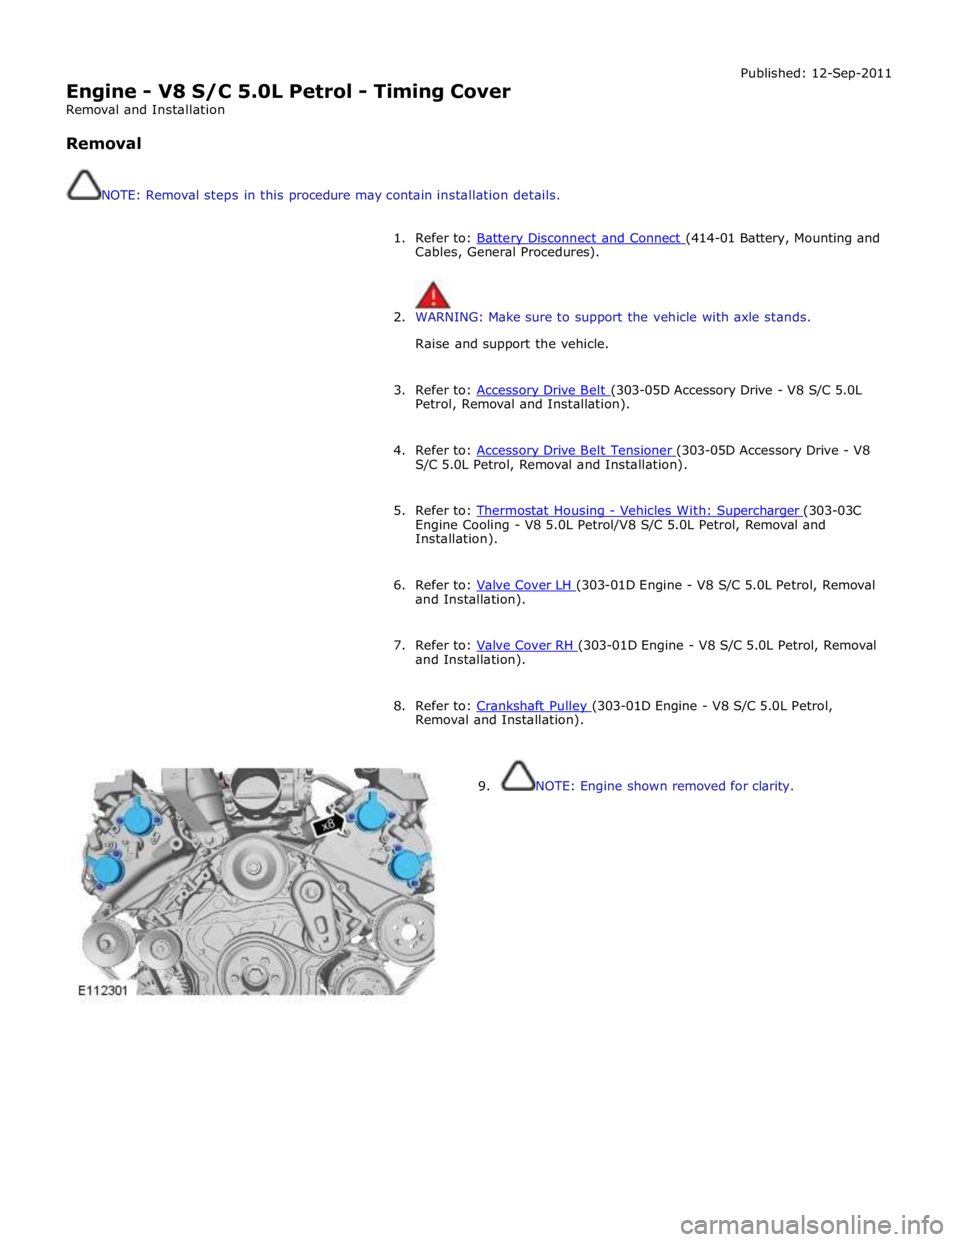
9. NOTE: Engine shown removed for clarity.
Page 1032 of 3039
Engine - V8 S/C 5.0L Petrol - Timing Drive Components
Removal and Installation
Special Tool(s)
303-1445
Timing Tool – Camshaft Alignment
303-1447
Timing Tool
303-1448
Locking Tool
303-1452
Camshaft Rotating Tool
303-1482
Tensioner Tool Removal
CAUTION: Check all timing components for wear and install new components if required.
NOTES:
Removal steps in this procedure may contain installation details. Published: 12-Jun-2014
Page 1033 of 3039
Some variation in the illustrations may occur, but the essential information is always correct.
1. Disconnect the battery ground cable.
Refer to: Battery Disconnect and Connect (414-01 Battery, Mounting and Cables, General Procedures).
2. WARNING: Make sure to support the vehicle with axle stands.
Raise and support the vehicle.
3. Refer to: Timing Cover (303-01C Engine - V8 5.0L Petrol, Removal and Installation).
4.
5. CAUTION: Only rotate the crankshaft clockwise.
Install the special tool.
Special Tool(s): 303-1447


