JAGUAR XJ 2004 X350 / 3.G Manual PDF
Manufacturer: JAGUAR, Model Year: 2004, Model line: XJ, Model: JAGUAR XJ 2004 X350 / 3.GPages: 227, PDF Size: 4.22 MB
Page 71 of 227
3 - 32 Before Driving
Memory recall using an integrated
key
The integrated key will recall a memory
position when the unlock button is
pressed when set as follows:
1. Adjust the seat, steering column, pedals and exterior rear view mirrors
to the desired positions.
2. Press the M button: The red LED will illuminate for a five second period.
3. Press button ‘1’, ‘2’ or ‘3’ and then press any button on the integrated
key. Both button presses must occur
while the red LED is illuminated.
4. Repeat for the other integrated key, pressing the remaining memory
buttons.
To cancel integrated key memory recall:
1. Place a key into the ignition switch and leave in the OFF position.
2. Press the M button: The red LED will illuminate for a five second period.
3. Press any button on the integrated key
(except the panic button, if fitted) then
press the M button again. Both button
presses must occur while the red LED
is illuminated. Note:
If memory recall is performed
using an integrated ke y with the vehicle in
entry/exit position, the steering column
and seat will not return to the memorised
position until either the integrated key is
placed in the ignition switch or the
driver’s door is closed.
Driving position memory system
operating tips
• When making adjustments to a set driving position, reset the new
position in the same memory channel.
• A driving position will only be memorised during the five second
period when the red memory LED is
illuminated.
• Previous memory is erased when a new driving position is entered.
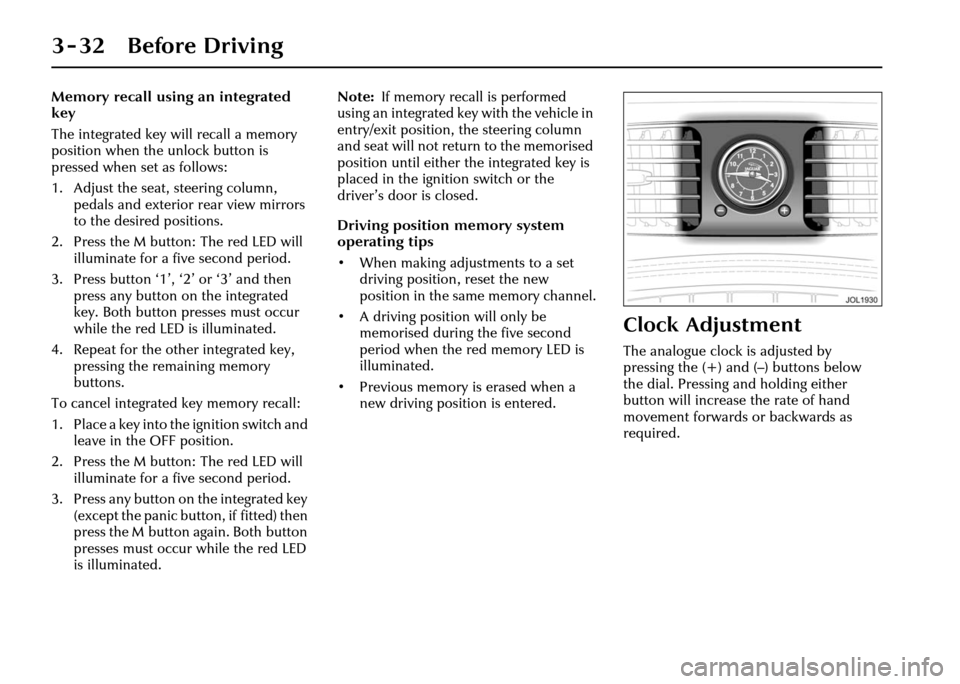
Clock Adjustment
The analogue clock is adjusted by
pressing the (+) and (–) buttons below
the dial. Pressing and holding either
button will increase the rate of hand
movement forwards or backwards as
required.
Page 72 of 227
Before Driving 3 - 33
Luggage Compartment
!WARNING:
1. Locate heavy loads in the luggage compartment towards the front of
the vehicle and secure them to
stop them sliding. Loose items can
be a hazard.
2. Do not drive wi th the luggage
compartment lid open as exhaust
fumes can be drawn into the
passenger compartment.
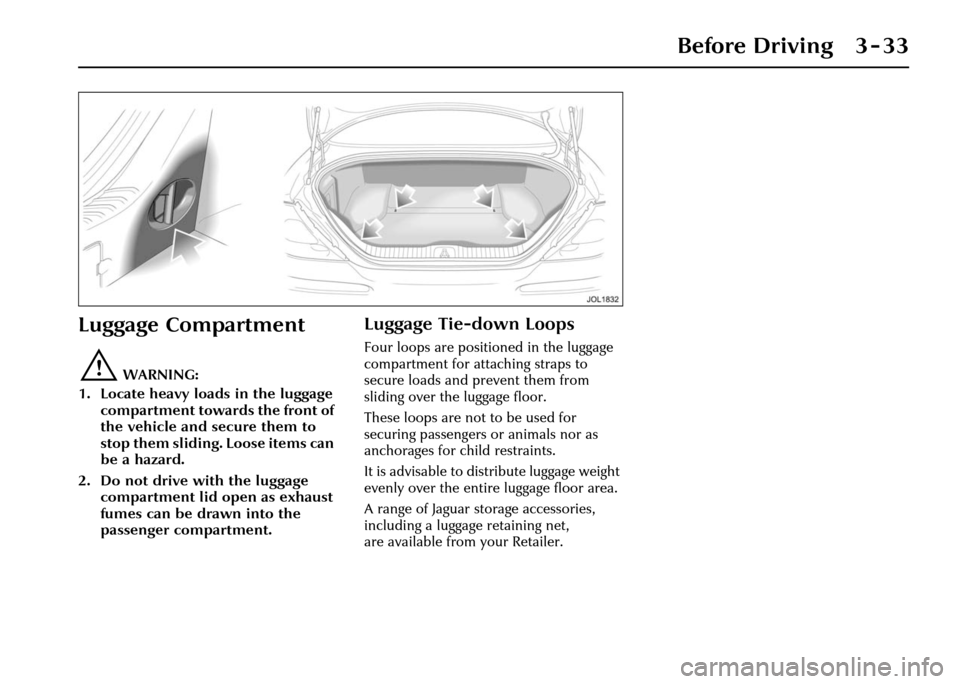
Luggage Tie-down Loops
Four loops are positioned in the luggage
compartment for attaching straps to
secure loads and prevent them from
sliding over the luggage floor.
These loops are not to be used for
securing passengers or animals nor as
anchorages for child restraints.
It is advisable to distribute luggage weight
evenly over the entire luggage floor area.
A range of Jaguar storage accessories,
including a luggag e retaining net,
are available from your Retailer.
Page 73 of 227
3 - 34 Before Driving
Ski Hatch
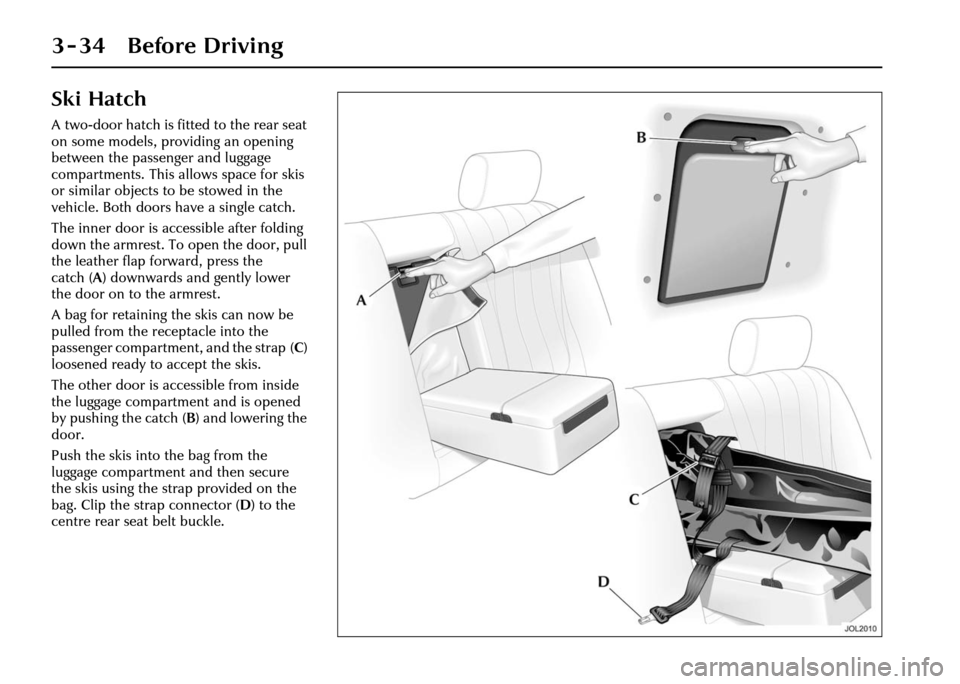
A two-door hatch is fitted to the rear seat
on some models, providing an opening
between the passenger and luggage
compartments. This allows space for skis
or similar objects to be stowed in the
vehicle. Both doors have a single catch.
The inner door is accessible after folding
down the armrest. To open the door, pull
the leather flap forward, press the
catch (A) downwards and gently lower
the door on to the armrest.
A bag for retaining the skis can now be
pulled from the receptacle into the
passenger compartment, and the strap ( C)
loosened ready to accept the skis.
The other door is accessible from inside
the luggage compartment and is opened
by pushing the catch ( B) and lowering the
door.
Push the skis into the bag from the
luggage compartment and then secure
the skis using the strap provided on the
bag. Clip the strap connector ( D) to the
centre rear seat belt buckle.
Page 74 of 227
On the Road 4 - 3
4 On the Road
Instruments
None of the instruments will show
correct indications until the ignition is
switched ON (position ‘II’).
If the exterior light switch is ON and the
ignition is ON, the display brightness can
be varied using the dimmer switch
(page 4 - 25).
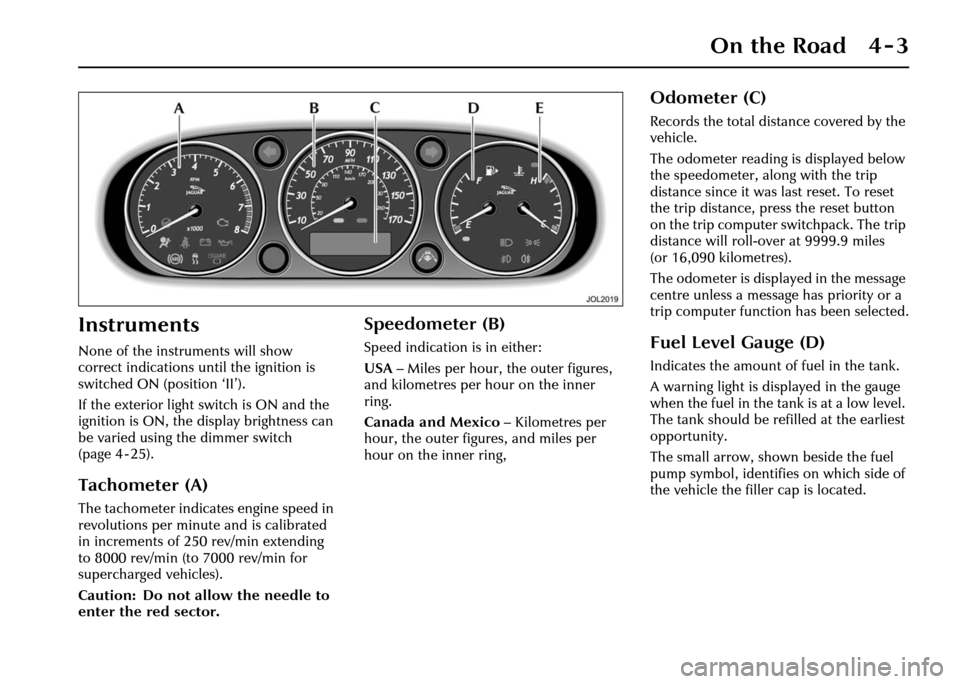
Tachometer (A)
The tachometer indicates engine speed in
revolutions per minute and is calibrated
in increments of 250 rev/min extending
to 8000 rev/min (to 7000 rev/min for
supercharged vehicles).
Caution: Do not allow the needle to
enter the red sector.
Speedometer (B)
Speed indication is in either:
USA– Miles per hour, the outer figures,
and kilometres per hour on the inner
ring.
Canada and Mexico – Kilometres per
hour, the outer figures, and miles per
hour on the inner ring,
Odometer (C)
Records the total distance covered by the
vehicle.
The odometer reading is displayed below
the speedometer, al ong with the trip
distance since it was last reset. To reset
the trip distance, press the reset button
on the trip computer switchpack. The trip
distance will roll-over at 9999.9 miles
(or 16,090 kilometres).
The odometer is displayed in the message
centre unless a message has priority or a
trip computer function has been selected.
Fuel Level Gauge (D)
Indicates the amount of fuel in the tank.
A warning light is displayed in the gauge
when the fuel in the tank is at a low level.
The tank should be refilled at the earliest
opportunity.
The small arrow, shown beside the fuel
pump symbol, identifies on which side of
the vehicle the filler cap is located.
Page 75 of 227
4-4 On the Road
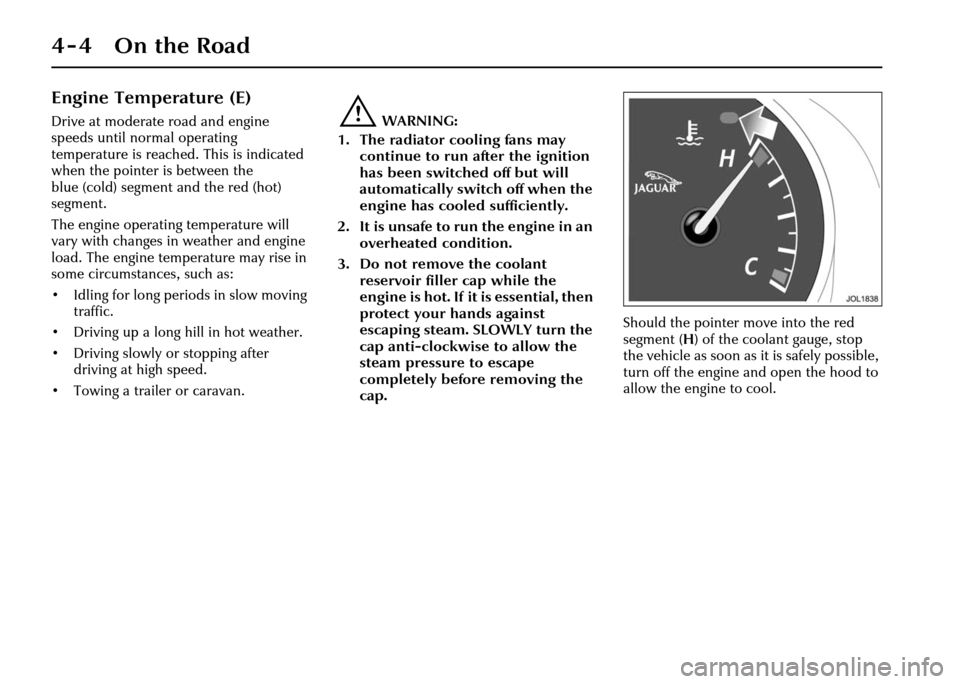
Engine Temperature (E)
Drive at moderate road and engine
speeds until normal operating
temperature is reached. This is indicated
when the pointer is between the
blue (cold) segment and the red (hot)
segment.
The engine operating temperature will
vary with changes in weather and engine
load. The engine temperature may rise in
some circumstances, such as:
• Idling for long periods in slow moving traffic.
• Driving up a long hill in hot weather.
• Driving slowly or stopping after driving at high speed.
• Towing a trailer or caravan.!WARNING:
1. The radiator cooling fans may continue to run after the ignition
has been switched off but will
automatically switch off when the
engine has cooled sufficiently.
2. It is unsafe to run the engine in an overheated condition.
3. Do not remove the coolant reservoir filler cap while the
engine is hot. If it is essential, then
protect your hands against
escaping steam. SLOWLY turn the
cap anti-clockwise to allow the
steam pressure to escape
completely before removing the
cap. Should the pointer move into the red
segment (
H) of the coolant gauge, stop
the vehicle as soon as it is safely possible,
turn off the engine and open the hood to
allow the engine to cool.
Page 76 of 227
On the Road 4 - 5
Warning Lights
Warning lights are arranged within the
instrument cluster.
There are two warning lights, one red,
the other amber, located above the
message centre for primary and
secondary status of the warnings
displayed by the message centre.
‘RED’ warning lights are for primary
warnings. A primary warning must be
investigated immediately by the driver or
a Jaguar Retailer.
‘AMBER’ warning lights are for secondary
warnings when the driver must take
action and then report the fault to a
Retailer at the earliest opportunity.
Other lights within the instrument cluster
indicate system status, such as blue for
main beam and green for direction
indicators, when in operation. Lamp check
A lamp check is initiated when the
ignition is switched ON and lasts for
three seconds (excepting the air bag
warning light which will remain on for
6seconds). Ifany wa
rning light remains
on after this period, investigate the cause
before driving.
Note: Not all lamps are included in the
lamp check, for example main beam
headlights or direction indicators.
Low Oil Pressure (RED)
This lights up with the ignition
switched ON and should go
out once the engine is running.
If the light remains ON once the engine
has started or comes ON whilst driving,
loss of oil pressure is indicated.
STOP the engine immediately and
investigate the cause.
Caution: Do not restart the engine
until the cause of loss of oil pressure
has been identified and rectified.
First check the engine oil level,
seepage7-6.
Page 77 of 227
4-6 On the Road
Charge Indicator (RED)
This lights up when the ignition
is switched ON and should go
out when the engine is
running.
If the light stays ON when the engine is
running it indicates that there is either a
battery voltage fault or a generator fault.
Turn OFF all electrical accessories, radio,
climate control, rear screen heater etc.
Try to use the minimum electrical load as
possible such as power windows, electric
sunroof etc. Report the fault to a Jaguar
Retailer.
Seat Belt (RED)
The warning lamp lights when
the ignition is ON and:
• The driver’s seat belt is not fastened.
• A passenger is sitting in the front seat and their seat belt is not fastened.
The light should go out when the driver’s
seat belt (and the front passenger’s if the
seat is occupied) is fastened.
Note: The vehicle must be moving above
10 mph (16 km/h) for the lamp to
illuminate if the passeng er seat belt is not
fastened.
Beltminder
The Beltminder feature is a supplemental
warning to the seat be lt warning function.
This feature provides additional
reminders to the driver that the driver’s
and/or front passenger’s seat belt is
unbuckled by intermittently sounding a
chime and illuminating the seat belt
warning light in the instrument cluster. If the vehicle is moving above 10 mph
(16 km/h) and one or both front seats are
occupied and a seat belt is not fastened,
a warning chime will be heard and the
light will flash.
The chime sound and the light flashing
will last for 10 seconds and then repeat
every 30 seconds for five minutes or until
the belts are fastened or the vehicle
stops.
If the warning light stays ON steady with
the seat belt(s) fastened, report the fault
to a Jaguar Retailer. It is safe to drive the
vehicle with the light ON steady,
provided that the seat belt(s) is properly
fastened. Ensure that all occupants seat
belts are fastened before driving.
Although not advisable, it is possible to
disable or reinstate the Beltminder
function. Please see a Jaguar Retailer.
Note:
If a heavy object is placed on the
front passenger seat it may activate the
Beltminder feature. It is recommended
that the object be placed in the luggage
compartment.
Page 78 of 227
On the Road 4 - 7
Brake (RED)
Lights up when:
• The ignition is ON and the parkbrake is ON.
• There is a fault with the parkbrake.
• The brake fluid is low.
If the light is ON and there are no
associated messages it means that the
parkbrake is applied.
If the light flashes, th ere is a fault with the
parkbrake system and the parkbrake
cannot be applied.
If the light is ON and the message
‘PARKBRAKE ON’ is displayed, it means
that the parkbrake is applied but the
vehicle is moving. Release the parkbrake
or stop the vehicle when it is safe to do
so. If the light is ON and the message ‘LOW
BRAKE FLUID’ message with a RED
priority light is displayed on the message
centre, low brake fluid is indicated.
In this case, loss of braking in one,
or both, brake circuits may be imminent.
!WARNING:
If the message ‘LOW BRAKE FLUID’ is
displayed, DO NOT drive the vehicle
until the fault is rectified. Consult a
Jaguar Retailer immediately.
Anti-lock Braking
System (ABS) (AMBER)
If a fault has been detected in
the anti-lock brake
system (ABS) or the electric
parkbrake system, this light will
illuminate.
A warning message will appear with this
light to indicate either ABS fault or
parkbrake fault.
The brake system will continue to
function normally, but without ABS
braking.
Should the light come on or stay on after
the bulb check cycle, stop the vehicle at
the first opportunity, turn the engine OFF
and then restart.
If the ABS light comes on again,
the vehicle should be driven to a Jaguar
Retailer at the earliest opportunity.
!WARNING:
If the ABS and brake warning lights
are ON at the same time, DO NOT
drive the vehicle until the fault is
rectified. Consult a Jaguar Retailer
immediately.
Page 79 of 227
4-8 On the Road
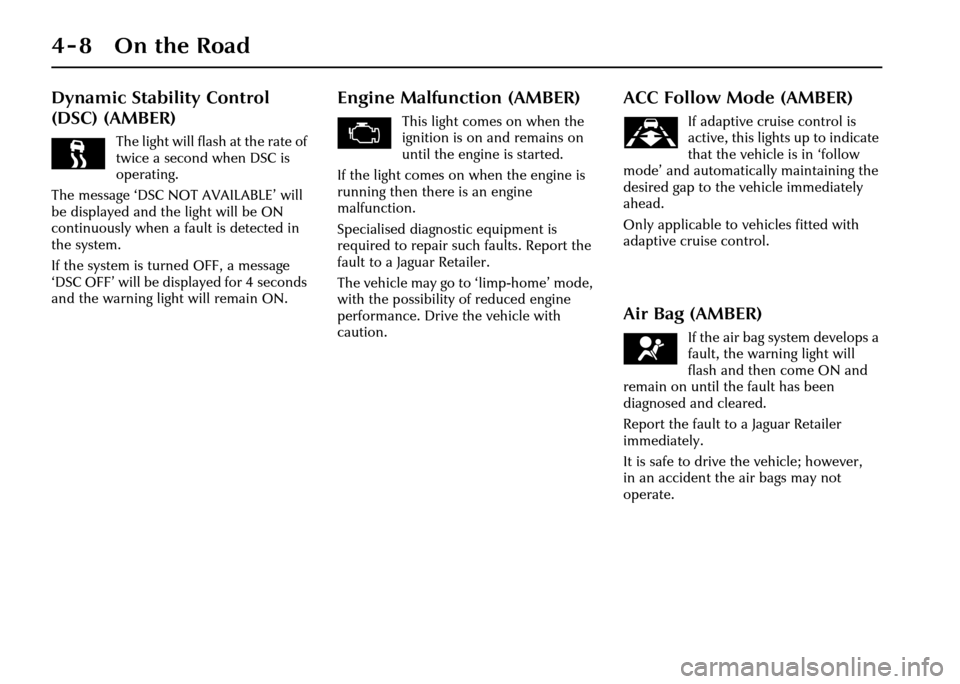
Dynamic Stability Control
(DSC) (AMBER)
The light will flash at the rate of
twice a second when DSC is
operating.
The message ‘DSC NOT AVAILABLE’ will
be displayed and the light will be ON
continuously when a fault is detected in
the system.
If the system is turned OFF, a message
‘DSC OFF’ will be displayed for 4 seconds
and the warning light will remain ON.
Engine Malfunction (AMBER)
This light comes on when the
ignition is on and remains on
until the engine is started.
If the light comes on when the engine is
running then there is an engine
malfunction.
Specialised diagnostic equipment is
required to repair such faults. Report the
fault to a Jaguar Retailer.
The vehicle may go to ‘limp-home’ mode,
with the possibility of reduced engine
performance. Drive the vehicle with
caution.
ACC Follow Mode (AMBER)
If adaptive cruise control is
active, this lights up to indicate
that the vehicle is in ‘follow
mode’ and automatically maintaining the
desired gap to the vehicle immediately
ahead.
Only applicable to vehicles fitted with
adaptive cruise control.
Air Bag (AMBER)
If the air bag system develops a
fault, the warning light will
flash and then come ON and
remain on until the fault has been
diagnosed and cleared.
Report the fault to a Jaguar Retailer
immediately.
It is safe to drive the vehicle; however,
in an accident the air bags may not
operate.
Page 80 of 227
On the Road 4 - 9
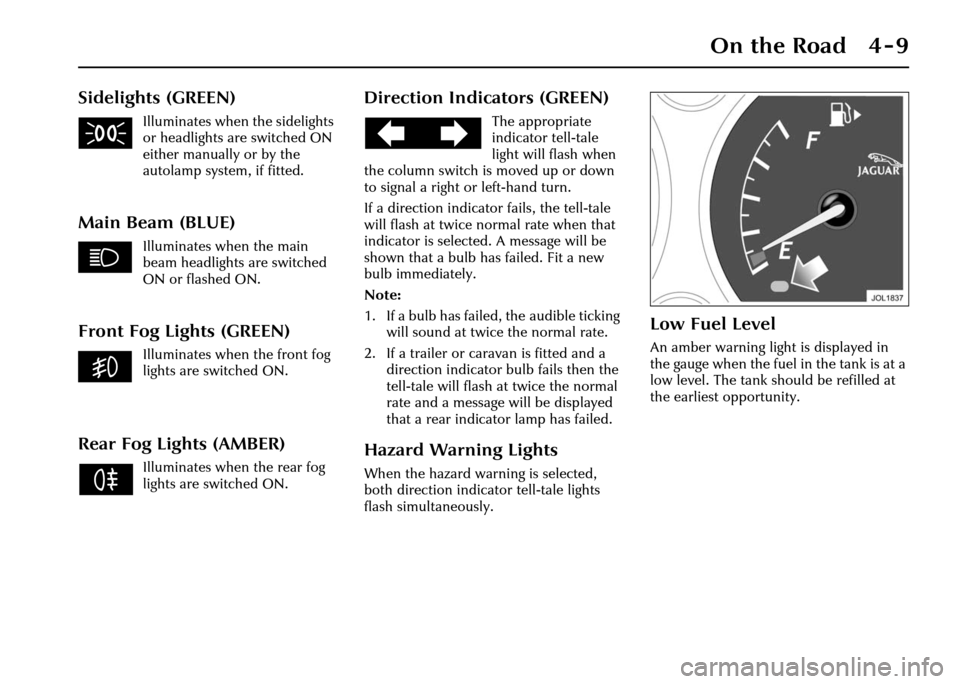
Sidelights (GREEN)
Illuminates when the sidelights
or headlights are switched ON
either manually or by the
autolamp system, if fitted.
Main Beam (BLUE)
Illuminates when the main
beam headlights are switched
ON or flashed ON.
Front Fog Lights (GREEN)
Illuminates when the front fog
lights are switched ON.
Rear Fog Lights (AMBER)
Illuminates when the rear fog
lights are switched ON.
Direction Indicators (GREEN)
The appropriate
indicator tell-tale
light will flash when
the column switch is moved up or down
to signal a right or left-hand turn.
If a direction indicato r fails, the tell-tale
will flash at twice normal rate when that
indicator is selected. A message will be
shown that a bulb has failed. Fit a new
bulb immediately.
Note:
1. If a bulb has failed, the audible ticking will sound at twice the normal rate.
2. If a trailer or caravan is fitted and a direction indicator bulb fails then the
tell-tale will flash at twice the normal
rate and a message will be displayed
that a rear indicator lamp has failed.
Hazard Warning Lights
When the hazard warning is selected,
both direction indicator tell-tale lights
flash simultaneously.
Low Fuel Level
An amber warning light is displayed in
the gauge when the fuel in the tank is at a
low level. The tank should be refilled at
the earliest opportunity.