brake sensor JAGUAR XJ6 1994 2.G Workshop Manual
[x] Cancel search | Manufacturer: JAGUAR, Model Year: 1994, Model line: XJ6, Model: JAGUAR XJ6 1994 2.GPages: 521, PDF Size: 17.35 MB
Page 9 of 521
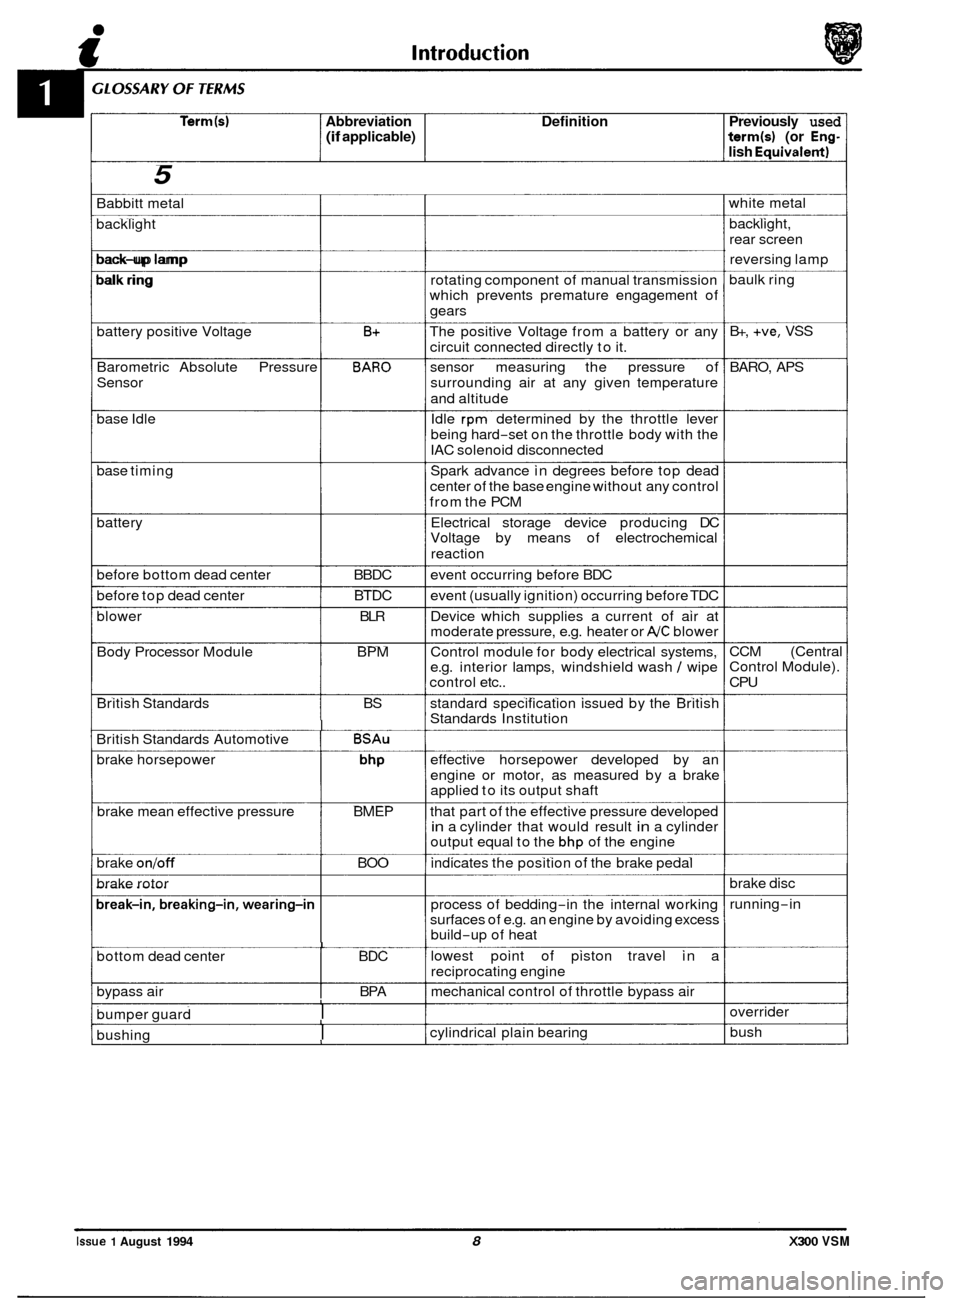
Terrn(s1 Abbreviation Definition Previously used (if applicable) term(s) (or Eng- lish Eauivalentl
5
Babbitt metal
backlight
back
-up lamp
balk ring
t
battery positive Voltage B+
Barometric Absolute Pressure BARO
Sensor
base Idle
base timing
battery
before bottom dead center BBDC
before top dead center BTDC
blower BLR
Body Processor Module BPM
British Standards BS
I British Standards Automotive BSAu
brake horsepower
brake mean effective pressure BMEP
brake
ontoff BOO
brake rotor
I bottom dead center BDC
bypass air BPA
bumper guard
I
bushing I
rotating component of manual transmission
which prevents premature engagement of
gears
The positive Voltage from
a battery or any
circuit connected directly to it.
sensor measuring the pressure of
surrounding air at any given temperature
and altitude
Idle
rpm determined by the throttle lever
being hard
-set on the throttle body with the
IAC solenoid disconnected
Spark advance in degrees before top dead
center of the base engine without any control
from the PCM
Electrical storage device producing DC
Voltage by means of electrochemical
reaction
event occurring before BDC
event (usually ignition) occurring before TDC
Device which supplies a current of air at
moderate pressure, e.g. heater or
AJC blower
Control module for body electrical systems,
e.g. interior lamps, windshield wash wipe
control etc..
standard specification issued by the British
Standards Institution
effective horsepower developed by an
engine or motor, as measured by a brake
applied to its output shaft
that part of the effective pressure developed
in a cylinder that would result in a cylinder
output equal to the bhp of the engine
indicates the position of the brake pedal
process of bedding
-in the internal working
surfaces of e.g. an engine by avoiding excess
build
-up of heat
lowest point of piston travel in a
reciprocating engine
mechanical control of throttle bypass air
cylindrical plain bearing white
metal
backlight,
rear screen reversing lamp
baulk ring
B+,
+ve, VSS
BARO, APS
CCM (Central
Control Module).
CPU
brake disc
running
-in
overrider bush
Issue 1 August 1994 8 X300 VSM
Page 22 of 521
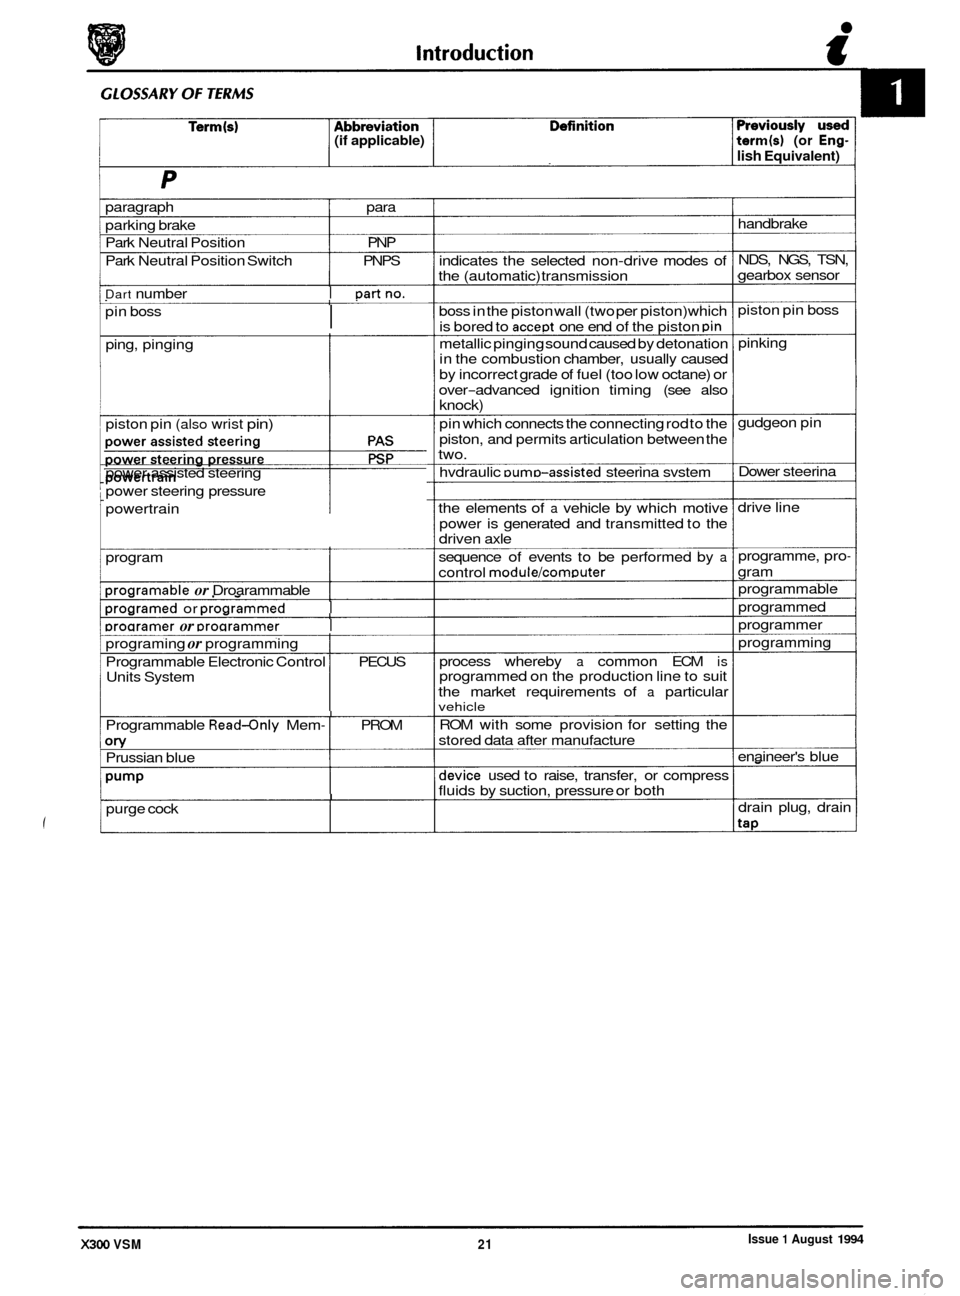
(if applicable) term(s) (or Eng-
lish Equivalent)
paragraph para
parking brake
Park Neutral Position PNP
Park Neutral Position Switch PNPS
Dart number I Dartno.
I pin boss
ping, pinging
piston pin
(also wrist pin)
power assisted steering
power steering pressure
. powertrain
program
Droaramable or Droarammable I
Droaramed or Droarammed I
Droaramer or Droarammer I
programing or programming
Programmable Electronic Control
I PECUS
Units System
I Programmable Read-only Mem- I PROM
on/ Prussian blue
Pump
purge cock I
indicates the selected non-drive modes of
the (automatic) transmission
boss in the piston wall (two per piston) which
is bored to
accept one end of the piston pin
metallic pinging sound caused by detonation
in the combustion chamber, usually caused
by incorrect grade of fuel (too low octane) or
over
-advanced ignition timing (see also knock)
pin which connects the connecting rod to the
piston, and permits articulation between the
two.
hvdraulic
DumD-assisted steerina svstem
the elements of
a vehicle by which motive
power is generated and transmitted to the
driven axle
sequence of events to be performed by
a
control module/comDuter
process whereby a common ECM is programmed on the production line to suit
the market requirements of
a particular vehicle
ROM with some provision for setting the
stored data after manufacture
device used to raise, transfer, or compress
fluids by suction, pressure or both handbrake
NDS, NGS, TSN,
gearbox sensor
piston pin boss
pinking
gudgeon pin
Dower steerina
drive line
programme, pro
-
gram
programmable
programmed
programmer
programming
enaineer's blue
drain plug, drain
tap
Issue 1 August 1994 X300 VSM 21
Page 156 of 521
Automatic Transmission (V12 & AJl6 Supercharged) Pomrtrain
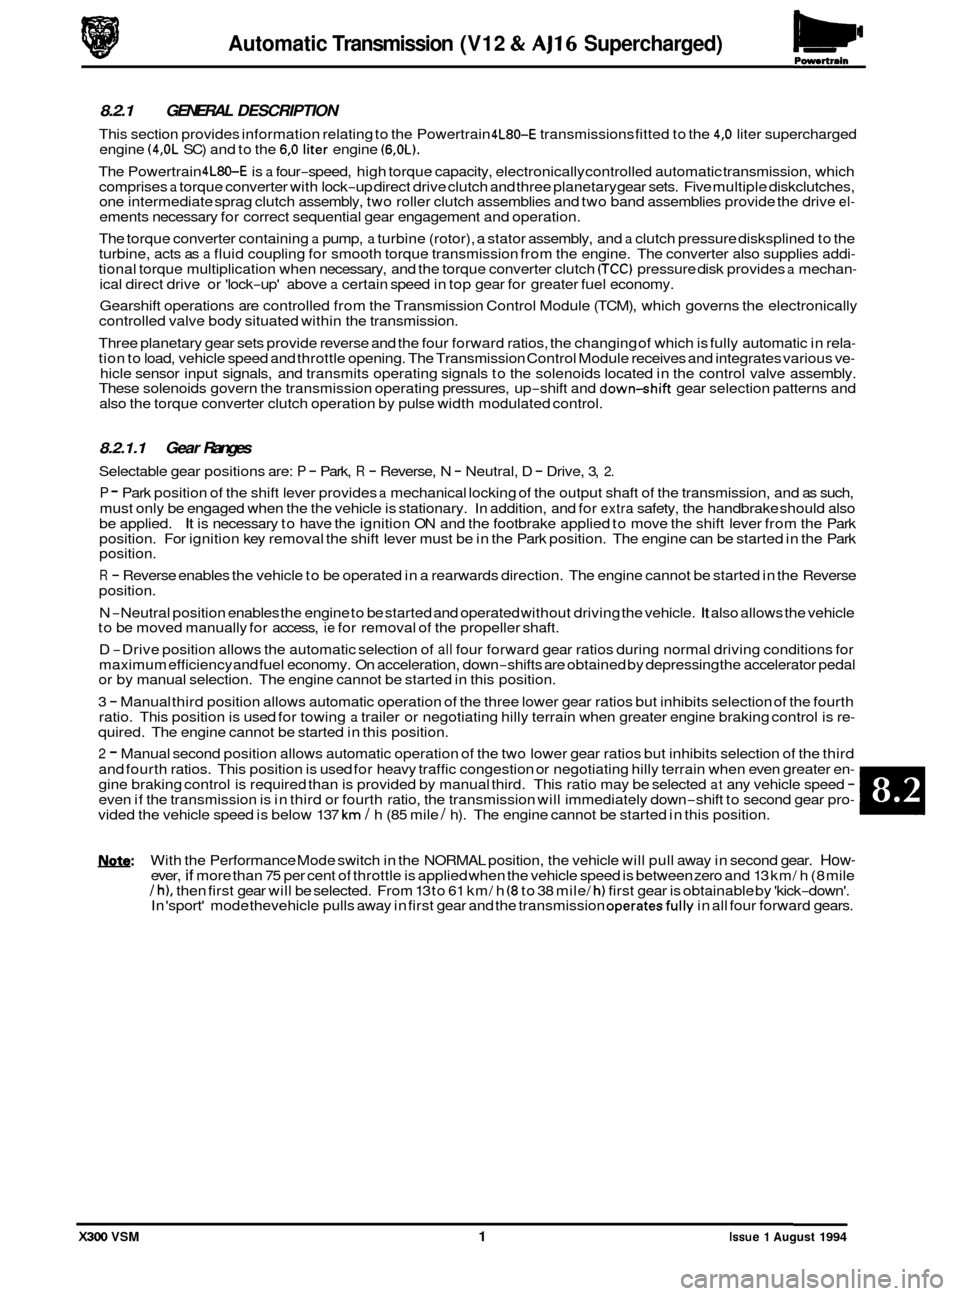
8.2.1 GENERAL DESCRIPTION
This section provides information relating to the Powertrain 4L80-E transmissions fitted to the 4,O liter supercharged
engine (4,OL SC) and to the 6,O liter engine (6,OL).
The Powertrain 4L80-E is a four-speed, high torque capacity, electronically controlled automatic transmission, which
comprises a torque converter with lock-up direct drive clutch and three planetary gear sets. Five multiple diskclutches,
one intermediate sprag clutch assembly, two roller clutch assemblies and two band assemblies provide the drive el- ements necessary for correct sequential gear engagement and operation.
The torque converter containing
a pump, a turbine (rotor), a stator assembly, and a clutch pressure disksplined to the
turbine, acts as a fluid coupling for smooth torque transmission from the engine. The converter also supplies addi- tional torque multiplication when necessary, and the torque converter clutch (TCC) pressure disk provides a mechan- ical direct drive or 'lock-up' above a certain speed in top gear for greater fuel economy.
Gearshift operations are controlled from the Transmission Control Module (TCM), which governs the electronically
controlled valve body situated within the transmission.
Three planetary gear sets provide reverse and the four forward ratios, the changing of which is fully automatic in rela
- tion to load, vehicle speed and throttle opening. The Transmission Control Module receives and integrates various ve- hicle sensor input signals, and transmits operating signals to the solenoids located in the control valve assembly.
These solenoids govern the transmission operating pressures, up-shift and down-shift gear selection patterns and
also the torque converter clutch operation by pulse width modulated control.
8.2.1.1 Gear Ranges
Selectable gear positions are: P - Park, R - Reverse, N - Neutral, D - Drive, 3, 2.
P - Park position of the shift lever provides a mechanical locking of the output shaft of the transmission, and as such,
must only be engaged when the the vehicle is stationary. In addition, and for
extra safety, the handbrake should also
be applied. It is necessary to have the ignition ON and the footbrake applied to move the shift lever from the Park
position. For ignition key removal the shift lever must be in the Park position. The engine can be started in the Park
position.
R - Reverse enables the vehicle to be operated in a rearwards direction. The engine cannot be started in the Reverse
position.
N
-Neutral position enables the engine to be started and operated without driving the vehicle. It also allows the vehicle
to be moved manually for access, ie for removal of the propeller shaft.
D
-Drive position allows the automatic selection of all four forward gear ratios during normal driving conditions for
maximum efficiency and fuel economy. On acceleration, down-shifts are obtained by depressing the accelerator pedal
or by manual selection. The engine cannot be started in this position.
3
- Manual third position allows automatic operation of the three lower gear ratios but inhibits selection of the fourth
ratio. This position is used for towing a trailer or negotiating hilly terrain when greater engine braking control is re- quired. The engine cannot be started in this position.
2 - Manual second position allows automatic operation of the two lower gear ratios but inhibits selection of the third
and fourth ratios. This position is used for heavy traffic congestion or negotiating hilly terrain when even greater en
- gine braking control is required than is provided by manual third. This ratio may be selected at any vehicle speed - even if the transmission is in third or fourth ratio, the transmission will immediately down-shift to second gear pro- vided the vehicle speed is below 137 km / h (85 mile / h). The engine cannot be started in this position.
N.g!b: With the Performance Mode switch in the NORMAL position, the vehicle will pull away in second gear. How- ever, if more than 75 per cent of throttle is applied when the vehicle speed is between zero and 13 km/ h (8 mile / h), then first gear will be selected. From 13 to 61 km/ h (8 to 38 mile/ h) first gear is obtainable by 'kick-down'.
In 'sport' mode thevehicle pulls away in first gear and the transmission operatesfully in all four forward gears.
X300 VSM 1 Issue 1 August 1994
Page 191 of 521
Driveshafts & Final Drive
9.8 FINAL DRWE UNIT RENEW
SRO 51.25.13
. Disconnect vehicle battery ground lead.
. Support the vehicle at the rear and remove the rear road
wheels.
Disconnect brake pad wear sensor multi-plug at RH hub
carrier and remove tie straps from wishbone. Release
ABS speed sensors at
RH and LH hub carriers and remove
tie straps from wishbones.
. Remove rear brake calipers, see Section 12, and support
at bump stop. Disconnect main handbrake cable at com- pensator, short cables at joining piece and remove com- pensator.
. Remove fixings, FLEXIBLE coupling to differential DRIVE FLANGE.
CAUTIW: Under no circumstances must the flexible
coupling (or itsfixings) be loosened or removed
from the drive shaft flange.
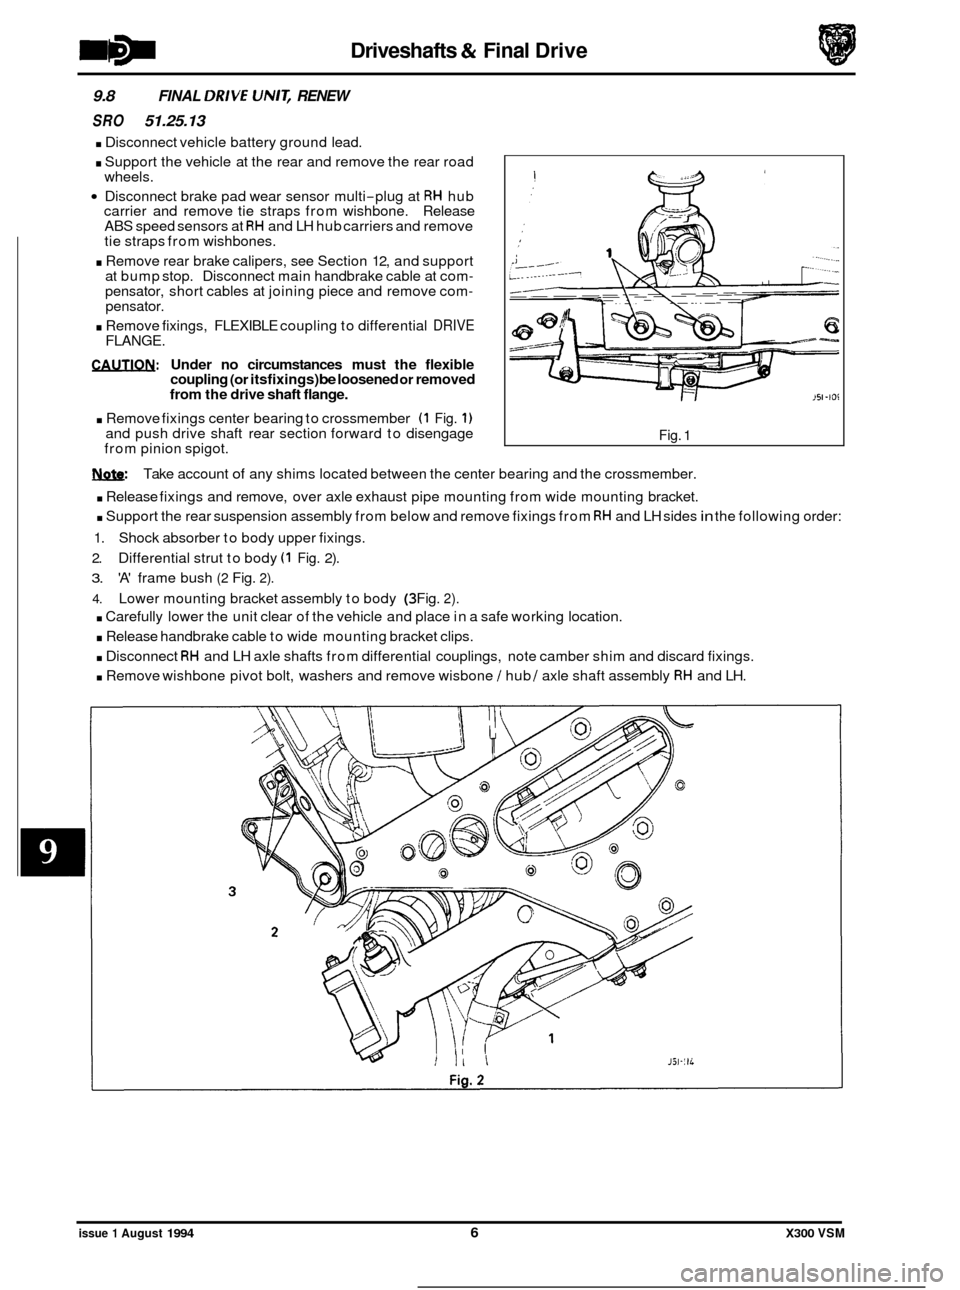
. Remove fixings center bearing to crossmember (1 Fig. 1) and push drive shaft rear section forward to disengage
from pinion spigot. Fig. 1
w: Take account of any shims located between the center bearing and the crossmember.
. Release fixings and remove, over axle exhaust pipe mounting from wide mounting bracket.
. Support the rear suspension assembly from below and remove fixings from RH and LH sides in the following order:
1. Shock absorber to body upper fixings.
2. Differential strut to body (1 Fig. 2).
3. 'A' frame bush (2 Fig. 2).
4. Lower mounting bracket assembly to body (3 Fig. 2).
. Carefully lower the unit clear of the vehicle and place in a safe working location.
. Release handbrake cable to wide mounting bracket clips.
. Disconnect RH and LH axle shafts from differential couplings, note camber shim and discard fixings.
. Remove wishbone pivot bolt, washers and remove wisbone / hub / axle shaft assembly RH and LH.
issue 1 August 1994 6 X300 VSM
Page 192 of 521
Driveshafts & Final Drive
. Remove upper link assembly from differential and wide mounting bracket / 'A' frame.
. Release fixings, 'A' frame to differential, 'A' frame to wishbone tie and wide mounting bracket to 'A' frame.
. Remove wishbone tie assembly, rear mounting bracket and pendulum assembly.
. Release fixings differential nose to wide mounting bracket.
. Assembly and fitting is the reversal of this procedure, taking note of the following:
Drive shaft must be aligned in accordance with Sub
-Section 9.2.
Renew all self locking nuts.
Renew all bolts that were originally fitted with thread locking adhesive.
Replace all locking wire and split pins (cotter pins).
Tighten all fixings to the specified torque.
Correct the final drive oil level
if required.
Check and adjust rear wheel camber setting as required.
9.9 AXLE SHAFT ASSEMBLY, RENEW
SRO
47.10.01
Disconnect vehicle battery ground lead.
. Slacken appropriate axle shaft hub nut.
. Support the vehicle at the rear and remove rear road
. Remove brake caliper in accordance with 70.55.03. Sec-
wheel.
tion 12, but do not disconnect hydraulics.
Slacken hub carrier fulcrum and remove ABS sensor from
hub carrier.
. Remove axle shaft hub nut and collar.
. Remove fixings axle shaft to differential output shaft
flange, note camber shim.
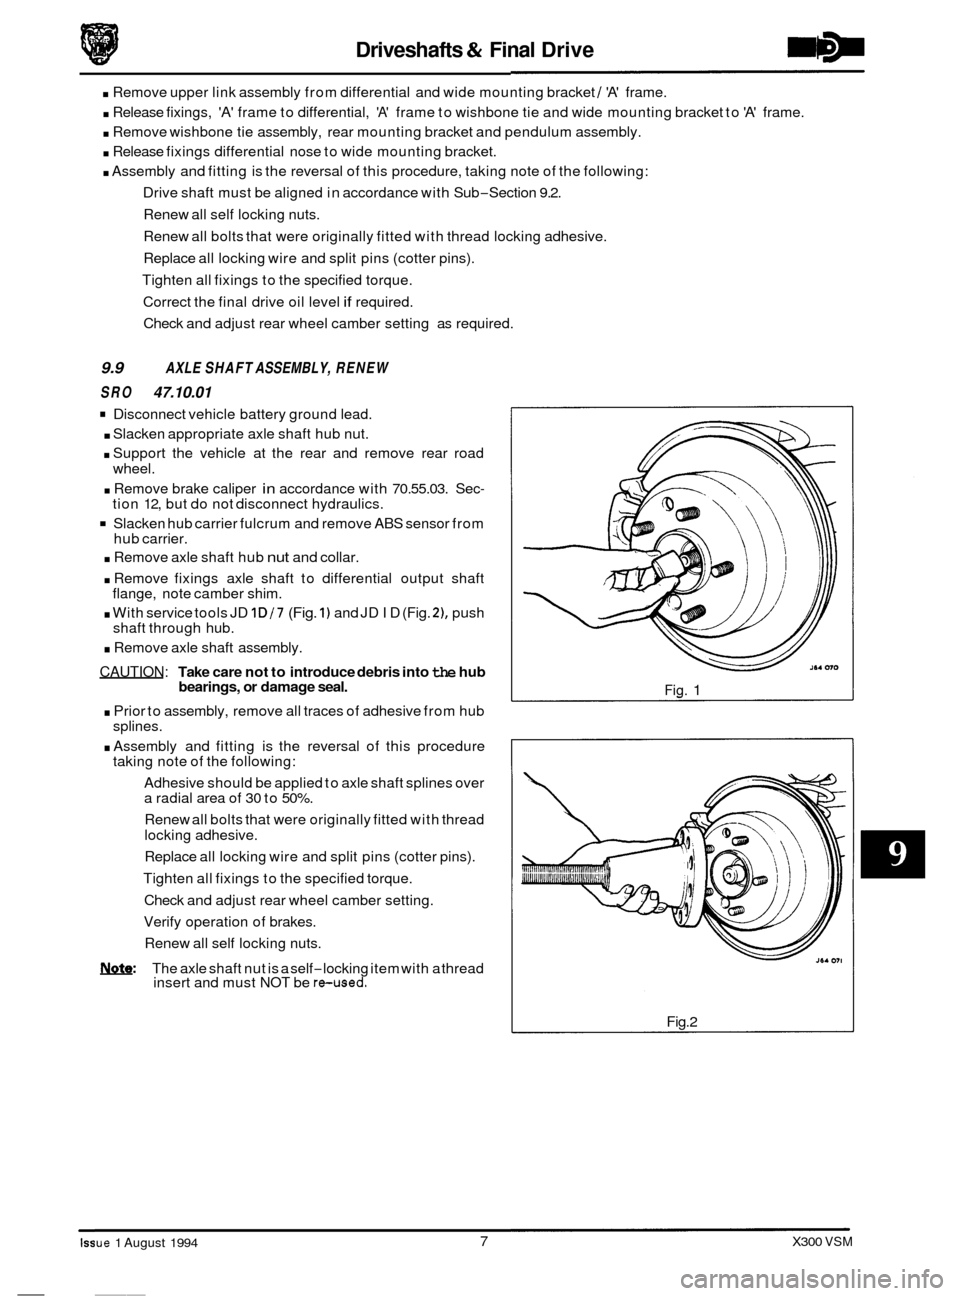
. With service tools JD 1D/7 (Fig. 1) and JD ID (Fig. 21, push
shaft through hub.
. Remove axle shaft assembly.
CAUTION: Take care not to introduce debris into the hub
bearings, or damage seal.
. Prior to assembly, remove all traces of adhesive from hub
. Assembly and fitting is the reversal of this procedure
Adhesive should be applied to axle shaft splines over
a radial area of
30 to 50%.
Renew all bolts that were originally fitted with thread
locking adhesive.
Replace all locking wire and split pins (cotter pins).
Tighten all fixings to the specified torque.
Check and adjust rear wheel camber setting.
Verify operation of brakes.
Renew all self locking nuts.
splines.
taking
note of the following:
0
NQ&: The axle shaft nut is a self-locking item with a thread
insert and must NOT be reused.
Fig. 1
Fig.2
- Iss ue 1 August 1994
__~
7 X300 VSM
Page 193 of 521
Driveshafts & Final Drive
9.10 REAR HUB BEARING, RENEW
SRO 64.15.14
9.11
SRO 64.15.15
REAR HUB OIL SEAL, RENEW
Removal
= Disconnect vehicle battery ground lead.
= Slacken appropriate axle shaft hub nut.
. Support the vehicle at the rear and remove rear road
m: To aid assembly, markthe position of the head of the
hub carrier fulcrum, relative to the wishbone slot.
. Disconnect handbrake cable inner and outer.
. Remove brake caliper in accordance with Section 12, but do not disconnect hydraulics.
. Slacken hub carrier fulcrum and remove ABS sensor from
hub carrier.
. Remove axle shaft hub nut (and discard), collar and hub
carrier fulcrum.
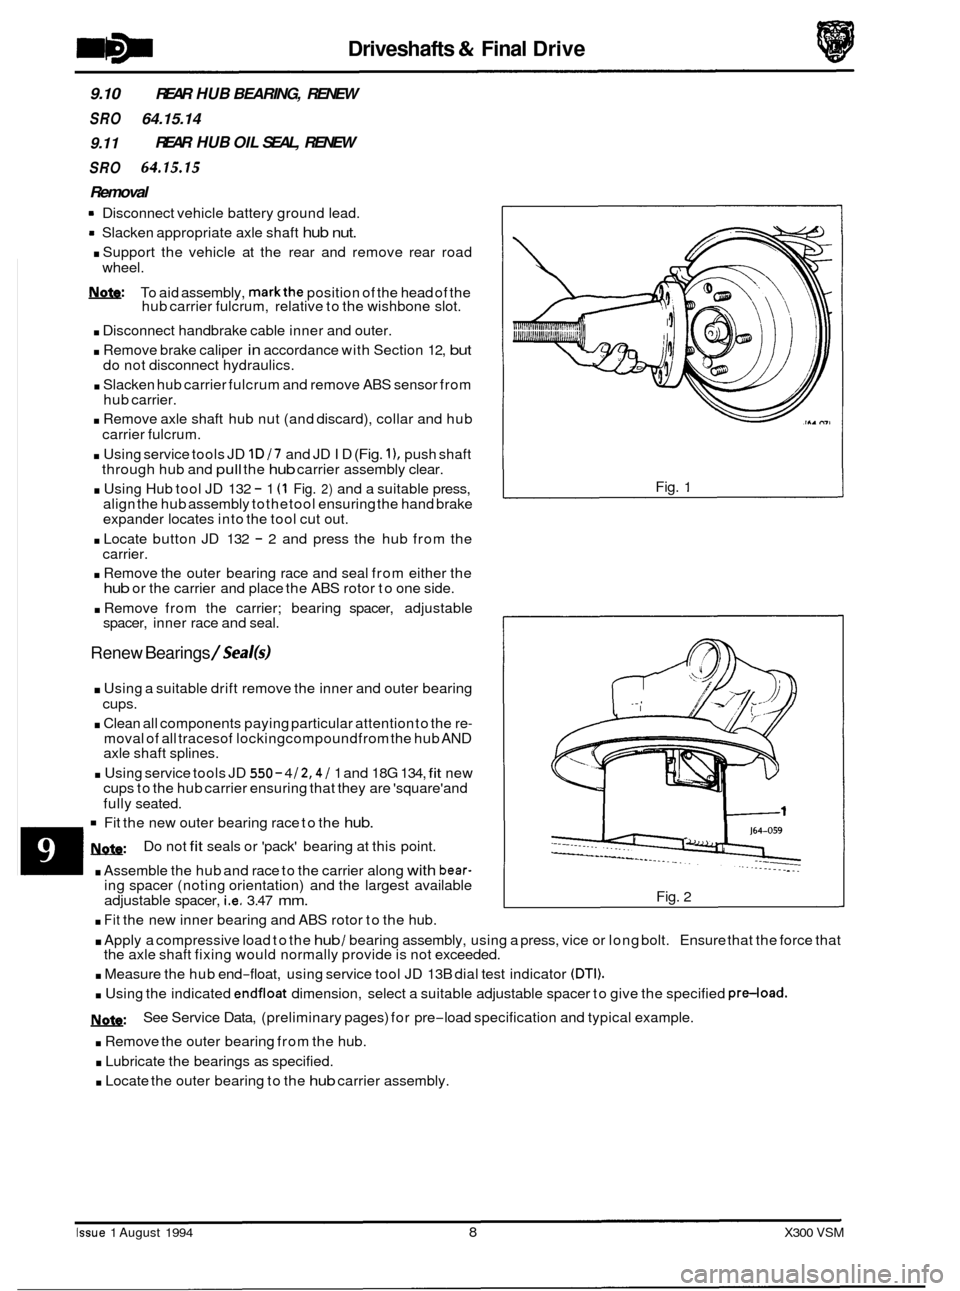
. Using service tools JD 1D/7 and JD ID (Fig. I), push shaft
through hub and pull the hub carrier assembly clear.
. Using Hub tool JD 132 - 1 (1 Fig. 2) and a suitable press,
align the hub assembly tothetool ensuring the hand brake
expander locates into the tool cut out.
. Locate button JD 132 - 2 and press the hub from the
carrier.
. Remove the outer bearing race and seal from either the hub or the carrier and place the ABS rotor to one side.
. Remove from the carrier; bearing spacer, adjustable
spacer, inner race and seal.
Renew Bearings /Sea/($
wheel.
. Using a suitable drift remove the inner and outer bearing
cups.
. Clean all components paying particular attention to the re- moval of all tracesof lockingcompoundfrom the hub AND
axle shaft splines.
. Using service tools JD 550 - 4 /2,4 / 1 and 18G 134, fit new
cups to the hub carrier ensuring that they are 'square'and
fully seated.
Fit the new outer bearing race to the hub.
&&Q:
. Assemble the hub and race to the carrier along with bear-
Do not fit seals or 'pack' bearing at this point.
ing spacer (noting orientation) and the largest available
adjustable spacer,
i.e. 3.47 mm.
. Fit the new inner bearing and ABS rotor to the hub. Fig.
1
Fig.
2
. Apply a compressive load to the hub / bearing assembly, using a press, vice or long bolt. Ensure that the force that
. Measure the hub end-float, using service tool JD 13B dial test indicator (DTI).
. Using the indicated endfloat dimension, select a suitable adjustable spacer to give the specified pre-load.
m:
. Remove the outer bearing from the hub.
. Lubricate the bearings as specified.
. Locate the outer bearing to the hub carrier assembly.
the axle shaft
fixing would normally provide is not exceeded.
See Service Data, (preliminary pages) for pre
-load specification and typical example.
Issue 1 August 1994 8 X300 VSM
Page 222 of 521
SECTION CONTENTS
Subsection Tit/e SRO Page
i to iv ............ Preliminary Pages .................................................................... i
12.1 ............. Anti-Lock Braking System (ABS) General Description ................................... 12.1
12.1.2.
........... Anti-lock Braking/ Traction Contd Operation ........................................ 12.3
12.1.3
............ Anti-lock Braking Operation ........................................................ 12.4
12.1.4
............ Actuation Components ............................................................. 12.5
12.1.5
............ ABSComponents ................................................................. 12.6
12.1.6
............ Calipers ........................................................................\
. 12.7
12.1.7
............ Parking Brake .................................................................... 12.9
12.1.8
............ Wheel Speed Sensors ............................................................. 12.11
12.1.9
............ Hydraulic Operation - ABS CM .................................................... 12.12
12.2
............. Fault Diagnosis and Testing ........................................................ 12.16
12.4
............. Brake System Bleeding ............................................................ 12.19
12.1.10
.......... Hydraulic Operation - ABS /TC CM ................................................. 12.14
12.3
............. Brake Fluid Level Check .......................................................... 12.18
12.4.1
............ System Bleeding - General Instructions .............................................. 12.19
12.4.2.
........... System Bleeding After Brake Fluid Renewal .......................................... 12.19
12.4.3
............ System Bleeding After Tandem Master Cylinder Renewal ............................... 12.19
12.4.4.
........... System Bleeding Afier Hydraulic Control Module Renewal ............................. 12.20
12.4.5.
........... Bleeding After Renewal of Caliper .................................................. 12.20
12.5
............. General Fitting Instructions ........................................................ 12.2 1
12.5.1 ............ General Fitting Instructions, Brake Fluid ............................................. 12.2 1
12.5.2. ........... General Fitting Instructions, Hoses .................................................. 12.2 1
12.5.3 ............ General Fitting Instructions, Pipes ................................................... 12.2 1
12.6 ............. Rear Wheel Speedsensor- Renew ............................... 70.60.04 ......... 12.22
12.7
............. Hydraulic Control Module- Renew ............................... 70.60.18/ 19 ..... 12.23
12.8
............. Pressure Conscious Reducing Valves .............................. 70.60.21 ......... 12.25
12.9
............. ABS/TCCM - Renew .......................................... 70.60.02/20 ..... 12.26
X300 VSM i Issue 1 August 1994
Page 224 of 521
12.1 ANTI-LOCK BRAKING SYSTEM (ASS), GENERAL DESCRIPTION
The anti-lock braking system (ABS) components are combined with a hydraulic booster and tandem master cylinder (TMC) to provide a two-circuit braking system. The anti-lock braking system comprises the following components:
0 Four inductive wheel speed sensors, hub end mounted
0 ABS warning light
0 Hydraulic module.
The hydraulic module consists of an electric motor driven pump,
two low pressure accumulators, valve block and an
ABS electronic control module.
m: Electronic control modules for vehicles without traction control are designated ABS CM. Control modules for
vehicles with traction control are designated ABS /TC CM.
The valve block houses solenoid operated valves which are activated by voltage signals from the control module. The
signals are generated using wheel speed information received from the wheel speed sensors.
For vehicles without traction control the valves operate on three circuits, two front and one rear, as necessary to pre
- vent wheel locking during braking. Brake pressure is modulated individually at thefront wheels and collectively at the
rear. Rear wheel control operates on a 'select low' principle i.e. locking in either wheel is sensed, and controlled brake
pressure is applied to both wheels.
For vehicles with traction control the valves operate on four circuits. During ABS control the rear wheel are controlled
on a 'select low' principle (as above), but during traction control operation the rear wheels are controlled individually.
0
1yQfB: Functional and diagnostic information for the ABS CM and the ABS/TC CM is contained in the Electrical Diag-
nostic Manual (EDM), Section 12.
ABS Warning lamp / Traction Control Warning lamp /Fluid level Indicator
The ABS and traction control warning lamps, mounted in the instrument panel, indicate a fault in the ABS or traction
control. These systems are inhibited or disabled when the lamps are lit, although conventional braking is unaffected.
When the ignition is switched on, an ABS self test is initiated. During this test, the ABS and traction control warning
lamps are
lit for approximately 1.7 seconds and then extinguish. A fault is indicated if the warning lamps remain lit or
come on whilst the vehicle is being driven.
W: The ABS self test is masked by the 5 second lamp test initiated when the ignition is switched on.
The fluid level indicator lamp, mounted in the instrument panel, is
lit when the brake fluid falls below the minimum
mark on the brake fluid reservoir.
ABS / Traction Control - Inhibit / Disable
Faults conditions are detected by the ABS/TC CM which disables the ABS and traction control until the fault is rectified.
The ABS and traction control warning lights on the instrument pack remains lit whilst a fault exists. The system will
be disabled when the following conditions occur:
0
0 Valve failure
0 Sensor failure
0 Main driver failure (internal ABS /TC CM fault)
0 Redundancy error (internal ABS JTC CM fault)
0 Overvoltage J undervoltage
0 Pump motor failure.
0 Throttle valve actuator motor failure (traction control vehicles only).
0 Throttle valve actuator potentiometer failure (traction control warning light only).
X300 VSM 1 Issue 1 August 1994
Page 226 of 521
Brakes (a)
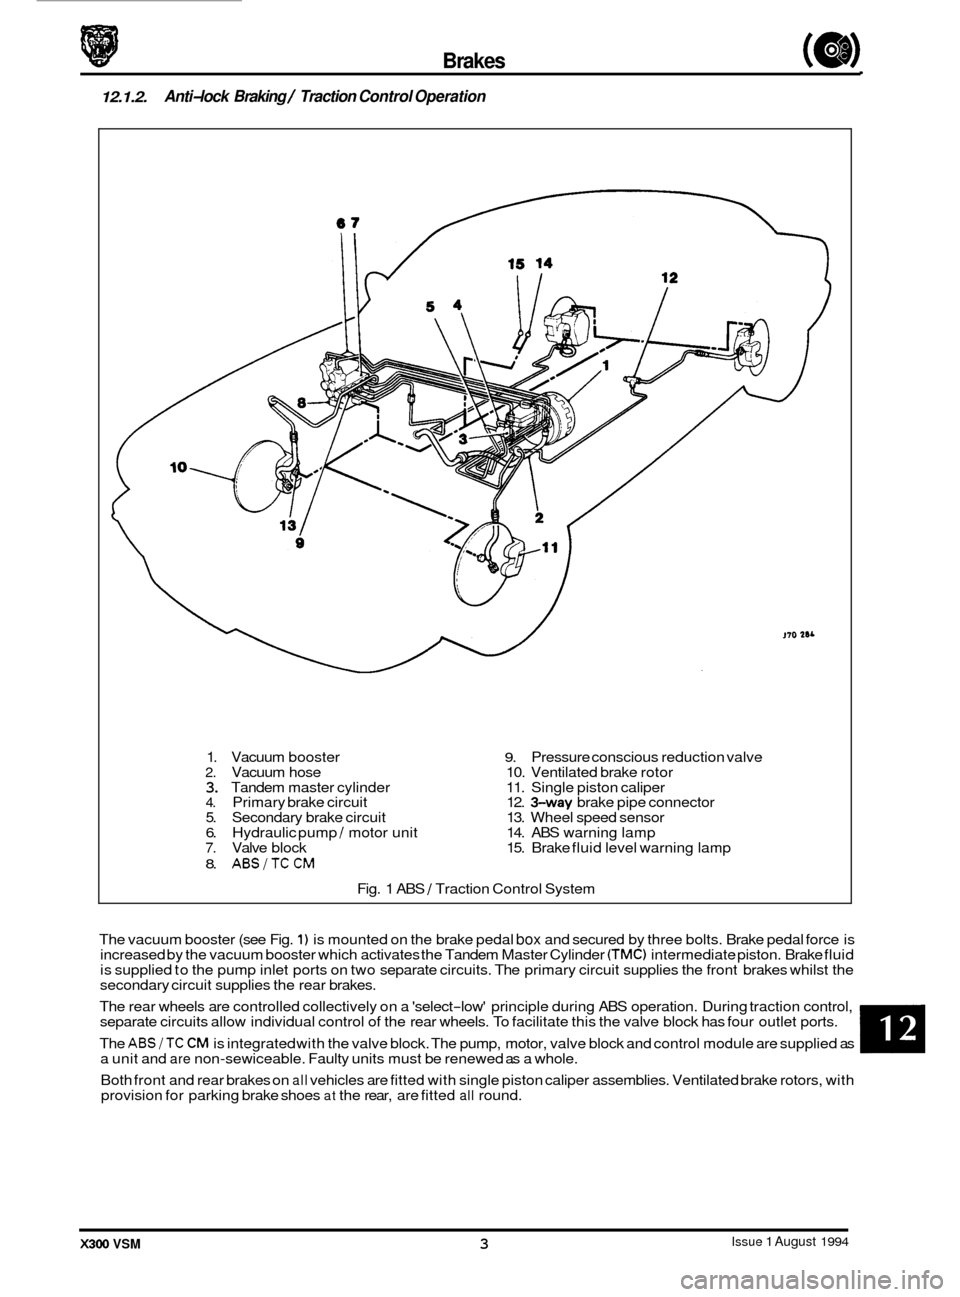
12.1.2. Anti-lock Braking / Traction Control Operation
The rear wheels are controlled collectively on a 'select-low' principle during ABS operation. During traction control,
separate circuits allow individual control of the rear wheels. To facilitate this the valve block has four outlet ports.
The
ABS/TC CM is integrated with the valve block. The pump, motor, valve block and control module are supplied as
a unit and are non-sewiceable. Faulty units must be renewed as a whole.
Both front and rear brakes on
all vehicles are fitted with single piston caliper assemblies. Ventilated brake rotors, with
provision for parking brake shoes at the rear, are fitted all round.
0
Issue 1 August 1994 X300 VSM 3
1. Vacuum booster 9. Pressure conscious reduction valve 2. Vacuum hose 10. Ventilated brake rotor 3. Tandem master cylinder 11. Single piston caliper 4. Primary brake circuit 12. %way brake pipe connector
5. Secondary brake circuit 13. Wheel speed sensor
6. Hydraulic pump / motor unit 14. ABS warning lamp 7. Valve block 15. Brake fluid level warning lamp
8. ABS/TCCM
Fig. 1 ABS / Traction Control System
The vacuum booster (see Fig.
1) is mounted on the brake pedal box and secured by three bolts. Brake pedal force is
increased by the vacuum booster which activates the Tandem Master Cylinder (TMC) intermediate piston. Brake fluid
is supplied to the pump inlet ports on two separate circuits. The primary circuit supplies the front brakes whilst the
secondary circuit supplies the rear brakes.
Page 227 of 521
Pressure conscious reduction valves (PCRVs) are fitted between the outlet of the valve block and the rear brake circuit
to optimize. The valves are fitted to prevent over braking due to the increased size of the rear brake calipers which are
required for traction control. Up to a threshold of 15 bar, brake pressure to the front and rear brakes is equal. Above
15 bar the PCRVs reduce pressure to the rear brakes to provide a closer balance between front and rear brakes and
optimize road adhesion.
Wheel speed sensors are fitted to all wheels to transmit wheel speed information to the control module. The module
uses this information to modulate brake pressure during anti
-lock braking or traction control.
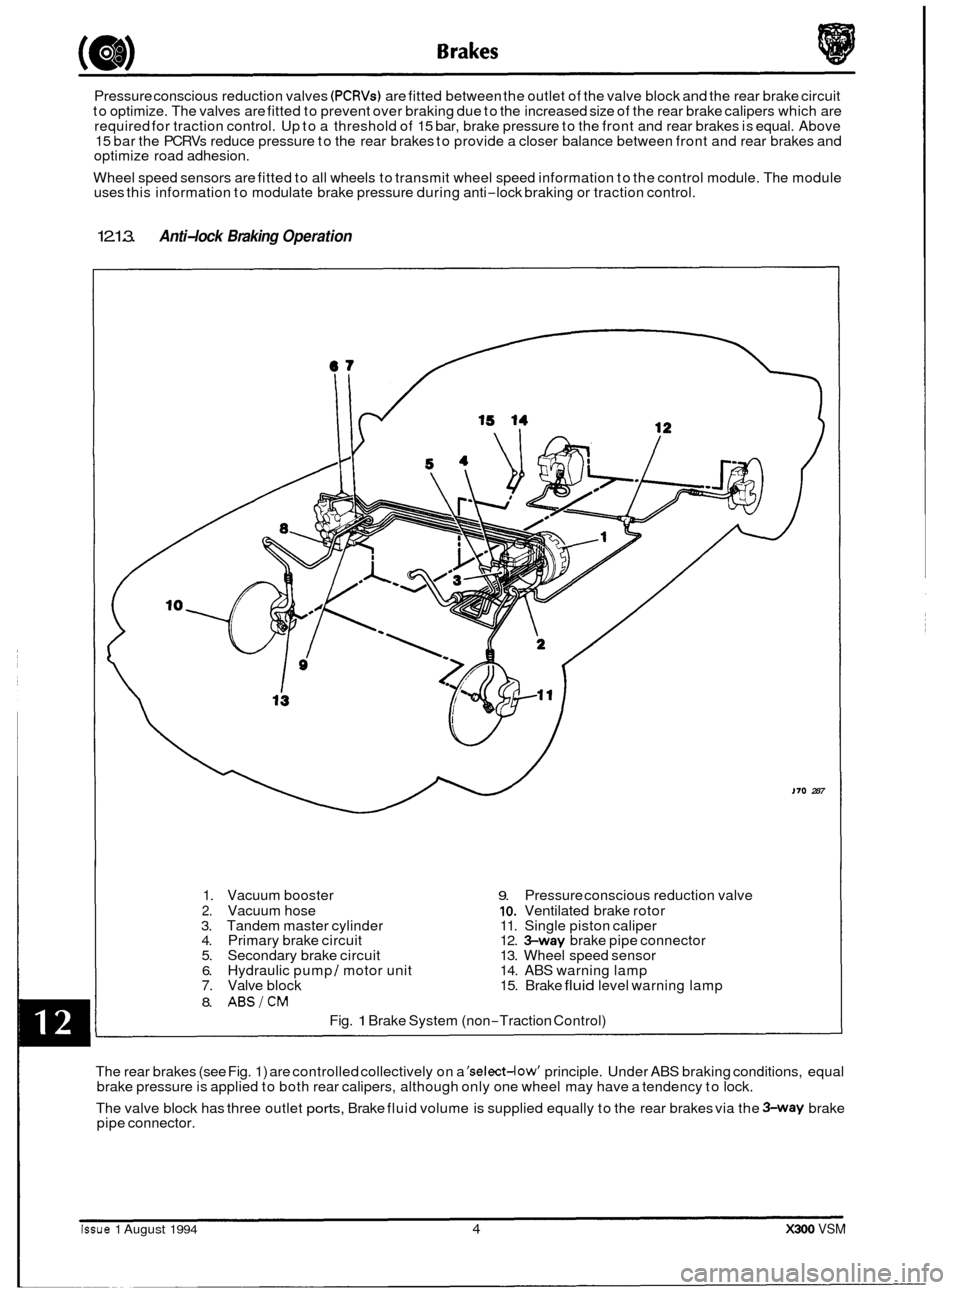
12.1.3. Anti-lock Braking Operation
170 287
1. Vacuum booster 9. Pressure conscious reduction valve
2. Vacuum hose 10. Ventilated brake rotor
3. Tandem master cylinder 11. Single piston caliper
4. Primary brake circuit 12.
%way brake pipe connector
5. Secondary brake circuit 13. Wheel speed sensor
6. Hydraulic pump I motor unit 14. ABS warning lamp 7. Valve block 15. Brake fluid level warning lamp
8. ABSICM
Fig. 1 Brake System (non-Traction Control)
The rear brakes (see Fig. 1) are controlled collectively on a
'select-low' principle. Under ABS braking conditions, equal
brake pressure is applied to both rear calipers, although only one wheel may have a tendency to lock.
The valve block has three outlet
ports, Brake fluid volume is supplied equally to the rear brakes via the %way brake
pipe connector.
Issue 1 August 1994 4 X300 VSM