ECU JEEP CJ 1953 Owner's Guide
[x] Cancel search | Manufacturer: JEEP, Model Year: 1953, Model line: CJ, Model: JEEP CJ 1953Pages: 376, PDF Size: 19.96 MB
Page 125 of 376
'Jeep'
UNIVERSAL
SERIES
SERVICE
MANUAL
E
is generally caused by excessive
engine
idle speed
in
combination with retarded ignition timing,
engine
heat soak or the use cf low octane fuel.
Should
engine
dieseling
(engine
running after ignition key is turned off) be experienced on V-6
engine
equipped vehicles, installation of Idle Stop
Valve
Kit
Part
No.
991722
will
correct the
difficulty.
E-43.
Fast
Idle Adjustment
No fast idle speed adjustment is required.
Fast
idle is controlled by the curb idle speed adjustment
screw.
If curb idle speed is correctly set and the choke rod is properly adjusted, fast idle speed
will
be correct;
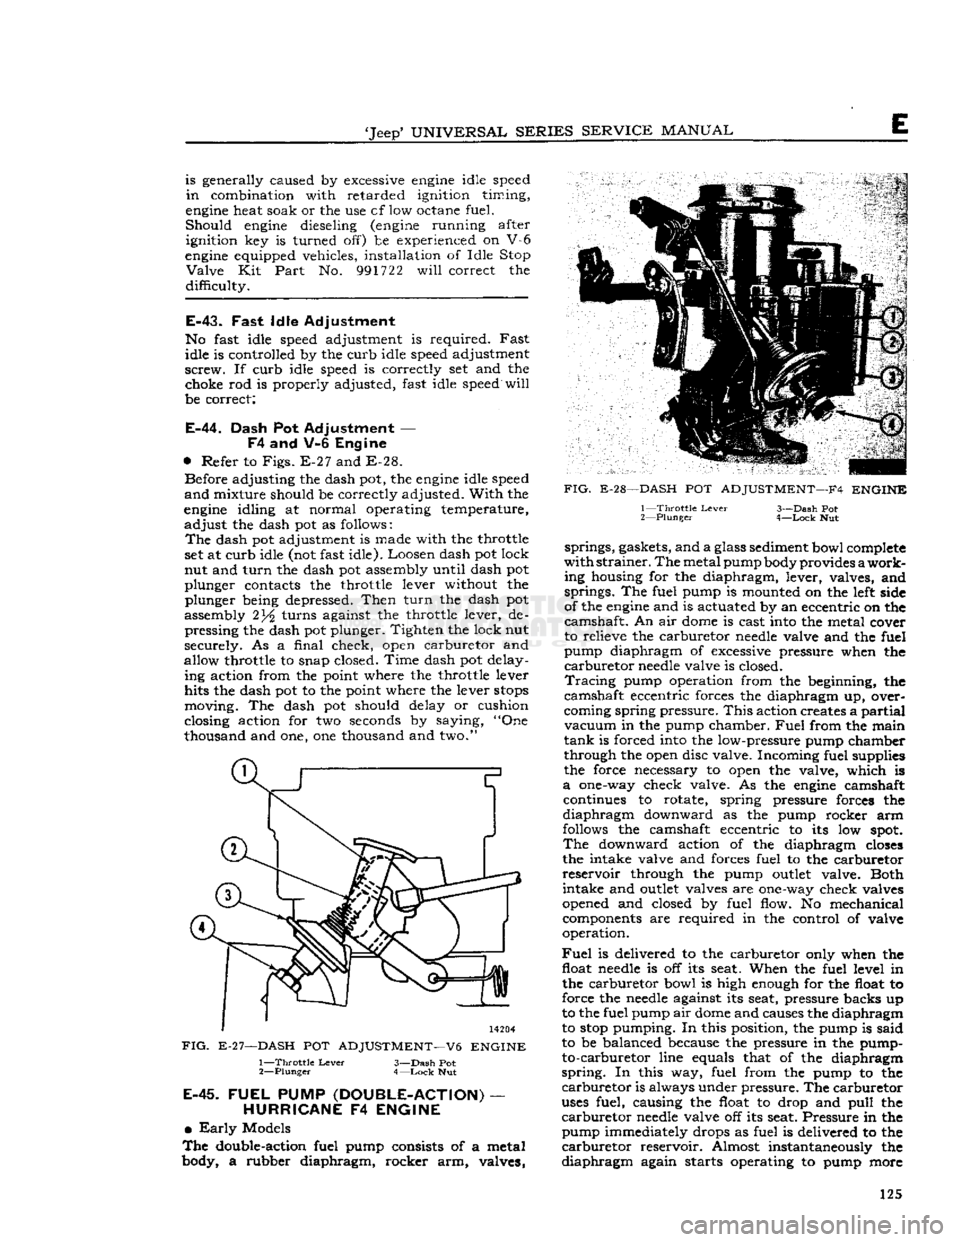
E-44.
Dash Pot Adjustment —
F4
and V-6 Engine
•
Refer to
Figs.
E-27 and E-28. Before adjusting the dash pot, the
engine
idle speed
and
mixture should be correctly adjusted.
With
the
engine
idling at normal operating temperature,
adjust
the dash pot as follows:
The
dash pot adjustment is made with the throttle
set at curb idle (not fast idle). Loosen dash pot lock
nut and
turn
the dash pot assembly until dash pot
plunger contacts the throttle lever without the plunger being depressed.
Then
turn
the dash pot
assembly 2turns against the throttle lever, de pressing the dash pot plunger. Tighten the lock nut
securely. As a final check, open carburetor and
allow throttle to snap closed. Time dash pot delay ing action from the point where the throttle lever
hits the dash pot to the point where the lever
stops
moving. The dash pot should delay or cushion
closing action for two seconds by saying, "One
thousand and one, one thousand and two."
14204
FIG.
E-27—DASH
POT
ADJUSTMENT—V6
ENGINE
1—
Throttle
Lever
3—Dash Pot
2—
Plunger
4—Lock
Nut
E-45.
FUEL
PUMP
(DOUBLE-ACTION)
—
HURRICANE
F4
ENGINE
•
Early
Models
The
double-action fuel pump consists of a metal
body, a rubber diaphragm, rocker arm, valves,
FIG.
E-28—DASH
POT
ADJUSTMENT—F4
ENGINE
1—
Throttle
Lever
3—Dash Pot
2—
Plunger
4—Lock
Nut springs, gaskets, and a glass sediment bowl complete
with
strainer.
The
metal pump body provides
a
work
ing housing for the diaphragm, lever, valves, and springs. The fuel pump is mounted on the left side
of the
engine
and is actuated by an eccentric on the
camshaft. An air
dome
is cast into the metal cover
to relieve the carburetor
needle
valve and the fuel
pump diaphragm of excessive pressure when the
carburetor
needle
valve is closed.
Tracing
pump operation from the beginning, the
camshaft eccentric forces the diaphragm up, over
coming spring pressure.
This
action creates a
partial
vacuum
in the pump chamber.
Fuel
from the main
tank
is forced into the low-pressure pump chamber
through the open disc valve. Incoming fuel supplies
the force necessary to open the valve, which is
a
one-way check valve. As the
engine
camshaft continues to rotate, spring pressure forces the
diaphragm
downward as the pump rocker arm
follows the camshaft eccentric to its low
spot.
The
downward action of the diaphragm
closes
the intake valve and forces fuel to the carburetor
reservoir
through the pump
outlet
valve. Both intake and
outlet
valves are one-way check valves
opened and closed by fuel flow. No mechanical components are required in the control of valve
operation.
Fuel
is delivered to the carburetor only when the float
needle
is off its seat. When the fuel level in the carburetor bowl is high enough for the float to
force the
needle
against its seat, pressure backs up
to the fuel pump air
dome
and causes the diaphragm
to
stop
pumping. In this position, the pump is said
to be balanced because the pressure in the pump- to-carburetor line equals that of the diaphragm
spring.
In this way, fuel from the pump to the
carburetor
is always under pressure. The carburetor
uses
fuel, causing the float to drop and
pull
the
carburetor
needle
valve off its seat. Pressure in the pump immediately drops as fuel is delivered to the
carburetor
reservoir. Almost instantaneously the
diaphragm
again starts operating to pump more 125
Page 126 of 376
FUEL
SYSTEM
|
11893
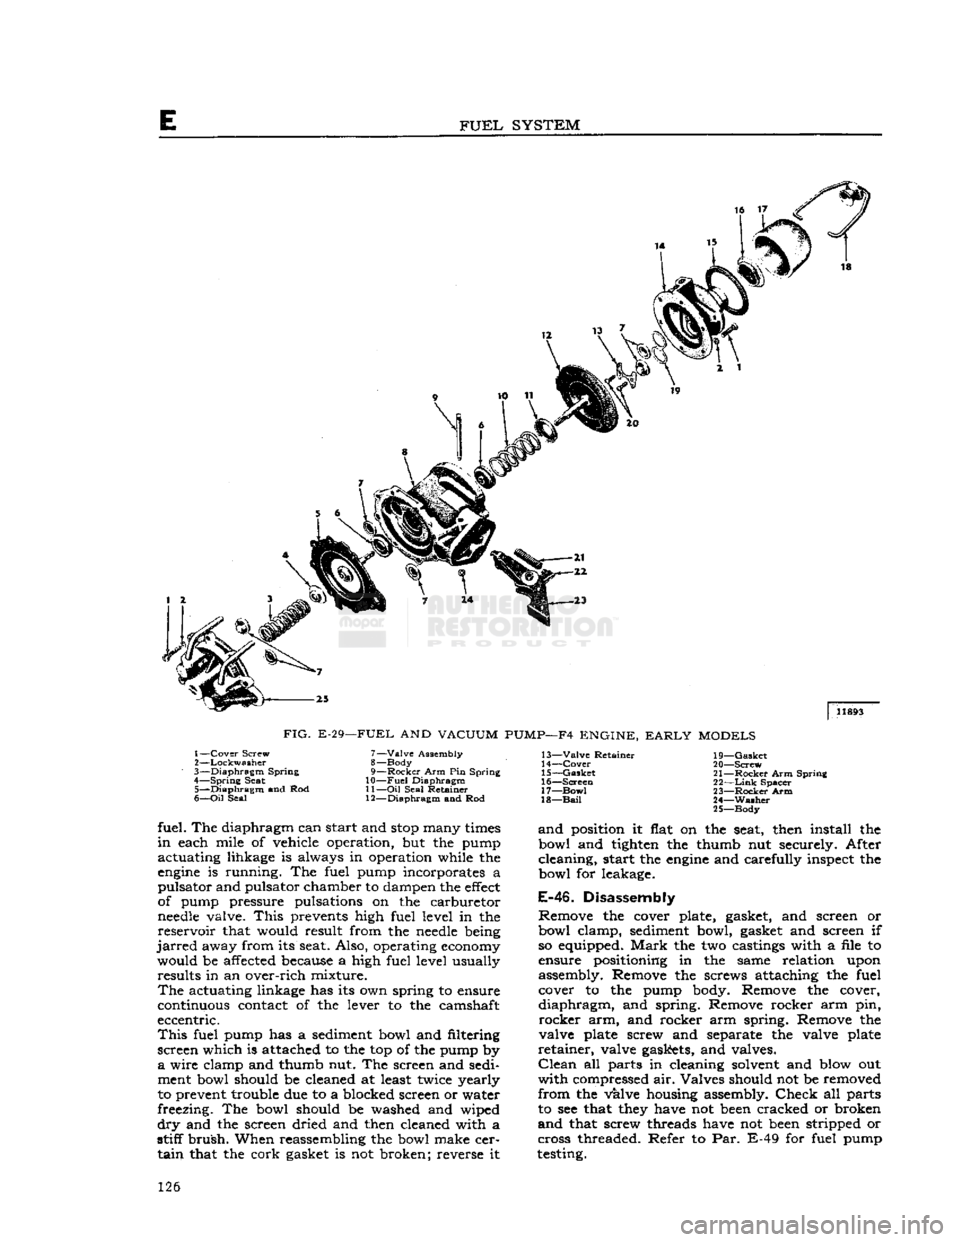
FIG.
E-29—FUEL
AND
VACUUM
PUMP—F4
ENGINE,
EARLY
MODELS
1—
Cover
Screw
2—
Lockwasher
3—
Diaphragm
Spring
4—
Spring
Seat 5—
Diaphragm
and Rod
6—
Oil
Seal 7—
Valve
Assembly
8— Body
9—
Rocker
Arm Pin Spring
10—
Fuel
Diaphragm
11—
Oil
Seal Retainer
12—
Diaphragm
and Rod 13—
Valve
Retainer
14—
Cover
15—
Gasket
16—
Screen
17—
Bow!
18—
Bail
19—
Gasket
20—
Screw
21—
Rocker
Arm Spring
22—
Link
Spacer
23—
Rocker
Arm
24—
Washer
25—
Body
fuel. The diaphragm can start and
stop
many
times
in
each mile of vehicle operation, but the pump
actuating lihkage is always in operation while the
engine
is running. The fuel pump incorporates a
pulsator and pulsator chamber to dampen the
effect
of pump pressure pulsations on the carburetor
needle
valve.
This
prevents high fuel level in the
reservoir
that would result from the
needle
being
jarred
away from its seat. Also, operating
economy
would be affected because a high fuel level usually results in an over-rich mixture.
The
actuating linkage has its own spring to ensure
continuous contact of the lever to the camshaft
eccentric.
This
fuel pump has a sediment bowl and filtering
screen which is attached to the top of the pump by
a
wire clamp and thumb nut. The screen and sedi
ment bowl should be cleaned at least twice yearly
to prevent trouble due to a blocked screen or water
freezing. The bowl should be washed and wiped
dry
and the screen dried and then cleaned with a
stiff
brush.
When reassembling the bowl make cer
tain
that the cork gasket is not broken; reverse it
and
position it flat on the seat, then install the
bowl and tighten the thumb nut securely. After
cleaning, start the
engine
and carefully inspect the
bowl for leakage.
E-46.
Disassembly
Remove the cover plate, gasket, and screen or
bowl clamp, sediment bowl, gasket and screen if so equipped.
Mark
the two castings with a file to
ensure positioning in the same relation upon
assembly. Remove the screws attaching the fuel cover to the pump body. Remove the cover,
diaphragm,
and spring. Remove rocker arm pin,
rocker
arm, and rocker arm spring. Remove the
valve plate screw and separate the valve plate
retainer,
valve gaskets, and valves.
Clean
all parts in cleaning solvent and blow out
with
compressed air. Valves should not be removed
from
the valve housing assembly.
Check
all parts
to see that
they
have not
been
cracked or broken
and
that screw threads have not
been
stripped or
cross threaded. Refer to Par. E-49 for fuel pump
testing. 126
Page 127 of 376
'Jeep'
UNIVERSAL
SERIES
SERVICE
MANUAL
E
E-47.
Reassembly
•
Refer to Fig. E-29.
Install
the valve gaskets, valves, valve retainer and
secure them with the valve retainer screws. Make
sure that the inlet and
outlet
valves are in their proper positions. Place the diaphragm spring re
tainer in position on the diaphragm
pull
rod
and
install diaphragm spring. Position the
dia
phragm assembly in pump
body
and attach the
cover to pump body, with file marks aligned, with
the six attaching screws. Do not draw the screws
up tight.
Install
rocker arm spring, rocker arm
pin
washers, rocker arm and rocker arm pin.
With
rocker
arm positioned on the diaphragm rod, draw
the six pump
body
screws up evenly and securely.
Install
the filter screen, cork gasket and sediment
bowl and secure them firmly with the thumb screw
on the bowl clamp.
E-48.
Vacuum
Pump
The
double-action fuel pump resembles two single-
action pumps placed one
above
the other. A single
fuel pump rocker arm actuates the two separate diaphragms. One diaphragm is part of the fuel
delivery pump and operates as described in Par.
E-45.
The other diaphragm is part of the vacuum
pump and operates as described here.
As
the actuating lever forces the diaphragm upward against spring pressure, air is forced through the
outlet
port
into
the
engine's
intake manifold. On
the return stroke, spring pressure forces the
dia
phragm downward, creating a
partial
vacuum and
opening the inlet valve. In this manner, air is pumped out of the windshield wiper motor and
into
the intake manifold. When the wiper motor is shut off, manifold vacuum holds the diaphragm against its spring so that the
full
motion of the actuating
lever is not accompanied by a
complete
up-and-
down motion of the diaphragm.
When
the windshield wiper motor is turned on, but manifold vacuum is greater than the vacuum
created by the
booster
pump, air
flows
from the
wiper motor through both valves of the vacuum
booster.
As manifold vacuum drops off as a result
of the
engine
operating under low
speed
and high load, the vacuum created by the vacuum
booster
will
be greater than
engine
intake manifold vacuum
and
the pump
will
operate the wiper motor when the wiper control switch is turned on.
•
Refer to Fig. E-29. Remove the
eight
cover attaching screws and
lockwashers, and remove the cover, diaphragm
spring
and spring seat. Detach the diaphragm rod
from the rocker arm and remove the diaphragm.
The
valve assemblies are pressed
into
the cover
and
body
and lightly staked. They may be removed
with the point of a knife blade. If installing new valves be sure the inlet and
outlet
valves are
correctly positioned and stake them lightly with
a
small punch.
Assemble the vacuum pump in the reverse order
of disassembly, drawing the cover attaching screws up evenly and tightly.
E-49.
Fuel
Pump
Testing
Four
tests
are presented in following paragraphs to
test
for proper operation of the fuel pump. In addi
tion, check the following:
a.
Check
for secure mounting of the fuel pump.
The
rocker arm may be working the entire pump
up and down, rather than just the pump
dia
phragms.
b. Remove and clean the fuel sediment bowl.
c.
Check
all fuel lines.
E-50.
Volume
Check
To
measure fuel pump capacity (amount of fuel
delivered in a given time) disconnect the pump-to-
carburetor
line at the carburetor end. Place the
open
end of the line in a suitable container.
Start
the
engine
and operate at normal idle speed.
Delivery
should be one quart U.S. [1 ltr.] within
one minute.
E-51.
Pressure
Check
To
measure fuel pump pressure (force of fuel de
livery)
disconnect the pump-to-carburetor line
at the carburetor end. Plug a pressure
gauge
and T-fitting
into
the
open
end of this line and
into
the
carburetor.
Start
the
engine
and operate at normal
idle speed. Pressure should be 2J4 to 3% psi.
[0,716
a
0,264
kg-cm2] at 1800 rpm. and at 16"
[406 mm.]
above
the
outlet.
E-52.
Vacuum
Check
To
measure fuel pump vacuum (pull of. the pump
at the inlet side) disconnect the pump-to-fuel-tank
line at the fuel pump. Attach a vacuum
gauge
to the fuel pump inlet.
Start
the
engine,
accelerate to
specified speed, and hold this
engine
speed
while
taking a
gauge
reading. Permissible
gauge
reading
is 8* [203 mm.] of mercury [Hg] at 1200 rpm. and
10j^'
[267 mm.] at 1800 rpm.
E-53.
Vacuum
Booster
Check
To
test
the condition of the vacuum
booster
pump,
disconnect both inlet and
outlet
lines at the pump.
Attach
a vacuum
gauge
to the windshield wiper
connection at the pump.
Start
the
engine,
accelerate
to
2000
rpm., and hold this
engine
speed
while taking a
gauge
reading. Permissible
gauge
reading
is 10* to 14" [254 a 356 cm.] of mercury [Hg].
E-54.'
FUEL
PUMP
(SINGLE-ACTION)
—
HURRICANE
F4
ENGINE
•
Early
Models.
Vehicles with electric windshield wiper motors are
equipped with a single-action fuel pump (Fig.
E-30).
The fuel pump cam lever is activated by an eccentric on the
engine
camshaft. When the
car
buretor float
needle
valve closes, accumulation of
fuel in the pump
extends
the diaphragm spring.
This
action causes the rocker arm linkage to be
come
inoperative until the pressure on the
dia
phragm and spring is reduced. The fuel pump dis
charge pressure is thus controlled by the diaphragm
spring.
This
provides a steady supply of fuel to the
carburetor
at a fairly constant pressure. 127
Page 128 of 376
E
FUEL
SYSTEM
E-55.
Fuel
Pump
Removal
To
remove the fuel pump from the engine, dis
connect the inlet and
outlet
fuel lines. Remove the two fuel pump body attaching nuts, lock
washers,
and washers, and pull the fuel pump and gasket free of the engine.
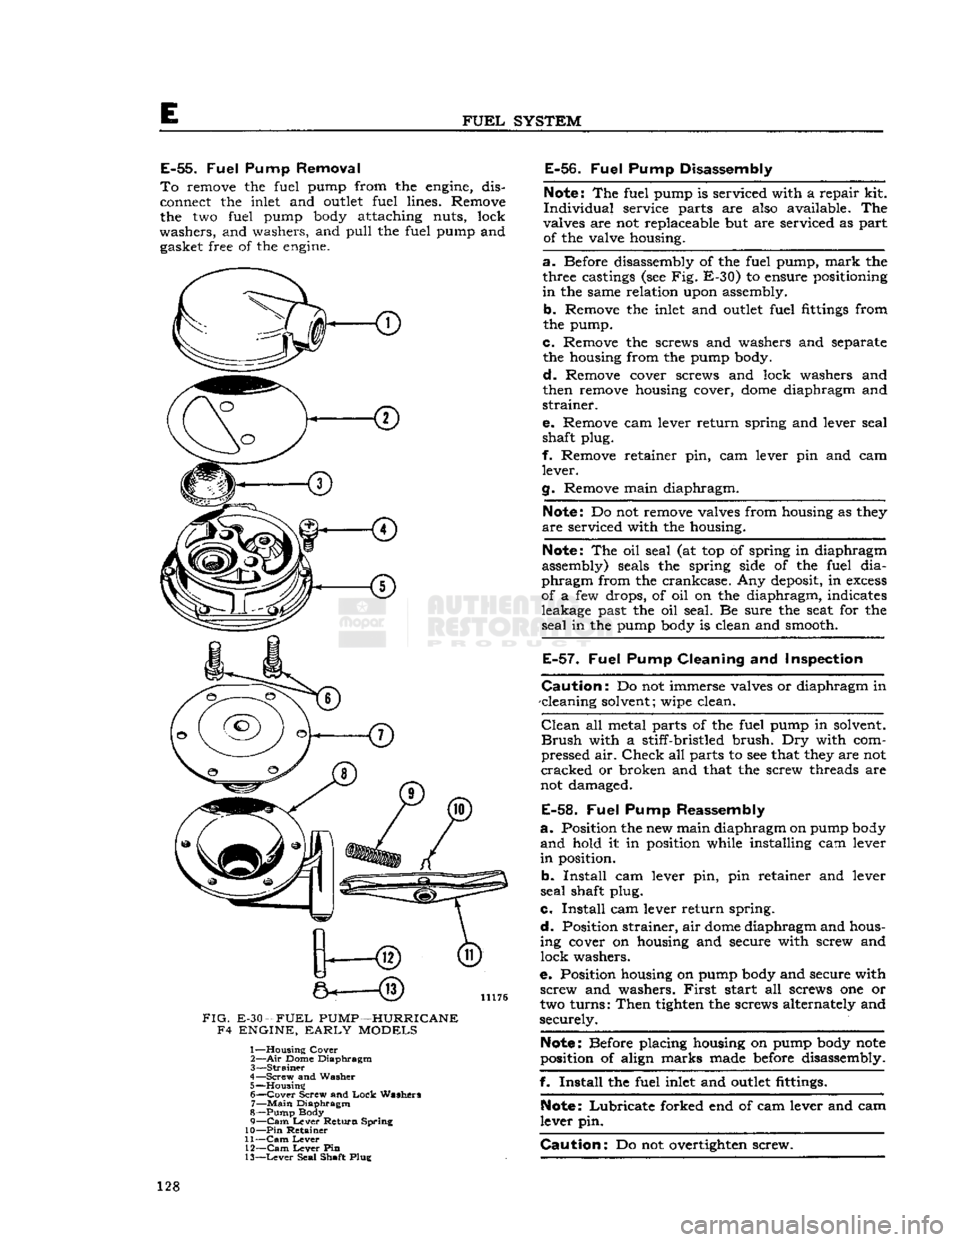
FIG.
E-30
—
FUEL
PUMP—HURRICANE
F4 ENGINE,
EARLY
MODELS
1—
Housing
Cover
2— Air
Dome
Diaphragm
3—
Strainer
4—
Screw
and
Washer
5—
Housing
6—
Cover
Screw
and
Lock
Washers
7—
Main
Diaphragm
8—
Pump
Body
9— Cam
Lever
Return
Spring
10— Pin
Retainer
11— Cam
Lever
12— Cam
Lever
Pin
13—
Lever
Seal
Shaft
Plug
E-56.
Fuel
Pump
Disassembly
Note:
The fuel pump is serviced with a repair kit.
Individual
service parts are also available. The
valves are not replaceable but are serviced as part of the valve housing.
a.
Before disassembly of the fuel pump,
mark
the
three castings (see Fig. E-30) to ensure positioning
in
the same relation upon assembly. b. Remove the inlet and
outlet
fuel fittings from
the pump.
c. Remove the screws and washers and separate the housing from the pump body.
d.
Remove cover screws and lock washers and
then remove housing cover,
dome
diaphragm and
strainer.
e.
Remove cam lever return spring and lever seal
shaft plug.
f. Remove retainer pin, cam lever pin and cam
lever.
g. Remove main diaphragm.
Note:
Do not remove valves from housing as they
are
serviced with the housing.
Note:
The oil seal (at top of spring in diaphragm
assembly) seals the spring side of the fuel
dia
phragm
from the crankcase. Any deposit, in
excess
of a few drops, of oil on the diaphragm, indicates
leakage past the oil seal. Be sure the seat for the
seal
in the pump body is clean and smooth.
E-57.
Fuel
Pump
Cleaning
and
Inspection
Caution:
Do not immerse valves or diaphragm in
-cleaning solvent; wipe clean.
Clean
all metal parts of the fuel pump in solvent.
Brush
with a stiff-bristled brush. Dry with com
pressed air.
Check
all parts to see that they are not
cracked
or broken and that the screw threads are
not damaged.
E-58.
Fuel
Pump
Reassembly
a.
Position the new main diaphragm on pump body
and
hold it in position while installing cam lever
in
position.
b.
Install
cam lever pin, pin retainer and lever
seal
shaft plug.
c.
Install
cam lever return spring.
d.
Position strainer, air
dome
diaphragm and hous
ing cover on housing and secure with screw and
lock
washers.
e.
Position housing on pump body and secure with screw and washers.
First
start all screws one or
two turns:
Then
tighten the screws alternately and
securely.
Note:
Before placing housing on pump body
note
position of align marks made before disassembly.
f.
Install
the fuel inlet and
outlet
fittings.
Note:
Lubricate
forked end of cam lever and cam
lever pin.
Caution:
Do not overtighten screw. 128
Page 129 of 376
'Jeep9
UNIVERSAL
SERIES
SERVICE
MANUAL
E-59.
Fuel
Pump Installation
a.
Make certain mating surfaces of fuel pump and
engine
cylinder case are clean. Cement a new gasket
to mounting
flange
of fuel pump.
b. Position fuel pump on cylinder block, so that
cam
lever of pump rests on fuel pump cam of cam
shaft. Secure pump to block with two cap screws
and
lock washers.
c. Connect intake and
outlet
fuel lines to fuel
pump.
E-60.
FUEL
PUMP
(SINGLE-ACTION)
—
HURRICANE
F4
ENGINE
•
Late
Models.
The
Hurricane F4
engine
is equipped with a single-
action fuel pump (Fig.
E-31).
The fuel pump cam lever is activated by an eccentric on the
engine
camshaft. When the carburetor float
needle
valve
closes, accumulation of fuel in the pump
extends
the diaphragm spring.
This
action causes the rocker
arm
linkage to
become
inoperative until the pres
sure on the diaphragm and spring is reduced. The fuel pump discharge pressure is thus controlled by
the diaphragm spring.
This
provides a steady sup ply of fuel to the carburetor at a fairly constant
pressure.
E-61.
Fuel
Pump Removal
To
remove the fuel pump from the
engine,
dis
connect the inlet and
outlet
fuel lines. Remove
the two fuel pump
body
attaching nuts, lock washers, and washers, and pull the fuel pump and
gasket free of the
engine.
E-62.
Fuel
Pump Disassembly
Note:
The fuel pump is serviced with a repair kit.
Individual
service parts are also available. The
valves are not replaceable but are serviced as part
of the valve housing.
•
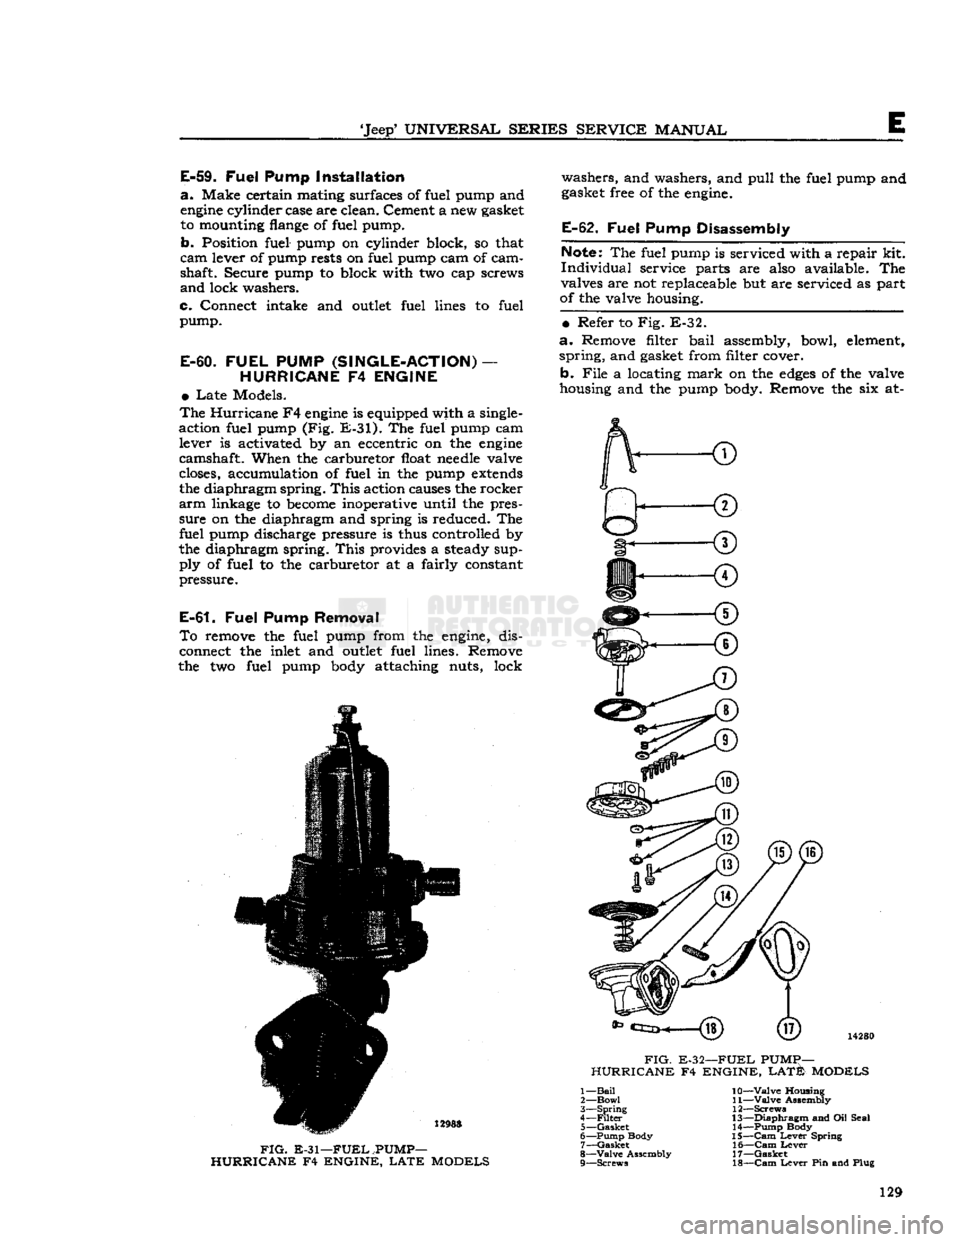
Refer to Fig. E-32.
a.
Remove filter bail assembly, bowl,
element,
spring,
and gasket from filter cover. b.
File
a locating
mark
on the
edges
of the valve
housing and the pump body. Remove the six at-
14280
FIG.
E-32—FUEL
PUMp—
HURRICANE F4 ENGINE,
LATE
MODELS
12988
FIG.
E-31—FUEL
.PUMP-
HURRICANE F4 ENGINE,
LATE
MODELS 1—
Bail
2—
Bowl
3—
Spring
4—
Filter
5—
Gasket
6— Pump Body 7—
Gasket
8—
Valve
Assembly 9— Screws 10—
Valve
Housing
11—
Valve
Assembly
12— Screws
13—
Diaphragm
and Oil Seal 14— Pump Body
15—
Cam
Lever
Spring 16—
Cam
Lever
17—
Gasket
18—
Cam
Lever
Pin and Plug 129
Page 130 of 376
E
FUEL
SYSTEM
taching screws and valve housing from the fuel
pump body.
c.
Remove the two screws in the valve housing
and
separate the filter cover and air
dome
dia
phragm.
d.
Remove the cam lever return spring, plug,
cam
lever pin, and cam lever from the pump body.
Tap
the cam lever pin out of body, using a drift
inserted through the small
hole
in the pump body.
e. Remove diaphragm from pump body.
f. Under normal service, the pump may be cleaned without further disassembly.
Note:
The oil seal (at top of spring in diaphragm
assembly) seals the spring side of the fuel
dia
phragm
from the crankcase. Any deposit, in
excess
of a few drops, of oil on the diaphragm indicates leakage past the oil seal. Be sure the seat for the
seal
in the pump body is clean and smooth.
E-63.
Fuel
Pump Cleaning and Inspection
Caution:
Do not immerse valves or diaphragm
in
cleaning solvent; wipe clean.
Clean
all metal parts of the fuel pump in solvent.
Brush
with a stiff-bristled
brush.
Dry with com
pressed
air.
Check
all parts to see that they are not
cracked
or broken and that the screw threads are
not damaged.
E-64.
Fuel
Pump Reassembly
•
Refer to Fig. E-32.
a.
Assemble the valve housing and filter cover, using a new air
dome
diaphragm. The opening
in
the air
dome
diaphragm is located over the
intake
valve. The filter cover is positioned cor
rectly
when the inlet passage in the cover aligns
with
the inlet valve. Tighten the attaching screws
alternately and securely.
b.
Lubricate
diaphragm assembly shaft, around
oil
seal, with
engine
oil. Position diaphragm as sembly on valve housing and thread all the attach ing screws through diaphragm.
(This
helps avoid
damage to the screw
holes
in diaphragm.)
c.
Place diaphragm assembly and valve housing
in
position on pump body (align marks made
before disassembly).
First
start all screws one
or
two threads; then tighten the screws alternately
and
securely.
d.
Lubricate
forked end of cam lever, pin bore
of body, and corresponding
hole
in lever, and the
pin
itself with
engine
oil.
Note:
Forked
end of lever
goes
around diaphragm
shaft. Be sure
loose
bumper washer on diaphragm shaft is on top of lever and
between
lever and fixed
washer
on shaft.
e.
Install
lever and pin. To install pin, use a drift
and
tap pin into the
hole
in the body until it hits
the
stop
on the
bottom
of the hole;
move
the lever while tapping, to align
hole
in lever with the pin;
then install plug.
Install
lever return spring.
f.
Install
a new filter bowl gasket in filter cover.
Place
bail
assembly in ears on cover and swing
to one side.
Install
spring and new filter element in
bowl and install bowl on pump. Position
bail
as
sembly under bowl; tighten retainer screw.
Caution:
Do not overtighten screw.
E-65.
Fuel
Pump Installation
a.
Make certain mating surfaces of fuel pump and
engine
cylinder case are clean. Cement a new gasket to mounting flange of fuel pump.
b.
Position fuel pump on cylinder block, so that
cam
lever of pump rests on fuel pump cam of cam
shaft. Secure pump to block with two cap screws
and
lock washers. Torque
bolts
13 to 17 lb-ft. [1,8
a
2,3 kg-m.].
c.
Connect intake and
outlet
fuel lines to fuel
pump.
E-66.
Fuel
Pump Testing
Whenever
the fuel pump is to be checked for pres
sure
or volume, follow the procedure outline in
Par.
C-23 of this manual.
Fuel
pump pressure is
important
for low pressure
will
seriously affect en
gine
operation and high pressure can cause exces
sive fuel consumption and flooding of the carbure
tor.
Should there be any doubt of normal opera
tion, check the procedure as outlined in Par. C-23.
In
addition to proper fuel pressure, volume of the
pump is also important. When testing for proper
pump pressure, be certain to also
test
for volume
as the pump may build up sufficient pressure, but
fail
to produce sufficient volume.
E-67. FUEL
PUMP
—
DAUNTLESS
V-6
ENGINE
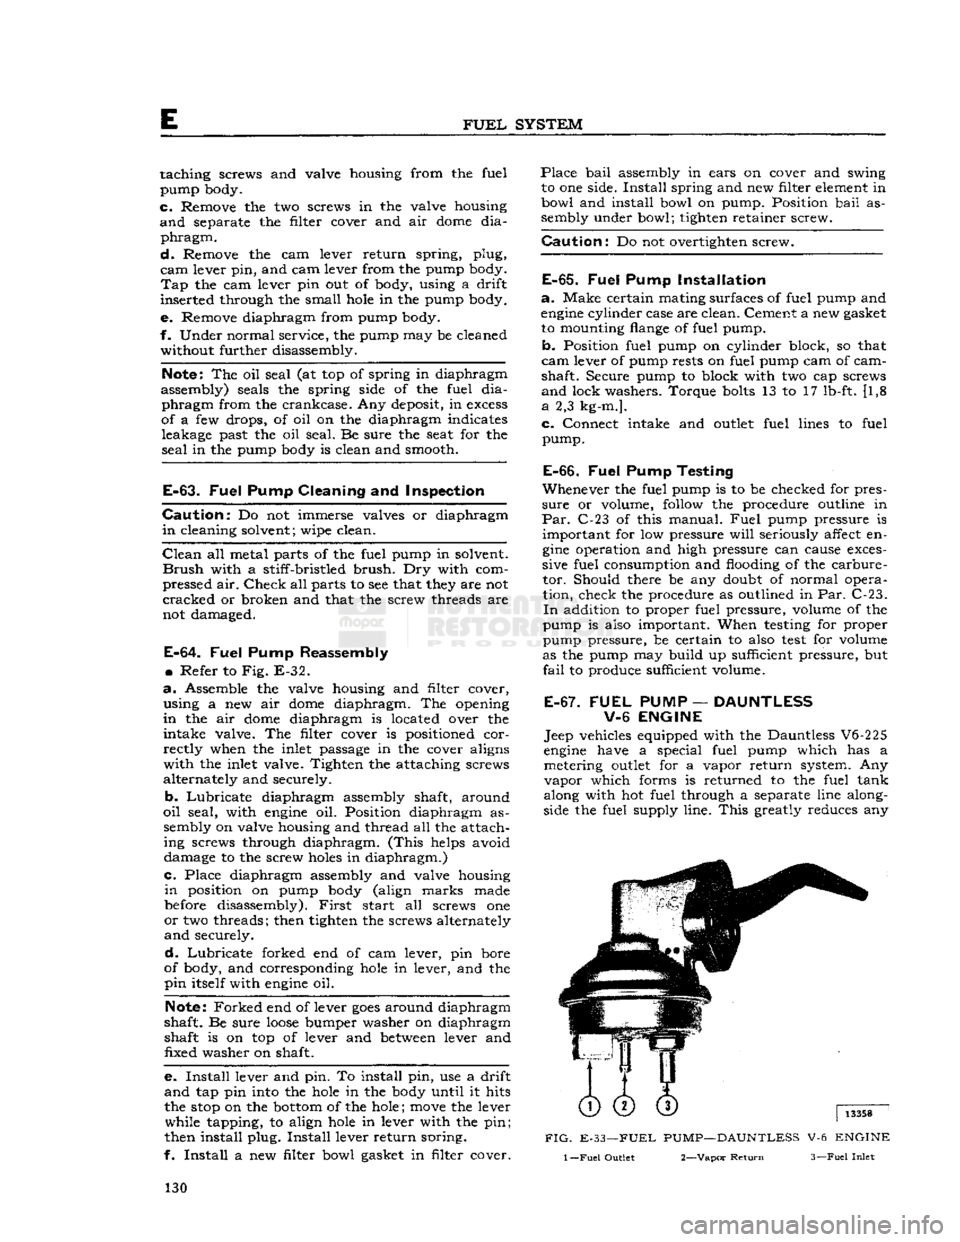
Jeep vehicles equipped with the Dauntless V6-225
engine
have a special fuel pump which has a metering
outlet
for a vapor return system. Any
vapor
which forms is returned to the fuel tank
along with hot fuel through a separate line along
side the fuel supply line.
This
greatly reduces any
FIG.
E-33—FUEL PUMP—DAUNTLESS V-6 ENGINE
1
—Fuel
Outlet 2—Vapor
Return
3—Fuel
Inlet
130
Page 131 of 376
'Jeep'
UNIVERSAL SERIES SERVICE
MANUAL
E
possibility of vapor lock by keeping cool fuel from
the tank constantly circulating through the fuel
pump.
Fuel
pump pressure at carburetor (inlet) on Daunt
less
V6-225
engine
should be 3% lbs.
[0,264
kgm-cm2] minimum at idle with the vapor return
hose
squeezed off. With the vapor return
hose
open
pump pressure should be 2j^ lbs. [0,176 kg-cm2]
minimum.
The
Dauntless V-6
engine
is equipped with a sealed
unit,
non-repairable, single-action fuel pump (Fig.
E-33).
Note:
All Dauntless V-6
engines
are equipped with
a
throw-away can-type gasoline filter installed in
the fuel line
between
the fuel pump and the
car
buretor.
This
unit must be replaced every
12,000
miles
[19.200
km.] of vehicle operation.
E-68.
Fuel
Pump Removal
To
remove the fuel pump from the Dauntless V-6
engine, disconnect the fuel inlet, fuel
outlet
and fuel return lines from the pump. Remove the two
fuel pump body attaching cap screws and lock
washers.
Pull
the fuel filter bracket free and remove the pump and gasket. Discard pump and gasket.
Install
new pump in reverse procedure of removal.
E-69.
AIR
CLEANER
Servicing
of the air cleaner is properly taken care of as part of the periodic lubrication and servicing of the vehicle. For this reason, air cleaner servicing
information is given in the Lubrication Section.
Refer
to and follow the instructions given there.
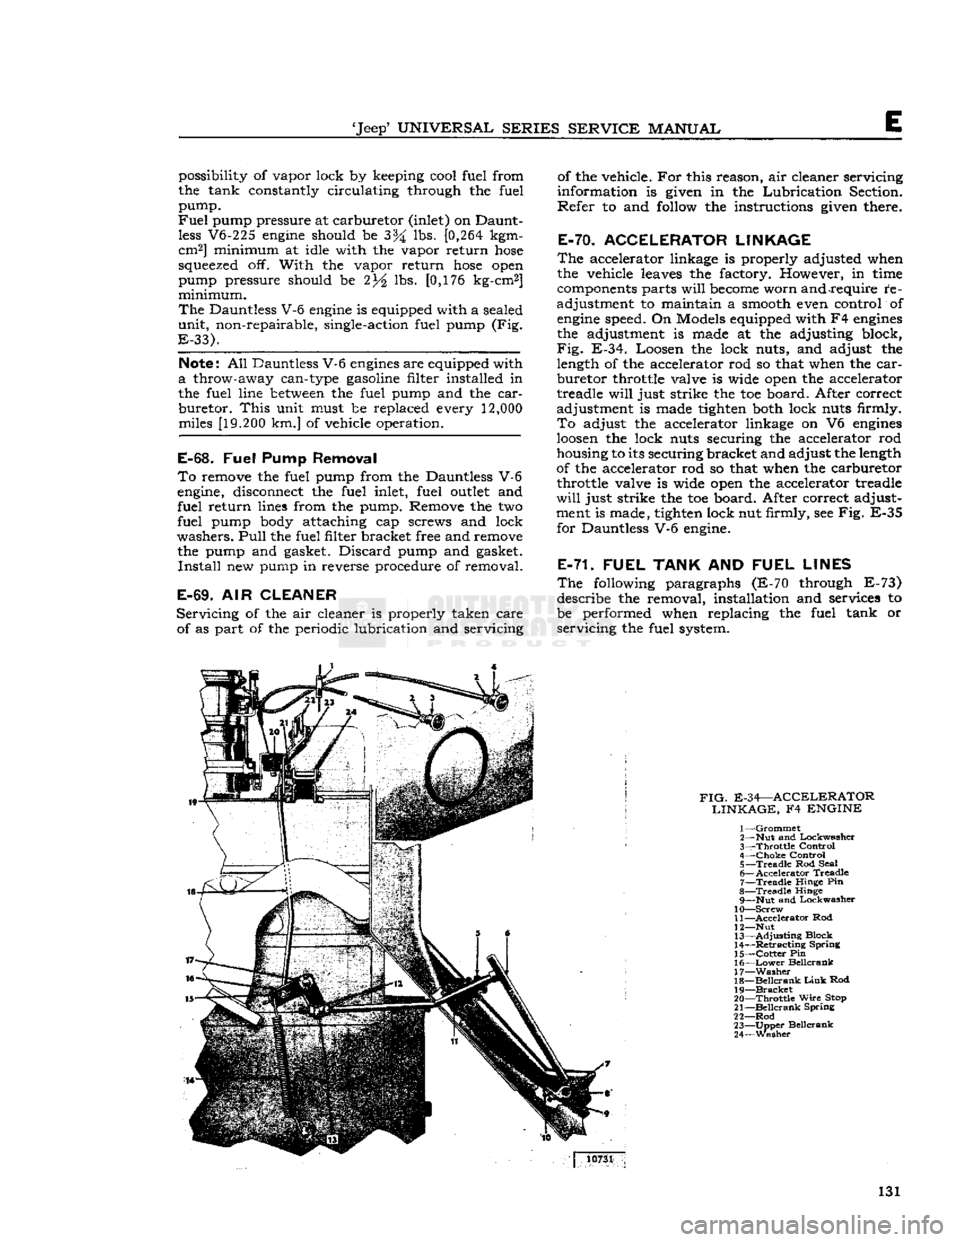
E-70. ACCELERATOR LINKAGE
The
accelerator linkage is properly adjusted when
the vehicle leaves the factory. However, in time
components parts
will
become
worn and require re
adjustment to maintain a smooth even control of
engine
speed. On Models equipped with F4
engines
the adjustment is made at the adjusting block,
Fig.
E-34. Loosen the lock nuts, and adjust the length of the accelerator rod so that when the
car
buretor throttle valve is wide open the accelerator
treadle
will
just strike the toe board. After correct
adjustment is made tighten both lock nuts firmly.
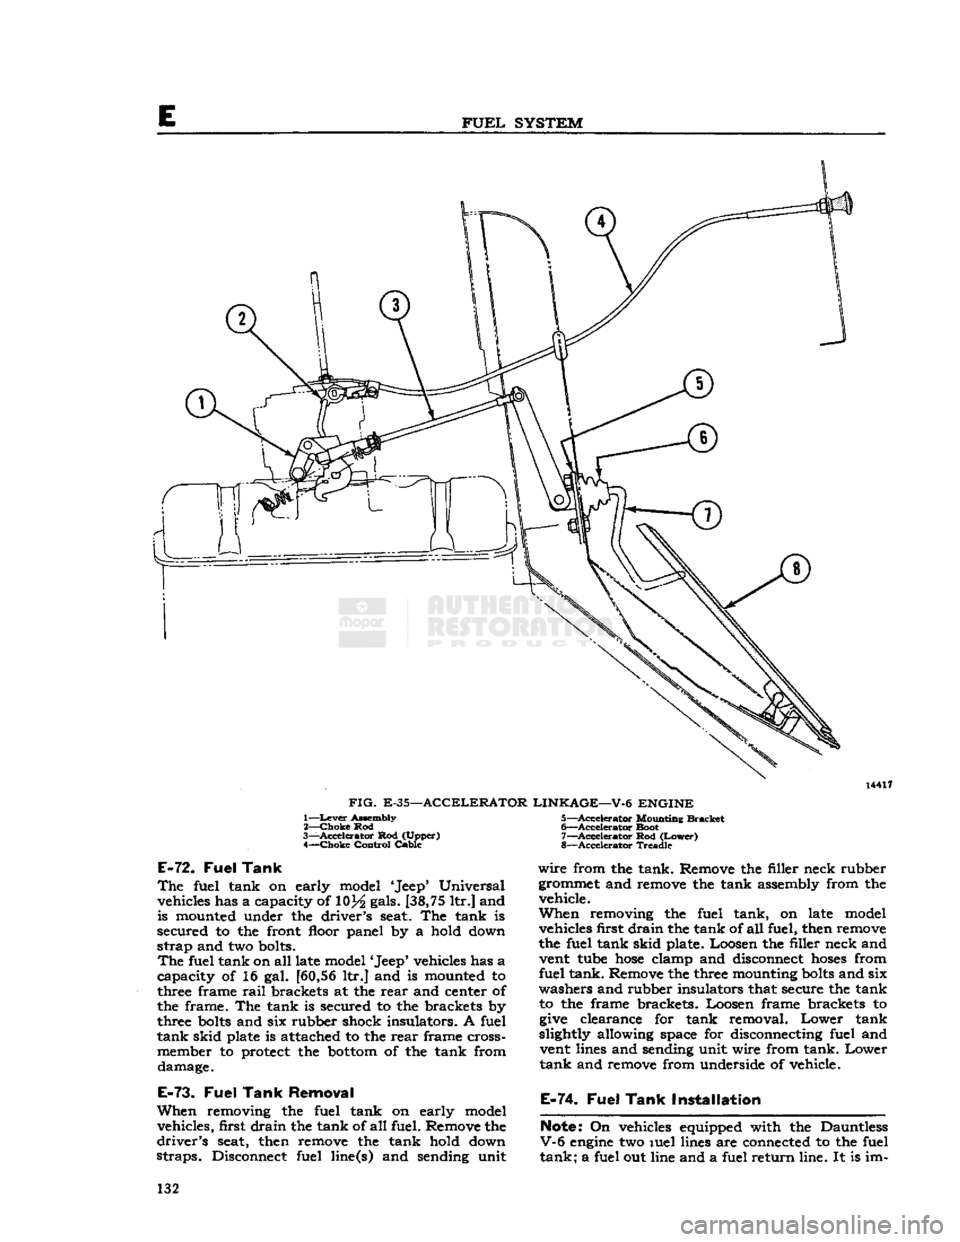
To
adjust the accelerator linkage on V6
engines
loosen
the lock nuts securing the accelerator rod
housing to its securing bracket and adjust the length
of the accelerator rod so that when the carburetor throttle valve is wide open the accelerator treadle
will
just strike the toe board. After correct adjust
ment is made, tighten lock nut firmly, see Fig. E-35 for Dauntless V-6 engine.
E-71. FUEL
TANK
AND
FUEL LINES
The
following paragraphs (E-70 through E-73) describe the removal, installation and services to
be performed when replacing the fuel tank or
servicing
the fuel system.
FIG.
E-34—ACCELERATOR LINKAGE,
F4
ENGINE
1—
Grommet
2— Nut and Lockwasher
3—
Throttle
Control
4—
Choke
Control 5—
Treadle
Rod Seal
6—
Accelerator
Treadle
7—
Treadle
Hinge Pin
8—
Treadle
Hinge 9— Nut and Lockwasher
10—
Screw
11—
Accelerator
Rod
12— Nut
13—
Adjusting
Block
14—
Retracting
Spring
15—
Cotter
Pin
16—
Lower
Beilcrank
17—
Washer
18—
Beilcrank
Link
Rod
19—
Bracket
20—
Throttle
Wire
Stop
21—
Beilcrank
Spring
22—
Rod
23—
Upper
Beilcrank
24—
Wesher
10731
131
Page 132 of 376
FUEL
SYSTEM
14417
FIG.
E-35—ACCELERATOR LINKAGE—V-6 ENGINE
1— Lever
Assembly
2—
Choke
Rod
3—
-Accelerator
Rod (Upper) 4—
Choke
Control Cable
E-72.
Fuel
Tank
The
fuel tank on early model 'Jeep* Universal vehicles has a capacity of 10}4 gals. [38,75 ltr.] and
is mounted under the driver's seat. The tank is
secured to the front floor panel by a hold down
strap
and two bolts.
The
fuel tank on all late model 'Jeep* vehicles has a
capacity of 16 gal. [60,56 ltr.] and is mounted to
three frame
rail
brackets at the
rear
and center of
the frame. The tank is secured to the brackets by
three
bolts
and six rubber shock insulators. A fuel
tank
skid plate is attached to the
rear
frame cross- member to protect the
bottom
of the tank from damage.
E-73.
Fuel
Tank
Removal
When
removing the fuel tank on early model vehicles, first drain the tank of
all
fuel. Remove the
driver's
seat, then remove the tank hold down
straps.
Disconnect fuel line(s) and sending unit 5—
Accelerator
Mounting Bracket
6—
-Accelerator
Boot
7—
Accelerator
Rod
(Lower)
8—
Accelerator
Treadle
wire
from the tank. Remove the filler neck rubber
grommet and remove the tank assembly from the vehicle.
When
removing the fuel tank, on late model vehicles first
drain
the tank of
all
fuel, then remove
the fuel tank skid plate. Loosen the filler neck and vent tube
hose
clamp and disconnect
hoses
from fuel tank. Remove the three mounting
bolts
and six
washers and rubber insulators that secure the tank to the frame brackets. Loosen frame brackets to
give
clearance for tank removal.
Lower
tank
slightly allowing space for disconnecting fuel and vent lines and sending unit wire from tank.
Lower
tank
and remove from underside of vehicle.
E-74.
Fuel Tank Installation
Note:
On vehicles equipped with the Dauntless
V-6
engine
two luel lines are connected to the fuel
tank;
a fuel out line and a fuel return line. It is im- 132
Page 133 of 376
'Jeep'
UNIVERSAL
SERIES
SERVICE
MANUAL
E
portant that
these
lines are not accidentally re
versed.
When
installing the fuel tank on late model vehicles, position the tank
between
the frame
rail
to allow space to connect the fuel line(s), vent
hose
and
sending unit wire. After connecting
these
items, align and secure tank to frame brackets.
Position filler
hose
on tank filler neck and tighten
hose
clamp.
Fill
tank with fuel and check for leaks.
When
installing the fuel tank on early model vehicles, reverse the order of removal as given in
Par.
E-73.
E-75.
Fuel
Tank
Cap
A
surge pressure type fuel tank filler cap is used on
all
models.
This
is necessary to prevent fuel leakage
from
the cap vent opening when the vehicle is on a
side slope. Two spring loaded relief valves which
open when venting is required are built into the
cap.
Should the pressure valve
fail
to open, pressure
in
the tank may force fuel by the carburetor inlet
valve causing flooding.
Failure
of the vacuum valve may prevent flow of fuel to the carburetor. Should
the valves
fail
to vent install a new cap.
Note:
Vehicles having a
Fuel
Evaporative
Emis
sion System are equipped with a non-vent sealed gas cap. The sealed cap is designed to allow no
vapors to discharge to the atmosphere. No other type of cap is to be used on vehicles having this
type system.
E-76.
Fuel
Gauge Float Unit
The
fuel tank
gauge
float unit is mounted in the top
of the fuel tank and consists of a housing enclosing
a
rheostat that is actuated by the float arm, and a
float
which
moves
with the fuel level in the tank.
On
V-6 and current production F4
engine
equipped vehicles, the fuel
outlet
pipe is integral with the
float
unit.
The fuel
outlet
pipe has a mesh filter on the inner end.
Note:
Under no circumstances should a fuel tank
gauge
be installed without a mesh filter element.
The
filter,
outlet
pipe, and float unit are locked as
an
assembly to the top of the fuel tank. To remove,
turn
the lock plate that secures the float unit
assembly.
E-77.
Fuel
Lines
Check
lines and connections occasionally for leaks,
and
for severe kinks that might restrict the flow of
fuel. If an excessive amount of
dirt
is found in the
carburetor
or fuel pump, the fuel tank should be
drained
and the fuel lines blown out with com
pressed air.
All
rubber fuel lines and their respective clamps should be checked occasionally to be certain they
are
correctly positioned and not leaking. 133
Page 139 of 376
'Jeep'
UNIVERSAL
SERIES
SERVICE
MANUAL
©
1
1
©-
IT
T"
I
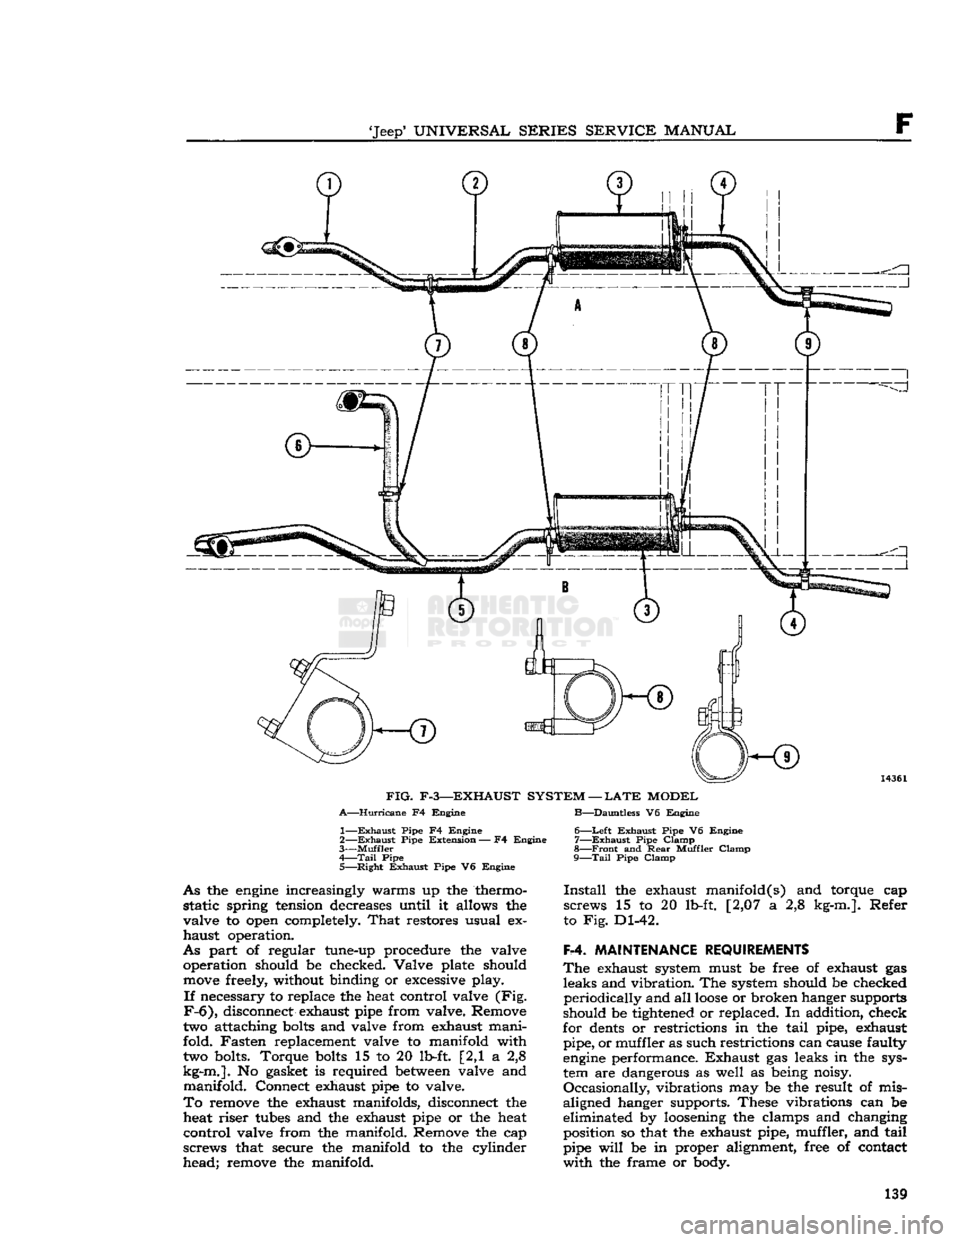
FIG.
F-3—EXHAUST SYSTEM —
LATE
MODEL
A—Hurricane
F4 Engine B—Dauntless V6 Engine
1—
Exhaust
Pipe F4 Engine
2—
Exhaust
Pipe
Extension
— F4 Engine
3—
Muffler
4—
Tail
Pipe
5—
Right
Exhaust
Pipe V6 Engine
As
the
engine
increasingly warms up the thermo static spring tension decreases until it allows the
valve to open completely.
That
restores usual ex haust operation.
As
part of regular tune-up procedure the valve operation should be checked. Valve plate should
move
freely, without binding or excessive play.
If
necessary to replace the heat control valve (Fig.
F-6),
disconnect exhaust pipe from valve. Remove
two attaching
bolts
and valve from exhaust mani
fold. Fasten replacement valve to manifold with two bolts. Torque
bolts
15 to 20 lb-ft [2,1 a 2,8
kg-m.].
No gasket is required
between
valve and manifold. Connect exhaust pipe to valve.
To
remove the exhaust manifolds, disconnect the heat riser
tubes
and the exhaust pipe or the heat
control valve from the manifold. Remove the cap screws that secure the manifold to the cylinder
head; remove the manifold. 6—
Left
Exhaust
Pipe V6 Engine
7—
Exhaust
Pipe
Clamp
8—
Front
and
Rear
Muffler
Clamp
9—
Tail
Pipe
Clamp
Install
the exhaust manifold(s) and torque cap
screws 15 to 20 lb-ft. [2,07 a 2,8 kg-m.]. Refer
to Fig. Dl-42.
F-4.
MAINTENANCE REQUIREMENTS
The
exhaust system must be free of exhaust gas leaks and vibration. The system should be checked periodically and all
loose
or broken hanger supports
should be tightened or replaced. In addition, check
for
dents
or restrictions in the tail pipe, exhaust pipe, or muffler as such restrictions can cause faulty
engine
performance. Exhaust gas leaks in the sys
tem are dangerous as well as being noisy.
Occasionally,
vibrations may be the result of mis
aligned hanger supports. These vibrations can be
eliminated by loosening the clamps and changing position so that the exhaust pipe, muffler, and tail
pipe
will
be in proper alignment, free of contact
with
the frame or body. 139