ECU JEEP CJ 1953 Workshop Manual
[x] Cancel search | Manufacturer: JEEP, Model Year: 1953, Model line: CJ, Model: JEEP CJ 1953Pages: 376, PDF Size: 19.96 MB
Page 141 of 376

'Jeep'
UNIVERSAL
SERIES
SERVICE
MANUAL
F F-8.
Exhaust
Pipe Replacement
When
replacing the exhaust pipe(s) refer to
Figs.
Fl,
F2 and
F-3.
Remove the nuts securing the ex
haust pipe(s) to the exhaust manifold(s), loosen
and
disconnect mounting
clamp
(s)
as necessary, loosen clamp securing exhaust pipe to muffler and
remove exhaust pipe(s).
Note: Always use new gasket(s) between exhaust
pipe(s) and exhaust manifold(s). After installation
of exhaust pipe(s), check the exhaust system for
alignment and leaks.
F-9.
Muffler Removal and Replacement
Disconnect the support bracket and clamps on each
side of the muffler. Loosen the
tail
pipe support
clamp
bolt and
pull
the
tail
pipe to the
rear
until
it
is free of the muffler. Remove the muffler. To
install
the muffler, reverse the above
steps
and
properly
align the complete system, then tighten
connecting support brackets securely. Operate the engine and check for possible leaks.
F-10.
Tail
Pipe Removal and Replacement
Refer
to
Figs.
F-l,
F-2 and
F-3.
Disconnect the support bracket and clamps both at the
rear
of the muffler and also at outlet end of
the
tail
pipe.
Free
the
tail
pipe from the muffler. To
assemble, position
tail
pipe to the muffler and secure clamps, being careful to align the exhaust
system so it doesn't contact body or frame.
Check
system for exhaust gas leaks.
F-ll.
EXHAUST SYSTEM SPECIFICATIONS
EARLY
MODEL
HURRICANE
F4
ENGINE
EARLY
MODEL
DAUNTLESS
V-6
ENGINE
TYPE:
Muffler:
Type
Exhaust
Pipe:
Wall
Thickness
Tail
Pipe:
Crossover
Pipe
Diameter
Single
Reverse
Flow
1.625*
[4,13 cm.] .065* [1,6 ram.]
1.625*
[4,13 cm.] Single
With
Cross-Over
Reverse
Flow
2.00* [5,08 cm.] .065* [1,6 mm.]
2.00* [5,08 cm.]
2.00* [5,08 cm.] .065* [1,6 mm.]
Wall
Thickness Single
With
Cross-Over
Reverse
Flow
2.00* [5,08 cm.] .065* [1,6 mm.]
2.00* [5,08 cm.]
2.00* [5,08 cm.] .065* [1,6 mm.]
LATE
MODEL
HURRICANE
F4
ENGINE
LATE
MODEL
DAUNTLESS
V6
ENGINE
TYPE:
Muffler:
Exhaust
Pipe:
Wall
Thickness
Exhaust
Pipe Extension:
Wall
Thickness
Crossover
Pipe: Single
Reverse
Flow
2.005* [5,09 cm.]
1.755*
[4,46 cm.]
1.625*
[4,13 cm.]
.065* [1,6 mm.]
1.629*
[4,14 cm.] 2.00* [5,08 cm.] .065* [1,6 mm.] Single with
Cross-Over
Reverse
Flow
2.005* [5,09 cm.]
1.755*
[4,46 cm.]
2.00* [5,08 cm.] .065* [1,6 mm.]
2.00* [5,08 cm.] .065* [1,6 mm.]
1.753*
[4,45 cm 1
Wall
Thickness
Tail
Pipe
1.753*
[4,45 cm.] Single with
Cross-Over
Reverse
Flow
2.005* [5,09 cm.]
1.755*
[4,46 cm.]
2.00* [5,08 cm.] .065* [1,6 mm.]
2.00* [5,08 cm.] .065* [1,6 mm.]
1.753*
[4,45 cm 1 141
Page 144 of 376
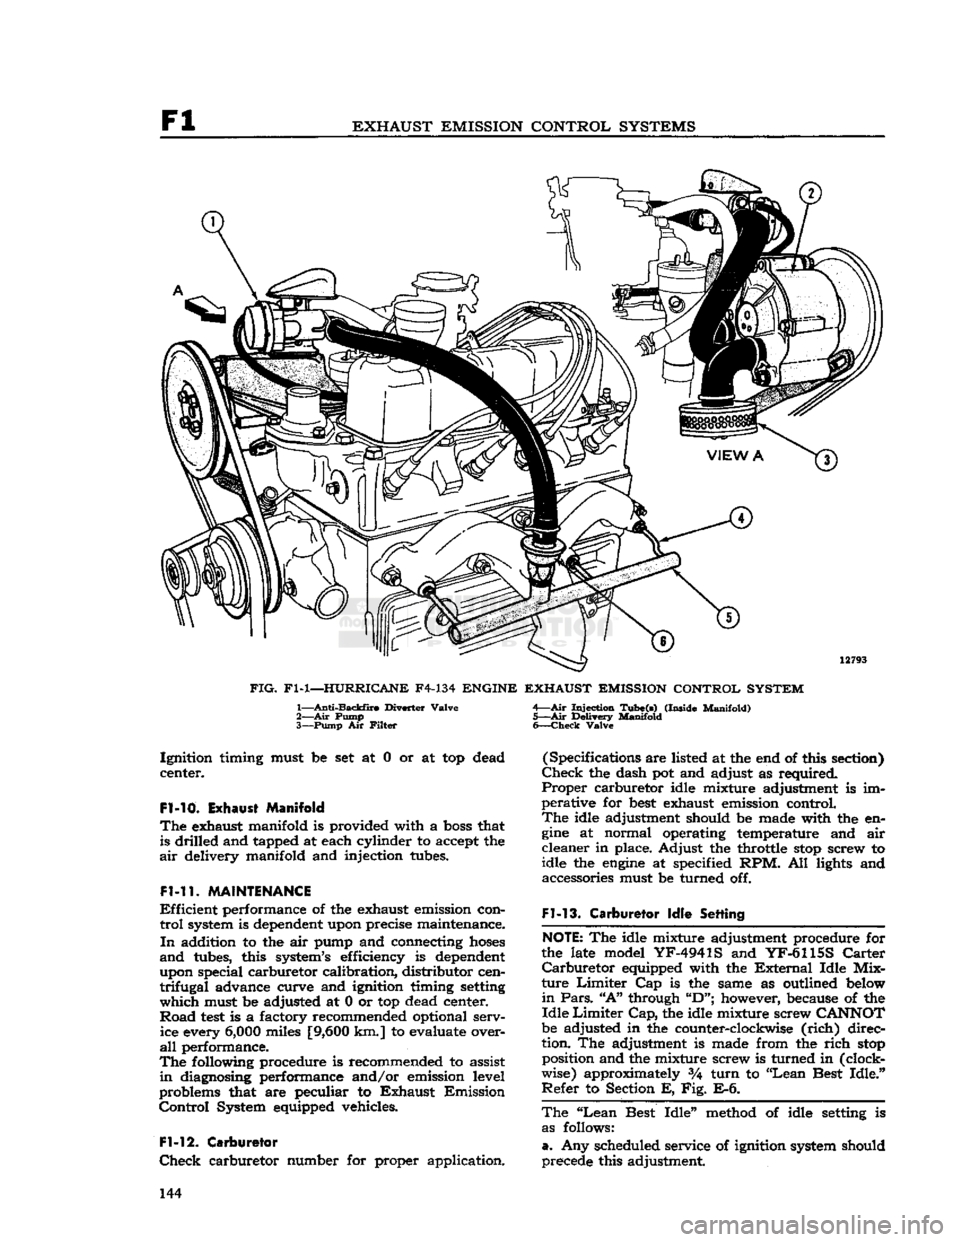
Fl
EXHAUST EMISSION CONTROL SYSTEMS
12793
FIG.
Fl-1—HURRICANE
F4-134
ENGINE EXHAUST EMISSION CONTROL SYSTEM
1—
Anti-Backfire
Diverter
Valve
2— Air
Pump
3—
Pump
Air
Filter
Injection
Tube(s)
(Inside
Manifold)
5—Air
Delivery
Manifold
6—
Check
Valve
Ignition
timing must be set at 0 or at top dead
center.
Fl-10.
Exhaust Manifold
The
exhaust manifold is provided with a
boss
that is drilled and tapped at each cylinder to accept the
air
delivery manifold and injection tubes.
Fl-11.
MAINTENANCE
Efficient
performance of the exhaust emission con
trol
system is dependent upon precise maintenance.
In
addition to the air pump and connecting
hoses
and
tubes, this system's efficiency is dependent
upon special carburetor calibration, distributor cen
trifugal
advance curve and ignition timing setting
which
must be adjusted at 0 or top dead center.
Road
test
is a factory recommended optional serv ice every
6,000
miles
[9,600
km.] to evaluate over
all
performance.
The
following procedure is recommended to assist
in
diagnosing performance and/or emission level
problems that are peculiar to
Exhaust
Emission
Control
System equipped vehicles.
Fl-12.
Carburetor
Check
carburetor number for proper application. (Specifications are listed at the end of this section)
Check
the dash pot and adjust as required.
Proper
carburetor idle mixture adjustment is im
perative for
best
exhaust emission control.
The
idle adjustment should be made with the en
gine
at normal operating temperature and air
cleaner
in place. Adjust the throttle
stop
screw to
idle the
engine
at specified RPM. All lights and accessories must be turned off.
Fl-13.
Carburetor
Idle
Setting
NOTE:
The idle mixture adjustment procedure for
the late model
YF-4941S
and
YF-6115S
Carter
Carburetor
equipped with the
External
Idle
Mix
ture
Limiter
Cap is the same as outlined below
in
Pars.
"A"
through
"D";
however, because of the
Idle
Limiter
Cap,
the idle mixture screw
CANNOT
be adjusted in the counter-clockwise
(rich)
direc
tion. The adjustment is made from the
rich
stop
position and the mixture screw is turned in (clock
wise) approximately %
turn
to "Lean Best
Idle."
Refer
to Section E, Fig. E-6.
The
"Lean
Best
Idle"
method of idle setting is as follows:
a.
Any scheduled service of ignition system should
precede this adjustment. 144
Page 151 of 376
'Jeep*
UNIVERSAL
SERIES
SERVICE
MANUAL
F2
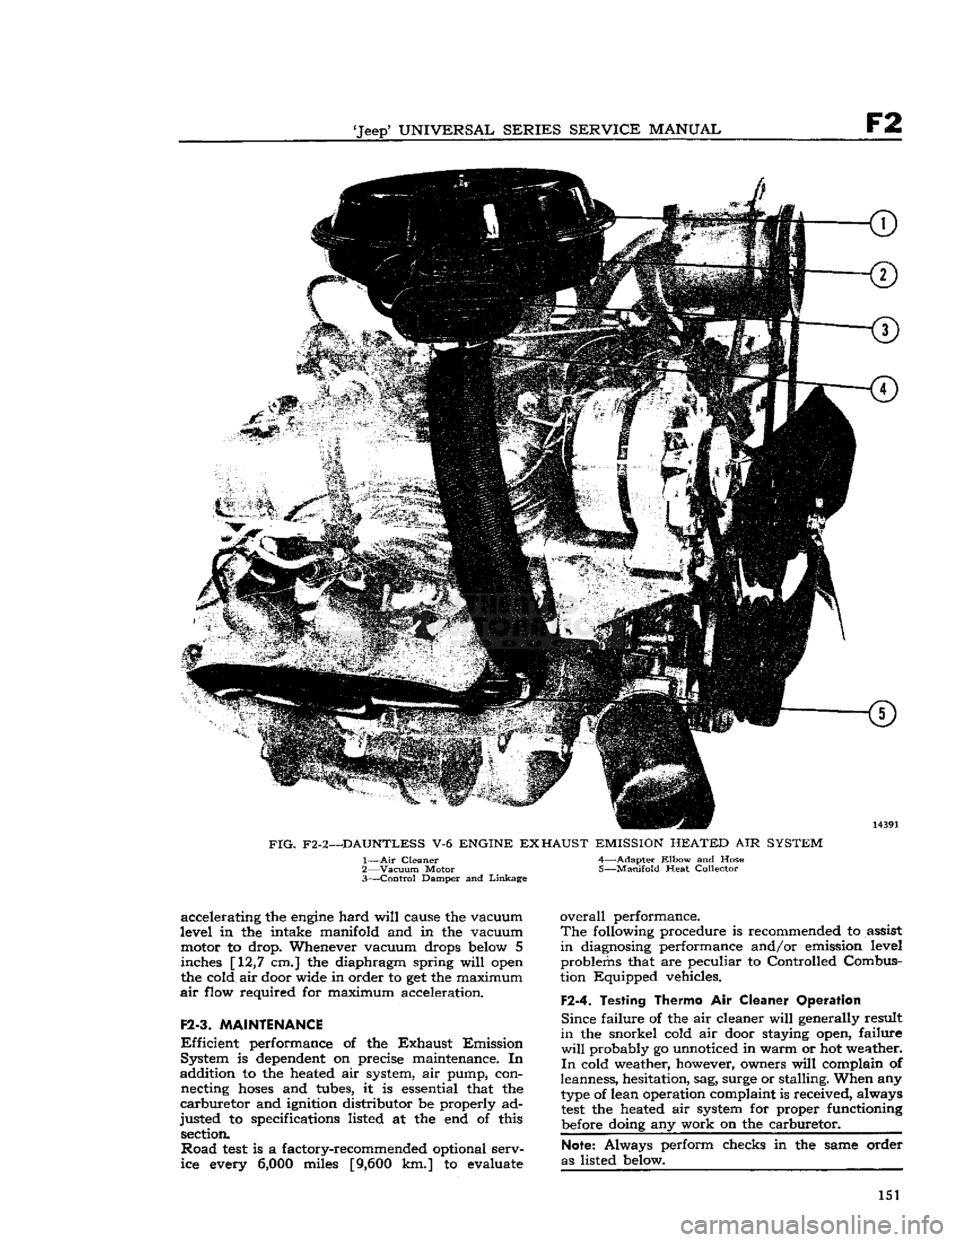
FIG.
F2-2—DAUNTLESS
V-6
ENGINE
EXHAUST
EMISSION
HEATED
AIR
SYSTEM
1—
Air
Cleaner 4—Adapter
Elbow
and Hose
2—
Vacuum
Motor 5—Manifold Heat Collector
3—
Control
Damper and
Linkage
accelerating the
engine
hard
will
cause the vacuum
level in the intake manifold and in the vacuum motor to drop. Whenever vacuum drops
below
5 inches [12,7 cm.] the diaphragm spring
will
open
the cold air door wide in order to get the maximum
air
flow required for maximum acceleration.
F2-3.
MAINTENANCE
Efficient
performance of the
Exhaust
Emission
System is
dependent
on precise maintenance. In
addition to the heated air system, air pump, con necting
hoses
and tubes, it is essential that the
carburetor
and ignition distributor be properly ad
justed to specifications listed at the end of this section.
Road
test
is a factory-recommended optional serv
ice every
6,000
miles
[9,600
km.] to evaluate
overall
performance.
The
following procedure is recommended to assist
in
diagnosing performance and/or emission level problems that are peculiar to Controlled Combus
tion Equipped vehicles.
F2-4.
Testing Thermo
Air
Cleaner Operation
Since
failure of the air cleaner
will
generally result
in
the snorkel cold air door staying open, failure
will
probably go unnoticed in warm or hot weather.
In
cold weather, however, owners
will
complain of
leanness, hesitation, sag, surge or stalling. When any
type
of lean operation complaint is received, always
test
the heated air system for proper functioning
before
doing any work on the carburetor.
Note:
Always perform checks in the same order
as listed
below.
151
Page 155 of 376
'Jeep'
UNIVERSAL
SERIES
SERVICE
MANUAL
F2
14043
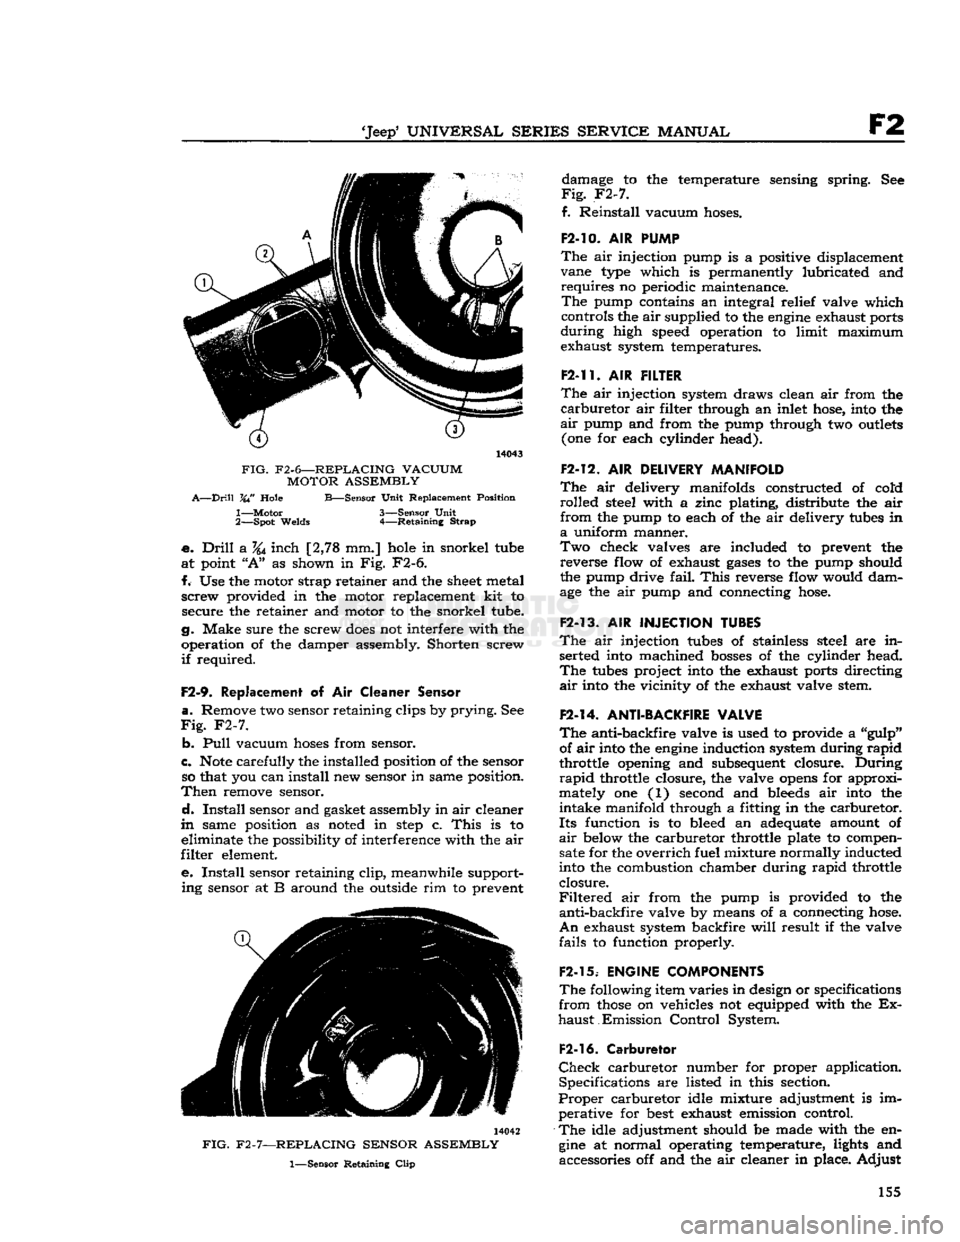
FIG.
F2-6—REPLACING VACUUM MOTOR ASSEMBLY
A—Drill
VW
Hole
B—Sensor
Unit
Replacement Position
1—
Motor
3—Sensor
Unit
2—
Spot
Welds
4—Retaining
Strap
•e.
Drill
a
%j
inch [2,78 mm.] hole in snorkel tube
at
point
"A"
as shown in Fig.
F2-6.
f.
Use the motor strap retainer and the
sheet
metal
screw
provided in the motor replacement kit to secure the retainer and motor to the snorkel tube.
g. Make sure the screw
does
not interfere with the
operation of the damper assembly. Shorten screw
if
required.
F2-9.
Replacement
of Air
Cleaner Sensor
a.
Remove two sensor retaining clips by
prying.
See
Fig.
F2-7.
b.
Pull
vacuum
hoses
from sensor.
c.
Note
carefully the installed position of the sensor so that you can install new sensor in same position.
Then
remove sensor.
d.
Install
sensor and gasket assembly in air cleaner
m
same position as noted in
step
c.
This
is to eliminate the possibility of interference with the air
filter
element.
e.
Install
sensor retaining
clip,
meanwhile support
ing
sensor at B around the outside rim to prevent 14042
FIG.
F2-7—REPLACING SENSOR ASSEMBLY
1—Sensor
Retaining
Clip
damage to the temperature sensing spring. See
Fig.
F2-7.
f.
Reinstall
vacuum hoses.
F2-10.
AIR
PUMP
The
air injection pump is a positive displacement
vane type which is permanently lubricated and
requires
no periodic maintenance.
The
pump contains an integral relief valve which
controls the
air
supplied to the
engine
exhaust ports
during
high speed operation to limit maximum exhaust system temperatures.
F2-11.
AIR
FILTER
The
air injection system draws clean air from the
carburetor
air filter through an inlet hose, into the
air
pump and from the pump through two
outlets
(one for each cylinder head).
F2-12.
AIR
DELIVERY MANIFOLD
The
air delivery manifolds constructed of cold
rolled
steel with a zinc plating, distribute the air
from
the pump to each of the air delivery tubes in
a
uniform manner.
Two
check valves are included to prevent the
reverse
flow of exhaust
gases
to the pump should
the pump drive
fail.
This
reverse flow would dam
age the air pump and connecting hose.
F2-13.
AIR
INJECTION TUBES
The
air injection tubes of stainless steel are in serted into machined
bosses
of the cylinder head.
The
tubes project into the exhaust ports directing
air
into the vicinity of the exhaust valve stem.
F2-14.
ANTI-BACKFIRE VALVE
The
anti-backfire valve is used to provide a "gulp" of air into the
engine
induction system during
rapid
throttle opening and subsequent closure.
During
rapid
throttle closure, the valve
opens
for approxi
mately one (1) second and bleeds air into the
intake
manifold through a fitting in the carburetor.
Its
function is to bleed an adequate amount of
air
below the carburetor throttle plate to compen sate for the
overrich
fuel mixture normally inducted
into the combustion chamber during
rapid
throttle
closure.
Filtered
air from the pump is provided to the
anti-backfire
valve by means of a connecting hose.
An
exhaust system backfire
will
result if the valve
fails
to function properly.
F2-15.
ENGINE COMPONENTS
The
following item varies in design or specifications
from
those
on vehicles not equipped with the Ex
haust
Emission
Control
System.
F2-16.
Carburetor
Check
carburetor number for proper application. Specifications are listed in this section.
Proper
carburetor idle mixture adjustment is im perative for
best
exhaust emission control.
The
idle adjustment should be made with the en
gine
at normal operating temperature, lights and accessories off and the air cleaner in place.
Adjust
155
Page 165 of 376
'Jeep*
UNIVERSAL SERIES SERVICE
MANUAL
G
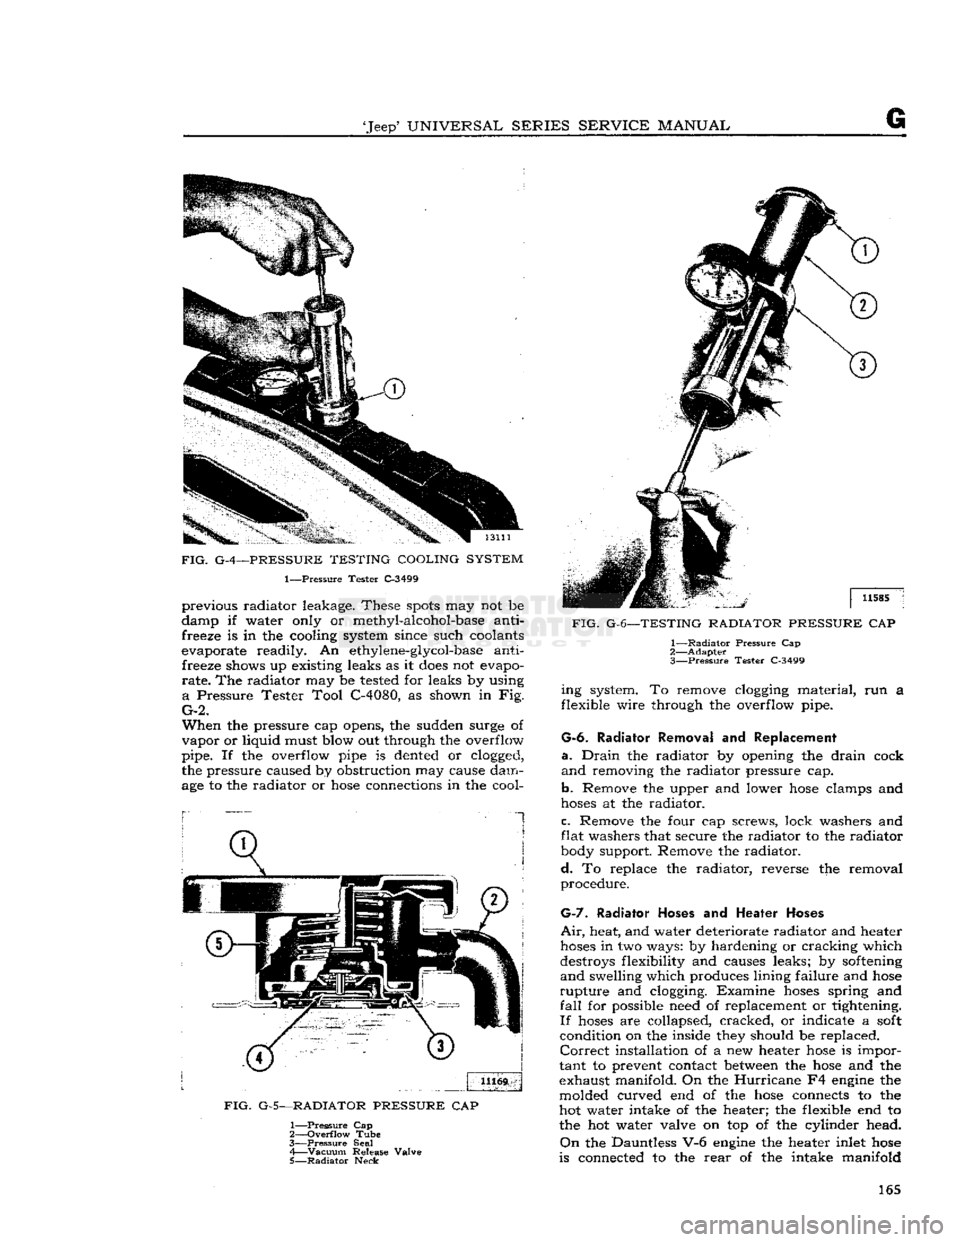
FIG.
G-4—PRESSURE TESTING COOLING SYSTEM
1—Pressure Tester C-3499 previous radiator leakage. These
spots
may not be
damp if water only or methyl-alcohol-base anti freeze is in the cooling system since such coolants
evaporate readily. An ethylene-glycol-base anti freeze shows up existing leaks as it
does
not evapo
rate.
The radiator may be tested for leaks by using
a
Pressure Tester Tool C-4080, as shown in Fig.
G-2.
When
the pressure cap opens, the sudden surge of
vapor
or liquid must blow out through the overflow
pipe. If the overflow pipe is dented or clogged,
the pressure caused by obstruction may cause dam
age to the radiator or
hose
connections in the cool-
1
FIG.
G-5—RADIATOR PRESSURE
CAP
1—
Pressure
Cap
2—
Overflow
Tube
3—
Pressure
Seal 4—
Vacuum
Release Valve
5—
Radiator
Neck
FIG.
G-6—TESTING RADIATOR PRESSURE
CAP
1—
Radiator
Pressure Cap
2—
Adapter
3—
Pressure
Tester C-3499 ing system. To remove clogging material, run a
flexible wire through the overflow pipe.
G-6.
Radiator Removal
and
Replacement
a.
Drain
the radiator by opening the
drain
cock
and
removing the radiator pressure cap.
b.
Remove the upper and lower
hose
clamps and
hoses
at the radiator.
c.
Remove the four cap screws, lock washers and
flat washers that secure the radiator to the radiator
body support. Remove the radiator.
d.
To replace the radiator, reverse the removal
procedure.
G-7.
Radiator
Hoses
and
Heater Hoses
Air,
heat, and water deteriorate radiator and heater
hoses
in two ways: by hardening or cracking which
destroys flexibility and causes leaks; by softening
and
swelling which produces lining failure and
hose
rupture
and clogging. Examine
hoses
spring and
fall
for possible need of replacement or tightening.
If
hoses
are collapsed, cracked, or indicate a
soft
condition on the inside they should be replaced.
Correct
installation of a new heater
hose
is impor
tant to prevent contact between the
hose
and the
exhaust manifold. On the
Hurricane
F4 engine the
molded curved end of the
hose
connects to the
hot water intake of the heater; the flexible end to the hot water valve on top of the cylinder head.
On
the Dauntless V-6 engine the heater inlet
hose
is connected to the
rear
of the intake manifold 165
Page 166 of 376
G
COOLING SYSTEM and
the outlet
hose
is connected to the water pump
housing.
When
installing a new hose, clean the pipe connec
tions and apply a thin layer of nonhardening seal
ing compound. Hose clamps should be properly
located over the connections to provide secure fastening. The pressurized cooling system pressure
can
blow off improperly installed hoses.
G-8.
Cylinder
Block
Any
coolant leaks at the engine block water joints
are
aggravated by pump pressure in the water
jacket
and by pressure developed in the cooling system when the pressure cap is in place.
Small
leaks showing up only as moist
spots
often
cannot
be detected when the engine is hot except by the
appearance of rust, corrosion, and dye stains where
leakage evaporated. Also, expansion and contrac tion of the engine block resulting from extreme
temperature changes can aggravate leaks. For
these
reasons, when checking for coolant leaks inspect
the block when it is cold and while the engine is
running.
A
leaking
drain
cock or plug that cannot be stopped
leaking
by tightening should be replaced.
Leaking
core-hole expansion plugs should be replaced.
If
tightening gasketed joints
will
not correct leak
age, install new gaskets. Use a sealing compound
where recommended.
G-9.
Thermostat
a.
The cooling system of the engine is designed
to provide adequate cooling under most adverse conditions. However, it is necessary to employ
some
device to provide quick warming and to prevent
overcooling during normal operation. Automatic
control
of engine operating temperature is provided
by a water flow control thermostat installed in the
water
outlet of the
Hurricane
F4 engine. The ther
mostat is a heat-operated valve. It should always
be maintained in working order and the vehicle
should never be driven without one installed as there would then be no control of engine tempera
ture.
The temperature at which the thermostat
opens
is preset and cannot be altered.
b.
The thermostat on the
Hurricane
F4 engine is
located in a housing on the top front of the cylinder
head.
On the Dauntless V-6 engine it is located
in
the thermostat housing of the air intake manifold.
The
standard engine thermostat for the
Hurricane
F4
and Dauntless V-6 engine has a normal rating
of
190°F.
[87.8°C]
and should begin to open at
a
coolant temperature between
180°F.
[82°C]
to
192°F.
[89°C]
and be fully open at
202°F.
[94°C.].
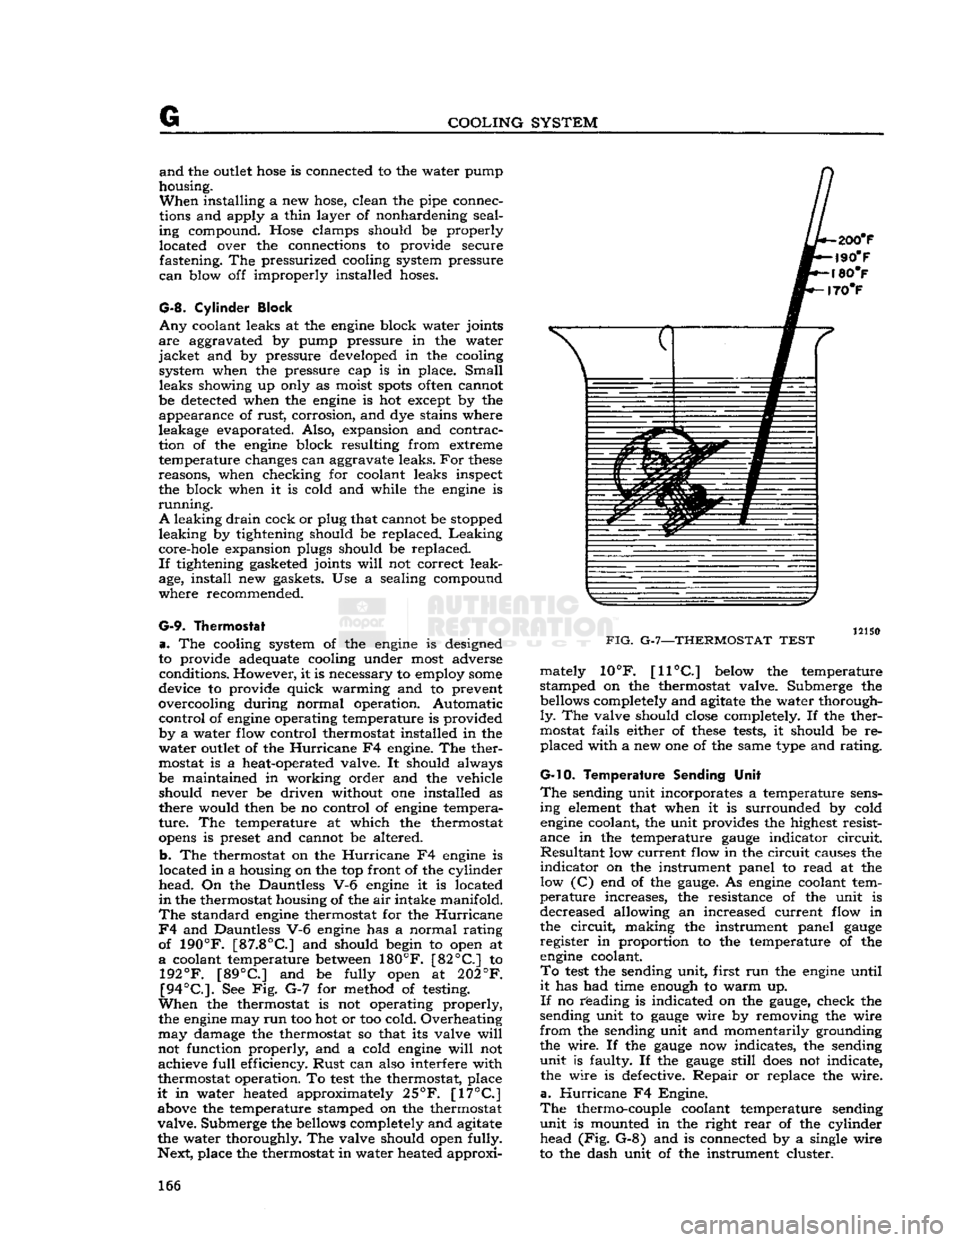
See Fig. G-7 for method of testing.
When
the thermostat is not operating properly, the engine may
run
too hot or too cold. Overheating
may
damage the thermostat so that its valve
will
not function properly, and a cold engine
will
not achieve
full
efficiency.
Rust
can also interfere with
thermostat operation. To
test
the thermostat, place
it
in water heated approximately
25°F.
[17°C]
above the temperature stamped on the thermostat
valve.
Submerge the bellows completely and agitate
the water thoroughly. The valve should open fully.
Next, place the thermostat in water heated approxi-
FIG.
G-7—THERMOSTAT
TEST
mately 10°F.
[11°C]
below the temperature
stamped on the thermostat valve. Submerge the bellows completely and agitate the water thorough
ly.
The valve should close completely. If the ther
mostat fails either of
these
tests, it should be re placed with a new one of the same type and rating.
G-10. Temperature
Sending Unit
The
sending unit incorporates a temperature sens ing element that when it is surrounded by cold engine coolant, the unit provides the highest resist
ance in the temperature
gauge
indicator
circuit.
Resultant
low current flow in the circuit causes the
indicator
on the instrument panel to read at the low (C) end of the
gauge.
As engine coolant tem
perature
increases, the resistance of the unit is
decreased allowing an increased current flow in
the
circuit,
making the instrument panel
gauge
register in proportion to the temperature of the engine coolant.
To
test
the sending unit, first run the engine until
it
has had time enough to warm up.
If
no reading is indicated on the
gauge,
check the
sending unit to
gauge
wire by removing the wire
from
the sending unit and momentarily grounding
the wire. If the
gauge
now indicates, the sending
unit
is faulty. If the
gauge
still
does
not indicate, the wire is defective.
Repair
or replace the wire,
a.
Hurricane
F4 Engine.
The
thermo-couple coolant temperature sending
unit
is mounted in the right
rear
of the cylinder head (Fig. G-8) and is connected by a single wire
to the dash unit of the instrument cluster. 166
Page 168 of 376
G
COOLING SYSTEM
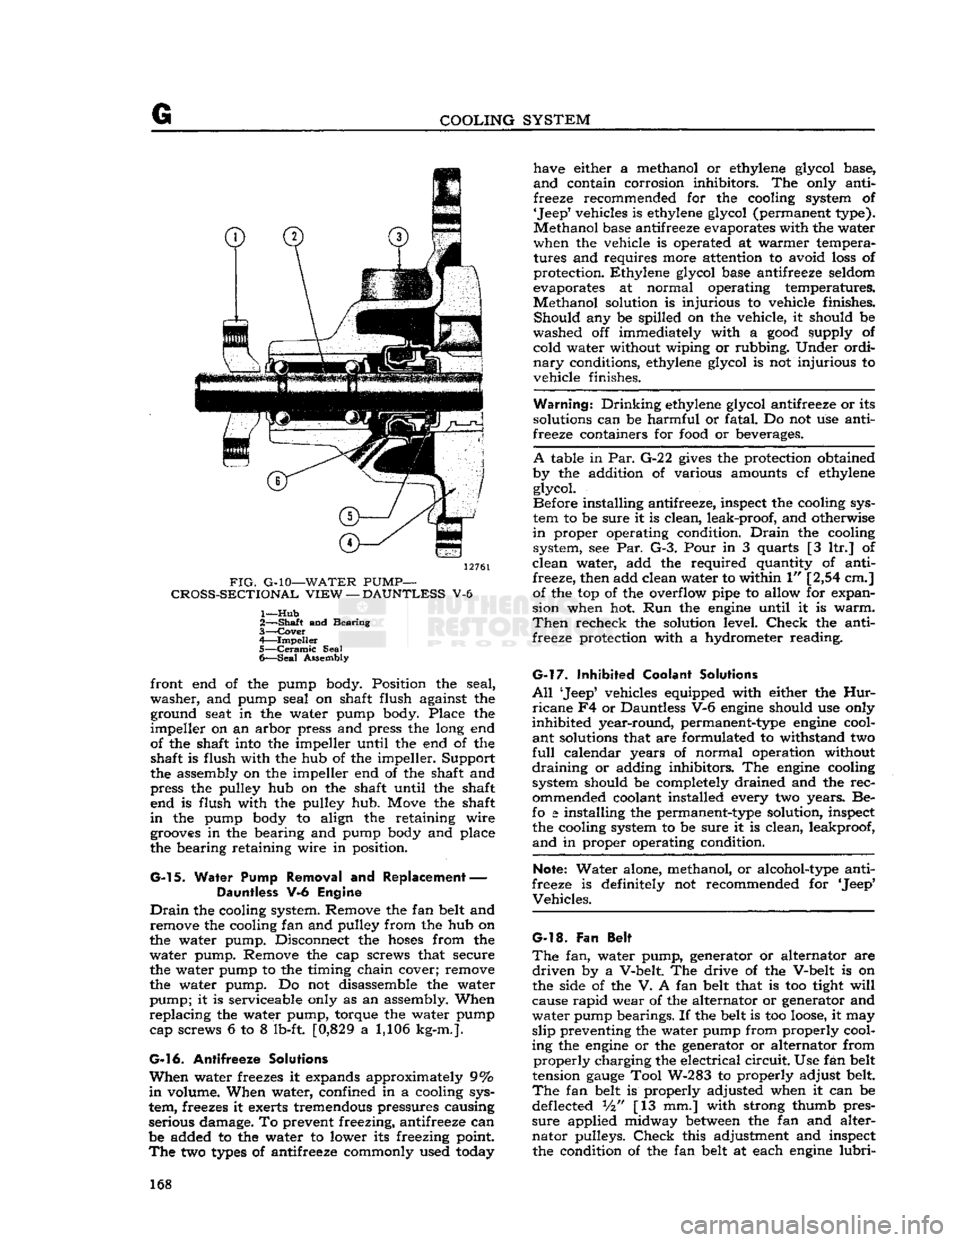
12761
FIG.
G-10—WATER
PUMP—
CROSS-SECTIONAL
VIEW
—
DAUNTLESS
V-6
1—
Hub
2—
—Shaft
and Bearing
3—
Cover
4—
Impeller
5—
Ceramic
Seal
6—
Seal
Assembly front end of the pump body. Position the seal,
washer,
and pump seal on shaft flush against the ground seat in the water pump body. Place the
impeller
on an arbor press and press the long end
of the shaft into the impeller until the end of the shaft is flush with the hub of the impeller. Support
the assembly on the impeller end of the shaft and
press the pulley hub on the shaft until the shaft end is flush with the pulley hub. Move the shaft
in
the pump body to align the retaining wire
grooves
in the bearing and pump body and place
the bearing retaining wire in position.
G-l
5. Water Pump Removal and Replacement — Dauntless V-6 Engine
Drain
the cooling system. Remove the fan belt and remove the cooling fan and pulley from the hub on
the water pump. Disconnect the
hoses
from the
water
pump. Remove the cap screws that secure
the water pump to the timing chain cover; remove
the water pump. Do not disassemble the water
pump;
it is serviceable only as an assembly. When
replacing
the water pump, torque the water pump cap screws 6 to 8 lb-ft. [0,829 a 1,106 kg-m.].
G-16.
Antifreeze Solutions
When
water freezes it expands approximately 9%
in
volume. When water, confined in a cooling sys
tem, freezes it exerts tremendous pressures causing
serious damage. To prevent freezing, antifreeze can
be added to the water to lower its freezing point.
The
two
types
of antifreeze commonly used today have either a methanol or ethylene glycol base,
and
contain corrosion inhibitors. The only anti
freeze recommended for the cooling system of
'Jeep'
vehicles is ethylene glycol (permanent type).
Methanol
base antifreeze evaporates with the water
when the vehicle is operated at warmer tempera
tures and requires more attention to avoid
loss
of
protection. Ethylene glycol base antifreeze seldom
evaporates at normal operating temperatures.
Methanol
solution is injurious to vehicle finishes.
Should
any be spilled on the vehicle, it should be
washed off immediately with a
good
supply of cold water without wiping or rubbing. Under ordi
nary
conditions, ethylene glycol is not injurious to
vehicle finishes.
Warning.*
Drinking
ethylene glycol antifreeze or its
solutions can be harmful or fatal. Do not use anti
freeze containers for
food
or beverages.
A
table in Par.
G-2
2
gives
the protection obtained
by the addition of various amounts cf ethylene glycol.
Before installing antifreeze, inspect the cooling sys
tem to be sure it is clean, leak-proof, and otherwise
in
proper operating condition.
Drain
the cooling system, see Par. G-3. Pour in 3 quarts [3 ltr.] of
clean
water, add the required quantity of anti freeze, then add clean water to within 1" [2,54 cm.] of the top of the overflow pipe to allow for expan
sion when hot. Run the
engine
until it is
warm.
Then
recheck the solution level.
Check
the anti
freeze protection with a hydrometer reading.
G-l7.
Inhibited Coolant Solutions
All
'Jeep5 vehicles equipped with either the
Hur
ricane
F4 or Dauntless V-6
engine
should use only
inhibited
year-round, permanent-type
engine
cool
ant
solutions that are formulated to withstand two
full
calendar years of normal operation without
draining
or adding inhibitors. The
engine
cooling
system should be completely drained and the
rec
ommended coolant installed every two years. Be-
fo
a
installing the permanent-type solution, inspect the cooling system to be sure it is clean, leakproof,
and
in proper operating condition.
Note:
Water alone, methanol, or alcohol-type anti
freeze is definitely not recommended for 'Jeep*
Vehicles.
G-l8.
Fan Belt
The
fan, water pump, generator or alternator are
driven
by a V-belt. The drive of the V-belt is on
the side of the V. A fan belt that is too tight
will
cause
rapid
wear of the alternator or generator and
water
pump bearings. If the belt is too
loose,
it may
slip
preventing the water pump from properly cool
ing the
engine
or the generator or alternator from
properly
charging the electrical
circuit.
Use fan belt
tension
gauge
Tool W-283 to properly adjust belt.
The
fan belt is properly adjusted when it can be
deflected Vi" [13 mm.] with strong thumb pres
sure
applied midway
between
the fan and alter
nator
pulleys.
Check
this adjustment and inspect the condition of the fan belt at each
engine
lubri-
168
Page 172 of 376
H
ELECTRICAL
SYSTEM SUBJECT
PAR.
Directional
Signal
Lamps
H-138
Hazard
Warning
Lamps
H-139
Head
Lamp
Replacement H-130
Head
Lamp
Aiming Procedure H-131 Headlight Dimmer Switch H-127
License
Plate
Lamp
H-136
Main
Light
Switch. H-126
Marker
Lights .H-l40
Parking
and
Turn
Signal
Light
H-133
Stop
Light
Switch. H-l28
Tail,
Stop and
Turn
Signal
Lamp
.H-134
H-1. GENERAL
All
'Jeep' Universal vehicles are equipped with 12- volt electrical systems. Use caution around the higher
voltage
of the 12-volt system as accidental
short
circuits are more capable of damaging electri
cal
units. Also, arcs around the 12-volt battery are
more apt to ignite any gas that may be escaping
from
it. In the following paragraphs
will
be found
information about the battery, distributor, coil,
generator, alternator,
voltage
regulator and start ing motor. These units with the connecting wires,
make
up the
engine
electrical system. The wiring
diagram
will
show the different circuits of the en
gine
electrical system and the various units which
make
up
those
circuits.
With
plastic-covered wiring harnesses use only
rubber-insulated
wiring clips.
Caution:
All current production vehicles are 12- volt, negative ground. Whenever servicing a 12-
volt electrical system, use caution, as an accidental
short
circuit is capable of damaging electrical units. Disconnect battery ground cable before changing
electrical
components.
H-2.
Battery
The
battery is a storage reservoir for electrical
energy produced by the alternator or generator.
The
battery should store sufficient energy for
operation of the entire electrical system when the
alternator
or generator is not pr 1,scing output,
such
as when the ignition is first turned on. Of
particular
importance is maintaining the electrolyte
at the correct level, regularly checking with a
hydrometer, and maintaining clean, tight cable connections.
Battery
service information is given in this section.
Caution:
Do not allow flames or sparks to be
brought near the vent
openings
of the battery since
hydrogen gas may be present in the battery and might explode.
Note:
The liquid in the battery (electrolyte) is a
solution of sulphuric acid which, on contact, can
injure
skin or
eyes,
or damage clothes. If it is spilled
on the skin or spattered in the
eyes,
promptly flush
it
away with quantities of clear water only. If the
acid
is spilled on clothes, wet it thoroughly with a
weak
solution of ammonia, or with a solution of sodium bicarbonate or baking soda.
SUBJECT
PAR.
HORN
H-137
ELECTRICAL
COMPONENT
REPLACEMENT
H-150
WINDSHIPLD
WIPER SYSTEM
H-141
thru
149
SERVICE
DIAGNOSIS.
. .H-151
ELECTRICAL
SPECIFICATIONS
H-152
Caution:
When installing the battery, the nega
tive terminal must be grounded. Reverse polarity of the battery can cause severe damage to the charging system.
Battery
Inspection
a.
Check
the specific gravity of the electrolyte in
each cell of the battery. A hydrometer reading of 1.260 indicates that the battery is fully charged.
If
the reading is 1.225 or below, the battery
needs
recharging.
If one or more cells is 25 "points" (.025) or more lower than the other cells, this in
dicates that the cell is shorted, the cell is about to
fail,
or there is a
crack
in the battery partition in
the case. Unless the battery is repaired or replaced, battery trouble
will
soon
be experienced.
b.
Check
the electrolyte level in each cell, add
distilled
water to maintain the solution [9,5 mm.] above the plates. Avoid overfilling. Replace
the filler caps and tighten securely. It is important to keep the electrolyte level above the plates at all
times because plates that are
exposed
for any
length of time
will
be seriously damaged.
c.
Check
the wing nuts on the hold-down frame for tightness. Tighten them only with finger pres
sure,
never with pliers or a wrench. Excessive
pressure
could damage the battery case.
d.
Clean
the battery terminals and cable con nectors. Prepare a strong solution of baking soda
and
water and brush it around the terminals to
remove any corrosion that is present. The cell caps must be tight and their vents sealed to prevent
cleaning solution entering the cells. After cleaning,
connect cables to battery and coat the terminals
with
heavy grease.
e.
Inspect the battery cables and replace if badly
corroded
or frayed.
Check
tightness
of terminal
screws to ensure
good
electrical connections.
Check
the
tightness
of the negative ground cable connection at the frame to ensure a
good
ground
connection.
f.
Load
test
the battery. Connect a voltmeter across the battery. Run the starting motor for 15 seconds. If the
voltage
does
not drop below 10
volts the battery is satisfactory. If the
voltage
falls
below the figure given, yet the specific gravity is
above
1.225,
the condition of the battery is questionable.
g. Be sure the
engine
ground strap connection, 172
Page 174 of 376
H
ELECTRICAL
SYSTEM
the condenser. Replace the condenser. If there is
no jump to full voltage, overhaul or replace the
distributor.
k.
With the points closed, connect the voltmeter
from
a clean, paint-free
post
on the distributor
body to the negative
post
of the battery. The volt
age drop should be practically zero, a hardly
readable deflection on the voltmeter. If the volt meter registers a
voltage
drop, perform the checks
in
steps
1
and m following.
I.
Check
for
voltage
drop in the battery ground
cable.
Clean
the battery
post,
cable terminals, and contact surface on the bellhousing, or on body if
a
noticeable deflection of the voltmeter occurs,
m.
Check
for any
voltage
drop
between
the dis
tributor
body and a clean, paint-free
spot
on the
cylinder
block. If there is any
voltage
drop, remove
the distributor and clean the mounting surfaces of
distributor
body and cylinder block.
H-5.
SECONDARY
CIRCUIT
If
satisfactory ignition is not obtainable with cor
rect
point gap and tension; satisfactory condenser;
sufficient primary voltage; and correctly cleaned, gapped, and installed spark plugs; the secondary
circiut
should be investigated.
a.
Test the coil.
Bring
the coil up to operating
temperature using the coil heat feature of a coil tester, if available. Refer to the coil tester manu
facturer's
instructions for specific hook-ups for
performing the checks given in
steps
b, c, and d following.
b. Connect the positive lead of the tester to the
battery terminal of the coil primary winding.
Con
nect the tester ground lead to the coil tower. Mea
sure
the resistance of the secondary winding. If the
resistance is more than
20,000
ohms, a fault in the
secondary winding is indicated.
c.
Check
for a grounded secondary by touching the tester ground lead to the coil cover. If resistance
is not over
100,000
ohms, the secondary is grounded
to the cover.
d.
If the secondary winding is satisfactory, mea
sure
the primary current draw in accordance with
the instructions of the
test
equipment manu
facturer.
e.
Check
the secondary circuit for leakage. With the coil primary in the circuit with the breaker unit of the tester, connect a long, high-tension
test
lead
to the coil tower.
Check
the secondary circuit for
leakage by performing the checks given in
steps
f. g, h, and i following.
Note:
In the following
tests,
a slight sparking and
meter deflection
will
usually be
seen
just as contact
is made.
This
is caused by capacitance and
does
not
indicate defective insulation.
f.
Check
distributor cap. Remove the coil lead from the cap and touch the
test
lead to the center contact
inside the cap. If the meter reading drops when the contact is touched or if sparking is seen, a leakage
path is present
between
the center contact and one
of the plug towers.
This
leakage path
will
be in the
form
of a
crack
or carbon track in the cap. Discon nect the spark plug wires from the cap one at a
time and
test
each plug contact with the high-
voltage
lead and with all other plug wires con
nected. Any sparking or meter drop indicates that
a
leakage path exists
between
that particular con
tact and an adjacent one. Testing the adjacent contacts
will
determine which pair is at fault,
g-
Check
distributor rotor. Touch the
test
lead to
the spring contact in the center of the distributor
rotor.
Any leakage in the rotor insulation
between
the contact and the shaft
will
cause a drop in the meter reading and usually sparking
will
be seen.
h.
Check
spark plug wires. Disconnect the spark
plug wires from the plugs and
test
the plug terminal of each. The meter reading should not drop below
the open secondary value (value before making contact). If it
does
or if a large spark occurs when
the
test
lead and the plug wire are separated, there
is a break in the insulation on that wire.
i.
Check
the coil tower insulation. Remove the
high-tension
test
lead from the coil tower and touch
the ground lead of the coil tester to several points
around
the base of the tower. Any sparking or deflection of the meter indicates a leakage path in
the tower insulation.
H-6.
Alternator Charging System
All
Jeep
Universal
Series vehicles have, as standard
equipment a 35-amp., 12-volt, negative ground
alternator and a transistorized
voltage
regulator.
For
repairing the alternator, many of its major components are furnished as complete assemblies
including:
complete brush assembly which requires no soldering or unsoldering of leads; two complete
rectifying
diode
assemblies which eliminate the need for removing and replacing individual diodes;
a
complete isolation
diode
assembly; and a rotor assembly complete with shaft,
pole
pieces, field coil,
and
slip rings.
The
transistorized
voltage
regulator is an electronic
switching device. It
senses
the
voltage
appearing at the auxiliary terminal of the alternator and
supplies the necessary field current for maintaining the system
voltage
at the output
terminal.
The out
put current is determined by the battery electrical
load;
such as headlights, heater, etc.
The
transistorized
voltage
regulator is a sealed unit,
has no adjustments, and must be replaced as a
complete unit.
H-7.
Starting System
The
operation of the starter motor is controlled by
the ignition switch. The starter is made up of a
frame,
field coil, armature, and brushes.
The
starter solenoid electrically
closes
the circuit
between
the battery and the starter motor. When the ignition key is turned to its extreme right, the
solenoid is energized and
closes
the battery-to- starter-motor circuit.
Note:
All Jeep Universal Series vehicles have the
starter
solenoid switch secured to the starter motor
assembly. The Hurricane F4 and Dauntless V-6
engine
Prestolite starter drive is of the inertia type
(rexr
continued on
page
176) 174
Page 180 of 376
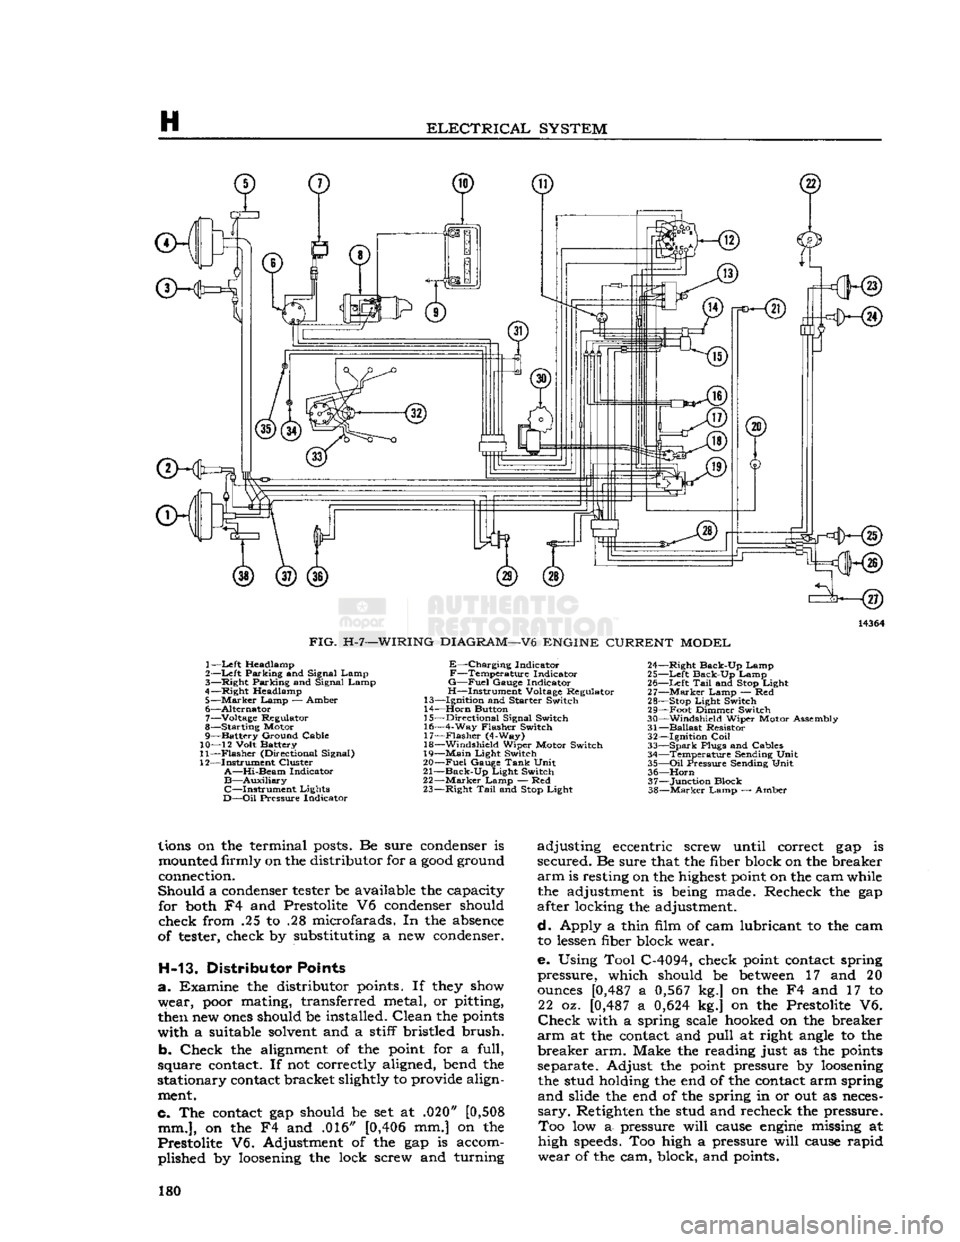
H
ELECTRICAL
SYSTEM
ffKHs)
3—<§)
FIG.
H-7—WIRING
DIAGRAM—V6
ENGINE
CURRENT
MODEL
1—
Left
Headlamp
2—Left Parking and Signal Lamp
3— Right Parking and Signal Lamp
4—Right Headlamp 5—
Marker
Lamp — Amber
6— Alternator 7— Voltage Regulator
8— Starting Motor
9— Battery Ground Cable
10— 12 Volt Battery
11—
Flasher
(Directional Signal)
12— Instrument Cluster
A—Hi-Beam
Indicator
B—Auxiliary
C—Instrument
Lights
D—Oil
Pressure Indicator
E—Charging
Indicator
F—Temperature
Indicator
G—Fuel
Gauge Indicator
H—Instrument Voltage Regulator
13— Ignition and Starter Switch
14—
Horn
Button
15— Directional Signal Switch
16— 4-Way Flasher Switch 17—
Flasher
(4-Way)
18— Windshield Wiper Motor Switch
19—
Main
Light Switch
20—
Fuel
Gauge
Tank
Unit
21—
Back-Up
Light Switch
22—
Marker
Lamp — Red
23— Right
Tail
and
Stop
Light 24— Right Back-Up Lamp
25—
Left
Back-Up Lamp 26—
Left
Tail
and
Stop
Light
27—
Marker
Lamp — Red
28—
Stop
Light Switch
29— Foot Dimmer Switch
30— Windshield Wiper Motor Assembly
31—
Ballast
Resistor 32— Ignition
Coil
33—
Spark
Plugs and Cables 34— Temperature Sending Unit
35—
Oil
Pressure Sending Unit 36—
Horn
37— Junction Block
38—
Marker
Lamp — Amber
lions
on the terminal
posts.
Be sure
condenser
is
mounted
firmly on the distributor for a
good
ground
connection.
Should a
condenser
tester
be available the capacity for
both
F4 and Prestolite V6
condenser
should
check from .25 to .28 microfarads. In the
absence
of
tester,
check by substituting a new
condenser.
H-13. Distributor Points
a. Examine the distributor
points.
If
they
show
wear,
poor
mating, transferred metal, or pitting,
then
new
ones
should be installed. Clean the
points
with a suitable
solvent
and a stiff bristled brush.
b. Check the
alignment
of the
point
for a full,
square
contact.
If not correctly aligned, bend the
stationary
contact
bracket slightly to provide align
ment.
c. The
contact
gap should be set at .020"
[0,508
mm.],
on the F4 and .016"
[0,406
mm.] on the
Prestolite V6. Adjustment of the gap is accom plished by
loosening
the lock screw and turning adjusting eccentric screw until correct gap is
secured. Be sure that the fiber block on the breaker
arm
is resting on the
highest
point
on the cam while the adjustment is
being
made. Recheck the gap
after locking the adjustment.
d. Apply a thin film of cam lubricant to the cam to
lessen
fiber block wear.
e. Using Tool C-4094, check
point
contact
spring
pressure, which should be
between
17 and 20
ounces
[0,487
a
0,567
kg.] on the F4 and 17 to 22 oz.
[0,487
a
0,624
kg.] on the Prestolite V6.
Check
with a spring scale
hooked
on the breaker
arm
at the
contact
and pull at right
angle
to the
breaker arm. Make the reading just as the
points
separate. Adjust the
point
pressure by
loosening
the stud holding the end of the
contact
arm spring
and slide the end of the spring in or out as
neces
sary.
Retighten the stud and recheck the pressure. Too low a- pressure will
cause
engine
missing at
high
speeds.
Too high a pressure will
cause
rapid
wear of the cam, block, and
points.
180