engine JEEP COMPASS 2019 Owner handbook (in English)
[x] Cancel search | Manufacturer: JEEP, Model Year: 2019, Model line: COMPASS, Model: JEEP COMPASS 2019Pages: 362, PDF Size: 6.23 MB
Page 157 of 362
WARNING!
is in the OFF mode), the transmission is
locked in PARK, securing the vehicle
against unwanted movement.
• When leaving the vehicle, always make
sure the ignition is in the OFF mode,
remove the key fob from the vehicle, and
lock the vehicle.
• Never leave children alone in a vehicle,
or with access to an unlocked vehicle.
Allowing children to be in a vehicle un-
attended is dangerous for a number of
reasons. A child or others could be seri-
ously or fatally injured. Children should
be warned not to touch the park brake,
brake pedal or the transmission gear
selector.
• Do not leave the key fob in or near the
vehicle (or in a location accessible to
children), and do not leave the ignition
(in a vehicle equipped with push button
start) in the ON/RUN mode. A child
could operate power windows, other
controls, or move the vehicle.
CAUTION!
• Before moving the transmission gear se-
lector out of PARK, you must turn the
ignition to the ON/RUN mode, and also
press the brake pedal. Otherwise, dam-
age to the gear selector could result.
• DO NOT race the engine when shifting
from PARK or NEUTRAL into another
gear range, as this can damage the drive-
train.
The following indicators should be used to
ensure that you have properly engaged the
transmission into the PARK position:
• When shifting into PARK, push the lock
button on the gear selector, and firmly
move the selector all the way forward until
it stops and is fully seated.
• Look at the transmission gear position dis-
play and verify that it indicates the PARK
position (P).
• With brake pedal released, verify that the
gear selector will not move out of PARK.REVERSE (R)
This range is for moving the vehicle back-
ward. Shift into REVERSE only after the ve-
hicle has come to a complete stop.
NEUTRAL (N)
Use this range when the vehicle is standing
for prolonged periods with the engine run-
ning. The engine may be started in this range.
Apply the park brake and shift the transmis-
sion into PARK if you must exit the vehicle.
WARNING!
Do not coast in NEUTRAL and never turn
off the ignition to coast down a hill. These
are unsafe practices that limit your re-
sponse to changing traffic or road condi-
tions. You might lose control of the vehicle
and have a collision.
CAUTION!
Towing the vehicle, coasting, or driving for
any other reason with the transmission in
NEUTRAL can cause severe transmission
damage.
155
Page 158 of 362
CAUTION!
Refer to “Recreational Towing” in “Start-
ing And Operating” and “Towing A Dis-
abled Vehicle” in “In Case Of Emergency”
for further information.
DRIVE (D)
This range should be used for most city and
highway driving. It provides the smoothest
upshifts and downshifts, and the best fuel
economy. The transmission automatically up-
shifts through all forward gears. The DRIVE
position provides optimum driving character-
istics under all normal operating conditions.
When frequent transmission shifting occurs
(such as when operating the vehicle under
heavy loading conditions, in hilly terrain,
traveling into strong head winds, or while
towing a heavy trailer), use the AutoStick
shift control to select a lower gear (refer to
"AutoStick" in this section for further infor-
mation). Under these conditions, using a
lower gear will improve performance and ex-
tend transmission life by reducing excessive
shifting and heat buildup.If the transmission temperature exceeds nor-
mal operating limits, the transmission con-
troller may modify the transmission shift
schedule, reduce engine torque, and/or ex-
pand the range of torque converter clutch
engagement. This is done to prevent trans-
mission damage due to overheating.
If the transmission becomes extremely hot,
the "Transmission Temperature Warning
Light" may illuminate, and the transmission
may operate differently until the transmis-
sion cools down.
During cold temperatures, transmission op-
eration may be modified depending on en-
gine and/or transmission temperature as well
as vehicle speed. This feature improves warm
up time of the engine and transmission to
achieve maximum efficiency. Engagement of
the torque converter clutch (and, for the
nine-speed, shifts into 8th or 9th gear), are
inhibited until the engine and/or transmis-
sion is warm (refer to the “Note” under
“Torque Converter Clutch” in this section).
Normal operation will resume once the tem-
perature(s) have risen to a suitable level.AUTOSTICK
AutoStick is a driver-interactive transmission
feature providing manual shift control, giving
you more control of the vehicle. AutoStick
allows you to maximize engine braking, elimi-
nate undesirable upshifts and downshifts,
and improve overall vehicle performance.
This system can also provide you with more
control during passing, city driving, cold slip-
pery conditions, mountain driving, trailer
towing, and many other situations.
Operation
When the gear selector is in the AutoStick
position (beside the DRIVE position), it can
be moved forward and rearward. This allows
the driver to manually select the transmission
gear being used. Moving the gear selector
forward (-) triggers a downshift and rearward
(+) an upshift. The current gear is displayed
in the instrument cluster.
In AutoStick mode, the transmission will
shift up or down when the driver moves the
gear selector rearward (+) or forward (-), un-
less an engine lugging or overspeed condition
STARTING AND OPERATING
156
Page 159 of 362
would result. It will remain in the selected
gear until another upshift or downshift is
chosen, except as described below.
• Six-speed transmissions will automatically
upshift when necessary to prevent engine
over-speed.
• The transmission will automatically down-
shift as the vehicle slows (to prevent engine
lugging) and will display the current gear.
• The transmission will automatically down-
shift to first gear when coming to a stop.
After a stop, the driver should manually
upshift (+) the transmission as the vehicle
is accelerated.
• You can start out, from a stop, in first or
second gear (or third gear, in six-speed
models, or in 4LO range, Snow mode, or
Sand mode, where available). Tapping (+)
(at a stop) will allow starting in second gear.
Starting out in second gear can be helpful
in snowy or icy conditions.
• If a requested downshift would cause the
engine to over-speed, that shift will not
occur.• The system will ignore attempts to upshift
at too low of a vehicle speed.
• Transmission shifting will be more notice-
able when AutoStick is enabled.
• The system may revert to automatic shift
mode if a fault or overheat condition is
detected.
NOTE:
When Selec-Speed or Hill Descent Control is
enabled, AutoStick is not active.
To disengage AutoStick, return the gear se-
lector to the DRIVE position. You can shift in
or out of the AutoStick position at any time
without taking your foot off the accelerator
pedal.
WARNING!
Do not downshift for additional engine
braking on a slippery surface. The drive
wheels could lose their grip and the ve-
hicle could skid, causing a collision or
personal injury.Transmission Limp Home Mode
Transmission function is monitored electroni-
cally for abnormal conditions. If a condition
is detected that could result in transmission
damage, Transmission Limp Home Mode is
activated. In this mode, the transmission may
operate only in a fixed gear, or may remain in
NEUTRAL. The Malfunction Indicator Light
(MIL) may be illuminated. Limp Home Mode
may allow the vehicle to be driven to an
authorized dealer for service without damag-
ing the transmission.
In the event of a momentary problem, the
transmission can be reset to regain all for-
ward gears by performing the following steps:
1. Stop the vehicle.
2. Shift the transmission into PARK, if pos-
sible. If not, shift the transmission to
NEUTRAL.
3. Turn the ignition to the OFF position. On
vehicles with push button start, push and
hold the ignition until the engine turns
OFF.
4. Wait approximately 30 seconds.
5. Restart the engine.
157
Page 160 of 362
6. Shift into the desired gear range. If the
problem is no longer detected, the trans-
mission will return to normal operation.
NOTE:
Even if the transmission can be reset, we
recommend that you visit an authorized
dealer at your earliest possible convenience.
An authorized dealer has diagnostic equip-
ment to assess the condition of your trans-
mission. If the transmission cannot be reset,
authorized dealer service is required.
Torque Converter Clutch
A feature designed to improve fuel economy
has been included in the automatic transmis-
sion on your vehicle. A clutch within the
torque converter engages automatically at
calibrated speeds. This may result in a
slightly different feeling or response during
normal operation in the upper gears. When
the vehicle speed drops or during some ac-
celerations, the clutch automatically disen-
gages.NOTE:
The torque converter clutch will not engage
until the engine and/or transmission is warm
(usually after 1 to 3 miles [2 to 5 km] of
driving). Because the engine speed is higher
when the torque converter clutch is not en-
gaged, it may seem as if the transmission is
not shifting properly when the vehicle is cold.
This is normal. The torque converter clutch
will function normally once the powertrain is
sufficiently warm.
FOUR-WHEEL DRIVE
OPERATION — IF EQUIPPED
Jeep Active Drive
Your vehicle may be equipped with a Power
Transfer Unit (PTU). This system is auto-
matic with no driver inputs or additional
driving skills required. Under normal driving
conditions, the front wheels provide most of
the traction. If the front wheels begin to lose
traction, power is shifted automatically to the
rear wheels. The greater the front wheel trac-
tion loss, the greater the power transfer to the
rear wheels.Additionally, on dry pavement under heavy
throttle input (where one may have no wheel
spin), torque will be sent to the rear in a
preemptive effort to improve vehicle launch
and performance characteristics.
CAUTION!
All wheels must have the same size and
type tires. Unequal tire sizes must not be
used. Unequal tire size may cause failure
of the power transfer unit.
Four Wheel Drive (4x4)
The four wheel drive (4WD) is fully automatic
in normal driving mode.
NOTE:
It is not possible to carry out the change of
mode when the vehicle exceeds the speed of
75 mph (120 km/h).
Enabling Four Wheel Drive (4x4)
The buttons for the activation of four wheel
drive are located on the device Selec-Terrain
and allow you to select the following:
•4WD LOCK
•4WD LOW — (Trailhawk models only)STARTING AND OPERATING
158
Page 161 of 362
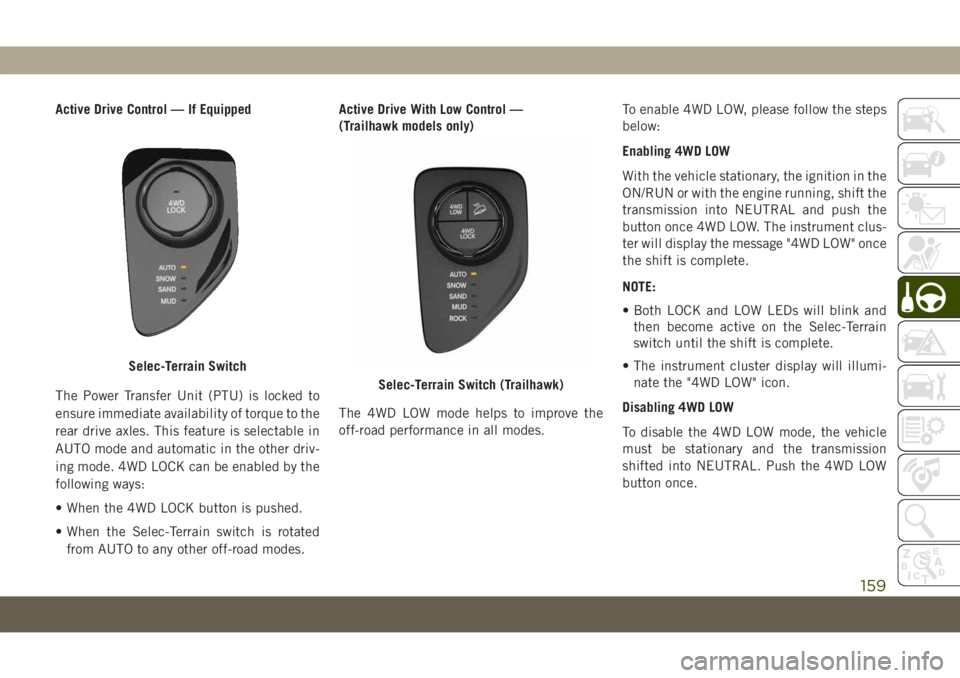
Active Drive Control — If Equipped
The Power Transfer Unit (PTU) is locked to
ensure immediate availability of torque to the
rear drive axles. This feature is selectable in
AUTO mode and automatic in the other driv-
ing mode. 4WD LOCK can be enabled by the
following ways:
• When the 4WD LOCK button is pushed.
• When the Selec-Terrain switch is rotated
from AUTO to any other off-road modes.Active Drive With Low Control —
(Trailhawk models only)
The 4WD LOW mode helps to improve the
off-road performance in all modes.To enable 4WD LOW, please follow the steps
below:
Enabling 4WD LOW
With the vehicle stationary, the ignition in the
ON/RUN or with the engine running, shift the
transmission into NEUTRAL and push the
button once 4WD LOW. The instrument clus-
ter will display the message "4WD LOW" once
the shift is complete.
NOTE:
• Both LOCK and LOW LEDs will blink and
then become active on the Selec-Terrain
switch until the shift is complete.
• The instrument cluster display will illumi-
nate the "4WD LOW" icon.
Disabling 4WD LOW
To disable the 4WD LOW mode, the vehicle
must be stationary and the transmission
shifted into NEUTRAL. Push the 4WD LOW
button once.
Selec-Terrain Switch
Selec-Terrain Switch (Trailhawk)
159
Page 163 of 362
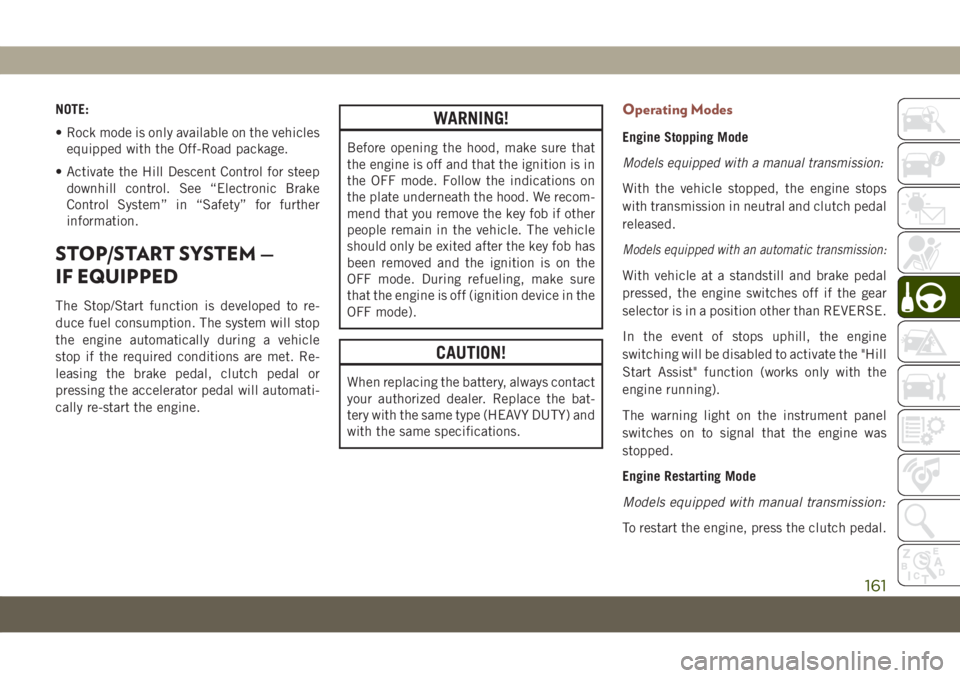
NOTE:
• Rock mode is only available on the vehicles
equipped with the Off-Road package.
• Activate the Hill Descent Control for steep
downhill control. See “Electronic Brake
Control System” in “Safety” for further
information.
STOP/START SYSTEM —
IF EQUIPPED
The Stop/Start function is developed to re-
duce fuel consumption. The system will stop
the engine automatically during a vehicle
stop if the required conditions are met. Re-
leasing the brake pedal, clutch pedal or
pressing the accelerator pedal will automati-
cally re-start the engine.
WARNING!
Before opening the hood, make sure that
the engine is off and that the ignition is in
the OFF mode. Follow the indications on
the plate underneath the hood. We recom-
mend that you remove the key fob if other
people remain in the vehicle. The vehicle
should only be exited after the key fob has
been removed and the ignition is on the
OFF mode. During refueling, make sure
that the engine is off (ignition device in the
OFF mode).
CAUTION!
When replacing the battery, always contact
your authorized dealer. Replace the bat-
tery with the same type (HEAVY DUTY) and
with the same specifications.
Operating Modes
Engine Stopping Mode
Models equipped with a manual transmission:
With the vehicle stopped, the engine stops
with transmission in neutral and clutch pedal
released.
Models equipped with an automatic transmission:
With vehicle at a standstill and brake pedal
pressed, the engine switches off if the gear
selector is in a position other than REVERSE.
In the event of stops uphill, the engine
switching will be disabled to activate the "Hill
Start Assist" function (works only with the
engine running).
The warning light on the instrument panel
switches on to signal that the engine was
stopped.
Engine Restarting Mode
Models equipped with manual transmission:
To restart the engine, press the clutch pedal.
161
Page 164 of 362
If the vehicle does not start pressing the
clutch, place the gear selector in neutral and
repeat the procedure. If the problem persists,
contact your authorized dealer.
Models equipped with an automatic transmission:
To restart the engine, release the brake pedal.
With brake pressed, if the gear selector is in
DRIVE the engine can be restarted moving
the selector to REVERSE or NEUTRAL or
“AutoStick”.
With brake pedal pressed, if the gear selector
is in "AutoStick" mode, the engine can be
restarted moving the selector to "+" or "–", or
REVERSE or NEUTRAL.
When the engine has been stopped automati-
cally, keeping the brake pedal pressed, the
brake can be released keeping the engine off
by quickly shifting the gear selector to PARK.
To restart the engine, just move the selector
out of PARK.
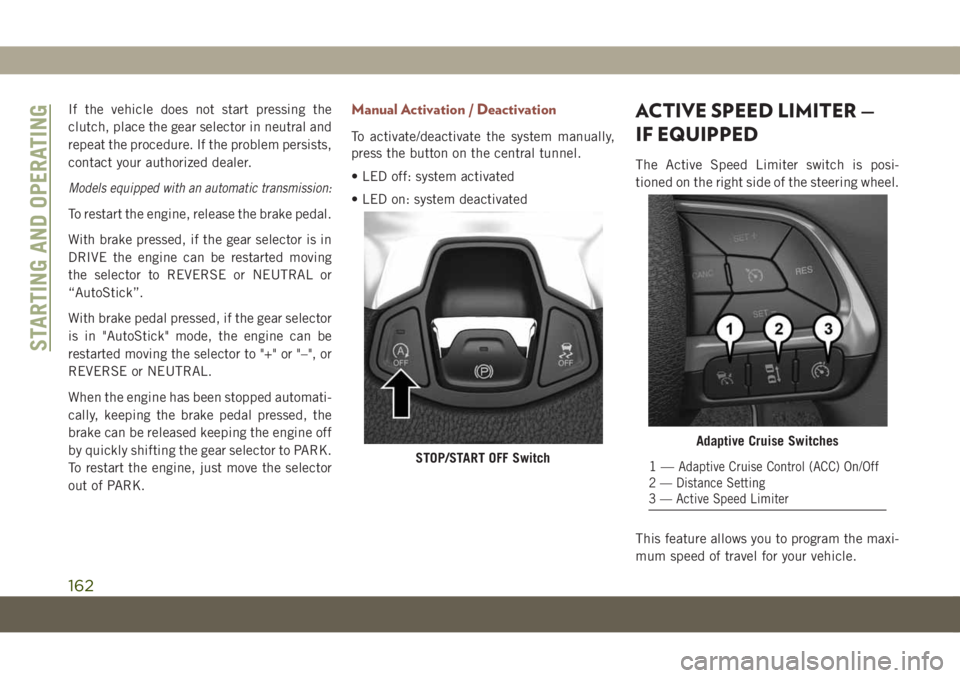
Manual Activation / Deactivation
To activate/deactivate the system manually,
press the button on the central tunnel.
• LED off: system activated
• LED on: system deactivated
ACTIVE SPEED LIMITER —
IF EQUIPPED
The Active Speed Limiter switch is posi-
tioned on the right side of the steering wheel.
This feature allows you to program the maxi-
mum speed of travel for your vehicle.
STOP/START OFF Switch
Adaptive Cruise Switches
1—Adaptive Cruise Control (ACC) On/Off
2 — Distance Setting
3 — Active Speed Limiter
STARTING AND OPERATING
162
Page 169 of 362
• If the button is continually pushed, the set
speed will continue to decrease in 5 mph
decrements until the button is released.
The decrease in set speed is reflected in the
instrument cluster display.
Metric Speed (km/h)
• Pushing the SET(-)button once will result
in a 1 km/h decrease in set speed. Each
subsequent tap of the button results in a
decrease of 1 km/h.
• If the button is continually pushed, the set
speed will continue to decrease in 10 km/h
decrements until the button is released.
The decrease in set speed is reflected in the
instrument cluster display.
NOTE:
• When you override and push the SET(+)
button or SET(-)buttons, the new set
speed will be the current speed of the
vehicle.
• When you use the SET(-)button to decel-
erate, if the engine’s braking power does
not slow the vehicle sufficiently to reach
the set speed, the brake system will auto-
matically slow the vehicle.• If equipped with a manual transmission,
the ACC system applies the brake down to
15 mph (24 km/h) when following a target
vehicle.
• If equipped with a automatic transmission,
The ACC system decelerates the vehicle to
a full stop when following a target vehicle.
If an ACC host vehicle follows a target
vehicle to a standstill, after two seconds the
driver will either have to push the RES
(resume) button, or apply the accelerator
pedal to reengage the ACC to the existing
set speed.
• The ACC system maintains set speed when
driving up hill and down hill. However, a
slight speed change on moderate hills is
normal. In addition, downshifting may oc-
cur while climbing uphill or descending
downhill. This is normal operation and nec-
essary to maintain set speed. When driving
up hill and down hill, the ACC system will
cancel if the braking temperature exceeds
normal range (overheated).Setting The Following Distance In ACC
The specified following distance for ACC can
be set by varying the distance setting be-
tween four bars (longest), three bars (long),
two bars (medium) and one bar (short). Using
this distance setting and the vehicle speed,
ACC calculates and sets the distance to the
vehicle ahead. This distance setting will show
in the instrument cluster display.
To decrease the distance setting, push the
Distance Button and release. Each time the
button is pushed, the distance setting de-
creases by one bar (longer). Once the longest
setting is reached, if the button is pushed
again it will be set to the shortest setting
available.
167
Page 183 of 362
7. Remove the fuel nozzle and close the fuel
door.
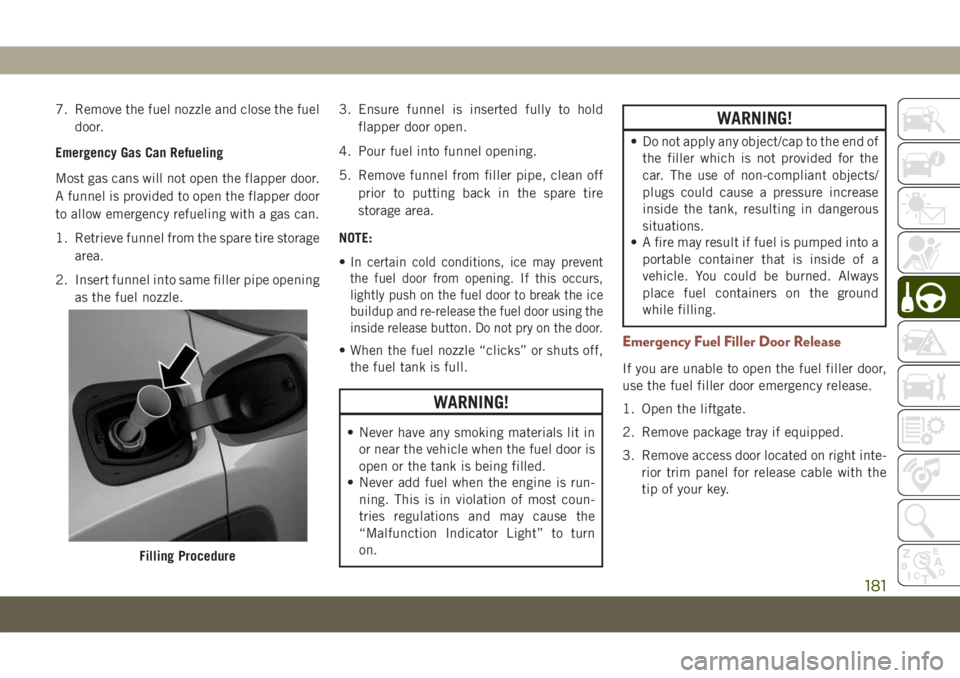
Emergency Gas Can Refueling
Most gas cans will not open the flapper door.
A funnel is provided to open the flapper door
to allow emergency refueling with a gas can.
1. Retrieve funnel from the spare tire storage
area.
2. Insert funnel into same filler pipe opening
as the fuel nozzle.3. Ensure funnel is inserted fully to hold
flapper door open.
4. Pour fuel into funnel opening.
5. Remove funnel from filler pipe, clean off
prior to putting back in the spare tire
storage area.
NOTE:
•
In certain cold conditions, ice may prevent
the fuel door from opening. If this occurs,
lightly push on the fuel door to break the ice
buildup and re-release the fuel door using the
inside release button. Do not pry on the door.
• When the fuel nozzle “clicks” or shuts off,
the fuel tank is full.
WARNING!
• Never have any smoking materials lit in
or near the vehicle when the fuel door is
open or the tank is being filled.
• Never add fuel when the engine is run-
ning. This is in violation of most coun-
tries regulations and may cause the
“Malfunction Indicator Light” to turn
on.
WARNING!
• Do not apply any object/cap to the end of
the filler which is not provided for the
car. The use of non-compliant objects/
plugs could cause a pressure increase
inside the tank, resulting in dangerous
situations.
• A fire may result if fuel is pumped into a
portable container that is inside of a
vehicle. You could be burned. Always
place fuel containers on the ground
while filling.
Emergency Fuel Filler Door Release
If you are unable to open the fuel filler door,
use the fuel filler door emergency release.
1. Open the liftgate.
2. Remove package tray if equipped.
3. Remove access door located on right inte-
rior trim panel for release cable with the
tip of your key.
Filling Procedure
181
Page 185 of 362
REFUELING THE VEHICLE —
DIESEL ENGINE
The Capless Fuel System uses a flapper
placed at the filler pipe of the fuel tank; it
opens and closes automatically upon
insertion/extraction of the fuel nozzle. The
Capless Fuel System is designed so that it
prevents the filling of an incorrect type of
fuel.
1. Unlock the Fuel Filler Door by pushing the
unlock button on the key fob or the unlock
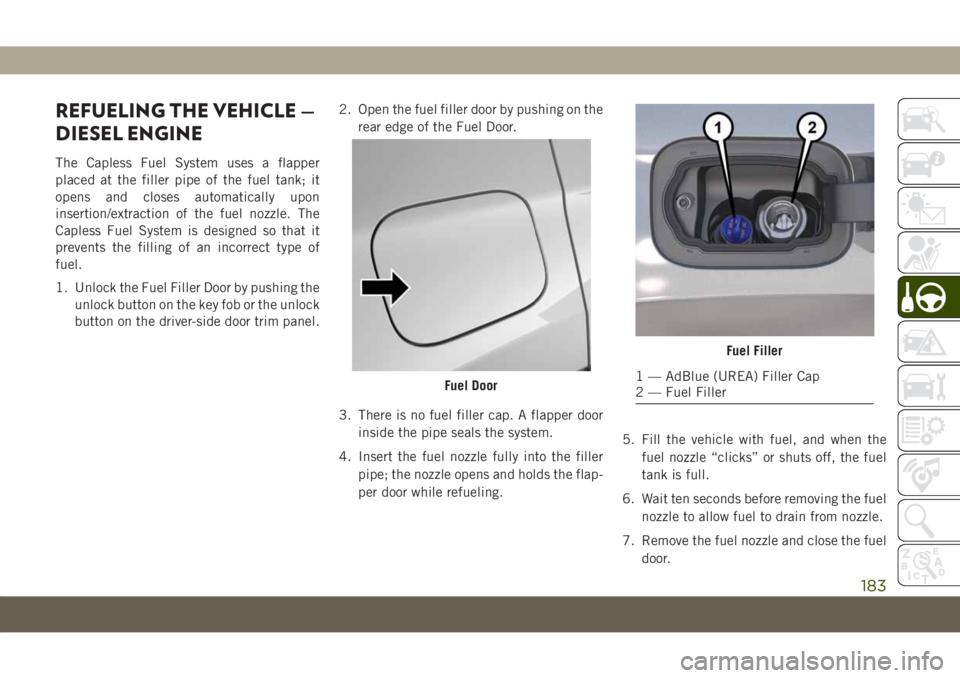
button on the driver-side door trim panel.2. Open the fuel filler door by pushing on the
rear edge of the Fuel Door.
3. There is no fuel filler cap. A flapper door
inside the pipe seals the system.
4. Insert the fuel nozzle fully into the filler
pipe; the nozzle opens and holds the flap-
per door while refueling.5. Fill the vehicle with fuel, and when the
fuel nozzle “clicks” or shuts off, the fuel
tank is full.
6. Wait ten seconds before removing the fuel
nozzle to allow fuel to drain from nozzle.
7. Remove the fuel nozzle and close the fuel
door.
Fuel Door
Fuel Filler
1 — AdBlue (UREA) Filler Cap
2 — Fuel Filler
183