lock JEEP COMPASS 2020 Owner handbook (in English)
[x] Cancel search | Manufacturer: JEEP, Model Year: 2020, Model line: COMPASS, Model: JEEP COMPASS 2020Pages: 328, PDF Size: 8.85 MB
Page 195 of 328
193
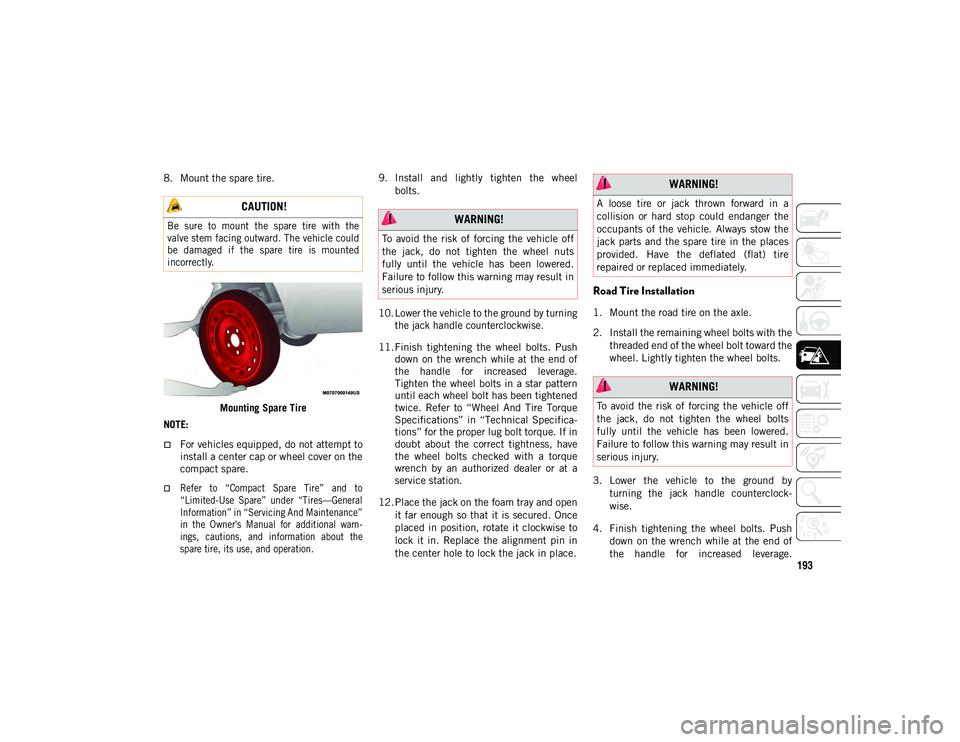
8. Mount the spare tire.Mounting Spare Tire
NOTE:
For vehicles equipped, do not attempt to install a center cap or wheel cover on the
compact spare.
Refer to “Compact Spare Tire” and to
“Limited-Use Spare” under “Tires—General
Information” in “Servicing And Maintenance”
in the Owner's Manual for additional warn- ings, cautions, and information about thespare tire, its use, and operation.
9. Install and lightly tighten the wheel
bolts.
10. Lower the vehicle to the ground by turning the jack handle counterclockwise.
11. Finish tightening the wheel bolts. Push down on the wrench while at the end of
the handle for increased leverage.
Tighten the wheel bolts in a star pattern
until each wheel bolt has been tightened
twice. Refer to “Wheel And Tire Torque
Specifications” in “Technical Specifica -
tions” for the proper lug bolt torque. If in
doubt about the correct tightness, have
the wheel bolts checked with a torque
wrench by an authorized dealer or at a
service station.
12. Place the jack on the foam tray and open it far enough so that it is secured. Once
placed in position, rotate it clockwise to
lock it in. Replace the alignment pin in
the center hole to lock the jack in place.
Road Tire Installation
1. Mount the road tire on the axle.
2. Install the remaining wheel bolts with thethreaded end of the wheel bolt toward the
wheel. Lightly tighten the wheel bolts.
3. Lower the vehicle to the ground by turning the jack handle counterclock -
wise.
4. Finish tightening the wheel bolts. Push down on the wrench while at the end of
the handle for increased leverage.
CAUTION!
Be sure to mount the spare tire with the
valve stem facing outward. The vehicle could
be damaged if the spare tire is mounted
incorrectly.
WARNING!
To avoid the risk of forcing the vehicle off
the jack, do not tighten the wheel nuts
fully until the vehicle has been lowered.
Failure to follow this warning may result in
serious injury.
WARNING!
A loose tire or jack thrown forward in a
collision or hard stop could endanger the
occupants of the vehicle. Always stow the
jack parts and the spare tire in the places
provided. Have the deflated (flat) tire
repaired or replaced immediately.
WARNING!
To avoid the risk of forcing the vehicle off
the jack, do not tighten the wheel bolts
fully until the vehicle has been lowered.
Failure to follow this warning may result in
serious injury.
2020_JEEP_M6_UG_UK.book Page 193
Page 196 of 328
IN CASE OF EMERGENCY
194
Tighten the wheel bolts in a star pattern
until each wheel bolt has been tightened
twice. Refer to “Wheel And Tire Torque
Specifications” in “Technical Specifica-
tions” for the proper lug bolt torque. If in
doubt about the correct tightness, have
them checked with a torque wrench by an
authorized dealer or service station.
5. Lower the jack until it is free. Remove the wheel blocks. Reassemble the lug
wrench to the jack assembly and stow it
in the spare tire area. Secure the
assembly using the means provided.
Release the parking brake before driving
the vehicle.
6. After 25 miles (40 km), check the wheel bolt torque with a torque wrench to
ensure that all wheel bolts are properly
seated against the wheel.
EC Declaration Of Conformance
1. The undersigned, Jaswant Singh, repre-
senting the Moonlight Tools Pvt. Ltd.,
herewith declares that the machinery
described below fulfills all the relevant
provisions of:
The EC-directive 2006/42/EC on Machinery 2. Description of machinery.
a. Generic Denomination: Pantograph
jack
b. Function: Lifting Motor Vehicle
3. Manufacturer Detail Moonlight Tools Pvt. Ltd.
Vill. Jaspalon, G.T. Road Doraha
Distt. Ludhiana (141421) Punjab (India)
Teh. PH. No. 01628 258302
4. Authorized Person to compile the tech -
nical file
Mr. Jaswant Singh DGM (QA & Dev.)
Moonlight Tools Pvt. Ltd.
Ludhiana
5. Reference standard: PF-90065 NOTE:
This declaration becomes invalid, if tech
-
nical or operational modifications are intro -
duced without the manufacture’s consent.
Follow operational manual and instructions
for use.
German Translation
Model
Code Model
Name Type Working
load
M6 (556) MPV MLF1 1250Kg
Date Place
Signature Seal
29–03–
2017 Doraha
Ludhiana
2020_JEEP_M6_UG_UK.book Page 194
Page 204 of 328
IN CASE OF EMERGENCY
202
JUMP STARTING
If your vehicle has a discharged battery, it
can be jump started using a set of jumper
cables and a battery in another vehicle or by
using a portable battery booster pack. Jump
starting can be dangerous if done improp-
erly, so please follow the procedures in this
section carefully.
NOTE:
When using a portable battery booster pack,
follow the manufacturer’s operating instruc -
tions and precautions.
Preparations For Jump Start
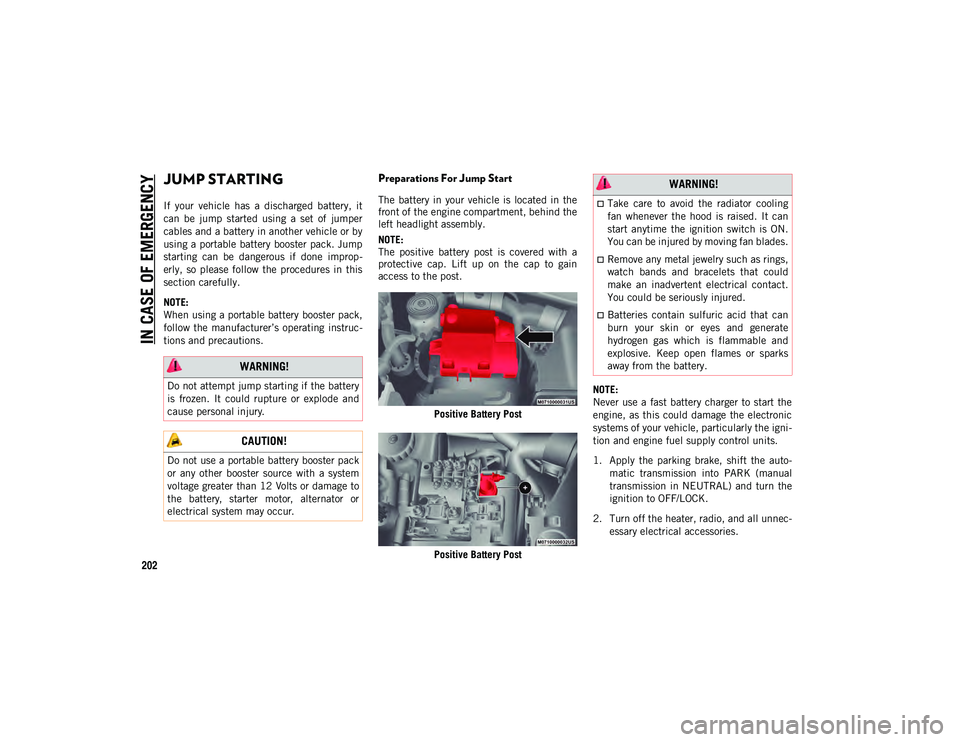
The battery in your vehicle is located in the
front of the engine compartment, behind the
left headlight assembly.
NOTE:
The positive battery post is covered with a
protective cap. Lift up on the cap to gain
access to the post.
Positive Battery Post
Positive Battery Post NOTE:
Never use a fast battery charger to start the
engine, as this could damage the electronic
systems of your vehicle, particularly the igni
-
tion and engine fuel supply control units.
1. Apply the parking brake, shift the auto -
matic transmission into PARK (manual
transmission in NEUTRAL) and turn the
ignition to OFF/LOCK.
2. Turn off the heater, radio, and all unnec -
essary electrical accessories.
WARNING!
Do not attempt jump starting if the battery
is frozen. It could rupture or explode and
cause personal injury.
CAUTION!
Do not use a portable battery booster pack
or any other booster source with a system
voltage greater than 12 Volts or damage to
the battery, starter motor, alternator or
electrical system may occur.
WARNING!
Take care to avoid the radiator cooling
fan whenever the hood is raised. It can
start anytime the ignition switch is ON.
You can be injured by moving fan blades.
Remove any metal jewelry such as rings,
watch bands and bracelets that could
make an inadvertent electrical contact.
You could be seriously injured.
Batteries contain sulfuric acid that can
burn your skin or eyes and generate
hydrogen gas which is flammable and
explosive. Keep open flames or sparks
away from the battery.
2020_JEEP_M6_UG_UK.book Page 202
Page 205 of 328
203
3. If using another vehicle to jump start thebattery, park the vehicle within the
jumper cables reach, set the parking
brake and make sure the ignition is OFF/
LOCK.
Jump Starting Procedure
Connecting The Jumper Cables
1. Connect the positive (+) end of the
jumper cable to the positive (+) post of
the discharged vehicle.
2. Connect the opposite end of the positive (+) jumper cable to the positive (+) post
of the booster battery.
3. Connect the negative (-) end of the
jumper cable to the negative (-) post of
the booster battery.
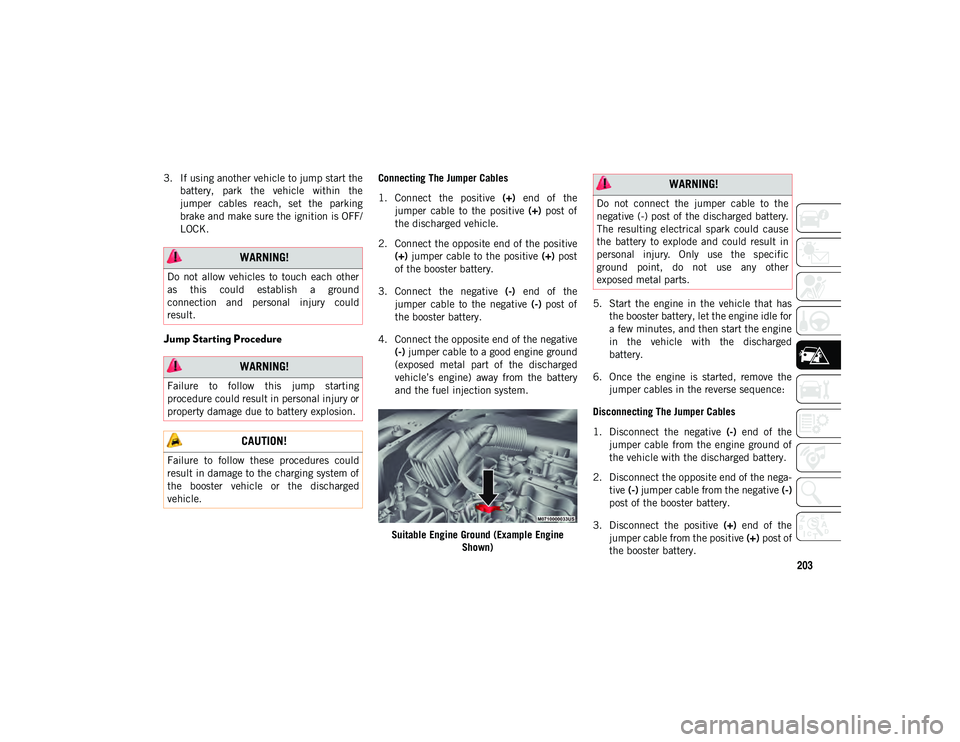
4. Connect the opposite end of the negative (-) jumper cable to a good engine ground
(exposed metal part of the discharged
vehicle’s engine) away from the battery
and the fuel injection system.
Suitable Engine Ground (Example Engine Shown) 5. Start the engine in the vehicle that has
the booster battery, let the engine idle for
a few minutes, and then start the engine
in the vehicle with the discharged
battery.
6. Once the engine is started, remove the jumper cables in the reverse sequence:
Disconnecting The Jumper Cables
1. Disconnect the negative (-) end of the
jumper cable from the engine ground of
the vehicle with the discharged battery.
2. Disconnect the opposite end of the nega -
tive (-) jumper cable from the negative (-)
post of the booster battery.
3. Disconnect the positive (+) end of the
jumper cable from the positive (+) post of
the booster battery.
WARNING!
Do not allow vehicles to touch each other
as this could establish a ground
connection and personal injury could
result.
WARNING!
Failure to follow this jump starting
procedure could result in personal injury or
property damage due to battery explosion.
CAUTION!
Failure to follow these procedures could
result in damage to the charging system of
the booster vehicle or the discharged
vehicle.
WARNING!
Do not connect the jumper cable to the
negative (-) post of the discharged battery.
The resulting electrical spark could cause
the battery to explode and could result in
personal injury. Only use the specific
ground point, do not use any other
exposed metal parts.
2020_JEEP_M6_UG_UK.book Page 203
Page 208 of 328
IN CASE OF EMERGENCY
206
FREEING A STUCK VEHICLE
If your vehicle becomes stuck in mud, sand
or snow, it can often be moved using a
rocking motion. Turn the steering wheel right
and left to clear the area around the front
wheels. For vehicles with automatic trans-
mission, push and hold the lock button on
the gear selector. Then shift back and forth
between DRIVE (D) and REVERSE (R) (for
automatic transmission) or SECOND GEAR
and REVERSE (for manual transmission)
while gently pressing the accelerator.
NOTE:
For vehicles with automatic transmission,
shifts between DRIVE (D) and REVERSE (R)
can only be achieved at wheel speeds of
5 mph (8 km/h) or less. Whenever the trans -
mission remains in NEUTRAL (N) for more
than two seconds, you must press the brake
pedal to engage DRIVE or REVERSE.
Use the least amount of accelerator pedal
pressure that will maintain the rocking
motion without spinning the wheels or racing
the engine. NOTE:
Push the “ESC Off” switch (if necessary), to
place the Electronic Stability Control (ESC)
system in “Partial Off” mode, before rocking
the vehicle. Refer to “Electronic Brake
Control System” in “Safety” in the Owner’s
Manual for further information. Once the
vehicle has been freed, push the “ESC Off”
switch again to restore “ESC On” mode.
WARNING!
Fast spinning tires can be dangerous.
Forces generated by excessive wheel
speeds may cause damage, or even failure,
of the axle and tires. A tire could explode
and injure someone. Do not spin your
vehicle's wheels faster than 30 mph
(48 km/h) or for longer than 30 seconds
continuously without stopping when you
are stuck and do not let anyone near a
spinning wheel, no matter what the speed.
CAUTION!
Racing the engine or spinning the wheels
may lead to transmission overheating
and failure. Allow the engine to idle with
the transmission in NEUTRAL for at
least one minute after every five
rocking-motion cycles. This will mini
-
mize overheating and reduce the risk of
clutch or transmission failure during
prolonged efforts to free a stuck vehicle.
When “rocking” a stuck vehicle by
shifting between DRIVE/SECOND gear
and REVERSE, do not spin the wheels
faster than 15 mph (24 km/h), or drive -
train damage may result.
Revving the engine or spinning the
wheels too fast may lead to transmission
overheating and failure. It can also
damage the tires. Do not spin the wheels
above 30 mph (48 km/h) while in gear
(no transmission shifting occurring).
2020_JEEP_M6_UG_UK.book Page 206
Page 210 of 328
IN CASE OF EMERGENCY
208
Without The Key Fob
Special care must be taken when the vehicle
is towed with the ignition in the LOCK/OFF
mode. The only approved method of towing
without the key fob is with a flatbed truck.
Proper towing equipment is necessary to
prevent damage to the vehicle.
Front-Wheel Drive (FWD) Models — With
Key Fob
The manufacturer recommends towing your
vehicle with all four wheels OFF the ground
using a flatbed.
If flatbed equipment is not available, this
vehicle must be towed with the front wheels
OFF the ground (using a towing dolly, or
wheel lift equipment with the front wheels
raised). Ensure that the Electric Park Brake is
released, and remains released, while being
towed. The Electric Park Brake does not
need to be released if all four wheels are off
the ground.
4x4 Models
The manufacturer requires towing with all
four wheels
OFF the ground.
Acceptable methods are to tow the vehicle
on a flatbed, or with one end of the vehicle
raised and the opposite end on a towing
dolly.
Ensure that the Electric Park Brake is
released, and remains released, while
being towed.
Do not use a bumper mounted clamp-on
tow bar on your vehicle. The bumper face
bar will be damaged.
CAUTION! (Continued)
CAUTION!
Towing this vehicle in violation of the
above requirements can cause severe
engine and/or transmission damage.
Damage from improper towing is not
covered under the New Vehicle Limited
Warranty.
CAUTION!
Front or rear wheel lifts must not be used
(if the remaining wheels are on the
ground). Internal damage to the trans-
mission or transfer case will occur if a
front or rear wheel lift is used when
towing.
Towing this vehicle in violation of the
above requirements can cause severe
transmission and/or transfer case
damage. Damage from improper towing
is not covered under the New Vehicle
Limited Warranty.
Proper towing or lifting equipment is
required to prevent damage to your
vehicle. Use only tow bars and other
equipment designed for this purpose,
following equipment manufacturer's
instructions.
Use of safety chains in mandatory.
Attach a tow bar or other towing devices
to main structural members of the
vehicle, not to bumpers or associated
brackets.
2020_JEEP_M6_UG_UK.book Page 208
Page 211 of 328
209
Emergency Tow Hooks
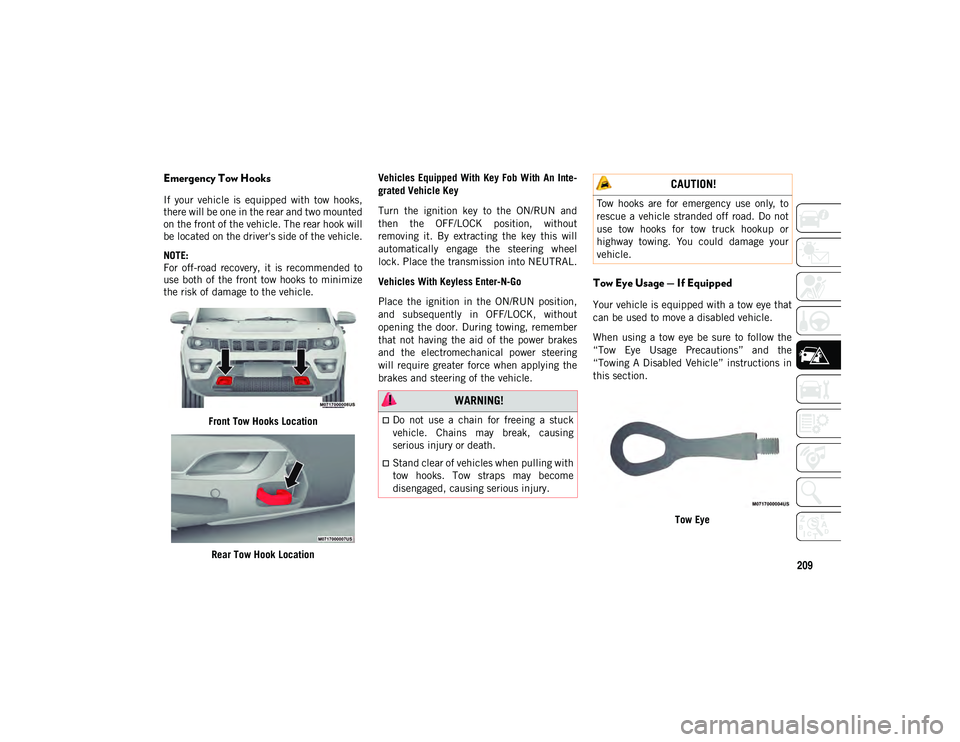
If your vehicle is equipped with tow hooks,
there will be one in the rear and two mounted
on the front of the vehicle. The rear hook will
be located on the driver's side of the vehicle.
NOTE:
For off-road recovery, it is recommended to
use both of the front tow hooks to minimize
the risk of damage to the vehicle.Front Tow Hooks Location
Rear Tow Hook Location Vehicles Equipped With Key Fob With An Inte
-
grated Vehicle Key
Turn the ignition key to the ON/RUN and
then the OFF/LOCK position, without
removing it. By extracting the key this will
automatically engage the steering wheel
lock. Place the transmission into NEUTRAL.
Vehicles With Keyless Enter-N-Go
Place the ignition in the ON/RUN position,
and subsequently in OFF/LOCK, without
opening the door. During towing, remember
that not having the aid of the power brakes
and the electromechanical power steering
will require greater force when applying the
brakes and steering of the vehicle.
Tow Eye Usage — If Equipped
Your vehicle is equipped with a tow eye that
can be used to move a disabled vehicle.
When using a tow eye be sure to follow the
“Tow Eye Usage Precautions” and the
“Towing A Disabled Vehicle” instructions in
this section.
Tow Eye
WARNING!
Do not use a chain for freeing a stuck
vehicle. Chains may break, causing
serious injury or death.
Stand clear of vehicles when pulling with
tow hooks. Tow straps may become
disengaged, causing serious injury.
CAUTION!
Tow hooks are for emergency use only, to
rescue a vehicle stranded off road. Do not
use tow hooks for tow truck hookup or
highway towing. You could damage your
vehicle.
2020_JEEP_M6_UG_UK.book Page 209
Page 263 of 328
261
EXTERIOR:
• Rock Rails• Front End Cover• Hood And Bodyside Decals
• Wheels • Splash Guards• Air Deflectors
• Wheel Locks • Locking Gas Cap• Hitch Receiver
• License Plate Frames • Valve Stem Covers
• Towing Accessories
INTERIOR:
• Premium Floor Mats • Roadside Safety Kit• Molded Cargo Tray
• Security Covers • Bright Pedal Kit• Katzkin Leather Interiors
• All-Weather Mats • Door Sill Guards• Cargo Mat
• Cargo Net • Cargo Management Accessories
ELECTRONICS:
• Remote Start • Speaker Upgrades• Electronic Vehicle Tracking System
CARRIERS:
• Hitch-mount Bike Carrier • Roof-mount Ski and Snowboard Carrier • Roof-mount Bike Carriers
• Roof Top Cargo Basket • Roof-mount Watersports Carrier• Roof Cargo Box Carrier
• Roof Rails • Cross Rails• Roof-mount Canoe Carrier
• Roof-mount Surfboard Carrier
2020_JEEP_M6_UG_UK.book Page 261
Page 265 of 328
263
UCONNECT 3 WITH 5–INCH
DISPLAY — IF EQUIPPED
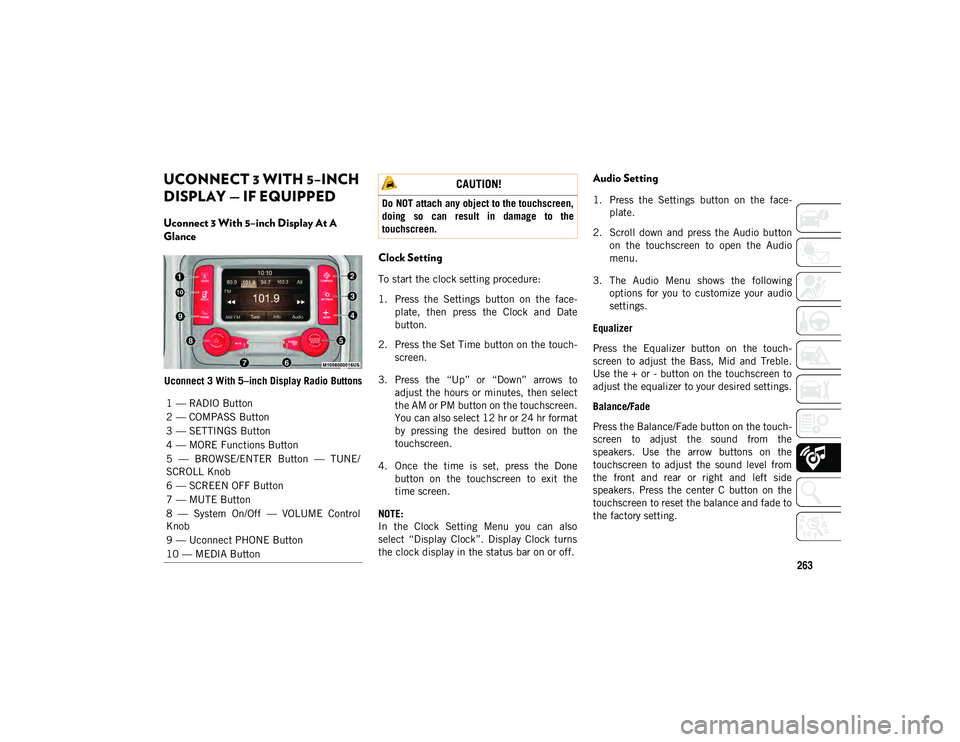
Uconnect 3 With 5–inch Display At A
Glance
Uconnect 3 With 5–inch Display Radio Buttons
Clock Setting
To start the clock setting procedure:
1. Press the Settings button on the face-
plate, then press the Clock and Date
button.
2. Press the Set Time button on the touch -
screen.
3. Press the “Up” or “Down” arrows to adjust the hours or minutes, then select
the AM or PM button on the touchscreen.
You can also select 12 hr or 24 hr format
by pressing the desired button on the
touchscreen.
4. Once the time is set, press the Done button on the touchscreen to exit the
time screen.
NOTE:
In the Clock Setting Menu you can also
select “Display Clock”. Display Clock turns
the clock display in the status bar on or off.
Audio Setting
1. Press the Settings button on the face -
plate.
2. Scroll down and press the Audio button on the touchscreen to open the Audio
menu.
3. The Audio Menu shows the following options for you to customize your audio
settings.
Equalizer
Press the Equalizer button on the touch -
screen to adjust the Bass, Mid and Treble.
Use the + or - button on the touchscreen to
adjust the equalizer to your desired settings.
Balance/Fade
Press the Balance/Fade button on the touch -
screen to adjust the sound from the
speakers. Use the arrow buttons on the
touchscreen to adjust the sound level from
the front and rear or right and left side
speakers. Press the center C button on the
touchscreen to reset the balance and fade to
the factory setting.
1 — RADIO Button
2 — COMPASS Button
3 — SETTINGS Button
4 — MORE Functions Button
5 — BROWSE/ENTER Button — TUNE/
SCROLL Knob
6 — SCREEN OFF Button
7 — MUTE Button
8 — System On/Off — VOLUME Control
Knob
9 — Uconnect PHONE Button
10 — MEDIA Button
CAUTION!
Do NOT attach any object to the touchscreen,
doing so can result in damage to the
touchscreen.
2020_JEEP_M6_UG_UK.book Page 263
Page 269 of 328
267
Apps — If Equipped
To access the Apps, Press the More button,
and the press the Apps button to browse the
list of applications:
EcoDrive
MyCar
TuneIn
Deezer
Reuters
Twitter
Facebook Check-In, and many more.
UCONNECT 4 WITH 7-INCH
DISPLAY
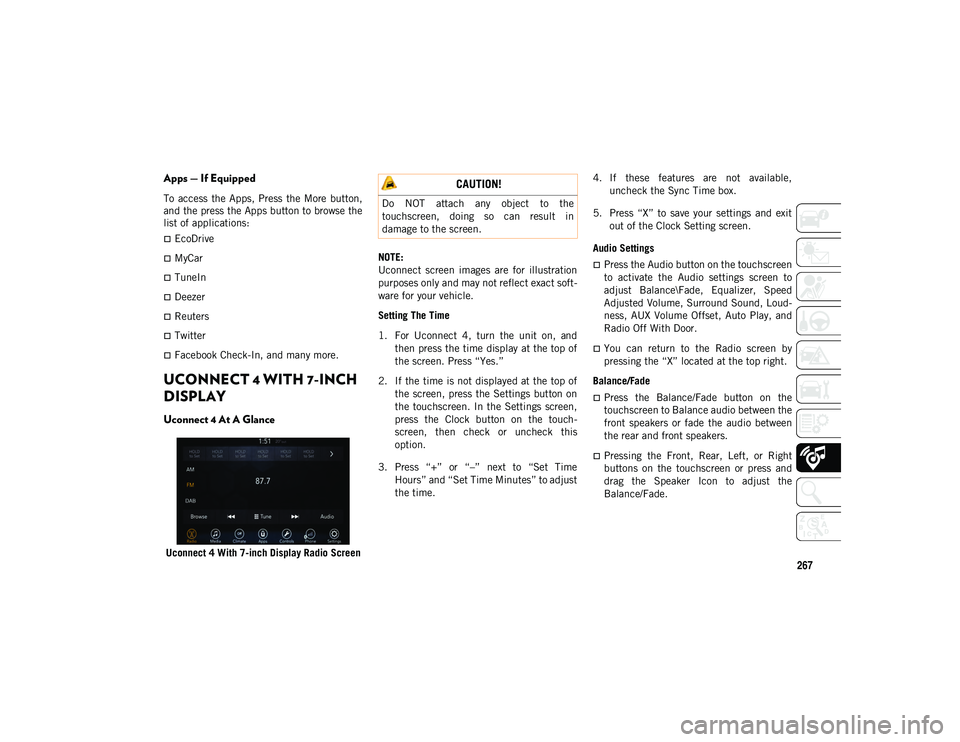
Uconnect 4 At A Glance
Uconnect 4 With 7-inch Display Radio ScreenNOTE:
Uconnect screen images are for illustration
purposes only and may not reflect exact soft
-
ware for your vehicle.
Setting The Time
1. For Uconnect 4, turn the unit on, and then press the time display at the top of
the screen. Press “Yes.”
2. If the time is not displayed at the top of the screen, press the Settings button on
the touchscreen. In the Settings screen,
press the Clock button on the touch -
screen, then check or uncheck this
option.
3. Press “+” or “–” next to “Set Time Hours” and “Set Time Minutes” to adjust
the time. 4. If these features are not available,
uncheck the Sync Time box.
5. Press “X” to save your settings and exit out of the Clock Setting screen.
Audio Settings
Press the Audio button on the touchscreen
to activate the Audio settings screen to
adjust Balance\Fade, Equalizer, Speed
Adjusted Volume, Surround Sound, Loud -
ness, AUX Volume Offset, Auto Play, and
Radio Off With Door.
You can return to the Radio screen by
pressing the “X” located at the top right.
Balance/Fade
Press the Balance/Fade button on the
touchscreen to Balance audio between the
front speakers or fade the audio between
the rear and front speakers.
Pressing the Front, Rear, Left, or Right
buttons on the touchscreen or press and
drag the Speaker Icon to adjust the
Balance/Fade.
CAUTION!
Do NOT attach any object to the
touchscreen, doing so can result in
damage to the screen.
2020_JEEP_M6_UG_UK.book Page 267