JEEP GLADIATOR 2023 Owners Manual
Manufacturer: JEEP, Model Year: 2023, Model line: GLADIATOR, Model: JEEP GLADIATOR 2023Pages: 448, PDF Size: 17.37 MB
Page 211 of 448

STARTING AND OPERATING209
additional low speed pulling power is needed.
Vehicle speeds in excess of 25 mph (40 km/h)
should be avoided when in 4L range.
Simultaneous Brake And Throttle
Operation
Many off-road driving conditions require the
simultaneous use of the brake and throttle
(two-footed driving). When climbing rocks, logs, or
other stepped objects, using light brake pressure
with light throttle will keep the vehicle from jerking
or lurching. This technique is also used when you
need to stop and restart a vehicle on a steep
incline.
Driving In Snow, Mud And Sand
SNOW
In heavy snow or for additional control and traction
at slower speeds, shift the transmission into a low
gear and the transfer case into 4L if necessary. Do
not shift to a lower gear than necessary to maintain
headway. Over-revving the engine can spin the
wheels and traction will be lost. If you start to slow
to a stop, try turning your steering wheel no more than a quarter turn quickly back and forth, while
still applying throttle. This will allow the tires to get
fresh traction and help maintain your momentum.
MUD
Deep mud creates a great deal of suction around
the tires and is very difficult to get through. You
should use DRIVE, with the transfer case in the 4L
position to maintain your momentum. If you start to
slow to a stop, try turning your steering wheel no
more than a quarter turn quickly back and forth for
additional traction. Mud holes pose an increased
threat of vehicle damage and getting stuck. They
are normally full of debris from previous vehicles
getting stuck. As a good practice before entering
any mud hole, get out and determine how deep it
is, if there are any hidden obstacles and if the
vehicle can be safely recovered if stuck.
SAND
Soft sand is very difficult to travel through with full
tire pressure. When crossing soft, sandy spots in a
trail, maintain your vehicle's momentum and do
not stop. The key to driving in soft sand is using the
appropriate tire pressure, accelerating slowly, avoiding abrupt maneuvers and maintaining the
vehicle's momentum. If you are going to be driving
on large soft sandy areas or dunes, reduce your
tire pressure to a minimum of 15 psi (103 kPa) to
allow for a greater tire surface area. Reduced tire
pressure will drastically improve your traction and
handling while driving on the soft sand, but you
must return the tires to normal air pressure before
driving on pavement or other hard surfaces. Be
sure you have a way to reinflate the tires prior to
reducing the pressure.
Crossing Obstacles (Rocks And Other High
Points)
While driving off-road, you will encounter many
types of terrain. These varying types of terrain bring
different types of obstacles. Before proceeding,
review the path ahead to determine the correct
approach and your ability to safely recover the
vehicle if something goes wrong. Keeping a firm
grip on the steering wheel, bring the vehicle to a
complete stop and then inch the vehicle forward
CAUTION!
Do not use 4L range when operating the vehicle
on dry pavement. Driveline hardware damage
can result.
CAUTION!
On icy or slippery roads, do not downshift at high
engine RPM or vehicle speeds, because engine
braking may cause skidding and loss of control.
CAUTION!
Reduced tire pressures may cause tire
unseating and total loss of air pressure. To
reduce the risk of tire unseating, while at a
reduced tire pressure, reduce your speed and
avoid sharp turns or abrupt maneuvers.
4
23_JT_OM_EN_USC_t.book Page 209
Page 212 of 448
210STARTING AND OPERATING
until it makes contact with the object. Apply the
throttle lightly while holding a light brake pressure
and ease the vehicle up and over the object.
USING A SPOTTER
There are many times where it is hard to see the
obstacle or determine the correct path.
Determining the correct path can be extremely
difficult when you are confronting many obstacles.
In these cases have someone guide you over,
through, or around the obstacle. Have the person
stand a safe distance in front of you where they
can see the obstacle, watch your tires and
undercarriage, and guide you through.
CROSSING LARGE ROCKS
When approaching large rocks, choose a path
which ensures you drive over the largest of them
with your tires. This will lift your undercarriage over
the obstacle. The tread of the tire is tougher and
thicker than the side wall and is designed to take
the abuse. Always look ahead and make every
effort to cross the large rocks with your tires.
CROSSING A RAVINE, GULLY, DITCH,
WASHOUT OR RUT
When crossing a ravine, gully, ditch, washout or a
large rut, the angled approach is the key to
maintaining your vehicle's mobility. Approach
these obstacles at a 45-degree angle and let each
tire go through the obstacle independently. You
need to use caution when crossing large obstacles
with steep sides. Do not attempt to cross any large
obstacle with steep sides at an angle great enough
to put the vehicle at risk of a rollover. If you get
caught in a rut, dig a small trench to the right or left
at a 45-degree angle ahead of the front tires. Use
the removed dirt to fill the rut ahead of the turnout
you just created. You should now be able to drive
out following the trench you just created at a
45-degree angle.
CROSSING LOGS
To cross a log, approach it at a slight angle
(approximately 10 to 15 degrees). This allows one
front tire to be on top of the log while the other just
starts to climb the log. While climbing the log,
modulate your brake and accelerator to avoid
spinning the log out from under your tires. Then
ease the vehicle off the log using your brakes.
GETTING HIGH-CENTERED
If you get hung up or high-centered on an object,
get out of the vehicle and try to determine what the
vehicle is hung up on, where it is contacting the
underbody and what is the best direction to
recover the vehicle. Depending on what you are in
contact with, jack the vehicle up and place a few
rocks under the tires so the weight is off of the high
point when you let the vehicle down. You can also
try rocking the vehicle or winching the vehicle off
the object.
WARNING!
Crossing obstacles can cause abrupt steering
system loading which could cause you to lose
control of your vehicle.
CAUTION!
Never attempt to straddle a rock that is large
enough to strike your axles or undercarriage.
Never attempt to drive over a rock which is
large enough to contact the door sills.
WARNING!
There is an increased risk of rollover when
crossing an obstacle, at any angle, with steep
sides.
CAUTION!
Do not attempt to cross a log with a greater
diameter than the running ground clearance or
the vehicle will become high-centered.
CAUTION!
Winching or rocking the vehicle off hard objects
increases the risk of underbody damage.
23_JT_OM_EN_USC_t.book Page 210
Page 213 of 448
STARTING AND OPERATING211
Hill Climbing
Hill climbing requires good judgment and a good
understanding of your abilities and your vehicle's
limitations. Hills can cause serious problems.
Some are just too steep to climb and should not be
attempted. You should always feel confident with
the vehicle and your abilities. You should always
climb hills straight up and down. Never attempt to
climb a hill on an angle.
BEFORE CLIMBING A STEEP HILL
As you approach a hill, consider its grade or
steepness. Determine if it is too steep. Look to see
what the traction is on the hill side trail. Is the trail
straight up and down? What is on top and the other
side? Are there ruts, rocks, branches or other
obstacles on the path? Can you safely recover the
vehicle if something goes wrong? If everything
looks good and you feel confident, shift the
transmission into a lower gear with 4L engaged,
and proceed with caution, maintaining your
momentum as you climb the hill.
DRIVING UP HILL
Once you have determined your ability to proceed
and have shifted into the appropriate gear, line
your vehicle up for the straightest possible run.
Accelerate with an easy constant throttle and apply
more power as you start up the hill. Do not race
forward into a steep grade; the abrupt change of grade could cause you to lose control. If the front
end begins to bounce, ease off the throttle slightly
to bring all four tires back on the ground. As you
approach the crest of the hill, ease off the throttle
and slowly proceed over the top. If the wheels start
to slip as you approach the crest of a hill, ease off
the accelerator and maintain headway by turning
the steering wheel no more than a quarter turn
quickly back and forth. This will provide a fresh
"bite" into the surface and will usually provide
enough traction to complete the climb. If you do
not make it to the top, place the vehicle in
REVERSE and back straight down the grade using
engine resistance along with the vehicle brakes.
DRIVING DOWNHILL
Before driving down a steep hill, you need to
determine if it is too steep for a safe descent. What
is the surface traction? Is the grade too steep to
maintain a slow, controlled descent? Are there
obstacles? Is it a straight descent? Is there plenty
of distance at the base of the hill to regain control
if the vehicle descends too fast? If you feel
confident in your ability to proceed, then make sure you are in 4L and proceed with caution. Allow
engine braking to control the descent and apply
your brakes, if necessary, but do not allow the tires
to lock.
DRIVING ACROSS AN INCLINE
If at all possible, avoid driving across an incline. If
it is necessary, know your vehicle's abilities. Driving
across an incline places more weight on the
downhill wheels, which increases the possibilities
of a downhill slide or rollover. Make sure the
surface has good traction with firm and stable
soils. If possible, transverse the incline at an angle
heading slightly up or down.WARNING!
Never attempt to climb a hill at an angle or turn
around on a steep grade. Driving across an
incline increases the risk of a rollover, which may
result in severe injury.
WARNING!
Do not descend a steep grade in NEUTRAL. Use
vehicle brakes in conjunction with engine
braking. Descending a grade too fast could
cause you to lose control and be seriously
injured or killed.
WARNING!
Driving across an incline increases the risk of a
rollover, which may result in severe injury.
4
23_JT_OM_EN_USC_t.book Page 211
Page 214 of 448
212STARTING AND OPERATING
IF YOU STALL OR BEGIN TO LOSE HEADWAY
If you stall or begin to lose headway while climbing
a steep hill, allow your vehicle to come to a stop
and immediately apply the brake. Restart the
engine and shift into REVERSE. Back slowly down
the hill allowing engine braking to control the
descent and apply your brakes, if necessary, but
do not allow the tires to lock.
Driving Through Water
Extreme care should be taken crossing any type of
water. Water crossings should be avoided, if
possible, and only be attempted when necessary in
a safe, responsible manner. You should only drive
through areas which are designated and approved.
You should tread lightly and avoid damage to the
environment. You should know your vehicle's
abilities and be able to recover it if something goes wrong. You should never stop or shut a vehicle off
when crossing deep water unless you ingested
water into the engine air intake. If the engine stalls,
do not attempt to restart it. Determine if it has
ingested water first. The key to any crossing is low
and slow. Shift into FIRST gear (manual
transmission), or DRIVE (automatic transmission),
with the transfer case in the 4L position and
proceed very slowly with a constant slow speed
(3 to 5 mph {5 to 8 km/h} maximum) and light
throttle. Keep the vehicle moving; do not try to
accelerate through the crossing. After crossing any
water higher than the bottom of the axle
differentials, you should inspect all of the vehicle
fluids for signs of water ingestion.
BEFORE YOU CROSS ANY TYPE OF WATER
As you approach any type of water, you need to
determine if you can cross it safely and
responsibly. If necessary, get out and walk through
the water or probe it with a stick. You need to be
sure of its depth, approach angle, current and
bottom condition. Be careful of murky or muddy
waters; check for hidden obstacles. Make sure you
will not be intruding on any wildlife, and you can
recover the vehicle if necessary. The key to a safe
crossing is the water depth, current and bottom
conditions. On soft bottoms, the vehicle will sink in,
effectively increasing the water level on the
vehicle. Be sure to consider this when determining
the depth and the ability to safely cross.
CROSSING PUDDLES, POOLS, FLOODED
AREAS OR OTHER STANDING WATER
Puddles, pools, flooded or other standing water
areas normally contain murky or muddy waters.
These water types normally contain hidden
obstacles and make it difficult to determine an
accurate water depth, approach angle, and bottom
condition. Murky or muddy water holes are where
you want to hook up tow straps prior to entering.
This makes for a faster, cleaner and easier vehicle
recovery. If you are able to determine you can
safely cross, than proceed using the low and slow
method.
WARNING!
If the engine stalls or you lose headway or
cannot make it to the top of a steep hill or grade,
never attempt to turn around. To do so may
result in tipping and rolling the vehicle, which
may result in severe injury. Always back carefully
straight down a hill in REVERSE. Never back
down a hill in NEUTRAL using only the vehicle
brakes. Never drive diagonally across a hill,
always drive straight up or down.
CAUTION!
Water ingestion into the axles, transmission,
transfer case, engine or vehicle interior can
occur if you drive too fast or through too deep
of water. Water can cause permanent damage
to engine, driveline or other vehicle compo -
nents, and your brakes will be less effective
once wet and/or muddy.
When driving through water, do not exceed
5 mph (8 km/h). Always check water depth
before entering as a precaution, and check all
fluids afterward. Driving through water may
cause damage that may not be covered by the
New Vehicle Limited Warranty.
23_JT_OM_EN_USC_t.book Page 212
Page 215 of 448
STARTING AND OPERATING213
CROSSING DITCHES, STREAMS, SHALLOW
RIVERS OR OTHER FLOWING WATER
Flowing water can be extremely dangerous. Never
attempt to cross a fast running stream or river
even in shallow water. Fast moving water can
easily push your vehicle downstream, sweeping it
out of control. Even in very shallow water, a high
current can still wash the dirt out from around your
tires putting you and your vehicle in jeopardy.
There is still a high risk of personal injury and
vehicle damage with slower water currents in
depths greater than the vehicle's running ground
clearance. You should never attempt to cross
flowing water which is deeper than the vehicle's
running ground clearance. Even the slowest
current can push the heaviest vehicle downstream
and out of control if the water is deep enough to
push on the large surface area of the vehicle's
body. Before you proceed, determine the speed of
the current, the water's depth, approach angle,
bottom condition and if there are any obstacles.
Then cross at an angle heading slightly upstream
using the low and slow technique.
After Driving Off-Road
Off-road operation puts more stress on your
vehicle than does most on-road driving. After going
off-road, it is always a good idea to check for
damage. That way you can get any problems taken
care of right away and have your vehicle ready
when you need it.
Completely inspect the underbody of your
vehicle. Check tires, body structure, steering,
suspension, driveline, and exhaust system for
damage.
Inspect the radiator for mud and debris and
clean as required.
Check threaded fasteners for looseness, partic -
ularly on the chassis, drivetrain components,
steering, and suspension. Retighten them, if
required, and torque to the values specified in
the Service Manual.
Check for accumulations of plants or brush.
These things could be a fire hazard. They might
hide damage to fuel lines, brake hoses, axle
pinion seals, and propeller shafts.
After extended operation in mud, sand, water, or
similar dirty conditions, have the radiator, fan,
brake rotors, wheels, brake linings, and axle
yokes inspected and cleaned as soon as
possible.
NOTE:Inspect the clutch vent holes in the manual trans -
mission bell housing for mud and debris and clean
as required.
If you experience unusual vibration after driving
in mud, slush or similar conditions, check the
wheels for impacted material. Impacted mate -
rial can cause a wheel imbalance and freeing
the wheels of it will correct the situation.
CAUTION!
Muddy waters can reduce the cooling system
effectiveness by depositing debris onto the
radiator.
WARNING!
Never drive through fast moving deep water. It
can push your vehicle downstream, sweeping it
out of control. This could put you and your
passengers at risk of injury or drowning.
WARNING!
Abrasive material in any part of the brakes may
cause excessive wear or unpredictable braking.
You might not have full braking power when you
need it to prevent a collision. If you have been
operating your vehicle in dirty conditions, get
your brakes checked and cleaned as necessary.
4
23_JT_OM_EN_USC_t.book Page 213
Page 216 of 448

214
MULTIMEDIA
UCONNECT SYSTEMS
For detailed information about your Uconnect
4C/4C NAV With 8.4-inch Display system, refer to
your Uconnect Owner’s Manual Supplement.
NOTE:Uconnect screen images are for illustration
purposes only and may not reflect exact software
for your vehicle.
CYBERSECURITY
Depending on applicability, your vehicle may be
able to send or receive information from a wired or
wireless network. This information allows systems
and features in your vehicle to function properly.Your vehicle may be equipped with certain security
features to reduce the risk of unauthorized and
unlawful access to vehicle systems and wireless
communications. Vehicle software technology
continues to evolve over time and FCA US LLC,
working with its suppliers, evaluates and takes
appropriate steps as needed. As always, if you
experience unusual behavior, contact an
authorized dealer immediately, Ú
page 428, or
refer to your Uconnect Owner’s Manual
Supplement for additional contact information.
The risk of unauthorized and unlawful access to
your vehicle systems may still exist, even if the
most recent version of vehicle software (such as
Uconnect software) is installed.
NOTE:To help further improve user experience, features,
stability, etc., and minimize the potential risk of a
security breach, vehicle owners should routinely
check www.driveuconnect.com (US Residents) or
www.driveuconnect.ca (Canadian Residents) to
learn about available Uconnect software updates.
WARNING!
ONLY insert trusted media devices/compo -
nents into your vehicle. Media of unknown
origin could possibly contain malicious soft -
ware, and if installed in your vehicle, it may
increase the possibility for vehicle systems to
be breached.
As always, if you experience unusual vehicle
behavior, contact an authorized dealer imme -
diately.
23_JT_OM_EN_USC_t.book Page 214
Page 217 of 448
MULTIMEDIA215
UCONNECT SETTINGS
The Uconnect system uses a combination of
buttons on the touchscreen and buttons on the
faceplate located on the center of the instrument
panel. These buttons allow you to access and
change the Customer Programmable Features.
Many features can vary by vehicle.
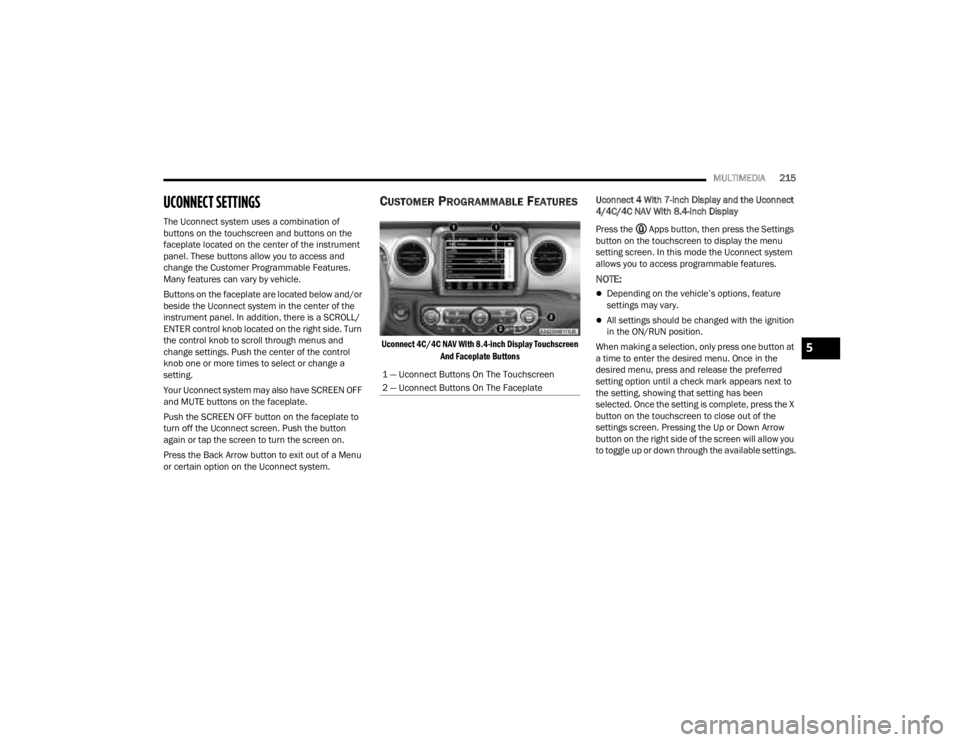
Buttons on the faceplate are located below and/or
beside the Uconnect system in the center of the
instrument panel. In addition, there is a SCROLL/
ENTER control knob located on the right side. Turn
the control knob to scroll through menus and
change settings. Push the center of the control
knob one or more times to select or change a
setting.
Your Uconnect system may also have SCREEN OFF
and MUTE buttons on the faceplate.
Push the SCREEN OFF button on the faceplate to
turn off the Uconnect screen. Push the button
again or tap the screen to turn the screen on.
Press the Back Arrow button to exit out of a Menu
or certain option on the Uconnect system.
CUSTOMER PROGRAMMABLE FEATURES
Uconnect 4C/4C NAV With 8.4-inch Display Touchscreen
And Faceplate Buttons
Uconnect 4 With 7-inch Display and the Uconnect
4/4C/4C NAV With 8.4-inch Display
Press the Apps button, then press the Settings
button on the touchscreen to display the menu
setting screen. In this mode the Uconnect system
allows you to access programmable features.
NOTE:
Depending on the vehicle’s options, feature
settings may vary.
All settings should be changed with the ignition
in the ON/RUN position.
When making a selection, only press one button at
a time to enter the desired menu. Once in the
desired menu, press and release the preferred
setting option until a check mark appears next to
the setting, showing that setting has been
selected. Once the setting is complete, press the X
button on the touchscreen to close out of the
settings screen. Pressing the Up or Down Arrow
button on the right side of the screen will allow you
to toggle up or down through the available settings.
1 — Uconnect Buttons On The Touchscreen
2 — Uconnect Buttons On The Faceplate
5
23_JT_OM_EN_USC_t.book Page 215
Page 218 of 448

216MULTIMEDIA
Language
Display
When the Language button is pressed on the touchscreen, the system displays the different language options. Once an option is selected, the system will
display in the chosen language. The available setting is:
NOTE:Depending on the vehicle’s options, feature settings may vary.
Setting Name Description
Language
This setting will change the language of the Uconnect system and Instrument
Cluster Display. The available languages are “English”, “Français”, and “Español”.
When the Display button is pressed on the touchscreen, the system will display the options related to the theme (if equipped), brightness, and color of the
touchscreen. The available settings are:
NOTE:Depending on the vehicle’s options, feature settings may vary.
Setting Name
Description
Display Mode This setting will allow you to set the brightness manually or have the system
set it automatically. The “Auto” setting has the system automatically adjust
the display brightness. The “Manual” setting will allow the user to adjust the
brightness of the display.
Display Brightness With Headlights ON/Brightness This setting will allow you to set the brightness when the headlights are on. To
access this setting, Display Mode must be set to Manual. The “+” setting will
increase the brightness; the “-” will decrease the brightness.
Display Brightness With Headlights OFF/Brightness This setting will allow you to set the brightness when the headlights are off. To
access this setting, Display Mode must be set to Manual. The “+” setting will
increase the brightness; the “-” will decrease the brightness.
23_JT_OM_EN_USC_t.book Page 216
Page 219 of 448

MULTIMEDIA217
Units
Set Theme This setting will allow you to change the display theme.
Keyboard
This setting will change the keyboard type on the display. The selectable key
-
boards are “ABCDEF Keyboard”, “QWERTY Keyboard”, and “AZERTY Keyboard”.
Touchscreen Beep This setting will allow you to turn the touchscreen beep on or off.
Control Screen Timeout This setting allows you to set the Control Screen to turn off automatically after
five seconds or stay open until manually closed.
Navigation Next Turn Pop-ups Displayed in Cluster This setting will display navigation prompts in the Instrument Cluster Display.
Phone Pop-ups Displayed In Cluster This setting will display smartphone notifications and messages in the
Instrument Cluster Display.
Setting Name
Description
When the Units button is pressed on the touchscreen, the system displays the different measurement options. The selected unit of measurement will display in
the instrument cluster display and Navigation system (if equipped). The available settings are:
NOTE:Depending on the vehicle’s options, feature settings may vary.
Setting NameDescription
US This setting will change the unit of measurement on the display to US.
Metric This setting will change the unit of measurement on the display to Metric.
Custom The setting changes the “Speed” (MPH or km/h), “Distance” (mi or km),
“Fuel Consumption” (MPG [US], MPG [UK], L/100 km, or km/L), “Pressure”
(psi, kPa, or bar), and “Temperature” (°C or °F) units of measurement
independently.
5
23_JT_OM_EN_USC_t.book Page 217
Page 220 of 448

218MULTIMEDIA
Voice
Clock
When the Voice button is pressed on the touchscreen, the system displays the options related to the vehicle’s Voice Recognition feature.
NOTE:Depending on the vehicle’s options, feature settings may vary.
Setting Name Description
Voice Response Length This setting will change the response length for the Voice Recognition system.
The “Brief” setting provides a shortened audio description from the system.
The “Detailed” setting provides the full audio description from the system.
Show Command List This setting will allow you to turn the Command List on or off. The “Always”
setting will always show the Command List. The “With Help” setting will show
the Command List and provide a brief description of what the command does.
The “Never” setting will turn the Command List off.
When the Clock button is pressed on the touchscreen, the system displays the different options related to the vehicle’s internal clock.
NOTE:Depending on the vehicle’s options, feature settings may vary.
Setting Name
Description
Sync Time With GPS This setting will sync the time to the GPS receiver in the system. The system
will control the time via the GPS location.
Set Time And Format/Time Format This setting will allow you to set the time format (AM/PM). Sync Time With GPS
must be Off for this setting to be available. The “12 hrs” setting will set the
time to a 12-hour format. The “24 hrs” setting will set the time to a 24-hour
format.
23_JT_OM_EN_USC_t.book Page 218