stop start JEEP GLADIATOR 2023 Workshop Manual
[x] Cancel search | Manufacturer: JEEP, Model Year: 2023, Model line: GLADIATOR, Model: JEEP GLADIATOR 2023Pages: 448, PDF Size: 17.37 MB
Page 196 of 448
194STARTING AND OPERATING
The DEF injection system consists of the following
components:
DEF tank
DEF pump
DEF injector
Electronically-heated DEF Lines
NOx sensors
Temperature sensors
SCR catalyst
The DEF injection system and SCR catalyst enable
the achievement of diesel emissions
requirements; while maintaining outstanding fuel
economy, drivability, torque and power ratings.
For system messages and warnings see
Ú page 121.
NOTE:
Your vehicle is equipped with a DEF injection
system. You may occasionally hear an audible
clicking noise from under the vehicle at a stop.
This is normal operation.
The DEF pump will run for a period of time after
engine shutdown to purge the DEF system. This
is normal operation and may be audible from
the rear of the vehicle.
Diesel Exhaust Fluid Storage
Diesel Exhaust Fluid (DEF) is considered a very
stable product with a long shelf life. If DEF is kept
in temperatures between 10° and 90°F (-12° and
32°C), it will last a minimum of one year.
DEF is subject to freezing at the lowest
temperatures. For example, DEF may freeze at
temperatures at or below 12°F (-11°C). The
system has been designed to operate in this
environment.
NOTE:When working with DEF, it is important to know
that:
Any containers or parts that come into contact
with DEF must be DEF compatible (plastic or
stainless steel). Copper, brass, aluminum, iron
or non-stainless steel should be avoided as they
are subject to corrosion by DEF.
If DEF is spilled, it should be wiped up
completely.
Adding Diesel Exhaust Fluid
The DEF gauge (located on the instrument cluster
display) will display the level of DEF remaining in
the tank Ú page 121.
NOTE:Driving conditions (altitude, vehicle speed, load,
etc.) will affect the amount of DEF that is used in
your vehicle.
DEF FILL PROCEDURE
NOTE:
For the correct DEF fluid type see Ú page 424.
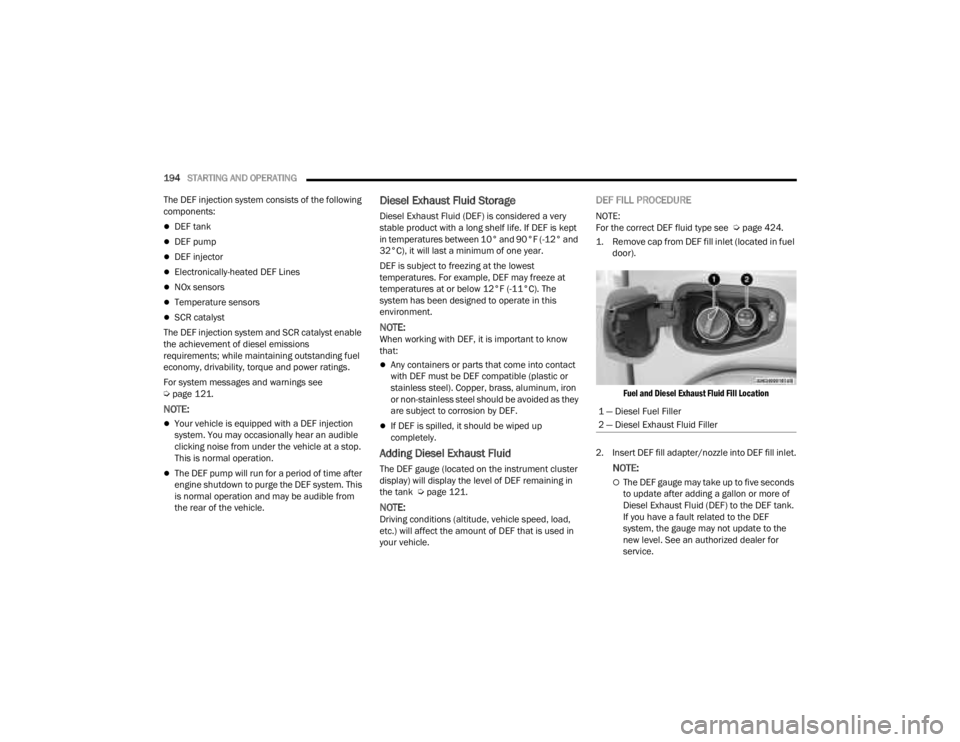
1. Remove cap from DEF fill inlet (located in fuel door).
Fuel and Diesel Exhaust Fluid Fill Location
2. Insert DEF fill adapter/nozzle into DEF fill inlet.
NOTE:
The DEF gauge may take up to five seconds
to update after adding a gallon or more of
Diesel Exhaust Fluid (DEF) to the DEF tank.
If you have a fault related to the DEF
system, the gauge may not update to the
new level. See an authorized dealer for
service.
1 — Diesel Fuel Filler
2 — Diesel Exhaust Fluid Filler
23_JT_OM_EN_USC_t.book Page 194
Page 197 of 448
STARTING AND OPERATING195
(Continued)
The DEF gauge may also not immediately
update after a refill if the temperature of the
DEF fluid is below 12°F (-11°C). The DEF
line heater will possibly warm up the DEF
fluid and allow the gauge to update after a
period of run time. Under very cold condi -
tions, it is possible that the gauge may not
reflect the new fill level for several drives.
Excessive overfilling of the DEF tank can
result in a MIL lamp/fault code and inaccu-
rate level readings.
Refilling With Nozzles
You can fill up at any DEF distributor.
Proceed as follows:
Insert the DEF nozzle in the filler, start
refilling and stop refilling at the first shut-off
(the shut-off indicates that the DEF tank is
full). Do not proceed with the refilling, to
prevent spillage of DEF.
Extract the nozzle.
Refilling With Containers
Proceed as follows:
Check the expiration date.
Read the advice for use on the label before
pouring the content of the bottle into the
DEF tank.
If systems which cannot be screwed in
(e.g. tanks) are used for refilling, after the
indication appears on the instrument panel
display Úpage 121 fill the DEF tank with no
more than 2 gal (8 L).
If containers which can be screwed to the
filler are used, the reservoir is full when the
DEF level in the container stops pouring out.
Do not proceed further.
3. Stop filling the DEF tank immediately when any of the following happen: DEF stops flowing
from the fill bottle into the DEF fill inlet, DEF
splashes out the fill inlet, or a DEF pump
nozzle automatically shuts off.
4. Reinstall cap onto DEF fill inlet.
VEHICLE LOADING
CERTIFICATION LABEL
As required by National Highway Traffic Safety
Administration regulations, your vehicle has a
certification label affixed to the driver's side door or
pillar.
CAUTION!
To avoid DEF spillage, and possible damage to
the DEF tank from overfilling, do not “top off”
the DEF tank after filling.
DO NOT OVERFILL. DEF will freeze below 12ºF
(-11ºC). The DEF system is designed to work in
temperatures below the DEF freezing point,
however, if the tank is overfilled and freezes,
the system could be damaged.
When DEF is spilled, clean the area immedi -
ately with water and use an absorbent mate -
rial to soak up the spills on the ground.
Do not attempt to start your engine if DEF is
accidentally added to the diesel fuel tank as it
can result in severe damage to your engine,
including but not limited to failure of the fuel
pump and injectors.
Never add anything other than DEF to the tank
– especially any form of hydrocarbon such as
diesel fuel, fuel system additives, gasoline, or
any other petroleum-based product. Even a
very small amount of these, less than
100 parts per million or less than 1 oz. per
78 gal (295 L) will contaminate the entire DEF
system and will require replacement. If
owners use a container, funnel or nozzle when
refilling the tank, it should either be new or
one that is has only been used for adding DEF.
Mopar® provides an attachable nozzle with its
DEF for this purpose.
CAUTION!
4
23_JT_OM_EN_USC_t.book Page 195
Page 205 of 448
STARTING AND OPERATING203
Towing Requirements — Tires
Proper tire inflation pressures are essential to
the safe and satisfactory operation of your
vehicle.
Check the trailer tires for proper tire inflation
pressures before trailer usage.
Check for signs of tire wear or visible tire
damage before towing a trailer.
Replacing tires with a higher load carrying
capacity will not increase the vehicle's GVWR
and GAWR limits.
For further information Úpage 395.
Towing Requirements — Trailer Brakes
Do not interconnect the hydraulic brake system
or vacuum system of your vehicle with that of
the trailer. This could cause inadequate braking
and possible personal injury.
An electronically actuated trailer brake
controller is required when towing a trailer with
electronically actuated brakes. When towing a
trailer equipped with a hydraulic surge actuated
brake system, an electronic brake controller is
not required.
NOTE:This vehicle has an aftermarket brake controller
connector under the dash to the left of the brake
pedal. This will be a four pin connector and will be
gray in color.
Trailer brakes are recommended for trailers
over 1,000 lb (453 kg) and required for trailers
in excess of 2,000 lb (907 kg).Towing Requirements — Trailer Lights And
Wiring
Whenever you pull a trailer, regardless of the trailer
size, stop lights and turn signals on the trailer are
required for motoring safety.
The Trailer Tow Package may include a four- and
seven-pin wiring harness. Use a factory approved
trailer harness and connector.
NOTE:Do not cut or splice wiring into the vehicle’s wiring
harness.
The electrical connections are all complete to the
vehicle but you must mate the harness to a trailer
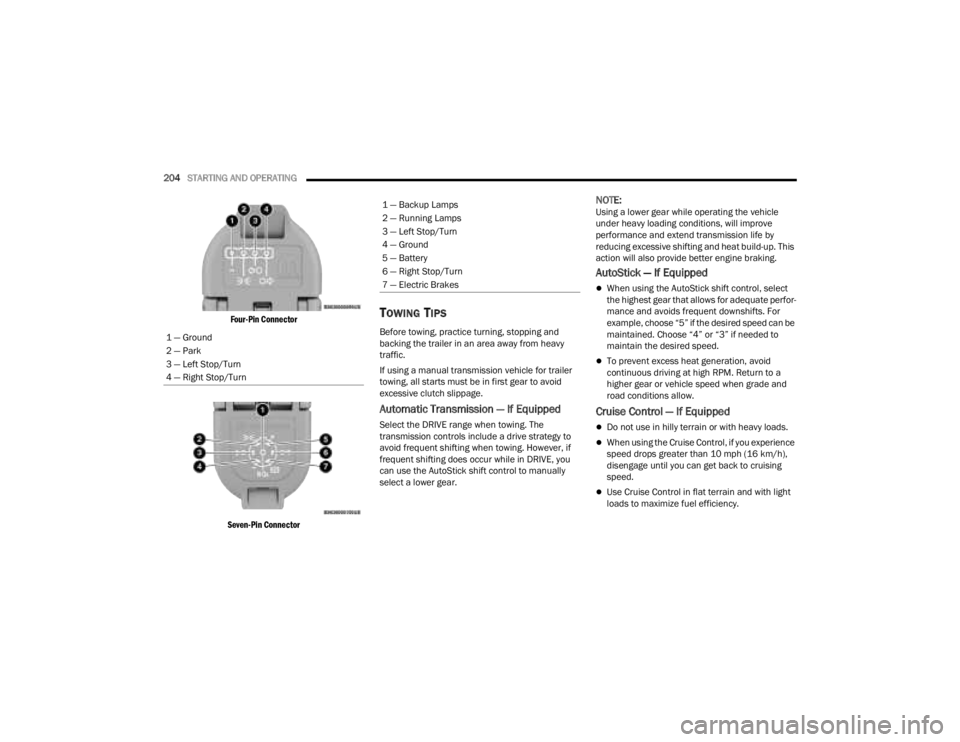
connector. Refer to the following illustrations.
NOTE:
Disconnect the trailer wiring connector from the
vehicle (or any other device plugged into
vehicle’s electrical connectors) before
launching a boat into water.
Be sure to reconnect once clear from water
area.
WARNING!
Do not connect trailer brakes to your vehicle's
hydraulic brake lines. It can overload your
brake system and cause it to fail. You might
not have brakes when you need them and
could have an accident.
Towing any trailer will increase your stopping
distance. When towing, you should allow for
additional space between your vehicle and the
vehicle in front of you. Failure to do so could
result in an accident.
CAUTION!
If the trailer weighs more than 1,000 lb (453 kg)
loaded, it should have its own brakes and they
should be of adequate capacity. Failure to do
this could lead to accelerated brake lining wear,
higher brake pedal effort, and longer stopping
distances.
4
23_JT_OM_EN_USC_t.book Page 203
Page 206 of 448
204STARTING AND OPERATING
Four-Pin Connector
Seven-Pin Connector
TOWING TIPS
Before towing, practice turning, stopping and
backing the trailer in an area away from heavy
traffic.
If using a manual transmission vehicle for trailer
towing, all starts must be in first gear to avoid
excessive clutch slippage.
Automatic Transmission — If Equipped
Select the DRIVE range when towing. The
transmission controls include a drive strategy to
avoid frequent shifting when towing. However, if
frequent shifting does occur while in DRIVE, you
can use the AutoStick shift control to manually
select a lower gear.
NOTE:Using a lower gear while operating the vehicle
under heavy loading conditions, will improve
performance and extend transmission life by
reducing excessive shifting and heat build-up. This
action will also provide better engine braking.
AutoStick — If Equipped
When using the AutoStick shift control, select
the highest gear that allows for adequate perfor -
mance and avoids frequent downshifts. For
example, choose “5” if the desired speed can be
maintained. Choose “4” or “3” if needed to
maintain the desired speed.
To prevent excess heat generation, avoid
continuous driving at high RPM. Return to a
higher gear or vehicle speed when grade and
road conditions allow.
Cruise Control — If Equipped
Do not use in hilly terrain or with heavy loads.
When using the Cruise Control, if you experience
speed drops greater than 10 mph (16 km/h),
disengage until you can get back to cruising
speed.
Use Cruise Control in flat terrain and with light
loads to maximize fuel efficiency.
1 — Ground
2 — Park
3 — Left Stop/Turn
4 — Right Stop/Turn
1 — Backup Lamps
2 — Running Lamps
3 — Left Stop/Turn
4 — Ground
5 — Battery
6 — Right Stop/Turn
7 — Electric Brakes
23_JT_OM_EN_USC_t.book Page 204
Page 208 of 448
206STARTING AND OPERATING
Shifting Into N (Neutral)
Use the following procedure to prepare your
vehicle for recreational towing.
1. Bring the vehicle to a complete stop on level
ground.
2. Press and hold the brake pedal.
3. Shift the automatic transmission into NEUTRAL or press the clutch pedal on a
manual transmission. 4. Turn the engine off.
5. Shift the transfer case lever into N (Neutral).
6. Start the engine.
7. Shift the transmission into DRIVE or REVERSE.
8. Release the brake pedal (and clutch pedal on
manual transmissions) for five seconds and
ensure that there is no vehicle movement.
9. Repeat steps 7 and 8 with automatic transmission in DRIVE or manual transmission
in first gear.
10. Turn the engine off.
11. Firmly apply the parking brake.
12. Shift the transmission into PARK or place manual transmission in gear (NOT in
NEUTRAL).
13. Attach the vehicle to the tow vehicle using a suitable tow bar.
14. Release the parking brake.Automatic transmissions must be placed in
PARK for recreational towing.
Manual transmissions must be placed in gear
(not in Neutral) for recreational towing.
Before recreational towing, perform the proce -
dure outlined under “Shifting Into N (Neutral)”
to be certain that the transfer case is fully in N
(Neutral). Otherwise, internal damage will
result.
Towing this vehicle in violation of the above
requirements can cause severe transmission
and/or transfer case damage. Damage from
improper towing is not covered under the New
Vehicle Limited Warranty.
Do not use a bumper-mounted clamp-on tow
bar on your vehicle. The bumper face bar will
be damaged.
CAUTION!
WARNING!
You or others could be injured or killed if you
leave the vehicle unattended with the transfer
case in the N (Neutral) position without first fully
engaging the parking brake. The transfer case N
(Neutral) position disengages both the front and
rear driveshafts from the powertrain, and will
allow the vehicle to roll, even if the automatic
transmission is in PARK (or manual transmission
is in gear). The parking brake should always be
applied when the driver is not in the vehicle.
CAUTION!
It is necessary to follow these steps to be certain
that the transfer case is fully in N (Neutral)
before recreational towing to prevent damage to
internal parts.CAUTION!
Damage to the transmission may occur if the
transmission is shifted into PARK with the
transfer case in N (Neutral) and the engine
running. With the transfer case in N (Neutral)
ensure that the engine is OFF before shifting the
transmission into PARK.
23_JT_OM_EN_USC_t.book Page 206
Page 209 of 448
STARTING AND OPERATING207
Shifting Out of N (Neutral)
Use the following procedure to prepare your
vehicle for normal usage.
1. Bring the vehicle to a complete stop, leaving
it connected to the tow vehicle.
2. Firmly apply the parking brake.
3. Start the engine.
4. Press and hold the brake pedal.
5. Shift the transmission into NEUTRAL.
6. Turn the engine off.
7. Shift the transfer case lever to the desired position.
NOTE:When shifting the transfer case out of N (Neutral),
the engine should remain off to avoid gear clash.
8. Shift the automatic transmission into PARK, or place manual transmission in NEUTRAL.
9. Release the brake pedal.
10. Disconnect vehicle from the tow vehicle.
11. Start the engine.
12. Press and hold the brake pedal.
13. Release the parking brake.
14. Shift the transmission into gear, release the brake pedal (and clutch pedal on manual
transmissions), and check that the vehicle
operates normally.
DRIVING TIPS
ON-ROAD DRIVING TIPS
Utility vehicles have higher ground clearance and a
narrower track to make them capable of
performing in a wide variety of off-road
applications. Specific design characteristics give
them a higher center of gravity than conventional
passenger cars.
An advantage of the higher ground clearance is a
better view of the road, allowing you to anticipate
problems. They are not designed for cornering at
the same speeds as conventional passenger cars
any more than low-slung sports cars are designed
to perform satisfactorily in off-road conditions.
Avoid sharp turns or abrupt maneuvers. As with
other vehicles of this type, failure to operate this
vehicle correctly may result in loss of control or
vehicle rollover.
OFF-ROAD DRIVING TIPS
Side Step Removal — If Equipped
NOTE:Prior to off-road usage, the side steps should be
removed to prevent damage.
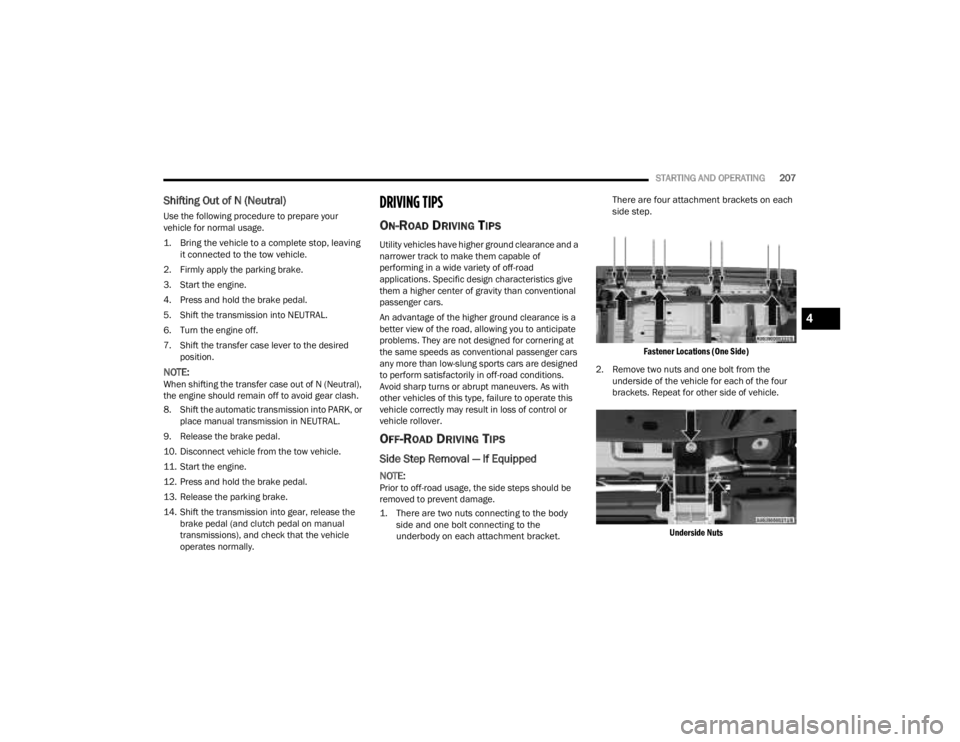
1. There are two nuts connecting to the body side and one bolt connecting to the
underbody on each attachment bracket. There are four attachment brackets on each
side step.
Fastener Locations (One Side)
2. Remove two nuts and one bolt from the underside of the vehicle for each of the four
brackets. Repeat for other side of vehicle.
Underside Nuts
4
23_JT_OM_EN_USC_t.book Page 207
Page 210 of 448
208STARTING AND OPERATING
3. After all bolts and nuts have been removed, pull the side step assembly off of the vehicle.
4. To reinstall the side steps align the studs to the body side holes and fasten all nuts on all four
brackets. Then secure all four bolts to the
underbody. Repeat the reassembly procedure
for the other side.
Bumper End Cap Removal — If Equipped
The end caps on your vehicle’s front bumper can
be removed by following the steps below:
NOTE:Bumper end caps are removable on steel bumpers
only.
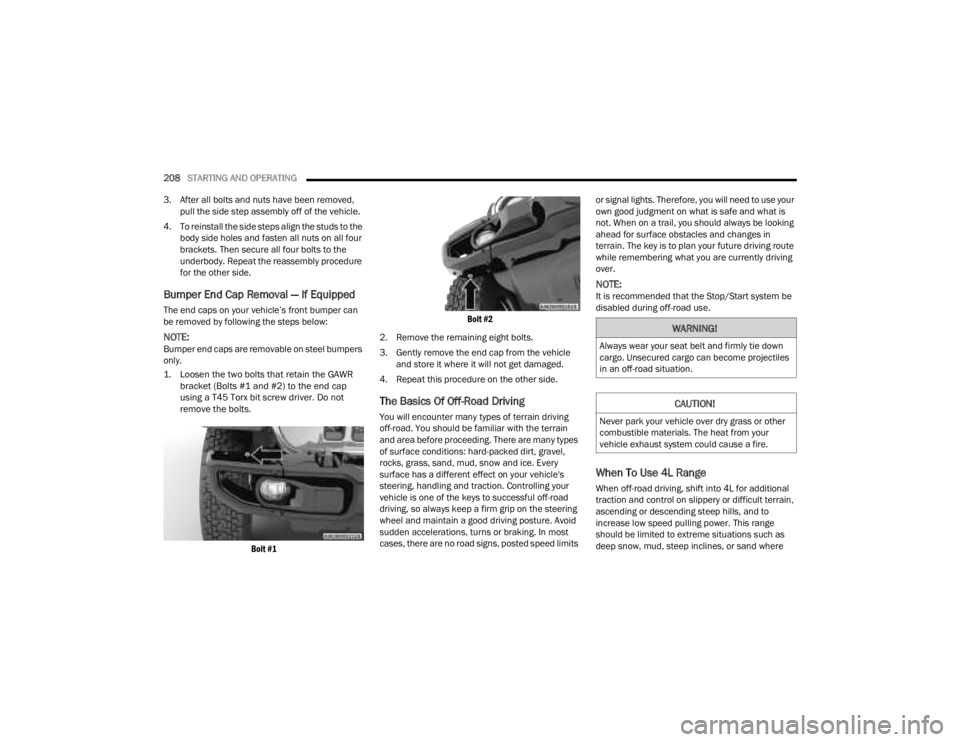
1. Loosen the two bolts that retain the GAWR bracket (Bolts #1 and #2) to the end cap
using a T45 Torx bit screw driver. Do not
remove the bolts.
Bolt #1 Bolt #2
2. Remove the remaining eight bolts.
3. Gently remove the end cap from the vehicle and store it where it will not get damaged.
4. Repeat this procedure on the other side.
The Basics Of Off-Road Driving
You will encounter many types of terrain driving
off-road. You should be familiar with the terrain
and area before proceeding. There are many types
of surface conditions: hard-packed dirt, gravel,
rocks, grass, sand, mud, snow and ice. Every
surface has a different effect on your vehicle's
steering, handling and traction. Controlling your
vehicle is one of the keys to successful off-road
driving, so always keep a firm grip on the steering
wheel and maintain a good driving posture. Avoid
sudden accelerations, turns or braking. In most
cases, there are no road signs, posted speed limits or signal lights. Therefore, you will need to use your
own good judgment on what is safe and what is
not. When on a trail, you should always be looking
ahead for surface obstacles and changes in
terrain. The key is to plan your future driving route
while remembering what you are currently driving
over.
NOTE:It is recommended that the Stop/Start system be
disabled during off-road use.
When To Use 4L Range
When off-road driving, shift into 4L for additional
traction and control on slippery or difficult terrain,
ascending or descending steep hills, and to
increase low speed pulling power. This range
should be limited to extreme situations such as
deep snow, mud, steep inclines, or sand where
WARNING!
Always wear your seat belt and firmly tie down
cargo. Unsecured cargo can become projectiles
in an off-road situation.
CAUTION!
Never park your vehicle over dry grass or other
combustible materials. The heat from your
vehicle exhaust system could cause a fire.
23_JT_OM_EN_USC_t.book Page 208
Page 211 of 448
STARTING AND OPERATING209
additional low speed pulling power is needed.
Vehicle speeds in excess of 25 mph (40 km/h)
should be avoided when in 4L range.
Simultaneous Brake And Throttle
Operation
Many off-road driving conditions require the
simultaneous use of the brake and throttle
(two-footed driving). When climbing rocks, logs, or
other stepped objects, using light brake pressure
with light throttle will keep the vehicle from jerking
or lurching. This technique is also used when you
need to stop and restart a vehicle on a steep
incline.
Driving In Snow, Mud And Sand
SNOW
In heavy snow or for additional control and traction
at slower speeds, shift the transmission into a low
gear and the transfer case into 4L if necessary. Do
not shift to a lower gear than necessary to maintain
headway. Over-revving the engine can spin the
wheels and traction will be lost. If you start to slow
to a stop, try turning your steering wheel no more than a quarter turn quickly back and forth, while
still applying throttle. This will allow the tires to get
fresh traction and help maintain your momentum.
MUD
Deep mud creates a great deal of suction around
the tires and is very difficult to get through. You
should use DRIVE, with the transfer case in the 4L
position to maintain your momentum. If you start to
slow to a stop, try turning your steering wheel no
more than a quarter turn quickly back and forth for
additional traction. Mud holes pose an increased
threat of vehicle damage and getting stuck. They
are normally full of debris from previous vehicles
getting stuck. As a good practice before entering
any mud hole, get out and determine how deep it
is, if there are any hidden obstacles and if the
vehicle can be safely recovered if stuck.
SAND
Soft sand is very difficult to travel through with full
tire pressure. When crossing soft, sandy spots in a
trail, maintain your vehicle's momentum and do
not stop. The key to driving in soft sand is using the
appropriate tire pressure, accelerating slowly, avoiding abrupt maneuvers and maintaining the
vehicle's momentum. If you are going to be driving
on large soft sandy areas or dunes, reduce your
tire pressure to a minimum of 15 psi (103 kPa) to
allow for a greater tire surface area. Reduced tire
pressure will drastically improve your traction and
handling while driving on the soft sand, but you
must return the tires to normal air pressure before
driving on pavement or other hard surfaces. Be
sure you have a way to reinflate the tires prior to
reducing the pressure.
Crossing Obstacles (Rocks And Other High
Points)
While driving off-road, you will encounter many
types of terrain. These varying types of terrain bring
different types of obstacles. Before proceeding,
review the path ahead to determine the correct
approach and your ability to safely recover the
vehicle if something goes wrong. Keeping a firm
grip on the steering wheel, bring the vehicle to a
complete stop and then inch the vehicle forward
CAUTION!
Do not use 4L range when operating the vehicle
on dry pavement. Driveline hardware damage
can result.
CAUTION!
On icy or slippery roads, do not downshift at high
engine RPM or vehicle speeds, because engine
braking may cause skidding and loss of control.
CAUTION!
Reduced tire pressures may cause tire
unseating and total loss of air pressure. To
reduce the risk of tire unseating, while at a
reduced tire pressure, reduce your speed and
avoid sharp turns or abrupt maneuvers.
4
23_JT_OM_EN_USC_t.book Page 209
Page 214 of 448
212STARTING AND OPERATING
IF YOU STALL OR BEGIN TO LOSE HEADWAY
If you stall or begin to lose headway while climbing
a steep hill, allow your vehicle to come to a stop
and immediately apply the brake. Restart the
engine and shift into REVERSE. Back slowly down
the hill allowing engine braking to control the
descent and apply your brakes, if necessary, but
do not allow the tires to lock.
Driving Through Water
Extreme care should be taken crossing any type of
water. Water crossings should be avoided, if
possible, and only be attempted when necessary in
a safe, responsible manner. You should only drive
through areas which are designated and approved.
You should tread lightly and avoid damage to the
environment. You should know your vehicle's
abilities and be able to recover it if something goes wrong. You should never stop or shut a vehicle off
when crossing deep water unless you ingested
water into the engine air intake. If the engine stalls,
do not attempt to restart it. Determine if it has
ingested water first. The key to any crossing is low
and slow. Shift into FIRST gear (manual
transmission), or DRIVE (automatic transmission),
with the transfer case in the 4L position and
proceed very slowly with a constant slow speed
(3 to 5 mph {5 to 8 km/h} maximum) and light
throttle. Keep the vehicle moving; do not try to
accelerate through the crossing. After crossing any
water higher than the bottom of the axle
differentials, you should inspect all of the vehicle
fluids for signs of water ingestion.
BEFORE YOU CROSS ANY TYPE OF WATER
As you approach any type of water, you need to
determine if you can cross it safely and
responsibly. If necessary, get out and walk through
the water or probe it with a stick. You need to be
sure of its depth, approach angle, current and
bottom condition. Be careful of murky or muddy
waters; check for hidden obstacles. Make sure you
will not be intruding on any wildlife, and you can
recover the vehicle if necessary. The key to a safe
crossing is the water depth, current and bottom
conditions. On soft bottoms, the vehicle will sink in,
effectively increasing the water level on the
vehicle. Be sure to consider this when determining
the depth and the ability to safely cross.
CROSSING PUDDLES, POOLS, FLOODED
AREAS OR OTHER STANDING WATER
Puddles, pools, flooded or other standing water
areas normally contain murky or muddy waters.
These water types normally contain hidden
obstacles and make it difficult to determine an
accurate water depth, approach angle, and bottom
condition. Murky or muddy water holes are where
you want to hook up tow straps prior to entering.
This makes for a faster, cleaner and easier vehicle
recovery. If you are able to determine you can
safely cross, than proceed using the low and slow
method.
WARNING!
If the engine stalls or you lose headway or
cannot make it to the top of a steep hill or grade,
never attempt to turn around. To do so may
result in tipping and rolling the vehicle, which
may result in severe injury. Always back carefully
straight down a hill in REVERSE. Never back
down a hill in NEUTRAL using only the vehicle
brakes. Never drive diagonally across a hill,
always drive straight up or down.
CAUTION!
Water ingestion into the axles, transmission,
transfer case, engine or vehicle interior can
occur if you drive too fast or through too deep
of water. Water can cause permanent damage
to engine, driveline or other vehicle compo -
nents, and your brakes will be less effective
once wet and/or muddy.
When driving through water, do not exceed
5 mph (8 km/h). Always check water depth
before entering as a precaution, and check all
fluids afterward. Driving through water may
cause damage that may not be covered by the
New Vehicle Limited Warranty.
23_JT_OM_EN_USC_t.book Page 212
Page 236 of 448
234MULTIMEDIA
goes to the beginning of the current track, or the
beginning of the previous track if it is within eight
seconds after the current track begins to play.
Double pressing the bottom button switch will skip
to the previous track if it is after eight seconds into
the current track.
RADIO MODE
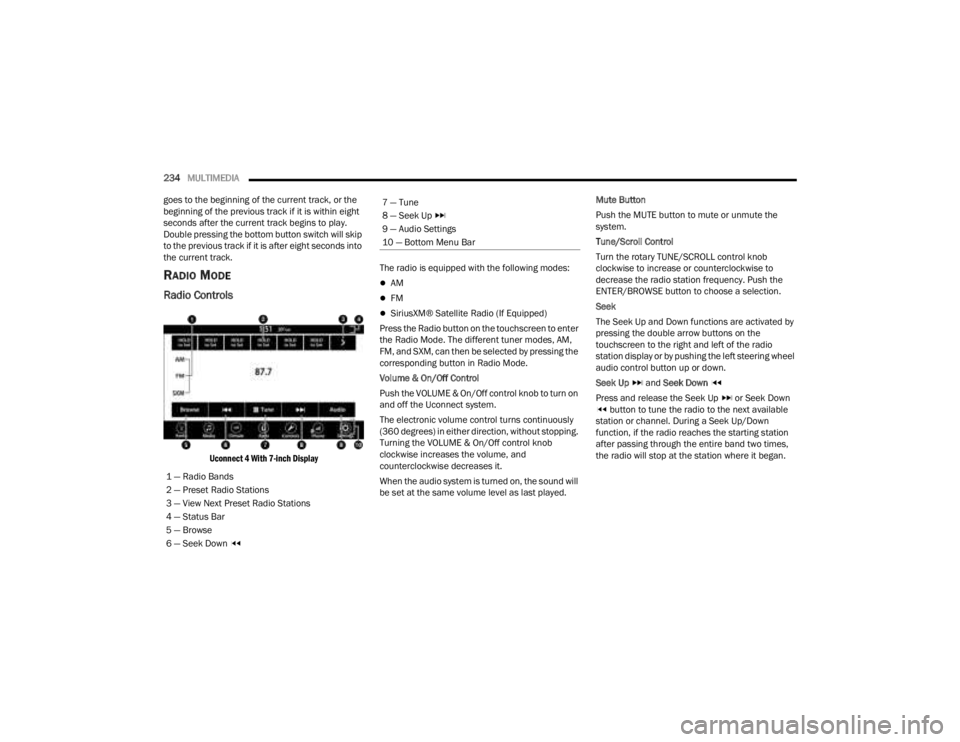
Radio Controls
Uconnect 4 With 7-inch Display
The radio is equipped with the following modes:
AM
FM
SiriusXM® Satellite Radio (If Equipped)
Press the Radio button on the touchscreen to enter
the Radio Mode. The different tuner modes, AM,
FM, and SXM, can then be selected by pressing the
corresponding button in Radio Mode.
Volume & On/Off Control
Push the VOLUME & On/Off control knob to turn on
and off the Uconnect system.
The electronic volume control turns continuously
(360 degrees) in either direction, without stopping.
Turning the VOLUME & On/Off control knob
clockwise increases the volume, and
counterclockwise decreases it.
When the audio system is turned on, the sound will
be set at the same volume level as last played. Mute Button
Push the MUTE button to mute or unmute the
system.
Tune/Scroll Control
Turn the rotary TUNE/SCROLL control knob
clockwise to increase or counterclockwise to
decrease the radio station frequency. Push the
ENTER/BROWSE button to choose a selection.
Seek
The Seek Up and Down functions are activated by
pressing the double arrow buttons on the
touchscreen to the right and left of the radio
station display or by pushing the left steering wheel
audio control button up or down.
Seek Up
and Seek Down
Press and release the Seek Up or Seek Down button to tune the radio to the next available
station or channel. During a Seek Up/Down
function, if the radio reaches the starting station
after passing through the entire band two times,
the radio will stop at the station where it began.
1 — Radio Bands
2 — Preset Radio Stations
3 — View Next Preset Radio Stations
4 — Status Bar
5 — Browse
6 — Seek Down
7 — Tune
8 — Seek Up
9 — Audio Settings
10 — Bottom Menu Bar
23_JT_OM_EN_USC_t.book Page 234