JEEP GRAND CHEROKEE 2017 WK2 / 4.G User Guide
Manufacturer: JEEP, Model Year: 2017, Model line: GRAND CHEROKEE, Model: JEEP GRAND CHEROKEE 2017 WK2 / 4.GPages: 372
Page 261 of 372
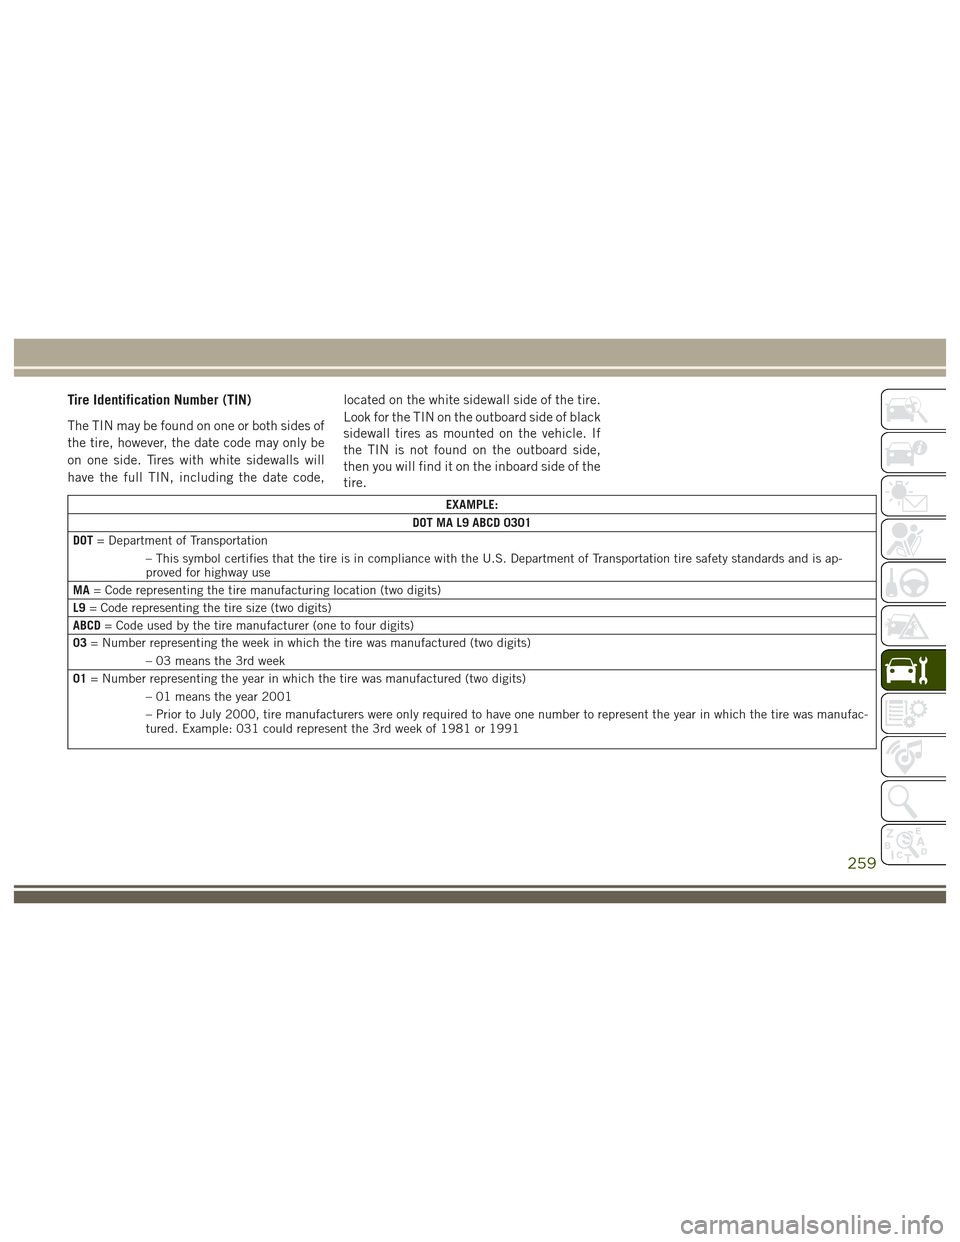
Tire Identification Number (TIN)
The TIN may be found on one or both sides of
the tire, however, the date code may only be
on one side. Tires with white sidewalls will
have the full TIN, including the date code,located on the white sidewall side of the tire.
Look for the TIN on the outboard side of black
sidewall tires as mounted on the vehicle. If
the TIN is not found on the outboard side,
then you will find it on the inboard side of the
tire.
EXAMPLE:
DOT MA L9 ABCD 0301
DOT = Department of Transportation
– This symbol certifies that the tire is in compliance with the U.S. Department of Transportation tire safety standards and is ap-
proved for highway use
MA = Code representing the tire manufacturing location (two digits)
L9 = Code representing the tire size (two digits)
ABCD = Code used by the tire manufacturer (one to four digits)
03 = Number representing the week in which the tire was manufactured (two digits)
– 03 means the 3rd week
01 = Number representing the year in which the tire was manufactured (two digits)
– 01 means the year 2001
– Prior to July 2000, tire manufacturers were only required to have one number to represent the year in which the tire was manufac-
tured. Example: 031 could represent the 3rd week of 1981 or 1991
259
Page 262 of 372
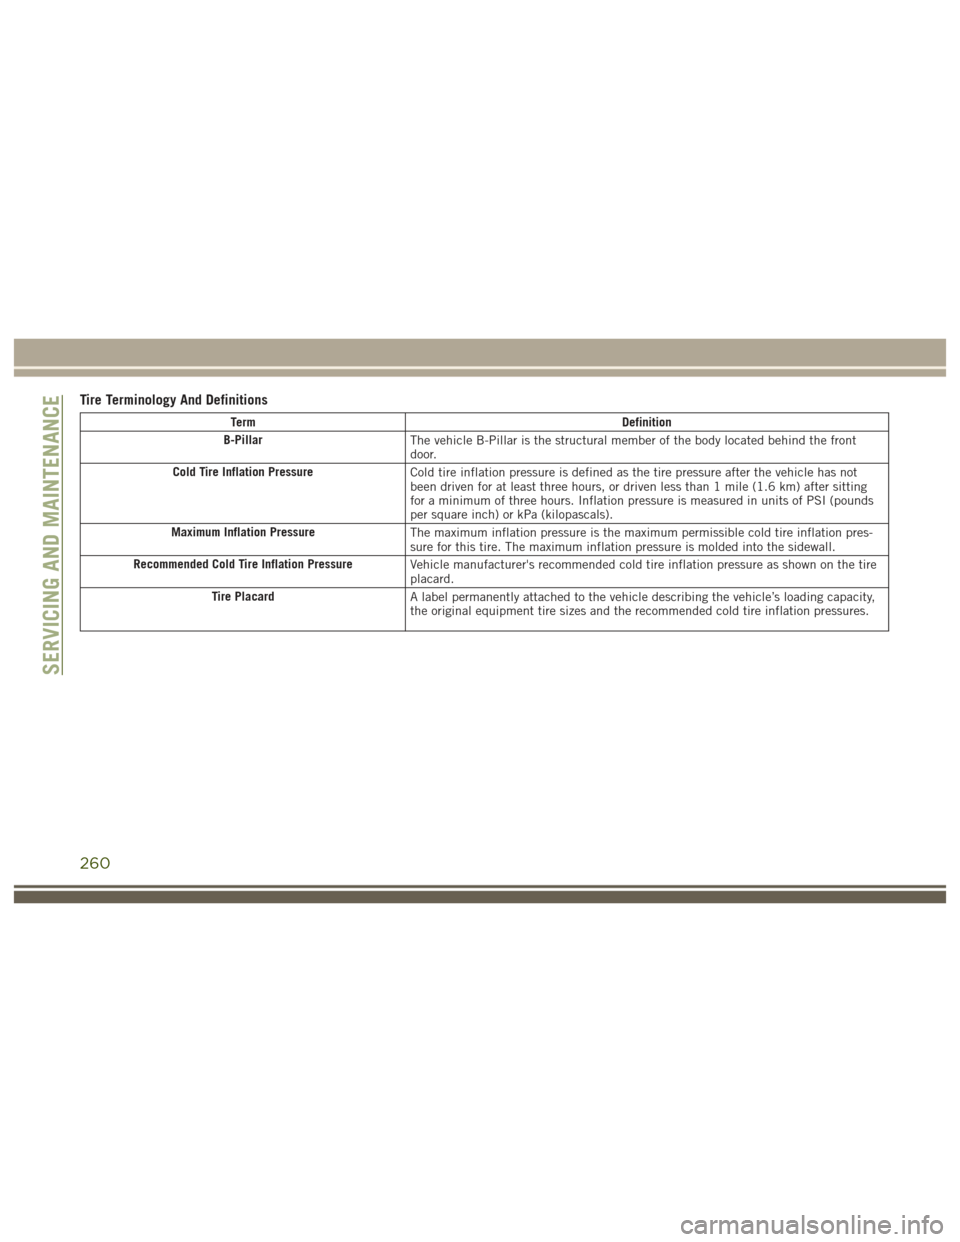
Tire Terminology And Definitions
TermDefinition
B-Pillar The vehicle B-Pillar is the structural member of the body located behind the front
door.
Cold Tire Inflation Pressure Cold tire inflation pressure is defined as the tire pressure after the vehicle has not
been driven for at least three hours, or driven less than 1 mile (1.6 km) after sitting
for a minimum of three hours. Inflation pressure is measured in units of PSI (pounds
per square inch) or kPa (kilopascals).
Maximum Inflation Pressure The maximum inflation pressure is the maximum permissible cold tire inflation pres-
sure for this tire. The maximum inflation pressure is molded into the sidewall.
Recommended Cold Tire Inflation Pressure Vehicle manufacturer's recommended cold tire inflation pressure as shown on the tire
placard.
Tire Placard A label permanently attached to the vehicle describing the vehicle’s loading capacity,
the original equipment tire sizes and the recommended cold tire inflation pressures.
SERVICING AND MAINTENANCE
260
Page 263 of 372
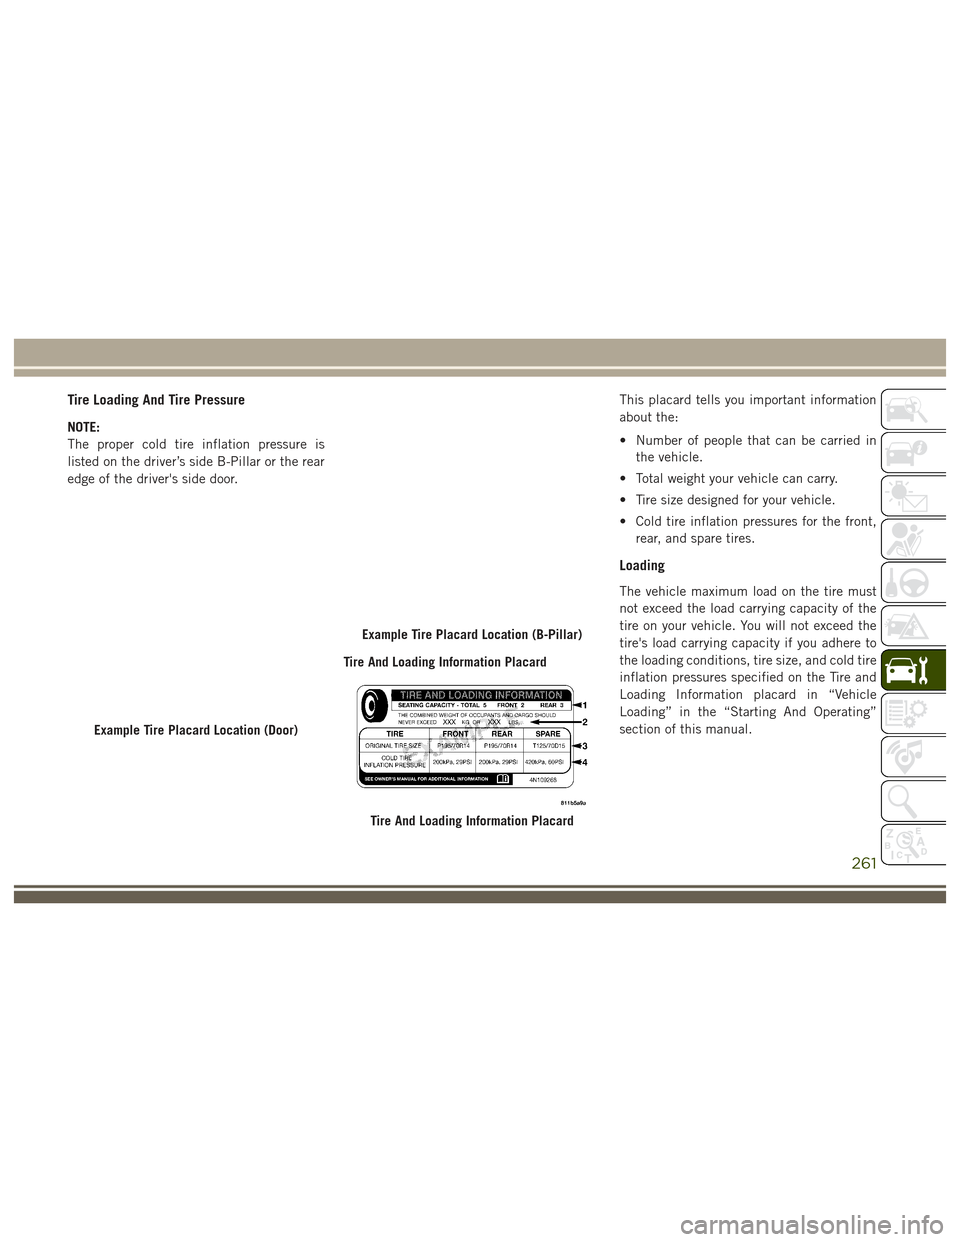
Tire Loading And Tire Pressure
NOTE:
The proper cold tire inflation pressure is
listed on the driver’s side B-Pillar or the rear
edge of the driver's side door.Tire And Loading Information PlacardThis placard tells you important information
about the:
• Number of people that can be carried in
the vehicle.
• Total weight your vehicle can carry.
• Tire size designed for your vehicle.
• Cold tire inflation pressures for the front, rear, and spare tires.
Loading
The vehicle maximum load on the tire must
not exceed the load carrying capacity of the
tire on your vehicle. You will not exceed the
tire's load carrying capacity if you adhere to
the loading conditions, tire size, and cold tire
inflation pressures specified on the Tire and
Loading Information placard in “Vehicle
Loading” in the “Starting And Operating”
section of this manual.
Example Tire Placard Location (Door)
Example Tire Placard Location (B-Pillar)
Tire And Loading Information Placard
261
Page 264 of 372
NOTE:
Under a maximum loaded vehicle condition,
gross axle weight ratings (GAWRs) for the
front and rear axles must not be exceeded.
For further information on GAWRs, vehicle
loading, and trailer towing, refer to “Vehicle
Loading” in the “Starting And Operating”
section of this manual.
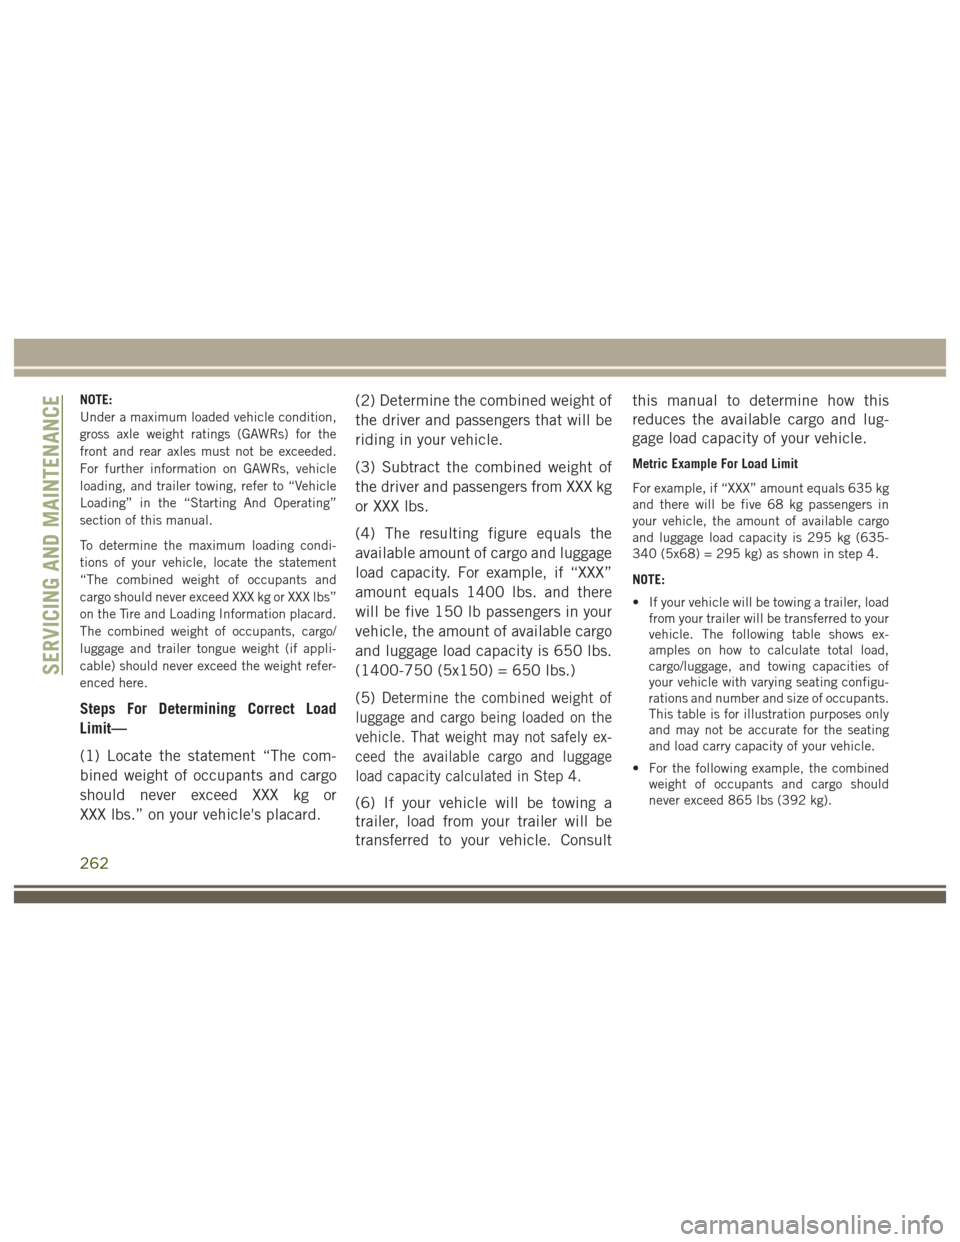
To determine the maximum loading condi-
tions of your vehicle, locate the statement
“The combined weight of occupants and
cargo should never exceed XXX kg or XXX lbs”
on the Tire and Loading Information placard.
The combined weight of occupants, cargo/
luggage and trailer tongue weight (if appli-
cable) should never exceed the weight refer-
enced here.
Steps For Determining Correct Load
Limit—
(1) Locate the statement “The com-
bined weight of occupants and cargo
should never exceed XXX kg or
XXX lbs.” on your vehicle's placard.(2) Determine the combined weight of
the driver and passengers that will be
riding in your vehicle.
(3) Subtract the combined weight of
the driver and passengers from XXX kg
or XXX lbs.
(4) The resulting figure equals the
available amount of cargo and luggage
load capacity. For example, if “XXX”
amount equals 1400 lbs. and there
will be five 150 lb passengers in your
vehicle, the amount of available cargo
and luggage load capacity is 650 lbs.
(1400-750 (5x150) = 650 lbs.)
(5)Determine the combined weight of
luggage and cargo being loaded on the
vehicle. That weight may not safely ex-
ceed the available cargo and luggage
load capacity calculated in Step 4.
(6) If your vehicle will be towing a
trailer, load from your trailer will be
transferred to your vehicle. Consult this manual to determine how this
reduces the available cargo and lug-
gage load capacity of your vehicle.
Metric Example For Load Limit
For example, if “XXX” amount equals 635 kg
and there will be five 68 kg passengers in
your vehicle, the amount of available cargo
and luggage load capacity is 295 kg (635-
340 (5x68) = 295 kg) as shown in step 4.
NOTE:
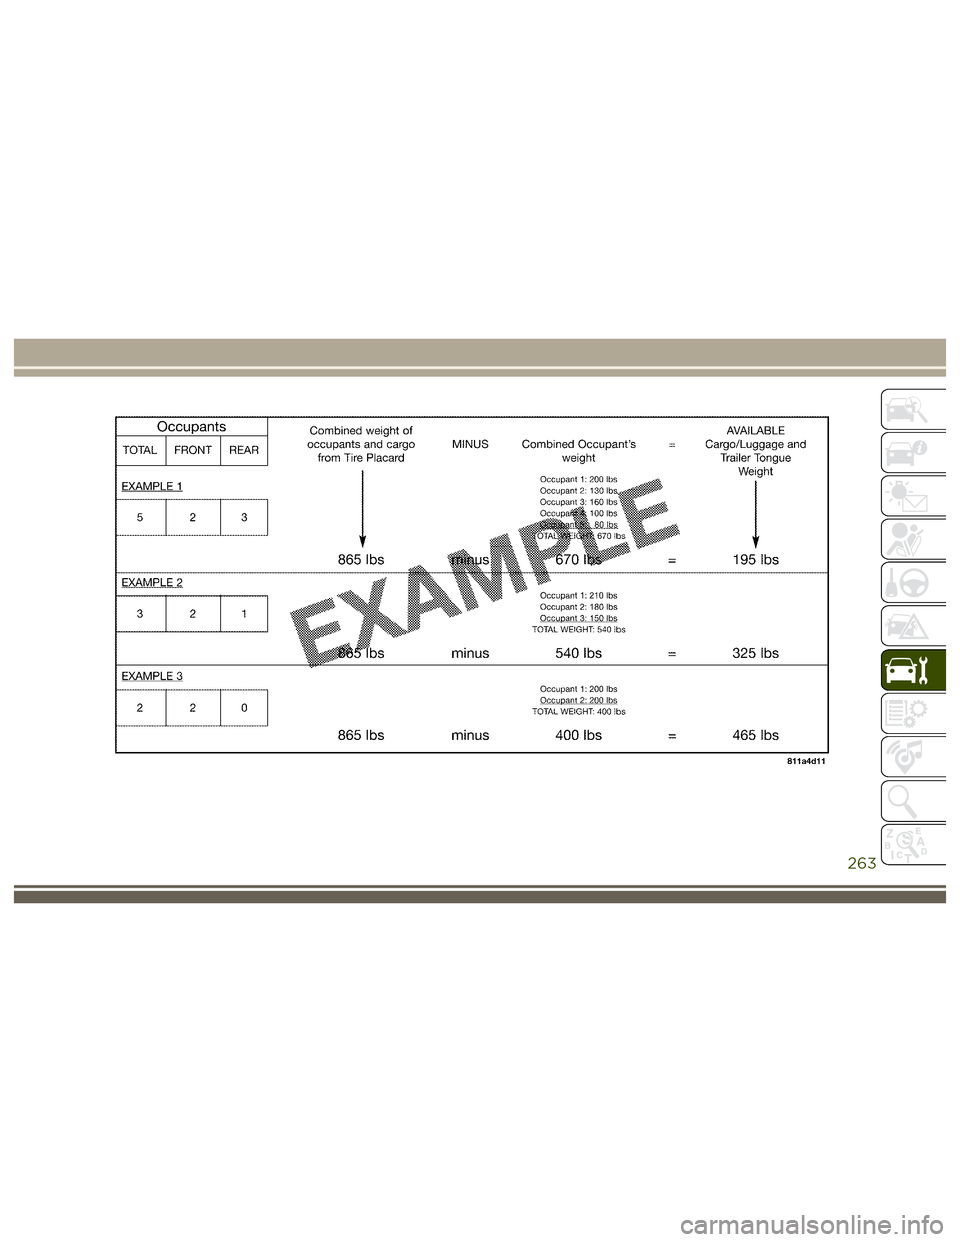
• If your vehicle will be towing a trailer, load
from your trailer will be transferred to your
vehicle. The following table shows ex-
amples on how to calculate total load,
cargo/luggage, and towing capacities of
your vehicle with varying seating configu-
rations and number and size of occupants.
This table is for illustration purposes only
and may not be accurate for the seating
and load carry capacity of your vehicle.
• For the following example, the combined weight of occupants and cargo should
never exceed 865 lbs (392 kg).
SERVICING AND MAINTENANCE
262
Page 265 of 372
263
Page 266 of 372
WARNING!
Overloading of your tires is dangerous.
Overloading can cause tire failure, affect
vehicle handling, and increase your stop-
ping distance. Use tires of the recom-
mended load capacity for your vehicle.
Never overload them.
Wheel And Wheel Trim Care
All wheels and wheel trim, especially alumi-
num and chrome plated wheels, should be
cleaned regularly using mild (neutral Ph)
soap and water to maintain their luster and to
prevent corrosion. Wash wheels with the
same soap solution recommended for the
body of the vehicle.
Your wheels are susceptible to deterioration
caused by salt, sodium chloride, magnesium
chloride, calcium chloride, etc., and other
road chemicals used to melt ice or control
dust on dirt roads. Use a soft cloth or sponge
and mild soap to wipe away promptly. Do notuse harsh chemicals or a stiff brush. They
can damage the wheel’s protective coating
that helps keep them from corroding and
tarnishing.
NOTE:
Many aftermarket wheel cleaners contain
strong acids or strong alkaline additives that
can harm the wheel surface.
CAUTION!
Avoid products or automatic car washes
that use acidic solutions or strong alkaline
additives or harsh brushes. These prod-
ucts and automatic car washes may dam-
age the wheel's protective finish. Such
damage is not covered by the New Vehicle
Limited Warranty. Only car wash soap,
MOPAR Wheel Cleaner or equivalent is
recommended.
When cleaning extremely dirty wheels includ-
ing excessive brake dust, care must be taken
in the selection of tire and wheel cleaning
chemicals and equipment to prevent damage
to the wheels. Mopar Wheel Treatment or
Mopar Chrome Cleaner or their equivalent is recommended or select a non-abrasive, non-
acidic cleaner for aluminum or chrome
wheels. Do not use any products on Dark
Vapor or Black Satin Chrome Wheels. They
will permanently damage this finish and such
damage is not covered by the New Vehicle
Limited Warranty.
CAUTION!
Do not use scouring pads, steel wool, a
bristle brush, metal polishes or oven
cleaner. These products may damage the
wheel's protective finish. Such damage is
not covered by the New Vehicle Limited
Warranty. Only car wash soap, MOPAR
Wheel Cleaner or equivalent is recom-
mended.
NOTE:
If you intend parking or storing your vehicle
for an extended period after cleaning the
wheels with wheel cleaner, drive your vehicle
for a few minutes before doing so. Driving the
vehicle and applying the brakes when stop-
ping will reduce the risk of brake rotor corro-
sion.
SERVICING AND MAINTENANCE
264
Page 267 of 372
Dark Vapor Or Black Satin Chrome Wheels
CAUTION!
If your vehicle is equipped with Dark Vapor
or Black Satin Chrome wheels DO NOT
USE wheel cleaners, abrasives or polishing
compounds. They will permanently dam-
age this finish and such damage is not
covered by the New Vehicle Limited War-
ranty. USE ONLY MILD SOAP AND WATER
WITH A SOFT CLOTH. Used on a regular
basis this is all that is required to maintain
this finish.
Tire Chains (Traction Devices)
Use of traction devices require sufficient tire-
to-body clearance. Follow these recommen-
dations to guard against damage.
• Traction device must be of proper size forthe tire, as recommended by the traction
device manufacturer.
• Install on Rear Tires Only • Due to limited clearance, Thule XG-12 Pro
or equivalent is recommended on P245/
70/R17, P265/60R18 or
265/50R20 tires.
WARNING!
Using tires of different size and type (M+S,
Snow) between front and rear axles can
cause unpredictable handling. You could
lose control and have a collision.
CAUTION!
To avoid damage to your vehicle or tires,
observe the following precautions:
• Because of restricted traction deviceclearance between tires and other sus-
pension components, it is important that
only traction devices in good condition
are used. Broken devices can cause se-
rious damage. Stop the vehicle immedi-
ately if noise occurs that could indicate
device breakage. Remove the damaged
parts of the device before further use.
CAUTION!
• Install device as tightly as possible andthen retighten after driving about ½ mile
(0.8 km).
• Do not exceed 30 mph (48 km/h).
• Drive cautiously and avoid severe turns
and large bumps, especially with a
loaded vehicle.
• Do not drive for a prolonged period on
dry pavement.
• Observe the traction device manufactur-
er’s instructions on the method of instal-
lation, operating speed, and conditions
for use. Always use the suggested oper-
ating speed of the device manufacturer’s
if it is less than 30 mph (48 km/h).
• Do not use traction devices on a com-
pact spare tire.
Tire Rotation Recommendations
The tires on the front and rear of your vehicle
operate at different loads and perform differ-
ent steering, handling, and braking func-
tions. For these reasons, they wear at unequal
rates.
265
Page 268 of 372
These effects can be reduced by timely rota-
tion of tires. The benefits of rotation are
especially worthwhile with aggressive tread
designs such as those on On/Off-Road type
tires. Rotation will increase tread life, help to
maintain mud, snow, and wet traction levels,
and contribute to a smooth, quiet ride.
Refer to the “Maintenance Plan” for the
proper maintenance intervals. More frequent
rotation is permissible if desired. The reasons
for any rapid or unusual wear should be
corrected prior to rotation being performed.
NOTE:
The premium Tire Pressure Monitor System
will automatically locate the pressure values
displayed in the correct vehicle position fol-
lowing a tire rotation.
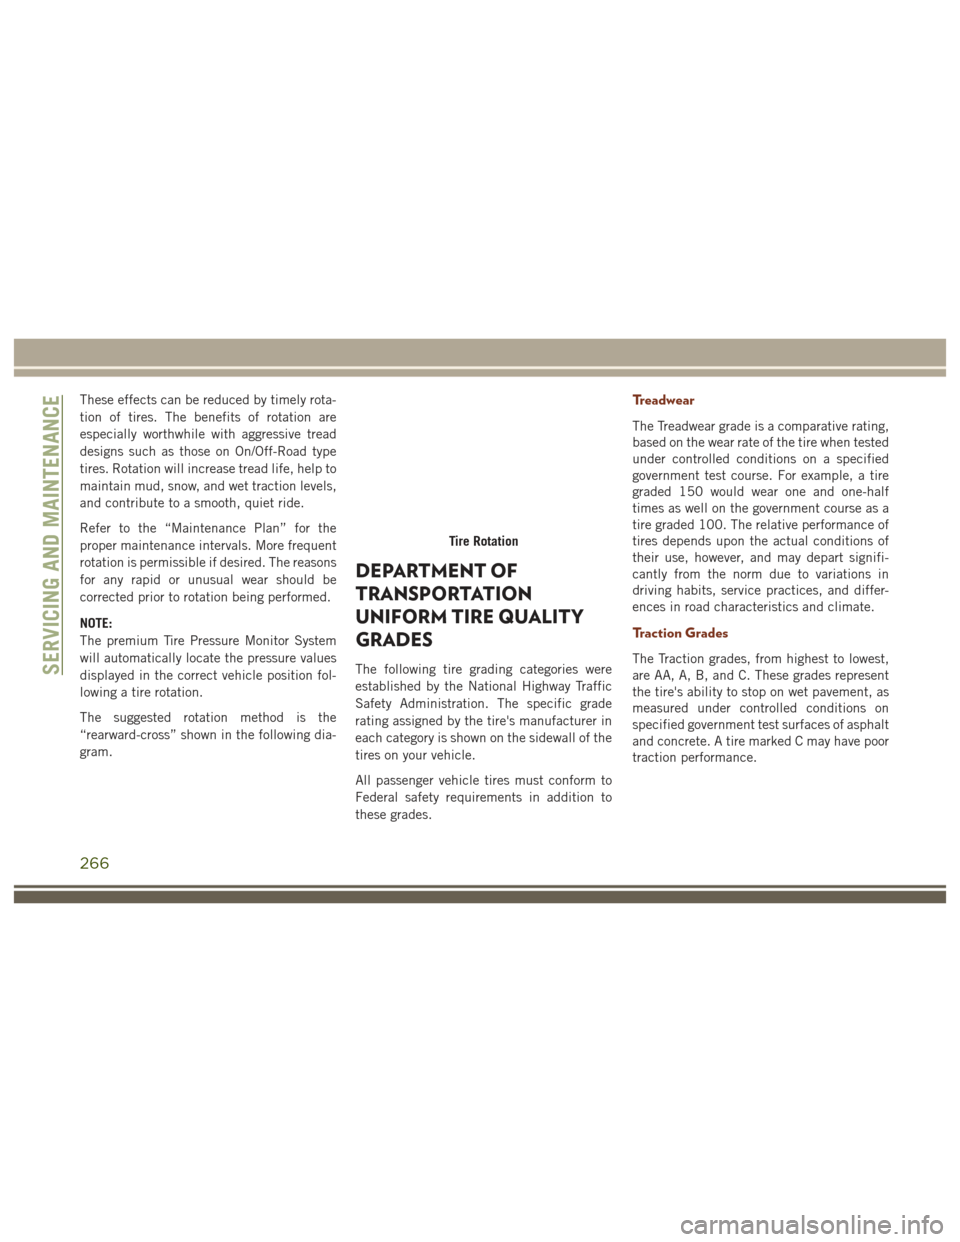
The suggested rotation method is the
“rearward-cross” shown in the following dia-
gram.
DEPARTMENT OF
TRANSPORTATION
UNIFORM TIRE QUALITY
GRADES
The following tire grading categories were
established by the National Highway Traffic
Safety Administration. The specific grade
rating assigned by the tire's manufacturer in
each category is shown on the sidewall of the
tires on your vehicle.
All passenger vehicle tires must conform to
Federal safety requirements in addition to
these grades.
Treadwear
The Treadwear grade is a comparative rating,
based on the wear rate of the tire when tested
under controlled conditions on a specified
government test course. For example, a tire
graded 150 would wear one and one-half
times as well on the government course as a
tire graded 100. The relative performance of
tires depends upon the actual conditions of
their use, however, and may depart signifi-
cantly from the norm due to variations in
driving habits, service practices, and differ-
ences in road characteristics and climate.
Traction Grades
The Traction grades, from highest to lowest,
are AA, A, B, and C. These grades represent
the tire's ability to stop on wet pavement, as
measured under controlled conditions on
specified government test surfaces of asphalt
and concrete. A tire marked C may have poor
traction performance.
Tire Rotation
SERVICING AND MAINTENANCE
266
Page 269 of 372
WARNING!
The traction grade assigned to this tire is
based on straight-ahead braking traction
tests, and does not include acceleration,
cornering, hydroplaning, or peak traction
characteristics.
Temperature Grades
The temperature grades are A (the highest),
B, and C, representing the tire's resistance to
the generation of heat and its ability to dissi-
pate heat, when tested under controlled con-
ditions on a specified indoor laboratory test
wheel.
Sustained high temperature can cause the
material of the tire to degenerate and reduce
tire life, and excessive temperature can lead
to sudden tire failure. The grade C corre-
sponds to a level of performance, which all
passenger vehicle tires must meet under the
Federal Motor Vehicle Safety Standard No.
109. Grades B and A represent higher levels
of performance on the laboratory test wheel,
than the minimum required by law.
WARNING!
The temperature grade for this tire is es-
tablished for a tire that is properly inflated
and not overloaded. Excessive speed,
under-inflation, or excessive loading, ei-
ther separately or in combination, can
cause heat buildup and possible tire fail-
ure.
STORING THE VEHICLE
If the vehicle should remain stationary for
more than a month, observe the following
precautions:
• Park your vehicle in a covered, dry andpossibly airy location the windows open
slightly.
• Check that the Electric Park Brake is not engaged.
• Disconnect the negative (-) terminal from the battery post and be sure that the
battery is fully charged. During storage
check battery charge quarterly. • If you do not disconnect the battery from
the electrical system, check the battery
charge every thirty days.
• Clean and protect the painted parts by applying protective waxes.
• Clean and protect polished metal parts by applying protective waxes.
• Apply talcum powder to the front and rear wiper blades and leave raised from the
glass.
• Cover the vehicle with an appropriate cover taking care not to damage the
painted surface by dragging across dirty
surfaces. Do not use plastic sheeting
which will not allow the evaporation of
moisture present on the surface of the
vehicle.
• Inflate the tires at a pressure of +7.25 psi (+0.5 bar) higher than recommended on
the tire placard and check it periodically.
• Do not drain the engine cooling system.
• Whenever you leave the vehicle is station- ary for two weeks or more, run idle the
engine for approximately five minutes,
with the air conditioning system on and
high fan speed. This will ensure a proper
267
Page 270 of 372
lubrication of the system, thus minimizing
the possibility of damage to the compres-
sor when the vehicle is put back into
operation.
NOTE:
When the vehicle has not been started or
driven for at least 30 days, an Extended Park
Start Procedure is required to start the ve-
hicle. Refer to “Starting Procedures” in
“Starting And Operating” for further
information.
CAUTION!
Before removal of the positive and nega-
tive terminals to the battery, wait at least a
minute with ignition switch in the OFF
position and close the drivers door. When
reconnecting the positive and negative ter-
minals to the battery be sure the ignition
switch is in the OFF position and the
drivers door is closed.
BODYWORK
Body And Underbody Maintenance
Cleaning Headlights
Your vehicle is equipped with plastic head-
lights and fog lights that are lighter and less
susceptible to stone breakage than glass
headlights.
Plastic is not as scratch resistant as glass and
therefore different lens cleaning procedures
must be followed.
To minimize the possibility of scratching the
lenses and reducing light output, avoid wip-
ing with a dry cloth. To remove road dirt, wash
with a mild soap solution followed by rinsing.
Do not use abrasive cleaning components,
solvents, steel wool or other aggressive mate-
rial to clean the lenses.
Preserving The Bodywork
Washing
• Wash your vehicle regularly. Always wash your vehicle in the shade using MOPAR Car
Wash, or a mild car wash soap, and rinse
the panels completely with clear water.
• If insects, tar, or other similar deposits have accumulated on your vehicle, use
MOPAR Super Kleen Bug and Tar Remover
to remove.
• Use a high quality cleaner wax, such as MOPAR Cleaner Wax to remove road film,
stains and to protect your paint finish. Take
care never to scratch the paint.
• Avoid using abrasive compounds and power buffing that may diminish the gloss
or thin out the paint finish.
SERVICING AND MAINTENANCE
268