buttons JEEP RENEGADE 2018 Owner handbook (in English)
[x] Cancel search | Manufacturer: JEEP, Model Year: 2018, Model line: RENEGADE, Model: JEEP RENEGADE 2018Pages: 356, PDF Size: 6.11 MB
Page 318 of 356
"TOUCH SCREEN" FUNCTION
The system uses the "touch screen”
function; to interact with the different
functions, press the "graphic buttons"
displayed.
Press the “OK” buttonto confirmthe
selection.
To go back to the previous screen, press
the
(Delete) button or/Done,
depending on the active screen.
RADIO MODE
After the desired radio station is
selected, the following information is
shown on the display:
At the top: the list of radio stations stored
(preset) is displayed; the station currently
playing is highlighted.
At the centre: the name of station being
listened too is displayed.
On the left side: displays the “AM”, “FM”,
“DAB” (where provided) buttons for
selecting the desired frequency band (the
button corresponding to the selected
band is highlighted).
On the right side: displays the “Info”
button: Additional information on the
source being listened to.
At the bottom: display of the following
buttons:
“Browse”: list of the radio stations
available;
/selecting previous/next
radio station;
“Tune” : manual radio station tuning;“Audio”: access to the “Audio
Settings” screen.
Audio menu
To access the "Audio" menu press the
Audio" button located at the bottom of
the display.
The following adjustments can be carried
out using the “Audio” menu:
“Balance & Fader" (left/right and
front/rear audio balance adjustment)
“Equaliser” (where provided)“Speed Adj Volume” (speed-
dependent automatic volume control)
“Loudness” (where provided)“AUX Volume compensation” (only
active if an AUX device is inserted)
(where provided)
“AutoPlay”“Auto-On Radio”“Radio Off with Door”
MEDIA MODE
Press the "Media" button to select the
desired audio source among those
available: USB,Bluetooth®and AUX
(where provided).
IMPORTANT Applications used on
portable devices may be not
compatible with theUconnect™
system.
After Media mode is selected, the
following information is shown on the
display.
At the top: information on the track being
played and the following graphic buttons:
“Repeat”: to repeat the track being
played;
“Shuffle”: to play the tracks in
random order;
Track progress and duration.
In the middle: information on the track
being played.
On the left: display of the following
buttons:
Selected device or audio source;“Select Source”: select the required
audio source.
On the right: display of the following
buttons:
“Info”: additional information on the
track being played;
“Tracks”: list of available tracks.
At the bottom: information on the track
being played and the following graphic
buttons:
“Bluetooth”: for aBluetooth®audio
source, opens the list of devices;
316
MULTIMEDIA
Page 319 of 356
“Browse” for a USB source, opens
browsing;
/: select previous/next track;: pause track being played;“Audio”: access to the “Audio
Settings” screen.
Track selection
The “Tracks” function allows you to open
a window with the list of tracks being
played.
The choices available depend on the
device connected. For example, on a
USB device you can also use the TUNE
SCROLL / BROWSE ENTER button/knob
or the
andbuttons to scroll
through the list of artists, genres and
albums available on the device,
depending on the information present on
the tracks.
Within each list, the “ABC” button allows
the user to skip to the desired letter in
the list.
NOTE This button might be disabled for
someApple®devices.
NOTE The TUNE SCROLL / BROWSE
ENTER button/knob does not allow any
operation on an AUX device.
BLUETOOTH® SOURCE
This mode is activated by pairing a
Bluetooth®device containing music
tracks with the system.
PAIRING A BLUETOOTH® AUDIO
DEVICE
To pair aBluetooth®audio device,
proceed as follows:
activate theBluetooth®function on
the device;
press the “Media” button on the
display;
press the "Select Source" button;select theBluetooth®Media source;press the "Add Device" button;search forUconnect™on the
Bluetooth®audio device (during the
pairing stage a screen is displayed
showing the progress of the operation);
when requested by the audio device,
enter the PIN code shown on the system
display or confirm the PIN displayed on
the device
if the pairing procedure is completed
successfully, a screen is displayed.
Answer “Yes” to the question to pair the
Bluetooth®audio device as favourite (the
device will have priority over all other
devices to be paired subsequently). If
“No” is selected, the priority isdetermined according to the order of
connection. The last device connected
will have the highest priority;
an audio device can also be paired by
pressing the "Phone" graphic button on
the display and by selecting "Settings" or
selecting "Phone/Bluetooth” from the
"Settings" menu.
NOTE If the device is connected via USB
after theBluetooth®connection, the
radio may change the track being played
when modifying the name-device in the
Bluetooth®settings of the phone (where
provided). After updating the phone
software, for proper operation, it is
recommended to remove the phone from
the list of devices linked to the radio,
delete the previous system pairing also
from the list ofBluetooth®devices on the
phone and make a new pairing.
IMPORTANT If theBluetooth®
connection between mobile phone and
system is lost, consult the mobile
phone handbook.
USB/AUX SOURCE
USB source
The car has a USB/AUX port located on
the central tunnel.
When a USB device is inserted with the
317
Page 320 of 356
radio on, it starts to play the tracks on
the device if the “AutoPlay” is set to
"ON" in the “Audio” menu.
AUX source
(where provided)
To activate AUX mode, insert an
appropriate device in the AUX socket in
the car. When a device is inserted using
the AUX output socket the system starts
reproducing the AUX source connected,
if it is already being played.
Adjust the volume using the VOLUME
button/knob onUconnect™or using the
volume adjustment control on the
connected device.
The "AUX Volume Offset" function can be
selected in “Audio” settings only when
the AUX source is active.
IMPORTANT NOTES
The functions of the device connected
with the AUX socket are directly
managed by the device itself: it is not
possible to change track/folder/playlist or
control playing start/end/pause with the
controls on the front panel or on the
steering wheel.
To avoid possible speaker noise, do not
leave the cable of the portable reader
connected to the AUX socket after
disconnection.PHONE MODE
Phone mode activation
Press the “Phone” button on the display
to activate the Phone mode.
NOTE To consult the list of mobile
phones and supported functions, visit the
www.driveuconnect.eu website
Use the buttons on the display to:
dial the phone number (using the
graphic keypad on the display);
display and call the contacts in the
mobile phone phonebook;
display and call contacts from the
registers of previous calls;
pair up to 10 phones/audio devices to
make access and connection easier and
quicker;
transfer calls from the system to the
mobile phone and vice versa and
deactivate the microphone audio for
private conversations.
The mobile phone audio is transmitted
through the vehicle’s audio system; the
system automatically mutes the radio
when the Phone function is used.
Pairing a mobile phone
IMPORTANT Carry out this operation
only with vehicle stationary and insafety conditions; this function is
deactivated when the vehicle is
moving.
The pairing procedure for a mobile phone
is described below: always consult the
handbook for the mobile phone in any
case.
To pair the mobile phone, proceed as
follows:
activate theBluetooth®function on
the mobile phone;
press the “Phone” button on the
display;
if no phone is paired with the system
yet, the display shows a dedicated
screen;
access “Settings” and select “Add
device” to start the pairing procedure,
then search for theUconnect™device on
the mobile phone;
when prompted by the mobile phone,
use its keypad to enter the PIN code
shown on the system display or confirm
on the mobile phone the PIN displayed;
during the pairing stage a screen is
displayed showing the progress of the
operation;
when the pairing procedure is
completed successfully, a screen is
displayed: answer “Yes” to the question
to pair the mobile phone as favourite (the
mobile phone will have priority over all
other mobile phones to be paired
318
MULTIMEDIA
Page 321 of 356
subsequently). If no other devices are
paired, the system will consider the first
associated device as favourite.
NOTE After updating the phone software,
for proper operation, it is recommended
to remove the phone from the list of
devices linked to the radio, delete the
previous system pairing also from the list
ofBluetooth®devices on the phone and
make a new pairing.
Making a phone call
The operations described below can only
be accessed if supported by the mobile
phone in use. For all functions available,
refer to the mobile phone owner's
handbook.
A call can be made by:
selecting "Phonebook";selecting "Recent";selecting "Dial";selecting "Redial".
Favourites
You can add a number or a contact (if
already in Contacts) to the favourite list
during a call by pressing one of the 5
"Empty" graphic buttons on the upper
part of the display. The favourites can
also be managed by using the Phonebook
optionsText message reader
The system can read the messages
received by the mobile phone. To use this
function the mobile phone must support
the SMS exchange function through
Bluetooth®.
If this function is not supported by the
phone, the corresponding "Text" button is
deactivated (greyed out).
When a text message is received, the
display will show a screen where the
options "Read", "Show", "Call" or "Ignore"
can be selected.
Press the "Text Message" graphic button
to access the list of text messages
received by the mobile phone (the list
displays a maximum of 60 messages
received).
NOTE On some mobile phones, to make
the SMS voice reading function
available, the SMS notification option on
the phone must be enabled; this option
is usually available on the phone, in the
Bluetooth®connections menu for a
device registered asUconnect™. After
enabling this function on the mobile
phone, it must be disconnected and
reconnected with theUconnect™system
in order to make it effective.
IMPORTANT Some mobile phones may
not take the SMS delivery confirmation
settings into account when interfacing
withUconnect™. If a text message is
sent via theUconnect™system, the
driver could face an additional cost,
without any warning, due to the text
message delivery confirmation request
sent by the phone. For any problems
related to the above, contact your
telephone service provider.
"Do not disturb" function
If supported by the connected phone, by
pressing the "Do not disturb" graphic
button the user will not receive
notifications of incoming calls or text
messages. The user can reply with a
default or customised message by means
of the settings.
SMS message options
Default SMS messages are stored in the
system memory and can be sent to
answer a received message or as a new
message.
Ye sNoOkayI can't talk right nowCall meI'll call you laterI'm on my way
319
Page 328 of 356
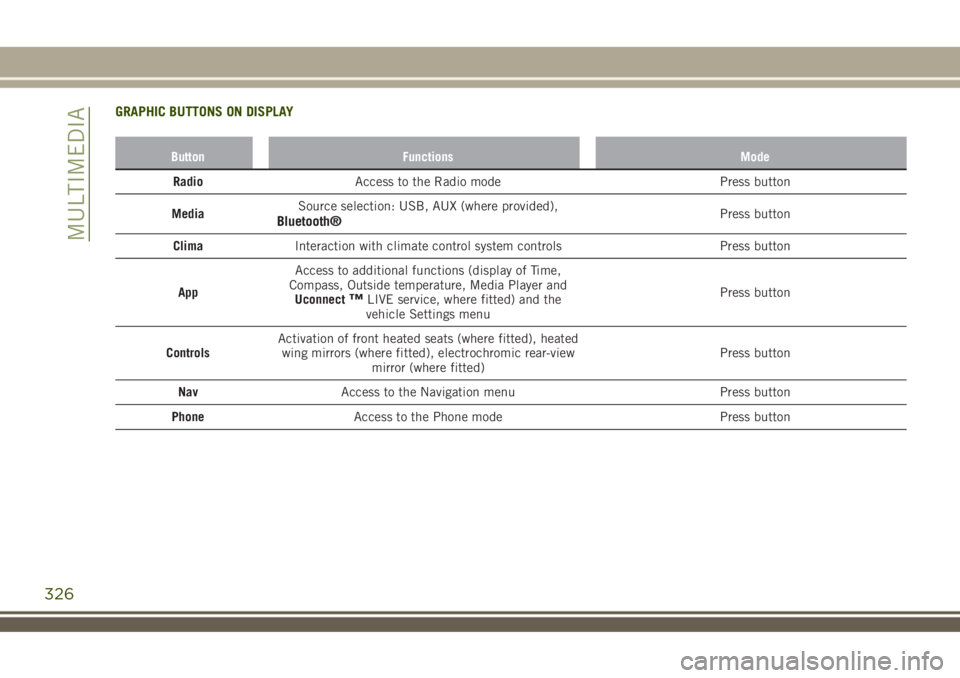
GRAPHIC BUTTONS ON DISPLAY
Button Functions Mode
RadioAccess to the Radio mode Press button
MediaSource selection: USB, AUX (where provided),
Bluetooth®Press button
ClimaInteraction with climate control system controls Press button
AppAccess to additional functions (display of Time,
Compass, Outside temperature, Media Player and
Uconnect
™LIVE service, where fitted) and the
vehicle Settings menuPress button
ControlsActivation of front heated seats (where fitted), heated
wing mirrors (where fitted), electrochromic rear-view
mirror (where fitted)Press button
NavAccess to the Navigation menu Press button
PhoneAccess to the Phone mode Press button
326
MULTIMEDIA
Page 332 of 356
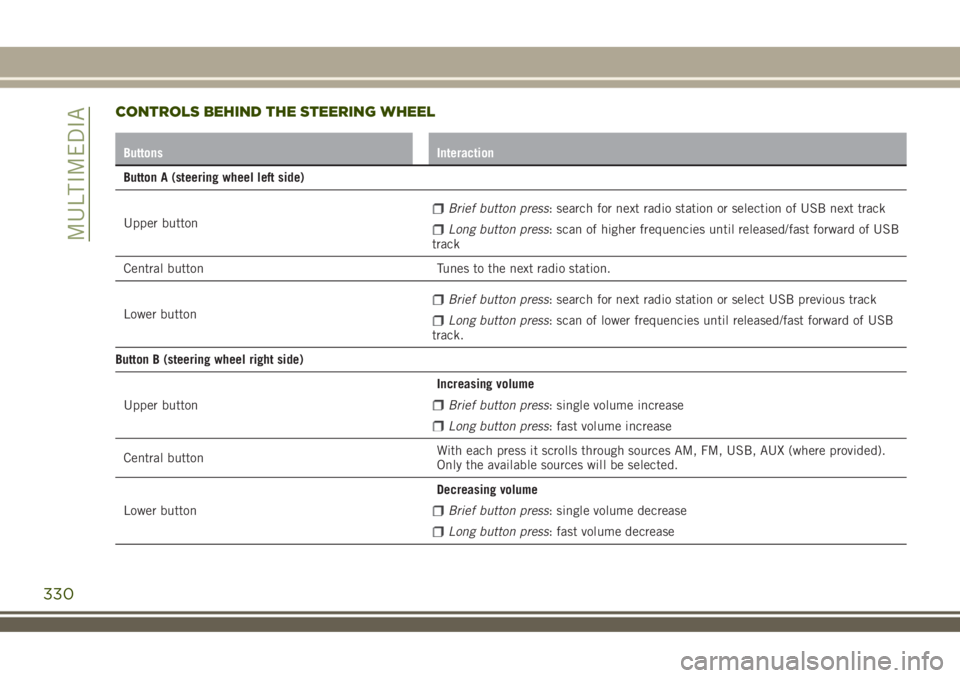
CONTROLS BEHIND THE STEERING WHEEL
Buttons Interaction
Button A (steering wheel left side)
Upper button
Brief button press: search for next radio station or selection of USB next track
Long button press: scan of higher frequencies until released/fast forward of USB
track
Central button Tunes to the next radio station.
Lower button
Brief button press: search for next radio station or select USB previous track
Long button press: scan of lower frequencies until released/fast forward of USB
track.
Button B (steering wheel right side)
Upper buttonIncreasing volume
Brief button press: single volume increase
Long button press: fast volume increase
Central buttonWith each press it scrolls through sources AM, FM, USB, AUX (where provided).
Only the available sources will be selected.
Lower buttonDecreasing volume
Brief button press: single volume decrease
Long button press: fast volume decrease
330
MULTIMEDIA
Page 333 of 356
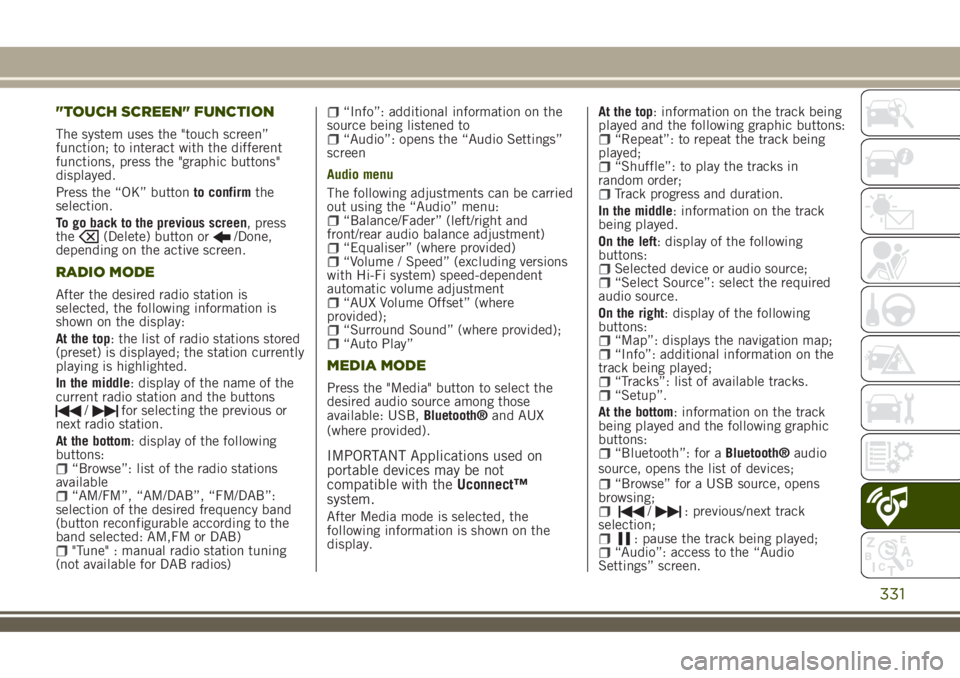
"TOUCH SCREEN" FUNCTION
The system uses the "touch screen”
function; to interact with the different
functions, press the "graphic buttons"
displayed.
Press the “OK” buttonto confirmthe
selection.
To go back to the previous screen, press
the
(Delete) button or/Done,
depending on the active screen.
RADIO MODE
After the desired radio station is
selected, the following information is
shown on the display:
At the top: the list of radio stations stored
(preset) is displayed; the station currently
playing is highlighted.
In the middle: display of the name of the
current radio station and the buttons
/for selecting the previous or
next radio station.
At the bottom: display of the following
buttons:
“Browse”: list of the radio stations
available
“AM/FM”, “AM/DAB”, “FM/DAB”:
selection of the desired frequency band
(button reconfigurable according to the
band selected: AM,FM or DAB)
"Tune" : manual radio station tuning
(not available for DAB radios)
“Info”: additional information on the
source being listened to
“Audio”: opens the “Audio Settings”
screen
Audio menu
The following adjustments can be carried
out using the “Audio” menu:
“Balance/Fader” (left/right and
front/rear audio balance adjustment)
“Equaliser” (where provided)“Volume / Speed” (excluding versions
with Hi-Fi system) speed-dependent
automatic volume adjustment
“AUX Volume Offset” (where
provided);
“Surround Sound” (where provided);“Auto Play”
MEDIA MODE
Press the "Media" button to select the
desired audio source among those
available: USB,Bluetooth®and AUX
(where provided).
IMPORTANT Applications used on
portable devices may be not
compatible with theUconnect™
system.
After Media mode is selected, the
following information is shown on the
display.At the top: information on the track being
played and the following graphic buttons:
“Repeat”: to repeat the track being
played;
“Shuffle”: to play the tracks in
random order;
Track progress and duration.
In the middle: information on the track
being played.
On the left: display of the following
buttons:
Selected device or audio source;“Select Source”: select the required
audio source.
On the right: display of the following
buttons:
“Map”: displays the navigation map;“Info”: additional information on the
track being played;
“Tracks”: list of available tracks.“Setup”.
At the bottom: information on the track
being played and the following graphic
buttons:
“Bluetooth”: for aBluetooth®audio
source, opens the list of devices;
“Browse” for a USB source, opens
browsing;
/: previous/next track
selection;
: pause the track being played;“Audio”: access to the “Audio
Settings” screen.
331
Page 334 of 356
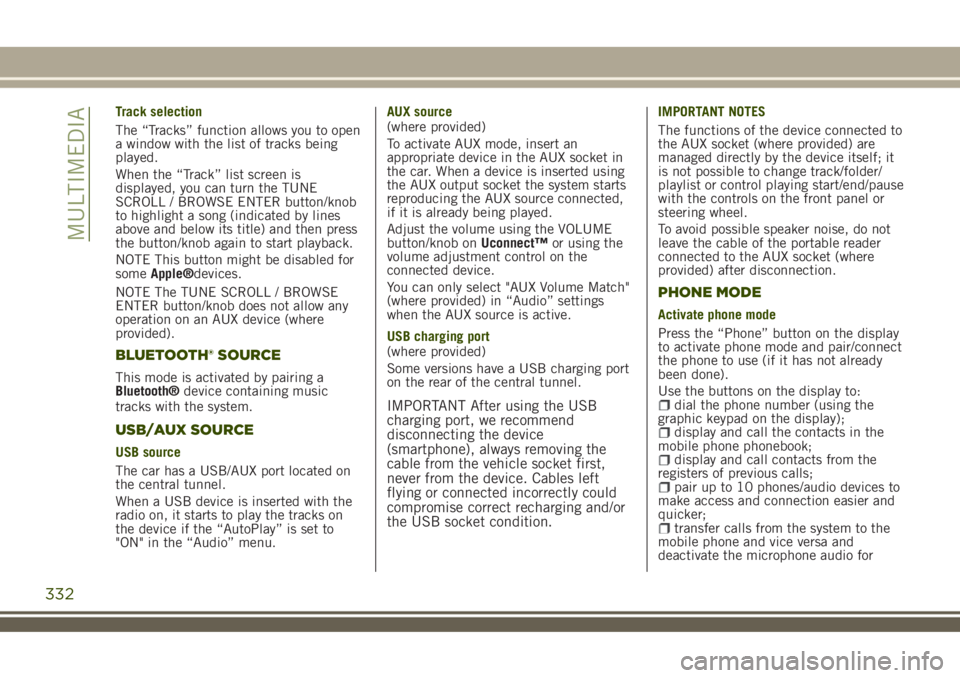
Track selection
The “Tracks” function allows you to open
a window with the list of tracks being
played.
When the “Track” list screen is
displayed, you can turn the TUNE
SCROLL / BROWSE ENTER button/knob
to highlight a song (indicated by lines
above and below its title) and then press
the button/knob again to start playback.
NOTE This button might be disabled for
someApple®devices.
NOTE The TUNE SCROLL / BROWSE
ENTER button/knob does not allow any
operation on an AUX device (where
provided).
BLUETOOTH® SOURCE
This mode is activated by pairing a
Bluetooth®device containing music
tracks with the system.
USB/AUX SOURCE
USB source
The car has a USB/AUX port located on
the central tunnel.
When a USB device is inserted with the
radio on, it starts to play the tracks on
the device if the “AutoPlay” is set to
"ON" in the “Audio” menu.AUX source
(where provided)
To activate AUX mode, insert an
appropriate device in the AUX socket in
the car. When a device is inserted using
the AUX output socket the system starts
reproducing the AUX source connected,
if it is already being played.
Adjust the volume using the VOLUME
button/knob onUconnect™or using the
volume adjustment control on the
connected device.
You can only select "AUX Volume Match"
(where provided) in “Audio” settings
when the AUX source is active.
USB charging port
(where provided)
Some versions have a USB charging port
on the rear of the central tunnel.
IMPORTANT After using the USB
charging port, we recommend
disconnecting the device
(smartphone), always removing the
cable from the vehicle socket first,
never from the device. Cables left
flying or connected incorrectly could
compromise correct recharging and/or
the USB socket condition.
IMPORTANT NOTES
The functions of the device connected to
the AUX socket (where provided) are
managed directly by the device itself; it
is not possible to change track/folder/
playlist or control playing start/end/pause
with the controls on the front panel or
steering wheel.
To avoid possible speaker noise, do not
leave the cable of the portable reader
connected to the AUX socket (where
provided) after disconnection.
PHONE MODE
Activate phone mode
Press the “Phone” button on the display
to activate phone mode and pair/connect
the phone to use (if it has not already
been done).
Use the buttons on the display to:
dial the phone number (using the
graphic keypad on the display);
display and call the contacts in the
mobile phone phonebook;
display and call contacts from the
registers of previous calls;
pair up to 10 phones/audio devices to
make access and connection easier and
quicker;
transfer calls from the system to the
mobile phone and vice versa and
deactivate the microphone audio for
332
MULTIMEDIA
Page 338 of 356
App Uconnect™ LIVE
TheUconnect™LIVEapp must be
installed on your smartphone to access
the connected services on the car. This
can be used to manage your profile and
customise yourUconnect™LIVE
experience.
The App can be downloaded from: the
"App Store" or "Google play". For safety
reasons, the App cannot be accessed
when the phone is paired with the radio.
Personal details (e-mail and password)
are required to access the
Uconnect™LIVEradio services, therefore
your personal account is protected and
can only be accessed by the real user.
Connected services that can be accessed
on the vehicle
Theeco:Drive™and my:Car applications
were developed to improve your driving
experience and are available in all
markets where theUconnect™LIVE
services can be accessed.Jeep Skills
The Jeep Skill application monitors the
inclination of the car, the position of the
wheels and if they are slipping, and
displays it on theUconnect™system in
real time. This offers greater direct
control and driving awareness so that you
can discover the supplied power and
torque in real time, while handling
difficult routes, or just when you want a
“challenge” in town
It provides detailed information on
acceleration and braking: you can also
display “G force”, battery charge status,
braking distance at the current speed as
well as other car and driving parameters.
For more information on your driving
behaviour, trip data can be accessed
outside the vehicle using the
Uconnect™LIVEapp.
IMPORTANT The Jeep Skills
application is intended for
entertainment purposes only. Drive
safely and responsibly.
Press the buttons on the display to
access the following sections:eco:Drive™
Theeco:Drive™application displays your
driving behaviour in real time, to help
you achieve a more efficient driving style
as far as consumption and emissions are
concerned.
In addition, you can also save the data
on a USB key or, thanks to the
Uconnect™LIVEapp, process the data on
your own computer using theeco:Drive™
desktop application available at
www.jeep-official.it or
www.driveuconnect.eu.
Evaluation of the driving style is linked to
four indexes that monitor the following
parameters: acceleration/deceleration/
gear shift/speed.
336
MULTIMEDIA
Page 341 of 356
to the car via the USB port.
When this function is set, each time a
connection is made via USB, the Apple
CarPlay or Android Auto apps will run
automatically on theUconnect™system
display.
The "AutoShow smartphone display on
connection" item can be found in the
"Display" submenu. The function is
enabled by default.
Exiting the Android Auto and Apple CarPlay
apps
To end the Apple CarPlay or Android Auto
session, physically disconnect the
smartphone from the car's USB port.
SETTINGS
Press thebutton to open the
"Settings" menu.
NOTE The menu items displayed vary
according to the versions.
Indicatively, the menu includes the
following items:
KeysenseLanguageDisplayUnits (where provided)VoiceTime & DateCamera (rear camera) (where provided)Safety/Driving assistance (where
provided)
Mirrors & screen wipers (where
provided)
Brakes (where provided)Lights (where provided)Doors & LocksAuto-On Comfort (where provided)Engine Off OptionsAudioTelephone/BluetoothRadio SetupReset
NAVIGATION MODE
IMPORTANT Navigation maps are
pre-loaded on the system, therefore no
external support is needed.
Map Update
NOTE To update the navigation maps,
contact a Jeep Dealership.
To activate the main navigation menu,
press the "Nav" graphic button on the
front panel, then press one of the
following graphic buttons on the screen:
“Where to?”: searches or navigates to
the destination;
“Map view”: displays the map;“Home”: use this to set a home
address and program a route there;
“Work”: use this to set a work address
and program a route there;
“Information”: displays all navigation
information;
“Emergency”: searches for Hospitals
or Police Stations near the destination. It
is also possible to view your current
position on the display and save, in
"Favourites", the location of the Hospitals
or Police Stations.
“Settings”: use this to access the
Navigation “Settings” menu.
Map view
Press the "View Map" button in the
Navigation Main Menu to display the
map relative to the current position.
When the display shows the map, the
following options are available:
“Menu”: press this button to return to
the main Navigation Menu;
“Zoom in +/Zoom out –”: press the
“Zoom in +” or “ Zoom out –” button to
change the size of the map (it is not
possible to zoom in on minor roads);
“Arrival Time/Estimated Time to
Destination/Distance” (only during
navigation): press this button at the top
right of the display to view one of the
following options: "Time of Arrival",
"Estimated Time to Destination",
"Distance".
“Turn List” (only during navigation):
press the list of turns along the route at
the top middle of the display. Select a
turn through the following options: “Map
view” or “Avoid Street”.
“Options”: press this button to
339