JEEP RENEGADE 2023 Owners Manual
Manufacturer: JEEP, Model Year: 2023, Model line: RENEGADE, Model: JEEP RENEGADE 2023Pages: 364, PDF Size: 18.65 MB
Page 321 of 364
SERVICING AND MAINTENANCE 319
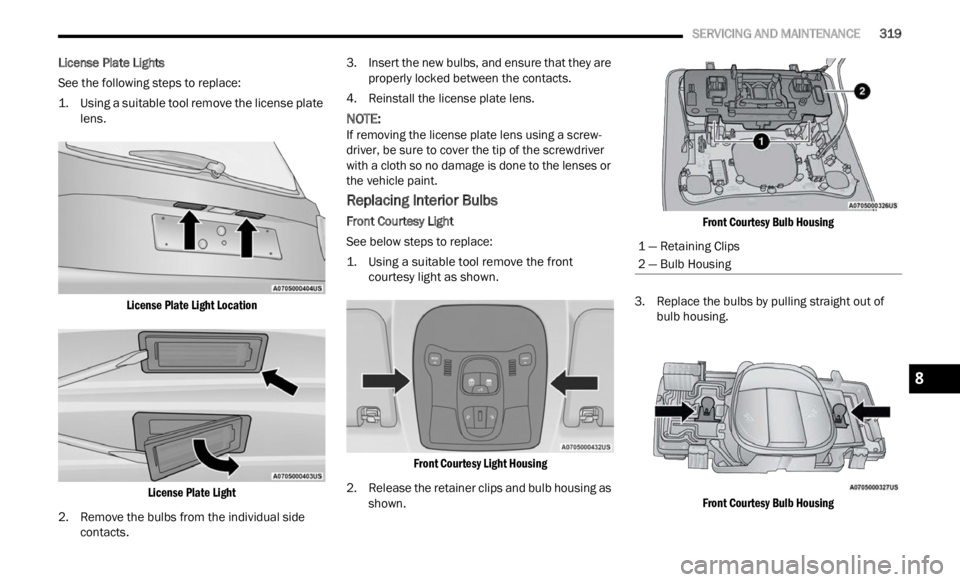
License Plate Lights
See the following steps to replace:
1. U
sing a suitable tool remove the license plate
lens.
L
icense Plate Light LocationLicense Plate Light
2. R emove the bulbs from the individual side
conta c
ts. 3. Insert the new bulbs, and ensure that they are
proper
ly locked between the contacts.
4. Reinstall the license plate lens.
NOTE:
If removing the license plate lens using a screw -
driver, be sure to cover the tip of the screwdriver
w ith a
cloth so no damage is done to the lenses or
the vehicle paint.
Replacing Interior Bulbs
Front Courtesy Light
See below steps to replace:
1. U sing a suitable tool remove the front
courte
sy light as shown.
Front Courtesy Light Housing
2. Release the retainer clips and bulb housing as shown .
F
ront Courtesy Bulb Housing
3. Replace the bulbs by pulling straight out of bulb
housing.
Front Courtesy Bulb Housing
1 — Retaining Clips
2 — Bulb Housing
8
Page 322 of 364
320 SERVICING AND MAINTENANCE
4. Insert the new bulbs, making sure that they are
properly locked.
5. Reassemble the bulb housing and courtesy light
housing making sure that they are
properly locked.
6. Install the front courtesy light making sure that it is
properly locked.
Dome Light Vanity Mirror
See below steps to replace:
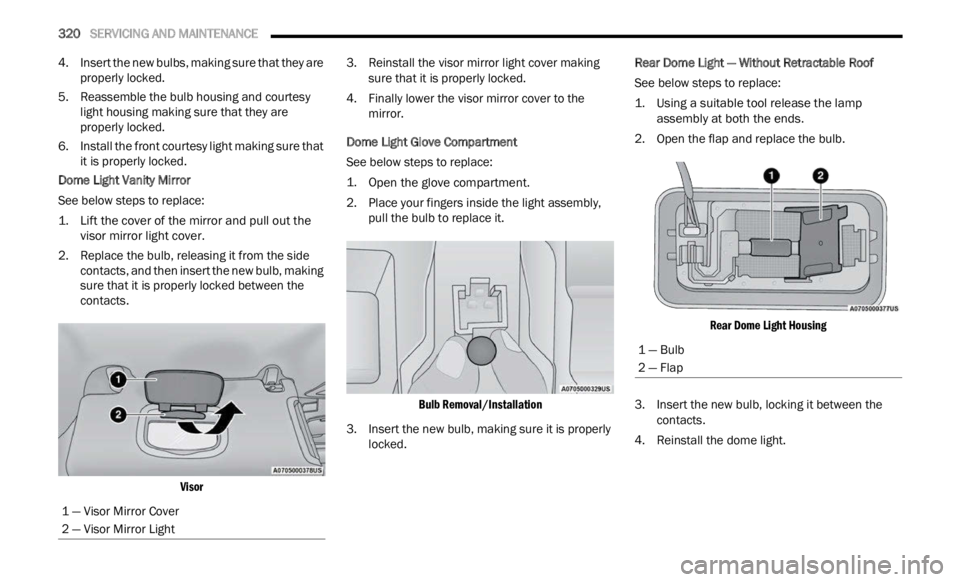
1. L ift the cover of the mirror and pull out the
visor m
irror light cover.
2. Replace the bulb, releasing it from the side contac
ts, and then insert the new bulb, making
sure that it is properly locked between the
contacts.
Visor
3. Reinstall the visor mirror light cover making
sure
that it is properly locked.
4. Finally lower the visor mirror cover to the mirror
.
Dome Light Glove Compartment
See below steps to replace:
1. O pen the glove compartment.
2. Pla
ce your fingers inside the light assembly,
pull
the bulb to replace it.
Bulb Removal/Installation
3. Insert the new bulb, making sure it is properly locke d
. Rear Dome Light — Without Retractable Roof
See below steps to replace:
1. U
sing a suitable tool release the lamp
asse m
bly at both the ends.
2. Open the flap and replace the bulb.
Rear
Dome Light Housing
3. Insert the new bulb, locking it between the conta c
ts.
4. Reinstall the dome light.
1 — V
isor Mirror Cover
2 — Visor Mirror Light
1 — Bulb
2 — Flap
Page 323 of 364
SERVICING AND MAINTENANCE 321
Dome Light — MY SKY
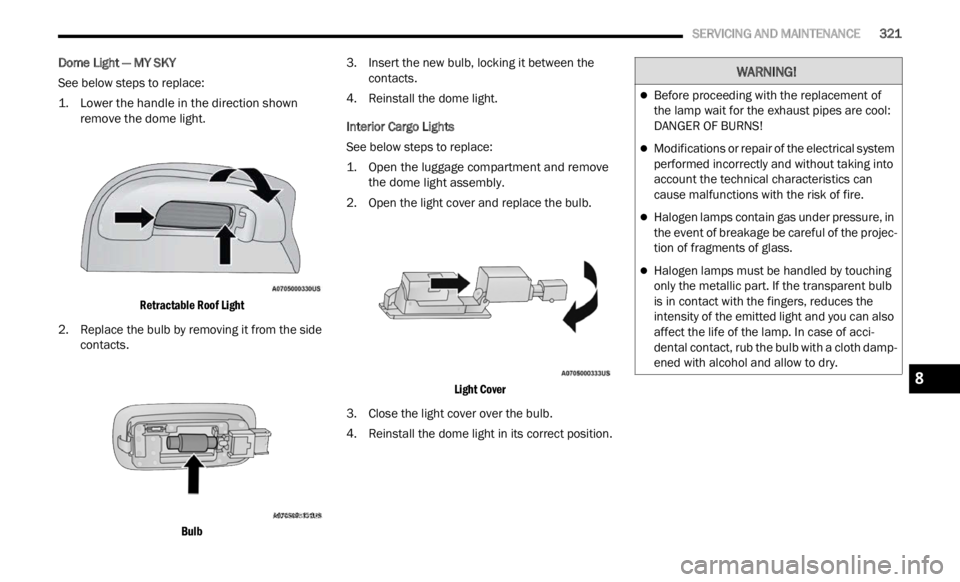
See below steps to replace:
1. L
ower the handle in the direction shown
remove
the dome light.
Retractable Roof Light
2. Replace the bulb by removing it from the side conta c
ts.
Bulb
3. I
nsert the new bulb, locking it between the
c on t
a c
ts.
4. Reinstall the dome light.
Inter
ior Cargo Lights
See below steps to replace:
1. Open the luggage compartment and remove the d o
me light assembly.
2. Open the light cover and replace the bulb.
Light
Cover
3. Close the light cover over the bulb.
4. R ein
stall the dome light in its correct position.
WARNING!
Before proceeding with the replacement of
the lamp wait for the exhaust pipes are cool:
DANGER OF BURNS!
Modifications or repair of the electrical system
performed incorrectly and without taking into
account the technical characteristics can
cause malfunctions with the risk of fire.
Halogen lamps contain gas under pressure, in
the event of breakage be careful of the projec -
tion of fragments of glass.
Halogen lamps must be handled by touching
only the metallic part. If the transparent bulb
is in contact with the fingers, reduces the
intensity of the emitted light and you can also
affect the life of the lamp. In case of acci -
dental contact, rub the bulb with a cloth damp -
ened with alcohol and allow to dry.
8
Page 324 of 364
322 SERVICING AND MAINTENANCE
TIRES
TIRE SAFETY INFORMATION
Tire safety information will cover aspects of the
following information: Tire Markings, Tire
Identification Numbers, Tire Terminology and
Definitions, Tire Pressures, and Tire Loading.
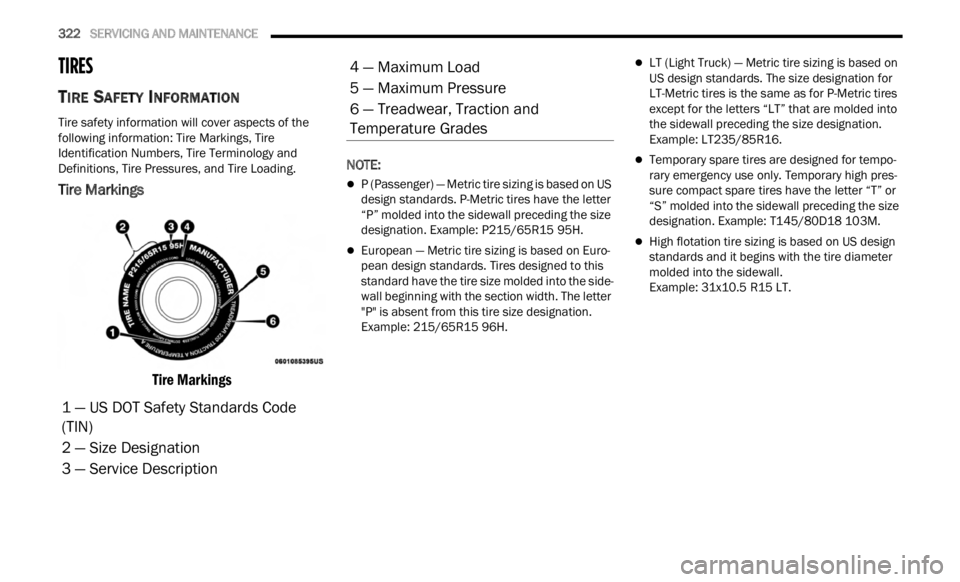
Tire Markings
Tire Markings
NOTE:
P (Passenger) — Metric tire sizing is based on US
design standards. P-Metric tires have the letter
“P” molded into the sidewall preceding the size
designation. Example: P215/65R15 95H.
European — Metric tire sizing is based on Euro -
pean design standards. Tires designed to this
s ta
nd
a
rd have the tire size molded into the side -
wall beginning with the section width. The letter
" P" is
absent from this tire size designation.
Example: 215/65R15 96H.
LT (Light Truck) — Metric tire sizing is based on
US design standards. The size designation for
LT-Metric tires is the same as for P-Metric tires
except for the letters “LT” that are molded into
the sidewall preceding the size designation.
Example: LT235/85R16.
Temporary spare tires are designed for tempo -
rary emergency use only. Temporary high pres -
sure compact spare tires have the letter “T” or
“ S” mol
ded into the sidewall preceding the size
designation. Example: T145/80D18 103M.
High flotation tire sizing is based on US design
standards and it begins with the tire diameter
molded into the sidewall.
Example: 31x10.5 R15 LT.
1 — US DOT Safety Standards Code
(TIN)
2 — Size Designation
3 — Service Description
4 — Maximum Load
5 — Maximum Pressure
6 — Treadwear, Traction and
Temperature Grades
Page 325 of 364

SERVICING AND MAINTENANCE 323
TIRE SIZING CHART
EXAMPLE:
Example Size Designation: P215/65R15XL 95H, 215/65R15 96H, LT235/85R16C, T145/80D18 103M, 31x10.5 R15 LT
P = Passenger car tire size based on US design standards, or
"....blank...." = Pas
senger car tire based on European design standards, or
LT = Light truck tire based on US design standards, or
T or S
= Temporary spare tire or
31 = O
verall diameter in inches (in)
215,
235, 145 = Sec
tion width in millimeters (mm)
65, 85, 80 = Aspect ratio in percent (%)
Ratio of section height to section width of tire, or
10.5 = Section width in inches (in)
R = C
onstruction code
"R" means radial construction, or
"D" means diagonal or bias construction
15, 16, 18 = Rim diameter in inches (in)
Servi
ce Description:
95 = Load Index
A numerical code associated with the maximum load a tire can carry
H = Speed Symbol
A symbol indicating the range of speeds at which a tire can carry a load corresponding to its load index under certain operating conditions
The maximum speed corresponding to the speed symbol should only be achieved under specified operating conditions (i.e., tire pressure, vehicle loading,
road conditions, and posted speed limits)
8
Page 326 of 364

324 SERVICING AND MAINTENANCE
Tire Identification Number (TIN)
The TIN may be found on one or both sides of the tire; however, the date code may only be on one side. Tires with white sidewalls will have the full TIN, including
the date code, located on the white sidewall side of the tire. Look for the TIN on the outboard side of black sidewall tires as mounted on the vehicle. If the TIN is
not found on the outboard side, then you will find it on the inboard side of the tire.Load Identification:
Absence of the following load identification symbols on the sidewall of the tire indicates a Standard Load (SL) tire:
XL = Extra load (or reinforced) tire, or
LL
= Light load tire or
C, D, E, F, G = Load range associated with the maximum load a tire can carry at a specified pressure
Maximum Load – Max
imum load indicates the maximum load this tire is designed to carry
Maximum Pressure – Max
imum pressure indicates the maximum permissible cold tire inflation pressure for this tire
EXAMPLE:
DOT MA L9 ABCD 0301
DOT = Department of Transportation
This symbol certifies that the tire is in compliance with the US Department of Transportation tire safety standards and is approved for highway use
MA = Code representing the tire manufacturing location (two digits)
L9 = Code representing the tire size (two digits)
ABCD =
Code used by the tire manufacturer (one to four digits)
03 = N
umber representing the week in which the tire was manufactured (two digits)
03 means the 3rd week
EXAMPLE:
Page 327 of 364

SERVICING AND MAINTENANCE 325
Tire Terminology And Definitions
01 = Number representing the year in which the tire was manufactured (two digits)
01 means the year 2001
Prior to July 2000, tire manufacturers were only required to have one number to represent the year in which the tire was manufactured. Example: 031 could
represent the 3rd week of 1981 or 1991
Term Definition
B-pillarThe vehicle B-pillar is the structural member of the body located behind the front door.
Cold Tire Inflation Pressure Cold tire inflation pressure is defined as the tire pressure after the vehicle has not been
driven
for at least three hours, or driven less than 1 mile (1.6 km) after sitting for a minimum
of thr e
e hours. Inflation pressure is measured in units of PSI (pounds per square inch) or kPa
(kilopascals).
Maximum Inflation Pressure The maximum inflation pressure is the maximum permissible cold tire inflation pressure for
this t
ire. The maximum inflation pressure is molded into the sidewall.
Recommended Cold Tire Inflation Pressure The manufacturer's recommended cold tire inflation pressure as shown on the tire placard.
Tire Placard A label permanently attached to the vehicle describing the vehicle’s loading capacity, the
origin
a
l equipment tire sizes and the recommended cold tire inflation pressures.
EXAMPLE:
8
Page 328 of 364
326 SERVICING AND MAINTENANCE
Tire Loading And Tire Pressure
NOTE:
The proper cold tire inflation pressure is listed on
the d r
iver’s side B-pillar or the rear edge of the
driver's side door.
Check the inflation pressure of each tire, including
the s p
are tire (if equipped), at least monthly and
inflate to the recommended pressure for your
vehicle.
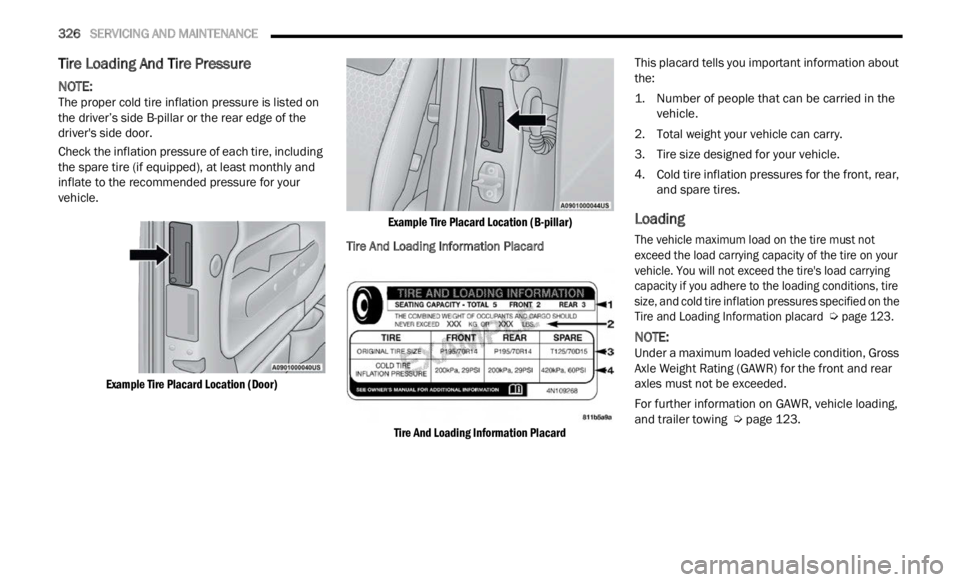
Example Tire Placard Location (Door) Example Tire Placard Location (B-pillar)
Tire And Loading Information Placard
Tire And Loading Information Placard
This placard tells you important information about
t
he:
1. N
umber of people that can be carried in the
vehicle
.
2. Total weight your vehicle can carry.
3. T ire
size designed for your vehicle.
4 .
Col
d
tire inflation pressures for the front, rear,
and s
pare tires.
Loading
The vehicle maximum load on the tire must not
exceed the load carrying capacity of the tire on your
vehicle. You will not exceed the tire's load carrying
capacity if you adhere to the loading conditions, tire
size, and cold tire inflation pressures specified on the
Tire and Loading Information placard
Ú
page 123.
NOTE:
Under a maximum loaded vehicle condition, Gross
Axle W
eight Rating (GAWR) for the front and rear
axles must not be exceeded.
For further information on GAWR, vehicle loading,
and t r
ailer towing Ú page 123.
Page 329 of 364

SERVICING AND MAINTENANCE 327
To determine the maximum loading conditions of
your vehicle, locate the statement “The combined
weight of occupants and cargo should never
exceed XXX kg or XXX lbs” on the Tire and Loading
Information placard. The combined weight of
occupants, cargo/luggage and trailer tongue
weight (if applicable) should never exceed the
weight referenced here.
Steps For Determining Correct Load
Limit—
(1) Locate the statement “The combined
weight
of occupants and cargo should
never exceed XXX kg or XXX lbs.” on your
vehicle's placard.
(2) Determine the combined weight of
the dri
ver and passengers that will be
riding in your vehicle.
(3) Subtract the combined weight of the
driver
and passengers from XXX kg or
XXX lbs. (4) The resulting figure equals the
avail
a
ble amount of cargo and luggage
load capacity. For example, if “XXX”
amount equals 1400 lbs. and there will
be five 150 lb passengers in your
vehicle, the amount of available cargo
and luggage load capacity is 650 lbs.
(1400-750 (5x150) = 650 lbs.)
(5) Determine the combined weight of
luggag
e and cargo being loaded on the
vehicle. That weight may not safely
exceed the available cargo and luggage
load capacity calculated in Step 4.
(6) If your vehicle will be towing a trailer,
load fr
om your trailer will be transferred
to your vehicle. Consult this manual to
determine how this reduces the
available cargo and luggage load
capacity of your vehicle.
Metric Example For Load Limit
For example, if “XXX” amount equals 635 kg and
there
will be five 68 kg passengers in your vehicle,
the amount of available cargo and luggage load
capacity is 295 kg (635-340 (5x68) = 295 kg) as
shown in step 4.
NOTE:
If your vehicle will be towing a trailer, load from
your trailer will be transferred to your vehicle.
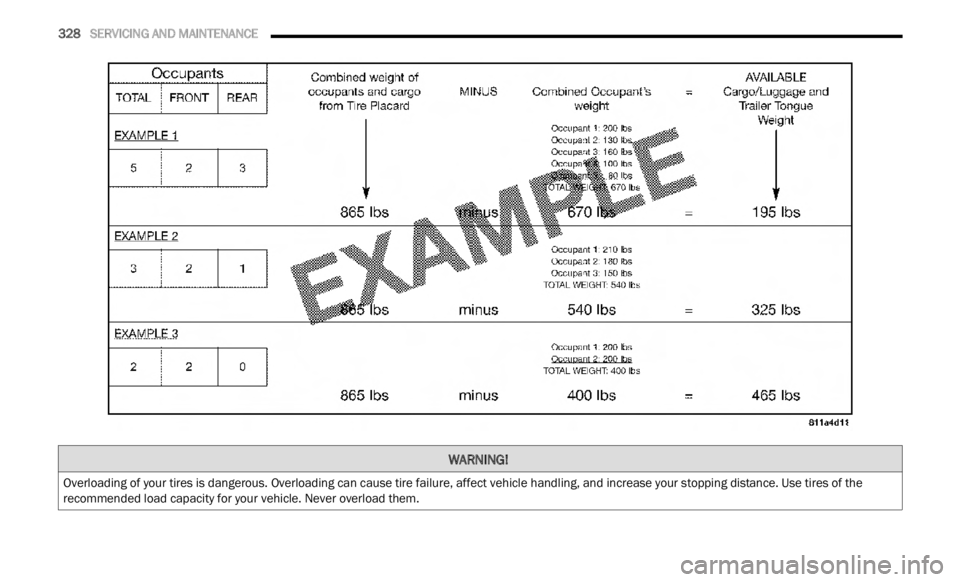
The following table shows examples on how to
calculate total load, cargo/luggage, and towing
capacities of your vehicle with varying seating
configurations and number and size of occu -
pants. This table is for illustration purposes only
a nd m a
y not be accurate for the seating and
load carry capacity of your vehicle.
For the following example, the combined weight
of occupants and cargo should never exceed
865 lbs (392 kg).
8
Page 330 of 364
328 SERVICING AND MAINTENANCE
WARNING!
Overloading of your tires is dangerous. Overloading can cause tire failure, affect vehicle handling, and increase your stopping distance. Use tires of the
recommended load capacity for your vehicle. Never overload them.