ECO mode JEEP RENEGADE 2023 Owners Manual
[x] Cancel search | Manufacturer: JEEP, Model Year: 2023, Model line: RENEGADE, Model: JEEP RENEGADE 2023Pages: 364, PDF Size: 18.65 MB
Page 4 of 364
2
INTRODUCTION
SYMBOLS KEY ...........................................................9
ROLLOVER WARNING ...... ....................................... 9
VEHICLE MODIFICATIONS/ALTERATIONS ...... .... 10
SYMBOL GLOSSARY...... ........................................ 10
GETTING TO KNOW YOUR VEHICLE
KEYS ....................................................................... 14
Key Fob .............................................................14
SENTRY KEY ..... . ..................................................... 16
IGNITION SWITCH ...... ............................................ 17
Keyless Enter ‘n Go™ Ignition ...... ...................17
REMOTE START — IF EQUIPPED ..... . .................... 18
How To Use Remote Start ...... ..........................18
To Exit Remote Start Mode ..... . ........................19
Remote Start Front Defrost Activation —
If Equipped. .....
..................................................19
Remote Start Comfort Systems —
If Equipped . .....
.................................................19
Remote Start Windshield Wiper
De–Icer Activation — If Equipped . .....
..............20
Remote Start Cancel Message —
If Equipped. .....
..................................................20
VEHICLE SECURITY SYSTEM — IF EQUIPPED ..... 2 0
To Arm The System ...... ...................................20
To Disarm The System . ..
..
. ..............................21DOORS .....................................................................21
Manu a
l Door Locks ...... ....................................21
Power Door Locks ..... . .....................................22
Keyless Enter ‘n Go™ — Passive Entry
(If Equipped) . .....
...............................................22
Automatic Unlock On Exit Feature —
If Equipped. .....
..................................................24
Dead Lock Device — If Equipped. ..
..
. ...............25
Child Locks ..... . ................................................25
STEERING WHEEL ..... . ............................................26
Tilt/Telescoping Steering Column ...... .............26
Heated Steering Wheel — If Equipped ..... . .....26
SEATS . ....................................................................26
M a
n u
a
l Front Seats...... ....................................27
Manual Rear Seat Adjustment ..... . ..................27
Power Adjustment (Front) — If Equipped . ..
..
. ..29
Heated Seats — If Equipped . ..
..
. .....................30
Unfolding The Rear Armrest
40/20/40 . ........................................................31
Head R
estraints . ..
..
. .........................................31
UCONNECT VOICE RECOGNITION ..... . ..................33
Introducing Voice Recognition...... ...................33
Basic Voice Commands . ..
..
. .............................33
Get Started ..... . .................................................33
Additional Information . ..
..
. ...............................33MIRRORS ................................................................ 34
Insi d
e Rearview Mirror...... ............................... 34
Illuminated Vanity Mirrors — If Equipped ..... . 34
Outside Mirrors . ..
..
. .......................................... 35
Heated Mirrors — If Equipped ..... . ................... 36
EXTERIOR LIGHTS. ..
..
. ............................................ 36
Headlight Switch ...... ....................................... 36
Daytime Running Lights (DRLs) —
If Equipped . .....
................................................ 37
High Beams ..... . ............................................... 37
Automatic High Beam Headlamp Control —
If Equipped . .....
................................................ 37
Flash-To-Pass . ..
..
. ............................................. 37
Automatic Headlights — If Equipped ..... . ........ 38
Parking Lights ..... . ............................................. 38
Headlight Time Delay . ..
..
. ................................ 38
Front Fog Lights — If Equipped ..... . .................38
Turn Signals. ..
..
. ................................................ 39
Lane Change Assist..... . ....................................39
Courtesy Lights. ..
..
. ...........................................39
INTERIOR LIGHTS ..... . ........................................... 39
Front Map/Reading Lights ...... ........................ 39
Dimmer Controls ..... . ....................................... 40
Rear Lights . ..
..
. .................................................40
Dome Light Timing ..... . ..................................... 41
Page 5 of 364
3
WINDSHIELD WIPERS AND WASHERS ............. 41
Windshield Wiper Operation ...... ......................42
Rain Sensing Wipers — If Equipped ..... . .........42
Rear Window Wiper/Washer . ..
..
. .....................43
Windshield Wiper De-Icer — If Equipped ..... . ...43
CLIMATE CONTROLS . ..
. .
. ...................................... 44
Automatic Climate Control Descriptions And
Functions ..........................................................44
Autom a
tic Temperature Control (ATC) ..... . .....47
Climate Voice Commands..... . ..........................47
Operating Tips . ..
..
. ...........................................47
INTERIOR STORAGE AND EQUIPMENT ..... . ......... 48
Storage..............................................................48
USB/A UX Control ..... . ........................................50
Power Outlets ..... . .............................................50
Power Inverter — If Equipped. ..
..
. .....................51
Cigar Lighter — If Equipped. ..
..
. ........................52
Ashtray — If Equipped ..... . ................................52
WINDOWS............................................................... 52
Power
Window Controls ...... .............................52
Automatic Window Features ..... . .....................53
Reset Auto-Up ..... . .............................................53
Window Lockout Switch . ..
..
. .............................54
Wind Buffeting ..... . ...........................................54
DUAL PANE PANORAMIC POWER SUNROOF
WITH POWER SHADE — IF EQUIPPED ..... .
.......... 54
Opening And Closing The Sunroof...... .............55
Venting Sunroof . ..
..
. ..........................................55
Opening And Closing The Power Sunshade....5 5
P inch Protect Feature . ..
. .
. ................................55
Sunroof Maintenance ..... . ................................56 HOOD ......................................................................56
To Op e
n The Hood...... ......................................56
To Close The Hood ..... . .....................................57
LIFTGATE . ................................................................ 57
U n
loc
k
/Open The Liftgate...... ..........................57
Lock/Close The Liftgate . ..
..
. .............................58
Cargo Area Features ..... . ..................................58
ROOF LUGGAGE RACK — IF EQUIPPED . ..
..
. ........61
GETTING TO KNOW YOUR
INSTRUMENT PANEL
INSTRUMENT CLUSTER .........................................62
Instrument Cluster Descriptions ...... ...............64
INSTRUMENT CLUSTER DISPLAY ..... . .................64
Instrument Cluster Display Location And
Controls.............................................................64
Oil C
hange Reset..... . ........................................65
Instrument Cluster Display Menu Items . ..
..
. ..66
TRIP COMPUTER ..... . ..............................................69
WARNING/INDICATOR LIGHTS AND
MESSAGES ......
........................................................69
Red Warning Lights ...... ....................................70
Yellow Warning Lights ..... . ................................72
Yellow Indicator Lights . ..
..
. ...............................75
Green Indicator Lights . ..
..
. ...............................76
White Indicator Lights ..... . ................................77
Blue Indicator Lights ..... . ..................................77
Gray Indicator Lights . ..
..
. ..................................77 ONBOARD DIAGNOSTIC SYSTEM (OBD II) .....
.
... 77
Onboard Diagnostic System
(OBD II) Cybersecurity ..... .
................................ 78
EMISSIONS INSPECTION AND MAINTENANCE
PROGRAMS ..... .
...................................................... 78
STARTING AND OPERATING
STARTING THE ENGINE ......................................... 80
Tip Start Feature ...... ....................................... 80
If Engine Fails To Start ..... . ..............................80
Cold Weather Operation ..... . ............................ 81
Extended Park Starting . ..
..
. ..............................81
After Starting — Warming Up The Engine ..... . . 81
Stopping The Engine . ..
..
. .................................. 81
Turbocharger “Cool Down” — If Equipped ..... . 82
ENGINE BREAK-IN RECOMMENDATIONS . ..
..
. .... 82
ELECTRIC PARK BRAKE (EPB) ...... ....................... 82
Auto Park Brake ...... ......................................... 84
SafeHold . .......................................................... 84
B r
a k
e
Service Mode..... . ................................... 84
9-SPEED AUTOMATIC TRANSMISSION . ..
..
. ........ 85
Gear Selector...... .............................................. 86
Gear Ranges ..... . ............................................... 87
Transmission Limp Home Mode . ..
..
. ............... 90
Ignition Park Interlock
(Keyless Vehicle) . .....
........................................ 90
Brake Transmission Shift Interlock (BTSI)
System . .............................................................90
Page 10 of 364
8
INTRODUCTION
Dear Customer,
Congratulations on the purchase of your new Jeep® vehicle. Be assured that it represents precision workmanship, distinctive styling, and high quality.
This is a specialized utility vehicle. It can go places and perform tasks that are not intended for conventional passenger vehicles. It handles and maneuvers
d
iffer
ently from many passenger vehicles both on-road and off-road, so take time to become familiar with your vehicle. If equipped, the two-wheel drive version
of this vehicle was designed for on-road use only. It is not intended for off-road driving or use in other severe conditions suited for a four-wheel drive vehicle.
Before you start to drive this vehicle, read the Owner’s Manual. Be sure you are familiar with all vehicle controls, particularly those used for braking, steering,
transmission, and transfer case shifting. Learn how your vehicle handles on different road surfaces. Your driving skills will improve with experience. When driving
off-road, or working the vehicle, don’t overload the vehicle or expect the vehicle to overcome the natural laws of physics. Always observe federal, state, provincial
and local laws wherever you drive. As with other vehicles of this type, failure to operate this vehicle correctly may result in loss of control or a collision Ú page 130.
This Owner's Manual has been prepared with the assistance of service and engineering specialists to acquaint you with the operation and maintenance of your
vehic l
e. It is supplemented by customer-oriented documents. Within this information, you will find a description of the services that FCA US LLC offers to its
customers as well as the details of the terms and conditions for maintaining its validity. Please take the time to read all of these publications carefully before
driving your vehicle for the first time. Following the instructions, recommendations, tips, and important warnings in this manual will help ensure safe and
enjoyable operation of your vehicle.
This Owner's Manual describes all versions of this vehicle. Options and equipment dedicated to specific markets or versions are not expressly indicated in the
text.
Therefore, you should only consider the information that is related to the trim level, engine, and version that you have purchased. Any content introduced
throughout the Owner's Information, which may or may not be applicable to your vehicle, will be identified with the wording “If Equipped”. All data contained in
this publication are intended to help you use your vehicle in the best possible way. FCA US LLC aims at a constant improvement of the vehicles produced. For
this reason, it reserves the right to make changes to the model described for technical and/or commercial reasons. For further information, contact an authorized
dealer.
When it comes to service, remember that authorized dealers know your Jeep® vehicle best, have factory-trained technicians and genuine Mopar® parts, and
care a
bout your satisfaction.
Page 19 of 364
GETTING TO KNOW YOUR VEHICLE 17
(Continued)
If the Vehicle Security Light turns on during normal
vehicle operation (vehicle running for longer than
10 seconds), it indicates that there is a fault in the
electronics. Should this occur, have the vehicle
serviced as soon as possible by an authorized
dealer.
All of the key fobs provided with your new vehicle
have b
een programmed to the vehicle electronics.
NOTE:
A key fob that has not been programmed is also
consid e
red an invalid key Ú page 349.
IGNITION SWITCH
KEYLESS ENTER ‘N GO™ IGNITION
This feature allows the driver to operate the
ignition with the push of a button as long as the key
fob is in the passenger compartment.
The START/STOP ignition button has three
operat i
ng modes: OFF, ON, and RUN.
NOTE:
The vehicle will not start if the key fob is located
insid e
the cargo area and the liftgate is opened.
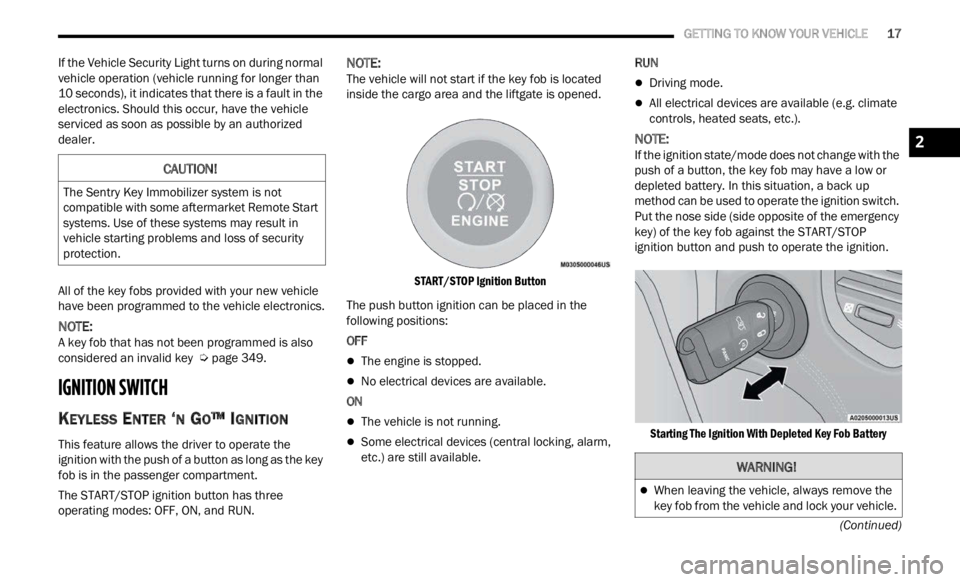
START/STOP Ignition Button
The push button ignition can be placed in the
follow i
ng positions:
OFF
The engine is stopped.
No electrical devices are available.
ON
The vehicle is not running.
Some electrical devices (central locking, alarm,
etc.) are still available. RUN
Driving mode.
All electrical devices are available (e.g. climate
controls, heated seats, etc.).
NOTE:
If the ignition state/mode does not change with the
push of
a button, the key fob may have a low or
depleted battery. In this situation, a back up
method can be used to operate the ignition switch.
Put the nose side (side opposite of the emergency
key) of the key fob against the START/STOP
ignition button and push to operate the ignition.
Starting The Ignition With Depleted Key Fob Battery
CAUTION!
The Sentry Key Immobilizer system is not
compatible with some aftermarket Remote Start
systems. Use of these systems may result in
vehicle starting problems and loss of security
protection.
WARNING!
When leaving the vehicle, always remove the
key fob from the vehicle and lock your vehicle.
2
Page 20 of 364

18 GETTING TO KNOW YOUR VEHICLE
For information on normal starting, see
Ú page 80.
REMOTE START — IF EQUIPPED
This system uses the key fob to start the
engine conveniently from outside the
vehic l
e while still maintaining security.
The system has a range of approximately
328 ft (100 m).
Remote Start is used to defrost windows in cold
w eathe
r, and to reach a comfortable climate in all
ambient conditions before the driver enters the
vehicle.
NOTE:
Obstructions between the vehicle and key fob may
reduc e
this range.
HOW TO USE REMOTE START
Push and release the Remote Start button on the
key fob twice within five seconds. The vehicle
doors will lock, the parking lights will flash, and the
horn will chirp twice (if programmed). Then, the
engine will start, and the vehicle will remain in the
Remote Start mode for a 15 minute cycle. Pushing
the R e
mote Start button a third time shuts the
engine off.
NOTE:
With Remote Start, the engine will only run for
15 minutes.
Remote Start can only be used twice.
If an engine fault is present or fuel level is low,
the vehicle will start and then shut down in
10 seconds.
The parking lights will turn on and remain on
during Remote Start mode.
For security, power window and power sunroof
operation (if equipped) are disabled when the
vehicle is in the Remote Start mode.
The ignition must be placed in the ON/RUN posi -
tion before the Remote Start sequence can be
repea t
ed for a third cycle.
Never leave children alone in a vehicle, or with
access to an unlocked vehicle.
Allowing children to be in a vehicle unattended
is dangerous for a number of reasons. A child
or others could be seriously or fatally injured.
Children should be warned not to touch the
parking brake, brake pedal or the gear
selector.
Do not leave the key fob in or near the vehicle,
or in a location accessible to children, and do
not leave the ignition in the ON or RUN posi -
tion. A child could operate power windows,
other c
ontrols, or move the vehicle.
Do not leave children or animals inside parked
vehicles in hot weather. Interior heat buildup
may cause serious injury or death.
CAUTION!
An unlocked vehicle is an invitation for thieves.
Always remove key fob from the vehicle and lock
all doors when leaving the vehicle unattended.
WARNING!
WARNING!
Do not start or run an engine in a closed
garage or confined area. Exhaust gas contains
Carbon Monoxide (CO) which is odorless and
colorless. Carbon Monoxide is poisonous and
can cause serious injury or death when
inhaled.
Keep key fobs away from children. Operation
of the Remote Start system, windows, door
locks or other controls could cause serious
injury or death.
Page 21 of 364
GETTING TO KNOW YOUR VEHICLE 19
(Continued)
All of the following conditions must be met before
the engine will remote start:
Gear selector in PARK
Doors closed
Hood closed
Liftgate closed
Hazard switch off
Brake switch inactive (brake pedal not pressed)
Battery at an acceptable charge level
PANIC button not pushed
System not disabled from previous Remote
Start event
Vehicle Security system indicator flashing
Ignition in OFF position
Fuel level meets minimum requirement
Vehicle Security system is not signaling an intru -
sion
Malfunction Indicator Light is not illuminated
TO EXIT REMOTE START MODE
To drive the vehicle after starting the Remote Start
system, push and release the START/STOP ignition
button while pressing the brake pedal prior to the
end of the 15 minute cycle.
The Remote Start system will turn the engine off if
t he Re
mote Start button on the key fob is pushed
again, or if the engine is allowed to run for the
entire 15 minute cycle. Once the ignition is placed
in th e
ON/RUN position, the climate controls will
resume previously set operations (temperature,
blower control, etc.).
NOTE:
The message “Remote Start Active — Push Start
Button” will show in the instrument cluster
display until you push the START/STOP ignition
button.
To avoid unintentional shutdowns, the system
will disable for two seconds after receiving a
valid Remote Start request.
REMOTE START FRONT DEFROST
A
CTIVATION — IF EQUIPPED
When Remote Start is active, and the outside
ambient temperature is 40°F (4.4°C) or below, the
system will automatically activate front defrost for
15 minutes or less. The time is dependent on the
ambie n
t temperature. Once the timer expires, the
system will automatically adjust the settings
depending on ambient conditions. See “Remote
Start Comfort Systems — If Equipped” in the next
section for detailed operation.
REMOTE START COMFORT SYSTEMS —
I
F EQUIPPED
When Remote Start is activated, the front and rear
defrost will automatically turn on in cold weather.
The heated steering wheel and driver heated seat
feature will turn on if selected in the comfort menu
screen within Uconnect Settings Ú page 133. The
vehicle will adjust the climate control settings
depen d
ing on the outside ambient temperature.
Automatic Temperature Control (ATC) —
If Equipped
The climate controls will be automatically adjusted
t o the
optimal temperature and mode settings
depending on the outside ambient temperature.
This will occur until the ignition is placed in the ON/
RUN position where the climate controls will
resume their previous settings.
WARNING!
Do not start or run an engine in a closed garage
or confined area. Exhaust gas contains Carbon
Monoxide (CO) which is odorless and colorless.
Carbon Monoxide is poisonous and can cause
serious injury or death when inhaled.
Keep key fobs away from children. Operation of
the Remote Start system, windows, door locks
or other controls could cause serious injury or
death.
WARNING!
2
Page 29 of 364
GETTING TO KNOW YOUR VEHICLE 27
MANUAL FRONT SEATS
Manual Front Seats Forward/Rearward
Adjustment
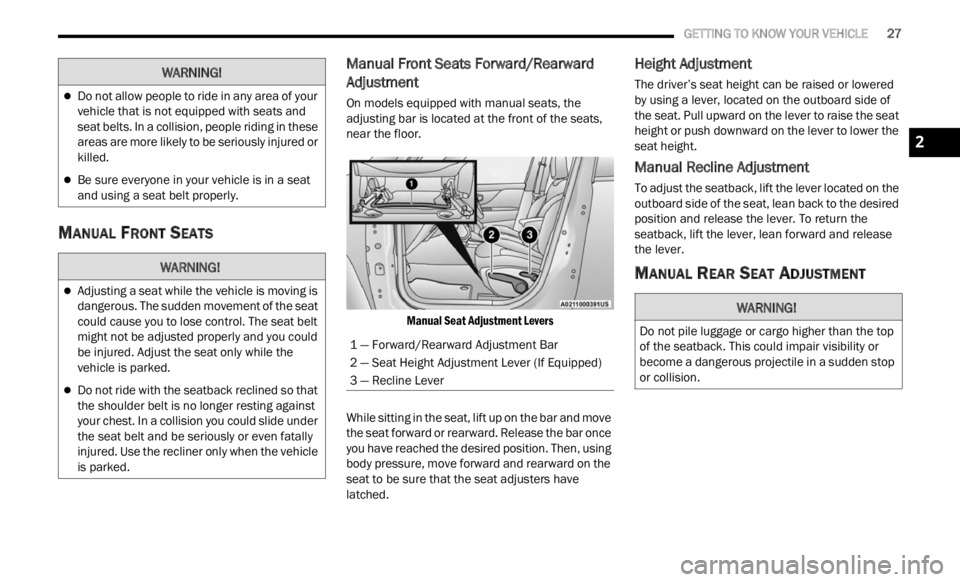
On models equipped with manual seats, the
adjusting bar is located at the front of the seats,
near the floor.
Manual Seat Adjustment Levers
While sitting in the seat, lift up on the bar and move
the se
at forward or rearward. Release the bar once
you have reached the desired position. Then, using
body pressure, move forward and rearward on the
seat to be sure that the seat adjusters have
latched.
Height Adjustment
The driver’s seat height can be raised or lowered
by using a lever, located on the outboard side of
the seat. Pull upward on the lever to raise the seat
height or push downward on the lever to lower the
seat height.
Manual Recline Adjustment
To adjust the seatback, lift the lever located on the
outboard side of the seat, lean back to the desired
position and release the lever. To return the
seatback, lift the lever, lean forward and release
the lever.
MANUAL REAR SEAT ADJUSTMENT
Do not allow people to ride in any area of your
vehicle that is not equipped with seats and
seat belts. In a collision, people riding in these
areas are more likely to be seriously injured or
killed.
Be sure everyone in your vehicle is in a seat
and using a seat belt properly.
WARNING!
Adjusting a seat while the vehicle is moving is
dangerous. The sudden movement of the seat
could cause you to lose control. The seat belt
might not be adjusted properly and you could
be injured. Adjust the seat only while the
vehicle is parked.
Do not ride with the seatback reclined so that
the shoulder belt is no longer resting against
your chest. In a collision you could slide under
the seat belt and be seriously or even fatally
injured. Use the recliner only when the vehicle
is parked.
WARNING!
1 — Forward/Rearward Adjustment Bar
2 — Seat Height Adjustment Lever (If Equipped)
3 — Recline Lever
WARNING!
Do not pile luggage or cargo higher than the top
of the seatback. This could impair visibility or
become a dangerous projectile in a sudden stop
or collision.
2
Page 31 of 364
GETTING TO KNOW YOUR VEHICLE 29
POWER ADJUSTMENT (FRONT) —
I
F EQUIPPED
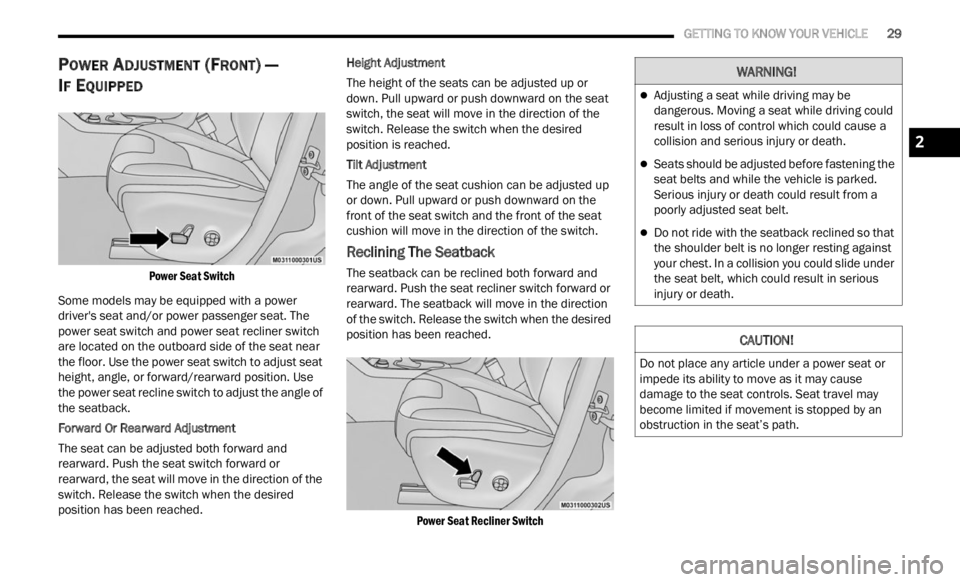
Power Seat Switch
Some models may be equipped with a power
driver
's seat and/or power passenger seat. The
power seat switch and power seat recliner switch
are located on the outboard side of the seat near
the floor. Use the power seat switch to adjust seat
height, angle, or forward/rearward position. Use
the power seat recline switch to adjust the angle of
the seatback.
Forward Or Rearward Adjustment
The seat can be adjusted both forward and
rearw a
rd. Push the seat switch forward or
rearward, the seat will move in the direction of the
switch. Release the switch when the desired
position has been reached. Height Adjustment
The height of the seats can be adjusted up or
d
own. P
ull upward or push downward on the seat
switch, the seat will move in the direction of the
switch. Release the switch when the desired
position is reached.
Tilt Adjustment
The angle of the seat cushion can be adjusted up
or down .
Pull upward or push downward on the
front of the seat switch and the front of the seat
cushion will move in the direction of the switch.
Reclining The Seatback
The seatback can be reclined both forward and
rearward. Push the seat recliner switch forward or
rearward. The seatback will move in the direction
of the switch. Release the switch when the desired
position has been reached.
Power Seat Recliner Switch
WARNING!
Adjusting a seat while driving may be
dangerous. Moving a seat while driving could
result in loss of control which could cause a
collision and serious injury or death.
Seats should be adjusted before fastening the
seat belts and while the vehicle is parked.
Serious injury or death could result from a
poorly adjusted seat belt.
Do not ride with the seatback reclined so that
the shoulder belt is no longer resting against
your chest. In a collision you could slide under
the seat belt, which could result in serious
injury or death.
CAUTION!
Do not place any article under a power seat or
impede its ability to move as it may cause
damage to the seat controls. Seat travel may
become limited if movement is stopped by an
obstruction in the seat’s path.
2
Page 40 of 364
38 GETTING TO KNOW YOUR VEHICLE
AUTOMATIC HEADLIGHTS — IF EQUIPPED
This system automatically turns the headlights on
or off according to ambient light levels. To turn the
system on, rotate the headlight switch clockwise to
the last detent (AUTO position) for automatic
headlight operation. To turn the automatic system
off, move the headlight switch out of the AUTO
position.
NOTE:
The ignition must be in the ON/RUN or START
positi on
before the headlights will come on in the
automatic mode.
Dusk Sensor
There is an infrared LED sensor that works with the
rain sensor, located on the windshield. It detects
changes in light intensity outside the vehicle,
based on the sensitivity of light set by using the
menu on the display or on the Uconnect system.
The higher the sensitivity, the lesser the amount of
exter n
al light required for controlling the lighting.
To turn the dusk sensor on, rotate the headlight
switch
to the AUTO position. To turn it off, rotate the
headlight switch to a position other than AUTO.
NOTE:
The dusk sensor can only be activated with the
ignit i
on in the ON/RUN position.
PARKING LIGHTS
Rotate the headlight switch to the first detent to
turn on the parking lights. The parking light
indicator in the instrument cluster display will
illuminate.
HEADLIGHT TIME DELAY
This feature provides the safety of headlight
illumination for up to 90 seconds when leaving
your vehicle in an unlit area.
The time delay of the headlights is programmable
betwe e
n 0, 30, 60 and 90 seconds within
Uconnect Settings Ú page 133.
Headlight Delay Activation
To activate the delay feature, place the ignition in
t he OF
F position while the headlights are still on.
The delay interval begins when the headlight
switch is turned off from the low beam position.
If the headlight switch is in AUTO and the
headli
ghts were on before the ignition was turned
off, the delay interval begins automatically.
Headlight Delay Deactivation
The feature is disabled by turning on the
h eadli
ghts, the parking lights or by placing the
ignition in the RUN position.
If you shut off the lights before the ignition is
turne d
on, they will turn off in the normal manner.
NOTE:
The lights must be turned off within two minutes of
placi n
g the ignition in the OFF position to activate
this feature.
FRONT FOG LIGHTS — IF EQUIPPED
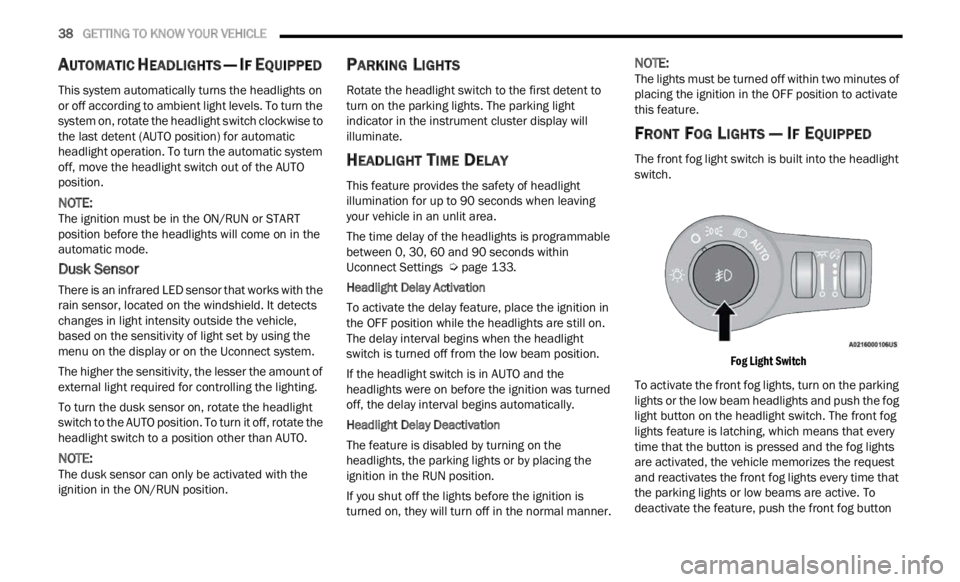
The front fog light switch is built into the headlight
switch.
Fog Light Switch
To activate the front fog lights, turn on the parking
light s
or the low beam headlights and push the fog
light button on the headlight switch. The front fog
lights feature is latching, which means that every
time that the button is pressed and the fog lights
are activated, the vehicle memorizes the request
and reactivates the front fog lights every time that
the parking lights or low beams are active. To
deactivate the feature, push the front fog button
Page 42 of 364
40 GETTING TO KNOW YOUR VEHICLE
NOTE:
Before exiting the vehicle, make sure that the
interior lights are turned off. This will prevent the
battery from discharging once the doors are
closed.
If a light is left on, it will automatically be turned
off after approximately 15 minutes after the
ignit i
on is in the OFF position.
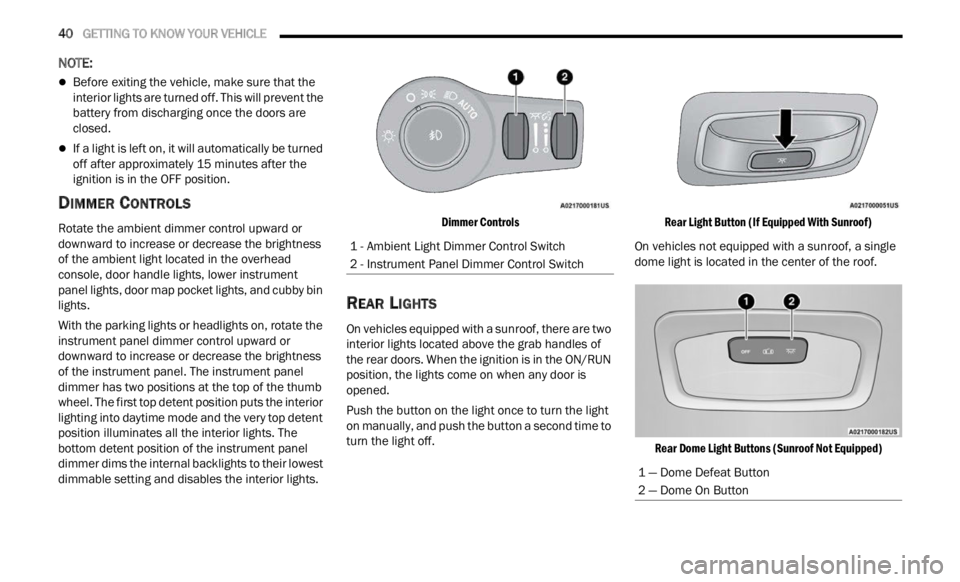
DIMMER CONTROLS
Rotate the ambient dimmer control upward or
downward to increase or decrease the brightness
of the ambient light located in the overhead
console, door handle lights, lower instrument
panel lights, door map pocket lights, and cubby bin
lights.
With the parking lights or headlights on, rotate the
instru
ment panel dimmer control upward or
downward to increase or decrease the brightness
of the instrument panel. The instrument panel
dimmer has two positions at the top of the thumb
wheel. The first top detent position puts the interior
lighting into daytime mode and the very top detent
position illuminates all the interior lights. The
bottom detent position of the instrument panel
dimmer dims the internal backlights to their lowest
dimmable setting and disables the interior lights.
Dimmer Controls
REAR LIGHTS
On vehicles equipped with a sunroof, there are two
interior lights located above the grab handles of
the rear doors. When the ignition is in the ON/RUN
position, the lights come on when any door is
opened.
Push the button on the light once to turn the light
on man
u
ally, and push the button a second time to
turn the light off.
Rear Light Button (If Equipped With Sunroof)
On vehicles not equipped with a sunroof, a single
dome l i
ght is located in the center of the roof.
Rear Dome Light Buttons (Sunroof Not Equipped)
1 - Ambient Light Dimmer Control Switch
2 - Instrument Panel Dimmer Control Switch
1 — Dome Defeat Button
2 — Dome On Button