JEEP XJ 1995 Service And Repair Manual
Manufacturer: JEEP, Model Year: 1995,
Model line: XJ,
Model: JEEP XJ 1995
Pages: 2158, PDF Size: 81.9 MB
JEEP XJ 1995 Service And Repair Manual
XJ 1995
JEEP
JEEP
https://www.carmanualsonline.info/img/16/57043/w960_57043-0.png
JEEP XJ 1995 Service And Repair Manual
Trending: boot, brake, weight, fuse chart, fuel filter location, sport mode, ECO mode
Page 1821 of 2158
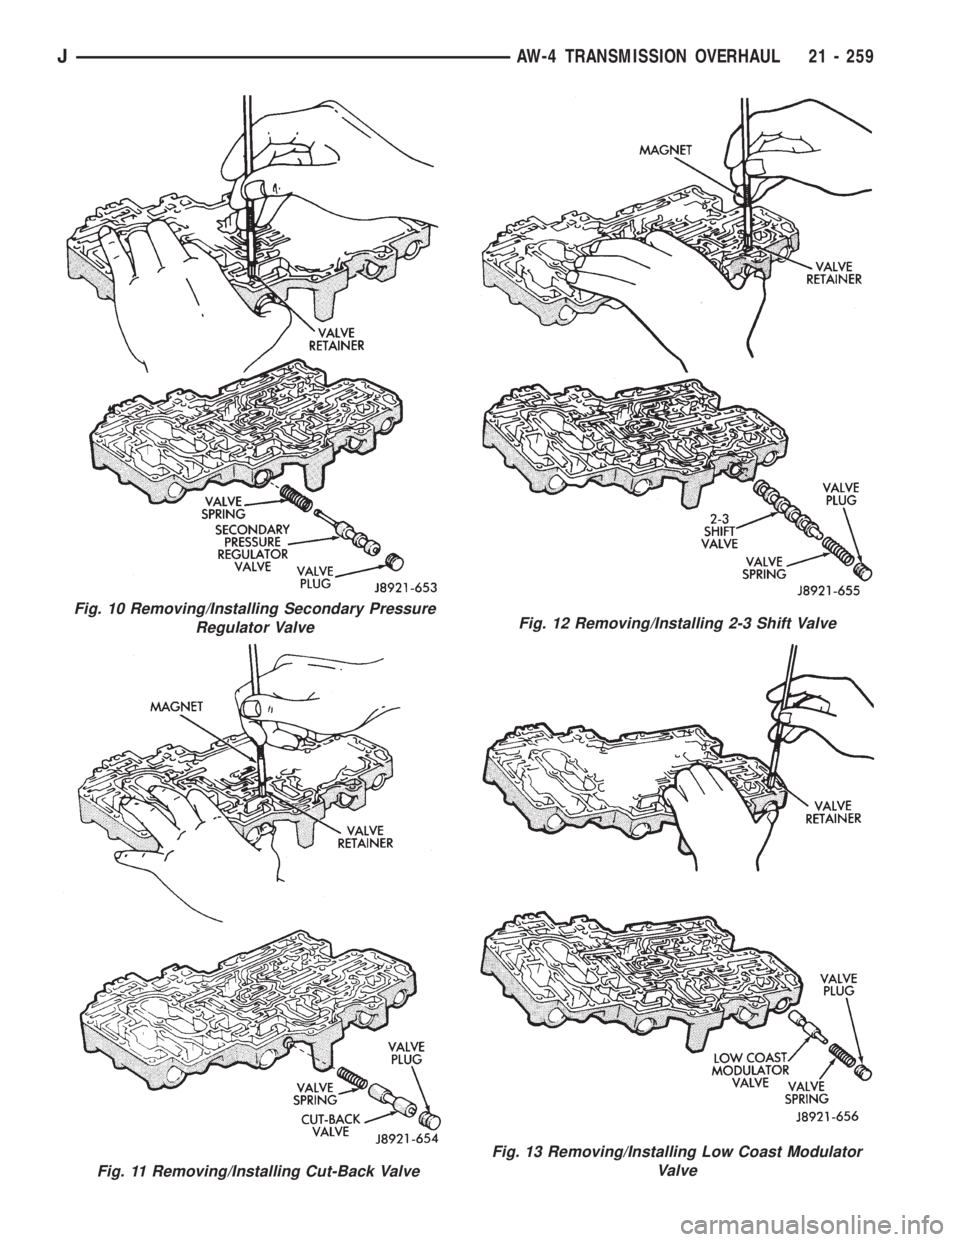
Fig. 10 Removing/Installing Secondary Pressure
Regulator Valve
Fig. 11 Removing/Installing Cut-Back Valve
Fig. 12 Removing/Installing 2-3 Shift Valve
Fig. 13 Removing/Installing Low Coast Modulator
Valve
JAW-4 TRANSMISSION OVERHAUL 21 - 259
Page 1822 of 2158
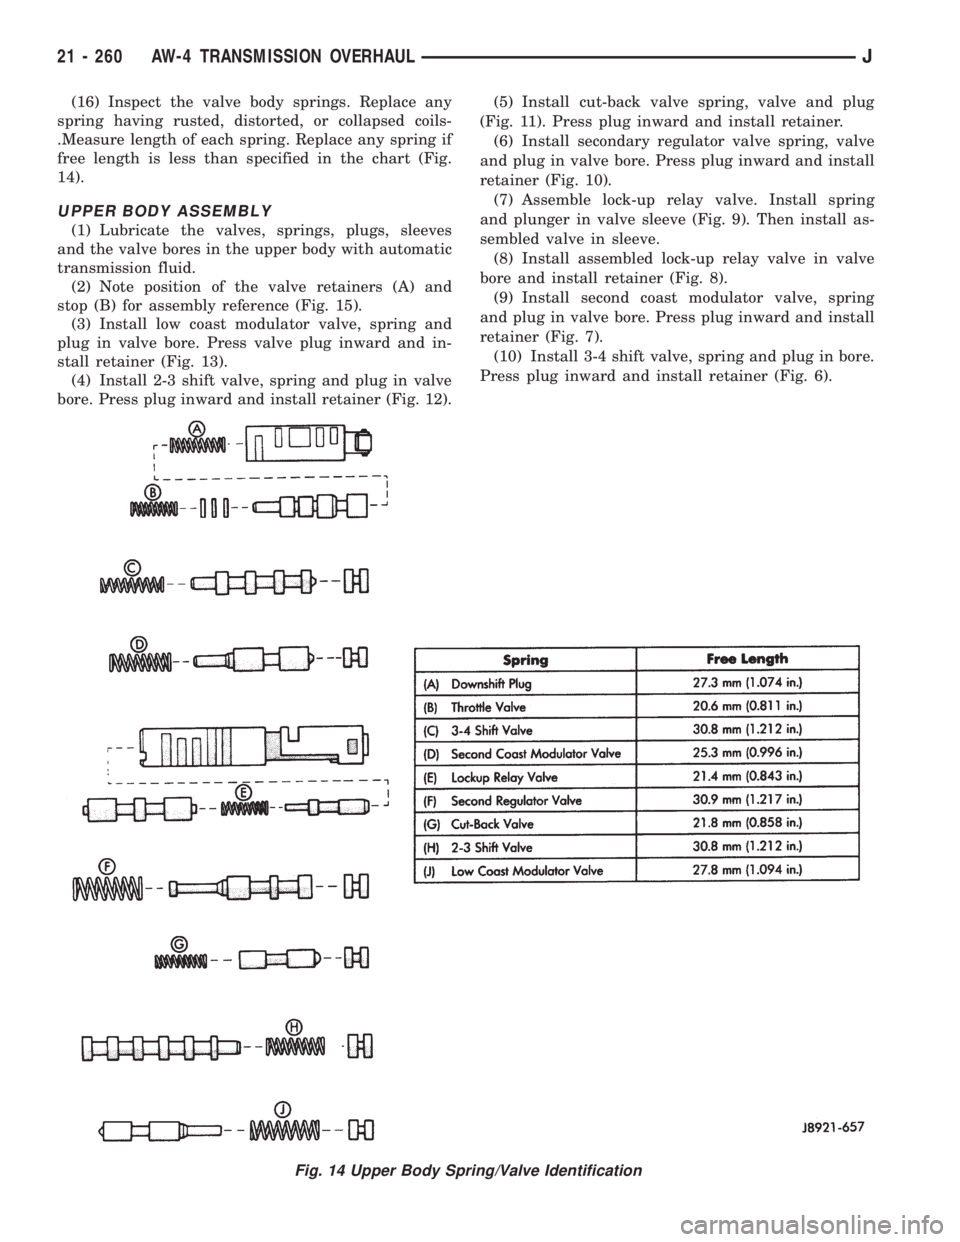
(16) Inspect the valve body springs. Replace any
spring having rusted, distorted, or collapsed coils-
.Measure length of each spring. Replace any spring if
free length is less than specified in the chart (Fig.
14).
UPPER BODY ASSEMBLY
(1) Lubricate the valves, springs, plugs, sleeves
and the valve bores in the upper body with automatic
transmission fluid.
(2) Note position of the valve retainers (A) and
stop (B) for assembly reference (Fig. 15).
(3) Install low coast modulator valve, spring and
plug in valve bore. Press valve plug inward and in-
stall retainer (Fig. 13).
(4) Install 2-3 shift valve, spring and plug in valve
bore. Press plug inward and install retainer (Fig. 12).(5) Install cut-back valve spring, valve and plug
(Fig. 11). Press plug inward and install retainer.
(6) Install secondary regulator valve spring, valve
and plug in valve bore. Press plug inward and install
retainer (Fig. 10).
(7) Assemble lock-up relay valve. Install spring
and plunger in valve sleeve (Fig. 9). Then install as-
sembled valve in sleeve.
(8) Install assembled lock-up relay valve in valve
bore and install retainer (Fig. 8).
(9) Install second coast modulator valve, spring
and plug in valve bore. Press plug inward and install
retainer (Fig. 7).
(10) Install 3-4 shift valve, spring and plug in bore.
Press plug inward and install retainer (Fig. 6).
Fig. 14 Upper Body Spring/Valve Identification
21 - 260 AW-4 TRANSMISSION OVERHAULJ
Page 1823 of 2158
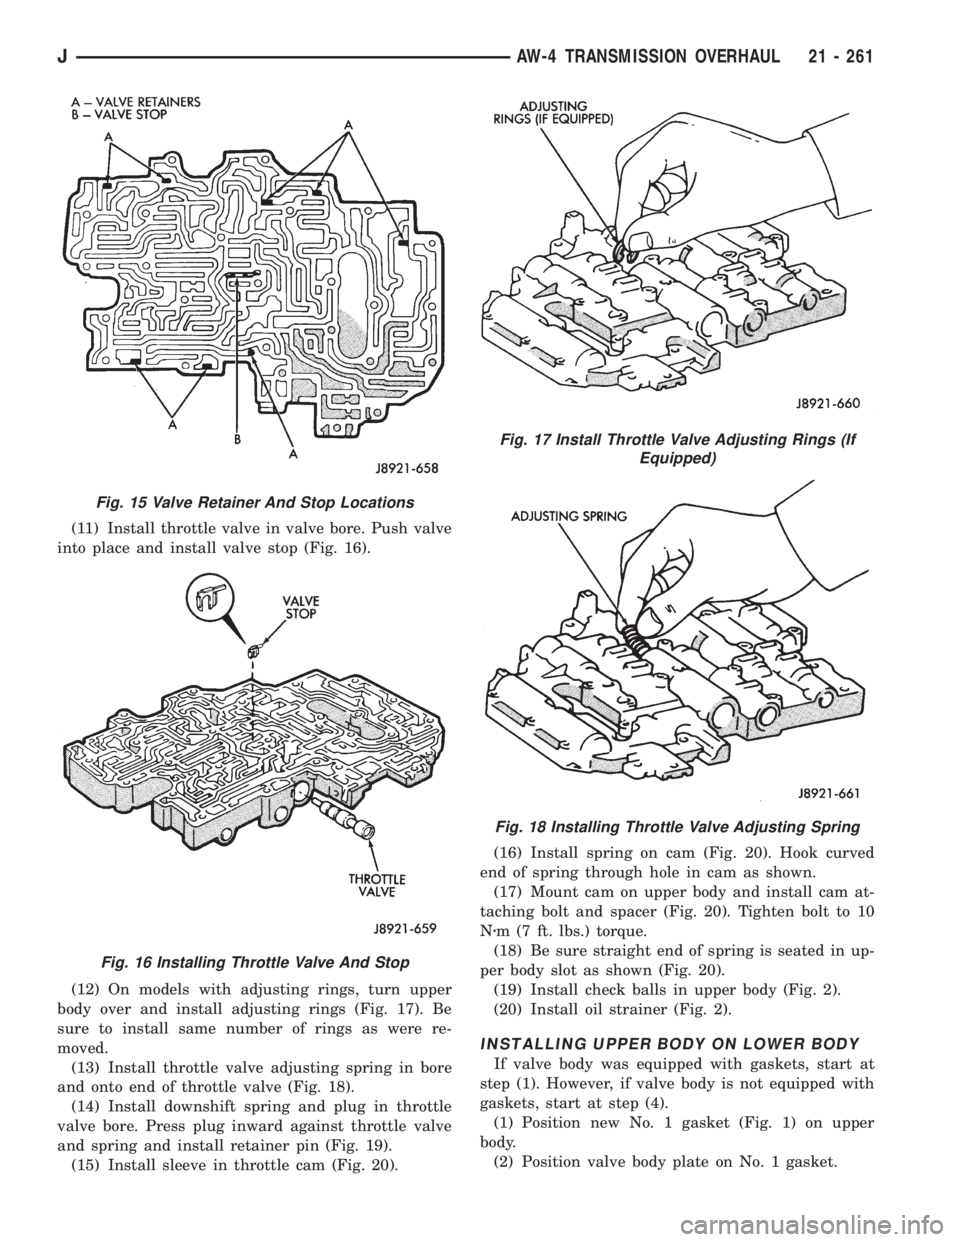
(11) Install throttle valve in valve bore. Push valve
into place and install valve stop (Fig. 16).
(12) On models with adjusting rings, turn upper
body over and install adjusting rings (Fig. 17). Be
sure to install same number of rings as were re-
moved.
(13) Install throttle valve adjusting spring in bore
and onto end of throttle valve (Fig. 18).
(14) Install downshift spring and plug in throttle
valve bore. Press plug inward against throttle valve
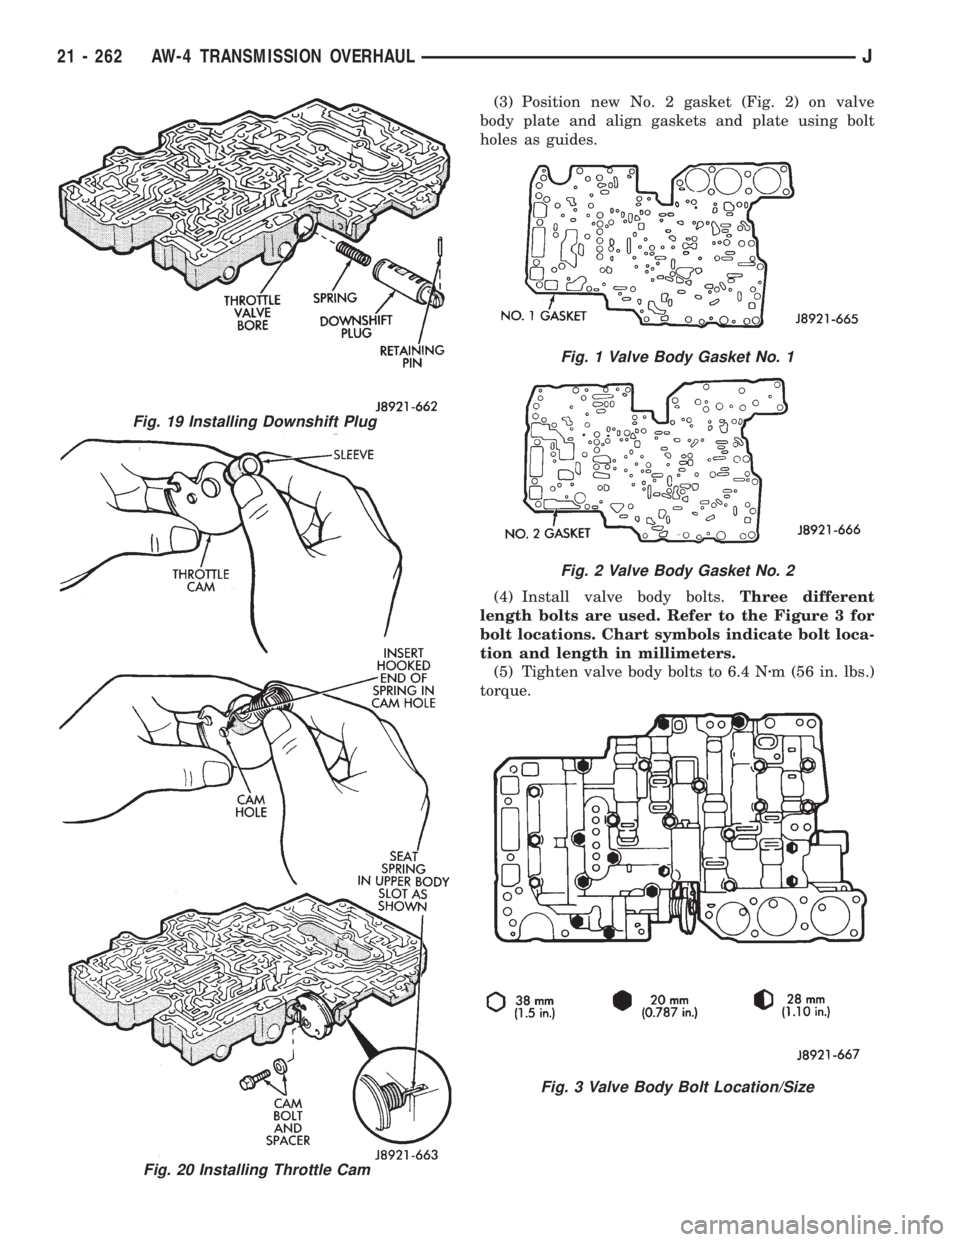
and spring and install retainer pin (Fig. 19).
(15) Install sleeve in throttle cam (Fig. 20).(16) Install spring on cam (Fig. 20). Hook curved
end of spring through hole in cam as shown.
(17) Mount cam on upper body and install cam at-
taching bolt and spacer (Fig. 20). Tighten bolt to 10
Nzm (7 ft. lbs.) torque.
(18) Be sure straight end of spring is seated in up-
per body slot as shown (Fig. 20).
(19) Install check balls in upper body (Fig. 2).
(20) Install oil strainer (Fig. 2).
INSTALLING UPPER BODY ON LOWER BODY
If valve body was equipped with gaskets, start at
step (1). However, if valve body is not equipped with
gaskets, start at step (4).
(1) Position new No. 1 gasket (Fig. 1) on upper
body.
(2) Position valve body plate on No. 1 gasket.
Fig. 15 Valve Retainer And Stop Locations
Fig. 16 Installing Throttle Valve And Stop
Fig. 17 Install Throttle Valve Adjusting Rings (If
Equipped)
Fig. 18 Installing Throttle Valve Adjusting Spring
JAW-4 TRANSMISSION OVERHAUL 21 - 261
Page 1824 of 2158
(3) Position new No. 2 gasket (Fig. 2) on valve
body plate and align gaskets and plate using bolt
holes as guides.
(4) Install valve body bolts.Three different
length bolts are used. Refer to the Figure 3 for
bolt locations. Chart symbols indicate bolt loca-
tion and length in millimeters.
(5) Tighten valve body bolts to 6.4 Nzm (56 in. lbs.)
torque.
Fig. 19 Installing Downshift Plug
Fig. 20 Installing Throttle Cam
Fig. 1 Valve Body Gasket No. 1
Fig. 2 Valve Body Gasket No. 2
Fig. 3 Valve Body Bolt Location/Size
21 - 262 AW-4 TRANSMISSION OVERHAULJ
Page 1825 of 2158
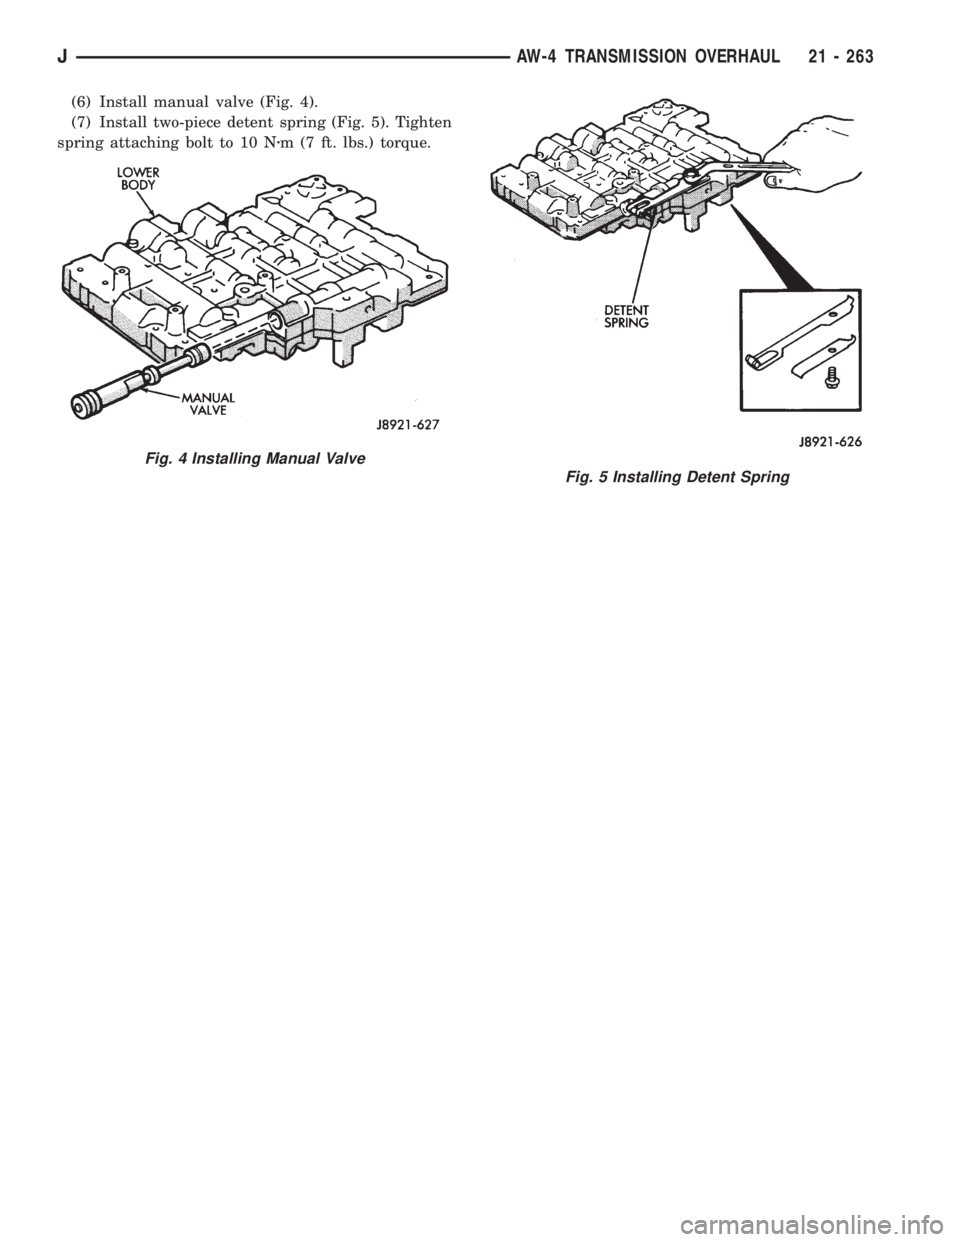
(6) Install manual valve (Fig. 4).
(7) Install two-piece detent spring (Fig. 5). Tighten
spring attaching bolt to 10 Nzm (7 ft. lbs.) torque.
Fig. 4 Installing Manual Valve
Fig. 5 Installing Detent Spring
JAW-4 TRANSMISSION OVERHAUL 21 - 263
Page 1826 of 2158
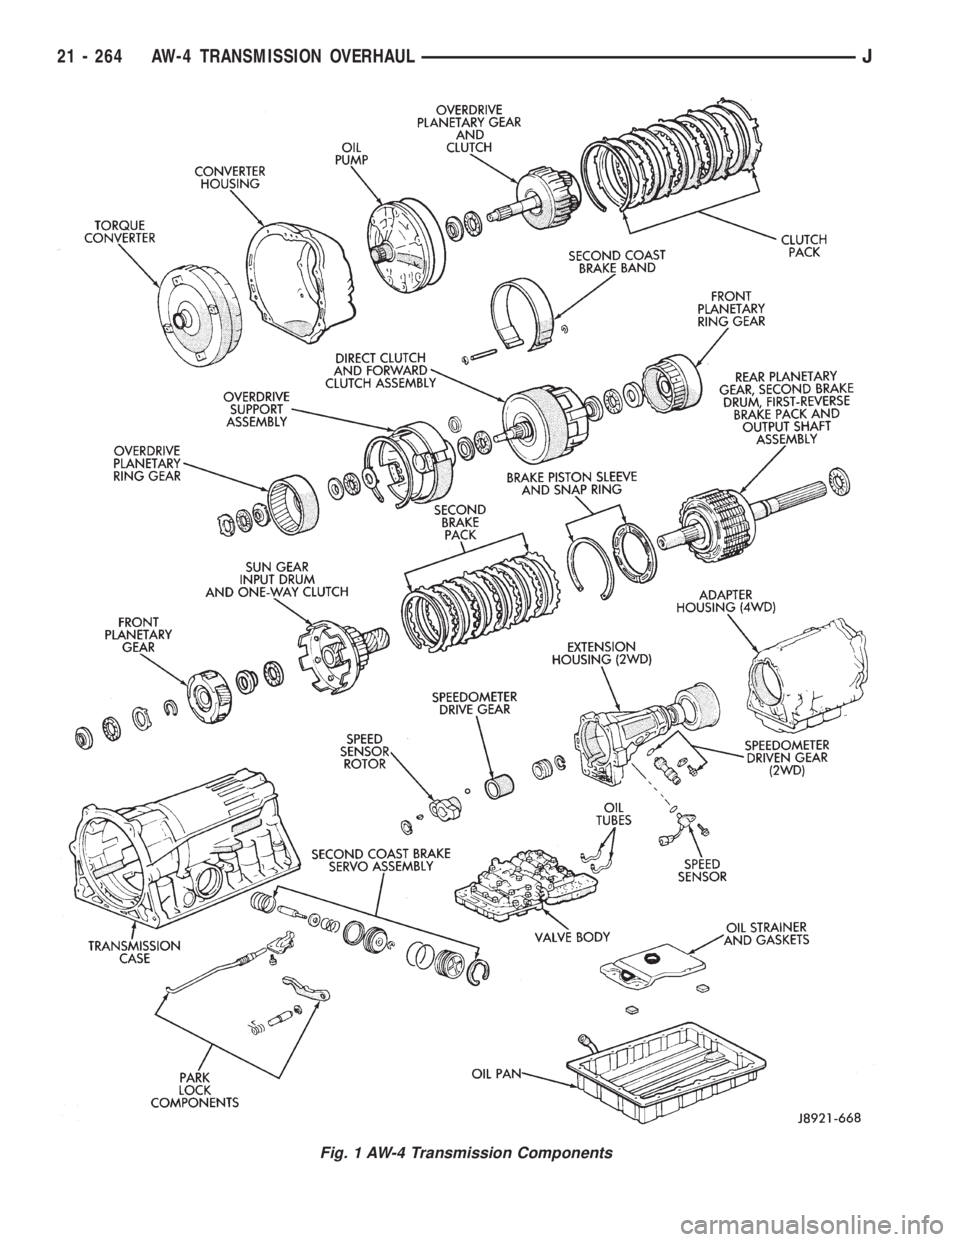
Fig. 1 AW-4 Transmission Components
21 - 264 AW-4 TRANSMISSION OVERHAULJ
Page 1827 of 2158
TRANSMISSION ASSEMBLY AND ADJUSTMENT
(1) During assembly, lubricate components with
transmission fluid or petroleum jelly as indicated.
(2) If any of the transmission components are still
assembled after overhaul checking procedures, disas-
semble as necessary in preparation for transmission
assembly.
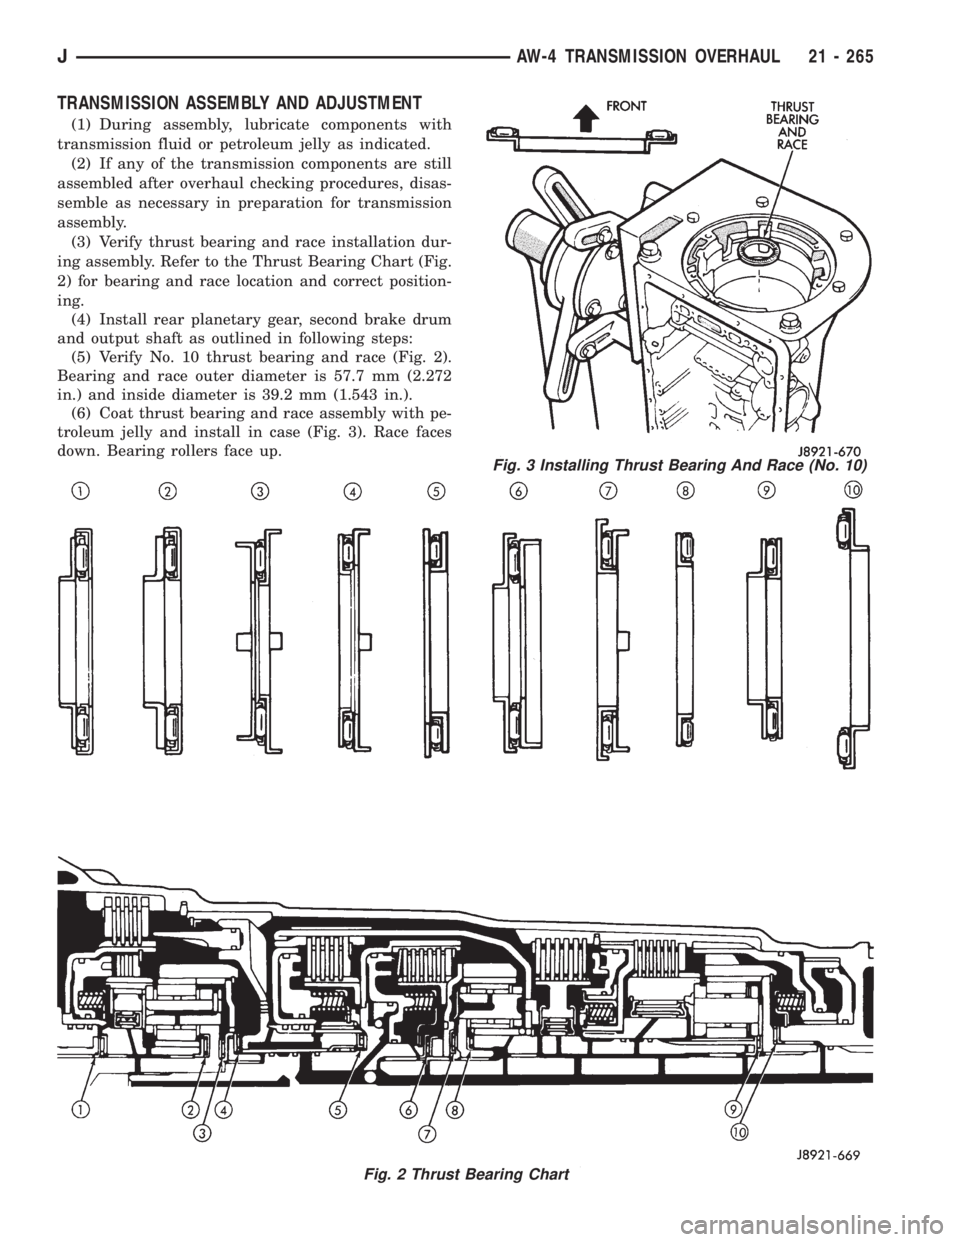
(3) Verify thrust bearing and race installation dur-
ing assembly. Refer to the Thrust Bearing Chart (Fig.
2) for bearing and race location and correct position-
ing.
(4) Install rear planetary gear, second brake drum
and output shaft as outlined in following steps:
(5) Verify No. 10 thrust bearing and race (Fig. 2).
Bearing and race outer diameter is 57.7 mm (2.272
in.) and inside diameter is 39.2 mm (1.543 in.).
(6) Coat thrust bearing and race assembly with pe-
troleum jelly and install in case (Fig. 3). Race faces
down. Bearing rollers face up.
Fig. 2 Thrust Bearing Chart
Fig. 3 Installing Thrust Bearing And Race (No. 10)
JAW-4 TRANSMISSION OVERHAUL 21 - 265
Page 1828 of 2158
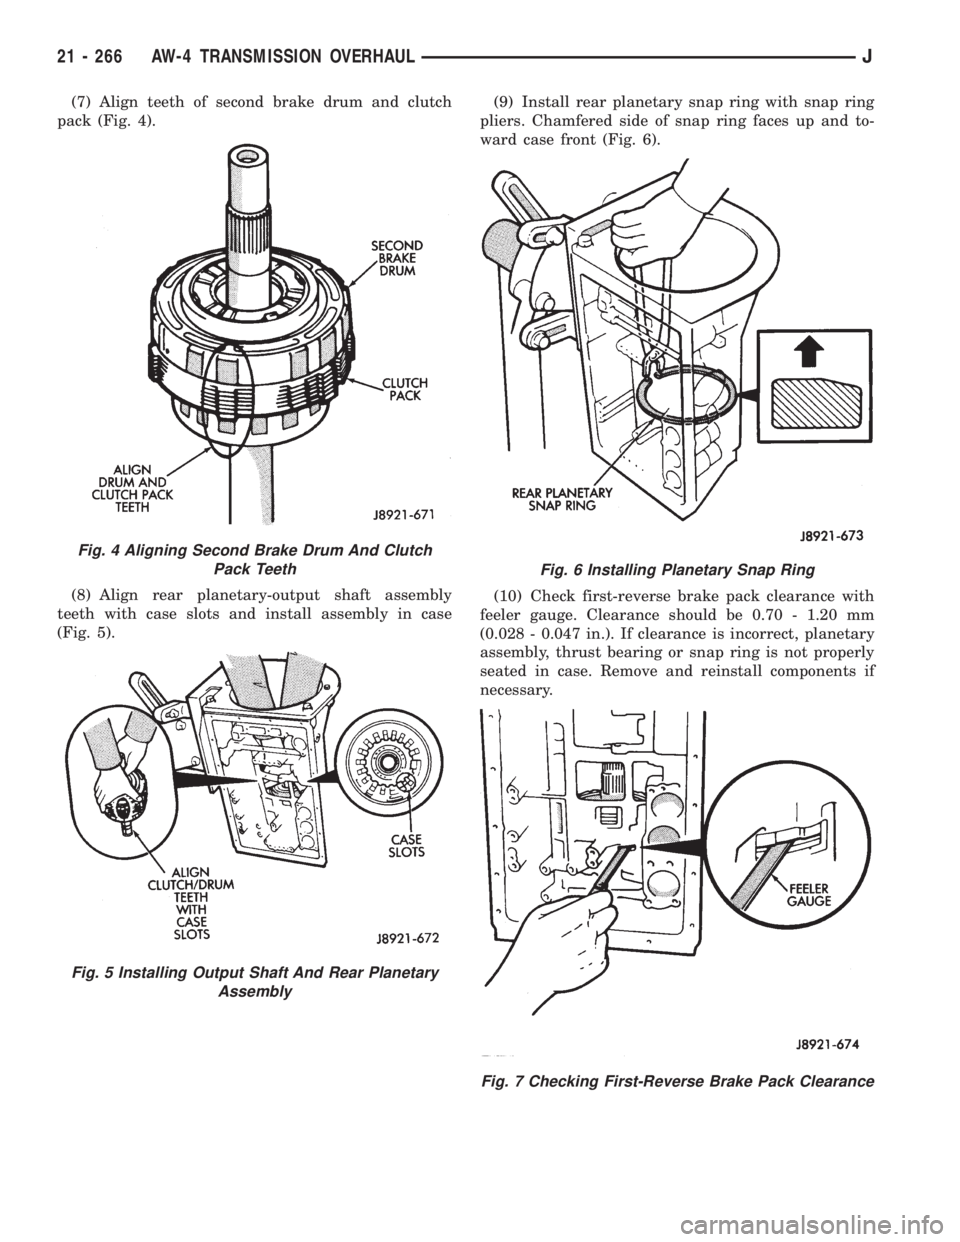
(7) Align teeth of second brake drum and clutch
pack (Fig. 4).
(8) Align rear planetary-output shaft assembly
teeth with case slots and install assembly in case
(Fig. 5).(9) Install rear planetary snap ring with snap ring
pliers. Chamfered side of snap ring faces up and to-
ward case front (Fig. 6).
(10) Check first-reverse brake pack clearance with
feeler gauge. Clearance should be 0.70 - 1.20 mm
(0.028 - 0.047 in.). If clearance is incorrect, planetary
assembly, thrust bearing or snap ring is not properly
seated in case. Remove and reinstall components if
necessary.
Fig. 4 Aligning Second Brake Drum And Clutch
Pack Teeth
Fig. 5 Installing Output Shaft And Rear Planetary
Assembly
Fig. 6 Installing Planetary Snap Ring
Fig. 7 Checking First-Reverse Brake Pack Clearance
21 - 266 AW-4 TRANSMISSION OVERHAULJ
Page 1829 of 2158
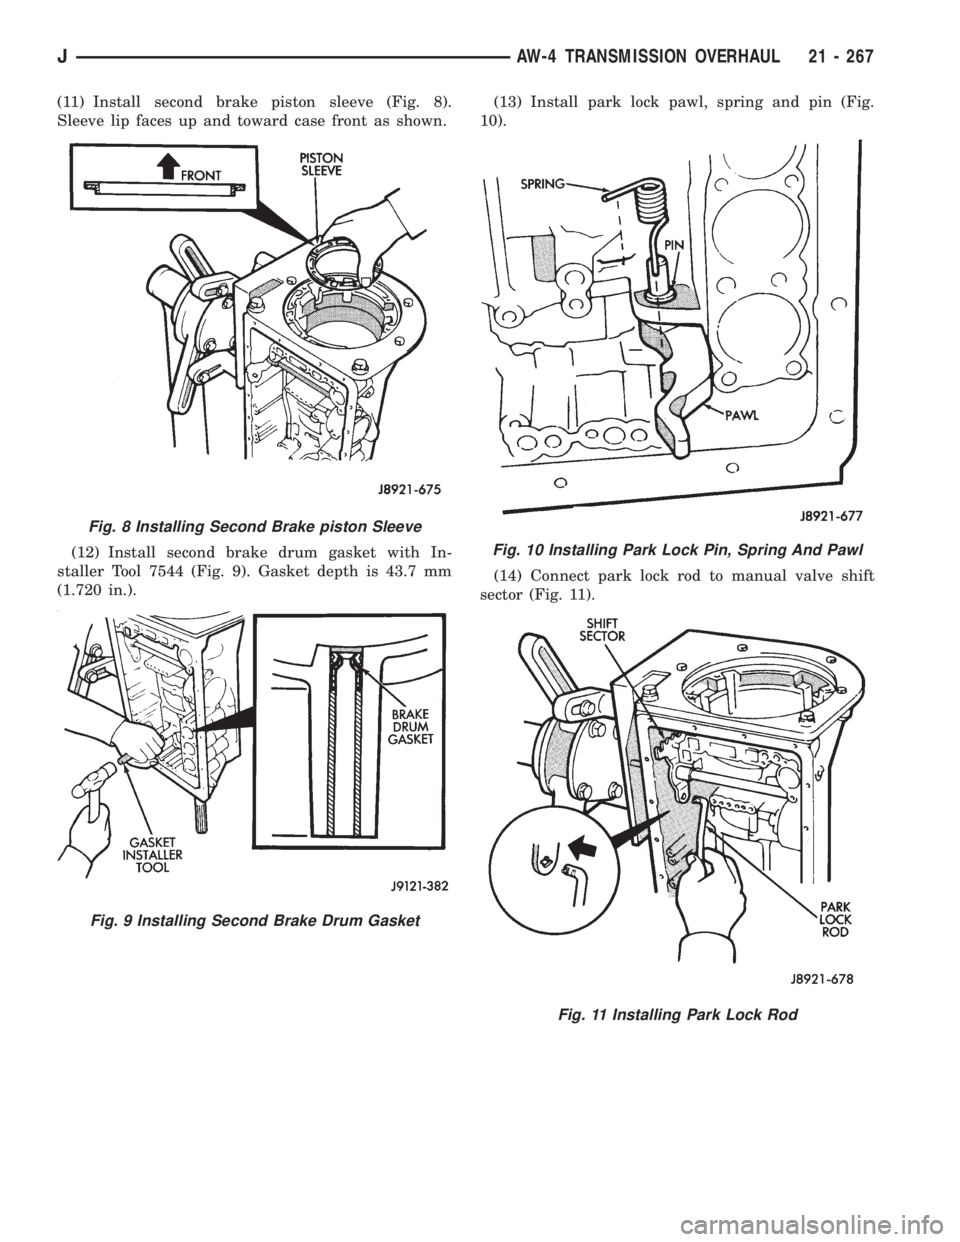
(11) Install second brake piston sleeve (Fig. 8).
Sleeve lip faces up and toward case front as shown.
(12) Install second brake drum gasket with In-
staller Tool 7544 (Fig. 9). Gasket depth is 43.7 mm
(1.720 in.).(13) Install park lock pawl, spring and pin (Fig.
10).
(14) Connect park lock rod to manual valve shift
sector (Fig. 11).
Fig. 8 Installing Second Brake piston Sleeve
Fig. 9 Installing Second Brake Drum Gasket
Fig. 10 Installing Park Lock Pin, Spring And Pawl
Fig. 11 Installing Park Lock Rod
JAW-4 TRANSMISSION OVERHAUL 21 - 267
Page 1830 of 2158
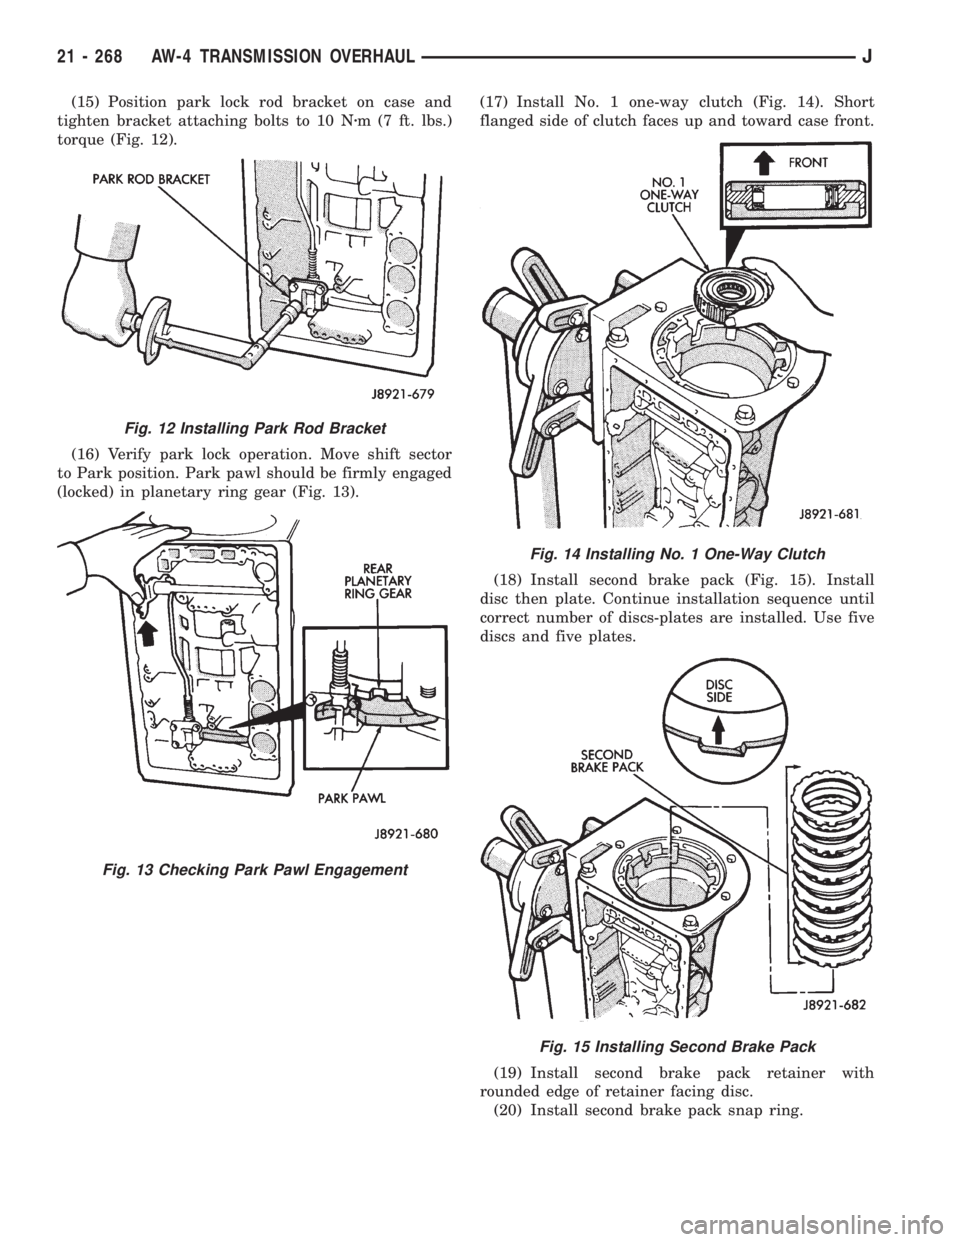
(15) Position park lock rod bracket on case and
tighten bracket attaching bolts to 10 Nzm (7 ft. lbs.)
torque (Fig. 12).
(16) Verify park lock operation. Move shift sector
to Park position. Park pawl should be firmly engaged
(locked) in planetary ring gear (Fig. 13).(17) Install No. 1 one-way clutch (Fig. 14). Short
flanged side of clutch faces up and toward case front.
(18) Install second brake pack (Fig. 15). Install
disc then plate. Continue installation sequence until
correct number of discs-plates are installed. Use five
discs and five plates.
(19) Install second brake pack retainer with
rounded edge of retainer facing disc.
(20) Install second brake pack snap ring.
Fig. 12 Installing Park Rod Bracket
Fig. 13 Checking Park Pawl Engagement
Fig. 14 Installing No. 1 One-Way Clutch
Fig. 15 Installing Second Brake Pack
21 - 268 AW-4 TRANSMISSION OVERHAULJ
Trending: warning light, automatic transmission fluid, air filter, fuel cap release, Rear brakes, jump start, steering wheel adjustment
