KIA CARNIVAL 2007 Workshop Manual
CARNIVAL 2007
KIA
KIA
https://www.carmanualsonline.info/img/2/57045/w960_57045-0.png
KIA CARNIVAL 2007 Workshop Manual
Trending: boot, key fob battery, window, wiring diagram, engine oil capacity, hood release, cruise control
Page 1061 of 1575
Page 1062 of 1575
2007 > 2.7L V6 GASOLINE >
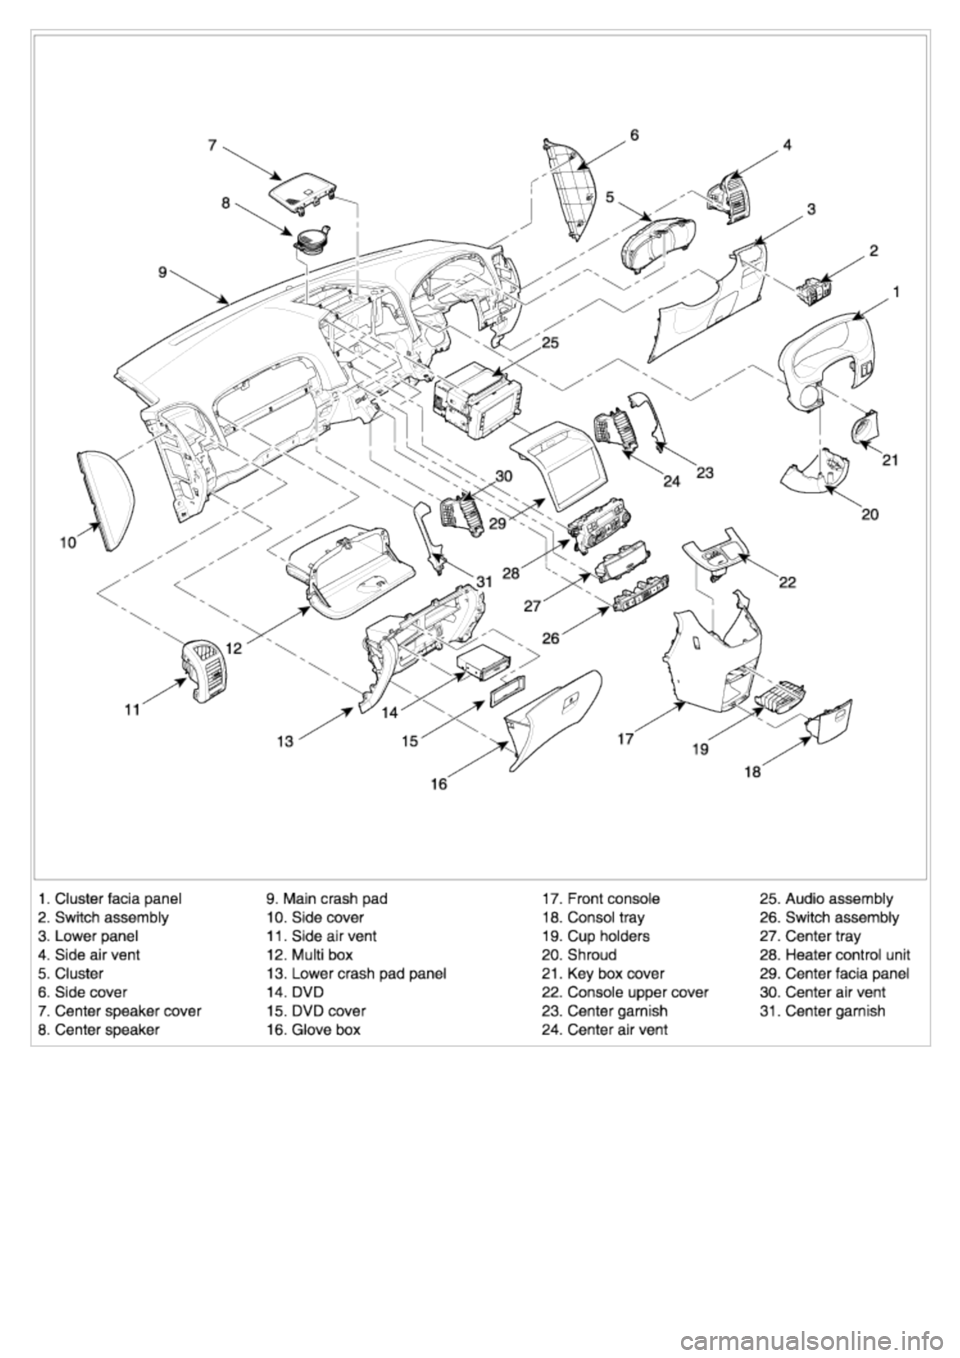
COMPONENTS
[LHD]
[RHD]
Page 1063 of 1575
Page 1064 of 1575
2007 > 2.7L V6 GASOLINE >
REPLACEMENT
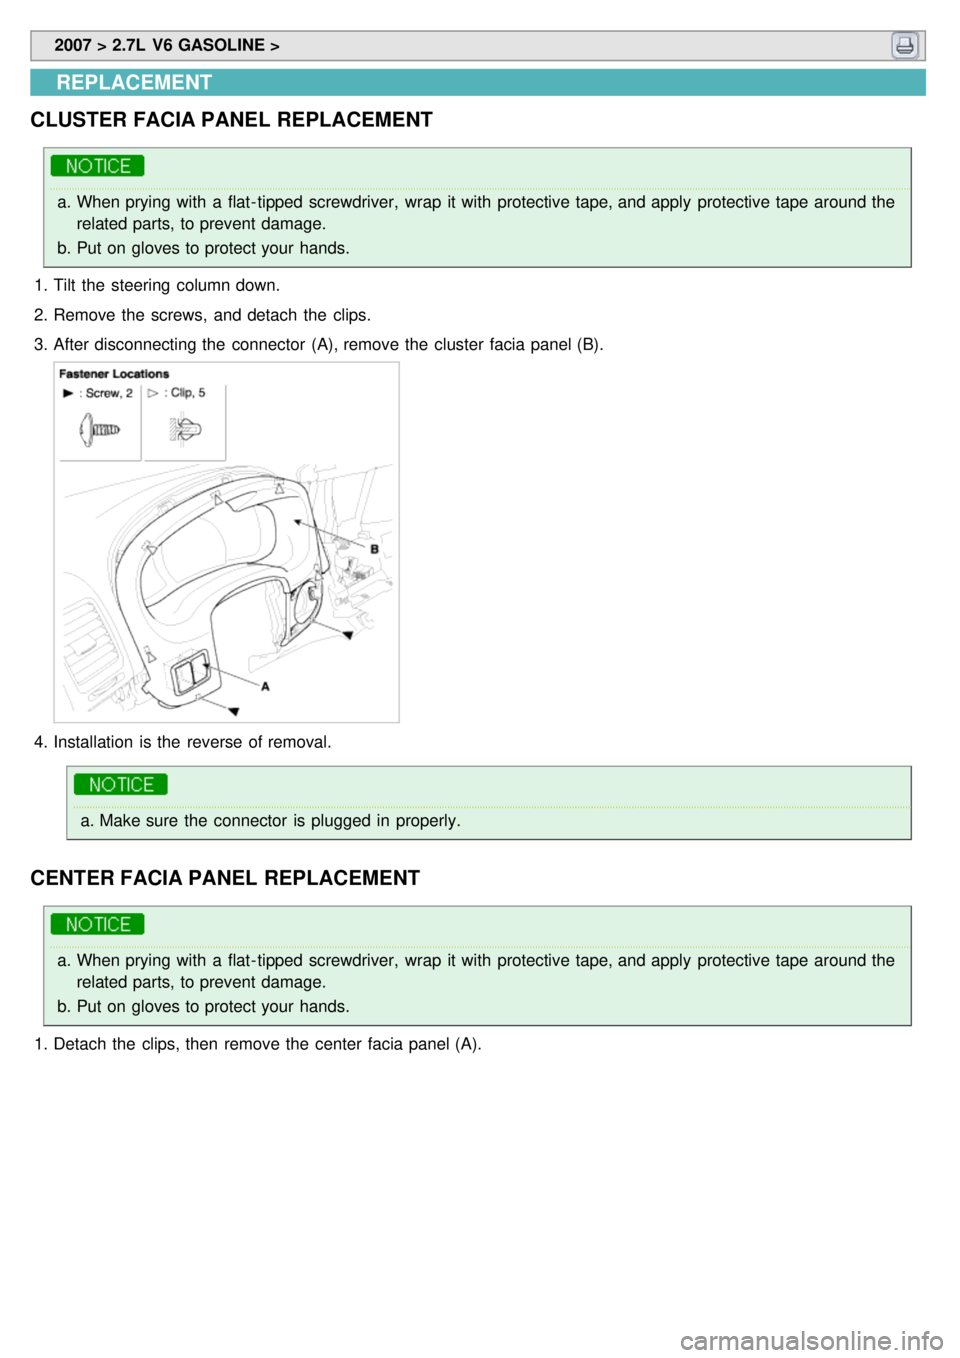
CLUSTER FACIA PANEL REPLACEMENT
a. When prying with a flat- tipped screwdriver, wrap it with protective tape, and apply protective tape around the
related parts, to prevent damage.
b. Put on gloves to protect your hands.
1. Tilt the steering column down.
2. Remove the screws, and detach the clips.
3. After disconnecting the connector (A), remove the cluster facia panel (B).
4.Installation is the reverse of removal.
a.Make sure the connector is plugged in properly.
CENTER FACIA PANEL REPLACEMENT
a.When prying with a flat- tipped screwdriver, wrap it with protective tape, and apply protective tape around the
related parts, to prevent damage.
b. Put on gloves to protect your hands.
1. Detach the clips, then remove the center facia panel (A).
Page 1065 of 1575
2.Installation is the reverse the removal.
a.Make sure the connector is plugged in properly.
LOWER PANEL REPLACEMENT
1.Remove the crash pad side cover.
2. Remove the fuse box cover (A).
3.After loosening the crash pad lower panel mounting screws, then remove the lower panel (B).
4. Remove the parking brake lever (C).
[LHD]
Page 1066 of 1575
[RHD]
5.Disconnect the connector (A).
6.Installation is the reverse of removal.
HEATER CONTROL UNIT REPLACEMENT
1.Remove the center facia panel.
2. Remove the console upper cover (A).
3. Disconnect the connector (B).
[LHD]
Page 1067 of 1575
[RHD]
4.Loosen the air vent mounting screw, then remove the air vent (A).
5.After loosening the heater control unit mounting screws, then remove the heater control unit (A).
6.Installation is the reverse of removal.
Page 1068 of 1575
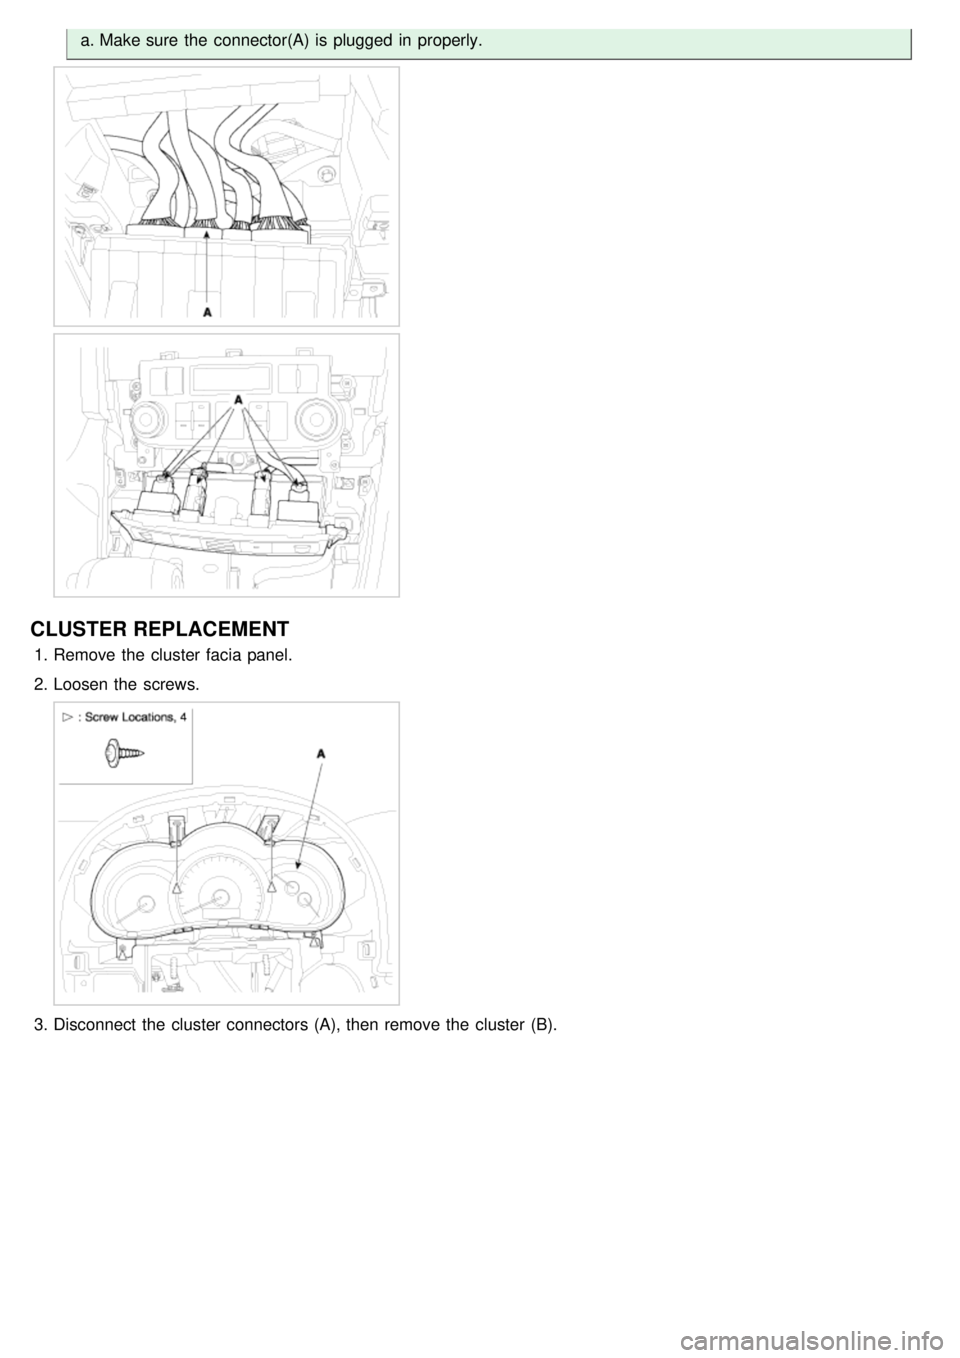
a.Make sure the connector(A) is plugged in properly.
CLUSTER REPLACEMENT
1.Remove the cluster facia panel.
2. Loosen the screws.
3.Disconnect the cluster connectors (A), then remove the cluster (B).
Page 1069 of 1575
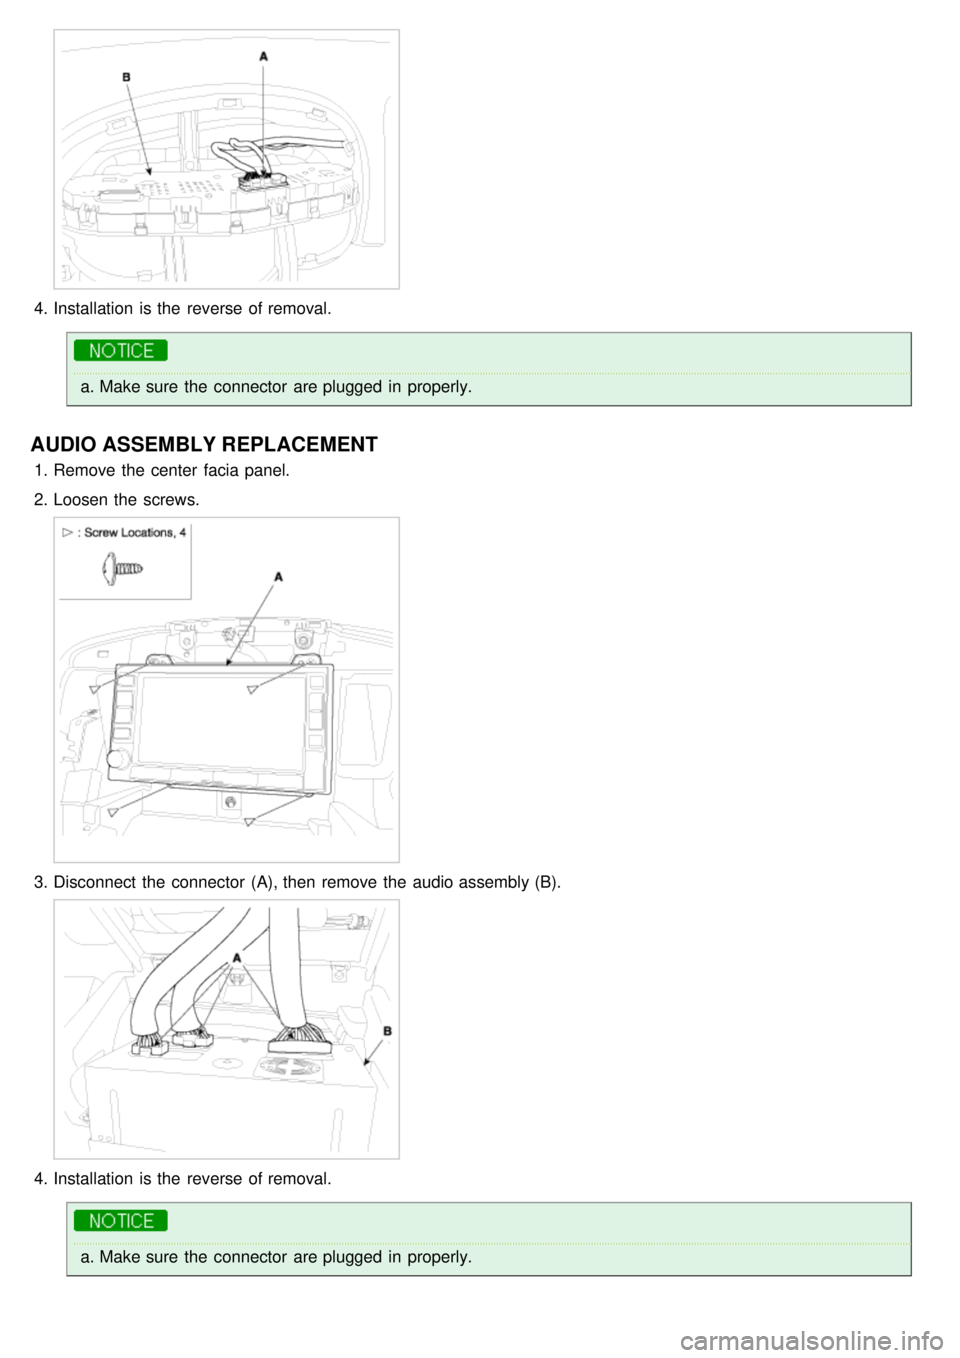
4.Installation is the reverse of removal.
a.Make sure the connector are plugged in properly.
AUDIO ASSEMBLY REPLACEMENT
1.Remove the center facia panel.
2. Loosen the screws.
3.Disconnect the connector (A), then remove the audio assembly (B).
4.Installation is the reverse of removal.
a.Make sure the connector are plugged in properly.
Page 1070 of 1575
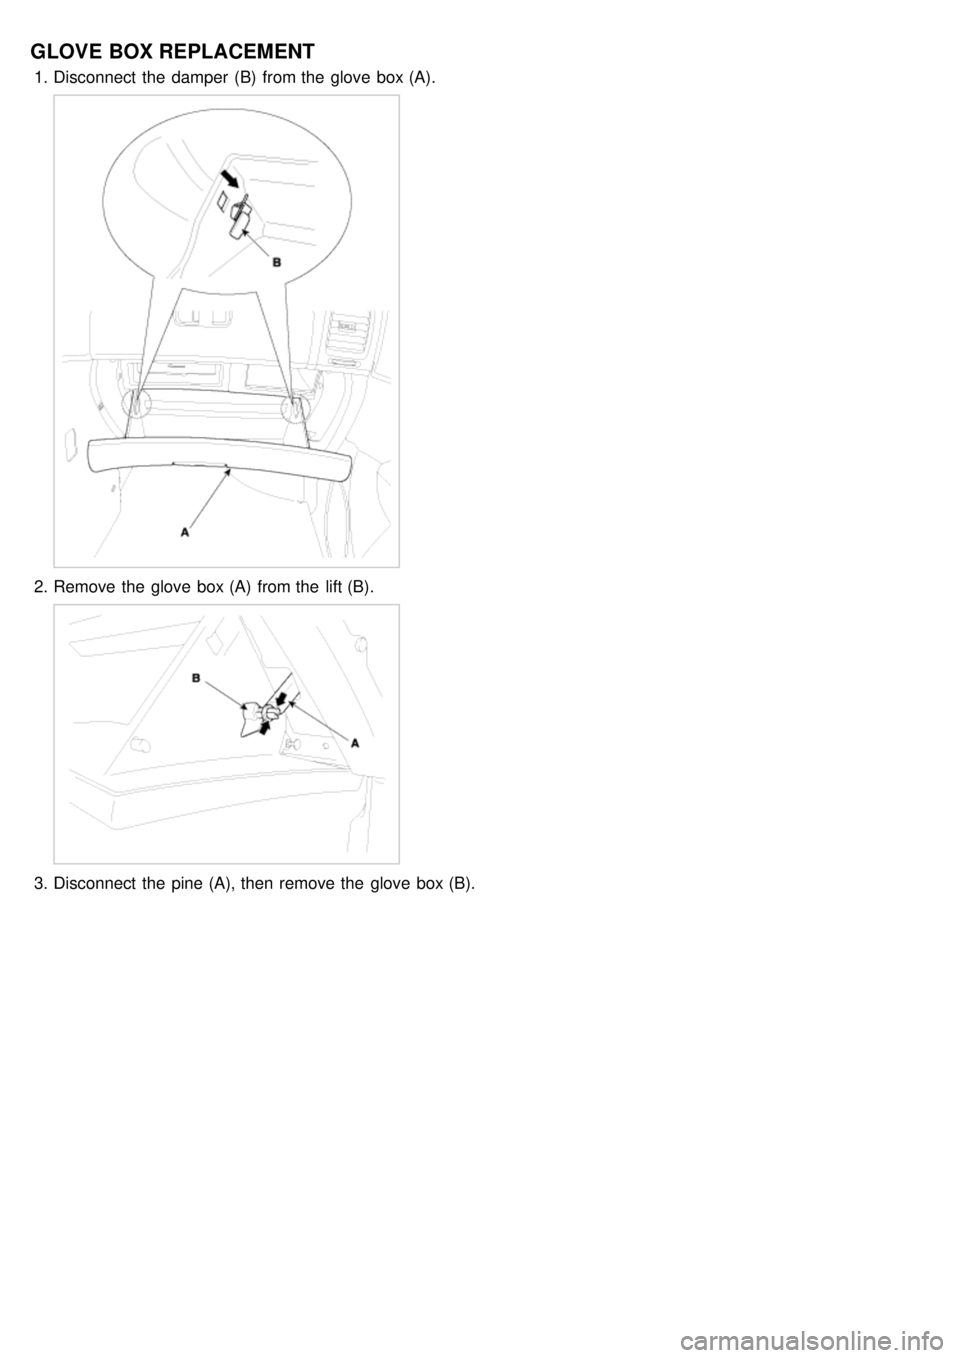
GLOVE BOX REPLACEMENT
1.Disconnect the damper (B) from the glove box (A).
2.Remove the glove box (A) from the lift (B).
3.Disconnect the pine (A), then remove the glove box (B).
Trending: heater fault codes, stop start, climate control, mirror controls, alternator, oil capacity, light

![KIA CARNIVAL 2007 Workshop Manual 2007 > 2.7L V6 GASOLINE >
COMPONENTS
[LHD]
[RHD] KIA CARNIVAL 2007 Workshop Manual 2007 > 2.7L V6 GASOLINE >
COMPONENTS
[LHD]
[RHD]](/img/2/57045/w960_57045-1061.png)

![KIA CARNIVAL 2007 Workshop Manual [RHD]
5.Disconnect the connector (A).
6.Installation is the reverse of removal.
HEATER CONTROL UNIT REPLACEMENT
1.Remove the center facia panel.
2. Remove the console upper cover (A).
3. Dis KIA CARNIVAL 2007 Workshop Manual [RHD]
5.Disconnect the connector (A).
6.Installation is the reverse of removal.
HEATER CONTROL UNIT REPLACEMENT
1.Remove the center facia panel.
2. Remove the console upper cover (A).
3. Dis](/img/2/57045/w960_57045-1065.png)
![KIA CARNIVAL 2007 Workshop Manual [RHD]
4.Loosen the air vent mounting screw, then remove the air vent (A).
5.After loosening the heater control unit mounting screws, then remove the heater control unit (A).
6.Installation i KIA CARNIVAL 2007 Workshop Manual [RHD]
4.Loosen the air vent mounting screw, then remove the air vent (A).
5.After loosening the heater control unit mounting screws, then remove the heater control unit (A).
6.Installation i](/img/2/57045/w960_57045-1066.png)
