reverse KIA CARNIVAL 2007 Workshop Manual
[x] Cancel search | Manufacturer: KIA, Model Year: 2007, Model line: CARNIVAL, Model: KIA CARNIVAL 2007Pages: 1575, PDF Size: 44.86 MB
Page 1545 of 1575

2007 > 2.7L V6 GASOLINE >
INSPECTION
Test the buzzer by connecting battery voltage to terminal 1, and ground terminal 2.
The buzzer should make a sound. If the buzzer fails to make a sound, replace it.
REPLACEMENT
1.Disconnect the negative ( - ) battery terminal.
2. Remove the crash pad lower panel (Refer to the Body group - crash pad).
3.Remove the buzzer (A) after loosening the bolt and disconnecting the connector from the left side of IPM.
4.Installation is the reverse of removal procedure.
Page 1548 of 1575
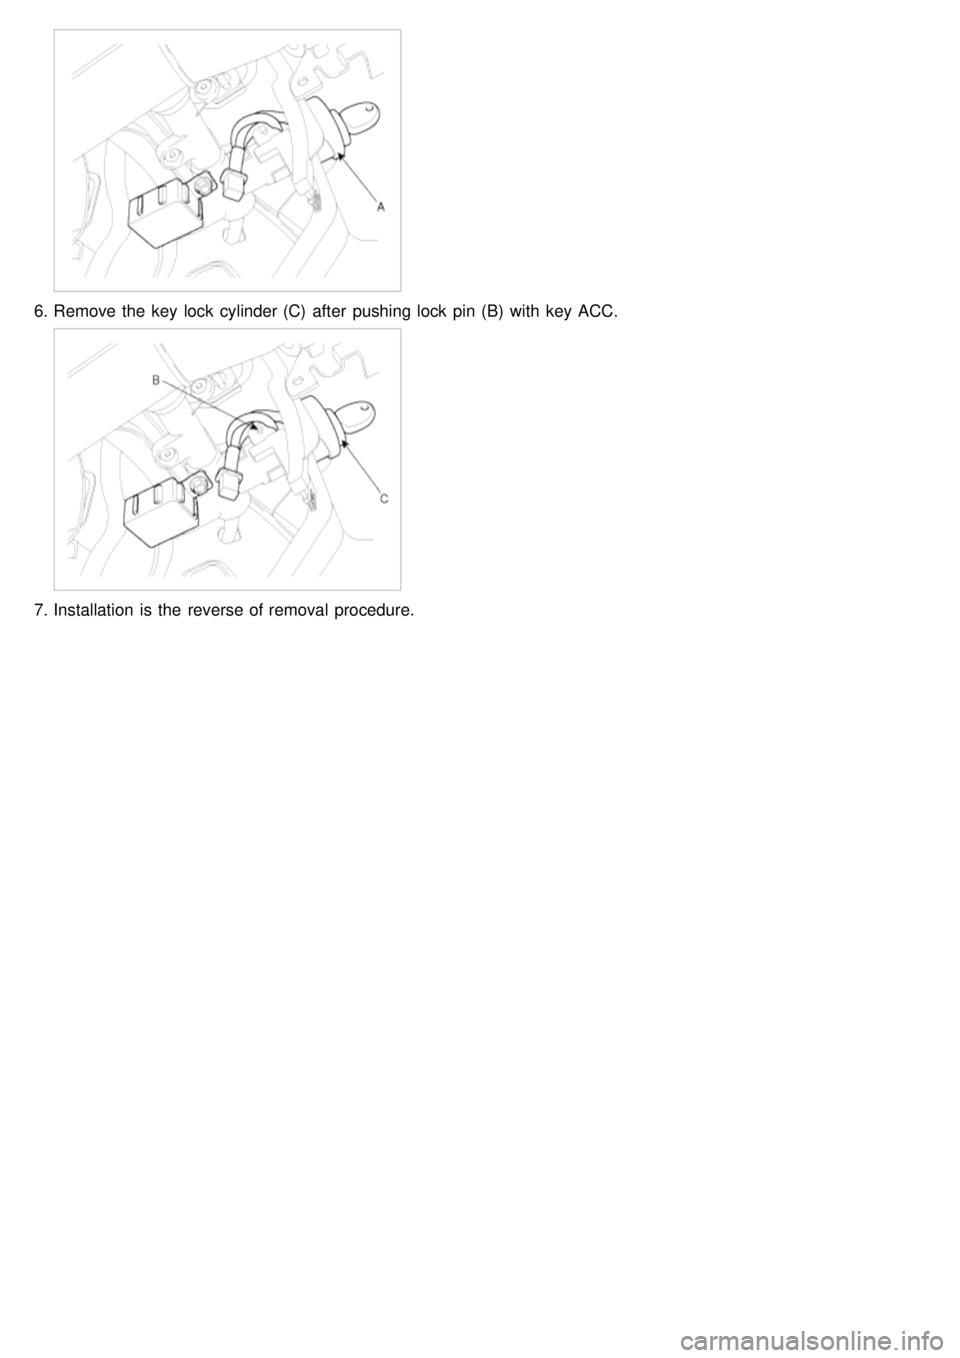
6.Remove the key lock cylinder (C) after pushing lock pin (B) with key ACC.
7.Installation is the reverse of removal procedure.
Page 1551 of 1575

2007 > 2.7L V6 GASOLINE >
DESCRIPTION
The driver door module is a part of a Controller Area Network (CAN), and performs CAN communication with the
BCM, FAM, IPM, RAM, ADM, and IMS. Driver controls driver side power window switch button located inside of the
driver side door to operate power window, mirror, door lock and unlock.
1. Two manual operations (up and down) for four p/windows. However, on the driver's seat the auto up/down
operation must be possible.
2. Opening and closing the quarter glass by the quarter glass switch.
3. Window UP/DOWN operation by RKE.
4. Manually operating the mirror position by the manual switch (Up, Down, Right, and Left)
5. Saving and replacing the mirror position by the MEMORY switch → For 2 persons
6. Saving and replacing the mirror position by RKE → For 2 persons
7. Out side mirror AUTO reverse operation
8. Out side mirror FOLD/UNFOLD power control
9. CENTRAL DOOR LOCK/UNLOCK function
10. DOOR COURTESY LAMP control
11. Out side mirror DEFOG control
12. Illumination control
CONTROL FUNCTION
POWER WINDOW CONTROL
1. This switch controls power window up/down, automatic up/down from driver & assist side.
a. Driver's power window switch sends input signal through CAN communication by the manual up/down and
automatic up/down switch input. At the same time passenger side sends manual up/down and automatic
up/down signals to the wires.
b. Each safety window ECU receives the signal and performs manual up/down and automatic up/down functions.
2. Power window lock
When the driver's power window lock switch is ON, each safety window ECU receives the power window lock
command to prohibit the operation by the passenger side doors except the driver's door.
3. Timer function
Power window switch can be controlled for 30 seconds after the ignition is turned off. This function stops
immediately even within 30 seconds if the front door is opened.
KEY REMINDER
1.If door is locked by using door lock knob after opening door while IGN KEY is inserted to KEY CYLINDER, Unlock
output will be for 1sec and there will be a series of three output signals every 0.5sec if door condition is "Lock".
2. If Key Reminder unlock message is "SHORT UNLOCK", DOOR UNLOCK lasts for 0.5sec.
3. If Key Reminder unlock message is "LONG UNLOCK", DOOR UNLOCK lasts for 1sec.
4. Remained action goes on though Key Reminder Unlock message changes to "OFF".
PRIORITY OF DOOR LOCK/UNLOCK
1.Crash Unlock > Auto Door Lock > Key Reminder > Central Door Lock
2. Higher priority signals take precedence, and will override lower priority signals.
3. If the priority is the same or low, it'll be ignored.
OUT SIDE MIRROR CONTROL BY THE SWITCH
1.If the mirror direction switch (up, down, left and right) is pressed when mirror selection switch on driver side power
window switch is in outside LH(RH) under ACC ON condition, then mirror motor moves to the corresponding
direction.
Page 1552 of 1575
direction.
OUTSIDE MIRROR MEMORY OPERATION BY THE MEMORY SWITCH
1.If position switch (POS1 or POS2) is pressed within 5 seconds after pressing the memory switch under ignition 2
on, it registers current mirror position. (Switch module sends in LIN communication). (Memory permit status lasts for
5 seconds after memory switch ON. After 5 seconds, memory permits status terminates. In other words, current
position is registered if the position switch (POS1 or POS2) is turned on, during the memory permit status).
However, RH side mirror position is not registered during the LH side mirror manual switch operation.
2. Memory permit status is released if any of the following conditions is met
a. If 5 seconds is elapsed after the memory switch is turned on
b. If the ignition 2 is turned off
c. When saving is completed
d. If Ignition switch of the CAN communication data sent by the IPM is not "Run" or "Start".
e. If Inhibit switch of the CAN communication data sent by the FAM is not "P".
f. If vehicle speed of the CAN communication data sent by the cluster is "3Km/h" or more.
3. Memory is cleared if the battery is removed.
OUTSIDE MIRROR MEMORY AND REPLAY OPERATION BY KEYLESS
1.Memory operation
a. Outside mirror LH position is registered in the driver side power window switch when the ignition is turned off
from on.
b. When door is locked by the keyless, outside mirror position is registered corresponding to the keyless code.
c. Data related to the memory operation is received from BCM in CAN communication.
2. Replay operation
a. When door is unlocked by the keyless under ignition off state, it replays the position corresponding to the
keyless code.
b. Data related to the replay operation is received from BCM in CAN communication on CAN line.
3. Replay prohibit condition
a. If the mirror switch on the LH side is pressed
b. If Ignition switch of the CAN communication data sent by the IPM is not "Run" or "Start".
c. If Inhibit switch of the CAN communication data sent by the FAM is not "P".
d. If vehicle speed of the CAN communication data sent by the CLUSTER is "3Km/h" or more.
OUTSIDE MIRROR MEMORY AND REPLAY OPERATION BY KEYLESS
1.Memory operation
a. Outside mirror LH position is registered in the driver side power window switch when the ignition is turned off
from on.
b. When door is locked by the keyless, outside mirror position is registered corresponding to the keyless code.
c. Data related to the memory operation is received from BCM in CAN communication.
2. Replay operation
a. When door is unlocked by the keyless under ignition off state, it replays the position corresponding to the
keyless code.
b. Data related to the replay operation is received from BCM in CAN communication on CAN line.
3. Replay prohibit condition
a. When the inhibit "P" switch is OFF.
b. When RH side mirror switch is pressed.
c. When mirror switch is pressed after ignition on.
d. When the vehicle speed is over 3km/h
AUTO REVERSE FUNCTION
No. Operation Select
SW Shift
Lever MIR Position
Manipulation Result
Page 1553 of 1575

No.Operation
SWLever
LRManipulation
Result
1 Basic
Operation LH
PPosition A Position
B
Changing the shift
lever from "P" to
"R" MIR L:Auto reverse to position (A-
5°)
MIR R:Auto reverse to position (B-
5°)
2 RHPPosition A Position
B MIR L:NO change
MIR R:Auto reverse to position (B-
5°)
3 NPPosition A Position
B MIR L:NO change
MIR R:NO change
4 Returning after
Basic
Operation LH
RResult of
No.1 Result of
No.2 Changing the shift
lever from "R" to
"P" MIR L:Return to position (A)
MIR R:Return to position (B)
5 RHRNo.1 is
being
performed Result of
No.2 MIR L:NO change
MIR R:Return to position (B)
FAIL SAFE FUNCTION
1.
If the sensor does not move more than 60mV for the input changes (5 second operation) of the position sensor
although the motor is operating, automatic control will stop.
2. The mirror operation signal cannot be displayed into the same direction for more than 15 seconds. (When the
mirror is replacing to the saved position or the switch is manually pressed)
3. Monitoring the replacing time
a. If the replacing operation does not stop within 40 seconds, the mirror motor will not outputted and the replacing
operation will stop.
IMS SWITCH
1.If it's satisfied with the followings
(1) Can communication Data ignition switch sent by IPM is "RUN"
(2) Can communication Data Inhibit switch sent by FAM is "P"
(3) Can communication Data vehicle speed sent by CLUSTER is under "3Km/h"
2. If SET switch is ON, IMS message is SET.
3. If POSITION switch is ON within 5sec since SET switch is ON, IMS message will be sent to MEMORY1 or
MEMORY2.
SEAT MANUAL SWiITCH
If Seat switch is controlled, seat control message is sent to seat.
COURTESY LAMP
1.If driver's door is opened, RAM changes door open Message to ON and Courtesy lamp is ON by DDM.
2. If driver's door is closed, RAM changes door open Message to Off and Courtesy lamp is OFF gradually by
DDM.(5±0.5sec)
3. During dim out, If IGN changes to ON or door is closed while Ignition switch is ON, Courtesy lamp is OFF
immediately.
4. If Key reminder switch is OFF and door is opened for 20min, Courtesy lamp is OFF immediately.
FUEL FILLER DOOR OPEN
When the fuel filler door open switch is turned on, this data is uploaded to the bus through CAN communication.
DEFOG CONTROL (O/S MIRROR HEAT LINE)
If rear defog switch is on while IGN is ON, rear defog control of IPM is ON and O/S Mirror Defog is ON by DDM,ADM.
Page 1557 of 1575

2007 > 2.7L V6 GASOLINE >
DESCRIPTION
The assist door module is a part of CAN, and performs CAN communication with the BCM, FAM, IPM, RAM, DDM,
and IMS. The driver can control the power window, mirror, door(lock/unlock) by using buttons of the ADM on the door
of the driver's seat.
1. Operating the power window by buttons
2. Central Door LOCK/UNLOCK function
3. Manually operating the mirror position by the manual SW (Up, Down, Right, and Left)
4. Saving and replacing the mirror position by the memory switch → For 2 persons
5. Out side mirror AUTO reverse operation
6. Door courtesy lamp control
7. Out side mirror defog control
8. Illumination control
CONTROL FUNCTION
POWER WINDOW CONTROL
1.This switch controls power window up/down from assist side.
a. According to the input of assist Door module window, up/down switch, output window motor up/down.
b. Power window up/down control from assist side.
2. Timer function
Power window switch can be controlled for 30 seconds after the ignition is turned off. This function stops
immediately even within 30 seconds if the front door is opened.
CRASH UNLOCK
1.Under the condition "IGN ON", if Crash Sensor message from IPM is ON, Door UNLOCK is output.(5 ± 0.5sec)
AUTO DOOR LOCK
1.If the vehicle is under any of the following conditions and the condition lasts for 3sec, all doors is locked.
If message from IPM is "Door Lock Control = LOCK ALL", it will be locked for 0.5sec.
a. IGN "RUN" or "START"
b. ALT L ON (Engine is running)
c. Speed of the vehicle is 40Km/h
d. If any door is on "UNLOCK"
2. After LOCK output, if any door is not locked, there will be a series of three Lock output every 0.5sec.
3. If all doors are locked during a series of three output signals, output will be stopped.
4. If any door is not locked after a series of three output signals, output will be stopped.
KEY REMINDER
1.If door is locked by using door lock knob after opening door while IGN KEY is inserted to KEY CYLINDER, Unlock
output will be for 1sec and there will be a series of three output signals every 0.5sec if door condition is "Lock".
2. If Key Reminder unlock message is "SHORT UNLOCK", DOOR UNLOCK lasts for 0.5sec.
3. If Key Reminder unlock message is "LONG UNLOCK", DOOR UNLOCK lasts for 1sec.
4. Remained action goes on though Key Reminder Unlock message changes to "OFF".
PRIORITY OF DOOR LOCK/UNLOCK
1.Crash Unlock > Auto Door Lock > Key Reminder > Central Door Lock
2. Higher priority signals take precedence, and will override lower priority signals.
3. If the priority is the same or low, it'll be ignored.
OUT SIDE MIRROR FOLD/UNFOLD POWER CONTROL
1.Supply folding power for 30sec after ACC ON or ACC OFF.
2. FOLD/UNFOLD operation is controlled by fold switch.
Page 1558 of 1575

OUT SIDE MIRROR CONTROL BY THE SWITCH
1.Manual control of left outside mirror
If the mirror direction switch (up, down, left and right) is pressed when mirror selection switch on driver side power
window switch is in outside LH under ACC ON condition, then mirror motor moves to the corresponding direction.
2. Manual control of right outside mirror
If the mirror direction switch (up, down, left and right) is pressed when mirror selection switch on driver side power
window switch is in outside RH under ACC ON condition, then operating signal is sent to passenger side power
window switch through CAN communication.
OUTSIDE MIRROR MEMORY OPERATION BY THE MEMORY SWITCH
1.IMS Message from DDM is sent to RETURN1 or RETURN2, out side mirror returns to the position stored.
2. Memory permit status is released if any of the following conditions is met
a. If 5 seconds is elapsed after the memory switch is turned on
b. If the ignition 2 is turned off
c. When saving is completed
d. If Ignition switch of the CAN communication data sent by the IPM is not "Run" or "Start".
e. If Inhibit switch of the CAN communication data sent by the FAM is not "P".
f. If vehicle speed of the CAN communication data sent by the cluster is "3Km/h" or more.
3. Memory is cleared if the battery is removed
OUTSIDE MIRROR MEMORY AND REPLAY OPERATION BY THE MEMORY SWITCH
1.IMS message from DDM is sent to RETURN1 or RETURN2, O/S MIRROR returns to the position stored.
2. Replacing not stored position doesn't work.
3. If RETURN Message is sent during replacing, the last Message has priority.
4. Replacing Prohibition Conditions.
(1) If the mirror switch on the LH side is pressed
(2) If Ignition switch of the CAN communication data sent by the IPM is not "Run".
(3) If Inhibit switch of the CAN communication data sent by the FAM is not "P".
(4) If vehicle speed of the CAN communication data sent by the CLUSTER is "3Km/h".
OUTSIDE MIRROR MEMORY AND REPLAY OPERATION BY KEYLESS
1.Memory operation
a. If the ignition is turned off after being on, the position of the O/S mirror RH is saved in the switch ASSY power
window main.
b. If the door was keyless- locked, the outside mirror RH position is saved corresponding to the keyless code.
2. Replay operation
a. If the door is keyless- unlocked while the IGN SW is off, replacing is made to the saved position corresponding
to the keyless code.
3. Replay prohibit condition
a. When the inhibit "P" switch is OFF
b. When RH side mirror switch is pressed
c. When mirror switch is pressed after ignition on
d. When the vehicle speed is over 3km/h
AUTO REVERSE FUNCTION
No. Operation Select
SW Shift
Lever MIR Position
Manipulation Result
L R
1 Basic
Operation LH
PPosition A Position
B
Changing the shift
lever from "P" to
"R" MIR L:Auto reverse to position (A-
5°)
MIR R:Auto reverse to position (B-
5°)
2 RHPPosition A Position
B MIR L:NO change
MIR R:Auto reverse to position (B-
5°)
Position MIR L:NO change
Page 1571 of 1575

5.Remove the pin and washer which connect the clutch pedal with the clutch master cylinder.
6. Remove the clutch master cylinder. It can be helpful to do this step after removing the clutch pedal mounting
bracket.
INSTALLATION
Installation is in the reverse order of removal.
After installation, bleed the clutch hydaulic system.
CONCENTRIC SLAVE CYLINDER AIR BLEEDING PROCEDURE
1.After disconnecting a cap from the concentric slave cylinder air bleeder, insert a vinyl hose in the plug.
2. Loosening the plug screw, press and release the clutch pedal about 10 times.
Hold the air bleeder body not to rotate with a spanner(A). The holding is needed when the plug loosened or
tightened.
3. Tighten the plug during the clutch pedal pressed. Afterwards, raise the pedal with a hand.
TORQUE :
25~29Nm (250~290Kgf.cm, 18.2~21.1lb - ft)
4. After pressing the clutch pedal 3 times more, loosen the plug and retighten it with the pedal pressed. Raise it
again, then.
5. Repeat the step 4 two or three times. (until there is no bubble in the fluid)
a.Do not clamp the pipe of a concentric slave cylinder.
b. Be careful not to damage O - rings.