lights Lancia Delta 2010 Owner handbook (in English)
[x] Cancel search | Manufacturer: LANCIA, Model Year: 2010, Model line: Delta, Model: Lancia Delta 2010Pages: 276, PDF Size: 5.31 MB
Page 34 of 276
GETTING TO KNOW YOUR CAR33
1
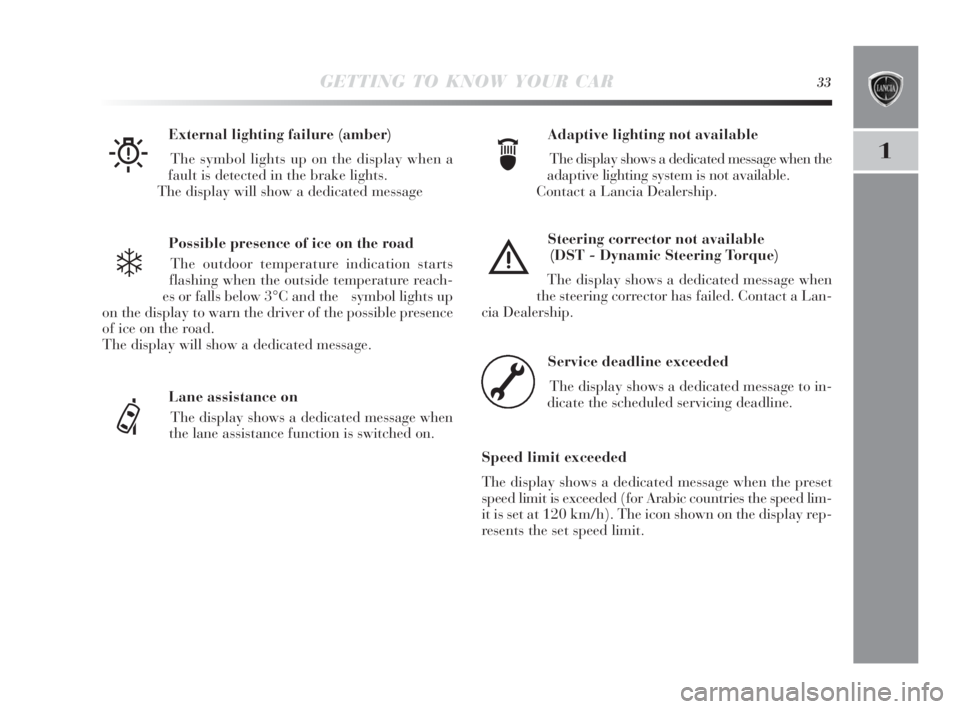
Possible presence of ice on the road
The outdoor temperature indication starts
flashing when the outside temperature reach-
es or falls below 3°C and the symbol lights up
on the display to warn the driver of the possible presence
of ice on the road.
The display will show a dedicated message.Adaptive lighting not available
The display shows a dedicated message when the
adaptive lighting system is not available.
Contact a Lancia Dealership. External lighting failure (amber)
The symbol lights up on the display when a
fault is detected in the brake lights.
The display will show a dedicated message
W
❄
Lane assistance on
The display shows a dedicated message when
the lane assistance function is switched on.
ef
Steering corrector not available
(DST - Dynamic Steering Torque)
The display shows a dedicated message when
the steering corrector has failed. Contact a Lan-
cia Dealership.
è
Service deadline exceeded
The display shows a dedicated message to in-
dicate the scheduled servicing deadline.
Speed limit exceeded
The display shows a dedicated message when the preset
speed limit is exceeded (for Arabic countries the speed lim-
it is set at 120 km/h). The icon shown on the display rep-
resents the set speed limit.
õ
001-142 Delta 3ed gb 30-11-2009 11:21 Pagina 33
Page 40 of 276
GETTING TO KNOW YOUR CAR39
1
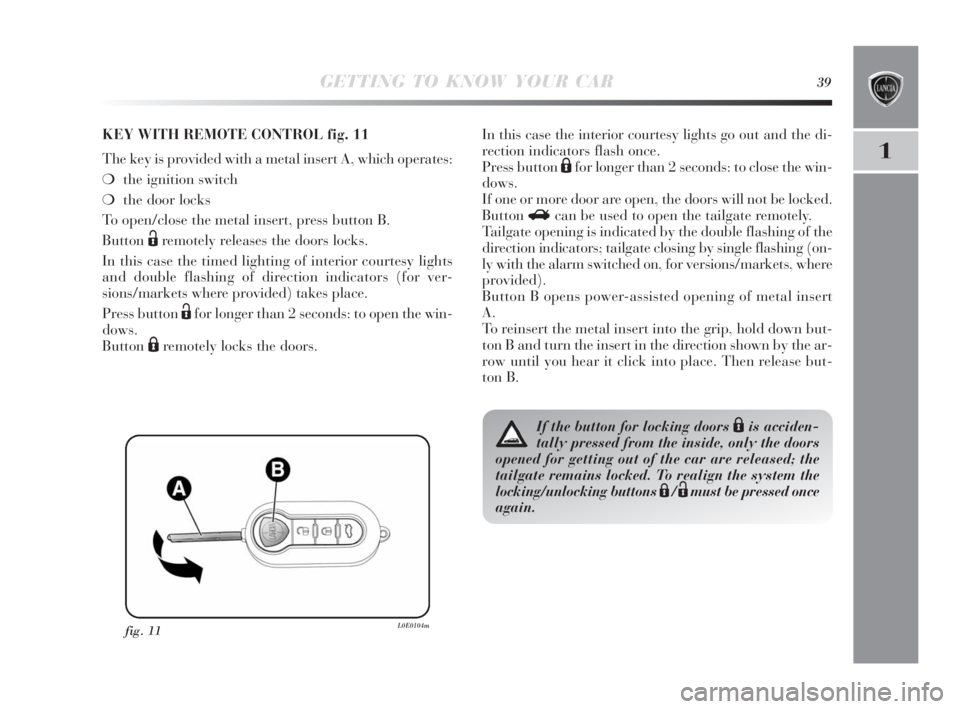
fig. 11L0E0104m
KEY WITH REMOTE CONTROL fig. 11
The key is provided with a metal insert A, which operates:
❍the ignition switch
❍the door locks
To open/close the metal insert, press button B.
Button
Ëremotely releases the doors locks.
In this case the timed lighting of interior courtesy lights
and double flashing of direction indicators (for ver-
sions/markets where provided) takes place.
Press button
Ëfor longer than 2 seconds: to open the win-
dows.
Button
Áremotely locks the doors.In this case the interior courtesy lights go out and the di-
rection indicators flash once.
Press button
Áfor longer than 2 seconds: to close the win-
dows.
If one or more door are open, the doors will not be locked.
Button
Rcan be used to open the tailgate remotely.
Tailgate opening is indicated by the double flashing of the
direction indicators; tailgate closing by single flashing (on-
ly with the alarm switched on, for versions/markets, where
provided).
Button B opens power-assisted opening of metal insert
A.
To reinsert the metal insert into the grip, hold down but-
ton B and turn the insert in the direction shown by the ar-
row until you hear it click into place. Then release but-
ton B.
If the button for locking doors Áis acciden-
tally pressed from the inside, only the doors
opened for getting out of the car are released; the
tailgate remains locked. To realign the system the
locking/unlocking buttons
Á/Ëmust be pressed once
again.
001-142 Delta 3ed gb 30-11-2009 11:21 Pagina 39
Page 43 of 276
42GETTING TO KNOW YOUR CAR
IMPORTANT The engine inhibitor function is guaranteed
by the Lancia CODE, which is automatically activated
when the ignition key is extracted from the starter de-
vice.
SWITCHING ON THE ALARM
With the doors and bonnet closed and the ignition key
either turned to STOP or removed, point the key with the
remote control towards the vehicle and press and release
button
Á.
Excluding some versions for specific markets, the system
produces an acoustic warning (beep) and enables door
locking.
Before the alarm is enabled, a self-diagnosis test is run:
if a fault is detected, the system emits another sound warn-
ing and a message is shown on the display, (see “Instru-
ment panel warning lights”).
In this case switch off the alarm by pressing
Ë, check that
all the doors, bonnet and tailgate are closed correctly; then
switch the alarm back on by pressing
Á.
If a door or the bonnet is not correctly closed, it will be ex-
cluded from the testing by the alarm system.
If the alarm produces an acoustic signal even when the
doors, bonnet and tailgate are correctly closed, a failure
has occurred in system operation. Contact a Lancia Deal-
ership.IMPORTANT Centrally locking the doors using the met-
al insert on the key does not activate the alarm.
IMPORTANT Originally, the alarm is configured in com-
pliance with the regulations existing in the different coun-
tries.
SWITCHING OFF THE ALARM
Press button
Ëon the key with the remote control.
The following operations are performed (excluding some
versions for specific markets):
❍the direction indicators flash twice;
❍two brief acoustic signals are emitted (“BEEP”);
❍the doors are unlocked.
IMPORTANT If the central door locking system is re-
leased using the metal insert of the key, the alarm is not
disabled.
001-142 Delta 3ed gb 30-11-2009 11:21 Pagina 42
Page 44 of 276
GETTING TO KNOW YOUR CAR43
1
VOLUME SENSING/ANTI-TILT PROTECTION
To guarantee the correct operation of the protection, close
the side windows and sunroof completely (for ver-
sions/markets, where provided).
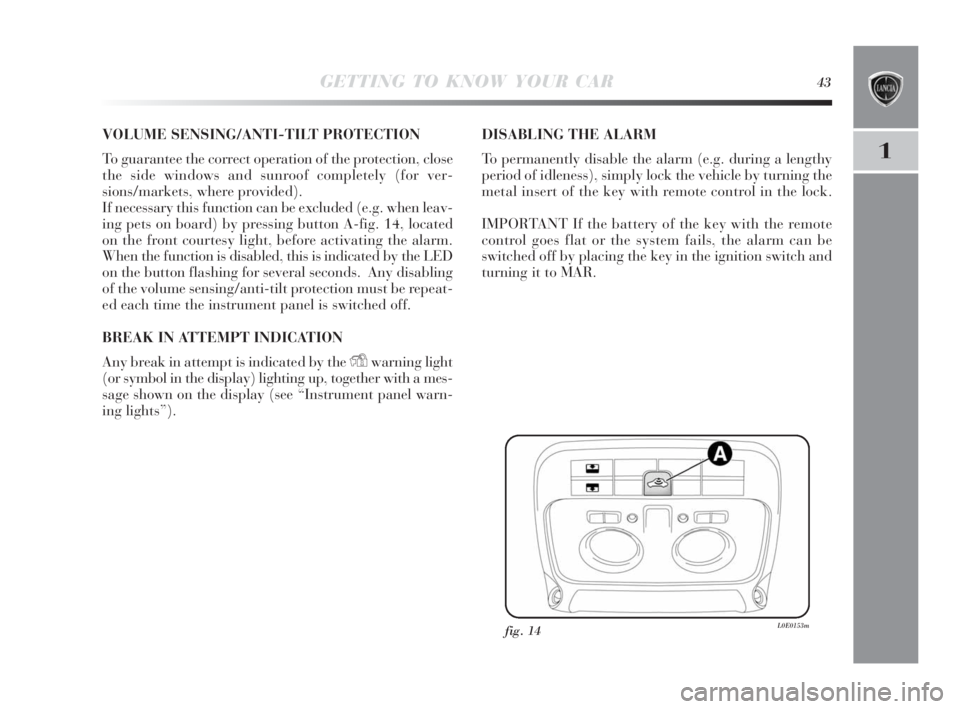
If necessary this function can be excluded (e.g. when leav-
ing pets on board) by pressing button A-fig. 14, located
on the front courtesy light, before activating the alarm.
When the function is disabled, this is indicated by the LED
on the button flashing for several seconds. Any disabling
of the volume sensing/anti-tilt protection must be repeat-
ed each time the instrument panel is switched off.
BREAK IN ATTEMPT INDICATION
Any break in attempt is indicated by the
Ywarning light
(or symbol in the display) lighting up, together with a mes-
sage shown on the display (see “Instrument panel warn-
ing lights”).DISABLING THE ALARM
To permanently disable the alarm (e.g. during a lengthy
period of idleness), simply lock the vehicle by turning the
metal insert of the key with remote control in the lock.
IMPORTANT If the battery of the key with the remote
control goes flat or the system fails, the alarm can be
switched off by placing the key in the ignition switch and
turning it to MAR.
fig. 14L0E0153m
001-142 Delta 3ed gb 30-11-2009 11:21 Pagina 43
Page 54 of 276

GETTING TO KNOW YOUR CAR53
1
IMPORTANT It is advisable to activate air recirculation
in queues or in tunnels to prevent the introduction of pol-
luted air. Do not use the function for a long time, partic-
ularly if there are many passengers on board, to prevent
the windows from misting up.
D Air recirculation on/off button
(LED lights when function is on).
E Manual climate control compressor on/off button (LED
lights when function is on).
F Heated rear windscreen on/off button.
When the function is active, an LED on the button is
lit. In order to maintain battery efficiency, the function
is automatically deactivated after about 20 minutes.FAST FRONT WINDOW AND FRONT SIDE
WINDOWS DEMISTING/DEFROSTING
(MAX-DEF)
Proceed as follows:
❍turn knob A to the red section;
❍turn knob C to
Ú;
❍turn knob D to -;
❍turn knob B to 4 -(maximum fan speed).
IMPORTANT The climate control system is very useful for
fast demisting because it dries the air. Adjust the controls
as described above and press knob B to switch the climate
control system on: the LED on the knob will light up.
LOOKING AFTER THE SYSTEM
Run the climate control system for at least 10 minutes
every month during the winter. Have the system inspect-
ed at a Lancia Dealership before the summer.
001-142 Delta 3ed gb 30-11-2009 11:21 Pagina 53
Page 59 of 276

58GETTING TO KNOW YOUR CAR
heated rear windscreen and door mirrors
demisting/defrosting fig. 26
Press button F (
() to activate the function: When the
function is active, an LED on the button lights up.
This function is timed and will turn off automatically af-
ter 20 minutes. Press
(again to disable the function in
advance.
IMPORTANT Do not apply stickers on the inside of the
rear window over the heating filaments to avoid damage
that might cause it to stop working properly.
IMPORTANT Press
Tto draw air in from the outside
(in this case the LED on the button should be off).Rapid window demisting/defrosting
(MAX-DEF function) fig. 26
Press button G
-to automatically activate the timed op-
eration of all the functions required to rapidly
demist/defrost the windscreen and front windows.
The functions are:
❍climate control compressor engagement (with an out-
door temperature of above 4°C);
❍disengagement (if previously engaged) of air recircu-
lation (the LED on button
Tshould be off);
❍engagement of heated rear windscreen (the LED on
button
-should be on) and door mirror heater coils;
❍air temperature set to maximum;
❍activation of air flow.
Activation of air recirculation and enablement of
AQS (Air Quality System) fig. 26
Press button
T.
Air recirculation is carried out according to three possi-
ble operation modes:
❍automatic control, indicated by the AQS appearing on
the display and the LED on button
Tshould be off;
001-142 Delta 3ed gb 30-11-2009 11:22 Pagina 58
Page 61 of 276

60GETTING TO KNOW YOUR CAR
Switching the climate control compressor
on/off I-fig. 26
Press button
❄to switch on the climate control system
compressor.
Compressor engagement
❍the LED on button
❄is lit up;
❍Symbol
❄is shown on the display.
Compressor disengagement
❍the LED on button
❄is off;
❍symbol
❄disappears from the display;
❍internal air recirculation is excluded;
❍the AQS function is disabled.
With the climate control system compressor disengaged,
it is not possible to introduce air of a lower temperature
than the outside temperature into the passenger com-
partment; in this case the symbol on the display will flash.
The disengagement of the climate control compressor re-
mains in the system memory even after the engine has
been stopped. To engage the climate control compressor
press the button
❄once again or press AUTO: in this last
case any manual settings will be cancelled.
EXTERNAL LIGHTS
The left-hand lever operates most of the external lights.
The external lights can only be switched on when the ig-
nition key is on MAR. The instrument panel and the var-
ious controls on the dashboard will be illuminated when
the external lights are switched on.
DAYLIGHT lights (D.R.L. - Adaptive Daylight Led)
(for versions/markets, where provided)
With the ignition key turned to MAR and the selector wheel
turned to position Othe daylight lights are automatical-
ly activated; the other lights and internal illumination re-
main off. The automatic lighting up of the daytime lights
can be switched on/off using the display menus (see “Dis-
play” section in this chapter). If the daytime lights are
switched off, when the selector wheel is turned to Ono
lights will come on.
fig. 27L0E0019m
001-142 Delta 3ed gb 30-11-2009 11:22 Pagina 60
Page 62 of 276
GETTING TO KNOW YOUR CAR61
1
Deactivation
When the lights are switched off by the sensor, the dipped
beam headlights and side lights are switched off and the
daylight lights are switched on (if activated).
The sensor cannot detect the presence of fog: switch the
lights on manually in this case.
FRONT FOG LIGHTS WITH CORNERING LIGHTS
FUNCTION
When travelling at a speed of less than 40 km/h with the
dipped beam headlights on, when the steering wheel is
turned at a wide angle or the direction indicators are lit
up, a light (built into the front fog lights) will be activat-
ed on the side of the turn to increase night time visibility.
This function can be switched on/off using the display
menus (see “Display” section in this chapter). AUTOMATIC HEADLIGHT SENSOR
(dusk sensor) fig. 27
(for versions/markets, where provided)
This sensor detects changes in external light levels ac-
cording to the sensitivity of the setting: the higher the sen-
sitivity, the lower the amount of external light needed to
switch the lights on. The sensitivity of the dusk sensor may
be adjusted, using the “Set-up menu” on the instrument
panel.
Activation
Turn the selector wheel to AUTO: in this way the external
lighting will switch on automatically according to the out-
side light level.
The headlights can only be flashed with the sensor on.The daytime lights are an alternative to the
dipped beam headlights for driving during
the daytime. They are compliant in countries
where is it obligatory to have lights on during the
day and permitted in those where it is not obliga-
tory Daytime lights cannot replace dipped beam
headlights when driving at night or through tunnels.
The use of daytime lights is governed by the High-
way Code of the country you are in. Keep to the
rules.
001-142 Delta 3ed gb 30-11-2009 11:22 Pagina 61
Page 63 of 276

62GETTING TO KNOW YOUR CAR
DIPPED BEAM HEADLIGHTS/SIDE LIGHTS
With the ignition key turned to MAR, turn the selector
wheel to 2. If dipped beam headlights are activated, the
daytime lights are switched off and the side lights, num-
ber plate light and dipped beam headlights are lit up. The
3warning light will come on in the instrument panel.
When the ignition key is turned to STOP or removed, and
the selector wheel is turned from
Oto2, the number plate
light and side lights are lit. The 3warning light will
come on in the instrument panel.
Parking function
With the side lights on and the ignition key turned to STOP
or removed, it is possible to light up one side of the vehi-
cle by moving the lighting lever down (left-hand side) or
up (right-hand side). In this case warning light
3on the
instrument panel will go out.
MAIN BEAM HEADLIGHTS
With the selector wheel in position 2, push the lever for-
ward toward the dashboard (stable position). The 1warn-
ing light will come on in the instrument panel. They are
switched off by pulling the lever towards the steering wheel.
Flashing the headlights
You can flash the headlights by pulling the lever towards
the wheel (unstable position). The
1warning light on the
instrument panel will come on.DIRECTION INDICATORS Fig. 28
Push the lever to (stable) position:
– up (position
a): right-hand indicator ON;
– down (position
b): left-hand indicator ON.
Warning light
¥orÎwill blink on the instrument pan-
el.. The direction indicators are switched off automatically
when the steering wheel is straightened.
fig. 28L0E0020m
001-142 Delta 3ed gb 30-11-2009 11:22 Pagina 62
Page 64 of 276
GETTING TO KNOW YOUR CAR63
1
LANE CHANGE FUNCTION
If you want to signal that you are changing lane, hold the
left-hand lever in the unstable position for less than half
a second. The direction indicator on the selected side flash-
es 5 times and then switches off automatically.
“FOLLOW ME HOME” DEVICE
This function allows the space in front of the car to be lit
up for a preset period of time.
Activation
With the ignition key on STOP or removed, pull the lever
towards the steering wheel within 2 minutes of switching
the engine off. The amount of time the lights remain on
is extended by 30 seconds at each movement of the lever,
up to a maximum of 210 seconds; after this the lights are
switched off automatically. Each time the lever is oper-
ated, the warning light on the instrument panel comes
on and the display shows how long the function will re-
main active. The warning light comes on the first time the
lever is operated, and stays on until the function is auto-
matically deactivated. Each time you operate the lever, the
amount of time the lights will remain lit up increases.
Deactivation
Keep the lever pulled towards the steering wheel for more
than 2 seconds.WINDOW WASHING
The right-hand lever fig. 29 controls windscreen
wiper/washer and heated rear window wiper/washer op-
eration.
WINDSCREEN WIPER/WASHER fig. 29
This only operates with the ignition turned to MAR.
The right-hand lever can take five different positions:
A: windscreen wiper off.
B: intermittent operation;
With the lever in position B, turn selector wheel F to se-
lect one of four different speeds for the intermittent op-
eration mode:
,= very slow intermittent operation
= slow intermittent operation.
= normal intermittent operation
= fast intermittent operation.
C: continuous slow operation;
D: continuous fast operation;
E: temporary fast operation (unstable position).
001-142 Delta 3ed gb 30-11-2009 11:22 Pagina 63