instrument panel Lancia Delta 2010 Owner handbook (in English)
[x] Cancel search | Manufacturer: LANCIA, Model Year: 2010, Model line: Delta, Model: Lancia Delta 2010Pages: 276, PDF Size: 5.31 MB
Page 6 of 276
GETTING TO KNOW YOUR CAR5
1
Instrument panel........................................ 6
Dashboard and on-board instruments.......... 7
Display ....................................................... 20
Menu Items ................................................. 24
Trip computer ............................................ 34
Symbols..................................................... 36
Lancia code system..................................... 37
Keys............................................................ 38
Alarm........................................................ 41
Ignition device............................................ 44
Seats .......................................................... 45
Head restraints ............................................ 48
Steering wheel............................................ 49
Rearview mirrors ........................................ 49
Climatic comfort ......................................... 51
Manual climate control system .................... 52
Two-zone automatic climate control system 54
External lights............................................ 60
Window washing ........................................ 63
Cruise Control ............................................. 66
Courtesy lights............................................ 68
Controls...................................................... 70Fuel cut-off system...................................... 73
Interior fittings........................................... 74
Sunroof....................................................... 79
Doors......................................................... 82
Electric windows........................................ 85
Luggage compartment................................. 89
Engine bonnet ............................................ 97
Roof rack/ski rack...................................... 99
Headlights................................................... 100
DST system ................................................ 102
SPORT function ......................................... 102
Reactive Suspension System ........................ 104
Driving Advisor........................................... 106
Advanced ESP system................................. 110
EOBD system ............................................. 115
“Dualdrive” electric power steering system . 115
T.P.M.S. system........................................... 117
Parking sensors........................................... 120
Magic Parking............................................. 123
Accessories purchased by the owner............. 137
Refuelling.................................................... 138
Protecting the environment ......................... 141
001-142 Delta 3ed gb 30-11-2009 11:21 Pagina 5
Page 7 of 276
6GETTING TO KNOW YOUR CAR
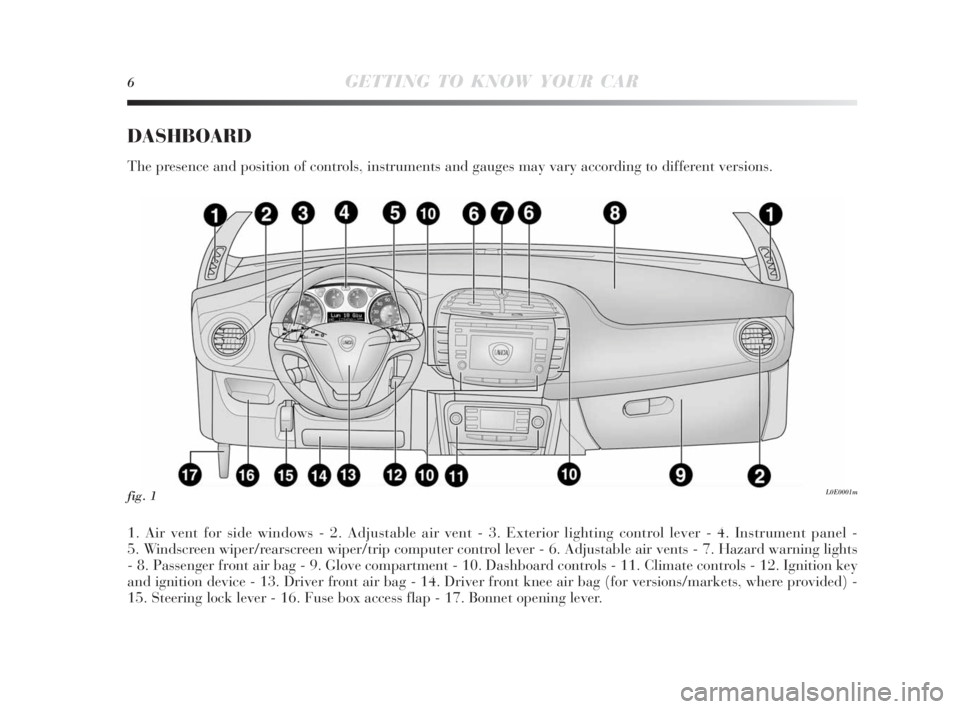
DASHBOARD
The presence and position of controls, instruments and gauges may vary according to different versions.
1. Air vent for side windows - 2. Adjustable air vent - 3. Exterior lighting control lever - 4. Instrument panel -
5. Windscreen wiper/rearscreen wiper/trip computer control lever - 6. Adjustable air vents - 7. Hazard warning lights
- 8. Passenger front air bag - 9. Glove compartment - 10. Dashboard controls - 11. Climate controls - 12. Ignition key
and ignition device - 13. Driver front air bag - 14. Driver front knee air bag (for versions/markets, where provided) -
15. Steering lock lever - 16. Fuse box access flap - 17. Bonnet opening lever.
fig. 1L0E0001m
001-142 Delta 3ed gb 30-11-2009 11:21 Pagina 6
Page 8 of 276
GETTING TO KNOW YOUR CAR7
1
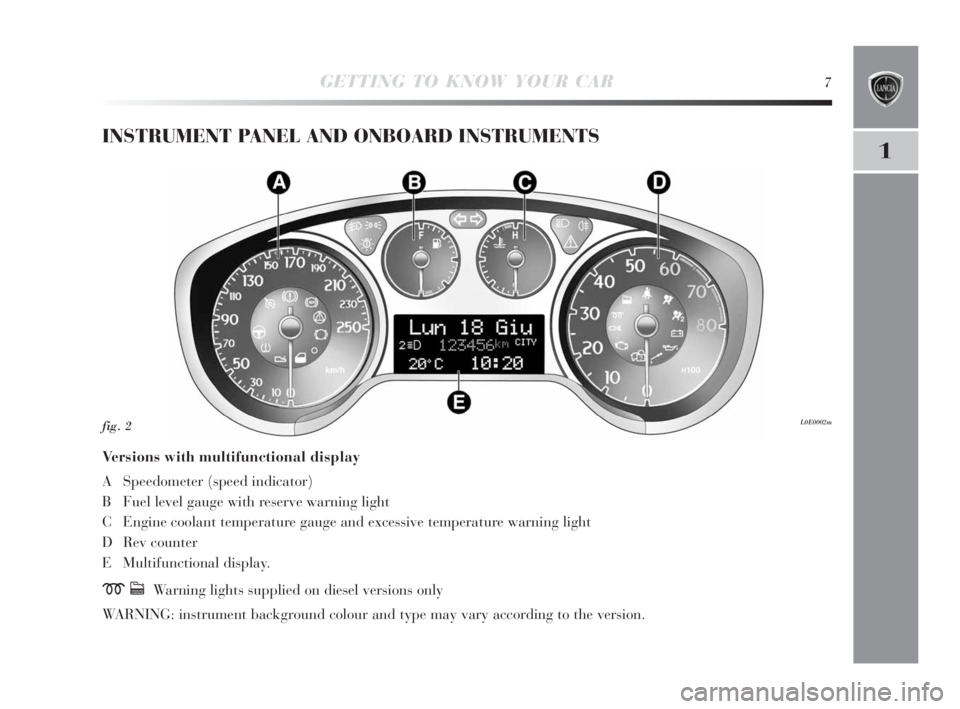
INSTRUMENT PANEL AND ONBOARD INSTRUMENTS
Versions with multifunctional display
A Speedometer (speed indicator)
B Fuel level gauge with reserve warning light
C Engine coolant temperature gauge and excessive temperature warning light
D Rev counter
E Multifunctional display.
mcWarning lights supplied on diesel versions only
WARNING: instrument background colour and type may vary according to the version.
L0E0002mfig. 2
001-142 Delta 3ed gb 30-11-2009 11:21 Pagina 7
Page 10 of 276
GETTING TO KNOW YOUR CAR9
1
SPEEDOMETER (SPEED INDICATOR) fig. 2-3
Indicator A shows the speed of the car.
REV. COUNTER fig. 2-3
The indicator D shows the engine revs.
FUEL LEVEL GAUGE fig. 2-3
Indicator B shows the amount of fuel in the tank.
The
Kwarning light will come on (together with a mes-
sage on the display) to indicate there are between 5 and
7 litres of fuel remaining.
Do not travel with the tank nearly empty: lack of fuel sup-
ply could damage the converter.
ENGINE COOLANT TEMPERATURE GAUGE
fig. 2-3
Gauge C shows the temperature of the engine coolant and
indicates when the coolant temperature exceeds 50°C. The
first reference remains on constantly to indicate the sys-
tem is operating correctly. The
uwarning light comes
on (together with a message on the display) to indicate
that the temperature of the engine coolant has increased
significantly. In this event, stop the engine and go to a Lan-
cia Dealership.INSTRUMENT PANEL WARNING LIGHTS
General warnings
The lighting up of a warning light is associated with a spe-
cific message and/or buzzer when applicable. These in-
dications are brief and precautionary and as such must
not be considered as exhaustive and/or alternative to the
information contained in the Owner’s Handbook, which
you are recommended to read carefully in all cases. Al-
ways refer to the information in this chapter in the event
of a failure indication.
Low brake fluid level (red)
This warning light comes on when the ignition
key is turned to MAR, but it should go out af-
ter a few seconds. The warning light comes on
when the level of the brake fluid in the reservoir falls be-
low the minimum level due to possible leaks in the circuit.
The display will show a dedicated message.
Handbrake on (red)
This warning light comes on when the ignition key is
turned to MAR, but it should go off after a few seconds.
The warning light turns on when the handbrake is on. If
the car is moving a buzzer is also triggered.
IMPORTANT If the warning light comes on with the ve-
hicle in motion, check that the handbrake is not engaged.
x
001-142 Delta 3ed gb 30-11-2009 11:21 Pagina 9
Page 15 of 276
14GETTING TO KNOW YOUR CAR
General failure indication (amber)
Fuel cut-off initiated
This warning light (or symbol on the display)
comes on when the fuel cut-off system cuts in.
The display will show a dedicated message.
Engine oil pressure sensor failure
This warning light (or symbol on the display) comes on
when a failure is detected in the engine oil pressure sen-
sor. The display will show a dedicated message.
Dusk sensor failure
This warning light (or symbol on the display) comes on
when a failure is detected in the dusk sensor.
Speed limit exceeded
This warning light (amber), or symbol on the display
(red), comes on when the preset speed limit is exceeded
(for Arabic countries the speed limit is set at 120 km/h).
The display will show a dedicated message.
Rain sensor failure
(for versions/markets, where provided)
This warning light (or symbol on the display) comes on
when a fault is detected in the rain sensor.
The display will show a dedicated message.
è
Parking sensor failure
(for versions/markets, where provided)
This warning light (or symbol on the display) comes on
when a fault is detected in the parking sensors.
The display will show a dedicated message.
Tyre pressure monitoring system failure
(for versions/markets, where provided)
This warning light (or symbol on the display) comes on
when a failure is detected in the T.P.M.S. system (for ver-
sions/markets, where provided).
Should one or more wheels be fitted without sensors, the
instrument panel warning light will come on and stay on
until initial conditions are restored.
The display will show a dedicated message.
NOTE If one of the above-mentioned faults occurs,
contact a Lancia Dealership as soon as possible.
AFS system failure
This warning light (or symbol on the display) comes on
when a failure is detected in the AFS system (see “Head-
lights” paragraph in this chapter). The display will show
a dedicated message.
001-142 Delta 3ed gb 30-11-2009 11:21 Pagina 14
Page 25 of 276
24GETTING TO KNOW YOUR CAR
Selecting an option from the main menu
without submenu:
– briefly press the SET button to select the main menu op-
tion to be set.
– Press button
ÕorÔ(by single presses) to select a new
setting;
– briefly press the SET button to store the new setting and
to go back to the main menu option selected previously.
Selecting an option from the main menu with
submenu:
– briefly press the SET button to display the first submenu
option;
– press button
ÕorÔ(by single presses) to scroll through
all the submenu options;
– briefly press the SET button to select the displayed sub-
menu option and to open the relevant set-up menu;
– press
ÕorÔ(by single presses) to select a new setting
for this submenu option;
– briefly press the SET button to store the new setting and
to go back to the previously selected submenu option.
MENU ITEMS
Lighting (Adjusting lighting
inside the car)
This function may be used to set the brightness of the in-
strument panel, sound system controls and automatic cli-
mate control system controls (for versions/markets, where
provided) to 8 levels.
Proceed as follows to adjust the brightness:
– briefly press SET. The previously set level will flash on
the display;
– press
ÕorÔto set the required brightness level;
– briefly press SET to go back to the menu screen or hold
the button down to go back to the standard screen with-
out storing the new settings.
Speed beep (Speed limit)
This function may be used to set the car speed limit (km/h
or mph); when this limit is exceeded the driver is imme-
diately alerted (see “Instrument panel warning lights” in
chapter 1). To set the speed limit, proceed as follows:
– briefly press SET. The display will show a dedicated mes-
sage;
001-142 Delta 3ed gb 30-11-2009 11:21 Pagina 24
Page 44 of 276
GETTING TO KNOW YOUR CAR43
1
VOLUME SENSING/ANTI-TILT PROTECTION
To guarantee the correct operation of the protection, close
the side windows and sunroof completely (for ver-
sions/markets, where provided).
If necessary this function can be excluded (e.g. when leav-
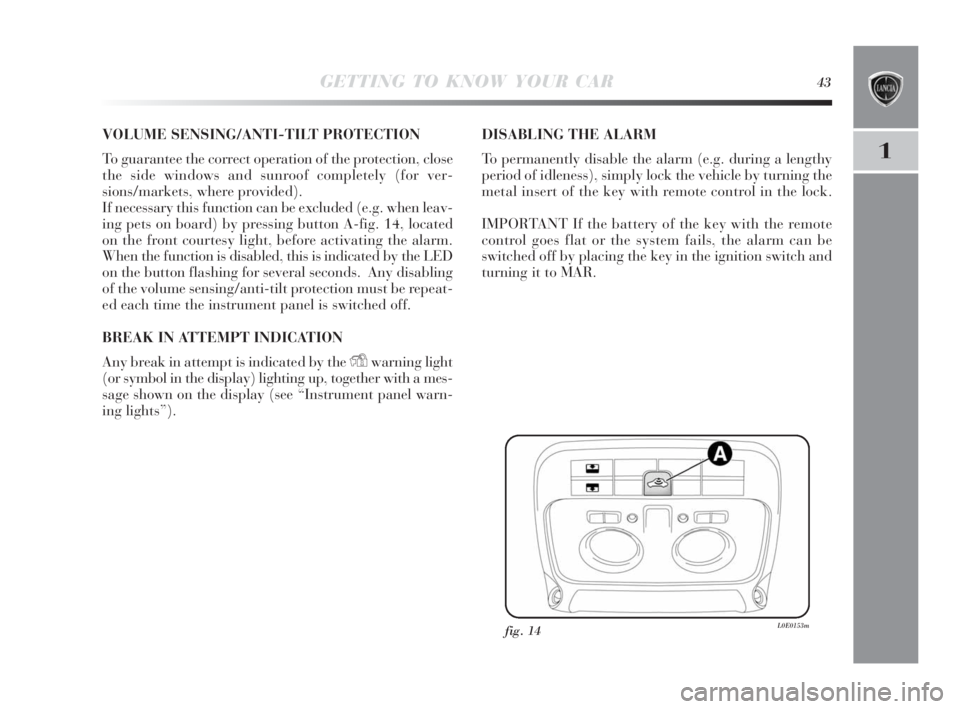
ing pets on board) by pressing button A-fig. 14, located
on the front courtesy light, before activating the alarm.
When the function is disabled, this is indicated by the LED
on the button flashing for several seconds. Any disabling
of the volume sensing/anti-tilt protection must be repeat-
ed each time the instrument panel is switched off.
BREAK IN ATTEMPT INDICATION
Any break in attempt is indicated by the
Ywarning light
(or symbol in the display) lighting up, together with a mes-
sage shown on the display (see “Instrument panel warn-
ing lights”).DISABLING THE ALARM
To permanently disable the alarm (e.g. during a lengthy
period of idleness), simply lock the vehicle by turning the
metal insert of the key with remote control in the lock.
IMPORTANT If the battery of the key with the remote
control goes flat or the system fails, the alarm can be
switched off by placing the key in the ignition switch and
turning it to MAR.
fig. 14L0E0153m
001-142 Delta 3ed gb 30-11-2009 11:21 Pagina 43
Page 61 of 276

60GETTING TO KNOW YOUR CAR
Switching the climate control compressor
on/off I-fig. 26
Press button
❄to switch on the climate control system
compressor.
Compressor engagement
❍the LED on button
❄is lit up;
❍Symbol
❄is shown on the display.
Compressor disengagement
❍the LED on button
❄is off;
❍symbol
❄disappears from the display;
❍internal air recirculation is excluded;
❍the AQS function is disabled.
With the climate control system compressor disengaged,
it is not possible to introduce air of a lower temperature
than the outside temperature into the passenger com-
partment; in this case the symbol on the display will flash.
The disengagement of the climate control compressor re-
mains in the system memory even after the engine has
been stopped. To engage the climate control compressor
press the button
❄once again or press AUTO: in this last
case any manual settings will be cancelled.
EXTERNAL LIGHTS
The left-hand lever operates most of the external lights.
The external lights can only be switched on when the ig-
nition key is on MAR. The instrument panel and the var-
ious controls on the dashboard will be illuminated when
the external lights are switched on.
DAYLIGHT lights (D.R.L. - Adaptive Daylight Led)
(for versions/markets, where provided)
With the ignition key turned to MAR and the selector wheel
turned to position Othe daylight lights are automatical-
ly activated; the other lights and internal illumination re-
main off. The automatic lighting up of the daytime lights
can be switched on/off using the display menus (see “Dis-
play” section in this chapter). If the daytime lights are
switched off, when the selector wheel is turned to Ono
lights will come on.
fig. 27L0E0019m
001-142 Delta 3ed gb 30-11-2009 11:22 Pagina 60
Page 62 of 276
GETTING TO KNOW YOUR CAR61
1
Deactivation
When the lights are switched off by the sensor, the dipped
beam headlights and side lights are switched off and the
daylight lights are switched on (if activated).
The sensor cannot detect the presence of fog: switch the
lights on manually in this case.
FRONT FOG LIGHTS WITH CORNERING LIGHTS
FUNCTION
When travelling at a speed of less than 40 km/h with the
dipped beam headlights on, when the steering wheel is
turned at a wide angle or the direction indicators are lit
up, a light (built into the front fog lights) will be activat-
ed on the side of the turn to increase night time visibility.
This function can be switched on/off using the display
menus (see “Display” section in this chapter). AUTOMATIC HEADLIGHT SENSOR
(dusk sensor) fig. 27
(for versions/markets, where provided)
This sensor detects changes in external light levels ac-
cording to the sensitivity of the setting: the higher the sen-
sitivity, the lower the amount of external light needed to
switch the lights on. The sensitivity of the dusk sensor may
be adjusted, using the “Set-up menu” on the instrument
panel.
Activation
Turn the selector wheel to AUTO: in this way the external
lighting will switch on automatically according to the out-
side light level.
The headlights can only be flashed with the sensor on.The daytime lights are an alternative to the
dipped beam headlights for driving during
the daytime. They are compliant in countries
where is it obligatory to have lights on during the
day and permitted in those where it is not obliga-
tory Daytime lights cannot replace dipped beam
headlights when driving at night or through tunnels.
The use of daytime lights is governed by the High-
way Code of the country you are in. Keep to the
rules.
001-142 Delta 3ed gb 30-11-2009 11:22 Pagina 61
Page 63 of 276

62GETTING TO KNOW YOUR CAR
DIPPED BEAM HEADLIGHTS/SIDE LIGHTS
With the ignition key turned to MAR, turn the selector
wheel to 2. If dipped beam headlights are activated, the
daytime lights are switched off and the side lights, num-
ber plate light and dipped beam headlights are lit up. The
3warning light will come on in the instrument panel.
When the ignition key is turned to STOP or removed, and
the selector wheel is turned from
Oto2, the number plate
light and side lights are lit. The 3warning light will
come on in the instrument panel.
Parking function
With the side lights on and the ignition key turned to STOP
or removed, it is possible to light up one side of the vehi-
cle by moving the lighting lever down (left-hand side) or
up (right-hand side). In this case warning light
3on the
instrument panel will go out.
MAIN BEAM HEADLIGHTS
With the selector wheel in position 2, push the lever for-
ward toward the dashboard (stable position). The 1warn-
ing light will come on in the instrument panel. They are
switched off by pulling the lever towards the steering wheel.
Flashing the headlights
You can flash the headlights by pulling the lever towards
the wheel (unstable position). The
1warning light on the
instrument panel will come on.DIRECTION INDICATORS Fig. 28
Push the lever to (stable) position:
– up (position
a): right-hand indicator ON;
– down (position
b): left-hand indicator ON.
Warning light
¥orÎwill blink on the instrument pan-
el.. The direction indicators are switched off automatically
when the steering wheel is straightened.
fig. 28L0E0020m
001-142 Delta 3ed gb 30-11-2009 11:22 Pagina 62