dashboard Lancia Delta 2011 Owner handbook (in English)
[x] Cancel search | Manufacturer: LANCIA, Model Year: 2011, Model line: Delta, Model: Lancia Delta 2011Pages: 290, PDF Size: 8.36 MB
Page 118 of 290

1
KNOWING YOUR CAR117
START&STOP SYSTEM
(for versions/markets where provided)
The Start&Stop system automatically stops the engine
each time the vehicle is stationary and starts it again
when the driver wants to move off. In this way, the ve-
hicle efficiency is increased, by reducing consumption,
dangerous gas emissions and sound pollution.
The system is active every time the engine is started.
OPERATING MODES
Engine stopping mode
With the car stopped, the engine stops with gearbox in
neutral and clutch pedal released.
NOTE The engine can only be stopped automatically
over about 10 km/h, to prevent the engine from being re-
peatedly stopped when driving at walking pace.
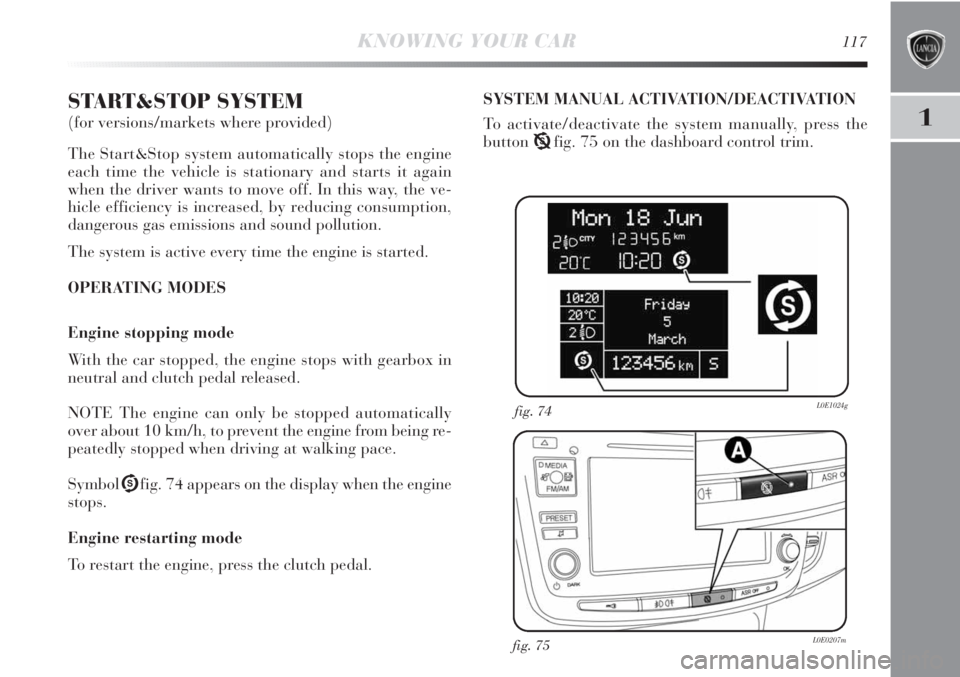
SymbolUfig. 74 appears on the display when the engine
stops.
Engine restarting mode
To restart the engine, press the clutch pedal.SYSTEM MANUAL ACTIVATION/DEACTIVATION
To activate/deactivate the system manually, press the
buttonTfig. 75 on the dashboard control trim.
fig. 74L0E1024g
fig. 75L0E0207m
Page 156 of 290

2
SAFETY155
CARRYING CHILDREN SAFELY
For optimal protection in the event of a collision, all pas-
sengers must be seated and wearing adequate restraint
systems.
This is even more important for children.
This prescription is compulsory in all EC countries ac-
cording to EC Directive 2003/20/EC.
Compared with adults, a child’s head is proportionally
larger and heavier than the rest of the body, while mus-
cles and bone structure are not fully developed.
Therefore, correct restraint systems are necessary which
are different from adult seat belts.
The results of research on the best child restraint system
are contained in the European Standard ECE-R44, which
enforces the use of restraint systems classified into five
groups:
Group 0 0-10 kg in weight
Group 0+ 0-13 kg in weight
Group 1 9-18 kg in weight
Group 2 15-25 kg in weight
Group 3 22-36 kg in weight
DANGER: Do not put cradle seats facing
backwards on the front seat if the front pas-
senger airbag is enabled. Deployment of the
airbag in an accident could cause fatal in-
juries to the baby. It is advisable always to
carry children on the rear seat which is the most
protected position in the event of an accident. Never
fit child seats systems on the front seat if the car
is provided with passenger’s air bag: as the airbag
could even cause fatal injury regardless of the
severity of the collision which caused its deploy-
ment. If necessary, children can stay on the front
seat, but only if the passenger’s airbag can be dis-
abled. In this case be sure to verify that the air bag
is actually deactivated, observing the “warning
light on the dashboard (see “Front air bag – pas-
senger side” in paragraph “Front air bags”). Move
the passenger’s seat as far back as possible to avoid
contact between the child seat and the dashboard.
Page 164 of 290

2
SAFETY163
FRONT AIR BAGS
The car is provided with front air bags for the driver and
the passenger, driver’s knee air bag (for versions/markets
where provided) and front side bags (side bags – window
bags).
The front air bags (driver, passenger driver’s knee bag)
protect the occupants of the front seats in the event of
moderate to serious front impacts by positioning the bag
between the occupant and the steering wheel or the dash-
board.
Therefore non-activation in other types of collisions (side
collisions, rear shunts, roll-overs, etc.) is not a system
malfunction.
An electronic control unit will make the bag inflate in the
event of a frontal impact.
The bag will inflate instantaneously placing itself be-
tween the front occupants body and the structures which
could cause injury. It will deflate immediately afterwards.
The front airbags (driver’s, passenger’s, driver’s knee air
bags) do not replace but rather complement the seat
belts, which you are always recommended to wear, as
specified by law in Europe and most non-European coun-
tries.
In the event of an impact, someone not wearing a seat belt
could move forward and come into contact with a bag
which is still in the opening phase. The protection offered
by the bag is reduced in such a case.The front air bags may not be activated in the following
situations:
❍front collisions against highly deformable objects not
affecting the front surface of the car (e.g. bumper col-
lision against guard rail, etc.);
❍car wedging under other vehicles or protective barri-
ers (e.g. trucks or guard rails);
they may not provide any additional protection compared
with seat belts, so their activation would be inappropri-
ate. Therefore, failure to come into action in the above
circumstances does not mean that the system is not work-
ing properly.
Do not apply stickers or other objects on the
steering wheel, on the dashboard in the pas-
senger side airbag area, on side upholstery
on roof and on the seats. Never put objects (e.g. mo-
bile phones) on the passenger’s side dashboard since
they could interfere with proper air bag inflation
and also cause serious injury to the passengers.
Page 165 of 290

164SAFETY
The front air bags (driver, passenger, driver’s knee bags)
are designed and calibrated to protect front seat passen-
gers wearing seat belts.
Their volume at the moment of maximum inflation fills
most space between the steering wheel and the driver, be-
tween the lower post guard and the knees on passenger
side and between the dashboard and the passenger.
The airbags are not deployed in the event of minor front
collisions (for which the restraining action of the seat
belts is sufficient). Safety belts must always be worn. In
the event of frontal impact they guarantee correct posi-
tioning of the passenger. FRONT AIR BAG ON DRIVER’S SIDE fig. 7
It consists of an instantly inflating bag contained in a spe-
cial recess in the centre of the steering wheel.
FRONT AIR BAG ON PASSENGER SIDE fig. 8
This consists of an instantly inflating bag contained in
a special recess in the dashboard: this bag has a larger
volume than that of the driver’s.
fig. 7L0E0067mfig. 8L0E0068m
Page 166 of 290

2
SAFETY165
KNEE BAG ON DRIVER’S SIDE fig. 9
(for versions/markets where provided)
It consists of an instantly cushion housed into a special
compartment provided for the purpose under the lower
post guard at driver’s knee level, designed to give fur-
ther protection in the event of frontal impact.MANUAL DEACTIVATION OF PASSENGER FRONT
AIR BAG AND SIDE BAG
Should it be absolutely necessary to carry a child on the
front seat, the passenger front and side airbags can be de-
activated.
The instrument panel warning light
“will stay on con-
stantly until the passenger front air bag and the Side Bag
are reactivated.
IMPORTANT To deactivate the passenger’s front air bag
and the Side Bag (for versions/markets where provided),
refer to paragraphs “Multifunction display” and “Recon-
figurable multifunction display” in chapter “1”.
SERIOUS DANGER: never place cradle
child seats facing backwards on the front
passenger’s seat of cars with active passen-
ger’s air bag. Deployment of the airbag in an
accident could cause fatal injuries to the
child. Always deactivate the passenger air bag
when placing a child seat on the front seat. Move
the passenger’s seat as far back as possible to avoid
contact between the child seat and the dashboard.
Even when this is not mandatory by law, the air
bag should be immediately reactivated when chil-
dren are no longer carried to ensure better protec-
tion for the adults.
fig. 9L0E0069m
Page 187 of 290

186IN AN EMERGENCY
❍informative leaflet (see fig. 3), used to ensure the cor-
rect use of the quick tyre repair kit and then given to
the personnel who will handle the treated tyre;
❍a compressor D-fig. 2 including a pressure gauge and
connections, found in the compartment;
❍a pair of protective gloves located in the side com-
partment of the compressor;
❍adapters for inflating different elements.
The quick repair kit also contains a screwdriver and a tow
ring.
fig. 3L0E0076m
QUICK TYRE REPAIR KIT
FIX & GO AUTOMATIC
The quick tyre repair kit Fix & Go automatic is located
in the luggage compartment.
The kit fig. 2 includes:
❍a canister A containing sealant liquid and fitted with:
– filler tube B;
–
an adhesive label C with the message “max. 80 km/h”
to be applied in a position clearly visible by the dri-
ver (on the dashboard) after repairing the tyre;
fig. 2L0E0075m
Page 214 of 290

IN AN EMERGENCY213
4
REPLACING FUSES
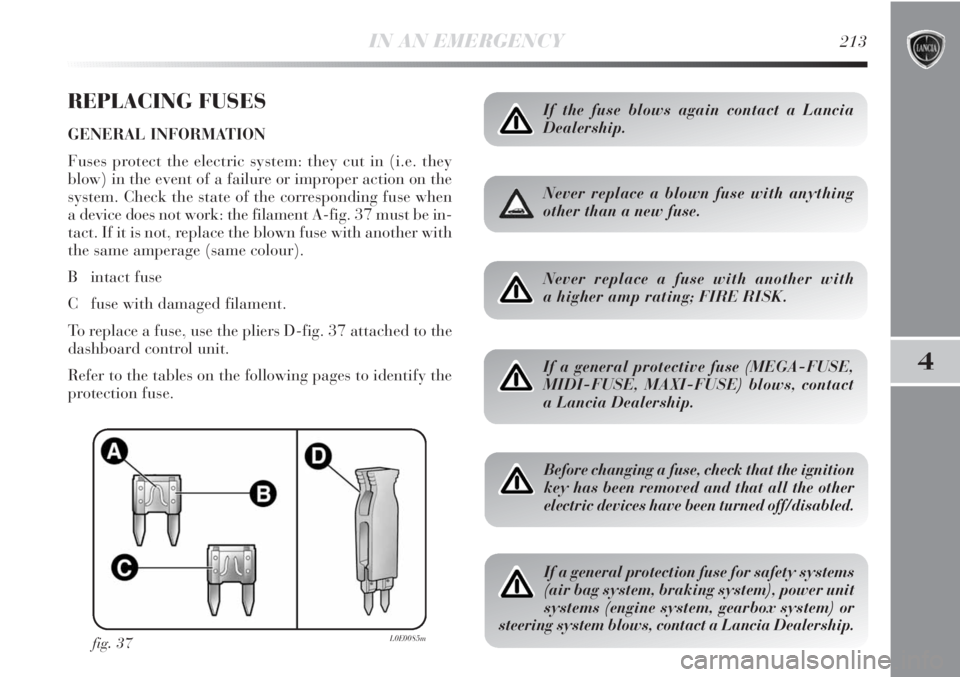
GENERAL INFORMATION
Fuses protect the electric system: they cut in (i.e. they
blow) in the event of a failure or improper action on the
system. Check the state of the corresponding fuse when
a device does not work: the filament A-fig. 37 must be in-
tact. If it is not, replace the blown fuse with another with
the same amperage (same colour).
B intact fuse
C fuse with damaged filament.
To replace a fuse, use the pliers D-fig. 37 attached to the
dashboard control unit.
Refer to the tables on the following pages to identify the
protection fuse.
fig. 37L0E0085m
If the fuse blows again contact a Lancia
Dealership.
Never replace a blown fuse with anything
other than a new fuse.
Never replace a fuse with another with
a higher amp rating; FIRE RISK.
If a general protective fuse (MEGA-FUSE,
MIDI-FUSE, MAXI-FUSE) blows, contact
a Lancia Dealership.
Before changing a fuse, check that the ignition
key has been removed and that all the other
electric devices have been turned off/disabled.
If a general protection fuse for safety systems
(air bag system, braking system), power unit
systems (engine system, gearbox system) or
steering system blows, contact a Lancia Dealership.
Page 215 of 290

214IN AN EMERGENCY
fig. 38L0E0209m
FUSE LOCATION
Dashboard fuse box
To access the fuses you must remove the press-fitted cover A. The fuse box shown in fig. 38 is located in the lower
area next to the pedal unit.
Page 216 of 290

IN AN EMERGENCY215
4
Engine compartment fuse box fig. 39 and 40
A second fuse box is located on the right side of the en-
gine compartment, next to the battery. To access this fuse
box release the side tabs and remove cover L. The ID
number of the electrical component corresponding to
each fuse can be found on the back of the cover.
fig. 39L0E0088mfig. 38aL0E0211m
If you need to wash the engine compartment,
take care not to directly hit the engine com-
partment fuse box with the jet of water.
Additional fuses (1.4 Turbo Multi Air versions)
On the 1.4 Turbo Multi Air versions there are four addi-
tional fuses (fig. 38a) next to the dashboard junction unit.
Page 229 of 290

228SERVICING AND MAINTENANCE
Thousands of km
Check engine control system operation (using diagnosis socket)
Check battery charge status and possibly recharge
Replace accessory drive belts
Replace toothed timing drive belt (*)
Replace fuel filter
Replace air filter cartridge
Change engine oil and oil filter (versions without DPF) (or every 24 months)
Change engine oil and oil filter (versions with DPF) (**)
Change brake fluid (or every 24 months)
Change pollen filter (or every 15 months)
(*) Regardless of the distance covered, the timing belt must be changed every 4 years for particularly demanding use (cold cli-
mates, city driving, long periods of idling) or at least every 5 years.
(**) The engine oil and oil filter should be changed when the warning light on the dashboard comes on, or every 24 months.
If the car is mainly used in towns and cities, change the engine oil and filter every 12 months.
35 70 105 140 175
●● ● ● ●
●● ● ● ●
●
●
●●
●●
●● ● ● ●
●●
●● ● ● ●