seats Lancia Delta 2011 Owner handbook (in English)
[x] Cancel search | Manufacturer: LANCIA, Model Year: 2011, Model line: Delta, Model: Lancia Delta 2011Pages: 290, PDF Size: 8.36 MB
Page 6 of 290
KNOWING YOUR CAR5
1
Instrument panel ........................................ 6
Control panel and instruments ................... 7
Display ...................................................... 21
Menu items ................................................ 26
Trip Computer ........................................... 36
Symbols ..................................................... 38
Lancia Code system ................................... 39
Keys ........................................................... 40
Alarm ........................................................ 43
Ignition device ........................................... 46
Seats .......................................................... 47
Headrest .................................................... 50
Steering wheel ............................................ 51
Rear view mirrors ...................................... 51
Climatic comfort ........................................ 53
Manual climate control system ................... 54
Automatic dual zone climate control system . 56
External lights ........................................... 62
Window washing ........................................ 65
Cruise Control ............................................ 68
Roof lights ................................................. 70
Controls ..................................................... 72
Fuel cut-off system .................................... 75Interior fittings ........................................... 76
Sunroof ...................................................... 81
Doors ......................................................... 84
Power windows .......................................... 87
Boot ........................................................... 91
Bonnet ....................................................... 99
Roof rack/ski rack ..................................... 101
Headlights ................................................. 102
DST system ................................................ 104
SPORT function ......................................... 104
Reactive Suspension System ....................... 106
Driving Advisor .......................................... 107
Advanced ESP system ................................ 112
Start&Stop system ..................................... 117
EOBD system ............................................. 122
“Dualdrive” electric power steering system ... 122
TPMS system ............................................. 124
Parking sensors .......................................... 127
Magic Parking ............................................ 130
Accessories purchased by the owner ........... 144
Refuelling the car ....................................... 145
Protecting the environment ........................ 148
Page 48 of 290
1
KNOWING YOUR CAR47
SEATS
FRONT SEATS
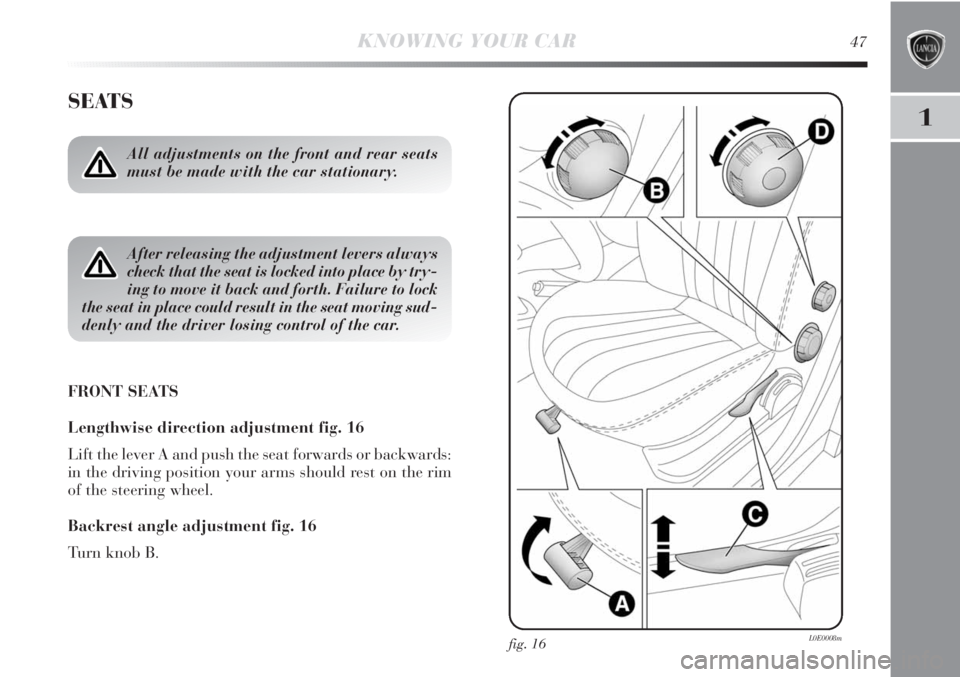
Lengthwise direction adjustment fig. 16
Lift the lever A and push the seat forwards or backwards:
in the driving position your arms should rest on the rim
of the steering wheel.
Backrest angle adjustment fig. 16
Turn knob B.
All adjustments on the front and rear seats
must be made with the car stationary.
After releasing the adjustment levers always
check that the seat is locked into place by try-
ing to move it back and forth. Failure to lock
the seat in place could result in the seat moving sud-
denly and the driver losing control of the car.
fig. 16L0E0008m
Page 49 of 290
48KNOWING YOUR CAR
Height adjustment fig. 16
Operate lever C to raise or lower the rear part of the seat
cushion to improve comfort.
Lumbar adjustment (driver’s seat) fig. 16
The position of the back against the seat backrest is ad-
justed by turning knob D.
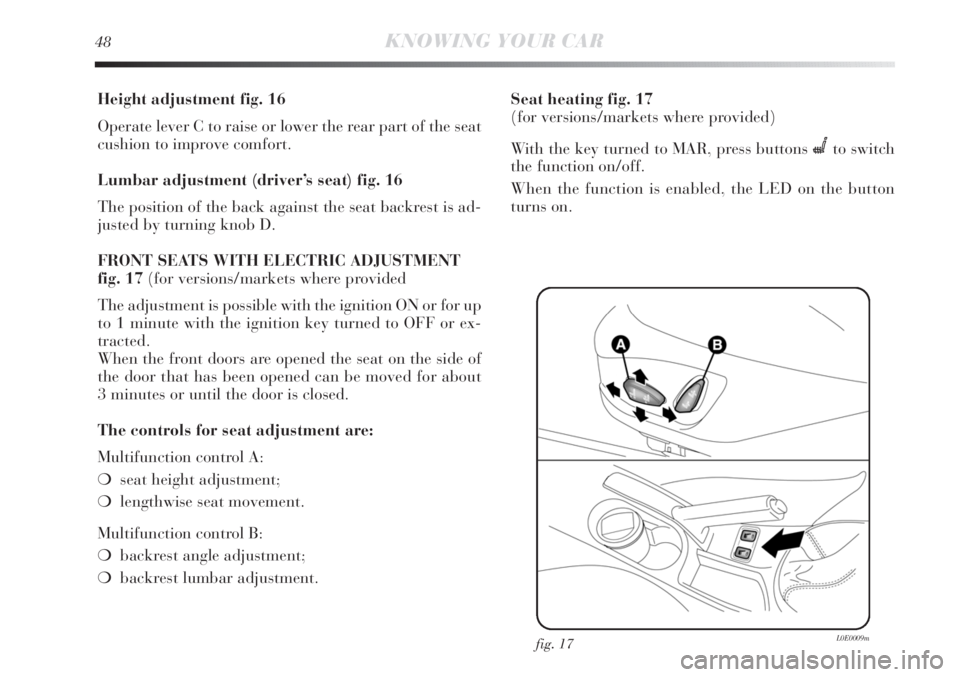
FRONT SEATS WITH ELECTRIC ADJUSTMENT
fig. 17(for versions/markets where provided
The adjustment is possible with the ignition ON or for up
to 1 minute with the ignition key turned to OFF or ex-
tracted.
When the front doors are opened the seat on the side of
the door that has been opened can be moved for about
3 minutes or until the door is closed.
The controls for seat adjustment are:
Multifunction control A:
❍seat height adjustment;
❍lengthwise seat movement.
Multifunction control B:
❍backrest angle adjustment;
❍backrest lumbar adjustment.Seat heating fig. 17
(for versions/markets where provided)
With the key turned to MAR, press buttons
Cto switch
the function on/off.
When the function is enabled, the LED on the button
turns on.
fig. 17L0E0009m
Page 50 of 290
1
KNOWING YOUR CAR49
REAR SEATS
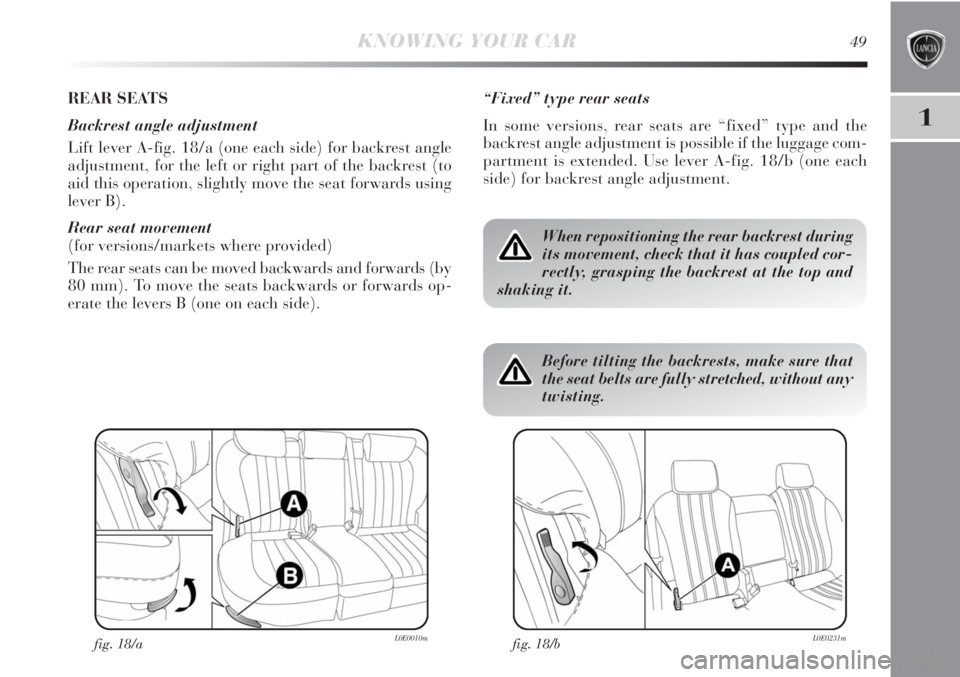
Backrest angle adjustment
Lift lever A-fig. 18/a (one each side) for backrest angle
adjustment, for the left or right part of the backrest (to
aid this operation, slightly move the seat forwards using
lever B).
Rear seat movement
(for versions/markets where provided)
The rear seats can be moved backwards and forwards (by
80 mm). To move the seats backwards or forwards op-
erate the levers B (one on each side).
fig. 18/aL0E0010m
“Fixed” type rear seats
In some versions, rear seats are “fixed” type and the
backrest angle adjustment is possible if the luggage com-
partment is extended. Use lever A-fig. 18/b (one each
side) for backrest angle adjustment.
When repositioning the rear backrest during
its movement, check that it has coupled cor-
rectly, grasping the backrest at the top and
shaking it.
fig. 18/bL0E0231m
Before tilting the backrests, make sure that
the seat belts are fully stretched, without any
twisting.
Page 51 of 290
50KNOWING YOUR CAR
HEADREST
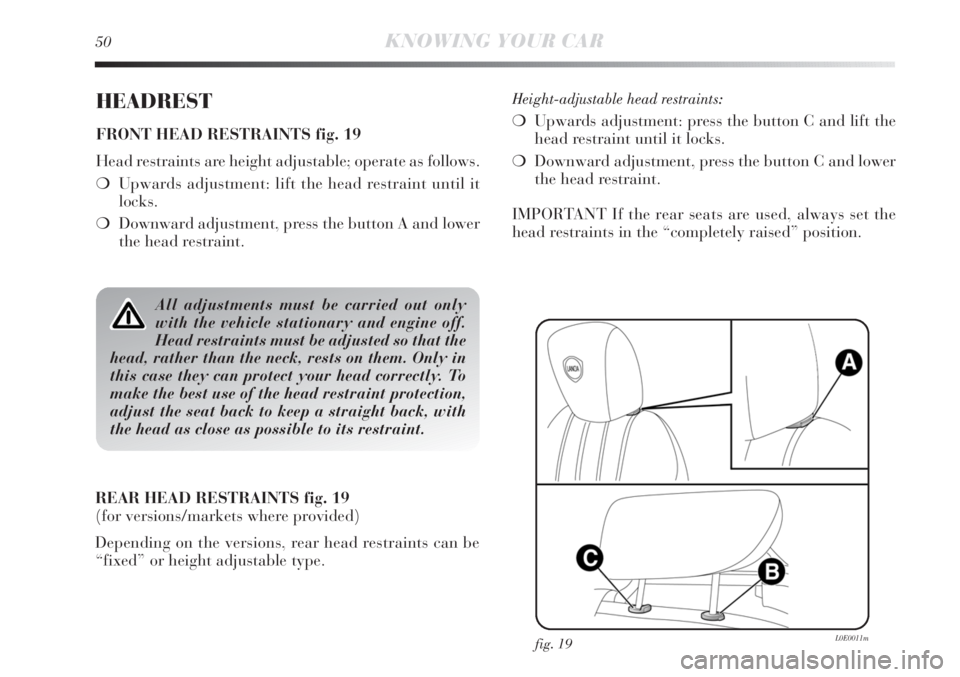
FRONT HEAD RESTRAINTS fig. 19
Head restraints are height adjustable; operate as follows.
❍Upwards adjustment: lift the head restraint until it
locks.
❍Downward adjustment, press the button A and lower
the head restraint.
fig. 19L0E0011m
Height-adjustable head restraints:
❍Upwards adjustment: press the button C and lift the
head restraint until it locks.
❍Downward adjustment, press the button C and lower
the head restraint.
IMPORTANT If the rear seats are used, always set the
head restraints in the “completely raised” position.
All adjustments must be carried out only
with the vehicle stationary and engine off.
Head restraints must be adjusted so that the
head, rather than the neck, rests on them. Only in
this case they can protect your head correctly. To
make the best use of the head restraint protection,
adjust the seat back to keep a straight back, with
the head as close as possible to its restraint.
REAR HEAD RESTRAINTS fig. 19
(for versions/markets where provided)
Depending on the versions, rear head restraints can be
“fixed” or height adjustable type.
Page 77 of 290
76KNOWING YOUR CAR
INTERIOR FITTINGS
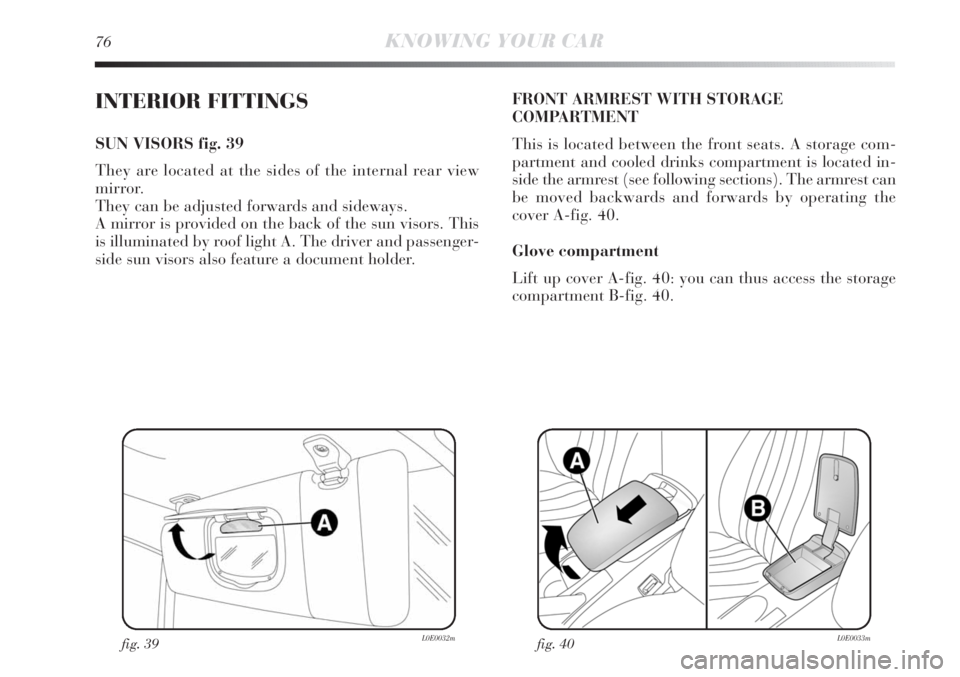
SUN VISORS fig. 39
They are located at the sides of the internal rear view
mirror.
They can be adjusted forwards and sideways.
A mirror is provided on the back of the sun visors. This
is illuminated by roof light A. The driver and passenger-
side sun visors also feature a document holder.
fig. 39L0E0032m
FRONT ARMREST WITH STORAGE
COMPARTMENT
This is located between the front seats. A storage com-
partment and cooled drinks compartment is located in-
side the armrest (see following sections). The armrest can
be moved backwards and forwards by operating the
cover A-fig. 40.
Glove compartment
Lift up cover A-fig. 40: you can thus access the storage
compartment B-fig. 40.
fig. 40L0E0033m
Page 95 of 290
94KNOWING YOUR CAR
fig. 59L0E0110m
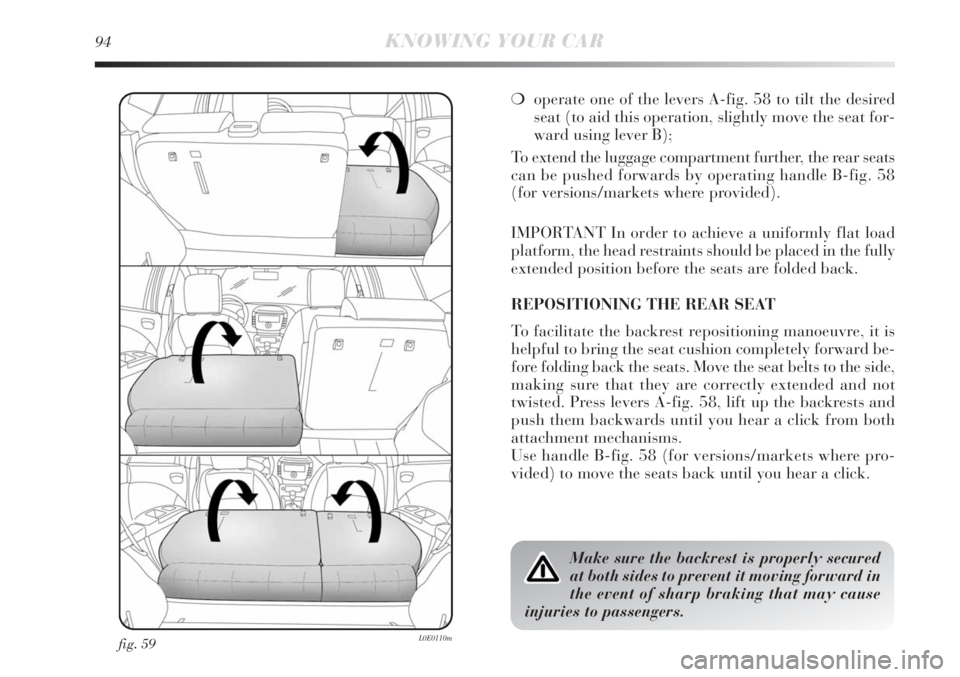
❍operate one of the levers A-fig. 58 to tilt the desired
seat (to aid this operation, slightly move the seat for-
ward using lever B);
To extend the luggage compartment further, the rear seats
can be pushed forwards by operating handle B-fig. 58
(for versions/markets where provided).
IMPORTANT In order to achieve a uniformly flat load
platform, the head restraints should be placed in the fully
extended position before the seats are folded back.
REPOSITIONING THE REAR SEAT
To facilitate the backrest repositioning manoeuvre, it is
helpful to bring the seat cushion completely forward be-
fore folding back the seats. Move the seat belts to the side,
making sure that they are correctly extended and not
twisted. Press levers A-fig. 58, lift up the backrests and
push them backwards until you hear a click from both
attachment mechanisms.
Use handle B-fig. 58 (for versions/markets where pro-
vided) to move the seats back until you hear a click.
Make sure the backrest is properly secured
at both sides to prevent it moving forward in
the event of sharp braking that may cause
injuries to passengers.
Page 97 of 290
96KNOWING YOUR CAR
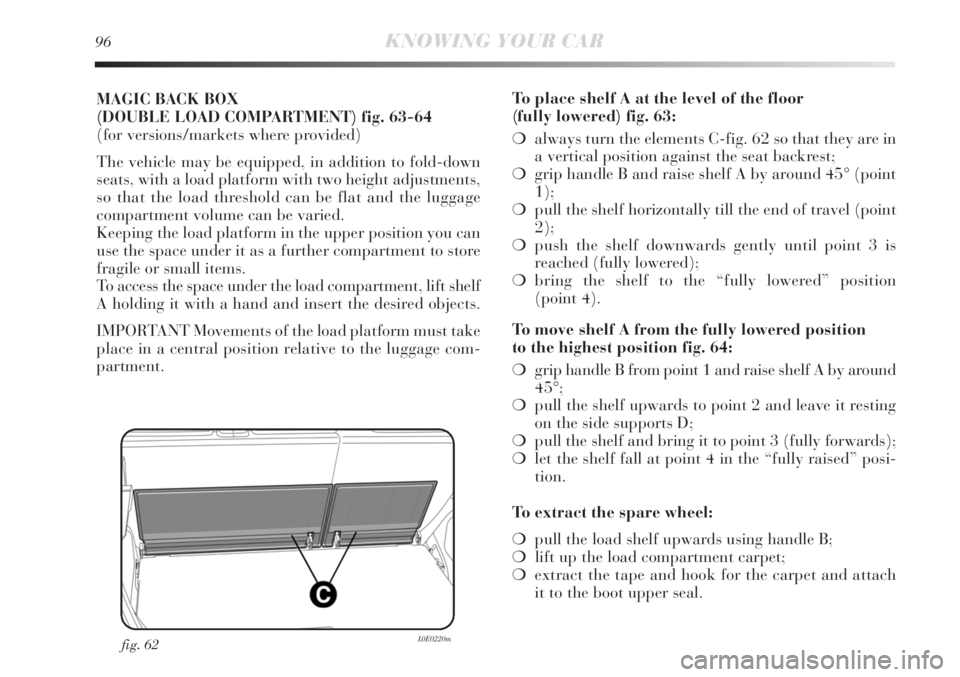
MAGIC BACK BOX
(DOUBLE LOAD COMPARTMENT) fig. 63-64
(for versions/markets where provided)
The vehicle may be equipped, in addition to fold-down
seats, with a load platform with two height adjustments,
so that the load threshold can be flat and the luggage
compartment volume can be varied.
Keeping the load platform in the upper position you can
use the space under it as a further compartment to store
fragile or small items.
To access the space under the load compartment, lift shelf
A holding it with a hand and insert the desired objects.
IMPORTANT Movements of the load platform must take
place in a central position relative to the luggage com-
partment.To place shelf A at the level of the floor
(fully lowered) fig. 63:
❍always turn the elements C-fig. 62 so that they are in
a vertical position against the seat backrest;
❍grip handle B and raise shelf A by around 45° (point
1);
❍pull the shelf horizontally till the end of travel (point
2);
❍push the shelf downwards gently until point 3 is
reached (fully lowered);
❍bring the shelf to the “fully lowered” position
(point 4).
To move shelf A from the fully lowered position
to the highest position fig. 64:
❍grip handle B from point 1 and raise shelf A by around
45°;
❍pull the shelf upwards to point 2 and leave it resting
on the side supports D;
❍pull the shelf and bring it to point 3 (fully forwards);
❍let the shelf fall at point 4 in the “fully raised” posi-
tion.
To extract the spare wheel:
❍pull the load shelf upwards using handle B;
❍lift up the load compartment carpet;
❍extract the tape and hook for the carpet and attach
it to the boot upper seal.
fig. 62L0E0220m
Page 103 of 290
102KNOWING YOUR CAR
HEADLIGHTS
HEADLIGHT BEAM AIMING
The correct aiming of the headlights is important for the
comfort and safety of not only the driver but all other
road users. This is also covered by a specific rule of the
highway code.
The headlights must be correctly aimed to guarantee the
best visibility conditions for all drivers while travelling
with headlights on.
Contact a Lancia Dealership to have the headlights prop-
erly adjusted.
Check beam alignment every time the load or its distri-
bution changes.
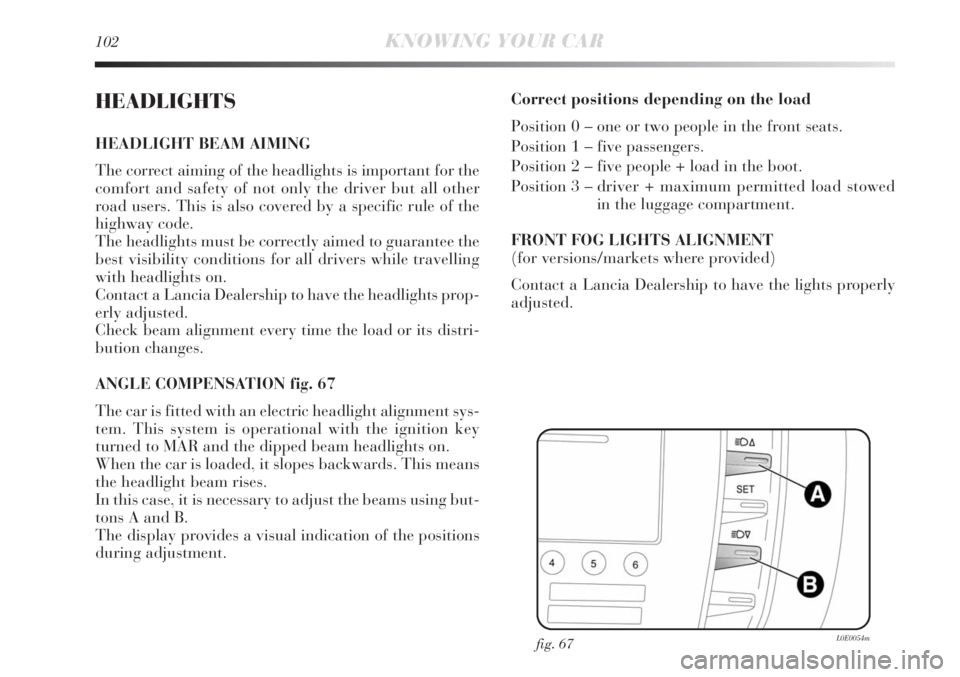
ANGLE COMPENSATION fig. 67
The car is fitted with an electric headlight alignment sys-
tem. This system is operational with the ignition key
turned to MAR and the dipped beam headlights on.
When the car is loaded, it slopes backwards. This means
the headlight beam rises.
In this case, it is necessary to adjust the beams using but-
tons A and B.
The display provides a visual indication of the positions
during adjustment.Correct positions depending on the load
Position 0 – one or two people in the front seats.
Position 1 – five passengers.
Position 2 – five people + load in the boot.
Position 3 – driver + maximum permitted load stowed
in the luggage compartment.
FRONT FOG LIGHTS ALIGNMENT
(for versions/markets where provided)
Contact a Lancia Dealership to have the lights properly
adjusted.
fig. 67L0E0054m
Page 152 of 290

2
SAFETY151
The rear seat belts must be used as shown in the diagram
in fig. 2.
IMPORTANT After putting the seats back to their trav-
elling position, restore the seat belt position to make them
ready for use.
IMPORTANT If the rear seat is being moved and this
causes the middle seat belt to lock temporarily, normal
conditions can be restored by simply moving the seat to-
wards the back of the car.
fig. 2L0E0062m
S.B.R. SYSTEM
The car is provided with the S.B.R. (Seat Belt Reminder)
system, which warns the driver and the front passenger
if the seat belt is not fastened, as follows:
❍warning light
❍warning light
For permanent deactivation, contact a Lancia Dealer-
ship.
S.B.R. system can also be reactivated through the set-up
menu.