Lancia Delta 2015 Owner handbook (in English)
Manufacturer: LANCIA, Model Year: 2015, Model line: Delta, Model: Lancia Delta 2015Pages: 291, PDF Size: 6.74 MB
Page 51 of 291

KNOWING YOUR CAR49
1
IMPORTANT The engine immobiliser function is guar-
anteed by the Lancia CODE, which is automatically ac-
tivated when the ignition ke y i s extracted from the s tarter
device.
TURNING THE ALARM ON
With the doors and bonnet clos ed and the ignition key
either turned to S TOP or removed, point the ke y with the
remote control toward s the vehicle and press and releas e
button
Á.
Excluding some markets , the system produce s an acous tic
s ignal (beep) and enable s door locking.
The switching on of the alarm i s preceded by a self-diag-
nos is s tage: if a fault is detected, the system emits a new
acous tic signal together with the di splay of a message (s ee
“Panel warning light s” chapter).
In this case switch off the alarm by pressing
Ë, check that
all the doors , bonnet and tailgate are clo sed correctly ; then
s witch the alarm back on b y pressing
Á.
If a door or the bonnet i s not properly s hut, it will be ex-
cluded from the tes ting by the alarm system.
If the alarm emits an acoustic signal even when the door s,
bonnet and tailgate are correctl y clo sed, a failure has oc-
curred in system operation. Contact a Lancia Dealer ship. IMPORTANT Centrall
y locking the door s u sing the met-
al ins ert on the key does not activate the alarm.
IMPORTANT The alarm is adapted to meet requirement s
in various countries.
TURNING THE ALARM OFF
Press button
Ëon the key with the remote control.
The following operation s are performed (excluding some
markets ):
❍ the direction indicator s flas h briefly twice;
❍ two brief acou stic signals are emitted (“BEEP”);
❍ the doors are unlocked.
IMPORTANT Activating the central opening us ing the
key ’s metal ins ert does not turn the alarm off.
001-154 Delta GB 1ed 03/03/14 10.00 Pagina 49
Page 52 of 291

50KNOWING YOUR CAR
VOLUMETRIC/ANTI-LIFT PROTEC TION
To guarantee the correct operation of the protection sys-
tem it is advisable to s hut all the s ide windows and the sun
roof (for ver sions /markets where provided).
If necessary , the function can be turned off (if, for exam-
ple, you are leaving an animal in the car) b y pressing but-
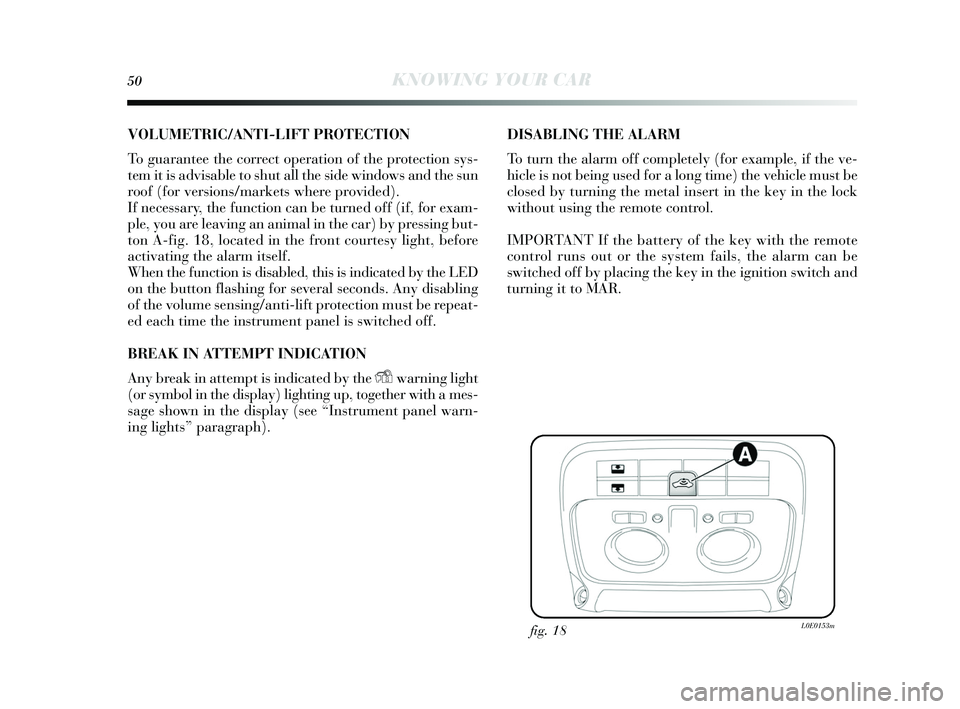
ton A-fig. 18, located in the front courtesy light, before
activating the alarm it self.
When the function is disabled, this is indicated by the LED
on the button flas hing for several seconds . Any disabling
of the volume s ensing/anti-lift protection mu st be repeat-
ed each time the ins trument panel is switched off.
BREAK IN ATTEMPT INDI CAT I O N
Any break in attempt i s indicated by the
Ywarning light
(or symbol in the dis play) lighting up, together with a mes -
s age shown in the dis play (see “Ins trument panel warn-
ing lights ” paragraph). DIS
ABLING THE ALARM
To turn the alarm off completel y (for example, if the ve-
hicle is not being us ed for a long time) the vehicle mu st be
clos ed by turning the metal ins ert in the key in the lock
without us ing the remote control.
IMPORTANT If the batter y of the key with the remote
control runs out or the system fails , the alarm can be
s witched off by placing the key in the ignition s witch and
turning it to MAR.
fig. 18L0E0153m
001-154 Delta GB 1ed 03/03/14 10.00 Pagina 50
Page 53 of 291

KNOWING YOUR CAR51
1
IGNITION SWITCH
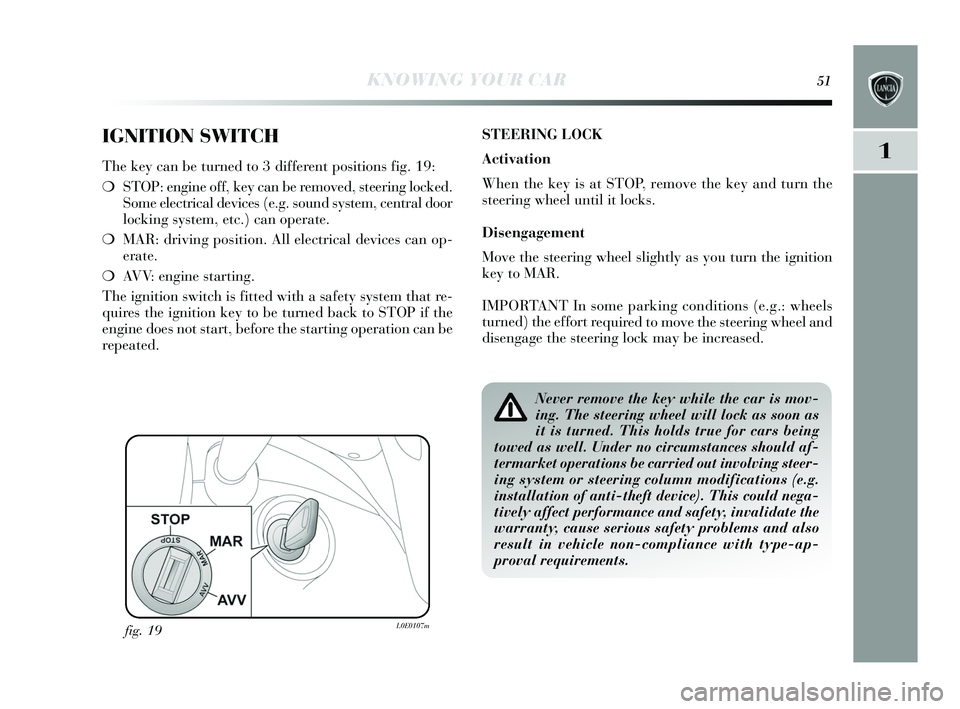
The key can be turned to 3 different po sitions fig. 19:
❍ STOP: engine off, key can be removed, steering locked.
S ome electrical device s (e.g. s ound system, central door
locking system, etc.) can operate.
❍ MAR: driving pos ition. All electrical device s can op-
erate.
❍ AVV: engine s tarting.
The ignition s witch is fitted with a safety system that re-
quires the ignition key to be turned back to STOP if the
engine does not start, before the s tarting operation can be
repeated. S
TEERING LOC K
Activation
When the ke y i s at S TOP, remove the key and turn the
s teering wheel until it locks .
Diseng agement
Move the s teering wheel s lightly as y ou turn the ignition
key to MAR.
IMPORTANT In s ome parking conditions (e.g.: wheels
turned) the effort r
equired to move the s teering wheel and
dis engage the steering lock ma y be increas ed.
fig. 19L0E0107m
Never remove the key while the car is mov-
ing. The steering wheel will lock as soon as
it is turned. This holds true for cars being
towed as well. Under no circumstances should af-
termarket operations be carried out involving steer-
ing system or steering column modifications (e.g.
installation of anti-theft device). This could nega-
tively affect performance and safety, invalidate the
warranty, cause serious safety problems and also
result in vehicle non-compliance with type-ap-
proval requirements.
001-154 Delta GB 1ed 03/03/14 10.00 Pagina 51
Page 54 of 291

52KNOWING YOUR CAR
SEATS
FRONT SEATS fig. 20
Long itudinal adjustment
Lift the lever A and pus h the seat forwards or backwards :
in the driving po sition your arms s hould res t on the rim
of the s teering wheel.
Backrest an gle adjustment
Turn knob B.
All adjustments on the front and rear seats
must be made with the car stationary.
After releasing the adjustment levers always
check that the seat is locked into place by try-
ing to move it back and forth. If the seat is not
locked into place, it may unexpectedly slide and
cause the driver to lose control of the car.
fig. 20L0E0008m
001-154 Delta GB 1ed 03/03/14 10.00 Pagina 52
Page 55 of 291

KNOWING YOUR CAR53
1
Height adjustment
Operate lever C to rai se or lower the rear part of the seat
cus hion to improve comfort.
Lumbar adjustment (driver’s seat)
The pos ition of the back again st the s eat backres t is ad-
jus ted by turning knob D.
FRONT SEATS WITH ELEC TRIC ADJUS TMENT
fig . 21 (for vers ions/markets where provided
The adjus tment is possible with the ignition key to MAR
or for up to 1 minute with the ignition ke y turned to OFF
or extracted.
When the front doors are opened the seat on the side of
the door that has been opened can be moved for about 3
minutes or until the door i s clos ed.
The controls for seat adjustment are:
Multifunction control A:
❍ seat height adjus tment;
❍ lengthwis e seat movement.
Multifunction control B:
❍ backres t angle adju stment;
❍ backres t lumbar adju stment. S
eat heating (for versions/markets , wher
e provided)
With the key turned to MAR, press buttons
Cto switch
the function on/off.
When the function is enabled, the LED on the button turns
on.
fig. 21L0E0009m
001-154 Delta GB 1ed 03/03/14 10.00 Pagina 53
Page 56 of 291

54KNOWING YOUR CAR
REAR SEATS
Backrest angle adjustment
Lift lever A - fig. 22 (one on each side) for backres t an-
gle adjus tment, for the left or right part of the backre st re-
s pectively (to facilitate thi s operation, s lightly move the
s eat forwards using lever B).
Rear seat movement
(for vers ions/markets , where provided)
The rear s eats can be moved backwards and forwards (by
80 mm). To move the seats backwards or forwards oper-
ate the levers B (one on each side).
fig. 22L0E0010m
“Fixed” type rear seats
(for vers ions/markets , where provided)
In some vers ions, rear s eats are “fixed” ty pe and the back-
re st angle adjus tment is possible if the luggage compart-
ment is extended. Us e lever A-fig. 23 (one each side) for
backres t angle adjus tment.
When repositioning the rear backrest dur-
ing its movement, check that it has been at-
tached correctly, grasping the backrest at the
top and shaking it.
fig. 23L0E0231m
Before tilting the backrests, make sure that the
seat belts are fully stretched, without any
twisting.
001-154 Delta GB 1ed 03/03/14 10.00 Pagina 54
Page 57 of 291

KNOWING YOUR CAR55
1
HEAD RESTRAINTS
Head restraints are height adju stable; operate a s follows .
❍ Upwards adjustment: lift the head res traint until it
locks .
❍ Downward adjus tment, press the button A and lower
the head res traint.
fig. 24L0E0011m
To extract the rear head re straints press button s B and C
at the s ide of the two supports s imultaneous ly and lift them
out upward s.
IMPORTANT When the rear s eats are in us e, the head
re straints must always be in the pos ition of use.
All adjustments must be carried out only with
the vehicle stationary and engine off. Head
restraints must be adjusted so that the head,
rather than the neck, rests on them. Only in this case
can they protect your head correctly. To make the
best use of the head restraint’s protective action, ad-
just the backrest so that your torso is upright and
keep your head as close as possible to the head re-
straint.
REAR HEAD RES TRAINTS fig. 24
(for vers ions/markets , where provided)
Depending on the vers ions, rear head res traints can be
“fixed” or height-adju stable ty pe.
Height-adjustable head restraint:
❍ Upwards adjustment: press button B and lift the head
re straint until it locks .
❍ Downward adjus tment, press button B and lower the
head res traint.
001-154 Delta GB 1ed 03/03/14 10.00 Pagina 55
Page 58 of 291

56KNOWING YOUR CAR
STEERING WHEEL
It can be adjusted vertically (and axially).
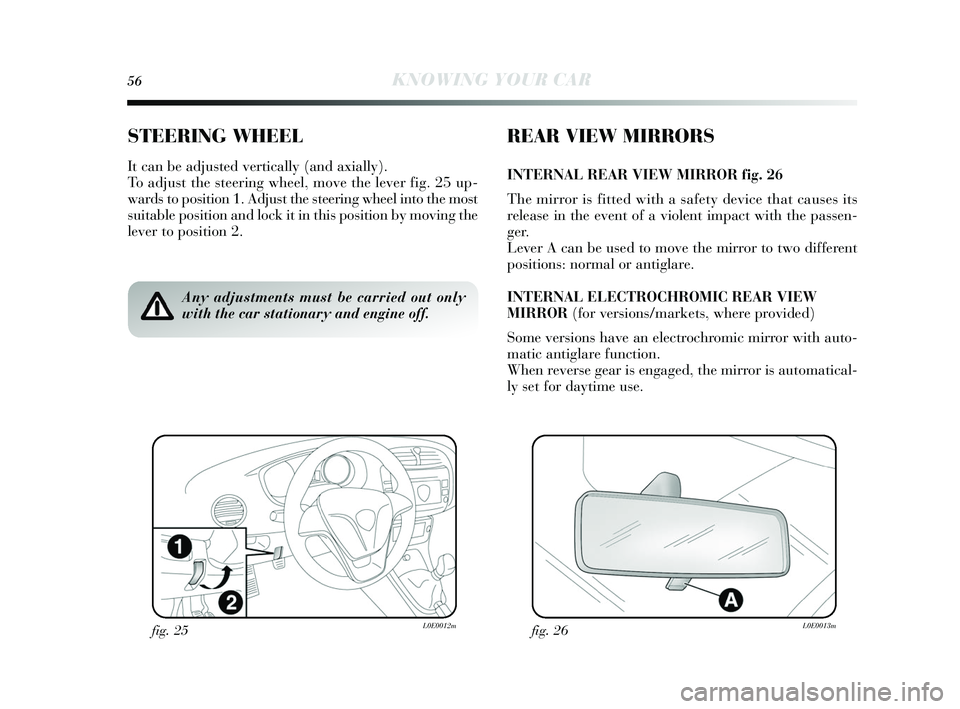
To adjust the steering wheel, move the lever fig. 25 up-
wards to pos ition 1. Adjus t the steering wheel into the mos t
s uitable pos ition and lock it in this position by moving the
lever to po sition 2.
REAR VIEW MIRRORS
INTERNAL REAR VIEW MIRROR fig . 26
The mirror is fitted with a s afety device that caus es its
releas e in the event of a violent impact with the passen-
ger.
Lever A can be us ed to move the mirror to two different
pos itions : normal or antiglare.
INTERNAL ELEC TROCHROMIC REAR VIEW
MIRROR (for versions/markets , where provided)
S ome vers ions have an electrochromic mirror with auto-
matic antiglare function.
When revers e gear is engaged, the mirror i s automatical-
l y s et for day time use.
Any adjustments must be carried out only
with the car stationary and engine off.
fig. 26L0E0013mfig. 25L0E0012m
001-154 Delta GB 1ed 03/03/14 10.00 Pagina 56
Page 59 of 291

KNOWING YOUR CAR57
1
DOOR MIRRORS
Mirror electric folding fig. 27
(for vers ions/markets , where provided)
Proceed as follows to adjus t the position of the door mir-
ror s:
❍ select the mirror us ing selector B;
❍ adjus t the mirror u sing the control s A, in all four di-
rections . Mirror manual foldin
g fig . 28
When required (for example when the mirror cau se s dif-
ficulty in narrow s paces) it is possible to fold the mirror
b y moving it from pos ition 1 (open), to pos ition 2
(clos ed).
On some vers ions the door mirrors can be folded back elec-
trically by operating a dedicated control.
fig. 27L0E0014mfig. 28L0E0015m
When driving, the mirrors should always be
in position 1. As the door mirrors are curved,
they may slightly alter the perception of dis-
tance.
001-154 Delta GB 1ed 03/03/14 10.00 Pagina 57
Page 60 of 291

58KNOWING YOUR CAR
CLIMATE COMFORT
DIFFUSERS fig. 29
1. Diffus ers for winds creen defros ting or demis ting – 2. Centre directable and adju stable diffus ers – 3. S ide directable
and adjus table diffus ers – 4. Fixed diffu sers for side windows – 5. Lower diffu sers – 6. Rear directable and adju stable vent
(for vers ions/markets , where provided).
L0E0016mfig. 29
001-154 Delta GB 1ed 03/03/14 10.00 Pagina 58